TDK TVT1001BLK User manual

PROFESSIONAL TURNTABLE WITH AUTO SPEED CORRECTION
Belt-Drive Turntable
USER GUIDE
TVT1001BLK
|
TVT2002BLK


3
SAFETY PRECAUTIONS
CAUTION: TO REDUCE THE RISK OF ELECTRIC SHOCK, DO NOT REMOVE COVER (OR BACK). NO USER-SERVICEABLE PARTS
INSIDE. REFER SERVICING TO QUALIFIED SERVICE PERSONNEL.
CAUTION
RISK OF ELECTRIC SHOCK
DO NOT OPEN
DANGEROUS VOLTAGE:
The lightning ash with arrowhead symbol within an equilateral triangle is intended to alert the user
to the presence of uninsulated dangerous voltage within the product’s enclosure that may be of
sufficient magnitude to constitute a risk of electric shock to persons.
ATTENTION:
The exclamation point within an equilateral triangle is intended to alert the user to the presence
of important operating and maintenance (servicing) instructions in the literature accompanying
the appliance.
FCC WARNING:
This equipment may generate or use radio frequency energy. Changes or modications to this equipment
may cause harmful interference unless the modications are expressly approved in the instruction manual. The
user could lose the authority to operate this equipment if an unauthorized change or modication is made.
ATTENTION: POUR ÉVITER LES CHOC ÉLECTRIQUES, INTRODUIRE LA LAME LA PLUS LARGE DE LA FICHE DANS
LA BORNE CORRESPONDANTE DE LA PRISES ET POUSSER JUSQU’AU FOND.

4
SAFETY PRECAUTIONS
NOTE: This equipment has been tested and found to comply with the limits for a Class B digital device, pursuant to
part 15 of the FCC Rules. These limits are designed to provide reasonable protection against harmful interference in
a residential installation. This equipment generates, uses and can radiate radio frequency energy and, if not installed
and used in accordance with the instructions, may cause harmful interference to radio communications. However,
there is no guarantee that interference will not occur in a particular installation. If this equipment does cause harmful
interference to radio or television reception, which can be determined by turning the equipment off and on, the
user is encouraged to try to correct the interference by one or more of the following measures:
•Reorientorrelocatethereceivingantenna.
•Increasetheseparationbetweentheequipmentandreceiver.
•Connecttheequipmentintoanoutletonacircuitdifferentfromthattowhichthereceiverisconnected.
•Consultthedealeroranexperiencedradio/TVtechnicianforhelp.
•Theratinginformationislocatedatthebottomoftheapparatus.
WARNING: TO PREVENT FIRE OR SHOCK HAZARD, DO NOT EXPOSE THIS UNIT TO RAIN OR MOISTURE.
This Class B digital apparatus complies with Canadian ICES-003.
Cet appareil numérique de la classe B est conforme à la norme NMB-003 du Canada.
Microsoft,XP,andVistaareeitherregisteredtrademarksortrademarksofMicrosoftCorporationintheUnitedStatesand/orothercountries.
Mac is either a registered trademark or trademark of Apple.
This product is not endorsed or manufactured by Microsoft Corporation or Apple.
SURGE PROTECTORS: It is recommended to use a surge protector for AC connection. Lightning and power surges
ARE NOT covered under warranty for this product.
Onlyuseattachments/accessoriesspecifiedbythemanufacturer.
Tobecompletelydisconnectedfromthepowerinput,themainplugoftheAC/DCadaptershallbedisconnectedfromthe
electricaloutlet.ThemainplugoftheAC/DCadaptershouldnotbeobstructedORshouldbeeasilyaccessedduringintended
use. Do not expose the product to dripping or splashing. Do not place liquid filled objects such as vases on the product.

5
1. Read these Instructions.
2. Keep these Instructions.
3. Heed all Warnings.
4. Follow all instructions.
5. Do not use this apparatus near water.
6. Clean only with a dry cloth.
7. Do not block any of the ventilation openings. Install in accordance with the manufacturer’s instructions.
8. Do not install near any heat sources such as radiators, heat registers, stoves, or other apparatus (including amplifiers) that
produce heat.
9. Do not defeat the safety purpose of the polarized or grounding-type plug. A polarized plug has two blades with one wider
than the other. A grounding-type plug has two blades and a third grounding prong. The wide blade or the third prong are
provided for your safety. When the provided plug does not fit into your outlet, consult an electrician for replacement of the
obsolete outlet.
10. Protect the power cord from being walked on or pinched particularly at plugs, convenience receptacles, and the point
where they exit from the apparatus.
11. Onlyuseattachments/accessoriesspecifiedbythemanufacturer.
12. Use only with a cart, stand, tripod, bracket, or table specified by the manufacturer, or sold with the
apparatus.Whenacartisused,usecautionwhenmovingthecart/apparatuscombinationtoavoidinjury
from tip-over.
13. Unplug this apparatus during lightning storms or when unused for long periods of time.
14. Refer all servicing to qualified service personnel. Servicing is required when the apparatus has been
damaged in any way, such as power-supply cord or plug is damaged, liquid has been spilled or objects
have fallen into the apparatus, the apparatus has been exposed to rain or moisture, does not operate normally, or has been
dropped.
15. Do not expose this product to dripping or splashing. Do not place objects filled with liquids, such as vases, on this product.
16. Main plug is used as disconnect device and it should remain readily operable during intended use. In order to disconnect
the apparatus from the mains completely, the mains plug should be disconnected from the mains socket outlet completely.
17. CAUTION: To reduce the risk of fire or explosion, do not expose batteries to excessive heat such as sunshine,
fire or other heat sources.
IMPORTANT SAFETY INSTRUCTIONS

6
WHAT’S INCLUDED
Platter Cover
Part No. 507-E13000-00R*
*Consumer Replaceable Part (See page 34 to order.)
AC Adapter
Part No. 001-41E130-01R* Main Unit
Platter with Belt
Platter Part No. 434-E13000-00R*
Belt Part No. 447-E13000-00R*

7
WHAT’S INCLUDED (CONTINUED)
Belt Cover
Part No. 447-E13000-00R*
Included but not pictured: Owner’s Manual and Quick Start Guide
*Consumer Replaceable Part (See page 34 to order.)
B Type USB Cable
(TVT2002 only)
Part No. 061-100100-04RP*
Audio Cable
Part No. 008-000015-10P* 45 Adapter
Part No. 456-E13000-00R* Counter Weight
Part No. (A) 449-E13000-00R*
(B) 278-E130N00-001R*
Dust Cover
Part No. 301-E13000-00R*
A
B
CD ROM
(TVT2002 only)
Part No. 393-E13000-000R*

8
1. Motor/MotorCover
2. Drive Belt
3. Spindle
4. Tone Arm Lifter
5. Counter Weight
6. Anti-Skate Control
7. Cue Lever
8. Tone Arm Rest
9. 33/OFF/45Controlwith
Power Indicator
10. Platter
11. Tone Arm Light
12. Stylus (Stylus Part No.
069-MG2801-01R*)
13. Display
14. Tone Arm
15. Audio Out Jacks
16. PRE-AMPON/OFFSwitch
(Please see caution on use
of this switch on page 12.)
17. B Type USB Out Jack
(TVT2002 only)
18. Power Jack
*Consumer Replaceable Part
(See page 34 to order.)
LOCATION OF CONTROLS
9
1
10 11 12 13 14
2 3 5 64 7 8
15 16 17 18
TOP
REAR

9
SETUP
After unpacking, set up the unit as follows:
1. Gently place the Platter onto the Spindle,
making certain that the Platter is fully seated
before proceeding to the next step.
2. Place the Platter Cover onto the Platter.
3a. Remove the plastic
cover from the stylus.
3b. Gently pull the Drive Belt around the Motor
Pulley. Be careful to not allow finger grease or
other contamination to foul the belt.
NOTE:
The Drive Belt comes installed around the Platter.
4. Place the Motor Cover onto the Motor,
making sure each side has the Drive Belt
coming through.

10
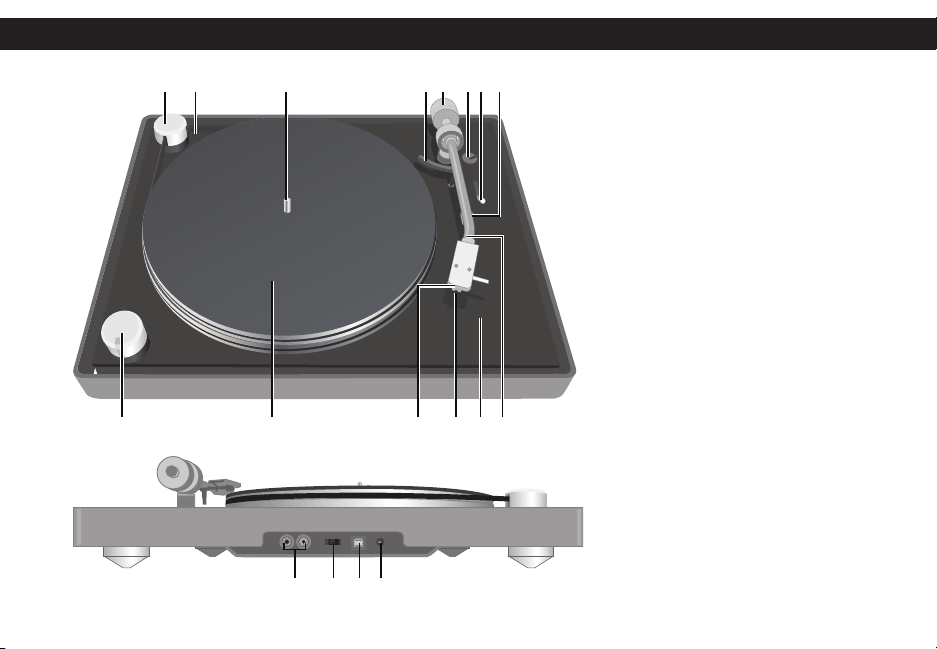
5. Installation of the Counterweight
As with all quality turntables built to utilize
aftermarket cartridges, the weight of
the cartridge must be balanced with a
counterweight to allow accurate setting of the
cartridge’s downward force.
5a. The first step is to insure a level, stable surface for
your new turntable.
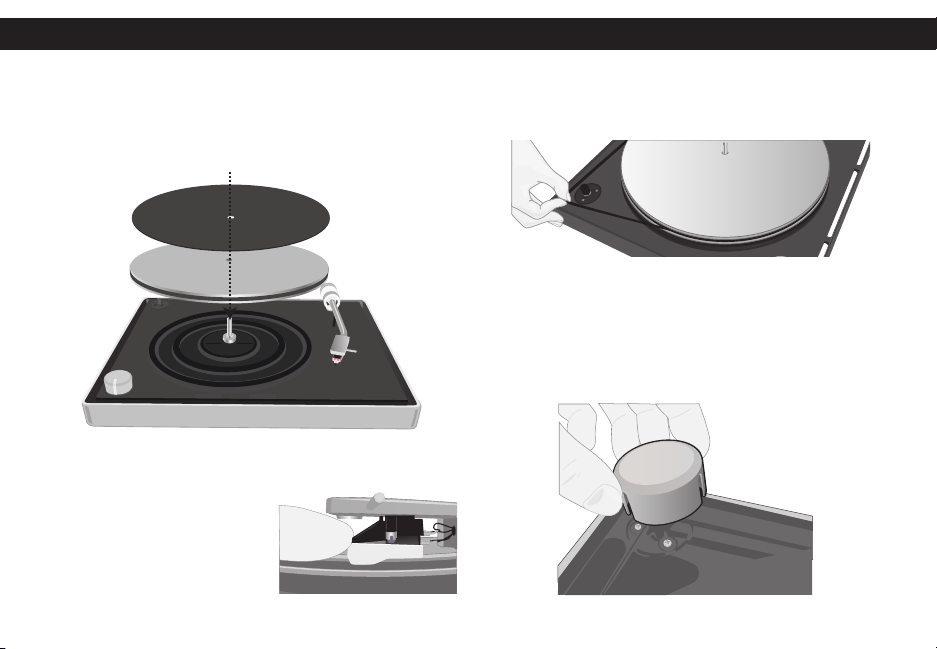
5b. While carefully securing the tonearm from
movement and protecting the stylus from
damage; gently glide the counterweight with
the numerals facing forward onto the rear of the
tonearm.
5c. Rotate the weight in a clockwise fashion from
the perspective of the end of the arm opposite
of the cartridge until the threads are just
engaged.
5d. With the tonearm lift lowered and the stylus
protector removed, seek to instill a state
of equilibrium in the arm by rotating the
counterweight so that balance will be achieved
in the form of a tonearm that is level and free
from interference.
5e. The next step is to create a reference to this
position by rotating the numerically enhanced
ring at the front of the counterweight to indicate
“0” at the top position in alignment with the
mark on the tonearm while holding the rear
portion of the counterweight to prohibit its
movement.
5f. From this “0” reference place, grasp both
the front and back of these two parts of the
counterweight and set the weight to indicate
“3” on the dial to align with the marking on the
top of the tonearm. This will indicate 3 grams of
downward force, the recommended tracking
weight for this cartridge.
5g. Finally, set the antiskating control to “3” to
match the downward force setting. See page
16 in the Operation section for possible further
adjustments.
NOTE:
Other cartridges will have other requirements;
therefore see the cartridge manufacturer’s
documentation for settings such as downward
force and anti-skating recommendations.
SETUP (CONTINUED)

11
SETUP (CONTINUED)
A. TO USE WITH A COMPUTER (TVT2002 only):
Install recording software as shown on page 22.
With the unit NOT connected to AC, connect the
small end of the USB Cable (included) to the USB
Out jack on the rear of this unit and the other end
to a USB jack on your computer.
NOTES:
• Whenconnectingtheunit,refertotheowner’s
manual of the computer, as well as this manual.
• Makesurethepowerisoffandbothunitsare
unplugged before making any connections.
• WhenconnectedviatheUSBcable,theUSB
indicator will light in the display.
6a. Insert the small end of the AC adapter into the Power jack
(located on the rear of the unit). Connect the other end
to a wall outlet having 120V AC, 60 Hz.
NOTES:
• RemoveboththeDCplugandtheACINplugto
disconnect the AC adapter when not in use.
• OnlyusethesuppliedACadapterwhichhasthe
following specs: DC 12V.
CONTINUE TO PAGE 15 TO USE THE TURNTABLE WITH A COMPUTER
TO AC
JACK
Computer
Turntable
USB cable
USB jack

12
SETUP (CONTINUED)
B. TO USE WITH A UNIT WITH LINE IN JACK (HOME STEREO, BOOM BOX, ETC.):
NOTES:
• Whenconnectingtheunit,refertotheowner’smanual
of the external unit, as well as this manual.
• Makesurethepowerisoffandbothunitsareunplugged
before making any connections.
6b. Connect the left and right plugs of the Audio Cable
(included) to the Left and Right Out jacks on the rear
of this unit, matching the red to red and white to white.
Connect the other end of the Audio Cable to the Line In
jacks of the Home Stereo or similar equipment.
Warning Regarding the PRE-AMP Switch
This unit is equipped with a moving magnet phono
preamplifier with RIAA equalization. This is a very convenient
addition for those customers not possessing an amplifier or receiver with a phono input. However, caution
should be applied to the use of this preamplifier. When you are using this preamplifier’s output as indicated
by the “ON” designation of the switch located on the back center panel of the turntable, do not under any
circumstances connect the RCA output connectors of the turntable to the input connections of an additional
phono preamplifier on a receiver or amplifier often marked “Phono Input”. Excess gain from the use of the
preamplifier in the turntable as well as the preamplifier in your amplifier or receiver may cause damage to
youramplifierand/orspeakers.
OUTPUT
R L
R L
R L
Amplifier
Turntable

13
On the contrary, if you have this switch in the “OFF” position and attempt to connect the turntable’s RCA
connectors to the line input levels of a receiver or amplifier such as “Tape” or “VCR”, you will find that the
level is insufficient and will not allow you to hear the output sufficiently. Under no circumstances do we
recommendswitchingthepreamplifier“ON/OFF”switchwhilemonitoringtheoutputwithanamplifier.To
be safe, select the appropriate switch position with the power off on the amplifier or receiver. The PRE-AMP
switch position will not affect users of the USB function.
7b. SlidethePRE-AMPON/OFFswitchontherearofthe
unit to the ON position.
8b. Insert the small end of the AC adapter into the Power
jack (located on the rear of the unit). Connect the
other end to a wall outlet having 120V AC, 60 Hz.
NOTES:
• RemoveboththeDCplugandtheACINplugto
disconnect the AC adapter when not in use.
• OnlyusethesuppliedACadapterwhichhasthefollowingspecs:DC12V.
• Afterconnecting,settheexternalunittoreceivethesignalfromitsLineInjacks.
SETUP (CONTINUED)
TO AC
JACK

14
SETUP (CONTINUED)
C. TO USE WITH A UNIT WITH PHONO PREAMPLIFIER INPUTS (RECEIVER, PRE-AMP, ETC.):
(See page 10 for the Warning regarding the PRE-AMP switch.)
6c. SlidethePRE-AMPON/OFFswitchontherearofthe
unit to the OFF position.
7c. Connect the left and right plugs of the Audio Cable
(included) to the Left and Right Out jacks on the rear
of this unit, matching the red to red and white to white.
Connect the other end of the Audio Cable to the Phono
In jacks of the Home Stereo or similar equipment.
8c. Insert the small end of the AC adapter into the Power jack
(located on the rear of the unit). Connect the other end
to a wall outlet having 120V AC, 60 Hz.
NOTES:
• RemoveboththeDCplugandtheACINplugto
disconnect the AC adapter when not in use.
• OnlyusethesuppliedACadapterwhichhasthe
following specs: DC 12V.
• Afterconnecting,settheexternalunittoreceivethe
signal from its Phono Input jacks.
OUTPUT
R L
R L
R L
Amplifier
Turntable
TO AC
JACK

15
OPERATION
1. Put a record on the turntable and remember to use the 45
adapter if using a 45 single record.
NOTE: Some 45 single records may not need the 45 adapter.
2. Rotatethe33/OFF/45controltothe33or45position
(to match the record being played); the Power indicator
and display will light.
3. Lift the Tone Arm and move over the Platter. The Platter will
start spinning and the Tone Arm light will illuminate.
4. Lower the Cue Lever.
5. Place the Tone Arm on the edge of the record to start at the
beginning or anywhere on the record’s playing surface to start
playback at that point. The display will show the spectrum of the
record’s output.
6. If the sound is distorted, check the tonearm balance,
counterweight and anti-skating setting previously adjusted.
Also check for accumulated dust on the stylus by visual
inspection.
(See page 10 for Installation of the counterweight.)

16
OPERATION (CONTINUED)
7. If necessary, adjust the Anti-Skating control as previously discussed
in the initial setup. In most cases, the Anti-Skating control should
be set to the same number as the counterweight. Anti-Skating
compensates for inward tracking forces that occur with all
cartridges and typically worsen when the stylus nears the center
of the record. If the turntable is experiencing excessive skipping
during playback while nearing the center spindle, try increasing
the Anti-Skating control in small increments. This control’s
effectiveness is also dependant on tracking force used with the
arm (i.e., the heavier the tracking weight, typically the less anti-
skating is required).
8. To pause playback, raise the Cue Lever; to resume playback,
lower the Cue Lever.
9. When the record reaches the end, the turntable will stop rotating
and the Tone Arm light will turn off. Raise the Cue Lever and move
the Tone Arm back over the Tone Arm rest; then lower the Cue
Lever. To stop playback before the end of the record is reached,
raise the Cue Lever and move the Tone Arm back over the Tone
Arm rest; then lower the Cue Lever.

17
OPERATION (CONTINUED)
10.Toturntheunitoff,rotatethe33/OFF/45controltotheOFFposition;
the Power indicator and display will turn off. Replace plastic Stylus
cover to protect stylus.
NOTE: If connected to a computer (TVT2002 only), see page 23 to
utilize the included software to record and edit the recording.

18
OPERATION (CONTINUED)
REPLACING THE TURNTABLE STYLUS (NEEDLE)
Your stylus should last for up to 400 hours. However, when the time comes to replace,
follow the instructions below.
1. Very gently, slide the stylus towards the front and remove
from the assembly.
2. To replace, slide new stylus onto the assembly.
Stylus Part No. 069-MG2801-01R*
*Consumer Replaceable Part (See page 34 to order.)

19
COMPUTER REQUIREMENTS (TVT2002 ONLY)
PC REQUIREMENTS:
• Windows7(32bit)
• WindowsVista(32bit)
• WindowsXP(32bit)
MAC REQUIREMENTS:
The Vinyl Recorder software is not available for
Macintosh. Audacity is recommended for Mac
users. The Audacity software, along with complete
documentation, can be downloaded for the Mac at
http://audacity.sourceforge.net.
FOR MAC AND PC: The performance of the software
is dependent upon the processing power available,
as well as the operating system in use. More capable
systems offer higher performance.
IMPORTANT NOTE REGARDING
THE INCLUDED SOFTWARE:
This manual touches the basics of the software
included. It is suggested you download the full
manual at the link provided below to utilize all the
software’s features and effects.
TDK Vinyl Recorder:http://www.cakewalk.com
NOTE: When using USB audio devices such as the
TDK Life on Record turntable, it is expected that the
drivers installed when the unit is connected to your
computing device will be used to route your audio.
This may mute or disable your previous sound card’s
driver while temporarily using the USB drivers. When
the USB device is disconnected, the normal audio
card drivers will be used again. Depending on the
system and the hardware installed, you may need
to adjust which audio drivers are used by navigating
to the Control Panel, clicking on Sounds and Audio
Devices and then clicking on the audio tab and
adjusting your default playback or recording device
according to your needs. Typically this is seamless
and does not require any user interaction.

20
INSTALLING TDK LIFE ON RECORD VINYL RECORDER – WINDOWS
INSTALLING THE VINYL RECORDER SOFTWARE
FOR WINDOWS
1. Insert the CD ROM. If the computer is set to
autorun, the installation will begin automatically.
If it is not set to autorun, then select CD ROM in
MY COMPUTER and double-click on the Vinyl
Recorder Setup.exe file.
2. The Select Setup Language screen will appear.
Select the language to be used during
installation and click OK.
3. The Welcome to the Vinyl Recorder Setup Wizard
screen will appear. Click Next to start installation.
4. The Software License Agreement screen will
appear. Click the I accept the terms in the
License Agreement button and then click Next.
Other manuals for TVT1001BLK
1
This manual suits for next models
1
Table of contents
Other TDK Turntable manuals