TDS Recon User manual

TDS Recon
Pocket PC handheld
Getting Started Guide

Limited Warranty & Liability Limitations
This product is limited warranted against defects in materials and
workmanship for twelve (12) months from the original date of purchase.
Recon accessories and peripherals are limited warranted against defects
in materials and workmanship for ninety (90) days from the original
date of purchase. If notice is received of such defects during the limited
warranty period, the proven defective product(s) will either be repaired
or replaced, at the manufacturer’s option. Replacement products may be
either new or like new.
The manufacturer does not warrant that the operation of the products will
be uninterrupted or error free. If the product is not, within a reasonable
time, repaired or replaced to a condition as limited warranted, the
customer will be entitled to a refund of the purchase price upon prompt
return of the product.
Limited warranty does not apply to defects resulting from (a) improper
or inadequate maintenance or calibration, (b) software, interfacing, parts,
or supplies not supplied by manufacturer, (c) unauthorized modification,
or misuse, (d) operation outside of the published environmental
specifications for the product, or (e) physical damage due to external
causes, including accident, abuse, misuse or problems with electrical
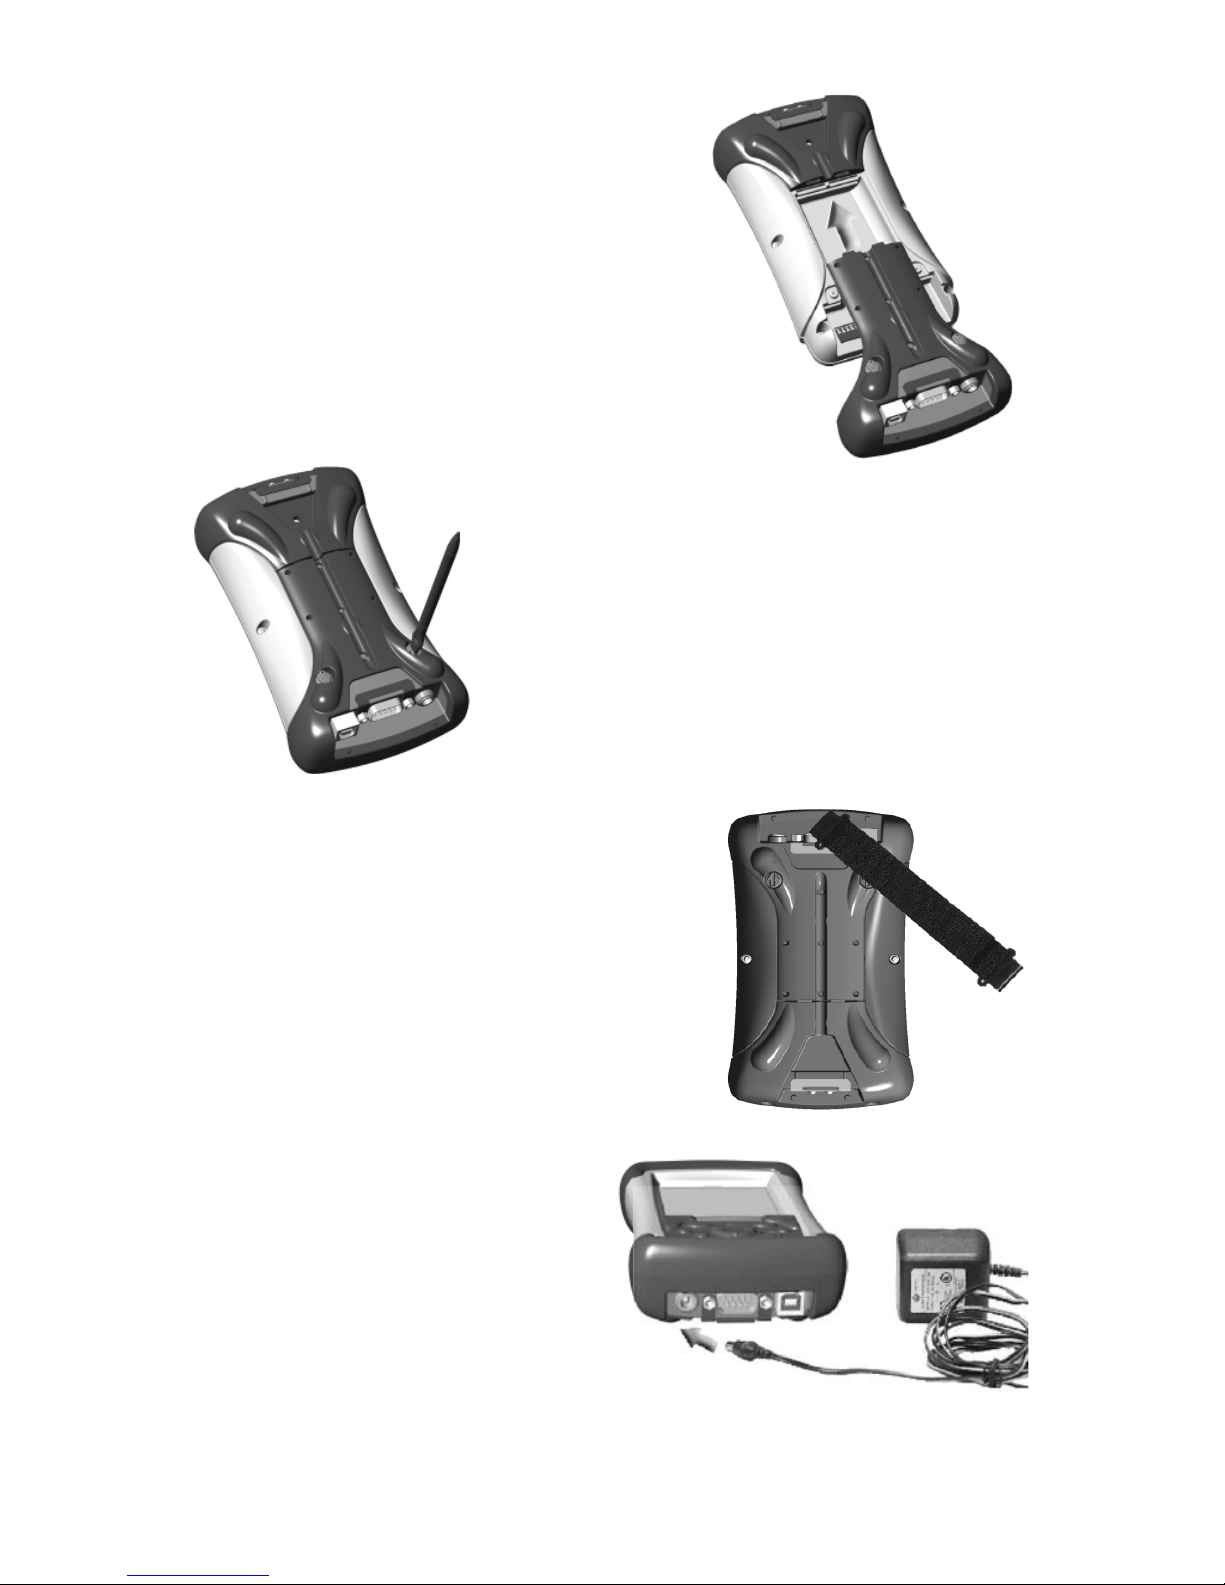
power. Water damage caused by improper installation of the CF-Cap
is not covered by warranty. Removal of the back case voids the limited
warranty. There are important seals that will break and the Recon will no
longer be waterproof.
To the extent allowed by local law, the above limited warranties are
exclusive and no other warranty or condition, whether written or oral,
is expressed or implied, specifically disclaiming any implied warranties
or conditions of merchantability, satisfactory quality, and fitness for a
particular purpose.
To the extent allowed by local law, the remedies in this limited
warranty statement are the customer’s sole and exclusive remedies.
Except as indicated above, in no event will the manufacturer or its
suppliers be liable for loss of data or for direct, special, incidental,
consequential (including lost profit or data), or other damage,
whether based in contract, tort, or otherwise.

1
Welcome
Congratulations on purchasing the ReconTM handheld computer with
Microsoft®Windows MobileTM 2003 software for Pocket PCs. The
immersible and shock-resistant design of the Recon allows you to
work in harsh outdoor environments. You can run your Pocket PC
applications in blazing heat, subzero cold, driving rain, dusty job sites--
anywhere you could never take a handheld before.
Contents
Welcome 1
Device Hardware 2
Setting up your Recon 3
Working with your Recon 5
Settings on your Recon 12
Connecting to your PC 13
Microsoft Pocket Outlook 17
Companion Programs 18
Caring for your Recon 20
Hardware Specifications 21
Safe Use of your Recon 22
Regulatory Information 23
Declaration of Conformity 23
Reference Materials 25

2
Front Panel Back Panel
Top View- without Cap Bottom View
Note: Be sure to read the warranty and safety information in the
manual prior to using your Recon.
Calendar
(button 2)*
Contacts
(button 3)*
Power
Navigation pad
Removable CF-Cap covers
two CompactFlash card slots
Enter
PowerBoot Module
Latches
Stylus
holder
CF-Cap
External
Power
Serial USB
Device Hardware
CompactFlash card slots
*Assignable application buttons;
see Settings.
Inbox
(button 4)*
Start Menu
(button 1)*

3
Setting up your Recon
1. Attach the PowerBoot
The PowerBoot ModuleTM for your
Recon is shipped unattached. To attach
the PowerBoot, turn the latches counter-
clockwise until they are parallel to the
stylus holder, with the arrows pointing
towards the communication ports located
at the bottom of the PowerBoot.
Firmly slide the PowerBoot onto the main
unit as shown. Pressure should be applied
downward and forward as the PowerBoot is
positioned.
Use the stylus to lock the PowerBoot
latches, by turning them clockwise one half
turn until they are pointed away from the
communication ports.
2. Attach the hand strap
To connect the hand strap to your
Recon, hold the hand strap clip at a 45
degree angle and push the clip onto the
Recon bracket. Repeat the process with
the other end of the hand strap.
3. Charge your Recon
Connect the AC adapter to the
external power port on your
Recon. Charge for at least 12 hours
before using. For best results, turn
the Recon off while charging.

4
Battery life varies greatly depending on the application and
environment. At moderate or high temperatures with no display light,
usage over 30 hours is possible. In typical use, with default display
light setting and two CompactFlash®memory cards installed, you can
expect 15 to 20 hours of battery life. At cold temperatures (-20C or
less) with heavy use of display light and/or non-memory CompactFlash
cards (e.g. wireless LAN), battery life may be only a few hours.
The keys to extended battery life are managing the display light,
keeping the batteries warm in cold environments, and using
CompactFlash cards that use power conservatively.
4. Align the touch screen
When the Recon first turns on (or after a hard reset), the touch screen
will require calibration. Tap the screen to set it up. Using a stylus, tap
the targets firmly and accurately at each location until the screen is
aligned.
5. Turning your Recon on and off
One of the most convenient features of the Recon is “instant on”.
There is no waiting for it to start up or shut down. To start working
immediately, press the power button. (“Instant on” does not occur
on the first boot up.) When you have finished working, turn off your
Recon by pressing the power button.
6. Using the CF Expansion Slots
To use the CompactFlash expansion slots,
you must first remove the CF-CapTM . To
do this, unscrew the two screws on the top
of the CF-Cap. Slide the cap off the main
unit. Gently insert a CompactFlash card or
device into one of the two CF slots. Do not force the card into the
slot. Cards must be inserted with the face toward the display side of
the Recon. Replace the CF-Cap and tighten the screws to reseal.
Note: Be sure to reattach the CF-Cap when you are finished. The
Recon is NOT sealed when the cap is off. Water damage caused
by improper installation of the cap is not covered by warranty.

5
Working with your Recon
Using the Stylus
The touch screen on your Recon works like a mouse on a PC. Use the
stylus to navigate and select objects on the screen.
Tap: Tap the screen with the stylus to select or open an item. Tapping
is equivalent to clicking an item with the mouse on your PC.
Touch and hold: When you touch and hold, a circle of red dots
appears around the stylus to indicate that a pop-up menu will soon
appear. Touching and holding is equivalent to right-clicking your PC
mouse button.
Drag: Hold the stylus on the screen and drag across the screen to
select text and images. Drag in a list to select multiple items.
Recon Memory
The Recon has built-in non-volatile, Nand flash storage. The content
of this storage is retained no matter what happens to battery power
or other environmental conditions. You should keep your data and
programs in this storage area. Built-in storage can be either 128
MB or 64 MB. Approximately 16 MB of this storage is used by the
Pocket PC operating system. The balance is available for your use.
There is also 64 MB of volatile RAM; about 58 MB is available to run
programs and to store temporary data.
If you need additional memory, third-party CompactFlash memory
cards can be used with your Recon. They work the same way as
built-in storage except that they are removable. The picture on the next
page shows how these different kinds of memory appear within File
Explorer (Start / Programs / File Explorer). The non-volatile built-in
storage is at the top of the list.

6
Some data and some programs do not give you the option of keeping
them in built-in storage. Your Pocket Outlook data and CompactFlash
card drivers are two examples of this type of information. Should you
experience a hard reset, this data will be lost. To prevent this type of
loss you should frequently use the built-in backup software to back up
all of this information to built-in storage.
Backup and Restore
Run Backup Now (Start / Programs /
Backup Now).
This easy-to-use program takes all
information that might be lost during a
hard reset and stores it safely in built-
in storage in a folder called System
in a file called backupimg. When the
Recon goes through a hard reset, it
automatically checks for the presence
of this file and gives you an opportunity
to restore the most recent backup.
The Pocket Backup program can be configured to give you a great deal
of flexibility for both backup and restore including scheduled backups.
You can find it in the Utilities folder of the Start / Programs area.
Built-in Storage: The contents are found in this
folder in File Explorer.
Storage Cards: If CompactFlash memory cards are
present, the contents are found in these folders in
File Explorer.
RAM: All other files and folders displayed by File
Explorer are stored in RAM and will need to be
backed up.

7
Power Button Features
The power button turns the Recon on and off and can perform a
number of additional useful tasks.
Turn Backlight on/off -- Hold down the power button for about 1
second to manually toggle the backlight state. Note: Manually turning
the backlight off disables auto turn on with screen taps or button
presses until the backlight is manually turned back on or the Recon is
turned off and back on.
Power Menu -- Hold down the power button
for about 3 seconds to bring up a screen with a
menu and a countdown in progress. Continuing
to hold the power button will cause a soft reset
when the countdown reaches zero. Releasing
the power button allows access to this menu.
Tap an option or press power again to exit.
Clean touch screen - Disables the touch screen.
After cleaning, press enter to enable touch screen and exit.
Align touch screen - Use a stylus to align the touch screen.
Soft reset - See the description below.
Exit - Takes you back to the previous screen.
Soft Reset -- A soft reset is comparable to rebooting your PC, which
stops all running programs. It is occasionally used when installing new
software.
To perform a soft reset, use the power menu or hold the power button
down for about eight to ten seconds. (The power menu may or may not
appear.)
Hard Reset -- A hard reset should be avoided if at all possible. It
should only be used if a soft reset fails to resolve an issue. Some
software programs store database information in RAM which would be
erased during a hard reset. So it is strongly recommended that you back
up your data before you perform a hard reset. See Backup and Restore.
To perform a hard reset, hold down the power button and application
button 1 (Start Menu) at the same time for about eight to ten seconds.
(The power menu may or may not appear.) When the message
“Booting - - - ->” appears in the display, release the buttons. If a
backup has been performed, the Recon will prompt to restore.
!
Clean touch screen
Release power button to use menu.
Continue to hold power button to
soft reset in countdown seconds.
Align touch screen
Exit
Soft reset
5

8
The Today Screen
The center of the Today screen provides information that you need for
the day. Tap an item to view or edit details.
At the top of the screen are status icons. Tap an icon to view details or
change options. (These icons appear at the top of every screen on your
Recon, and not only the Today screen.)
When you turn on your Recon for the first time each day (or after four
hours of inactivity), the Today screen displays. You can also view it by
tapping and then Today.
Tap to go to
a program.
Tap to change date, time, or
time zone.
Tap to change owner information.
Your day at a glance. Tap to
open the associated program.
Tap to view connection status
Tap to create a new item.
Tap to view notification information.
Tap to view network status and options.
Tap to change volume or mute all sounds.
Touch and hold to change time format.

9
The Command Bar
At the bottom of the screen is the command bar. You can use its menus
and buttons to perform tasks in programs. Depending upon which
program you are using, the buttons may vary from those depicted.
The Start Menu
From the Start Menu, you can select programs, settings, and help
topics. To display the Start Menu, from the top of any screen, tap .
Tap to switch to a program that you recently used.
Tap to switch to a program.
Tap to see more programs.
Tap to change device settings.
Tap to see a Help topic for the current screen.
Tap to select menu
commands.
Tap to select button
commands.
Tap to display the
input panel.

10
Pop-up Menus
You can use pop-up menus to quickly select an action for an item. To
access a pop-up menu, tap and hold the stylus on an item name.
Text Input Panels
Use the input panel to enter information in any program on your
Recon. You can type using the standard Keyboard or the Recon
Keyboard. You can write using Block Recognizer, Letter Recognizer,
or Transcriber. The characters appear as typed text on the screen.
Select the input panel that is easiest for you to use.
To change input panels, tap the arrow next to the Input Panel icon and
then tap the input panel that you want.
Touch and hold to display the pop-up menu.
Lift the stylus and tap the action you want.
Tap outside the menu to close it without
performing an action.
Tap to change input panel options
Tap to select an input panel.
Tap to change input panel.
Tap icon to open the selected input panel.
Options
Block Recognizer
Keyboard
Letter Recognizer
• Recon Keyboard
Transcriber

11
The Recon Keyboard has larger keys than the standard keyboard.
Tapping on the “123” or “*&%”, identified in the circle above, gives
additional characters.
The Block Recognizer and Letter Recognizer input panels render
individual characters that you write as “typed.” The Transcriber input
panel converts handwritten words and symbols into typed characters.
Tap Start / Help for more information and demonstrations on these
input panels.
Tap a text box to edit the text using the
current input panel. In this example, the
keyboard is selected.
To enter characters, tap on the Keyboard
input panel.
When you tap in a text entry area, such as a text box or notes page, the
currently selected input panel activates as shown in the example below.

12
Settings on your Recon
Tap , then tap Settings. You can tap any of the icons on the
Personal, System, or Connections tabs to customize the Recon settings
to your own preferences.
The following features appear in the Recon Pocket PC user interface,
but are non-functional due to the special rugged design of the Recon:
* Recording/Microphone functions are not available.
* Beam/Infrared communications are not available.
* Backup Battery is not available.
Here are a few of the settings on the Recon that are worth noting.
Application Buttons
Tap the Personal tab at the bottom. Tap on the Buttons icon. The four
application buttons can be reassigned to your favorite programs.
Input
Tap the Personal tab at the bottom. Tap on the Input icon. You can
change settings related to input panels, such as Block Recognizer,
Keyboard, Letter Recognizer, Recon Keyboard, and Transcriber.
Backlight
Tap the System tab at the bottom. Tap on the Backlight icon. Choose
the settings in the Battery Power, External Power, and Brightness
tabs as needed for your use of the Recon. (The display backlight has
significant impact on battery life.) Tap “OK” to exit.
Memory
Closing Programs still leaves them running in the background. If you
need more resources to run your programs, tap the System tab at the
bottom. Tap on the Memory icon and tap the Running Programs tab
at the bottom. You can stop the individual programs or tap Stop All to
free memory.
Power
Tap the System tab at the bottom. Tap on the Power icon to view
the approximate battery power remaining. Tap the Advanced tab and
choose the settings that work best for you. Tap “OK” to exit.

13
Connecting to your PC
I/O ports
The Recon supports connections to other
devices via USB and 9-pin serial ports.
USB connections to your PC require an A-
B USB cable (included with the Recon).
USB is faster, more reliable and does not
have baud rates or com ports to select. Serial connections require a 9-
pin null-modem serial cable (not included).
You may also increase your connectivity options through using Recon-
compatible CompactFlash cards.
ActiveSync
Using Microsoft®ActiveSync®, you can synchronize information and
copy files between your desktop or laptop computer and your Recon.
ActiveSync compares the data on your Recon with the data on your
PC, then updates all locations with the most recent information.
ActiveSync is already installed on your Recon. Before connecting
your Recon to your PC, install ActiveSync on your PC from the Recon
Pocket PC Companion CD.
You can also download the most current version of PC ActiveSync
at: http://www.microsoft.com/mobile/pocketpc/downloads/. The
installation instructions for ActiveSync may vary if you use a version
other than the version originally shipped on the Recon Companion CD.
Setting Up ActiveSync
DO NOT connect your Recon until the installation is complete.
External
Power Serial USB
Pin 1 Pin 5
Pin 6 Pin 9
Note: If you don’t have Microsoft®Outlook®98 or later installed
on your PC, please install Microsoft®Outlook®2002 from the
Companion CD. Even if you have Outlook 98 or Outlook 2000
installed, you are encouraged to upgrade. Microsoft recommends that
users choosing to install Outlook 2002 from this CD do so before
installing ActiveSync.

14
When installing ActiveSync on the PC, you will see the screen “Set
Up Microsoft ActiveSync 3.7. Click Next. A screen will appear asking
what folder to install to. We recommend using the default setting.
Click Next.
The “Get Connected” dialog box
will automatically appear on the
PC. Connect the Recon to your PC
using USB. Click Next.
There are two types of ActiveSync
connections. The table below
summarizes the advantages and
disadvantages of each choice. The
Standard Partnership synchronizes
data and is recommended for ease
of connection. Click Next.
Connection Advantages Disadvantages
Standard
Partnership
Information is synchronized.
Subsequent connections are
automatic.
More options for file sharing.
Once a partnership is established,
you can connect to your PC via
wired or wireless LAN.
Your Recon’s clock gets set to
match your PC’s clock.
More questions to answer
on initial connection.
If the clock on your PC
is wrong, it will make
the clock on your Recon
wrong.
Partnership will be deleted
when the Recon is hard
reset, unless a backup has
been run.
Guest
Partnership
Use to manually move and copy
files.
Safer because synchronization
cannot adversely impact data
either on your Recon or your PC.
For use on borrowed or shared
PCs.
Slower subsequent
connections (one more
step per connection that
requests for partnership).
LAN connection is not
possible.

15
Standard Partnership only - Choose to synchronize your Recon with
your PC. Click Next. You can have up to two partnerships or have a
partnership only with this computer. Enter a unique name for your
Recon and Click Next.
Select the type of information you
want to synchronize. To customize
settings for each program, click on
the information type and click on
settings. Click next.
Running ActiveSync
Start ActiveSync on your PC. Connect the Recon with the USB cable
and wait while ActiveSync automatically establishes a connection.
(This may require several seconds.)
Standard Partnership - ActiveSync will automatically synchronize the
settings chosen. To change those settings, go to ActiveSync on the PC
and click Tools, Options.
Guest Partnership - ActiveSync will ask you each time if you want the
Standard or Guest Partnership.
Click on the Explore icon on the
PC to view the file structure on the
Recon, which now looks and acts
like the Windows Explorer on your
PC.
Disconnecting ActiveSync
To avoid connection problems, disconnect ActiveSync
on the Recon by tapping the ActiveSync connection icon
in the lower right corner of the Today Screen before
removing the cable from either the PC or the Recon.
Tap “Disconnect” and then remove the cable.
For additional information on using ActiveSync, visit the Microsoft
website and search for articles on ActiveSync. For information specific
to the use of ActiveSync with Recon, see the website listed under
reference materials on the last page of this manual.

16
Additional Connectivity
The Recon supports several kinds of connections in addition to direct
ActiveSync connections to a PC. Note that you will need to purchase
third party accessories (such as CompactFlash modems or Bluetooth
cards) in order to implement these connections:
• Modem -- The Recon supports dial-up connections to an Internet
Service Provider and sending and receiving e-mail with file
attachments. (You will need to purchase a modem and cable or a
CompactFlash modem.)
• Web-enabled Cell Phones -- The Recon can connect to the Internet
via web-enabled cell phones that are compatible with Pocket PC
devices. Refer to your phone service provider for more information
on establishing Internet connections via your cell phone.
• Bluetooth -- Pocket PC-compatible Bluetooth CompactFlash
cards are supported by the Recon. Bluetooth is used for wireless
communication over distances of up to 10 meters. Typical Bluetooth
applications include sending files to a PC or another Recon, or
communicating with a printer or cell phone.
• Wireless LAN -- Pocket PC-compatible Wireless LAN (or 802.11)
CompactFlash cards can be used with Recon. These cards allow you
to maintain a wireless connection to the LAN and the Internet while
within range of an 802.11 network.
• VPN -- The Recon includes support for VPN (Virtual Private
Network) connections. Used together with a connection to the
Internet, a VPN connection allows you to browse network files from
a remote site and also supports remote synchronization with your PC
via ActiveSync. Note that the network you access must be configured
to allow VPN connections.
• Ethernet -- Pocket PC-compatible Ethernet CompactFlash cards
can be used with Recon. These connections allow the Recon to
connect to a LAN and browse network file shares. You can also use
ActiveSync over an Ethernet connection to synchronize with your
PC. Note that the Recon does not expose file shares and cannot be
browsed by PCs on the network.
For more information on creating these connections, see the website
listed under reference materials on the last page of this manual.

17
Installing additional software on your Recon
The Recon can run third-party software designed for Microsoft
Windows Mobile 2003 Pocket PC devices.
Most third-party software is installed by running a setup program on
the PC while the Recon is connected with ActiveSync. If prompted by
the installation wizard, perform a soft reset to complete the installation.
Microsoft Pocket Outlook
Microsoft Pocket Outlook includes Calendar, Contacts, Inbox,
Notes and Tasks. Open the program and then tap Start / Help for
instructions on using the various programs. To synchronize information
on your PC with your Recon, see the information on using ActiveSync.
Note: For best results, follow the setup instructions that came with
your software.
Calendar Use Calendar to schedule appointments, including
meetings and other events. You can check your
appointments in one of several views (Day, Week,
Month, and Agenda) and set the Calendar to remind
you of appointments with a sound or other method. Tap
the Today icon to view the current date.
Contacts Use Contacts to maintain a list of both business and
personal information so that you can easily find the
information you’re looking for, whether you’re at home
or on the road.
Inbox You can send and receive e-mail by synchronizing with
your PC, or by connecting to a POP3 or IMAP4 mail
server. You need to set up e-mail accounts for each
method that you use except for ActiveSync, which is
set up by default. The ActiveSync folder on the Recon
is used to store messages that you send and receive
through Synchronization with a PC. Account names
appear as folders in the folder list in the Inbox message
list.

18
Notes Notes helps you quickly capture your ideas, notes, and
thoughts. You can create a note using written and typed
text and drawings. You can also share your notes with
others through e-mail and synchronization with your PC.
Tasks Use Tasks to keep track of things you need to do. You can
use categories to help organize tasks and set reminders
for them. If you use Outlook on your PC, you can
synchronize tasks between the Recon and the PC.
Companion Programs
Your Recon comes with the following programs installed. Open the
program and then tap Start / Help for instructions on using the
various programs.
Pocket
Excel
You can use Pocket Excel much the same way you use
Excel on your PC. Use split panes to view different parts
of a worksheet at the same time. You can also use freeze
panes to keep row and column labels or other data visible
as you scroll through a sheet.
Excel files (.xls) and templates (.xlt) created in Excel
version 5.0/95 or later on the PC are converted to Pocket
Excel workbook (.pxl) or template (.pxt) files when
they are synchronized or copied to the Recon or when
you open an e-mail message with an Excel file as an
attachment. Pocket Excel workbooks are converted to
Excel workbooks when they’re synchronized or copied
to the PC. During conversion, some formatting attributes
may be changed or lost. For more information, see
ActiveSync Help on the PC.
Pocket
Word
You can enter information by working in different modes,
which you select from the View menu.
• Typing. Using the input panel, enter typed text into the
document.
• Writing. Use your stylus to write directly on the screen.
Lines are displayed as a guide.
• Drawing. Use your stylus to draw directly on the
screen. A drawing box appears, indicating a single object.
Other manuals for Recon
1
Table of contents
Other TDS Handheld manuals