Te Pari Racewell HD3 User manual

Operators Manual
Racewell
HD3, HD4 & HD6
Sheep Handlers

2Te Pari Racewell HD3, HD4 & HD6 Operators Manual
Racewell HD3/HD4/HD6
Contents
Main components of your Racewell handler 3
Compressor 4
Attaching the air ttings and connecting the compressor 4
Power Supply 4
Remote Control 5
Dashboard controls 6–7
Positioning the sensors (eyes) 8
Anti backing hook 9
Adjusting the clamp and weigh area width 9
Adjusting the lead up race 9
Trouble shooting guide 10–13
Hazard Identication 14
EC Declaration of Conformity Machinery 15
Contact us Back
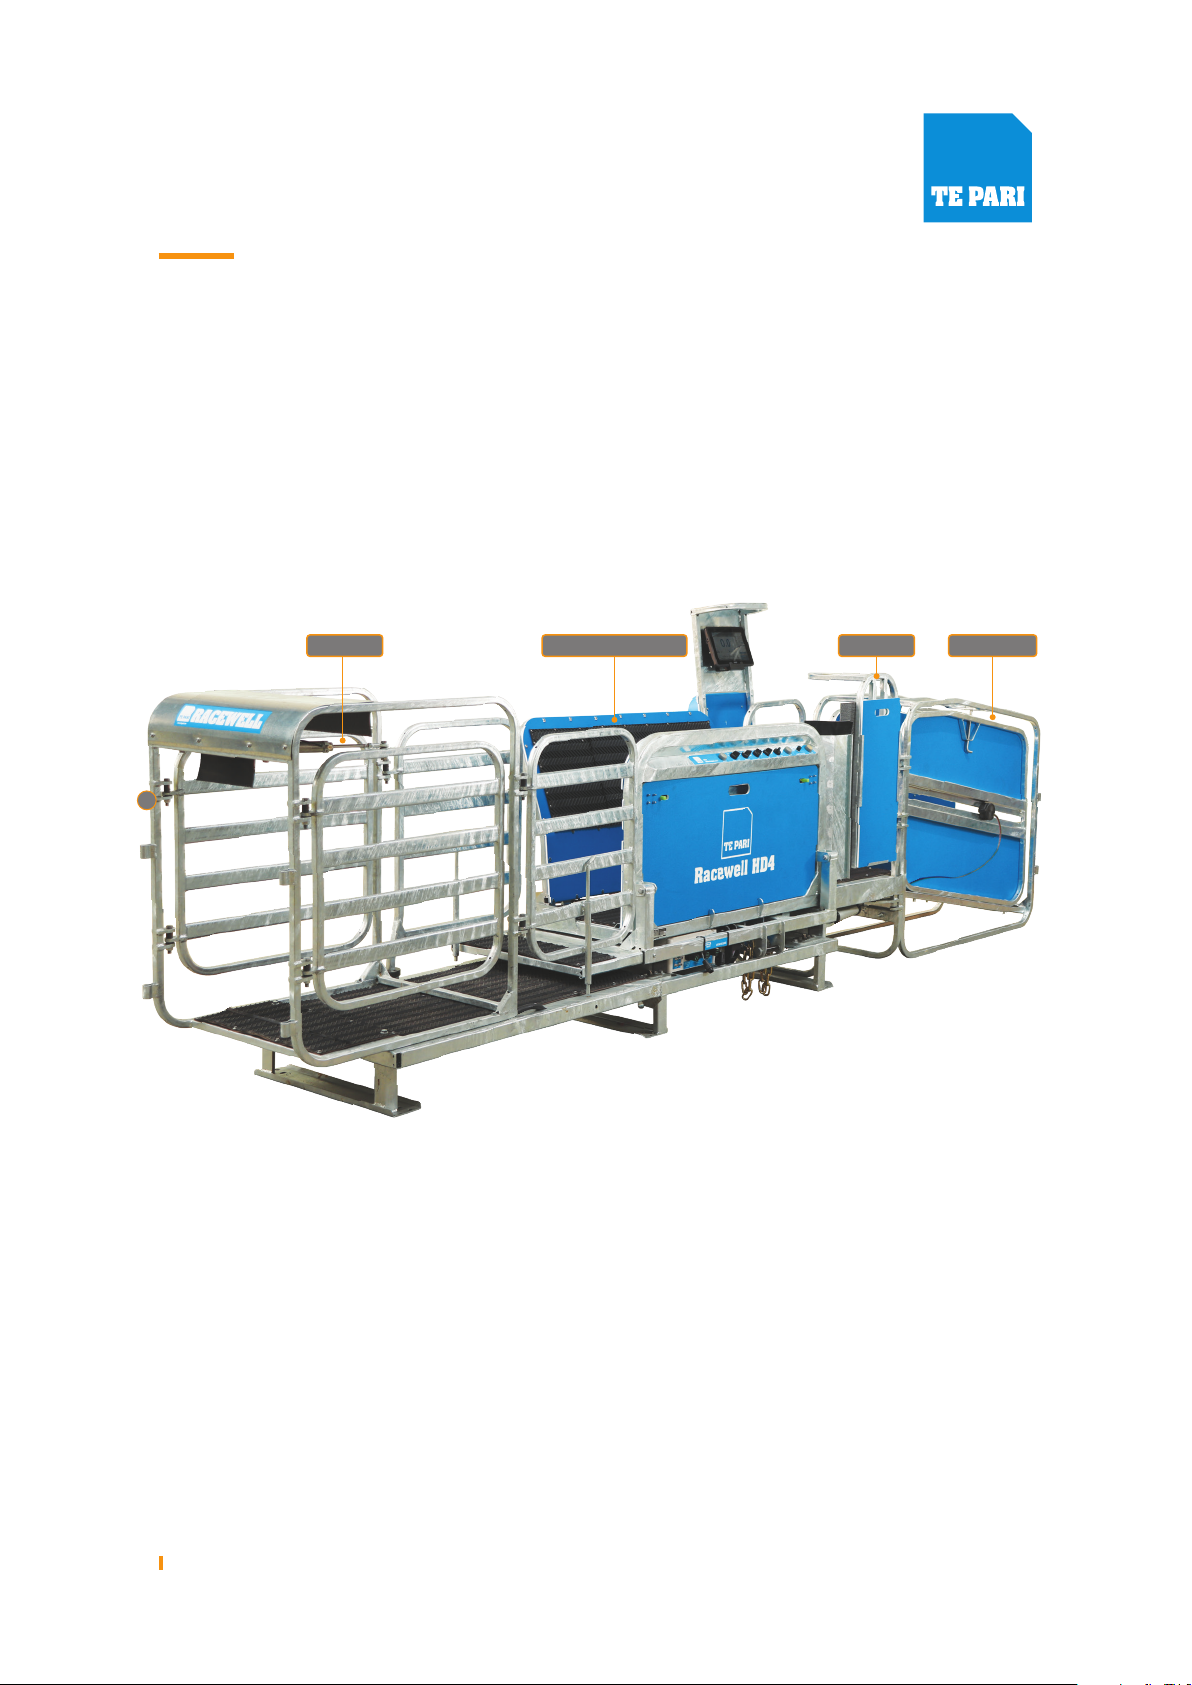
3Te Pari Racewell HD3, HD4 & HD6 Operators Manual
Racewell HD SHEEP HANDLING SYSTEMS
Main components of your Racewell handler
2
Draft Gates Entry GateClamp and Weigh Area Leadup Race
4Te Pari Racewell HD3, HD4 & HD6 Operators Manual
Racewell HD SHEEP HANDLING SYSTEMS
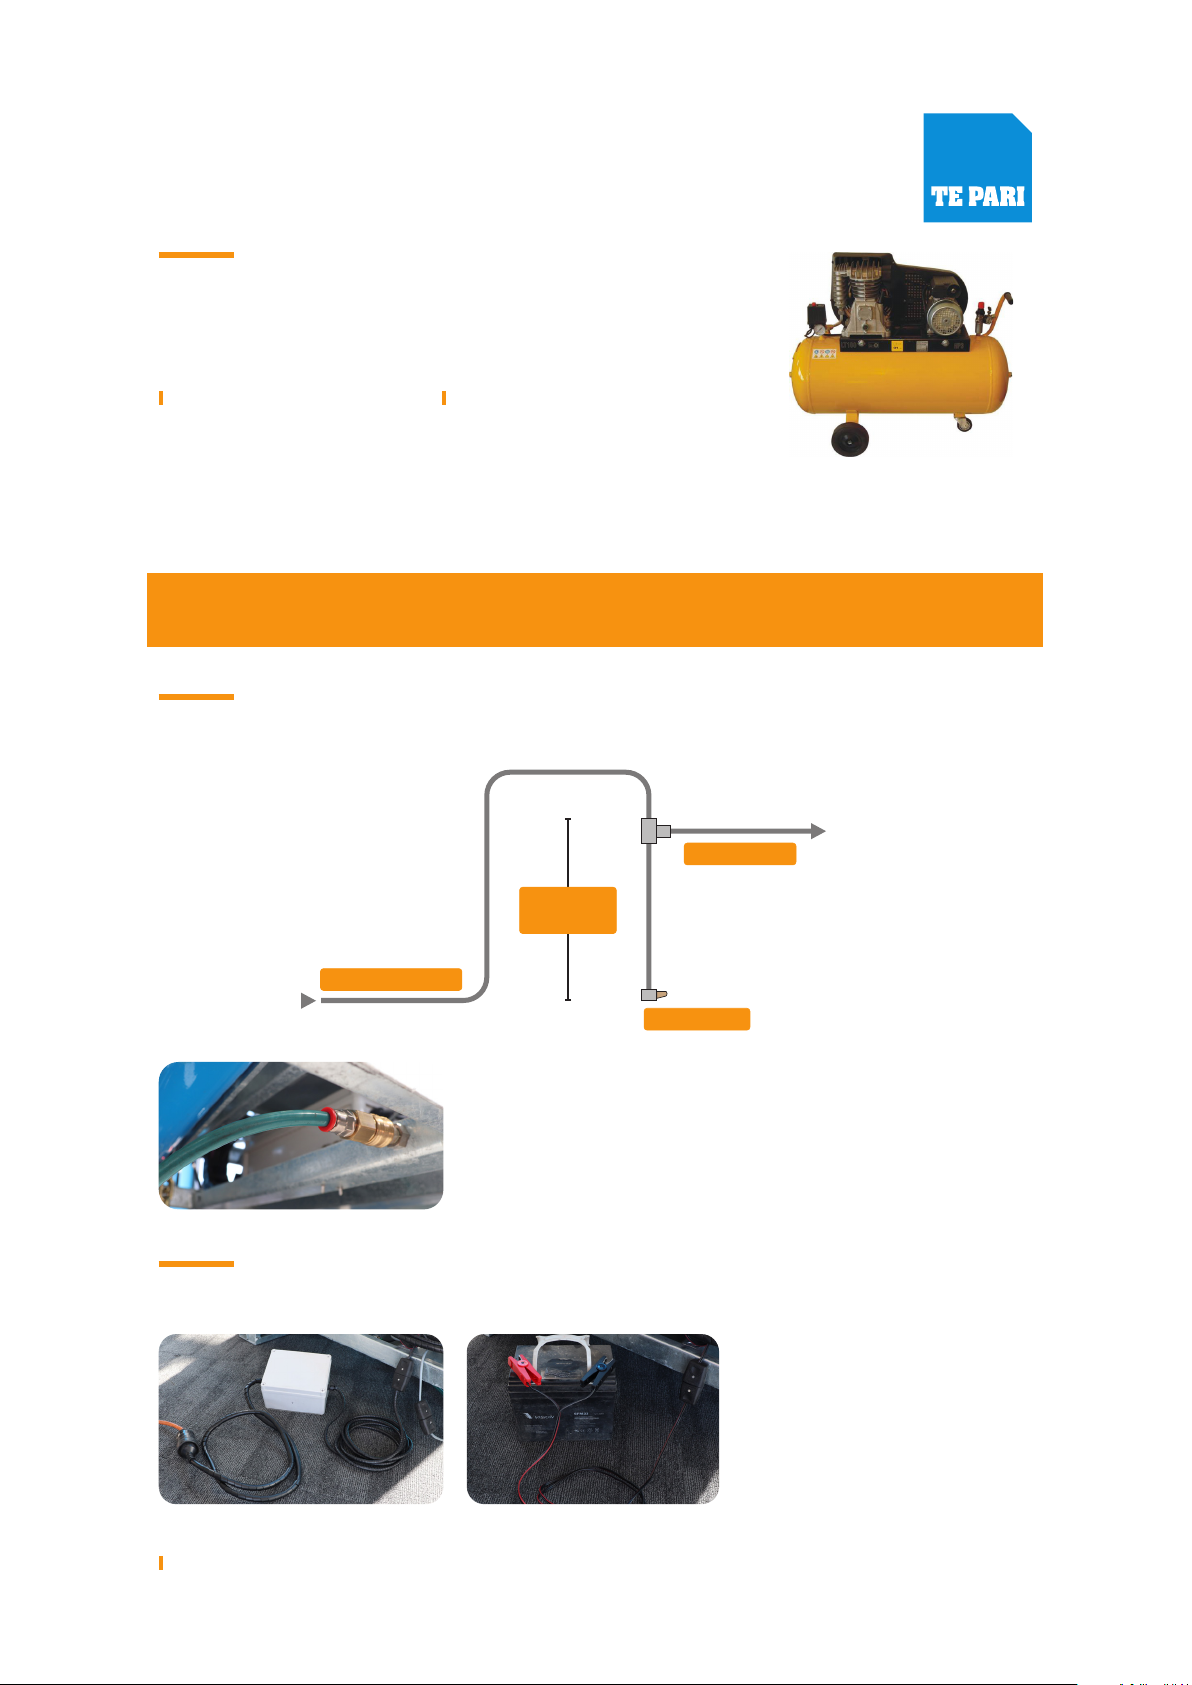
Compressor
The following specication is required for your Racewell Handler:
If your compressor lower capacity than these specication then the Racewell may work slowly.
Manufacturer installation and maintenance guidlines for the compressor should be followed.
This includes checking the oil and draining water from the tank.
Please note: when turning the compressor on or o use the switch on the compressor
and not the switch at the power source.
Attaching the air ttings and connecting the compressor
Connect the air line to the Racewell handler. The connection
is located underneath the Clamp and Weigh Area. If the
compressor is located some distance away from the racewell
handler it is recommended that you include a water trap on the
line to avoid condensation getting to the handler pneumatics.
The image above shows a design for a simple water trap.
Power Supply
Power can be supplied via
mains (110V AC to 240V AC)
or via the 12 Volt battery leads
supplied with the handler. The
internal system is all 12 Volt AC
power supply.
1 m / 3 feet
(approx)
From your Compressor
Ball or tap valve
To your Racewell
12 CFM capacity Minimum pressure of 90psi
5Te Pari Racewell HD3, HD4 & HD6 Operators Manual
Racewell HD SHEEP HANDLING SYSTEMS
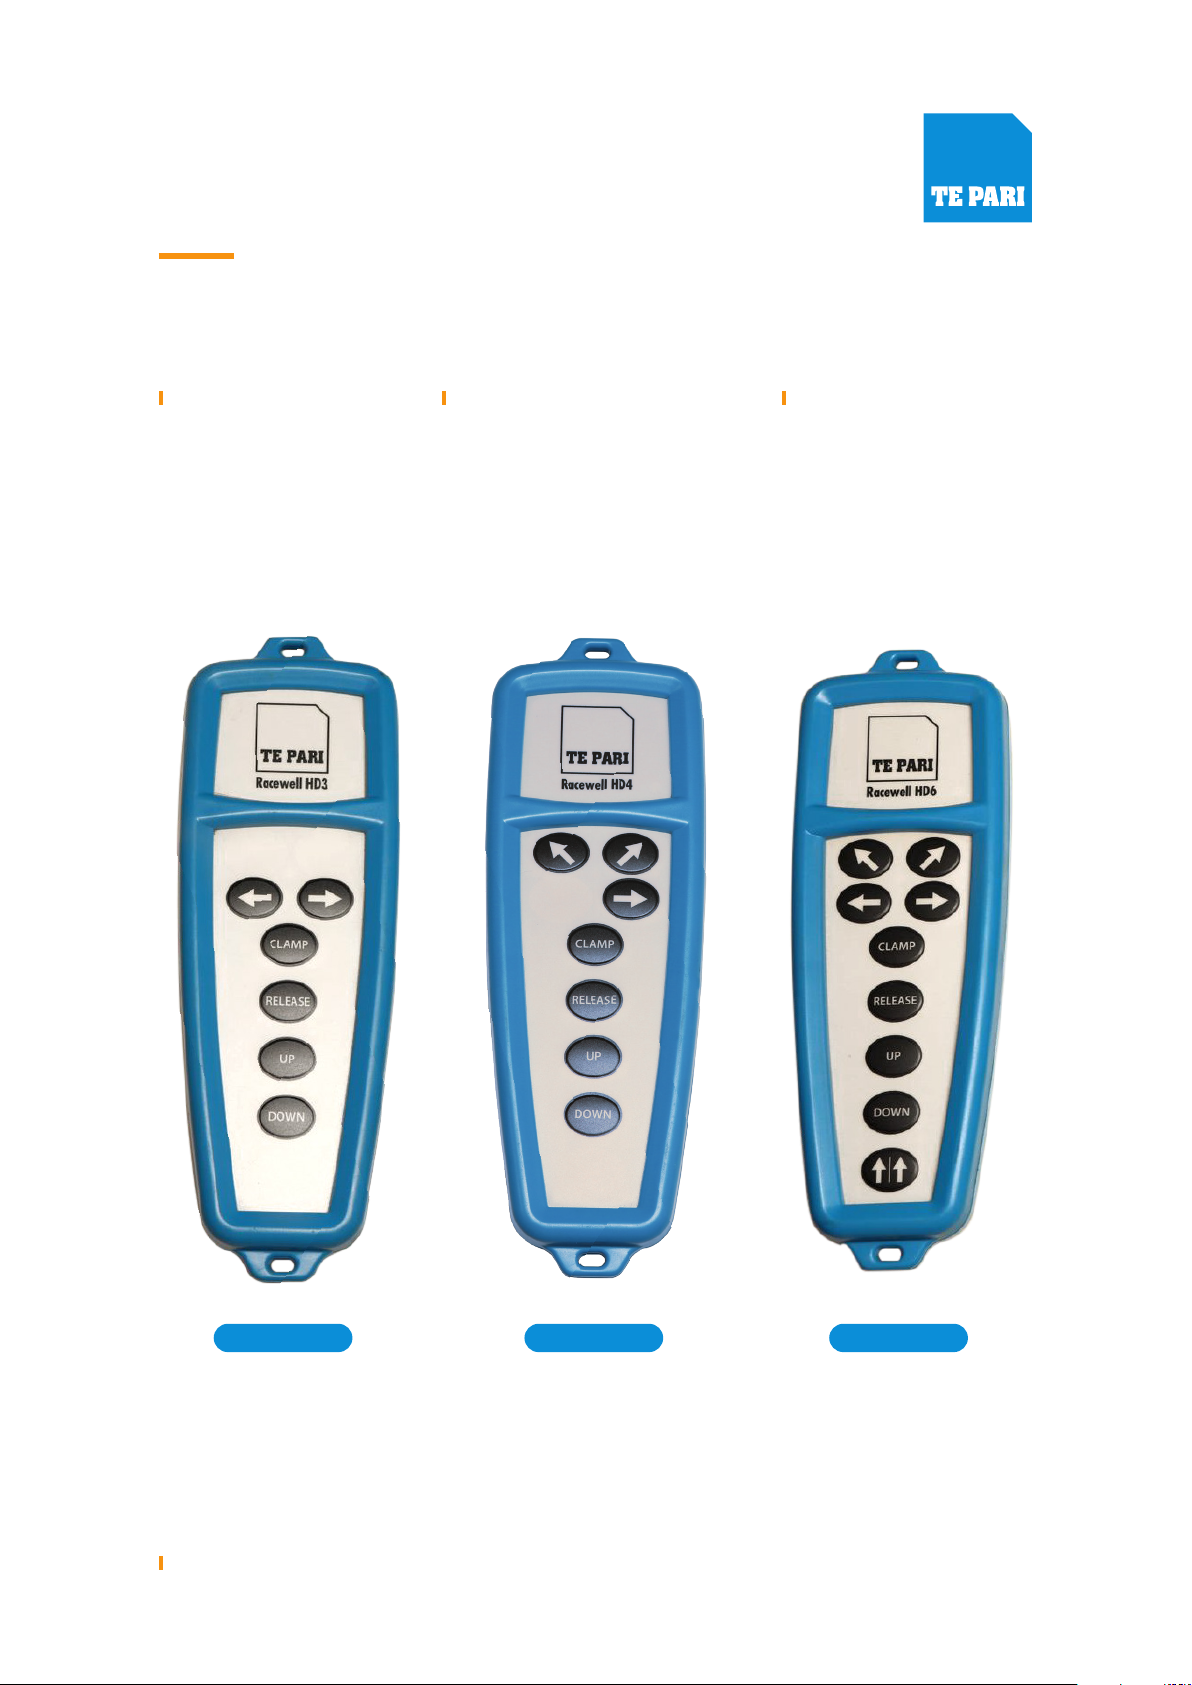
Remote Control
All remotes have the following buttons:
The remote is powered by x2 AA batteries.
HD3 HD4 HD6
Tilt: Up / Down Clamp: Clamp/Release Draft gates

6Te Pari Racewell HD3, HD4 & HD6 Operators Manual
Racewell HD SHEEP HANDLING SYSTEMS
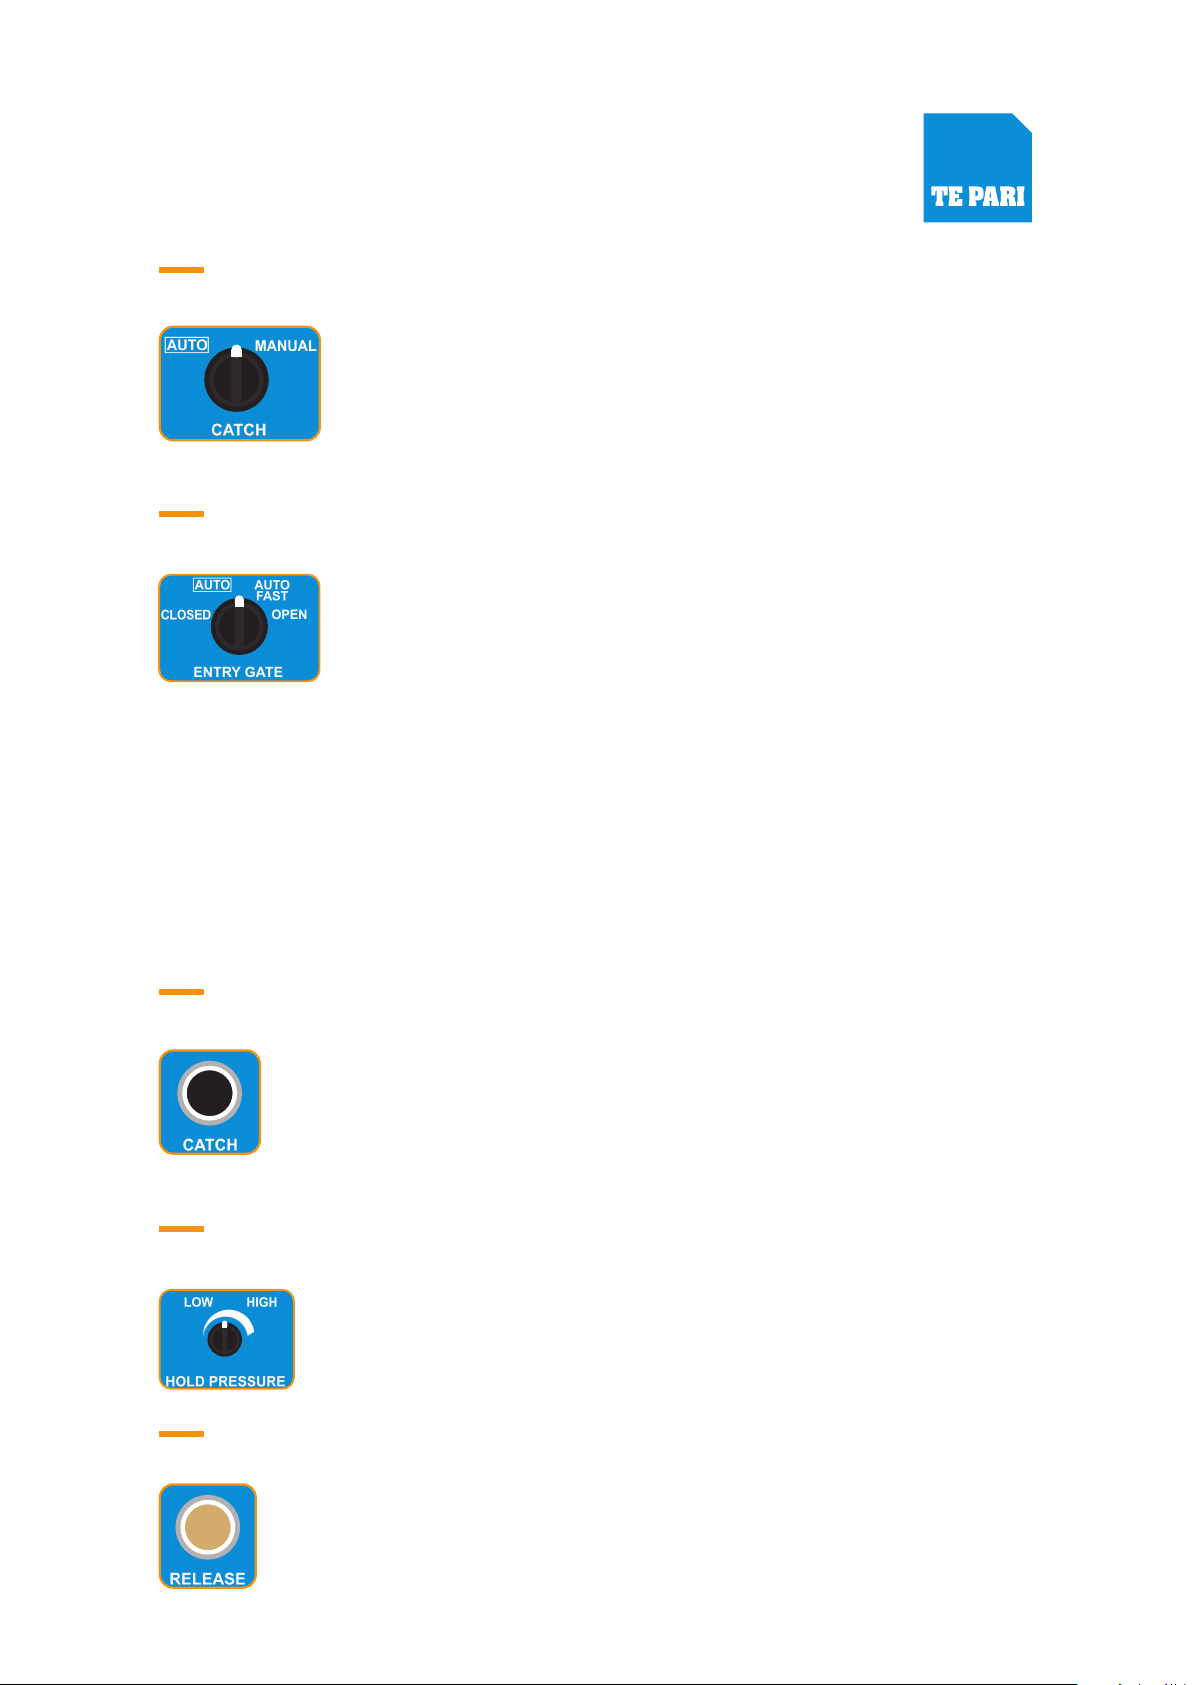
Dashboard controls
Your Racewell handler has a number of dierent operating modes. These are explained below.
(Starting from the Left button on the dashboard)
Power
When power is connected to the Racewell Handler it can then be powered on via the
dashboard power button. When the Racewell Handler is ON the button will glow green. It is
strongly recommended to turn the racewell Handler o when you have nished working.
Draft gates
The draft gate switch will move the postion of the Drafting gates to the left
or right. When Auto drafting the switch must be set to AUTO. The draft gate
direction can be changed at any time during weighing and drafting should you
wish to change the direction manually.
Release button
When set to AUTO the sheep will be automaticlly released from the Clamp and
weigh area when it has been weighed. If set to MANUAL then the operator will
have to press the release button for the sheep to be released.
Tilt
The tilt switch will move the Clamp and Weigh area up or down for access to the
sheep.
7Te Pari Racewell HD3, HD4 & HD6 Operators Manual
Racewell HD SHEEP HANDLING SYSTEMS
Catch (Auto/Manual)
The Catch switch is used if the operator wants to catch a sheep manually rather
than using the eyes on the side of the machine. For general use the switch should
be set to AUTO.
Safety Note: Please ensure the machine is turned o or this switch is set to manual
before adjusting the clamp wall width. Failure to do could result in the clamp being activated and personal injury
Entry
The entry gate has 4 modes:
Closed: The entry gate will remain closed regardless of the sensors on the side
of the Handler. This option is used when you may have sheep in the race and do
not want them to come through the handler.
Auto: The Entry gate will be closed when one of the Blue eyes on the side of the handler are activated.
It will open again when eye is cleared
Auto fast: The Entry gate will be closed when one of the Blue eyes on the side of the handler are activated
however it will open at the same time as the clamp releases allowing for faster ow into the machine
Open: The entry gate will remain open regardless of the sensors on the side of the Handler. This option
is very useful when doing tasks such as treatments and the animals are not being weighed as it provides
continuous ow
Recommended postion is AUTO
Catch
The catch button will activate the clamp. This button is used for catching a sheep
manually. If a sheep is caught in the clamp and the button is pressed again, more air
will ow to the cylinder and increase the pressure on the sheep. If the catch switch is
set to AUTO and you press the CATCH button. It will overide the auto function and the
sheep will not be released automatically.
Hold pressure
The Hold pressure knob increases or decreases the pressure of the clamp wall. The
recommended setting is at about ⁄ if your compressor is running at reommended
pressure of 90100 psi. If set to the lowest pressure the clamp wall will not move at all.
It is important not to have the pressure to high for animal welfare.
Release
The release button will release the clamp. This button is used for releasing a sheep
manually.
8Te Pari Racewell HD3, HD4 & HD6 Operators Manual
Racewell HD SHEEP HANDLING SYSTEMS
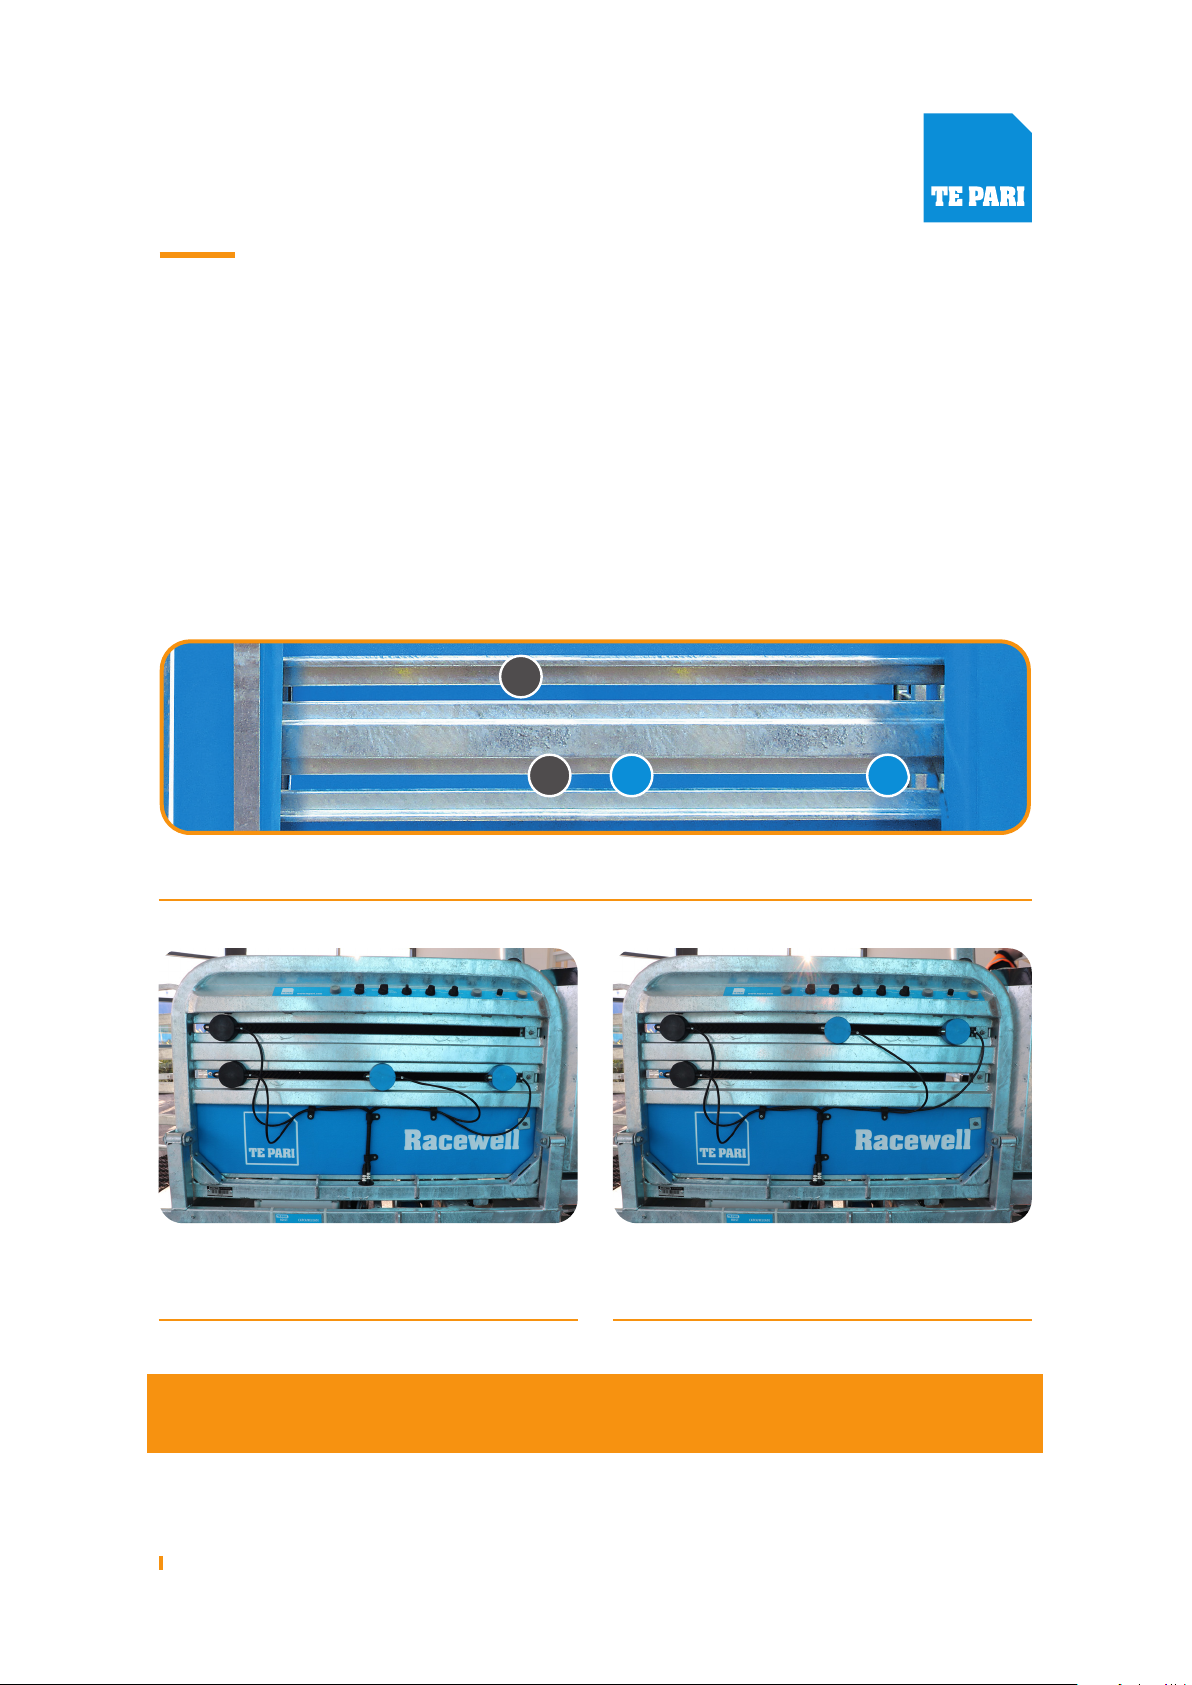
SENSOR EYE POSITION GUIDE FOR DAGGING SMALLER SHEEP
SENSOR EYE POSITION GUIDE
FOR WEIGHING SMALLER LAMBS
SENSOR EYE POSITION GUIDE FOR
WEIGHING LARGER LAMBS OR SHEEP
Please Note: Wool dust or debris covering any of the four eyes can aect operation.
Make sure that the lenses of the eyes are clean at all times.
Positioning the sensors (eyes)
Blue Eyes These activate the closing of the entry gate to stop the next sheep coming in while
there is one being weighed. The backing hook in the lead up race is also activated
by these eyes.
Black eyes When one of the blue eyes is covered and one of the black eyes is covered the clamp
will activate and a sheep will be caught and weighed. It is important that the eyes are
positioned correct and that a sheep can not get inbetween the Blue and black eyes.
The eyes are on magnets to allow ease of adjustment to suit the size of animals you are working
with or the task your wanting to achieve in the handler.

9Te Pari Racewell HD3, HD4 & HD6 Operators Manual
Racewell HD SHEEP HANDLING SYSTEMS
Anti backing hook
This works with the auto gate, and ensures that the animal
can't walk backwards the handler.
The anti backing hook is activated by the blue eyes and
prevents the sheep moving backwards when it is released. It
is recommended the hook is disabled when doing tasks such
as crutching where the sheep is caught towards the back of
the clamp and weigh area. The hook can be deactivated by shifting the pin position.
Adjusting the clamp and weigh area width
At the bottom of the clamp wall, there are adjustment holes.
Safety Note: Please ensure the machine is turned o or this switch is set to manual before adjusting
the clamp wall width. Failure to do so could result in the clamp being activated and personal injury. It
is also possible to remove the air hoses on the cylinder to make adjustment easier
The width of the clamp and weigh area can be adjusted to suit dierent size animals. Ideal
adjustment will catch the sheep with the clamp wall parellel with the other side and minimise
movment of the clamp wall to catch a sheep.
Size can also be adjusted dierently from front to back if required.
The length of the squeeze clamp wall ram can also be adjusted. In the middle of the moving wall
there are four adjustments for ram length. Adjust the ram so that the clamp wall movement is
minimal to catch a sheep. Ideally the wall is vertical when a sheep is clamped
Adjust this pin so the wall cannot touch the opposite side. This is a safety feature so that hands
and ngers cannot be caught in the empty unit accidentally.
Safety Note: when adjusting for large sheep the wall may be able to touch the opposite side. Be
careful not to activate the clamp without a sheep in the clamp area
Adjusting the lead up race
The lead up race can be adjusted for width at
the top and bottom. A slight V conguration is
best to prevent smaller animals turning around.
Shift pin position

10 Te Pari Racewell HD3, HD4 & HD6 Operators Manual
Racewell HD SHEEP HANDLING SYSTEMS
Trouble shooting guide
Please check this trouble shooting guide before contacting customer support, as often
something quite simple could be the problem.
A service charge will be made for call outs if the fault is not covered by your warranty.
When testing the unit without sheep ensure at least one blue an one black eye are covered,
covering either of the blue eyes on their own will only close the auto gate.
For your safety, and that of others, never leave the unit operational when not attended.
SYMPTOM
POSSIBLE CAUSES POSSIBLE SOLUTIONS
NO POWER AT UNIT AND IT WON’T GO
12v adaptor not getting power
Faulty extension cords to 12V adaptor
Faultly 12v Adaptor
Faulty On/O switch
Wire loose/o in autobox
No air to unit
Check the12v adaptor cord is rmly connected
Check all extension cords
Check for external damage to the adaptor and using a
multimeter check the adaptor output is at least 11 volts
Check the On/O switch and wiring to it
Check wiring generally for breaks or chew marks
Check the air lines and compressor
SHEEP UNIT DOING UNUSUAL THINGS
Fluctuating power supply
Faulty Catch/Release switch
Faulty compressor
Check power, compressor and test unit for a stable weight
Check air lines and wiring
Check compressor is operating correctly
AUTO GATE MOVING UNEXPECTEDLY
Sensors (eyes) obscured by dust or wool Check the sensors (eyes) for dust on the lenses
Also check they have no loose wool in front of them
SHEEP ARE NOT BEING DRAFTED/SORTED
Draft switch Communication cable may not be connected or scale
congured correctly
Check cable for damage
Racewell HD SHEEP HANDLING SYSTEMS
DRAFTING THE WRONG WAY FOR PRESET WEIGHTS
Ensure the manual draft switch is in the auto position
Turn power o and on again on the Handler. This will
force a communication handshake between the scales
and handler
EVERYTHING WORKS APART FROM THE DRAFTER
Indicator not talking to drafter Check comms cable between indicator and autobox
for damage
Turn power o and on again on the Handler. This will
force a communication handshake between the scales
and handler
Ensure autodrafting option on your indicator is selected
PARTS OF THE UNIT ARE WORKING SLOWLY
Constricted, broken or punctured air lines Check the airlines for cracks & leaks
Remove hoses from the cylinder and test. This will
help identify if the issue is a air issue or a cylinder issue
Ensure the compressor is resting upon the airlines
CRUSH WALL IS NOT OPERATING QUICKLY ENOUGH
Low air pressure Check the compressor–require 90--120psi
TILT GOING BACK OR CREEPING OVER
Faulty switch
Faulty solenoid
Air leak
Repair or replace the switch
Replace solenoid
Check joints and lines and remedy as required
Remove air line and see if there is air ow leaking
through the valve. If so contact support
UNIT IS NOT CATCHING PROPERLY
Low air pressure
Eye not working
Dirty Sensor (eye)
Incorrect eye positions
Check compressor output is above 90 psi at all times
Check sensor (eye) and cables for damage
Remove wool and/or dust from the sensor (eye) lenses
Adjust positions so 1x blue and 1x black eye get covered
Remove air line and see if there is air ow leaking
through the valve. If so contact support
WALL PRESSURE IS HIGH ALL THE TIME
Faulty potentiometer Check and adjust or replace as required
Remove hoses from ram and activate catch and see
if air keeps coming out should only do a short burst,
possible the valve needs service as its stuck open

Racewell HD SHEEP HANDLING SYSTEMS
UNIT SLOWLY RELEASES AFTER SHEEP ARE CLAMPED
Air may be leaking
Catch solenoid may be faulty
Damage to cylinder piston
Check for air leaks
Check solenoid
Check piston
Remove air line and see if there is air ow leaking
through the valve. If so contact support
THE UNIT IS NOT HOLDING THE SHEEP
The unit is designed to operate at 90-120psi Check the ram adjustment on the moving walls
allows the ram to apply pressure to the wall
Check the potentiometer(increase/decrease knob)
on the dashboard is turned up enough
Ensure any regulator on the compressor is set to
correct pressure
SHEEP SLIPPING OUT OF CLAMP
Potentiometer (increase/decrease knob)
Wall position
Air leak
Adjust upwards to increase pressure
Ensure position is correct for animal size, when a
sheep is held the top at of the crush wall should be
about vertical
Check for air leaks to ram and replace hosing
SHEEP ARE GETTING TOO FAR THROUGH THE UNIT
Wall not adjusted for animal size
Eye lengths are too short
Potentiometer (increase/decrease knob)
Compressor
Air leak
Adjust the wall
Adjust the black eyes closer to the blue ones so the
sheep is caught further back
Adjust upwards to increase pressure
Check pressure is 90 psi cut in and 120-130psi cut out
Check if crush cylinder needs lubricating
MACHINE IS CLOSING WITHOUT ANY SHEEP
Dirty eyes
Eye length is too long
Clean eyes and ensure they are free from dust, wool etc.
Use allen key to remove grub screw so the sensor can
be removed from the plastic eye holder, on the back
of the sensor is a small at head screw which can be
adjusted to increase or decrease the read range
REDUCTION IN AIR PRESSURE
Water trap lters Should be checked visually every 3 months and
replaced as required
Please ensure there is no air pressure from compressor
into the handler

Racewell HD SHEEP HANDLING SYSTEMS
REMOTE CONTROL IS NOT WORKING PROPERLY OR AT ALL
Flat remote control battery
Remote is not programmed to your unit
Check and replace as required
Program remote to your unit by turning on the unit then:
Remote
EYES ARE NOT WORKING
Faulty eye switch
Dirty or broken eye
Eye cables broken or frayed
Check power supply. low power will aect eye
performance
Swap the eyes from each cable to elimate cable or
eye issues
Check eye cables are not damaged
INDICATOR READOUT IS FLUCTUATING OR NOT ZEROING
Plugs not completely connected
Plugs are damp
Battery is not adequately charged
Unit is damp
Electrical interference
Check loadbar cables are rmly in place, don’t over
tighten
Check for moisture
Check there is nothing touching the clamp and weigh
area including build up of dirt or muck underneath
Check battery is in a charged state
Check indicator to unit cord
Electrical interference from a short can aect your
indicator
Battery and unit charges must be kept dry
NOT AUTOMATICALLY DRAFTING OR RELEASING
Comms cable fault
Incorrect indicator settings
Communication cable from indicator to unit is damaged
or has dirty terminals – clean terminals with CRC
Communications cable is in the wrong comm port
Check your indicator settings are correct
TRU-TEST INDICATOR DISPLAYS WAIT FOR TRIGGER
Clean eyes
Ensure communication cable connected turn handler
o and on, ensure the scale does not require
information like a trait before it will record
Check the Yand Communications cables and the
cables pins for damage, replace if required
INDICATOR NOT ZEROING
Tension in loadbars Refer to the scale manual
Loosen 4 top bolts on loadbars, if they settle they
may require a washer in one corner
Loadbars may require servicing

14 Te Pari Racewell HD3, HD4 & HD6 Operators Manual
Racewell HD SHEEP HANDLING SYSTEMS
Hazard Identication
The Racewell Drafter has moving gates positioned at both the front and rear of the unit. Keep
hands clear to avoid the risk of a crush injury when the machine is operational.
Crush hazard
WARNING
! !
Entry gate The entry gate will move when switch position is changed on the dashboard or the
blue sensor is covered. Be sure to keep your limbs, head and body out of the area of
movement area
All above hazards can be activated be the double foot pedals. unplug when not in use
Clamp wall The clamp wall will move quickly and with force when the catch or release button
on dashboard or button on remote is pressed. It is also activated when one of the
blue and one of the black eyes are covered. It can also be activated if the foot pedal
is connected to the clamp / release plug on the underside of the handler. Depending
o the adjustment of the wall it is possible for the wall to come in contact with the
opposite side of the clamp and weigh area. This is a potential crush hazard. Be sure to
keep your limbs, head and body out of the area of movement area. Please ensure the
machine is turned o or this switch is set to manual before adjusting the clamp wall
width. Failure to do so could result in the clamp being activated and personal injury.
It is also possible to remove the air hoses on the cylinder to make adjustment easier
Tilt If the handler is tted with a tilt option–The tilt will move when the tilt switch position
is changed on the dashboard or button on remote is pressed. It can also be activated
if the foot pedal is connected to the Hoist Up/Down plug on the underside of the
handler. Ensure the entry gate is closed before tilting. This is a potential crush hazard.
Be sure to keep your limbs, head and body out of the area of movement area
Tilt Service position. If the tilt is up to allow access to the control box under the oor be sure
that the power is disconnected to the machine and that a chock is put in place to prevent
the tilt from coming down while working on the handler. This is a potential crush hazard.
Be sure to keep your limbs, head and body out of the area of movement area
Draft gates The draft gates will move when the switch position is changed on the dashboard or
gate buttons pressed on the remote. Be sure to keep your limbs, head and body out
of the area of movement area. Draft gates may activate from signals received from the
scale causing unexpected movement
All the above hazards are applicable during manual or automatic operation.
15 Te Pari Racewell HD3, HD4 & HD6 Operators Manual
Racewell HD SHEEP HANDLING SYSTEMS
EC DECLARATION OF CONFORMITY MACHINERY
(according to Annex II.1.A of the Machinery Directive)
Te Pari Products Ltd hereby declares as manufacturer that the Racewell Sheep
Handler with specications:
Meets the provisions of the following Directives:
Machinery Directive (2006/42/EG)
And furthermore declares that (parts of) the following harmonized standards have
been applied:
Machine :
Type :
Serial :
Year :
Manufacturer : Te Pari Products Ltd
Address : 9 Endeavour Crescent, Oamaru, Otago 9494
Country : New Zealand
Responsible : Patrick Blampied
ISO 14120: Safety of machinery - Guards - General requirements for the design and
construction of xed and movable guards
IEC 60204-1: 2006 Safety of machinery - Electrical equipment of machines
Part 1: General requirements
ISO 13849-1: Safety of machinery - Safety-related parts of control systems
Part 1: General principles for design
IEC 61310-1: 2008 Safety of machinery. Indication, marking and actuation.
Part 1: Requirements for visual, auditory and tactile signals
IEC 61310-2: 2008 Safety of machinery. Indication, marking and actuation.
Part 2: Requirements for marking
ISO 4414 : 2010 Pneumatic uid power - General rules and safety requirements for
systems and their components

NEW ZEALAND HEAD OFFICE
PO Box 25, 9 Endeavour Crescent
Oamaru, 9444, New Zealand
FREEPHONE NZ: 0800 837 274
REST OF WORLD: + 64 3 433 0077
EMAIL
AUSTRALIA OFFICE
44 Ricky Way, Epping
Melbourne, 3076 VIC
PHONE: 1800 650 682
EMAIL
accounts : [email protected]om
Thank you for your purchase, enjoy your new Te Pari Racewell HD Sheep Handlers
from the Te Pari team
Warranty Claims and Returns Form
https://www.tepari.com/contact-us/warranty-claim/
Other manuals for Racewell HD3
2
This manual suits for next models
2
Table of contents
Other Te Pari Farm Equipment manuals


