Teac A-H300mkII User manual

9A10000400
OWNER’S MANUAL
MANUEL DU PROPRIÉTAIRE
MANUAL DEL USUARIO
Integrated Stereo Amplifier
Z
A-H300mk
@
ENGLISH FRANÇAIS ESPAÑOL

2
IMPORTANT SAFETY INSTRUCTIONS
1) Read these instructions.
2) Keep these instructions.
3) Heed all warnings.
4) Follow all instructions.
5) Do not use this apparatus near water.
6) Clean only with dry cloth.
7) Do not block any ventilation openings. Install in accordance with
the manufacturer’s instructions.
8) Do not install near any heat sources such as radiators, heat
registers, stoves, or other apparatus (including amplifiers) that
produce heat.
9) Do not defeat the safety purpose of the polarized or grounding-
type plug. A polarized plug has two blades with one wider than
the other. A grounding type plug has two blades and a third
grounding prong. The wide blade or the third prong are provided
for your safety. If the provided plug does not fit into your outlet,
consult an electrician for replacement of the obsolete outlet.
10) Protect the power cord from being walked on or pinched
particularly at plugs, convenience receptacles, and the point
where they exit from the apparatus.
11) Only use attachments/accessories specified by the manufacturer.
12) Use only with the cart, stand, tripod,
bracket, or table specified by the
manufacturer, or sold with the apparatus.
When a cart is used, use caution when
moving the cart/apparatus combination
to avoid injury from tip-over.
13) Unplug this apparatus during lightning storms or when unused
for long periods of time.
14) Refer all servicing to qualified service personnel. Servicing is
required when the apparatus has been damaged in any way,
such as power-supply cord or plug is damaged, liquid has been
spilled or objects have fallen into the apparatus, the apparatus
has been exposed to rain or moisture, does not operate normally,
or has been dropped.
<Do not expose this apparatus to dripps or splashes.
<Do not place any objects filled with liquids, such as vases, on the
apparatus.
<Do not install this apparatus in a confined space such as a book
case or similar unit.
<The apparatus draws nominal non-operating power from the AC
outlet with its POWER switch in the off position.
CAUTION: TO REDUCE THE RISK OF ELECTRIC SHOCK,
DO NOT REMOVE COVER (OR BACK). NO USER-
SERVICEABLE PARTS INSIDE. REFER SERVICING TO
QUALIFIED SERVICE PERSONNEL.
The lightning flash with arrowhead symbol, within an
equilateral triangle, is intended to alert the user to the
presence of uninsulated “dangerous voltage” within the
product’s enclosure that may be of sufficient magnitude
to constitute a risk of electric shock to persons.
The exclamation point within an equilateral triangle is
intended to alert the user to the presence of important
operating and maintenance (servicing) instructions in the
literature accompanying the appliance.

3
ENGLISH
IMPORTANT (for U.K.Customers)
DO NOT cut off the mains plug from this equipment. If the plug
fitted is not suitable for the power points in your home or the
cable is too short to reach a power point, then obtain an
appropriate safety approved extension lead or consult your
dealer.
If nonetheless the mains plug is cut off, remove the fuse and
dispose of the plug immediately, to avoid a possible shock
hazard by inadvertent connection to the mains supply.
If this product is not provided with a mains plug, or one has to
be fitted, then follow the instructions given below:
IMPORTANT. DO NOT make any connection to the larger
terminal which is marked with the letter E or by the safety earth
symbol | or coloured GREEN or GREEN-and-YELLOW.
The wires in the mains lead on this product are coloured in
accordance with the following code:
BLUE : NEUTRAL
BROWN : LIVE
As these colours may not correspond with the coloured
markings identifying the terminals in your plug proceed as
follows:
The wire which is coloured BLUE must be connected to the
terminal which is marked with the letter N or coloured BLACK.
The wire which is coloured BROWN must be connected to the
terminal which is marked with the letter L or coloured RED.
When replacing the fuse only a correctly rated approved type
should be used and be sure to re-fit the fuse cover.
IF IN DOUBT — CONSULT A COMPETENT ELECTRICIAN.
CAUTION
<DO NOT REMOVE THE EXTERNAL CASES OR CABINETS TO
EXPOSE THE ELECTRONICS. NO USER SERVICEABLE PARTS
ARE WITHIN!
<IF YOU ARE EXPERIENCING PROBLEMS WITH THIS PRODUCT,
CONTACT TEAC FOR A SERVICE REFERRAL. DO NOT USE THE
PRODUCT UNTIL IT HAS BEEN REPAIRED.
WARNING : TO PREVENT FIRE OR SHOCK
HAZARD, DO NOT EXPOSE THIS APPLIANCE
TO RAIN OR MOISTURE.
This equipment has been tested and found to comply with the
limits for a Class B digital device, pursuant to Part 15 of the
FCC Rules. These limits are designed to provide reasonable
protection against harmful interference in a residential
installation. This equipment generates, uses, and can radiate
radio frequency energy and, if not installed and used in
accordance with the instructions, may cause harmful
interference to radio communications. However, there is no
guarantee that interference will not occur in a particular
installation. If this equipment does cause harmful interference
to radio or television reception, which can be determined by
turning the equipment off and on, the user is encouraged to
try to correct the interference by one or more of the following
measures:
• Reorient or relocate the equipment and/or the receiving
antenna.
• Increase the separation between the equipment and
receiver.
• Connect the equipment into an outlet on a circuit different
from that to which the receiver is connected.
• Consult the dealer or an experienced radio/TV technician
for help.
CAUTION
Changes or modifications to this equipments not expressly
approved by TEAC CORPORATION for compliance will void the
user’s warranty.
For U.S.A.
CAUTION Regarding Placement
To maintain proper ventilation, be sure to leave a space
around the unit (from the largest outer dimensions including
projections) equal to, or greater than, shown below.
Left and Right Panels : 5 cm
Rear Panel : 5 cm
Top Panel : 20 cm

4
Contents
CAUTION
The product shall not be exposed to dripping or splashing and
that no object filled with liquids, such as vases, shall be placed
on the product.
Do not install this equipment in a confined space such as a
book case or similar unit.
Thank you for choosing TEAC. Read this manual carefully
to get the best performance from this unit.
Before Use
Read this before operation
<As the unit may become warm during operation, always leave
sufficient space around the unit for ventilation.
The ventilation holes should not be covered. Make sure there
is at least 20 cm of space above and at least 5 cm of space on
each side of the unit. Do NOT place anything on top of the
unit.
<The voltage supplied to the unit should match the voltage as
printed on the rear panel. If you are in any doubt regarding
this matter, consult an electrician.
<Choose the installation location of your unit carefully. Avoid
placing it in direct sunlight or close to a source of heat. Also
avoid locations subject to vibrations and excessive dust, heat,
cold or moisture.
<Do not place the unit on the amplifier/receiver.
<Do not open the cabinet as this might result in damage to the
circuitry or electrical shock. If a foreign object should get into
the unit, contact your dealer or service company.
<When removing the power plug from the wall outlet, always
pull directly on the plug, never yank the cord.
<Do not attempt to clean the unit with chemical solvents as
this might damage the finish. Use a clean, dry or slightly
damp cloth.
<Keep this manual in a safe place for future reference.
Specificatioins
Amplifier Section
Power output . . . . . . . . . . . 45 W + 45 W (6 Ω, 1 kHz, 0.5%)
Total Harmonic Distortion . . . . . . . . 0.5% (1 kHz, 6 Ω, 45 W)
S/N Ratio . . . . . . . . . . . . . . . . . . . . . . . PHONO: 70 dB (IHF-A)
AUX, CD, TAPE, TUNER: 95 dB (IHF-A)
CD direct: 95 dB (IHF-A)
Input Sensitivity/Impedance. . PHONO: 4.0 mV ±0.8 mV/10 kΩ
AUX, CD, TAPE, TUNER: 300 mV ±30 mV/10 kΩ
Frequency Response . . . . . . . . . . . . . . . . . . . . . 5 Hz - 80 kHz
Tone Control . . . . . . . . . . . . . . . . . . . BASS : ±10 dB (100 Hz)
TREBLE : ±10 dB (10 kHz)
General
Power Requirement
Europe model . . . . . . . . . . . . . . . . . . . . . AC 230 V, 50 Hz
U.S.A./Canada model. . . . . . . . . . . . . . . . AC 120 V, 60 Hz
Power Consumption . . . . . . . . . . . . . . . . . . . . . . . . . . . 85 W
AC Outlet (total 100 W max.)
Europe model. . . . . . . . . . . . . . . . . . . . . . . unswitched x 1
U.S.A./Canada model . . . . . . . . . . . . . . . . . unswitched x 2
Dimensions (W x H x D) . . . . . . . . . . . . . 215 x 312 x 110 mm
(8-7/16" x 12-5/16" x 4-5/16")
Weight (Net) . . . . . . . . . . . . . . . . . . . . . . . . . 4.2 kg (9-1/4 lb)
Operating temperature. . . . . . . . . . . . . . . . . . . . +5˚C - +35˚C
Operating humidity . . . . . . . . . 5% to 85% (no condensation)
Storage temperature. . . . . . . . . . . . . . . . . . . . . –20˚C - +55˚C
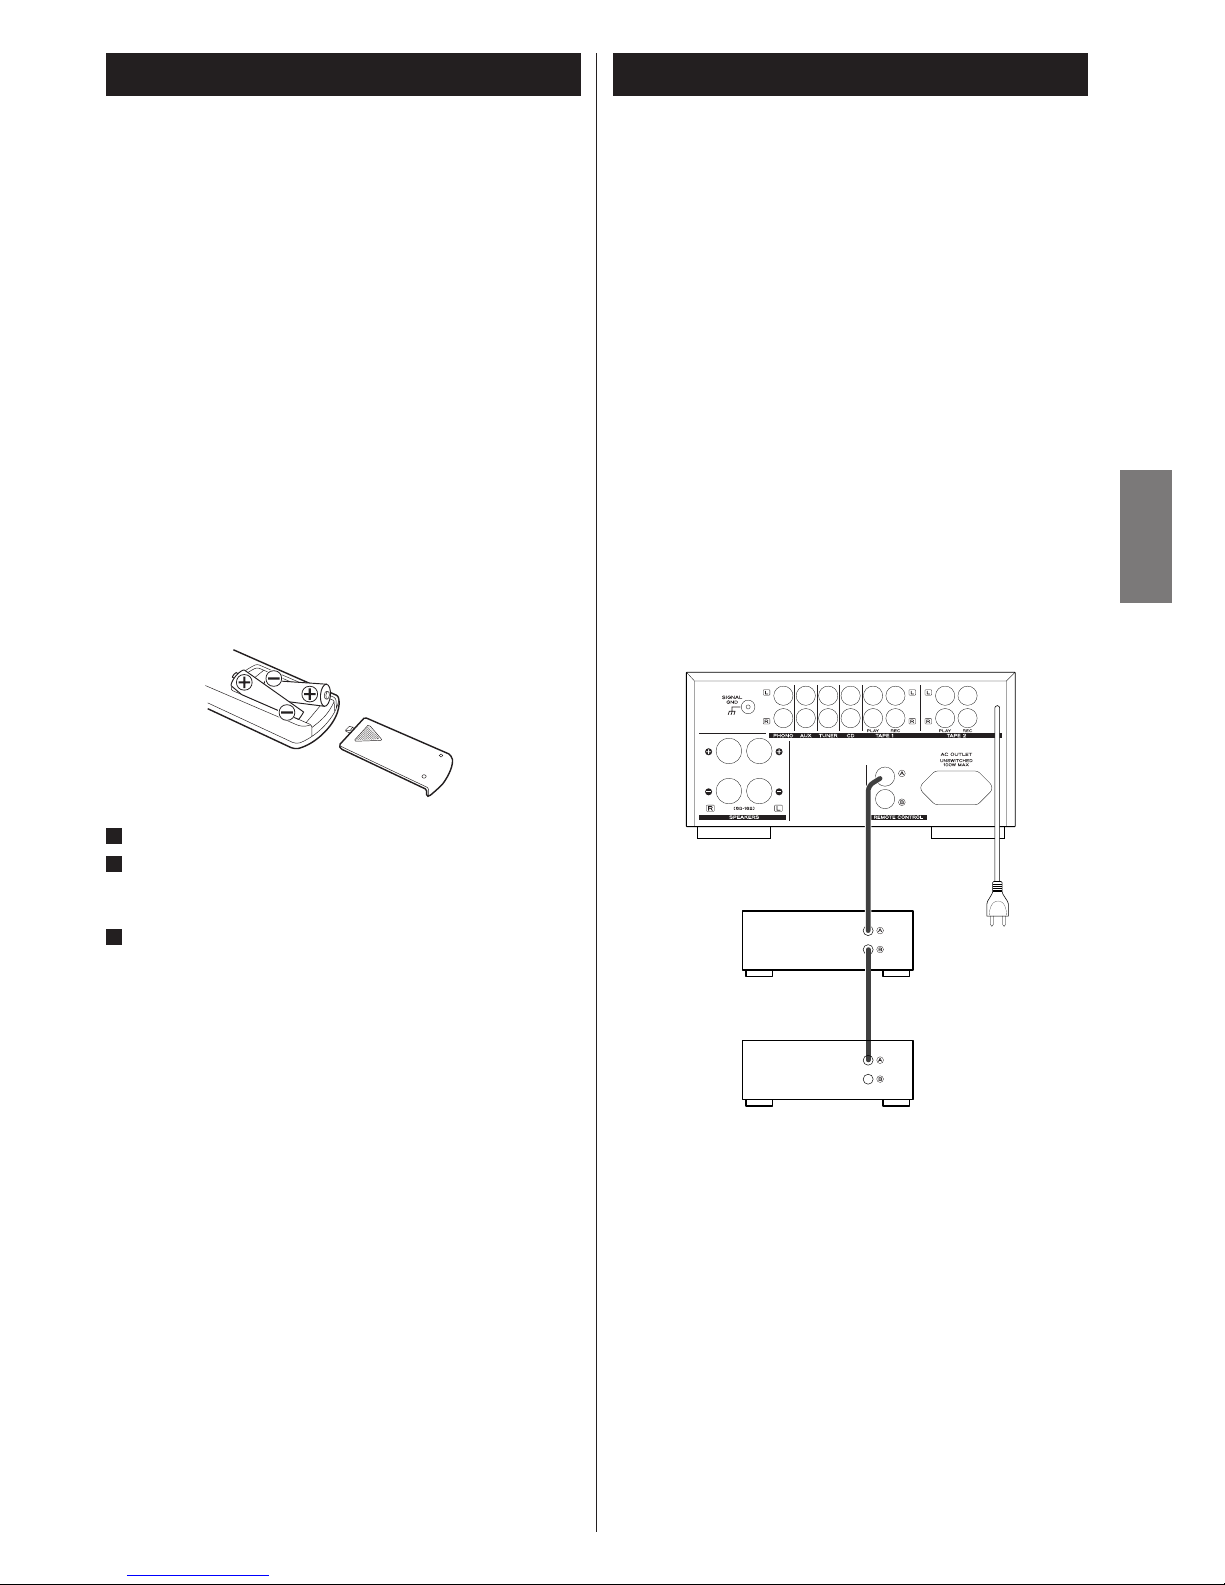
Standard Accessory . . . . . . . . . . . . . . . . Remote Control Unit
Battery (AAA, R03, UM-4) x 2
• Design and specifications are subject to change without
notice.
• Weight and dimensions are approximate.
• Illustrations may differ slightly from production models.
Contents . . . . . . . . . . . . . . . . . . . . . . . . . . . . . . . . . . . . . . . . . 4
Specificatioins. . . . . . . . . . . . . . . . . . . . . . . . . . . . . . . . . . . . . . 4
Before Use . . . . . . . . . . . . . . . . . . . . . . . . . . . . . . . . . . . . . . . . 4
Remote Control Unit . . . . . . . . . . . . . . . . . . . . . . . . . . . . . . . . 5
System Connection. . . . . . . . . . . . . . . . . . . . . . . . . . . . . . . . . . 5
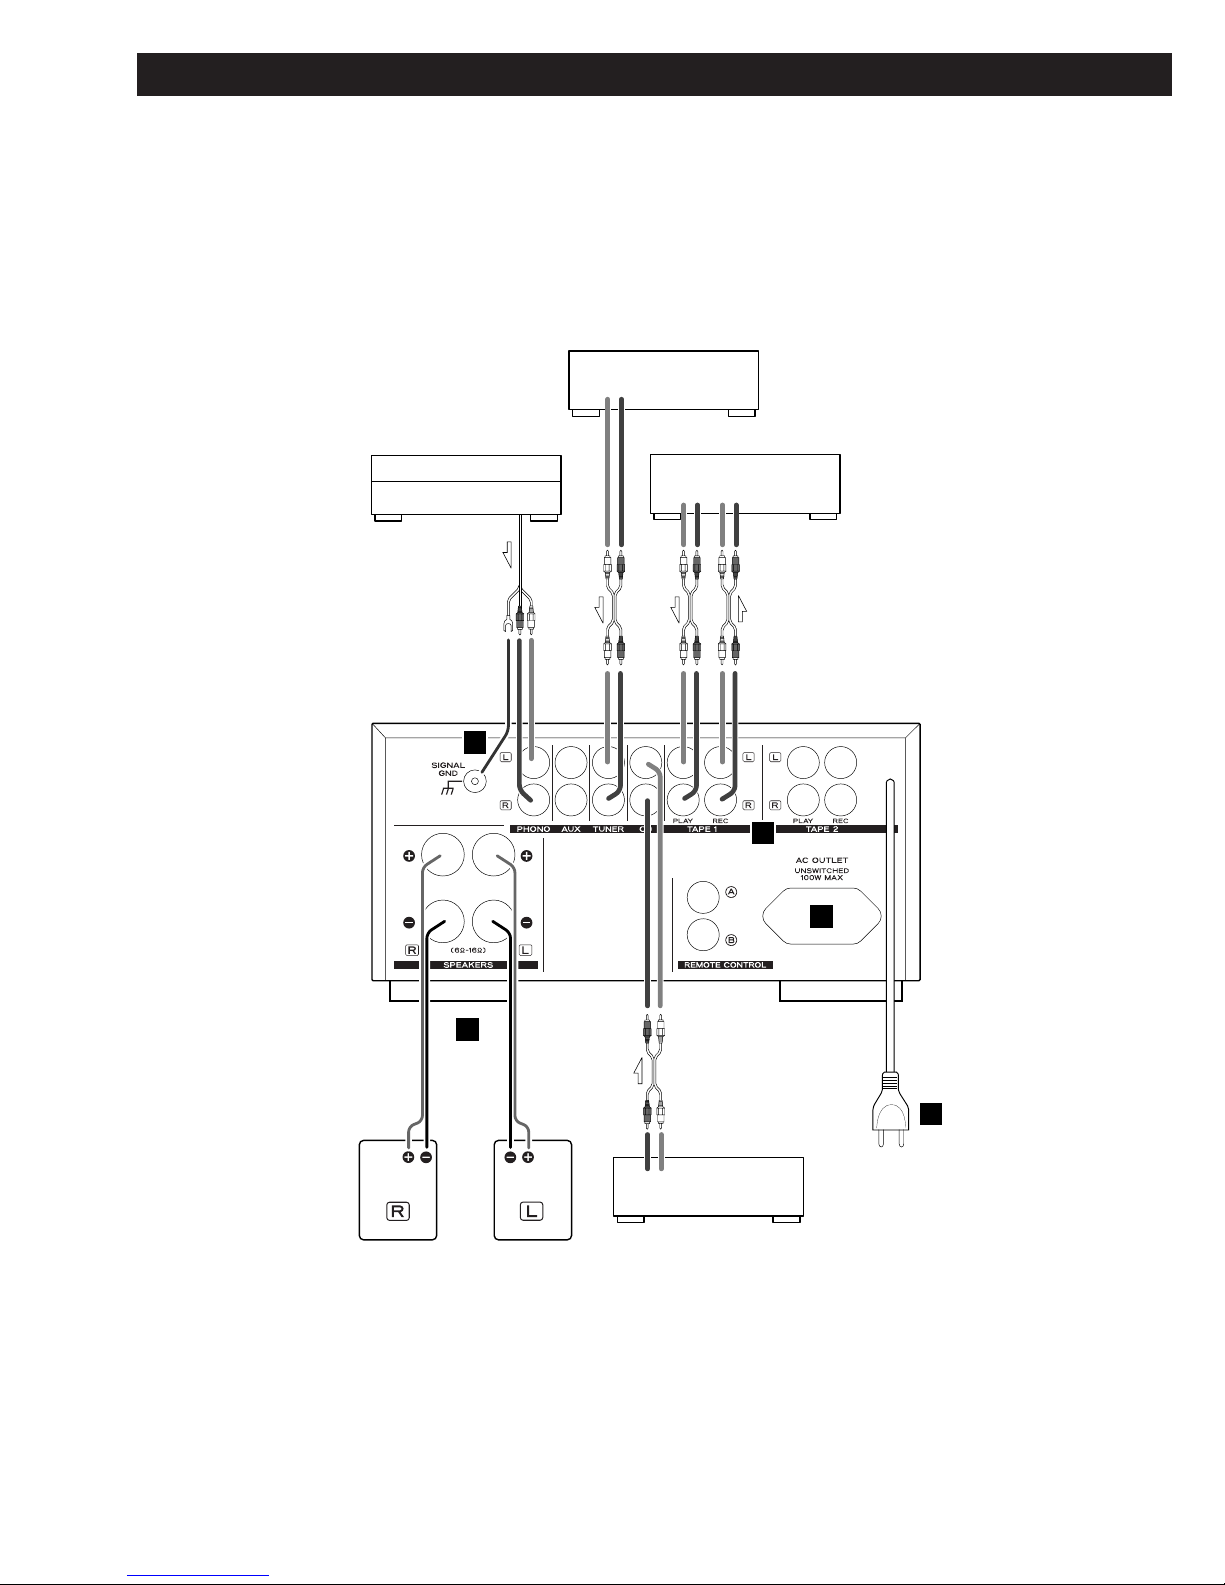
Connection. . . . . . . . . . . . . . . . . . . . . . . . . . . . . . . . . . . . . . . . 6
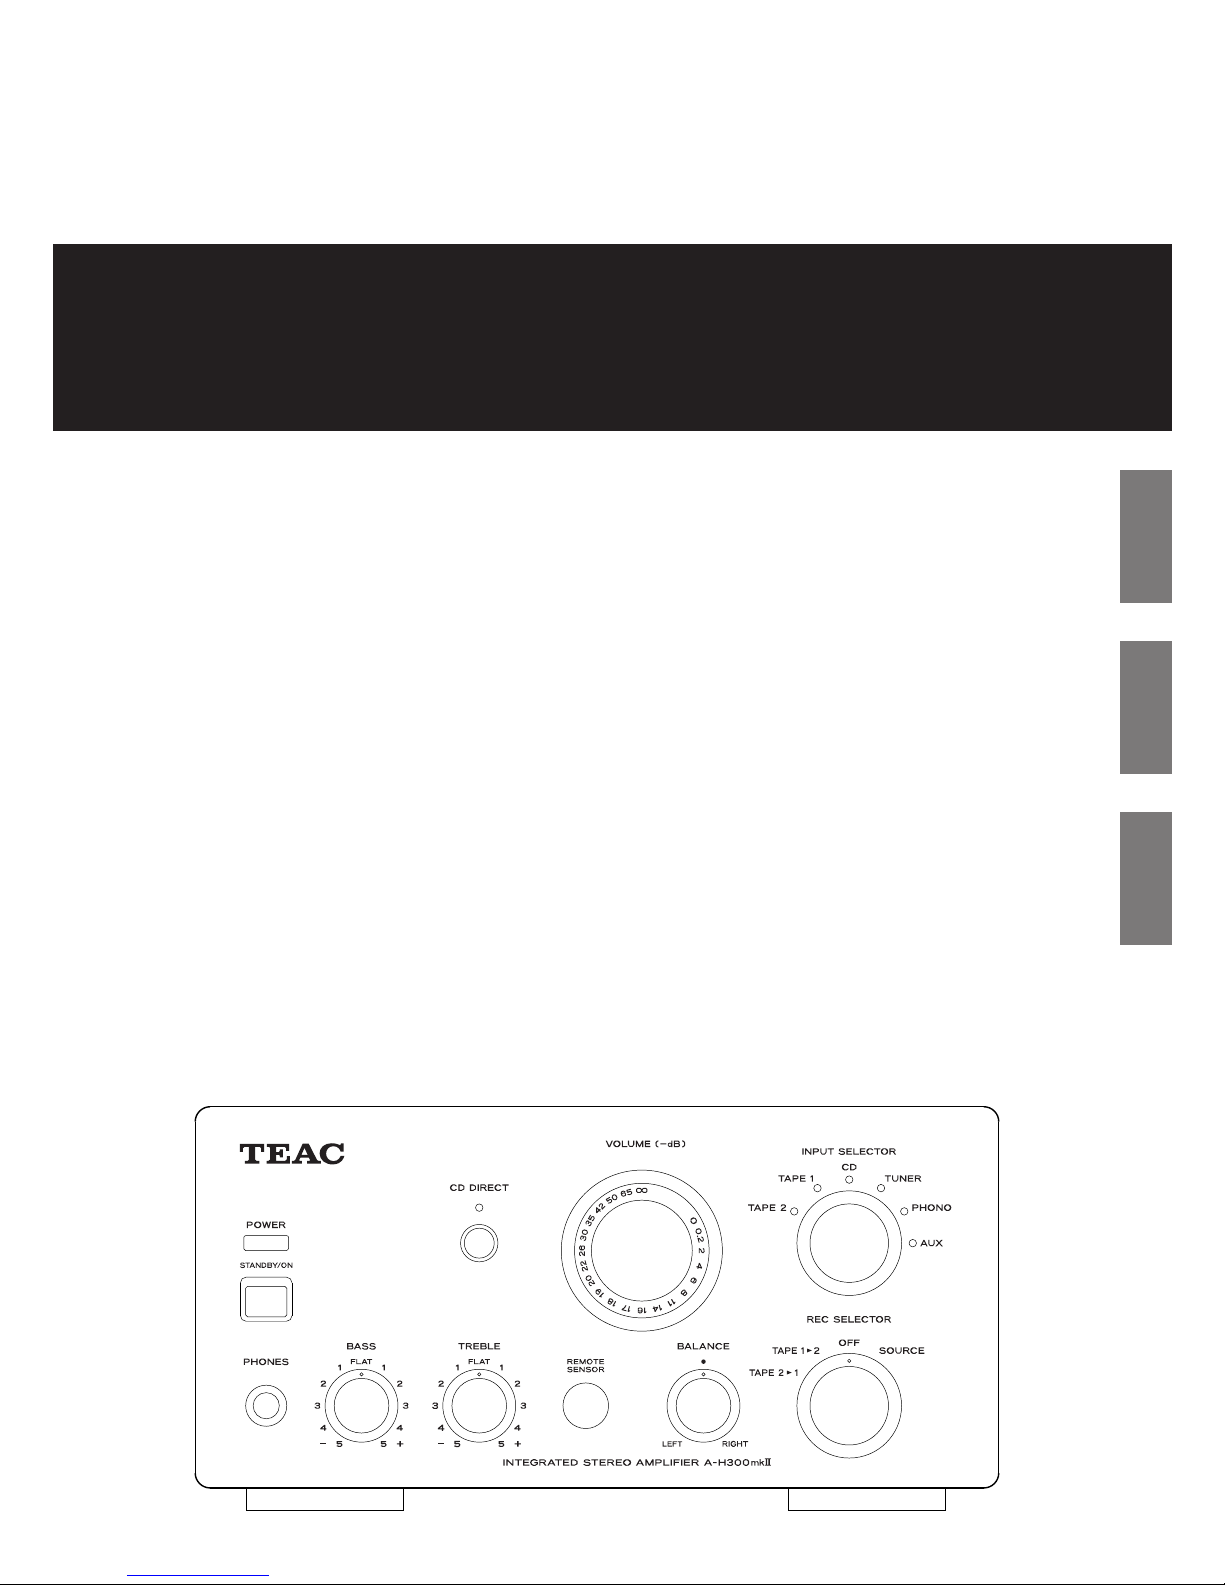
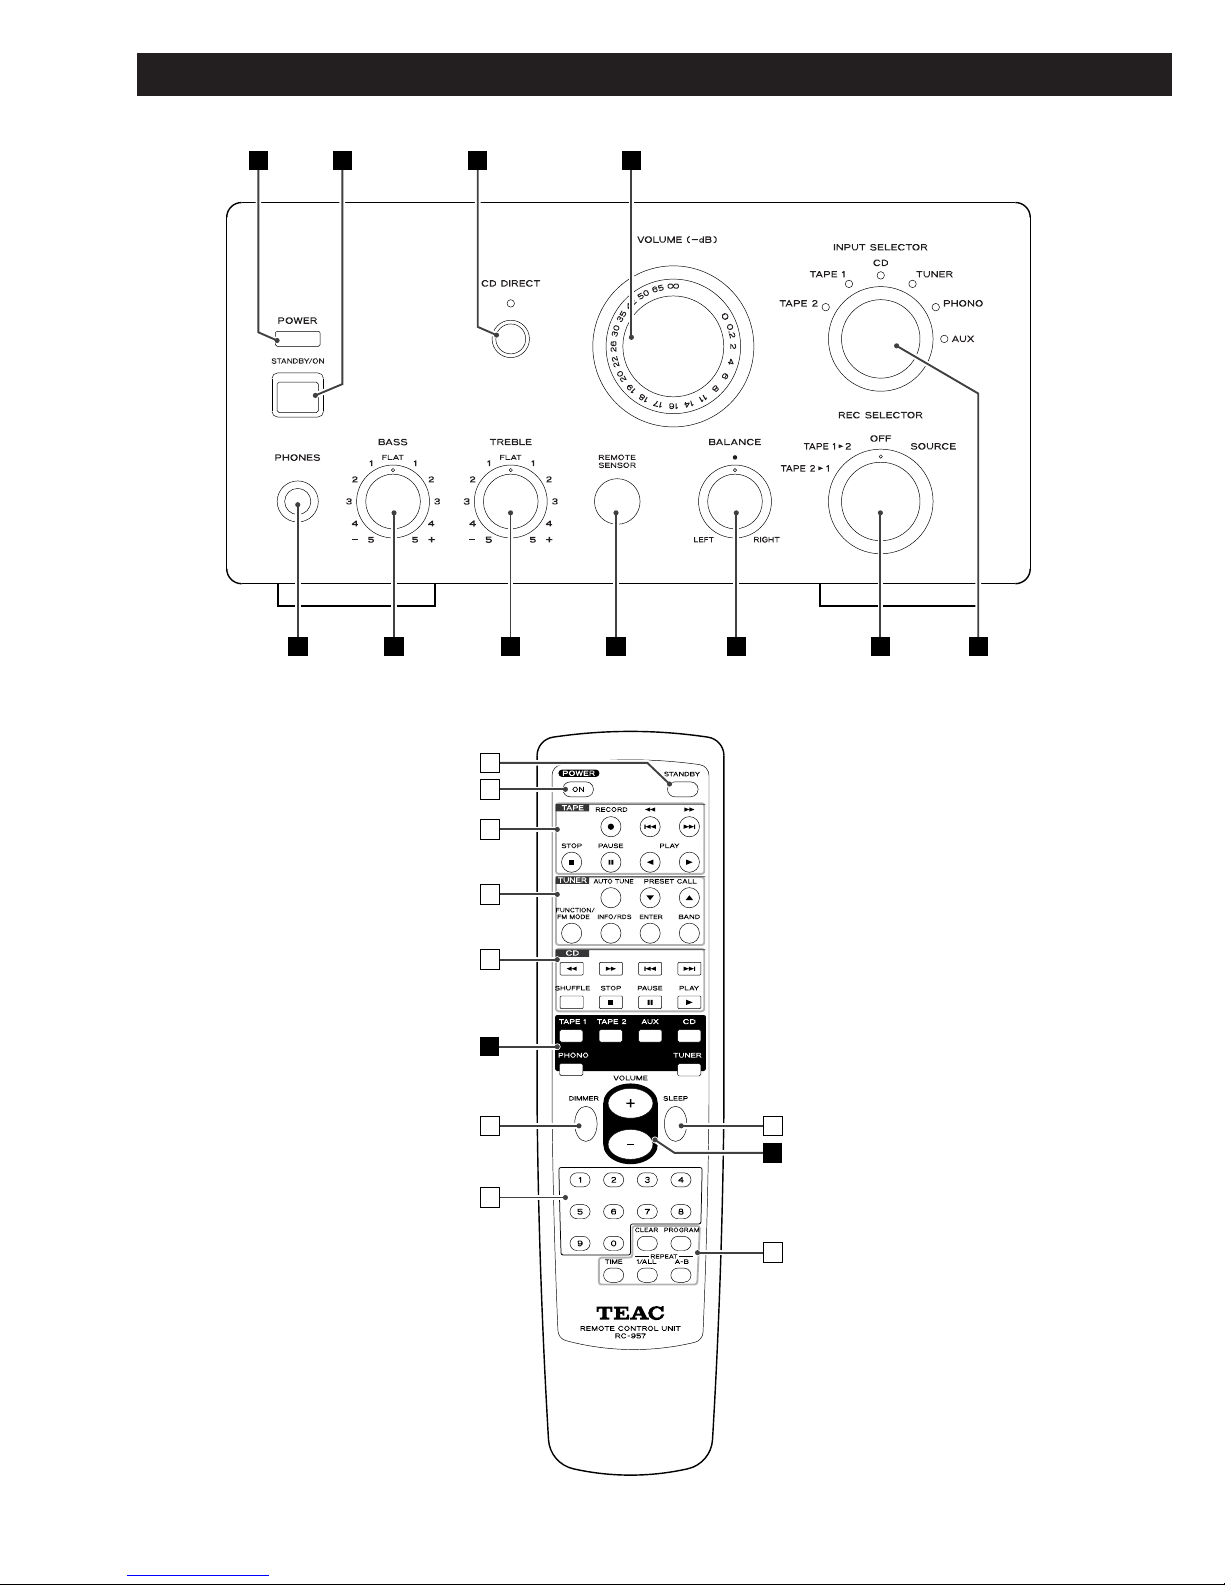
Names of Each Control . . . . . . . . . . . . . . . . . . . . . . . . . . . . . . . 8
Recording . . . . . . . . . . . . . . . . . . . . . . . . . . . . . . . . . . . . . . . . 10
Basic Operation. . . . . . . . . . . . . . . . . . . . . . . . . . . . . . . . . . . . 10
Dubbing . . . . . . . . . . . . . . . . . . . . . . . . . . . . . . . . . . . . . . . . . 11
Troubleshooting . . . . . . . . . . . . . . . . . . . . . . . . . . . . . . . . . . . 11

5
ENGLISH
Reference 300mk
@
If you have TEAC Reference 300mk
@
series, convenient
system control operations and AI direct play functions are
possible.
<By pressing the STANDBY/ON button of A-H300mk
@
, you can
switch ON/standby all the unit connected by remote control
cords.
<When you press the PLAY button of a source, the INPUT
SELECTOR of A-H300mk
@
is set to the source automatically.
<The source you select by the INPUT SELECTOR of A-H300mk
@
will be played automatically.
<When you turn on the system, the source that was selected
last time will start playback automatically.
<You can use the system remote control unit to operate all the
unit connected by remote control cords.
Connect the REMOTE CONTROL jack (A or B) of each
component by remote control cords.
System ConnectionRemote Control Unit
Remove the battery compartment cover.
Insert two “AAA” (R03, UM-4) dry batteries. Make sure that
the batteries are inserted with their positive “+” and negative
“_” poles positioned correctly.
Close the cover.
Battery Replacement
If the distance required between the remote control unit and
main unit decreases, the batteries are exhausted. In this case
replace the batteries with new ones.
Precautions concerning batteries
<Be sure to insert the batteries with correct positive “+” and
negative “_” polarities.
<Use batteries of the same type. Never use different types of
batteries together.
<Rechargeable and non-rechargeable batteries can be used.
Refer to the precautions on their labels.
<When the remote control unit is not to be used for a long
time (more than a month), remove the batteries from the
remote control unit to prevent them from leaking. If they leak,
wipe away the liquid inside the battery compartment and
replace the batteries with new ones.
<Do not heat or disassemble batteries and never dispose of old
batteries by throwing them in a fire.
3
2
1
The amplifier and Reference 300mk
@
series connected by
remote control cords can be operated by the provided remote
control unit.
When operating the remote control unit, point it towards the
REMOTE SENSOR on the front panel of the A-H300mk
@
.
<Even if the remote control unit is operated within the effective
range, remote control operation may be impossible if there
are any obstacles between the unit and the remote control.
<If the remote control unit is operated near other appliances
which generate infrared rays, or if other remote control
devices using infrared rays are used near the unit, it may
operate incorrectly. Conversely, the other appliances may
operate incorrectly.
Battery Installation
Dubbing
When you intend to dub a cassette tape using 2 sets of R-
H300mk
@
, don’t connect the remote control cords to the
second deck. Please use the buttons on the front panel.
REMOTE
CONTROL
Reference300mk@
Reference300mk@
A-H300mk@
REMOTE
CONTROL

6
CAUTION:
<Switch off the power to all equipment before making connections.
<Read the instructions of each component you intend to use with this unit.
<Be sure to insert each plug securely. To prevent hum and noise, avoid bundling the signal
interconnection cables together with the AC power cord or speaker cables.
Connection
LINE
OUT LINE
IN
RLRL
TAPE (R-H300mk@)
LINE
OUT
RL
LINE
OUT
RL
CD PLAYER (PD-H300mk@)
TURNTABLE
SPEAKERSPEAKER
D
E
B
C
A
TUNER (T-H300DABmk@/T-H300mk@)

7
ENGLISH
AUDIO IN/OUT jacks
Analog 2-channel audio signal is input or output from these
jacks. Connect the component with commercially-available
RCA cables.
Make sure to connect :
white plug qwhite jack (L: left channel)
red plug qred jack (R: right channel)
SIGNAL GND
Connect the ground lead of the turntable to this terminal.
<This is not a safety earth.
AC OUTLET (unswitched)
Even when the unit is off, this outlet is active as long as the
power cord is connected to an AC outlet.
Caution:
Make sure that the total power consumption of all
equipment connected to the outlet(s) does not exceed 100
watts (or 1A).
AC Power Cord
After all other connections have been completed, connect
the plug to the AC wall socket.
Be sure to connect the power cord to an AC outlet which
supplies the correct voltage.
Hold the power plug when plugging or unplugging the
power cord.
E
D
C
B
Speaker Terminals
Caution:
To avoid damaging the speakers with a sudden high-level
signal, be sure to switch the power off before connecting
the speakers.
Check the impedance of your speakers. Connect speaker
with an impedance of 6 to 16 ohms.
The black speaker terminals are – (negative).
Generally, the + side of the speaker cable is marked to make
it distinguishable from the – side of the cable. Connect this
marked side to the + terminal and the unmarked side to the
black – terminal.
Prepare the speaker cables for connection by stripping off
approximately 10 mm or less of the outer insulation.
(Removing too much insulation may lead to a short circuit if
the bared wired should come in contact with each other.)
Twist the strands of the stripped wires tightly together:
A
Caution:
The metal portions of the two separate wires should not
touch or an electrical short can occur. Shorted wires can
create a fire hazard or induce a failure in your equipment.
How to connect:
1.Turn the terminal cap counterclockwise to loosen it. The
speaker terminal caps cannot be fully removed from the
base.
2.Insert the wire into the terminal fully and turn the terminal
cap clockwise to securely connect it:
Make sure none of the wire insulation is under the terminal,
only the bare, stripped wire.
3.Make sure it is fastened firmly by pulling the cable lightly.

8
A C
B D
FGHIJK E
Names of Each Control
b
c
d
e
f
g
h
e
a
E
D

9
ENGLISH
POWER
Press this switch to turn the unit standby or off.
STANDBY/ON
When the POWER switch of the main unit is depressed, use
this button to turn the unit on or standby.
The standby indicator lights when the unit is in the standby
mode. When the unit is turned on, it goes off.
CD DIRECT
Use this button to turn on or off the CD direct function.
When the CD direct function is on, the sound input from the
CD jack bypasses the BASS, TREBLE and BALANCE control.
The indicator lights when the CD direct function is on.
VOLUME
Turn this knob (or press the VOLUME buttons of the remote
control unit) to adjust the volume.
INPUT SELECTOR
Use this knob (or buttons of the remote control unit) to
select a source.
REC SELECTOR
Use this knob to select a source to be recorded.
Select “OFF” when it isn’t in use.
BALANCE
Use this knob to adjust the balance of the speakers.
Normally, set the knob to the center position.
Remote Sensor
When operating the remote control unit, point it towards the
remote sensor.
TREBLE
Use this knob to adjust the level of high frequency sound
range.
BASS
Use this knob to adjust the level of low frequency sound
range.
PHONES
For private listening, insert the headphones plug into this jack,
and adjust the volume by turning the VOLUME knob.
STANDBY
When the POWER switch of the main unit is depressed, use
this button to turn the unit standby.
a
K
J
I
H
G
F
E
D
C
B
A
The equipment draws nominal non-operating power from
the AC outlet with its POWER switch in the OFF position.
ON
When the POWER switch of the main unit is depressed, use
this button to turn the unit on.
Buttons for the operation of TEAC R-H300mk
@
(TAPE).
Buttons for the operation of TEAC T-H300DABmk
@
or
T-H300mk
@
(TUNER).
<Following buttons work on the T-H300DABmk@only. They
don’t work on T-H300mk@:
FUNCTION/FM MODE, AUTO TUNE, ENTER, INFO
Buttons for the operation of TEAC PD-H300mk
@
(CD).
FL DIMMER
When the T-H300DABmk
@
/T-H300mk
@
is connected by a
remote control cord, use this button to dim the display of T-
H300DABmk
@
/T-H300mk
@
, R-H300mk
@
, and PD-H300mk
@
.
<The T-H300DABmk
@
/T-H300mk
@
is indispensable for this
function.
Numeric buttons
Use these buttons to select a track number or a preset
channel.
Press the CD or TUNER button to select the component to be
operated, and then press the numeric buttons.
(Even when the CD or TUNER button is pressed without
pointing at the main unit, the selection of the remote control
unit will be changed.)
For instance, to select track number 35, first press the CD
button, and then press “3” and “5”.
To select numbers less than 10, press “0” and then the
number. As an example, to select number 5, press “0” and
“5”. (Optionally, you may press just the number “5” and
then wait a few seconds.)
SLEEP
Use this button to set sleep timer.
<The T-H300DABmk
@
/T-H300mk
@
is indispensable for this
function.
Note:
<To simplify explanations, instructions refer to names of
buttons and controls on the front panel, making no mention
of the use of remote control unit.
h
g
f
e
d
c
b

10
Basic Operation
Play the source, and gradually turn up the volume to
the required level by turning the VOLUME knob.
5
Start recording on the cassette tape deck connected to
TAPE 1 or TAPE 2 (or both).
You can use both TAPE 1 and 2 for recording.
<The volume and tone control have no effect on the recording
signals.
<You cannot record (or dub) when the CD direct function is
on, because no sound is output from the TAPE REC jacks. If
the CD DIRECT indicator is lit, press the CD DIRECT button to
turn it off.
3
Recording
3 4
2 1 5
To protect speakers from a sudden high-level signal,
turn the VOLUME knob counterclockwise to minimize
the volume.
1
–∞(infinity): minimum volume
0dB: maximum volume
Press the POWER switch.
2
The unit enters standby mode, and the standby indicator
lights.
Press the STANDBY/ON switch to turn the unit on.
3
The standby indicator
goes off.
Select a source by turning the INPUT SELECTOR (or
pressing one of the INPUT SELECTOR buttons of the
remote control unit).
4
Select a source to be recorded by turning the INPUT
SELECTOR.
Do not select TAPE 1 or TAPE 2.
1
Set the REC SELECTOR to “SOURCE”.
2
INPUT SELECTOR
REC SELECTOR

11
ENGLISH
If you want to dub from TAPE 2 to TAPE 1, select “TAPE
2t1”, and set the INPUT SELECTOR to “TAPE 2”.
Start recording on the cassette tape deck connected to
TAPE 2 (or TAPE 1).
Start playback on the cassette tape deck connected to
TAPE 1 (or TAPE 2).
<The volume and tone control have no effect on the recording
signals.
<You cannot record (or dub) when the CD direct function is
on, because no sound is output from the TAPE REC jacks. If
the CD DIRECT indicator is lit, press the CD DIRECT button to
turn it off.
Caution:
When you intend to dub a cassette tape using 2 sets of R-
H300mk
@
, don’t connect the remote control cords to the
second deck.
4
3
Dubbing Troubleshooting
If you experience any problems with the unit, please take a
moment to look through this chart and see if you can solve the
problem yourself before you call your dealer or a TEAC service
center.
No power
eCheck the connection to the AC power supply. Check and
make sure the AC source is not a switched outlet and that,
if it is, the switch is turned on. Make sure there is power to
the AC outlet by plugging another item such as a lamp or
fan.
There is no sound or only a very low-level sound is heard.
eAdjust the volume by turning the VOLUME knob.
eCheck that the speakers and components are connected
securely.
eCheck the operation of the connected component.
eSelect the proper source using the INPUT SELECTOR.
Sound cuts off during listening to the music or no sound
even though power is ON.
eSpeaker impedance is less than prescribed for this unit.
eTurn the power off and reduce the volume.
Low bass response.
eSpeaker polarity (+/–) is reversed. Check all speakers for
correct polarity.
Severe hum or noise is heard.
eCheck that the speakers are connected securely.
eMake sure the line cords and speaker cables are as far away
from the AC supply as possible.
Remote control doesn’t work.
ePress the POWER switch of the main unit to turn it standby.
eIf the batteries are dead, change the batteries.
eUse remote control unit within the range (5m) and point at
the front panel.
eClear obstacles between the remote control unit and the
main unit.
eIf a strong light is near the unit, turn it off.
If normal operation cannot be recovered, unplug the
power cord from the outlet and plug it again.
Maintenance
If the surface of the unit gets dirty, wipe with a soft cloth or
use diluted mild liquid soap. Be sure to remove any excess
completely. Do not use thinner, benzine or alcohol as they
may damage the surface of the unit.
Set the INPUT SELECTOR to “TAPE 1” (or “TAPE 2”).
1
Set the REC SELECTOR to “TAPE 1t2” (or “TAPE 2t1”).
2
REMOTE
CONTROL
R-H300mk@(TAPE 1)
REMOTE
CONTROL
A-H300mk@
REMOTE
CONTROL
R-H300mk@(TAPE 2)

12
Sommaire
ATTENTION
Ne pas exposer l'appareil à l'humidité ou aux projections
d'eau; ne pas poser d'objets contenant de l'eau, tels qu'un
vase, ou un liquide quelconque, sur l'appareil.
Ne pas installer l'appareil dans un endroit clos tel qu'une
bibliothèque ou un meuble fermé.
Nous vous remercions pour l’achat d’un appareil TEAC. Lire
ce manuel avec attention pour obtenir les meilleures
performances possibles de cet appareil.
Section Amplificateur
Sortie de puissance . . . . . . . 45 W + 45 W (6 Ω, 1 kHz, 0,5%)
Distorsion harmonique totale. . . . . . 0,5% (1 kHz, 6 Ω, 45 W)
Rapport signal/bruit . . . . . . . . . . . . . . . PHONO: 70 dB (IHF-A)
AUX, CD, TAPE, TUNER: 95 dB (IHF-A)
CD DIRECT: 95 dB (IHF-A)
Sensibilité d'entrée/impédance
PHONO: 4,0 mV ±0,8 mV/10 kΩ
AUX, CD, TAPE, TUNER: 300 mV ±30 mV/10 kΩ
Réponse en fréquence . . . . . . . . . . . . . . . . . . . 5 Hz à 80 kHz
Commande de tonalité . . . . . . . . . . . Graves: ±10 dB (100 Hz)
Aigus: ±10 dB (10 kHz)
Générales
Alimentation
Modèle Europe/Royaume-Uni . . . . . . . . . . . 230 Vca 50 Hz
Modèle Etats-Unis/Canada . . . . . . . . . . . . . 120 Vca 60 Hz
Consommation . . . . . . . . . . . . . . . . . . . . . . . . . . . . . . . 85 W
Sortie AC (total 100 W maxi)
Modèle Europe/Royaume-Uni . . . . . . . . non commutée x 1
Modèle Etats-Unis/Canada . . . . . . . . . . non commutée x 2
Dimensions (L x H xP) . . . . . . . . . . . . . . . 215 x 312 x 110 mm
Poids (net) . . . . . . . . . . . . . . . . . . . . . . . . . . . . . . . . . . 4,2 kg
Température de fonctionnement . . . . . . . . . . +5 °C à +35 °C
Humidité . . . . . . . . . . . . . . . . 5% à 85% (sans condensation)
Température de stockage . . . . . . . . . . . . . . . –20 °C à +55 °C
Accessoire standard . . . . . . . . . . . . . . . . . . . . Télécommande
Pile (AAA, R03, UM-4) x 2
Pays d'origine . . . . . . . . . . . . . . . . . . . . . . . . . . . . . . . . Chine
• Les caractéristiques et la présentation peuvent être modifiées
sans avis préalable.
• Poids et dimensions sont approximatifs.
• Les illustrations peuvent légèrement différer des modèles de
production.
Spécifications
Avant utilisation
Lire les consignes suivantes avant toute utilisation
<L’appareil pouvant dégager de la chaleur lorsqu’il fonctionne,
laissez un espace suffisant autour de l’appareil afin de
permettre une ventilation naturelle.
Ne pas obstruer les orifices de ventilation. Laissez au moins 20
cm de libre au-dessus et au moins 5 cm de chaque côté de
l’appareil.
Ne placez RIEN au-dessus de l’appareil.
<La tension d'alimentation utilisée doit être identique à la
tension indiquée sur la plaque à l'arrière de l'appareil. En cas
de doute, n'hésitez pas à consulter un électricien.
<Choisissez soigneusement l'endroit où vous installerez
l'appareil. Evitez de le placer dans un endroit exposé
directement aux rayons solaires ou à proximité d'une source
de chaleur. Evitez également les endroits soumis à des
vibrations ou exposés à la poussière, à la chaleur, au froid et à
l'humidité.
<Ne placez pas l'appareil sur l'amplificateur ou le récepteur.
<N’ouvrez jamais l'appareil pour ne pas endommager les
circuits ou vous exposer à un risque d’électrocution. Au cas
où un objet tomberait par inadvertance dans l'appareil,
contactez votre revendeur ou la société chargée de la
maintenance.
<Pour débrancher le cordon d’alimentation de la prise murale,
tirez directement sur la prise, ne tirez jamais sur le cordon.
<N’essayez pas de nettoyer l'appareil avec un détergent
chimique, vous risqueriez d'abîmer la finition du revêtement.
Utilisez toujours un chiffon propre et sec.
<Conservez soigneusement ce manuel pour pouvoir vous y
référer ultérieurement.
Sommaire . . . . . . . . . . . . . . . . . . . . . . . . . . . . . . . . . . . . . . . . 12
Avant utilisation . . . . . . . . . . . . . . . . . . . . . . . . . . . . . . . . . . . 12
Spécifications . . . . . . . . . . . . . . . . . . . . . . . . . . . . . . . . . . . . . 12
Boîtier de télécommande . . . . . . . . . . . . . . . . . . . . . . . . . . . . 13
Raccordement du système . . . . . . . . . . . . . . . . . . . . . . . . . . . 13
Raccordements . . . . . . . . . . . . . . . . . . . . . . . . . . . . . . . . . . . . 14
Nom de chaque commande . . . . . . . . . . . . . . . . . . . . . . . . . . 16
Fonctions de base . . . . . . . . . . . . . . . . . . . . . . . . . . . . . . . . . . 18
Enregistrement . . . . . . . . . . . . . . . . . . . . . . . . . . . . . . . . . . . . 18
Copie . . . . . . . . . . . . . . . . . . . . . . . . . . . . . . . . . . . . . . . . . . . 19
Dépannage. . . . . . . . . . . . . . . . . . . . . . . . . . . . . . . . . . . . . . . 19

13
FRANÇAIS
Référence 300mk
@
Avec les appareils de la série Référence 300mk
@
, il est
possible de contrôler le fonctionnement du système et
exécuter les fonctions intelligentes de lecture directe.
<En appuyant sur le bouton STANDBY/ON de l’A-H300mk
@
,
vous pouvez allumer ou mettre en veille tous les appareils
raccordés avec des cordons de télécommande.
<Quand vous appuyez sur le bouton PLAY d’une source, le
sélecteur d’entrée (INPUT SELECTOR) de l’A-H300mk
@
est
commuté automatiquement sur cette source.
<La source sélectionnée par le sélecteur d’entrée (INPUT
SELECTOR) de l’A-H300mk
@
sera lue automatiquement.
<Quand vous allumez le système, la dernière source
sélectionnée sera lue automatiquement.
<Vous pouvez utiliser la télécommande du système pour
télécommander tous les appareils raccordés par des cordons
de télécommande.
Raccordez les prises de télécommande (REMOTE
CONTROL A ou B) de chaque appareil avec les cordons
de télécommande.
Raccordement du système
Copie
Lorsque vous voulez copier une cassette en utilisant deux R-
H300mk
@
, ne raccordez pas les cordons de télécommande du
deuxième magnétophone. Servez-vous des boutons sur la
face avant.
REMOTE
CONTROL
Référence 300mk@
Référence 300mk@
A-H300mk@
REMOTE
CONTROL
Boîtier de télécommande
Retirer le couvercle du compartiment des piles.
Introduire deux piles “AAA” (R03, UM-4). S'assurer que les
piles sont correctement mises en respectant les polarités plus
+et moins _.
Fermer le couvercle jusqu'au déclic.
Remplacement des piles
Si vous remarquez que la distance entre le boîtier de
télécommande et le lecteur devient plus courte pour un
fonctionnement correct, ceci indique que les piles sont usées.
Dans ce cas, remplacer les piles par des nouvelles.
Précautions à observer concernant les piles
<Bien placer les piles en respectant les polarités plus +et
moins _.
<Utiliser des piles du même type. Ne jamais essayer d'utiliser
des types de pile différents ensemble.
<Des piles ou des batteries peuvent être utilisées. Se référer à
leurs étiquettes pour les précautions à respecter.
<Si le boîtier de télécommande n'est pas utilisé pendant une
longue période (pluss d'un mois), retirer les piles du boîtier de
télécommande pour éviter des fuites de pile. Si elles coulent,
essuyer le liquide dans le compartiment des piles et remplacer
les piles par des neuves.
<Ne pas chauffer, démonter les piles ni les mettre au feu.
3
2
1
L’amplificateur et les composants de la série Référence
300mk
@
raccordés par les cordons de télécommande,
peuvent être commandés par la télécommande fournie.
Lorsque vous utilisez la télécommande pointez-la en direction
du capteur situé sur la façade avant de l’appareil.
<Même si le boîtier de télécommande est activé dans la zone
de fonctionnement, la commande à distance peut être
impossible s'il y a des obstacles entre le lecteur et le boîtier
de télécommande.
<Si le boîtier de télécommande fonctionne dans le voisinage
d'autres appareils générant des rayons infrarouges, ou si
d'autres télécommandes utilisant des rayons infrarouges sont
utilisées près du lecteur, le lecteur peut de ne pas bien
fonctionner. Dans la situation inverse, les autres apaareils
peuvent ne pas bien fonctionner.
Mise en place des piles

14
PRÉCAUTION:
<Coupez l’alimentation de tous les appareils avant d’effectuer les raccordements.
<Lisez les instructions qui accompagnent chaque appareil que vous avez l’intention d’utiliser en
association avec cet appareil-ci.
<Veillez à ce que chaque fiche soit soigneusement insérée. Pour éviter les ronflements et les bruits
parasites, évitez d’attacher les câbles d’interconnexion parcourus par les signaux avec le cordon
d’alimentation secteur ou les câbles de liaison aux enceintes.
Raccordements
LINE
OUT LINE
IN
RLRL
TAPE (R-H300mk@)
LINE
OUT
RL
LINE
OUT
RL
CD PLAYER (PD-H300mk@)
TURNTABLE
SPEAKERSPEAKER
D
E
B
C
A
TUNER (T-H300mk@)

15
FRANÇAIS
Prises AUDIO IN/OUT
Un signal audio analogique 2 canaux d’entrée ou de sortie
est disponible sur ces prises.. Raccordez l’appareil avec des
câbles standard de type RCA.
Veillez à brancher:
la fiche blanche qla prise blanche (L: voie gauche)
la fiche rouge qla prise rouge (R: voie droite)
SIGNAL GND
Branchez la prise de terre de la platine disques à ce
connecteur.
<Cette borne n’est pas une prise de sécurité.
Embase Secteur (non commutée)
Même lorsque l’appareil n’est pas en marche, cette prise est
active tant que le cordon secteur est branché.
Attention:
Assurez-vous que la puissance électrique totale de tous les
équipements raccordés sur cette prise (ou ces prises)
n'excède pas 100 W.
Cordon Secteur
Après avoir terminé toutes les autres connexions, branchez
le câble dans une prise secteur.
Assurez-vous de raccorder le câble à une prise qui délivre
une tension correcte.
Tenez la prise lorsque vous branchez ou débranchez le câble
secteur.
E
D
C
B
Bornes Enceintes
Attention:
Pour éviter d’endommager les enceintes avec un signal
brusque de niveau trop élevé, veillez à mettre l’appareil hors
tension avant de raccorder les enceintes.
Vérifiez l’impédance de vos enceintes. Raccordez des
enceintes dont l’impédance est d'au moins 6 à 16 ohms.
Les bornes noires des enceintes correspondent au – (bornes
négatives).
Généralement, le côté + des câbles d’enceinte est indiqué
ou identifié par une couleur, qui le distingue du “–”.
Raccordez le côté ainsi marqué à la borne + et le côté
dépourvu de marque à la borne –.
Avant de raccorder les câbles des enceintes, préparez-les en
les dénudant sur environ 10 mm maximum, de la gaine
isolante (pas plus pour éviter tout risque de court-circuit).
Torsadez les brins des extrémités de fils dénudés:
A
Attention:
Les parties métalliques de deux fils séparés ne doivent jamais
se toucher pour éviter tout risque de court-circuit. Les fils en
court-circuit peuvent provoquer un incendie ou détériorer
sérieusement votre appareil.
Commet effectuez les raccordements :
1. Desserrez le capuchon de protection en tournant dans le
sens inverse des aiguilles d’une montre. Ces capuchons de
protection ne peuvent pas être retirés complètement de la
base.
2. Insérez à fond le fil dans la borne et tournez le capuchon de
protection dans le sens des aiguilles d’une montre pour que
le raccorder solidement:
Veillez à ce que seule la partie dénudée du fil soit sous la
borne et non la gaine isolante.
3. Tirez légèrement sur le câble pour vérifier qu'il est bien fixé.

16
A C
B D
FGHIJK E
Nom de chaque commande
b
c
d
e
f
g
h
e
a
E
D

17
FRANÇAIS
POWER
Appuyez sur cet interrupteur pour allumer ou mettre en veille
l’appareil.
STANDBY/ON
Lorsque l’interrupteur secteur de l’appareil principal est
enclenché, utilisez ce bouton pour mettre en marche (ON) ou
en veille (STANDBY) l’appareil.
L’afficheur de mise en veille s’illumine lorsque l’appareil est en
mode veille. Lorsque l’appareil est en fonction, il s’éteint.
CD DIRECT
Utilisez ce bouton pour enclencher ou non la fonction CD
direct. Lorsque elle est enclenchée, le signal du lecteur CD ne
traverse pas les correcteurs graves, aigus et la balance.
Le voyant s’illumine quand la fonction CD Direct est active.
VOLUME
Tournez ce bouton (ou pressez le bouton de VOLUME de la
télécommande) pour ajuster le volume.
INPUT SELECTOR
Utilisez ce bouton (ou les touches de la télécommande) pour
sélectionner une source.
REC SELECTOR
Utilisez ce bouton pour sélectionner la source à enregistrer.
Sélectionner “OFF” lorsque vous ne l’utilisez pas.
BALANCE
Utilisez ce bouton pour ajuster la balance des enceintes
acoustiques.
Normalement, mettez le bouton en position centrale.
Capteur de télécommande
Lorsque vous utilisez la télécommande pointez-la en direction
du capteur.
TREBLE
Utilisez ce bouton pour ajuster le niveau des fréquences
aiguës.
BASS
Utilisez ce bouton pour ajuster le niveau des fréquences
graves.
PHONES
Pour une écoute privée, branchez un casque dans cette prise,
et ajustez le volume en tournant le bouton VOLUME.
STANDBY
Lorsque l’interrupteur secteur de l’appareil principal est
enclenché, utilisez ce bouton pour mettre l’appareil en veille.
a
K
J
I
H
G
F
E
D
C
B
A
L’appareil tire de la prise secteur une puissance faible mais
non nulle lorsque l’interrupteur POWER est sur la position
OFF.
ON
Lorsque l’interrupteur secteur de l’appareil principal est
enclenché, utilisez ce bouton pour mettre l’appareil en
marche.
Touches pour commander le TEAC R-H300mk
@
(TAPE).
Touches pour commander le TEAC T-H300mk
@
ouT-
H300DABmk
@
(TUNER).
<Les touches suivantes ne fonctionnent que pour le
T-H300DABmk@(modèle Royaume-Uni uniquement). Celles-ci
ne fonctionnent pas pour le T-H300mk@:
FUNCTION/FM MODE, AUTO TUNE, ENTER, INFO
Touches pour commander le TEAC PD-H300mk
@
(CD).
FL DIMMER
Quand le T-H300mk
@
est raccordé avec un cordon de
télécommande, utilisez ce bouton pour régler la luminosité
des afficheurs du T-H300mk
@
, R-H300mk
@
, et PD-H300mk
@
.
<Le T-H300mk
@
est indispensable pour cette fonction.
Touches numériques
Utilisez ces touches pour sélectionner un numéro de piste ou
un canal préréglé.
Pressez la touche CD ou TUNER pour sélectionner la source
choisie, puis presser les touches numériques.
(Les touches CD ou TUNER sont prises en compte même si la
télécommande n’est pas pointée vers le récepteur de
l’appareil principal.)
Par exemple pour sélectionner le morceau 35, appuyer sur CD
puis “3” et “5”.
Pour sélectionner des nombres inférieurs à 10, appuyez sur
“0” puis entrez le chiffre. Par exemple, pour choisir le
morceau numéro 5, appuyez sur “0” puis “5”. (En option
vous pouvez juste presser la touche “5” et attendre quelques
secondes.)
SLEEP
Utilisez ce bouton pour activer l’extinction différée. (Sleep
timer)
<Le T-H300mk
@
est indispensable pour cette fonction.
Note:
<Pour simplifier les explications, les instructions se rapportent
aux noms des boutons et des contrôles sur la face avant, sans
faire mention de l’emploi de la télécommande.
h
g
f
e
d
c
b

18
Fonctions de base
Activez la source, et amenez graduellement le volume
au niveau requis en tournant le bouton de VOLUME.
5
Commencez à enregistrer avec le magnétocassette
connecté en TAPE 1 ou TAPE 2 (ou les deux).
Vous pouvez utiliser à la fois TAPE 1 et 2 pour enregistrer.
<Le volume et les contrôles de tonalité n’ont aucun effet sur les
signaux enregistrés.
<Vous ne pouvez pas enregistrer (ou copier) quand la fonction
CD direct est active, en effet aucun son n’est fourni sur les
prises TAPE REC. Si le voyant CD DIRECT est illuminé, pressez
le bouton CD DIRECT pour rendre la fonction inactive.
3
Enregistrement
3 4
2 1 5
–∞(Infini): volume minimum
0dB: volume maximum
Pressez l’interrupteur POWER.
2
L’appareil passe en mode veille, et le voyant de mode veille
s’illumine.
Pressez l’interrupteur STANDBY/ON pour mettre en
marche l’appareil.
3
Le voyant de mode
veille s’éteint.
Sélectionnez une source en tournant le sélecteur
d’entrée (INPUT SELECTOR) (ou en pressant une des
touches de la télécommande).
4
Sélectionnez la source à enregistrer en tournant le
sélecteur d’entrée (INPUT SELECTOR)
Ne sélectionnez pas TAPE 1 ou TAPE 2.
1
Mettez le sélecteur d’enregistrement (REC SELECTOR)
sur “SOURCE”.
2
INPUT SELECTOR
REC SELECTOR
Afin de protéger les enceintes acoustiques d’un signal
soudain très fort, tournez le bouton VOLUME en sens
inverse des aiguilles d’une montre pour réduire le
volume.
1

19
FRANÇAIS
Si vous voulez copier de TAPE 2 vers TAPE 1, sélectionnez
“TAPE 2t1”, et mettez le sélecteur d’entrée (INPUT
SELECTOR) sur “TAPE 2”.
Commencez d’enregistrer sur le magnétocassette
connecté à TAPE 2 (ou TAPE 1).
Mettez en lecture le magnétocassette connecté à TAPE 1
(ou TAPE 2).
<Le volume et les contrôles de tonalité n’ont aucun effet sur les
signaux enregistrés.
<Vous ne pouvez pas enregistrer (ou copier) quand la fonction
CD direct est active, en effet aucun son n’est fourni sur les
prises TAPE REC. Si le voyant CD DIRECT est illuminé, pressez
le bouton CD DIRECT pour rendre la fonction inactive.
Attention:
Lorsque vous voulez copier une cassette à l’aide de 2
appareils R-H300mk
@
, ne raccordez pas les cordons de
télécommande au second magnétocassette.
4
3
Copie
Mettez le sélecteur d’enregistrement (REC SELECTOR)
sur “TAPE 1t2” (ou “TAPE 2t1”).
2
REMOTE
CONTROL
R-H300mk@(TAPE 1)
REMOTE
CONTROL
A-H300mk@
REMOTE
CONTROL
R-H300mk@(TAPE 2)
Mettez le sélecteur d’entrée (INPUT SELECTOR) sur
“TAPE 1” (ou “TAPE 2”).
1
Dépannage
En cas de problème avec l’appareil, prenez le temps de lire ce
tableau et de voir si vous pouvez résoudre le problème tout seul
avant de faire appel à votre revendeur ou au centre d'assistance
TEAC.
L'appareil ne s'allume pas
eVérifier que l'appareil est bien branché sur la prise secteur.
Vérifiez que la source d'alimentation CA n’est pas une prise
équipée d’un interrupteur et si tel et le cas vérifiez que
l’interrupteur est bien sur ON. Vérifiez que la prise délivre
bien du courant en branchant un autre appareil électrique,
une lampe ou un ventilateur par exemple.
Aucun son ne sort ou le son est très faible.
eRéglez le volume à l'aide du bouton VOLUME.
eVérifiez que les enceintes et les différents appareils
périphériques sont correctement raccordés.
eVérifiez que chacun des éléments raccordés fonctionne
correctement.
eSélectionnez la source désirée à l'aide du sélecteur d’entrée
(INPUT SELECTOR).
Le son se coupe pendant l’écoute de musique ou aucun
son n’est diffusé même lorsque l’appareil est sous tension.
eL’impédance des enceintes est inférieure à celle prescrite
pour cet appareil.
eMettez l’appareil hors tension et réduisez le volume.
Réponse faible des graves.
eLa polarité du caisson (+/–) est inversée. Vérifiez la polarité
de toutes les enceintes.
Emission d’un bourdonnement ou d’un bruit sourd.
eVérifiez que les enceintes sont correctement branchées.
eVérifiez que les cordons et les câbles des enceintes sont le
plus éloigné possible de l’alimentation en courant alternatif.
La télécommande ne fonctionne pas.
eAppuyez sur l'interrupteur POWER de l’appareil principal
pour le mettre en veille.
eSi les piles sont usées, changez-les.
eUtilisez la télécommande à une distance d'environ 5 m et
dirigez-la vers le panneau avant de l'appareil.
eEnlevez tous les obstacles qui se trouvent éventuellement
entre la télécommande et l'appareil.
eSi une lumière puissante est allumée à proximité de
l'appareil, éteignez-la.
Si malgré ces indications, vous ne parvenez pas à faire
fonctionner normalement l'appareil, débranchez le cordon
d'alimentation du secteur et rebranchez-le.
Entretien
Si la surface de l’appareil est sale, nettoyez-la avec un chiffon
doux ou utilisez une solution diluée de savon doux. Veillez à
ce qu’il ne reste pas de produit sur l’appareil. N’utilisez jamais
de diluant, de benzène ou d’alcool, ceux-ci risquant
d’endommager la surface de l’appareil.

20
Especificaciones
Seccón del amplificador
Salida de potencia. . . . . . . . 45 W + 45 W (6 Ω, 1 kHz, 0,5%)
Distorsión armonica total . . . . . . . . . 0,5% (1 kHz, 6 Ω, 45 W)
S/R (entrada cortocircuitada) . . . . . . . . PHONO: 70 dB (IHF-A)
AUX, CD, TAPE, TUNER: 95 dB (IHF-A)
CD DIRECT: 95 dB (IHF-A)
Sensibilidad/impedancia de entrada
PHONO: 4,0 mV ±0,8 mV/10 kΩ
AUX, CD, TAPE, TUNER: 300 mV ±30 mV/10 kΩ
Respuesta de frecuencia . . . . . . . . . . . . . . . . . . 5 Hz - 80 kHz
Control de tono . . . . . . . . . . . . . . . . . BASS: ±10 dB (100 Hz)
TREBLE: ±10 dB (10 Hz)
Generalidades
Requisitos de alimentación
Modelo Europa/G.B. . . . . . . . . . . . . . . . . 230 V c.a., 50 Hz
Modelo EE.UU/Canadá . . . . . . . . . . . . . . 120 V c.a., 60 Hz
Consumo de energía . . . . . . . . . . . . . . . . . . . . . . . . . . . 85 W
Dimensiones (A x Alt.x P) . . . . . . . . . . . . 215 x 312 x 110 mm
Peso (neto) . . . . . . . . . . . . . . . . . . . . . . . . . . . . . . . . . . 4,2 kg
Toma de c.a (total 100 W máx.)
Modelo Europa/G.B . . . . . . . . . . . . . . . . no conmutada x 1
Modelo EE.UU/Canadá. . . . . . . . . . . . . . no conmutada x 2
Temperatura de operación . . . . . . . . desde +5ºC hasta +35ºC
Humedad de operación . . . . . . . . . desde el 5% hasta el 85%
(sin condensación)
Temperatura de almacenamiento . . desde –20ºC hasta +55ºC
Accesorios estándar . . . . . . . . . . . . Unidad de control remoto
Pila (AAA, R03, UM-4) x 2
• El diseño y las especificaciones están sujetos a cambios sin
previo aviso.
• El peso y dimensiones son aproximados.
• Las ilustraciones pueden diferir de los modelos de producción.
Indice
PRECAUCIÓN
El producto no deberá quedar expuesto a goteos o
salpicaduras, ni servir de base para objetos que contengan
líquido (jarrones, etc.).
No instale este equipo en espacios cerrados tales como
estantes de libros o similares.
Enhorabuena por la adquisición de un TEAC. Lea
detenidamente este manual a fin de obtener el mejor
rendimiento de esta unidad.
Antes de comenzar
Léase antes de continuar
<La unidad puede calentarse durante su funcionamiento, por
lo que habrá que dejar espacio suficiente alrededor para su
ventilación.
Los orificios de ventilación no deberán obstruirse. Deje al
menos 20 cm de espacio libre encima de cada unidad y 5 cm
en los laterales.
NO coloque ningún objeto encima de la unidad.
<La tensión suministrada a la unidad deberá coincidir con el
valor indicado en el panel posterior. En caso de duda,
consulte a un electricista.
<Elija cuidadosamente el emplazamiento de la unidad. No
coloque la unidad a la luz solar directa ni cerca de fuentes de
calor. Evite también los lugares expuestos a vibraciones o a un
exceso de suciedad, frío, calor o humedad.
<No coloque la unidad encima del amplificador/receptor.
<No abra la carcasa de la unidad, ya que podrían dañarse los
circuitos o producirse descargas eléctricas. Si entra algún
cuerpo extraño en la unidad, póngase en contacto con su
distribuidor o empresa de servicios.
<Cuando desconecte el cable de la toma mural, sostenga
únicamente el conector y nunca el propio cable.
<No intente limpiar la unidad con disolventes químicos, ya que
podrían dañar el acabado. Utilice un paño limpio y seco.
<Conserve el manual en un lugar seguro para futuras
consultas.
Indice . . . . . . . . . . . . . . . . . . . . . . . . . . . . . . . . . . . . . . . . . . . 20
Especificaciones . . . . . . . . . . . . . . . . . . . . . . . . . . . . . . . . . . . 20
Antes de comenzar. . . . . . . . . . . . . . . . . . . . . . . . . . . . . . . . . 20
Mando a distancia . . . . . . . . . . . . . . . . . . . . . . . . . . . . . . . . . 21
Conexión del sistema . . . . . . . . . . . . . . . . . . . . . . . . . . . . . . . 21
Conexión . . . . . . . . . . . . . . . . . . . . . . . . . . . . . . . . . . . . . . . . 22
Nombres de los controles . . . . . . . . . . . . . . . . . . . . . . . . . . . . 24
Funcionamiento básico . . . . . . . . . . . . . . . . . . . . . . . . . . . . . . 26
Grabación. . . . . . . . . . . . . . . . . . . . . . . . . . . . . . . . . . . . . . . . 26
Copia . . . . . . . . . . . . . . . . . . . . . . . . . . . . . . . . . . . . . . . . . . . 27
Solución de problemas . . . . . . . . . . . . . . . . . . . . . . . . . . . . . . 27
Table of contents
Languages:
Other Teac Amplifier manuals