Teac CTH340 User manual

CTH340
OWNER S MANUAL
IMPORTANT
WARRANTY INFORMATION INSIDE. PLEASE READ
COLOUR TELEVISION
TV/AV
ALT.
VOL+
VOL-
CH-
CH+
MENU
0
9
8
7
3
2
1
-/--
MUTE STANDBY
SYS
P.MODE PIC.
6
5
4
CALL

WARRANTY REGISTRATION
Please read this warranty card.
Keep your purchase receipt to enable you to proceed quickly in the event of a Warranty Service.
Warranty Terms & Conditions
1. TEAC warrants to the original retail purchaser only, that this product is free from defects in material and
workmanship under normal domestic use and authorises free service during the warranty period at any TEAC
Authorised Centre only. TEAC warranty only applies to products purchased, used and serviced in Australia.
2. Subject to the terms herein, this warranty effectively covers the equipment as specified in the Warranty Periods
Table from the date of purchase.
3. All parts, except the external cabinet, are warranted as specified in Warranty Periods Table, and will be repaired or
replaced at the sole judgement of TEAC.
4. Normal customer maintenance as described in the owner’s manual is not covered by this warranty (such as cleaning
VCR heads etc.)
5. This warranty does not apply to equipment showing abuse, damage or that it may have been tampered with, altered
or repaired outside any TEAC Authorised Service Centre. If so, the warranty will be void.
*Your nearest Authorised TEAC Service Centre is listed in your Owners Manual
6. In the event that this unit or any defective parts must be returned to TEAC Service Centres, a copy of this warranty
certificate and of your purchase receipt must be enclosed to be a valid warranty. Such equipment or parts must be
sent freight prepaid to the nearest authorised TEAC Service Centre. After the repair, the unit will be available for
collection by the owner or it will be returned to the owner. The warranty does not cover freight or insurance. In all
cases of in-transit damages or loss, a claim must be filed against the carrier by the purchaser.
7. No one is authorised to assume any liability on behalf of TEAC or impose any obligation on it, in connection with
the sale of any equipment other than as stated in this warranty and outlined above.
8. In no event will TEAC be responsible or liable for indirect or consequential damages from interrupted operations or
other causes.
9. Warranty is not transferable to any subsequent purchaser if the product is sold during the warranty period,
HISENSE PRODUCT
WARRANTY PERIOD
Televisions / Plasma 106 cm and
above 1 Year
LCD televisions 56cm and above 1 Year
Televisions – 51cm and above 1 Year
Televisions under 51 cm 1 Year
Digital Set Top Boxes 1 Year
VCR 1 Year
DVD 1 Year
Audio Systems 1 Year

WARRANTY PROCEDURES
Please keep this information for your own records.
Please refer to the owner’s manual to ensure that you have followed the correct installation and operating procedures.
1. Read owner’s manual carefully
2. If you require Warranty Service, please contact the TEAC Service Centre
3. Please have your purchase receipt as your proof of purchase and the following details completed for a valid
Warranty.
Owner’s Name
Owner’s Address
Postcode
Model Name/No. Serial No.
Dealer’s Name
Dealer’s Address
Postcode
4. Please ensure that your product is packed appropriately upon return to the service centre.
If you have any other queries regarding service or warranty please contact the TEAC Service below:
www.teac.com.au

CONTENTS
WELCOME TO THE BRIGHT, VIVID AND JOYFUL COLOR WORLD
Dear customer,
Thank you for your purchasing this color TV and we wish you many years of viewing pleasure with your new TV.Before
operating the set, please read this manual carefully and keep it handy for future reference.
High voltage inside.
To prevent the risk of electric shock ,do not remove the cover.
No user -serviceable parts inside.
Refer servicing to qualified service personnel .
Do not obstruct ventilation slots in back or base of receiver.
Don't expose the unit in rain or moisture.
Don't put
water
(or
any
other
kind
of
liquid)-containing
vessel
on
the
set
to
avoid
causing fire.
Before storming, please unplug the antenna and the power supply from their sockets.
This is an IEC safety class II (reinforced insulation) product and does not need grounding for safety.
SAFETY CLASS
NOTICE
KnowingYourTelevisionSet...........................................3
....................................................5
..............................................................8
...................................
.............................8
Troubleshooting.................................................................1
Installation......................................................................2
...........................................4
.......................................6
.............
.......
...................................7
.....................................
..................
....7
MaintenanceAndSafetyInformation.............................1
Toconnectwithterrestrialsignalsource................2
Toprepareremotecontrol......................................2
Frontcontrols...........................................................3
.....................................................
3
...............................
..............................
....7
Basic operation
....................................5
Power/Standby on/off
.....................................5
Selecting the program
.....................................5
Adjusting the volume
.............................6
Selecting the signalsource
...........................................
6
Alternating
.......................
6
Calling up onscreen display
....................................
6
Muting the sound
Selecting the picturemode
Option1 menu
Clock menu
Picture menu
Option2 menu
Preset menu
................
....
............
10
Specifications
..
.
..
............
..............
9
Connecting with theaudiovisual equipments
............
....
...........
Rear view
Remote control handset

Please read these instructions carefully and do accordingly.
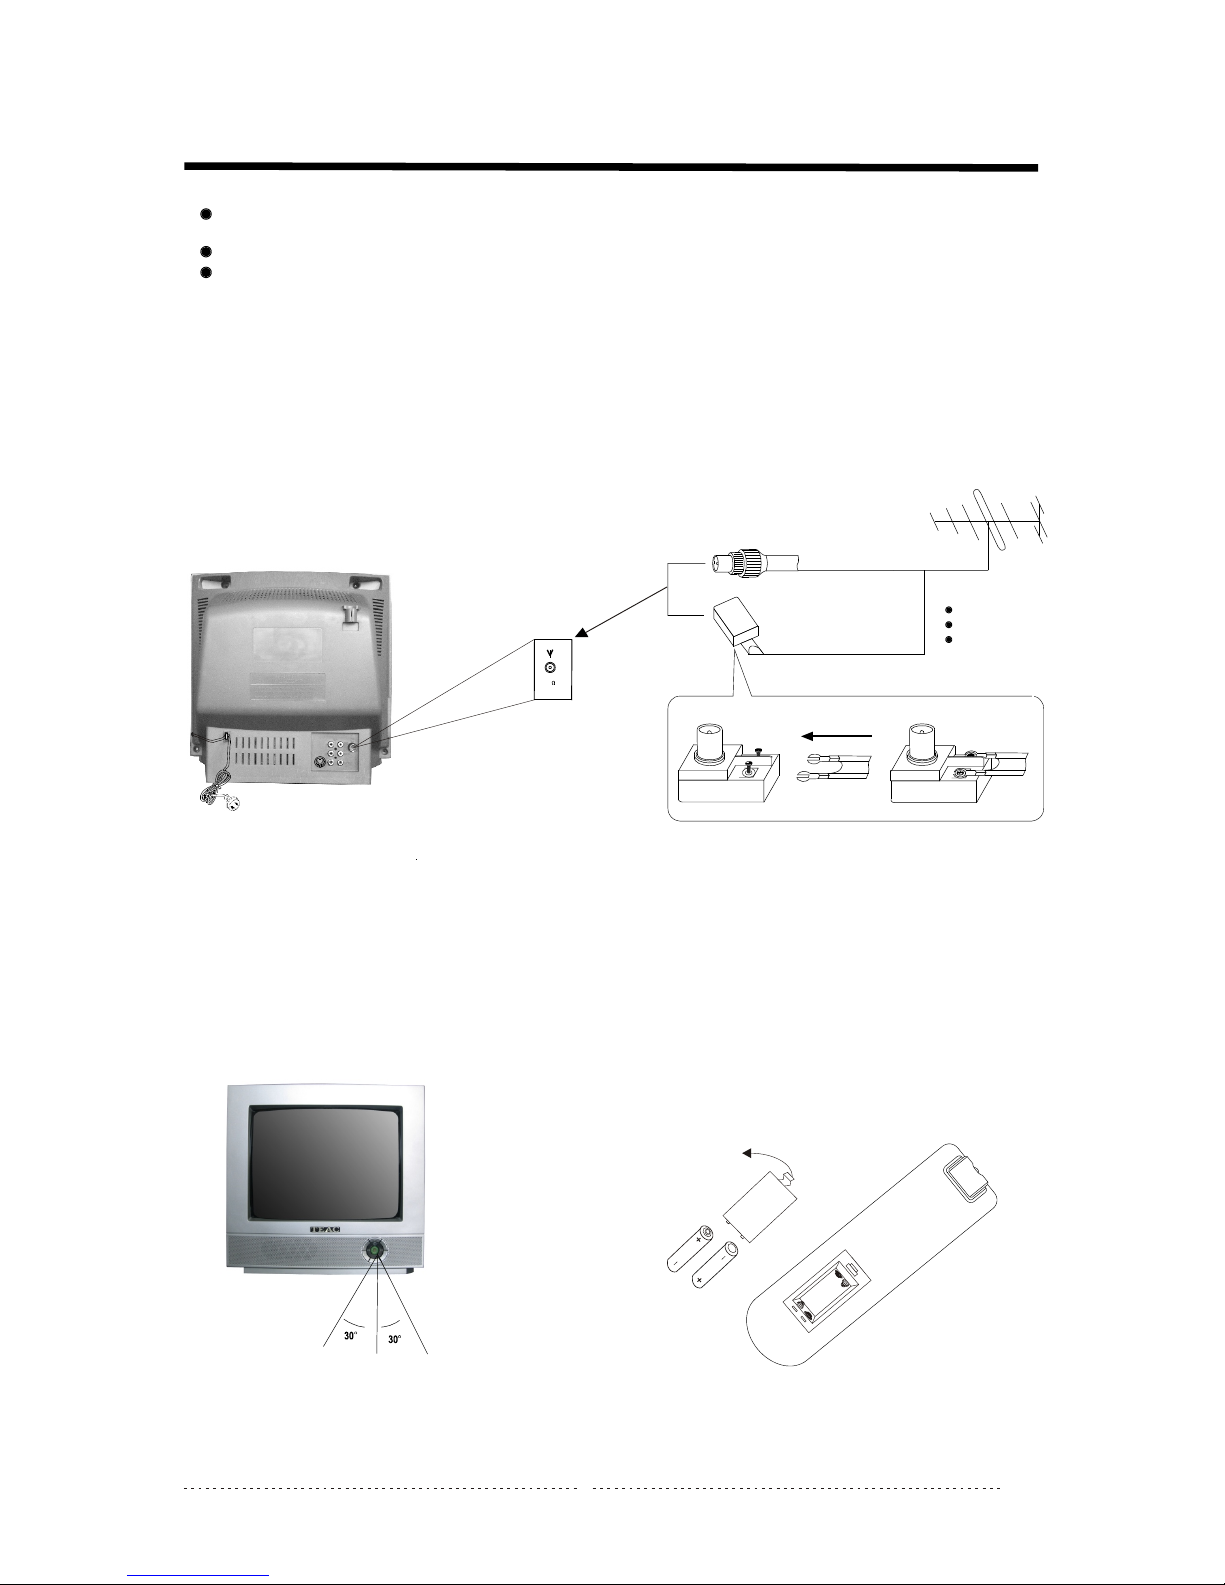
TV set requires adequate ventilation. If you place the set near walls, leave sufficient space (15cm) on all sides so that
the air can circulate freely. The ventilation slots at the rear of the set can not be covered by curtains, newspapers or any
other similar objects.
Do not expose the TV set to direct sunlight or place it near radiator and other similar sources of heat.
TV sets are intended for use in dry rooms. If you wish to use it occasionally outdoors, be sure to protect it against any
kind of moisture (rain,splashes, dew and etc.).
Do not put metal and combustibles into the TV through the rear slots to avoid possible fire or shock hazard.
Do not place water(or any other kind of liquid)-containing vessel on the set.
Do not step on or twist the power cord. A damaged cord may cause fire or shock hazard.
Keep any magnetic object away from the TV as far as possible.
If there is a lightning storm coming, unplug the TV set and the outdoor antenna.
If any abnormal phenomenon
(smoke,
unusual
sound,
or
strange
smell),
stop
using
the
TV
at
once.
Power it
off and unplug it.
Maintenance And Safety Information
1
occurs
Troubleshooting
Beforecallingtheservicepersonnel,pleasecheckthelistbelowtofixsomesimpleproblemsnotcausedbytheunititself.
Checkthesethings
Besurethepowercordispluggedin.
Thesoundvolumeisadjustedtotheminimalorinmuteposition.
Maybepulseinterferencefromnearbycars,motorcycles,electrictrains,high
tensionlines,neonsigns,hairdryers,etc.
MayberadiointerferenceformnearbyTVreceivers,personalcomputers,
andTVgames,orradiostation.
Maybeduetobroadcastwavesreflectedfromnearbymountsandhighbuildings.
Checkifthedirectionofaerialhasbeendeflectedbecauseofstrongwind,etc.
Theaeriallead-inmaybebrokenordisconnected.
Checkifthedirectionofaerialhasbeendeflectedbecauseofstrongwind,etc.
Cleanindicatorwindow.
Thebatteriesmaybehavewornout.
Thebatteriesmaybeimproperlyinstalled.
Symptom
Nopicture.Nosound.
Normalpicture.Nosound.
Poorcolor,contrast,tint
Spotsonscreen
Linesonscreen
Double/tripleimage
Snowypicture
Reductioninoperatingdistance
Remotecontroldoesnotwork
May need toadjust contrast, colorand tint.Also try finetuning the stations.
(Ref to page7)
Try re-tuningin stations.
Can be causedby magnetic interference.Ensure to unplugthe TV Set
from the powerpoint for approximately8-10 hours.
Green/Purple spots

To Connect With Terrestrial Signal Source
To enjoy the terrestrial signal transmitted by your local TV station, you need an indoor or outdoor aerial (not supplied). Perfect
picture quality requires a good signal and generally means that an outdoor aerial must be implemented. The exact type and
location of the aerial will depend on your particular area. Consult your local dealer or service personnel for best advice.
If you are a subscriber of your local CATV net, the outdoor or indoor aerial is not needed.
Connect the equipments as in the following figure.
To Prepare Remote Control
Battery installation
1.Slide or lift the battery cover from back of remote control.
2.Insert two batteries (1.5V) matching the +/- polarity of the
battery to the +/- marks inside the battery compartment.
3.Close the battery cover by doing reversely to step 1.
Install the unit where sunlight will not fall upon the screen directly.
Total dark environment or a reflection on the picture screen may cause eyestrain. Soft indirect lighting is recommended
for comfortable viewing.
Allow enough space between the unit and the wall for proper ventilation.
Avoid excessively warm locations to prevent possible damage to the cabinet or components.
AERIAL SOCKET
REAR VIEW
The above figures are for reference only, and please refer to the actual units to determine their appearance.
COAXIAL CABLE(75ohm)
TWIN-LEAD FEEDER(300ohm)
Insert the feeder in Tighten the screw
Plug(not supplied)
Adaptor (not supplied)
The signal comes from:
An outdoor aerial
An indoor aerial
CATV net
Loosen the screw
ANT
75
Notes about using remote control:
1.The
batteries
have
a
typical
operating
time
of
one
year
2.When the remote control will not be used for a long period of
Time or when the batteries are worn out, remove the batteries
to prevent leakage.
3.Do not drop, dampen or disassemble the remote control.
4.The effective range of remote control is suggested in the left
figure.
face to infrared sensor
Installation
2
depending on batterybrand and use.
6m

Knowing your television set
3
AC cord andplug
INPUT
Rear view
Front controls
S-VIDEO
VIDEO
L
R
Y
Cb
Cr
ANTENNA
(75 )
VIDEO
L
R
AV2(VIDEO2)
AV1(VIDEO1)
SIDE AV
MENU
POWER SWITCH
VOLUME UP
POWER INDICATOR
VOLUME DOWN
TV/AV
INFRARED SENSOR
PROGRAM UP
PROGRAM DOWN
MENU
TV/AV
+
-
CH
VOL
+
-

Infrared LED
TV/AV
Toselect signal source
STANDBY
Toswitch the TVoff to standby
mode or onto last viewedposition
MENU
Tocall up themain menu
Tocall up informationdisplay
CALL(DISPLAY)
MUTE
Tomute the soundor cancel it
P.MODE
Toselect the picturemodes
PROGRAM UP(CH+)
Toselect next higherposition
VOLUME UP(V+)
PROGRAM DOWN(CH-)
Toselect next lowerposition
ALT.(RECALL)
Toreturn to thelast viewed position
DIGIT
Toselect between one(-),two(- -),
or (- --) three digitsprogram numbers
NUMERIC KEYS
Todirectly select theprogram
VOLUME DOWN(V-)
Remote control handset
4
TV/AV
ALT.
VOL+
VOL-
CH-
CH+
MENU
0
9
8
7
3
2
1
-/--
MUTE STANDBY
SYS
P.MODE PIC
6
5
4
CALL
PICTURE
Tocall up thepicture menu
SYS
Tocall up theoption2 menu or change
the color system(in video, s-video, YCBCRmode)

MENU
TV/AV
+
-
CH
VOL
+
-
MENU
TV/AV
+
-
CH
VOL
+
-
STANDBY
Basic operation
Power/Standby on/off
Topower up theTV,press the powerswitch located onthe bottom-right ofthe cabinet. The power indicator
lights red andthe last viewedprogram appears. Ifthe power indicatorlights up butno picture appears,the
TV may bein standby mode.
Toturn the TV on, youcan do thefollowing:
1.Press the standbykey on handsetto get intothe last viewedprogram.
2.Press one ofNumerical keys onhandset to getinto the selectedprogram.
3.Press the CH+/CH-keys on frontpanel of TV.
When the TV is on,press the standbykey to swapthe TV to standby modeor press powerswitch to power
it off completely.
Note:
1. If apower failure occurswhen the TV is on,press the powerswitch to cutoff from the power supplyto
avoid possible hazardto the TV which maybe caused bya high voltagepulse when thepower supply restores.
2.The TV set hasAUTO SWITCH OFF function, whichcause the TV to standbymode after about15 minutes
of no incomingsignal and nooperation.
3.Standby mode: Useto turn off TV for a shortperiod of time.If you donot intend touse the TV for along
period of timeit is bestto turn itoff from the power switchon the televisionset.
Selecting the program
Directly selecting
Toselect a one-digitnumber program, pressthe digit keyto display"-" andthen input thenumber directly with
one of thenumeric keys(0-9).
When the numberis between 10and 99, pressthe digit keyto display "--"and then inputtwo numbers withthe
numeric keys.
When the numberis between 100and 199, pressthe digit keyto display "---"and then inputtwo numbers with
the numeric keys.
Note:
When you arein multi-digit mode(thedisplay is "--")andthe digits arenot fulfilled(for example,"2_","12_" ),
the channel willnot be changed.
Sequentially selecting
Press the CH+/CH-keys to selectthe next higher/lowerprogram.
Adjusting the volume
Press the VOL+/VOL-key to adjustthe volume.
5
0
9
8
7
3
2
1
-/--
6
5
4
VOL+
VOL-
CH-
CH+
VOL+
VOL-
CH-
CH+

Muting the sound
MUTE The muting functionis useful andconvenient when youneed to payattention to surroundingsounds,
answer a phonecall, receive avisitor, etc.
Press the mutekey to mutethe sound andcancel the muteby pressing itagain.
Note: (when inmuting)
1.Press the V+key also cancancel the mute.
2.Press the V- key volumewill be turndown in muting.
Alternating
ALT. Press theALT. key togo back tothe program thatyou've just beenwatching before thecurrent one.
By pressing itrepeatedly, you can alternatebetween your twofavorite programs.
Calling up on screen display
CALL Press the CALLkey to showthe current programnumber on thetop-right of thescreen.
Press the CALLkey again toclear it .
Whenever you wantto clear theundesired OSD, pressthe CALLkey.
Selecting the picture mode
P.MODE The TV set provides fourmodes for instantselection by touchingP.MODE key.
STANDARD PERSONAL
DYNAMIC
MILD
The STANDARD MILD and DYNAMIC settings can't beadjusted by the user. The PERSONAL setting can be
customized by selectingyour personal preferencein the Brightness,Color and contrast.
Each time theP.MODE key ispressed, the pictureis displayed in one of theabove four modes sequentially.
Basic operation
6
Press the TV/AV key to selectthe video source.
The program youenjoy can comefrom terrestrial signal(viaaerial input socket)
or audio/video signal(viaAV input terminals.)
Selecting the signal source
TV/AV
1
VIDEO1
VIDEO2
S-VIDEO
YCBCR
ALT.
MUTE
CALL
TV/AV
P.MODE

Basic operation
7
Picture menu
MENU Press MENU keyto call upPicture menu asshown right:
Press CH+/CH- keysto select thedesired item andpress V+/V-keys to adjustit with
the keys tocustomize the pictureto your preference.
MENU
80
CONT. 60
COLOR 60
SHARP 60
C.TEMP. 00
BRIGHT
PICTURE
SELECT ADJUST
SLEEP ___
TIME __:__
ON-TIME __:__
OFF-TIME __:__
ATTENTION __:__
PROG. TIMER __:__
POSITION 1
CLOCK
SELECT ADJUST
Press the CH+/CH-keys to selectthe desired itemand activate itwith the V+/V- keys.
The items in this Time menuare explained indetail as follows.
'SLEEP', you canset the SLEEPtimer to turnoff the TV set automatically. The time
period can beadjusted from 0up to 120minutes in 15minutes steps.
'TIME', please setTIME to the current time.This will be used asa reference forall timing functions.
'ON TIME', set ON TIME if youwant to turnon automatically the TV at a specific time.
'OFF TIME', set OFF TIME to turnoff the unit automatically.
'ATTENTION', the ATTENTION function displaysa reminder.The message "ATTENTION" will display atthe set time.
'PROG. TIMER ', it allowsto change automaticallyto a different channel ata convenient time,for example whena
program of interestis about tostart in anotherchannel.
'POSITION', set POSITIONto indicate thedesired program numberfor the PROGRAMTIMER.
Note:
press VOL- keyto change thehour, pressVOL+ key tochange the minutes.
Press MENU keyto call upclock menu asshown right:
Clock menu
MENU
MENU
CORING ON
CALENDAR
GAME1
GAME2
LIMIT SET
OPTION1
SELECT ADJUST
Press MENU keyto call upoption1 menu asshown below:
MENU
MENU
Press the CH+/CH-keys to selectthe desired itemand activate itwith the V+/V- keys.
The items in this option1menuare explained indetail as follows.
'CORING', CORING isused to reducepicture noise whenset on.
'CALENDAR', allows accessto a permanentcalendar. Youcan use CH+/CH-keys to
select the ''year' ', ''month' ' and''day' '. PressVOL-/VOL+ keys tochange.
'GAME1', single out' 'money' 'from six things.Press CALLkey to exitgame and pressALT.key to restartgame.
'GAME2', guess 888.Press CALLkey to exitgame and pressALT.key to restartgame.
''
'' ''
''''
After entering thegame, please useV+/V- keysto move theman horizontally; theALT.key can beused as thepause
key before thegame is over, after thegame is over, this keybecomes the restartkey. When it's paused,press theALT.
Key to restart;press CALLkey to exit.All otherkeys do notwork in thestate of gameexcept POWER SWITCH.There
are six objectsfalling down: moneybags, coins, snowflakes, crosses, hearts,and bombs. You get 10 creditsby
receiving one moneybag and 5credits for onecoin. Credits willbe added upautomatically when it'sover.At the start,
the man isgreen, it becomeswhite, while receivingsnow flake(being frozen)and the movingspeed ( leftand right)
slows down. This state willbe cleared upif a crossis received. Itis over ifthe bomb isreceived and thefigure becomes
red. Receiving Heart,the figure getspurple which lasts5 seconds duringwhich the gameis not overeven with receiving
a bomb.
After entering thegame, PressALT. key tostart and CALLkey to exit.
All other keysdo not workin the stateof Game exceptPOWER SWITCH.
Youget one goldcoin by gettingone 8 out of 3numbers, two goldcoins by
getting identical numberswhich are not 8 , three goldcoins by gettingtwo 8 s,
four gold coinsby getting threesequential numbers(e.g. 123 , 321 ), and five
gold coins ifthe numbers areall the same.
DATE:2005 -6- 20
SU MO TU WE TH FR SA
1 2 3 4
5 6 7 8 9 10 11
12 13 14 15 16 17 18
19 20 21 22 23 24 25
26 27 28 29 30
Option1 menu

Preset menu
Press MENU key to call up Preset menu as shown right:
The items inthis Preset menuare explained indetail as follows.
'POSITION', presents thenumber of thecurrent program.
'REMEMBER', is usedto disable thecurrent program, ifunwanted, when changingchannels with CH+/CH-keys .
'BAND', use BANDto select frequencyband location ofa channel forSEMI-SEARCH tuning.
'FINE TUNING', use FINETUNING to improveimage and soundquality under poorreception conditions.
'SEMI-SEARCH', SEMI-SEARCH canbe used tomanually tune inindividual channels toa specific programnumber.
This function canalso be usedif tuning ina VCR.
'AUTO-SEARCH', the AUTO-SEARCHfunction will tunein automatically allchannels available inyour area.
Press V+ tostart this process.
Note:
Please set COLOURto AUTO and SOUNDto 5.5M beforestarting AUTO-SEARCH.
Press the CH+/CH-keys to selectthe desired itemand activate itwith the V+/V- keys.
Basic operation
8
MENU
MENU
POSITION 1
REMEMBER ON
BAND V-L
FINE
SEMI-SEARCH
AUTO-SEARCH
PRESET
SELECT ADJUST
COLOR-SYS AUTO
SOUND-SYS 5.5M
SHIFT MODE ON
EXCHANGE 001 - - -
COPY 001 - - -
CLEAR ALL
OPTION2
SELECT ADJUST
Press MENU keyto call upoption2 menu asshown right:
MENU
MENU
Press the CH+/CH-keys to selectthe desired itemand activate itwith the
VOL+/VOL- keys.
The items inthis option2 menuare explained indetail as follows.
'COLOR-SYS', COLOR-SYS allowsthe selection ofdifferent color systems. Please setto eitherAUTO or PALpositions.
set it ON to display ablack screen duringthe transition betweenprograms when changingchannels.
'SOUND-SYS', SOUND-SYS isfor the selectionof different sound systems. Pleaseset to 5.5M.
'EXCHANGE', is usedto exchange twoposition's contents.
'COPY', is usedto copy previousposition's contents.
'CLEAR ALL',is used toclear the programshaving been stored.
Please press theV+ key forabout three seconds.
'SHIFT MODE', ''
Option2 menu
LIMIT SET
PLEASE INPUT
PASSWORD:
_ _ _ _
LIMIT SET
LIMIT TIME OFF
CHANGE PASSWORD
PLEASE INPUT
NEW PASSWORD
_ _ _ _
INPUT NEW
PASSWORD AGAIN
_ _ _ _
PASSWORD CHANGED
PLEASE REMEMBER
LIMIT SET
LIMIT TIME 00:10
CHANGE PASSWORD
The primary password
is '0000'.
press VOL- key tochange the hour,
press VOL+ key tochange the minutes.
(for example 10 minutes.)
PLEASE INPUT
PASSWORD:
_ _ _ _
LOCKED
LIMIT SET
LIMIT TIME 00:00
CHANGE PASSWORD
LOCKED
press VOL- key toturn off.
10 minutes later,
the screen will display'LOCKED'
and the TV programwill disappear.
Input your new password
or primary password
The time LIMITSET function allowsyou
to restrict theuse of thetelevision, for
example to avoidexcessive number of
watching hours bychildren.
This function ispassword protected.
The initial passwordis '0000' andit can be
changed following theprocedure described
in the diagram.Please keep thenew password
in a safeplace, as youwill need it in the future.

9
Connecting with the audiovisual equipments
Toenjoy the programscoming from your audiovisual equipments suchas VCR, DVD etc, the signalmust be received by the set
via theAV inputterminals at rearor side.
Note:
The following figuresare only forreference, please referto the instruction included with yourDVD or VCRfor direction onhow
to connect theseto your TV.
RFoutput
R
AUDIO
L
AudioInput
DVD/LDwithYCbCroutput
YCbCrR
AUDIO
L
VCR
OUTPUT
AUDIO
VIDEO
AUDIO
INPUT
S-VIDEO
VIDEO
L
R
Y
Cb
Cr
VIDEO
L
R
AV2
AV2
L
R

10
SPECIFICATIONS
MAIN UNIT
TV Receiving System---------------------------PAL,BG
AV Color System---------------------------------PAL,NTSC 3.58 &4.43
Tuner-----------------------------------------------FS TUNER
Number of PresetProgram---------------------200(0-199)
Channel Indicator--------------------------------On screendisplay
Function AdjustIndicator-----------------------MENU display
Language of OSD--------------------------------English
RF Aerialinput------------------------------------75-ohm unbalanced
Video Input----------------------------------------75-ohm 1.0Vp-p,RCA
Audio Input----------------------------------------10k ohm 0.5 Vrms, high impedance
Audio Output Power----------------------------- 2W
Operating Voltage-------------------------------220V-240V , 50Hz
Power Consumption-----------------------------60W
Power Consumption-----------------------------10W(in standbymode)
Picture Tube--------------------------------------14"(34cm)
Dimensions---------------------------------------390 X 393X 368 (WX D XH)
Net Weight----------------------------------------10Kg
INFRARED REMOTE CONTROL
Features------------------------------------------Full Function RemoteControl
Effective Distance Power----------------------6 meters
Power Supply------------------------------------DC 3V(twobatteries, sizeAAA)
PACKING LIST
1.TV set-------------------one set
2.Remote-----------------one set
3.Operation Manual ----onepcs
Product improvements mayresult in changesto features andspecifications without priornotice.
*

Table of contents
Other Teac TV manuals