Teagle Telehawk User manual

Telehawk Quick Start Guide page 1
A
C
B
D
E
TELEHAWK
QUICK START GUIDE
ATTACHING POWER
CABLE AND HOSES TO
THE TELEHANDLER
Connect the curly cable multi-plug into
the boom bracket socket. Connect the
feed and return hoses on the telehandler
making sure the ow direction is correct.
When you connect the junction box plug
in, you should hear a “click” from the
machine which tells you it has power.
HOW TO GET THE BEST FROM YOUR TELEHAWK
2
FITTING THE CONTROL BOX
IN THE CAB & BLUETOOTH
The control box is supplied with a suction
cup attachment. This should be tted in the
cab in a suitable position that is convenient
to the operator on a smooth, clean dust
free surface.
The control box requires a 12v supply and
is shipped with a cigarette lighter plug as
standard. If the supply cable is connected
with the wrong polarity the control box will
not switch on.
Plug in the control box in the cab. Once the
bluetooth light has stopped ashing and is
illuminated bluetooth is paired and you are
ready to proceed.
INITIAL START
Set the oil owing with the loader at low revs
and the fan will instantly start to spin. Note: To
stop the fan motor, you will need to stop the
hydraulic oil ow. Press the“power on” button
when the bluetooth is illuminated. Check
chute rotation & deector functions work.
CROSSBEATER /
BED FORWARD
Press the working button to start
the crossbeater and bed chain. If the
bed chain is set to ‘0’ the bed should
be stationary. Pressing this button
again will stop the bed chain and
crossbeater.
Stopping the bed will not stop the
fan. To do this the hydraulic ow
must be cut o.
BED CHAIN SPEED
The bed chain speed can be varied
in the cab by twisting the dial
independently of the crossbeater
speed. If the bed is rotating when the
dial is set to “0”, then you need to re-
calibrate the bed speed (see page 20
of the manual).
CROSSBEATER
BED REVERSE
To reverse the machine at any time
press the “crossbeater & bed chain
unloading” button.
SEE THE MANUAL FOR
MORE INFORMATION
ON PAIRING THE DEVICES.
C
D
E
FITTING THE
TELEHAWK ONTO
THE LOADER
Make sure the appropriate loader
brackets are central and secure. Attach
the Telehawk to the loader headstock
engaging the locking mechanism
to prevent the machine detaching.
Carefully crowd up and check there is
clearance between the fan motor cover
and headstock.
1
A
B
Telehawk Quick Start Guide page 2
The strings or net should be removed from the bale
before spreading, if they are not removed they will wrap
around the crossbeater. Putting twine or netwrap through
the machine is not recommended as it will eventually be
spread on the land, polluting future crops.
Loading rectangular bales: If you are using a loader with the
driver positioned to the left hand side of the loading boom
and loading direct from a stack of bales. We recommend
starting from the right hand side of the stack and working
to the left. This enables the driver to see the gap between
two bales. Once the end of the bale is inside the Telehawk,
slightly lift the bale and continue driving until the bale is
3
ROUND BALES
With a round bale in the chamber make sure that the bed
chain is inclined at 5°. To maximise performance for round
bales, keep the machine slightly angled upwards and keep
the bed speed on a setting of approx. 5. This will keep the
round bale tumbling. Stripping a thin layer of straw from the
bale with each rotation is the most ecient way.
7
in the machine. Do not force the bale into the crossbeater.
This will cause the machine to go into unblocking mode
once the crossbeater is engaged. Place the chains around
the rear of the bale. Cut and remove the strings.
For easy removal of the strings place the bale on its side so
that the strings are not in contact with the oor.
Loading round bales:
To load round bales drive the
machine forwards forcing the front lip under the bale. Place
the chains around the rear of the bale. Cut the strings /
netwrap on the bale as low as possible on the crossbeater side
of the bale. Crowd the machine rolling the bale into the bale
chamber before removing the strings / netwrap completely.
SQUARE BALES
To maximise performance for square bales, keep the
machine horizontal. This allows the rst section of bale to
rotate freely within the bale chamber. The speed of the bed
chain will require adjustment according to the quality of the
bale. For brittle wheat bales a higher speed of 6 to 8 can be
achieved. For longer damp material a slower speed of 3 to 5
is recommended.
6
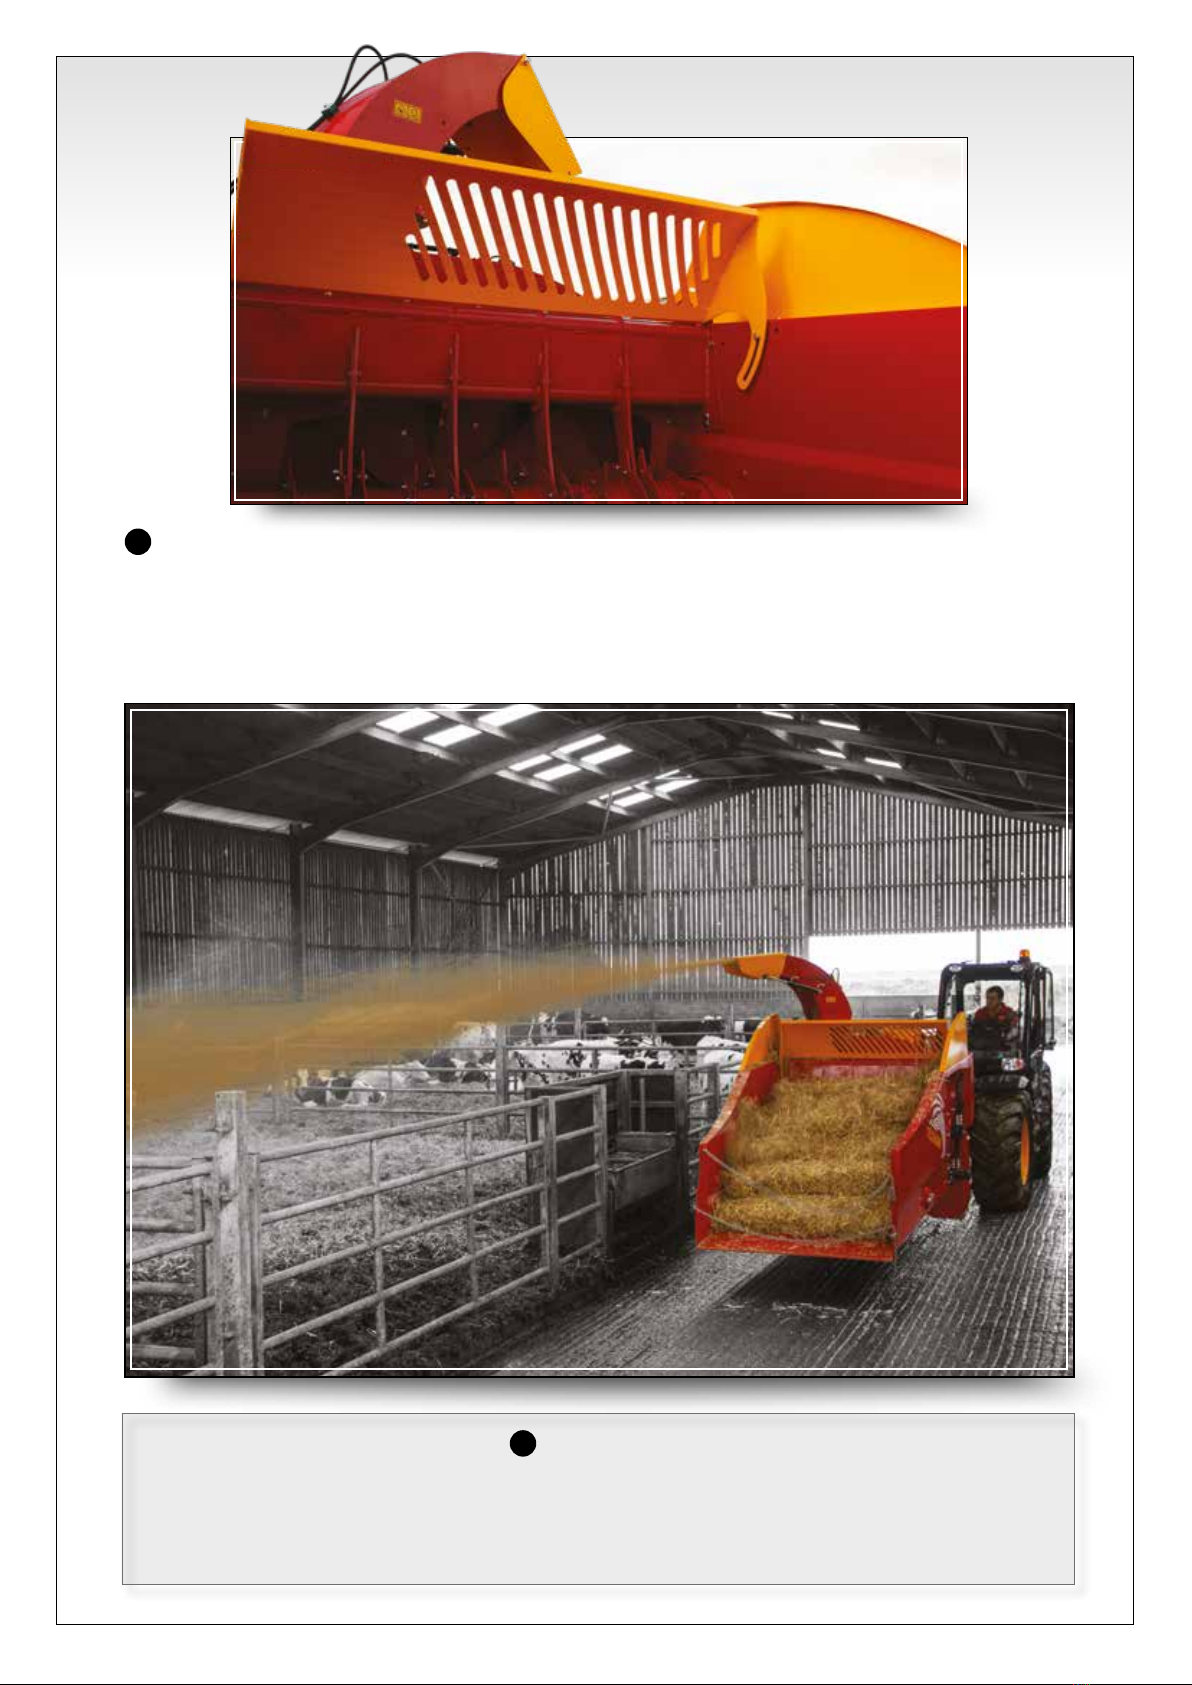
With both parts of the electronics connected via
bluetooth, switch the control box ON (making sure the
bed chain dial is set to ’0’). Start the following sequence:
Engage the spool valve on the loader.
Wait for the discharge rotor to rotate at working speed.
Rotate the chute and adjust the deector to give the
desired spread direction and distance.
Start the bed chain and cross beater by pressing the bed
chain working button. Spreading will now start. Once the
straw has cleared, increase the bed speed to the desired
feed rate.
It is important to ensure that the fan motor is turning
at full working speed before engaging the bed chain.
Failure to do so is likely to result in a blockage.
4
5
LOADING THE MACHINE
SPREADING MATERIAL/PERFORMANCE
1
2
3
4

Telehawk Quick Start Guide page 3
SPREADING
MATERIALPERFORMANCE
Once you have spread the rst part of the bale. We
recommend stopping the crossbeater before crowding
up the Telehawk to allow the next part of the bale to fall
onto the bed chain. Once the straw has fallen onto the bed
chain. The machine can be levelled out and the crossbeater
and bed chain re-started.
If spreading wet or poor quality bales it may be an
advantage to stop both the crossbeater and bed chain
before inclining the machine.
Do not force bales against the crossbeater by inclining the
body steeply while spreading. This may cause a blockage
and could also damage the machine.
If you are moving from one shed to another. We suggest
stopping the bed chain by turning the speed to zero and
then stopping the crossbeater. Before starting again, make
sure the fan is running at normal speed then re-engage the
crossbeater. The bed chain speed can then be increased.
The length of material will vary with the condition of
the bale. Fresh clean straw will tend to result in a longer
material whereas old, slightly damp, weathered or matted
bales will tend to have a shorter length. The power
consumption will also vary with the material being spread.
In general damp or matted straw will require a relatively
high power input.
8
REVERSE TIME
Generally, the taller the bale in the chamber, the longer the
reverse time of the bed chain is required. The reverse time
can be increased by pressing the increasing reverse time
button and decreased using the decreasing button.
Guidance table: (LED lights on control box)
Round bales ........................................................ 2 lights
Rectangular (quadrants) bales....... 2 or 3 lights
Rectangular (hesston) bales ............ 3 at rst, 4 lights
.............................................................. 2nd half of bale
PRESSURE SWITCH
The machine is tted with a pressure sensing system
to prevent the fan being overloaded. This works
automatically by briey reversing the crossbeater and
bed chain, this is called the reversing time. The reversing
time can be altered on the control box in the cab. The
pressure sensor setting can be altered on the side of the
machine. The factory setting is 100 bar (1450psi).
The pressure at which the bed chain reverse movement
is triggered can be varied by rotating the knob on the
outside of the rotor housing. We recommend a starting
setting of 100bar. The higher oil ow rate the higher
the pressure setting. With a higher oil ow loader the
fan is rotating at a higher speed, hence the fan can
spread more straw. With a lower oil ow loader the fan
is rotating slower, hence can be more easily blocked. To
avoid this the pressure switch needs to be set lower.
If the pressure switch is set too high you can easily block
the fan. If the pressure switch is too low the machine
will keep going into automatic reverse and take a long
time to spread the bale (bleed the pressure switch if the
machine goes into reverse at random times).
9
10
Telehawk Quick Start Guide page 4
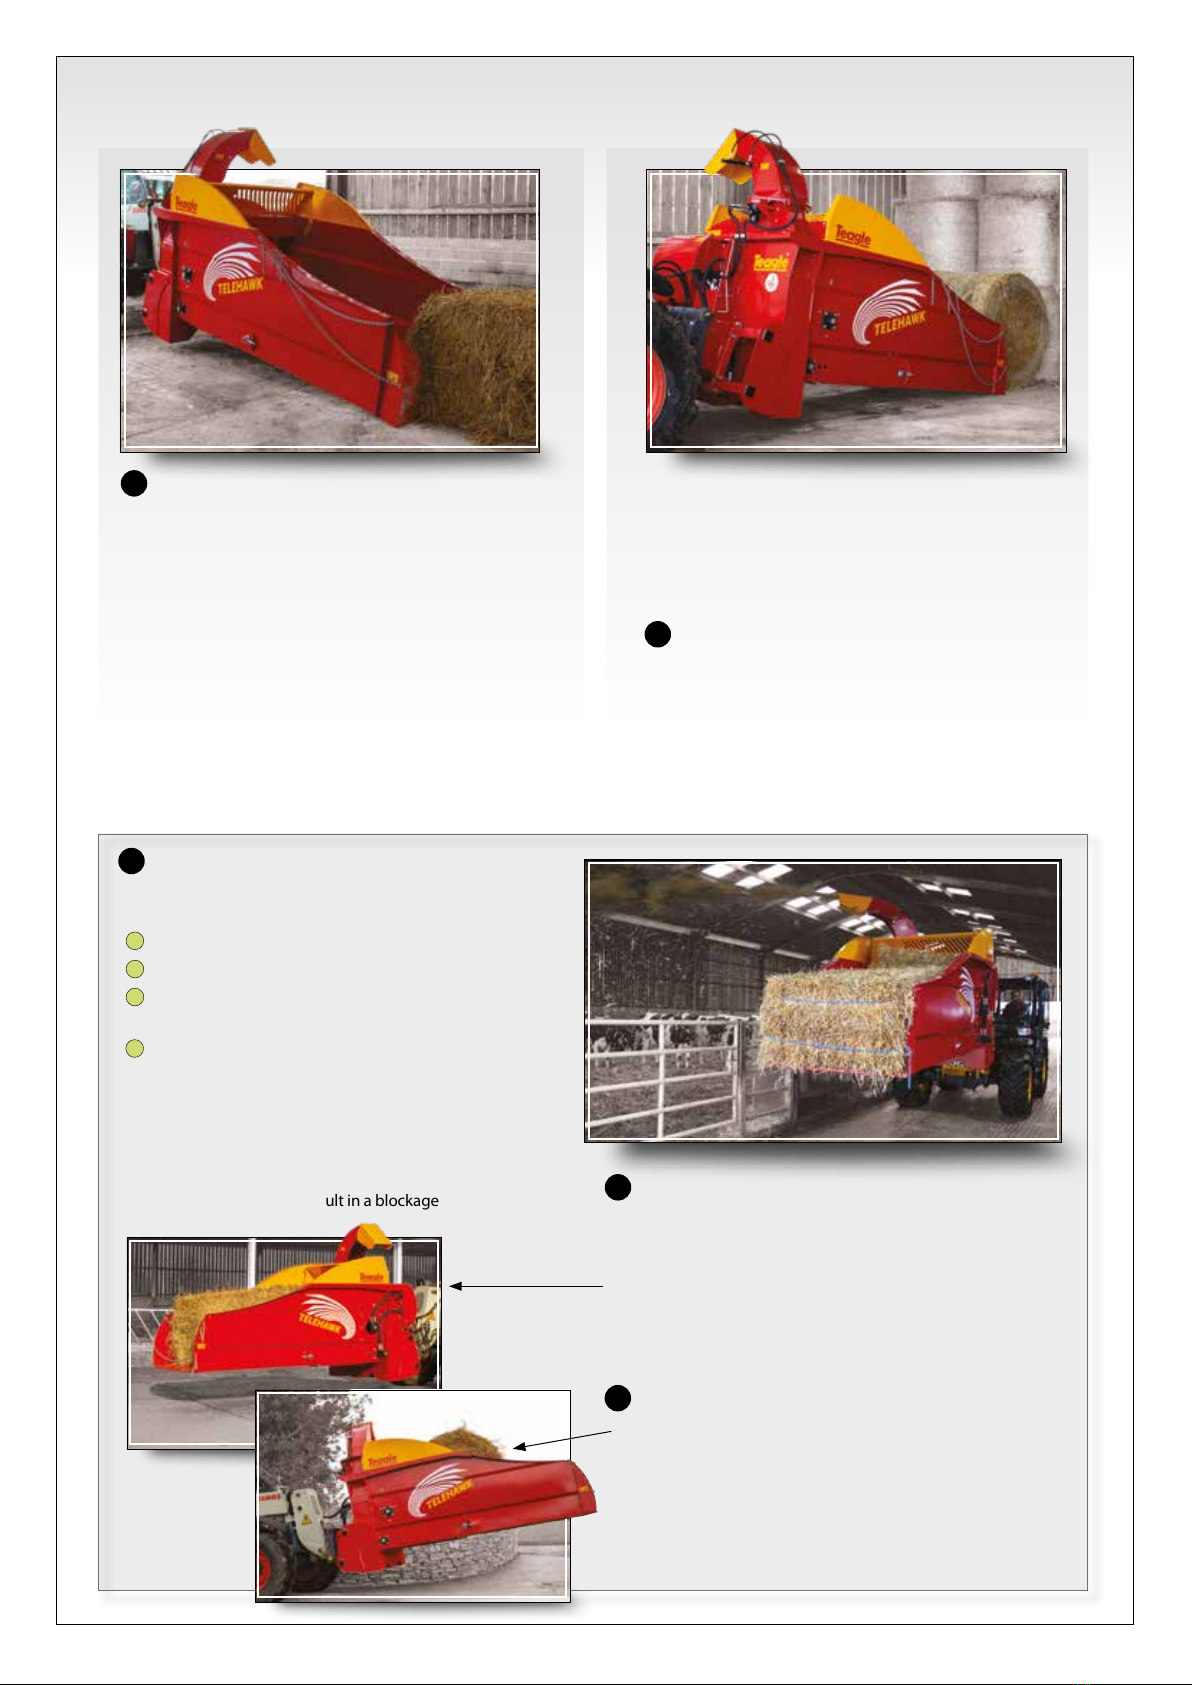
BALE RESTRAINT
The position of the bale restraint has an important role on
how much of the bale is exposed to the crossbeater. The closer
the bale restraint is to the fan motor the more straw will ow
through the machine. If you have damp, matted bales we
suggest moving the bale restraint away from the fan of the
11
machine and slowing the bed speed down.
To adjust the bale restraint beam remove the three M12 bolts
located in the holes on both sides of the restraint beam, and
loosen the fourth bolt in the slot. Reposition the bale restraint
beam by aligning the necessary holes, replace and tighten bolts.
PERFORMANCE
The blow distance is dependant upon a number of factors. The main factor is the ow of oil to the fan motor. The higher the oil
ow the greater the blow distance. Keeping the fan motor spinning at high speed is important. Other factors include bed chain
speed, bale restraint position, bale condition and material type.
Higher output is achieved by a rapid tumbling action of the straw on the bed chain.
12
Other manuals for Telehawk
2
Other Teagle Spreader manuals


Popular Spreader manuals by other brands


Fisher
Fisher POLY-CASTER 78601 owner's manual

TurfEx
TurfEx RS7200 Owner's/operator's manual

Ferris
Ferris Pathfinder Series Operator's manual

Fayat Group
Fayat Group DYNAPAC S100 operation & maintenance

Art's-Way Manufacturing
Art's-Way Manufacturing X700 Operator's manual & parts list

EASTMAN
EASTMAN CR 500 instruction manual


