Teal Sport User manual
TEAL SPORT USER GUIDE
TEAL SPORT User Guide
TEAL SPORT User Guide
tealdrones.com
tealdrones.com
2
3
TABLE OF CONTENTS
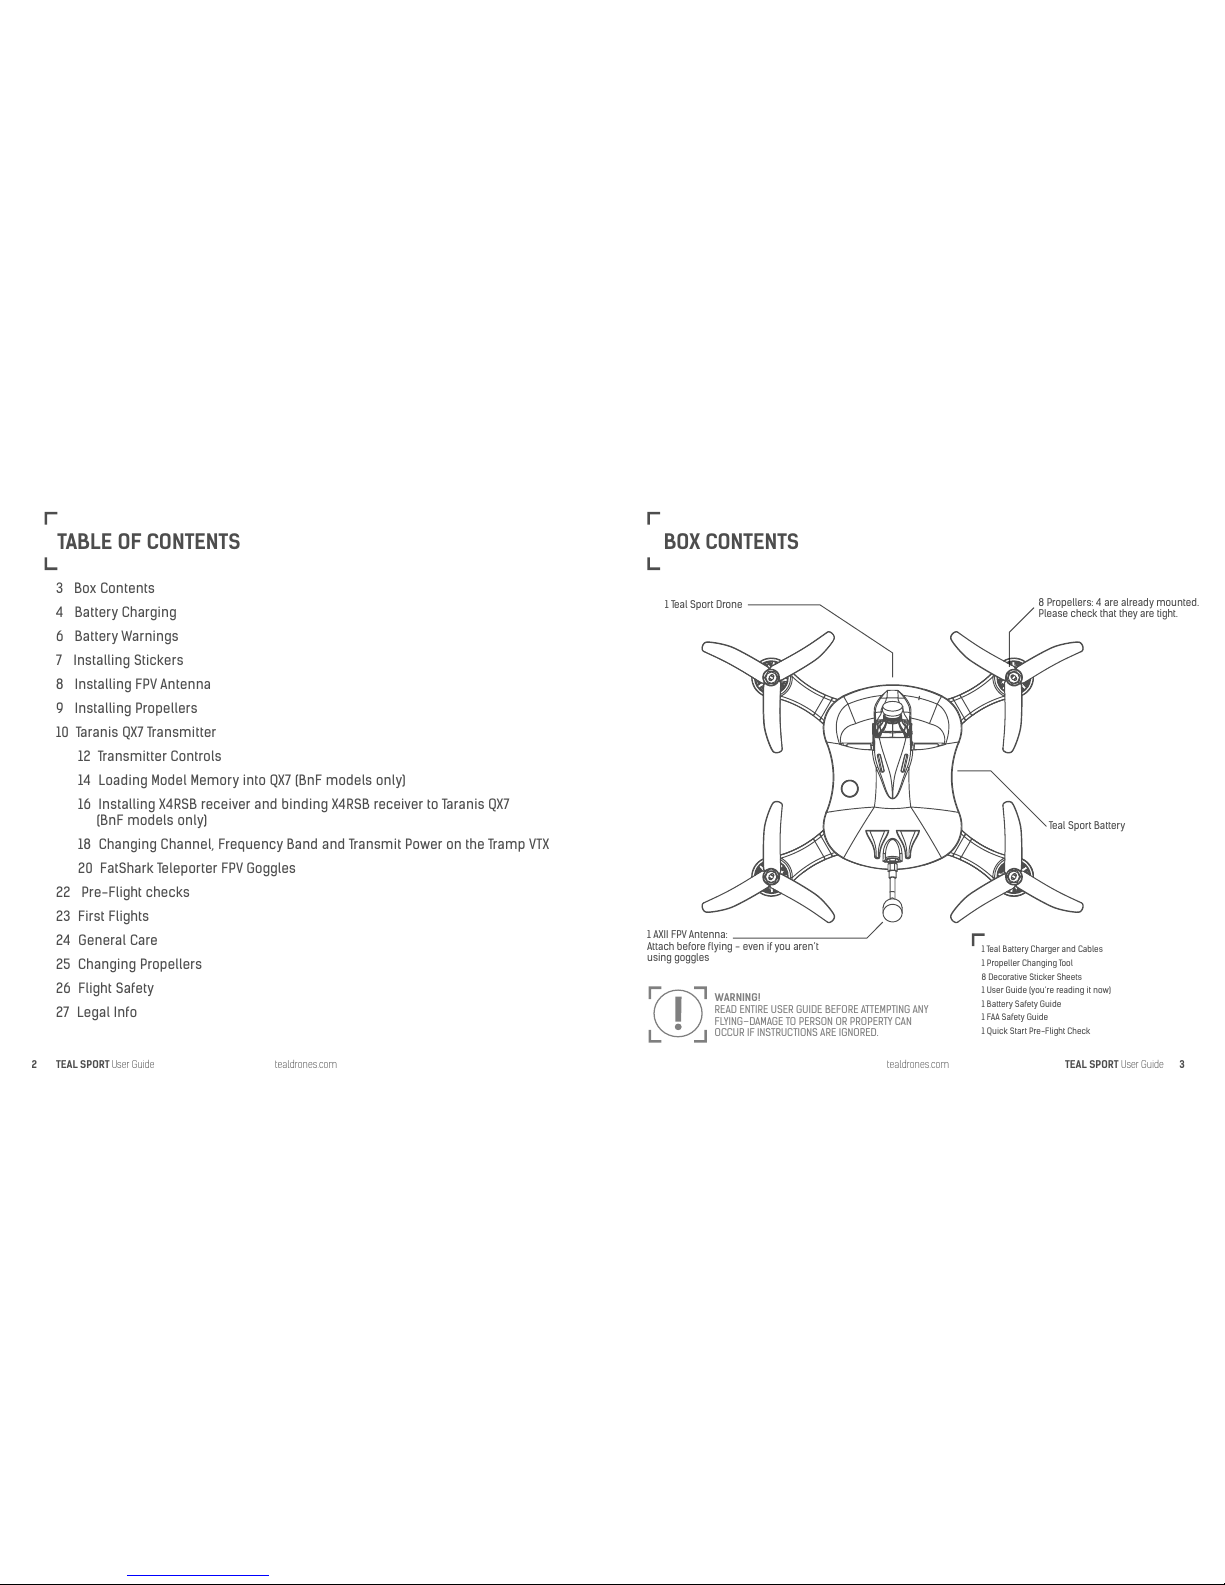
BOX CONTENTS
1 Teal Sport Drone
1 AXII FPV Antenna:
Attach before flying - even if you aren’t
using goggles
WARNING!
READ ENTIRE USER GUIDE BEFORE ATTEMPTING ANY
FLYING–DAMAGE TO PERSON OR PROPERTY CAN
OCCUR IF INSTRUCTIONS ARE IGNORED.
8 Propellers: 4 are already mounted.
Please check that they are tight.
Teal Sport Battery
1 Teal Battery Charger and Cables
1 Propeller Changing Tool
8 Decorative Sticker Sheets
1 User Guide (you’re reading it now)
1 Battery Safety Guide
1 FAA Safety Guide
1 Quick Start Pre-Flight Check
3 Box Contents
4 Battery Charging
6 Battery Warnings
7 Installing Stickers
8 Installing FPV Antenna
9 Installing Propellers
10 Taranis QX7 Transmitter
12 Transmitter Controls
14 Loading Model Memory into QX7 (BnF models only)
16 Installing X4RSB receiver and binding X4RSB receiver to Taranis QX7
(BnF models only)
18 Changing Channel, Frequency Band and Transmit Power on the Tramp VTX
20 FatShark Teleporter FPV Goggles
22 Pre-Flight checks
23 First Flights
24 General Care
25 Changing Propellers
26 Flight Safety
27 Legal Info

TEAL SPORT User Guide
TEAL SPORT User Guide
tealdrones.com
tealdrones.com
4
5
BATTERY CHARGING
To charge the Teal Sport flight battery, first read and remove the warning sticker covering
the balance port on the battery. Next, plug the charger into a wall outlet and connect the
supplied balance lead cable between the battery’s balance port and the correct connector
on the charger. The charger will only work when the cables are plugged into to the right holes.
Charging time for a complete charge is 30 minutes. Charge state is determined by flashing
LED’s on the charger with 25%, 50%, 75% and 100% positions. When all lights are solid, the
battery is fully charged.
SEVERE WARNING: NEVER FLY LONGER THAN THE LOW BATTERY WARNING. DISCHARGING THE
BATTERY PAST ITS LIMITS WILL RESULT IN DAMAGE TO THE BATTERY AND POTENTIALLY THE DRONE. IT
WILL CREATE A SWOLLEN BATTERY, WHICH NEEDS TO BE IMMEDIATELY AND PROPERLY DISPOSED OF
AT A BATTERY DISPOSAL FACILITY. DO NOT ATTEMPT TO CHARGE A SWOLLEN BATTERY OR IT COULD
CAUSE A FIRE OR EXPLOSION.
Important Note: Typical flight times for high speed racing drones are 2 ½ minutes. This
might seem short compared to slow flying aerial camera drones, but FPV is a rush and
feels much longer in the goggles. These batteries are built to perform at high speed with a
high discharge rate. Pro mini-quad pilots carry 25-30 charged batteries to the field for long
practice sessions. Having 2-3 extra batteries and possibly a second charger when you are
first starting to learn to fly a racing drone is a great idea to keep you from getting impatient
and discouraged while waiting for your charge to complete.
Teal Sport Battery Charger
LED Charge Indicators
Connector Cable
Teal Sport Battery

TEAL SPORT User Guide
TEAL SPORT User Guide
tealdrones.com
tealdrones.com
6
7
• Never leave a charging battery unattended.
• If a battery gets hot to the touch, turn off the charger and disconnect the battery
from the charger.
• Do not mistreat batteries. Do not puncture or crush. This action could start a fire.
• If a battery looks like it is swelling, do not attempt to charge. Refer to battery
manufacture warnings for proper disposal.
• If traveling by air with lipo batteries, do not send them away with your check
luggage, keep them with you in your carry-on bag. They are safe for x-rays and
in-cabin air-pressure environments.
NOTE: Read the supplied safety document
about Lithium Polymer batteries.
BATTERY WARNINGS - READ CAREFULLY
STICKER INSTALLATION
Be creative and personalize your Teal Sport, or use our
examples if you’re feeling uninspired.
!

TEAL SPORT User Guide
TEAL SPORT User Guide
tealdrones.com
tealdrones.com
8
9
FPV ANTENNA INSTALLATION
Screw on FPV Antenna to brass SMA connector at the back of the Teal Sport to finger tight
for best results. Check tightness before every flight.
NOTE: Never plug in a battery or power-up the Teal Sport Drone without this antenna
connected or else damage to the FPV transmitter will occur.
INSTALLING PROPELLERS
The Teal Sport Drone uses propellers with two different directions: Clockwise and
Counterclockwise. It is important to get these directions installed correctly or the drone
will not fly and in some cases spin out of control. Always match the indicator dots on the
propellers, motor shafts and arms to corresponding placements.
TEAL SPORT User Guide
TEAL SPORT User Guide
tealdrones.com
tealdrones.com
10
11
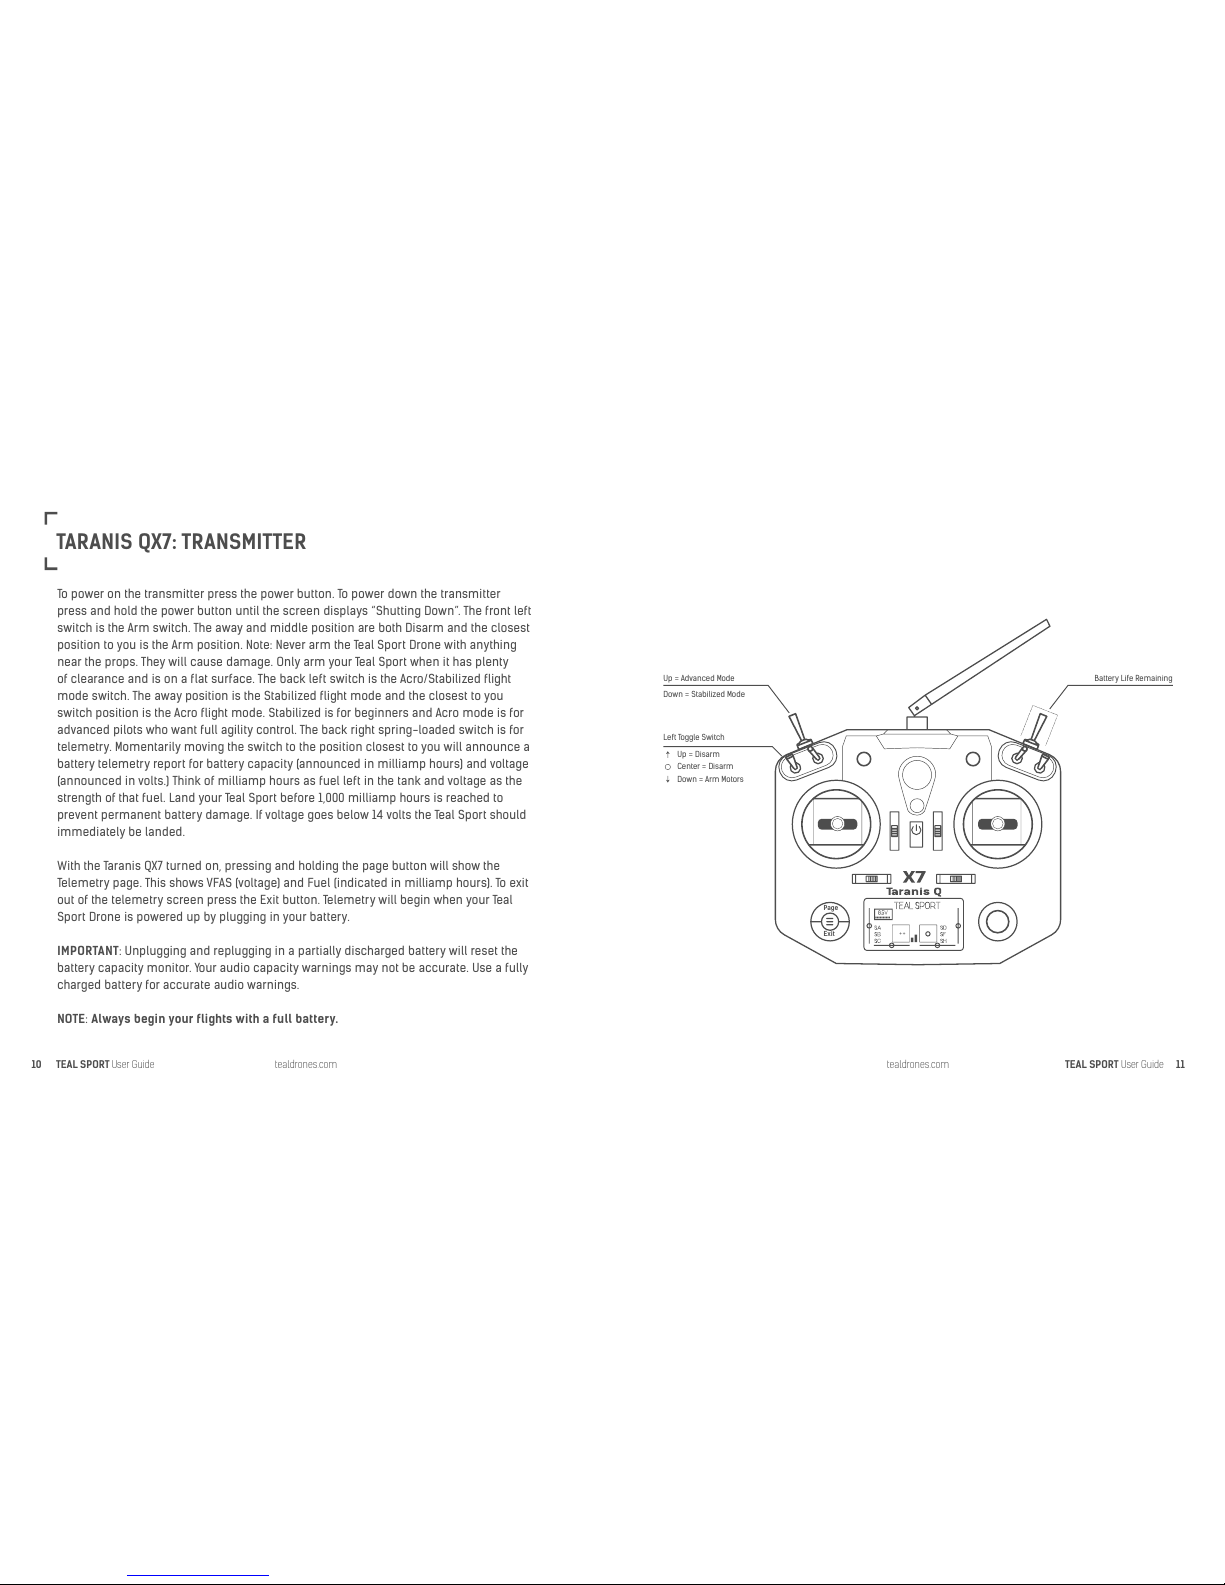
TARANIS QX7: TRANSMITTER
To power on the transmitter press the power button. To power down the transmitter
press and hold the power button until the screen displays “Shutting Down”. The front left
switch is the Arm switch. The away and middle position are both Disarm and the closest
position to you is the Arm position. Note: Never arm the Teal Sport Drone with anything
near the props. They will cause damage. Only arm your Teal Sport when it has plenty
of clearance and is on a flat surface. The back left switch is the Acro/Stabilized flight
mode switch. The away position is the Stabilized flight mode and the closest to you
switch position is the Acro flight mode. Stabilized is for beginners and Acro mode is for
advanced pilots who want full agility control. The back right spring-loaded switch is for
telemetry. Momentarily moving the switch to the position closest to you will announce a
battery telemetry report for battery capacity (announced in milliamp hours) and voltage
(announced in volts.) Think of milliamp hours as fuel left in the tank and voltage as the
strength of that fuel. Land your Teal Sport before 1,000 milliamp hours is reached to
prevent permanent battery damage. If voltage goes below 14 volts the Teal Sport should
immediately be landed.
With the Taranis QX7 turned on, pressing and holding the page button will show the
Telemetry page. This shows VFAS (voltage) and Fuel (indicated in milliamp hours). To exit
out of the telemetry screen press the Exit button. Telemetry will begin when your Teal
Sport Drone is powered up by plugging in your battery.
IMPORTANT: Unplugging and replugging in a partially discharged battery will reset the
battery capacity monitor. Your audio capacity warnings may not be accurate. Use a fully
charged battery for accurate audio warnings.
NOTE: Always begin your flights with a full battery.
Up = Advanced Mode
Down = Stabilized Mode
Up = Disarm
Center = Disarm
Down = Arm Motors
Left Toggle Switch
Battery Life Remaining
Page
Exit
++

TEAL SPORT User Guide
TEAL SPORT User Guide
tealdrones.com
tealdrones.com
12
13
The Taranis will give automatic audio warnings when the battery consumption approaches
its limits. If voltage gets low, an audio warning will sound. When 90% of the battery capacity
is used, a warning will sound. When 95% has been reached you will be told to land. Do not
continue flying or you will damage your battery. The Teal Drone has 4 stick flight controls.
Pitch, Roll, Yaw and Throttle.
• Pitch controls the forward and backward angle. Moving the pitch stick away from
you will make the drone fly forwards and moving it backward will make the drone fly
backwards.
• Throttle controls the height-speed of altitude gain or loss and makes the drone move
up ordown vertically. Just the right amount of throttle is needed to hover. USE VERY
SMALL MOVEMENTS AT FIRST. A little more throttle and the drone will gain altitude. A little
less and the drone will descend. A lot more or less throttle input will exaggerate the
speed at which the drone gains or loses height.
• Roll controls the sideways angle. Pushing the roll stick the the left will make the drone
fly sideways to the left and pushing the roll stick to the right will make the drone fly
sideways to the right.
• Yaw makes the drone yaw left and right. Pushing the yaw stick to the left will make the
drone do a flat spin to the left and and pushing the yaw stick to the right will make the
drone do a flat spin to the right.
TARANIS QX7: TRANSMITTER CONTROLS
Pitch
Side View
Top View
Back View
Back View
Throttle
Roll
Yaw

TEAL SPORT User Guide
TEAL SPORT User Guide
tealdrones.com
tealdrones.com
14
15
TARANIS QX7: LOADING MODEL MEMORY TO QX7 RADIO
BIND AND FLY VERSION ONLY (BnF) — This process will teach you how to install the custom settings
onto the recommended Taranis QX7 transmitter.
1. Download the custom Teal QX7 Taranis files from tealdrones.com and place them
on a Micro SD card.
2. Remove plastic flap at base of the radio and insert the Micro SD card into the slot.
Figure 1
3. Turn on the QX7 radio by pressing the middle power button. Press the middle menu
button to access the menu and the model select screen.
Figure 2
4. Use scroll wheel to select an unused model memory slot Press the scroll wheel
button. Use the scroll wheel to highlight “Restore Model” and press the scroll wheel
button.
Figure 3
5. Select Teal_Sport file and press scroll wheel button to write file onto Taranis QX7. The
new file has been written and is ready to use with the Teal Drone.
Figure 4
6. A star will show beside the model memory indicating it is the selected model profile.
Highlight the Teal Sport model memory, press the scroll wheel button, highlight “select
model” and press the scroll wheel button once more. The Teal Sport model memory
is now selected.
Figure 5
Page
Exit
++
Figure 1
Figure 4
Figure 5
Figure 2
Figure 3

TEAL SPORT User Guide
TEAL SPORT User Guide
tealdrones.com
tealdrones.com
16
17
To fly the Teal Sport Bind and Fly model, first you must install the radio receiver and bind the
receiver to the radio transmitter so the transmitter knows which receiver it is talking to. The FRSky
Taranis QX7 and FRSky X4RSB receiver are the recommended hardware for the Teal Sport. Other
types and brands of receivers and transmitters can be used but the below instructions only show
how to install the X4RSB receiver used with the Taranis QX7 transmitter.
1. Remove props (take note of direction/orientation before removing).
2. Remove the eight (8) arm screws that hold the top plate. Remove top plate.
3. Place X4RSB receiver on double sided tape.
4. Connect receiver cable to receiver. The plug connects to the side of the X4R and the S.Bus
needs to be connected to the bottom pin, closest to the side plug. It is very important that
the correct pin is connected as damaging components may result if done incorrectly.
Figure 1
5. Place receiver antennas along the inside of the drone chassis.
6. To bind the receiver to the Taranis QX7, power on Tanaris QX7 transmitter and press the
middle menu button to access the menu.
7. Press the center menu button, followed by the page button to get to the “Setup” menu. Scroll
down to “Bind” and press the scroll wheel to select it. The radio will beep every few seconds
indicating the Taranis is in bind mode.
Figure 2
INSTALLING X4RSB RECEIVER AND BINDING
X4RSB RECEIVER TO TARANIS QX7
8. Hold down the bind button on X4R receiver and power up the quad by plugging in a battery,
while continuing to hold down the receiver bind button. The green LED will turn solid, the red
LED will flash indicating it has bound. After this has happened, you can release the bind button.
Select bind on the radio’s setup menu one more time to stop the Taranis binding process, now
that the receiver is bound. Cycle power by unplugging and replugging battery to check bind
process is successful. A solid green LED will confirm bind is correctly set up.
Figure 3
9. Replace the top plate and install the eight arm screws.
10. Re-install props in correct rotation positions. Double check they are spinning the correct
directions.
Figure 1 Figure 2 Figure 3
Connect Receiver Cable to bottom pin,
closest to the side plug.
TEAL SPORT User Guide
TEAL SPORT User Guide
tealdrones.com
tealdrones.com
18
19
1. With props removed (never ignore us when we tell you to remove props!) and power
connected, hold down the button on the Tramp FPV transmitter (through top plate access
hole) for 3 seconds to access the channel menu.
2. Menu 1 (indicated by one long LED flash) will show what channel number you are currently
on by the number of short flashes. Quick presses of the button will select the next channel
and the change will be indicated by the number of short flashes.
3. One more 3 second long press will move to Menu 2. This will be indicated by 2 long LED
flashes and the short flashes will correspond to the band you are on (Note that ready to fly
battery packs supplied with FatShark Predator Goggles will only work on the IRC/Fatshark
band). If needed, short presses will change the band.
4. One more 3 second long press will move to Menu 3. This will be shown by 3 long LED
flashes and the short flashes will correspond to the transmit power level you want to use.
Short presses will change the power level. Note: Many countries regulate that 25mw is the
highest level you can transmit on without an Amatuer HAM radio license.
5. One more 3 second button press will exit the menu. All variables on the Tramp vTx can
also be configured using the ImmersionRC Wand. The NFC zone used to communicate
between the drone and the wand is indicated by the embossed circle on the top cover.
Hold the wand near this circle to program. [Picture of the Tramp vtx looking through the top
plate with the red LED turned on]
CHANGING CHANNEL, FREQUENCY BAND
AND TRANSMIT POWER ON THE TRAMP VTX
NOTE:
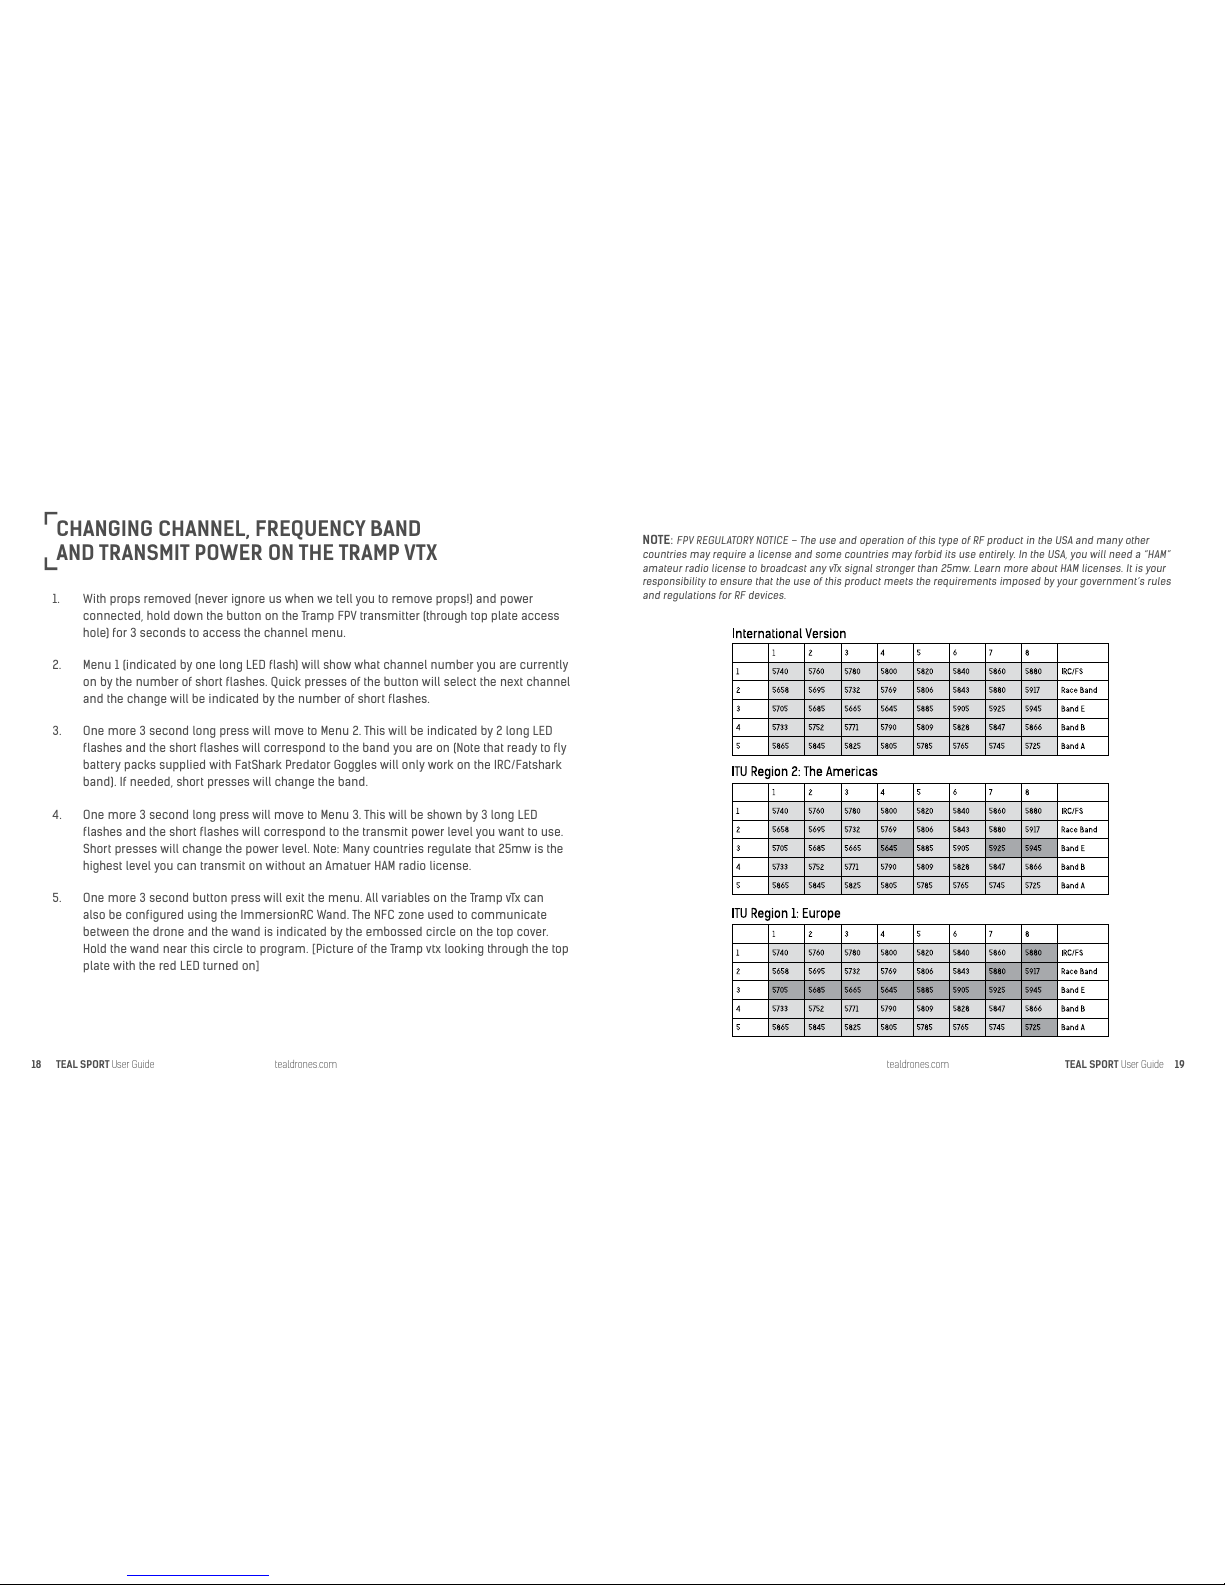
FPV REGULATORY NOTICE – The use and operation of this type of RF product in the USA and many other
countries may require a license and some countries may forbid its use entirely. In the USA, you will need a “HAM”
amateur radio license to broadcast any vTx signal stronger than 25mw. Learn more about HAM licenses. It is your
responsibility to ensure that the use of this product meets the requirements imposed by your government’s rules
and regulations for RF devices.

TEAL SPORT User Guide
TEAL SPORT User Guide
tealdrones.com
tealdrones.com
20
21
• The battery for the FPV goggles can be charged via the USB cable.
• Install receiver antenna to the SMA connector sticking out of the front
left hand side of the goggles. Ensure connector is hand tight for best
results.
• Insert battery into elastic strap on right hand side of goggles and
plug in the barrel connector. Never power up the goggles without first
attaching the antenna.
Damage will occur.
• The 4-way button on the top of the goggles controls brightness and
contrast. Sideways is contrast, forward and back is brightness.
• The “CH” buttons cycle through the 7 channels available on the IRC/
FatShark band. Select the same channel that the Teal Sport Drone is
transmitting on.
• Remember to unplug the battery when not in use.
• Never leave the lenses of your goggles facing direct sunlight.
Damage may occur.
FATSHARK TELEPORTER FPV GOGGLES
Power in
Antenna SMA
AV in/out
Volume Control
Display Control - Center (up/down/left/right)
Channel Select
Receiver on/off
(power to RX module
PS2 Port
Alternative power
Earphone Jack
TEAL SPORT User Guide
TEAL SPORT User Guide
tealdrones.com
tealdrones.com
22
23
NOTE: Conduct your first flights in an open, flat field, away from people, animals and obstacles.
• Verify wind conditions are below 15-20mph for your first flights.
• Bring a spotter friend with you when you fly. Otherwise, locating a crashed drone when
you’re flying FPV can be difficult when you’re alone.
• Check that the props are in the correct orientation, in good repair and prop nuts are tight.
Mismatched and incorrectly installed props are one of the most common reasons drones
are having trouble getting airborne.
• For your first flights it is recommended to have the FPV camera in the flat position. (zero
to ten degrees of tilt) You can tilt it more as you gain experience and want to go faster by
loosening the camera mount screws and adjusting the camera angle. Advanced pilots
often fly with 30-40 degrees of camera tilt.
• Always power on your Taranis QX7 Radio Transmitter before plugging in your drone’s battery,
move the throttle stick to the down position and move all switches to the away position.
Always ensure the Transmitter is turned on before the Teal Sport is powered on or you risk a
drone flyaway and/or unsafe drone misbehavior.
• Ensure the radio’s Arming switch is in the disarm position (away from you) before powering
up the Teal Sport.
• Plug in drone’s battery, place drone on a flat surface and wait up to 10 seconds for the
drone’s flight controller chip to calibrate. The Teal Sport will beep three times which will
indicate it has powered up and calibrated its sensors. The drone will not arm until the
sensors have calibrated.
• If conditions are safe to take off, the Teal Sport is ready to fly.
PRE-FLIGHT CHECKS
It is recommended for new pilots to start-off flying in “Stabilized” mode. “Acro” mode
gives the pilot more freedom and control to fly in all axis’ but is harder to master. It
is recommended to fly your first 10-20 full battery charges in Stabilized mode before
switching to Acro mode.
• In Stabilized (aka “level”) mode the drone will level itself when you let go of the
controls. NOTE: This is not the case for throttle.
• In Acro mode, the drone will hold the last position you gave it with the controls. If
you roll upside down and let go of the controls it will stay there which means you
have to concentrate on flying a lot more.
• Make sure yourself and other people are a safe distance away from the drone and
always take off with it facing away from you, especially if you’re not flying with
goggles.
• Ease up throttle in very small increments and slowly get a feel for the throttle
inputs needed.
• Concentrate on keeping the Teal Sport facing away from you and simply hovering
in one spot. Hovering is the hardest thing to learn, it can become tedious or
boring. You must learn to crawl before you learn to walk. Your patience will be
rewarded.
• Keep the drone low to the ground while learning. The lower it is, the shorter its
fall will be when you crash. You will crash. This is part of learning to fly. Stay with
it. Keep extra parts and batteries on hand when you go out to the field for quick
repairs and longer flight sessions.
FIRST FLIGHTS

TEAL SPORT User Guide
TEAL SPORT User Guide
tealdrones.com
tealdrones.com
24
25
Crashes and hitting objects can damage and bend props. To ensure a smooth, safe and
enjoyable flight, props must be straight and not damaged. Chipped and broken props
should be replaced before your next flight.
Props have specific rotation directions and orientations that are needed to fly. If even a single
prop is not correct, the drone will not fly. Use the indicator dots on the props, arms and motors
to ensure clockwise and counterclockwise directions are fitted correctly.
GENERAL CARE
Fly drone away from you, and stand back a safe distance.
Make sure props are in the correct rotating directions.
10’ – 15’
CHANGING PROPELLERS

TEAL SPORT User Guide
TEAL SPORT User Guide
tealdrones.com
tealdrones.com
26
27
• KEEP AWAY FROM THE SPINNING PROPELLERS.
They are sharp and can cause serious injury.
They bite hard. Do not experiment with prop
safety or ignore this warning.
• Only fly in an open area that is a safe distance
from people, power lines, animals and
property.
• Do not fly over people or property.
• Do not fly near roads or cars.
• Do not fly near airports. (There are phone apps
available to help you with this.)
• Read the enclosed FAA Warning Sheet and
your local aviation regulations regarding
flying your Teal Sport Drone in your area. The
FAA may pursue enforcement action against
anyone operating model aircraft in a way that
endangers the safety of the national airspace
system.
• Only arm your Teal Sport Drone when it’s on the
ground and a safe distance away. Arming while
holding the drone may cause the propellers to
spin up unexpectedly
• Always turn on the Taranis QX7 Transmitter
before powering the Teal Sport Drone.
• Do not carry your Teal Sport Drone while
powered up. Accidentally arming the quad
while carrying it could cause injury.
• Do not fly so far that the video transmitter and
radio transmitter go out of range. Too far for the
radio transmitter and the Teal Drone will cause
it to go into a failsafe state and stop its motors,
making it fall from the sky, so that it doesn’t
fly away. If the video feed is too far away it will
show static in the goggles.
• Do not fly in a manner that is intrusive to
others.
• Do not fly with damaged propellers.
• When flying with goggles, make sure you have
a spotter.
• Do not fly in rain, snow or wet conditions.
• Do not mistreat batteries. Do not puncture or
crush. This could start a large fire.
• If a battery looks like it is swelling, do
not attempt to charge. Refer to battery
manufacturer warnings for proper disposal or
recycling.
FLIGHT SAFETY (WARNINGS—PLEASE READ)
LEGAL
For private households: Information on Disposal for Users of WEEE
This symbol on the product(s) and / or accompanying documents means that figure 1 used electrical and
electronic equipment (WEEE) should not be mixed with general household waste. For proper treatment, recovery
and recycling, please take this product(s) to designated collection points where it will be accepted free of charge.
Alternatively, in some countries, you may be able to return your products to your local retailer upon purchase of
an equivalent new product. Disposing of this product correctly will help save valuable resources and prevent any
potential negative effects on human health and the environment, which could otherwise arise from inappropriate
waste handling. Please contact your local authority for further details of your nearest designated collection point.
Penalties may be applicable for incorrect disposal of this waste, in accordance with you national legislation.
For Professional Users In The European Union
If you wish to discard electrical and electronic equipment (EEE), please contact your dealer or supplier for further
information.
For Disposal In Countries Outside Of The European Union
This symbol is only valid in the European Union (EU). If you wish to discard this product please contact your local
authorities or dealer and ask for the correct method of disposal.
FPV Regulatory Notice
The use and operation of this type of product in the USA and many other countries may require a license,
and some countries may forbid its use entirely. In the USA, you will need a “HAM” amateur radio license. Learn
more about HAM licenses.
It is your responsibility to ensure that the use of this product meets the requirements imposed by your
government’s rules and regulations for RF devices. Do not purchase this product if you are unsure of the
government requirements or are not able to comply with them. Teal Drones cannot be held responsible for your
actions if you purchase and/or use this product in violation of your government’s regulations.
Packaging and visuals are not contractual. Product specifications may change without prior notice.
KISS Racing, ImmersionRC, Lumenier, RunCam, Rotor Riot, HQ Prop, Thunder Power RC and related logos are trademarks
and are used with permission by © Teal Drones, Inc. 2017.
Designed in USA.
©2017 Teal Drones, Inc. All Rights Reserved.
Figure 1

tealdrones.com
Table of contents
Other Teal Drone manuals


