TECHCON SYSTEMS Micro-Meter Mix TS8200D Series User manual

TS8200D Series
Micro-Meter Mix Quick Start Guide
techcon.com/contact-us
______________________________________________________________________
______________________________________________________________________
1. INSTALLATION
Required tools: 8 mm (5/16”) wrench; 3.0 mm hex wrench; 2.5 mm hex wrench;
2.0 mm hex wrench
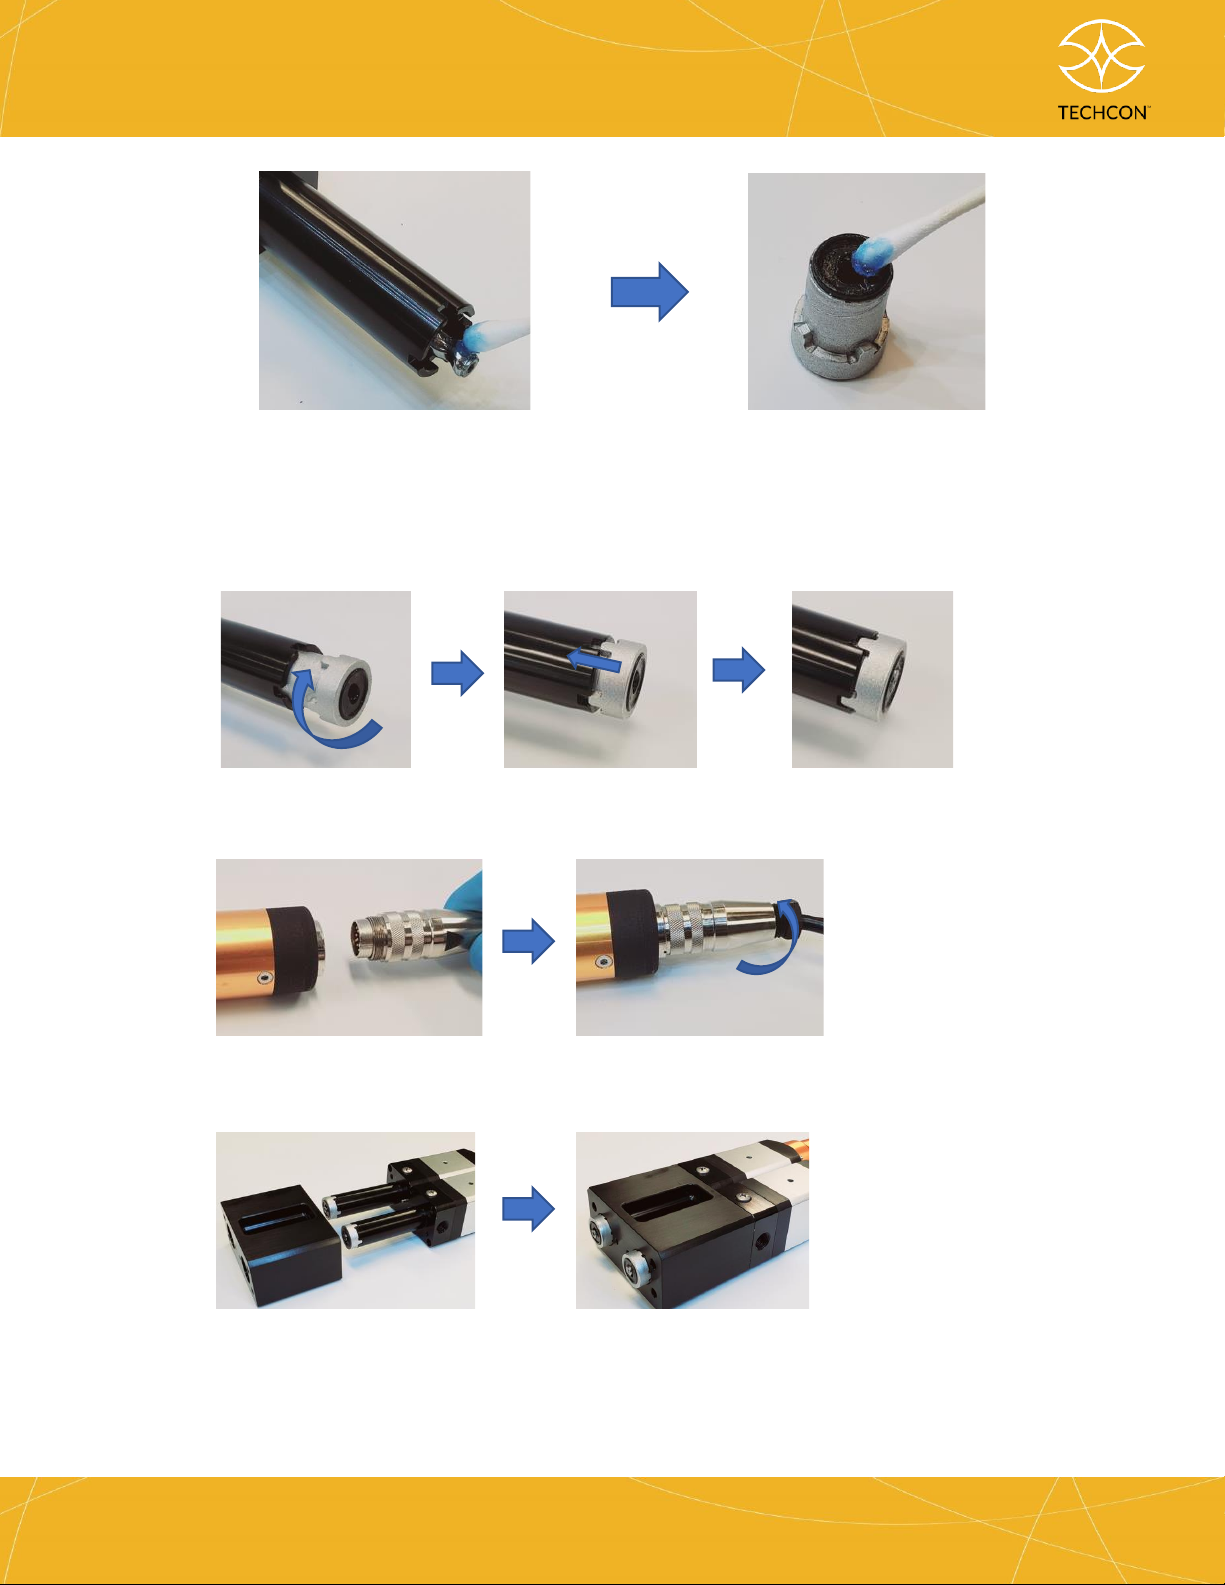
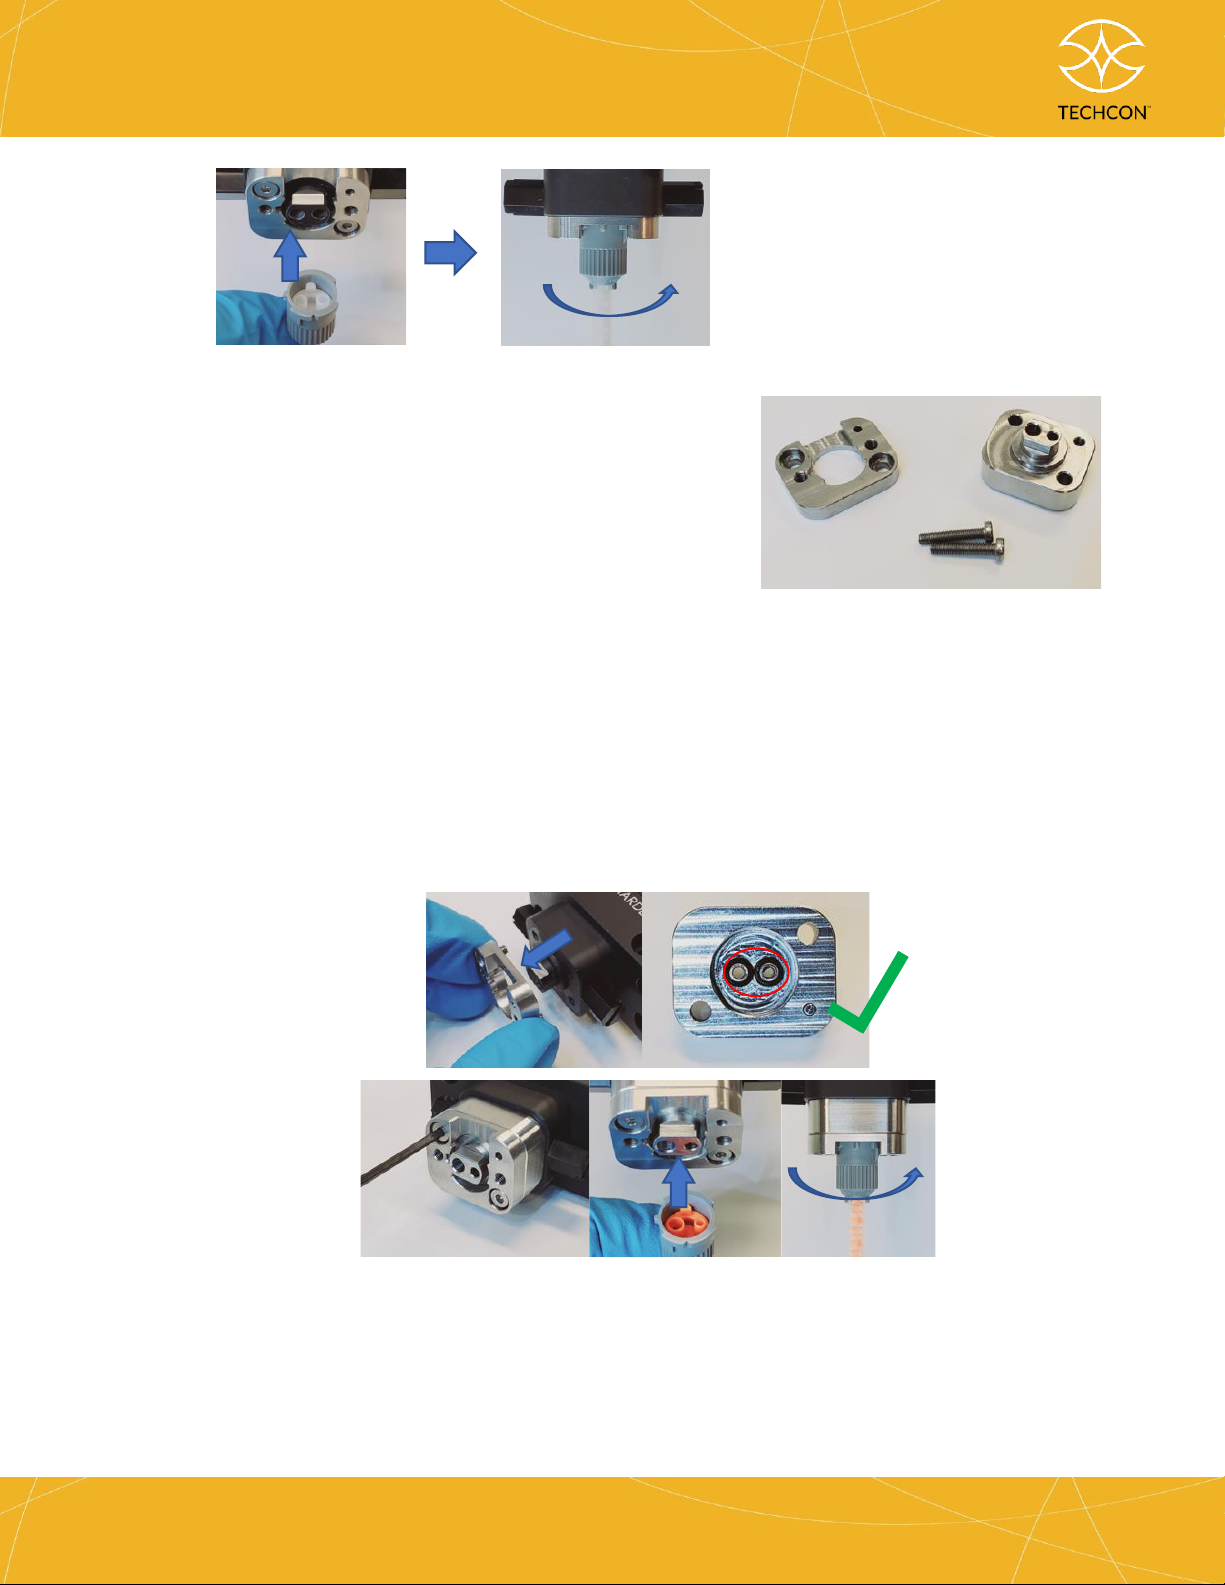
Warning! Do not dry-assemble the rotor and stator. Excessive friction between dry
components may damage stators and effect pump performance.
a. Apply the dispensing fluid or any appropriate lubricant compatible with the
dispensing fluid to the surface of the rotor.
TS8200D Series Micro-Meter Mix
True volumetric measuring, mixing, and dispensing
of 2-component materials
TS8200D Series
Micro-Meter Mix Quick Start Guide
techcon.com/contact-us
b. Screw the stator onto the rotor in a clockwise direction, align the four tabs of the
stator with the four notches of the stator housing, and push in the stator to lock it
into place with the stator housing.
c. Plug and thread in the motor cables.
d. Insert pump assemblies into the pump housing.

TS8200D Series
Micro-Meter Mix Quick Start Guide
techcon.com/contact-us
e. Make sure that the high-pressure seals sit and fit properly along the groove
located inside the manifold.
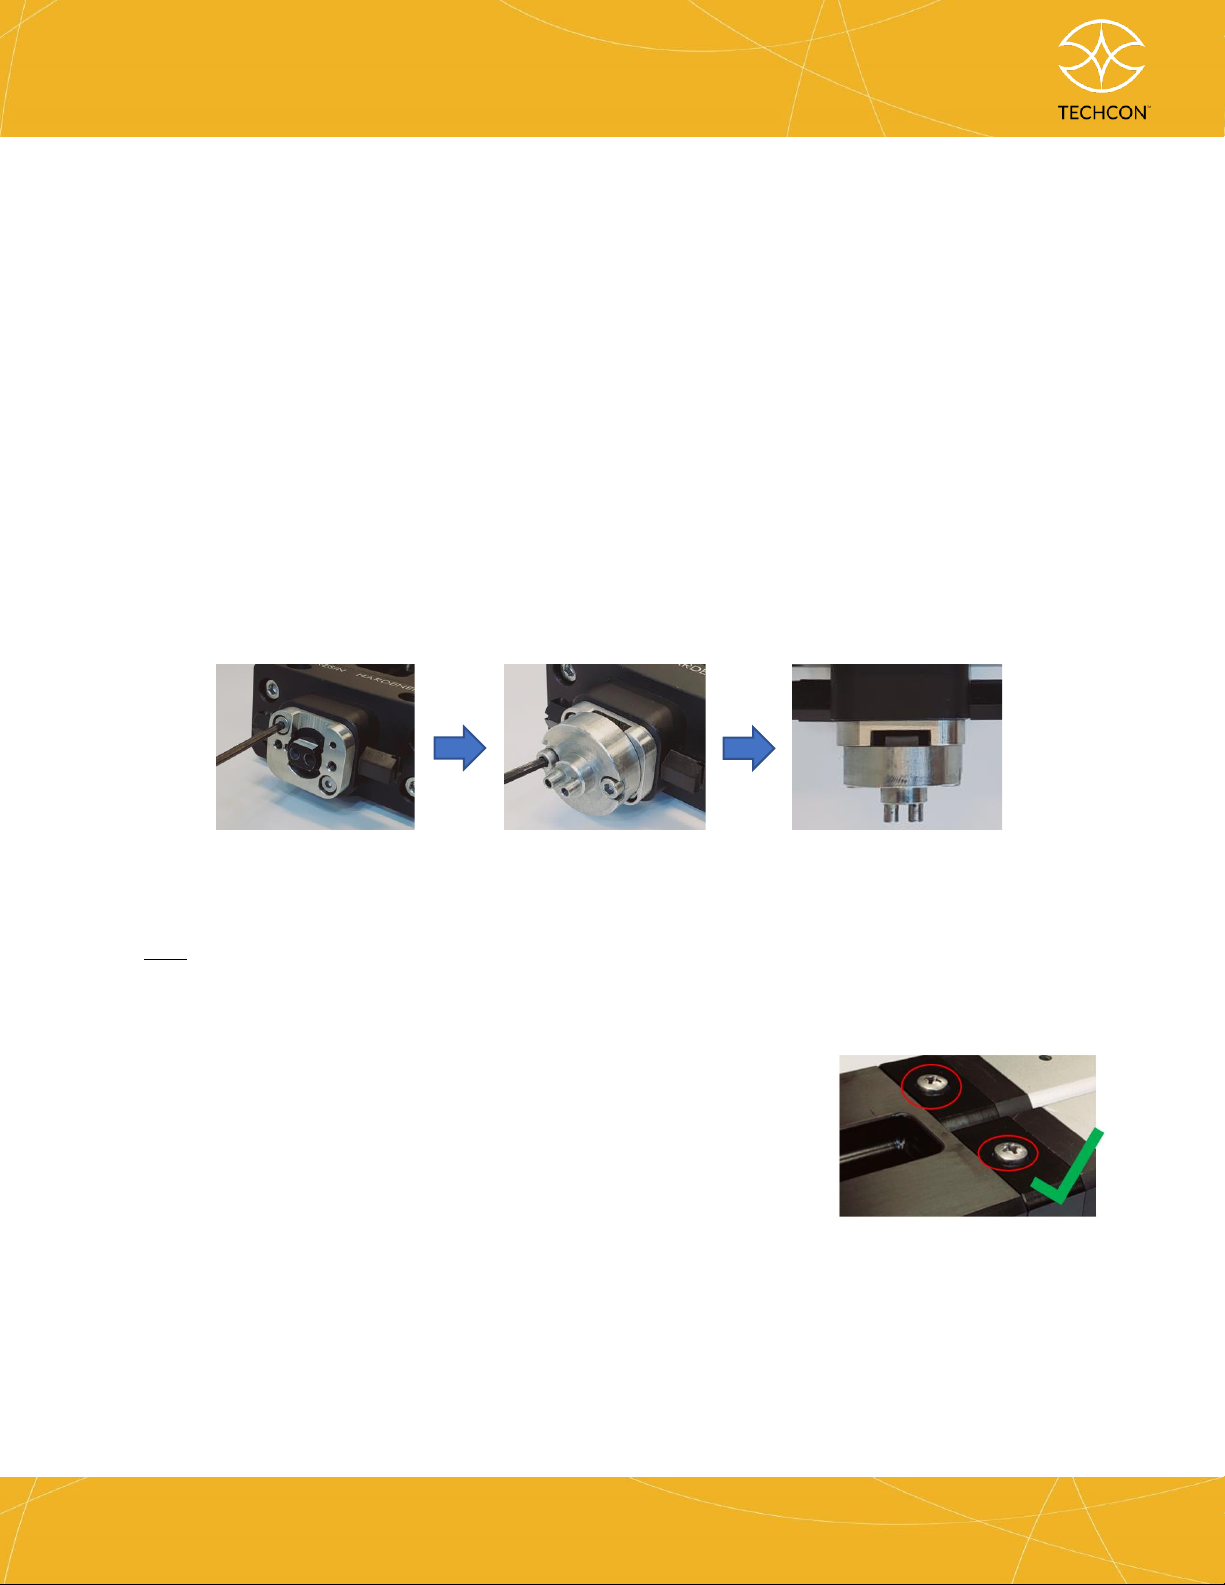
f. Align the manifold with the now-assembled pump and pump housing. The
engraved labels “RESIN” and “HARDENER” should be facing you. Insert and
fasten four 3.0 mm hex screws with lock washers in the order shown in the image
below. Make sure the two now-assembled pumps are vertically symmetrical and
not flaring outwards. Make sure there are no gaps or any visible
light between pump housing and mating parts. If there are issues,
relieve tension on the screws and tighten evenly.
g. Install fluid inlet fittings. There are several different fluid inlet fittings available.
The fluid inlet fitting required will depend on the fluid reservoir option you select.
In the picture below, we use 1/8”NPT x luer lock elbow. Reference the
“Accessories” section for information on fluid inlet fittings. It is recommended that
Teflon tape be applied to the thread of the fluid inlet fitting prior to installation.
1
2
3
4
2
3
TS8200D Series
Micro-Meter Mix Quick Start Guide
techcon.com/contact-us
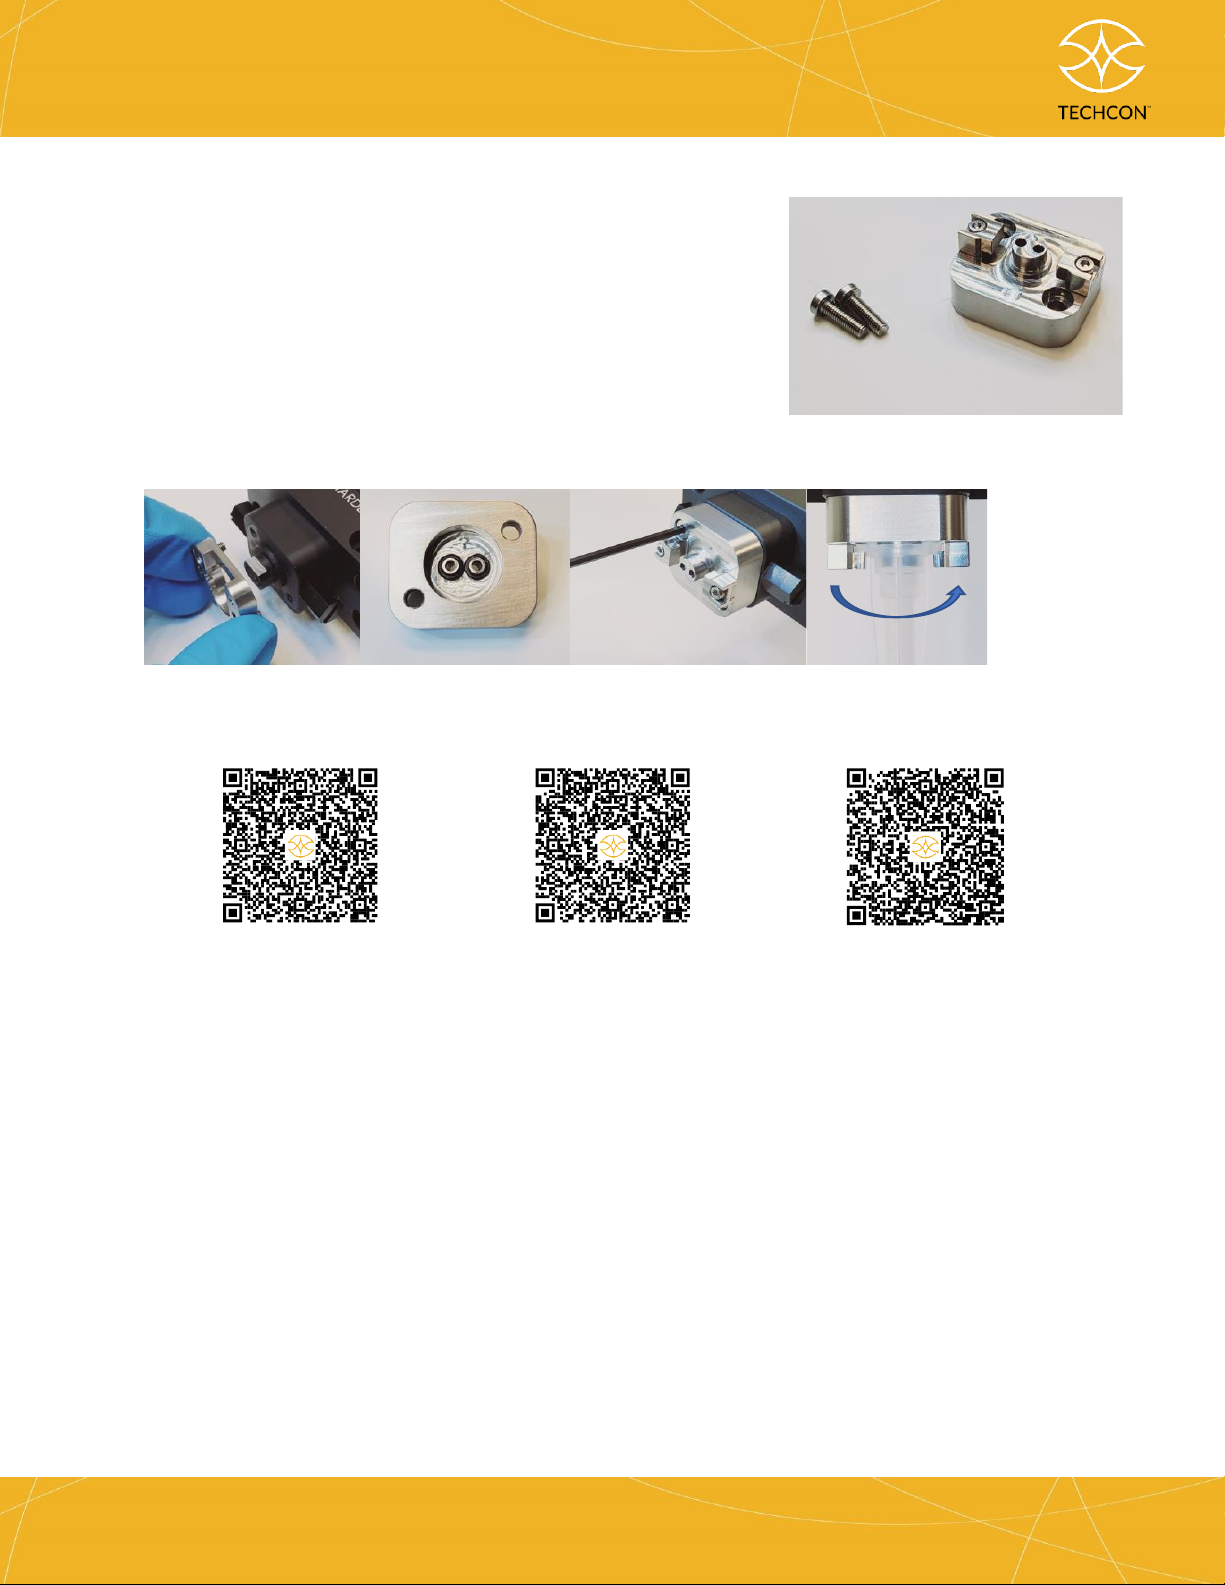
h. Install calibration adaptor. The calibration adaptor is required whenever
calibration is performed, when a new fluid is introduced, when the valve is
disassembled & reassembled, or when the stators or rotors are changed.
Connecting calibration adaptor can protect the TS8200D from having direct
contact with the material as it exits the pump.
i. Mount the 1:1/2:1 K-type Nozzle Locking Plate and use a 2.0 mm hex wrench to
fasten screws into place.
i. Mount the calibration adaptor and use a 2.5 mm hex wrench to fasten screws
into place.
ii. Make sure that the calibration adaptor rest evenly against the nozzle locking
plate.
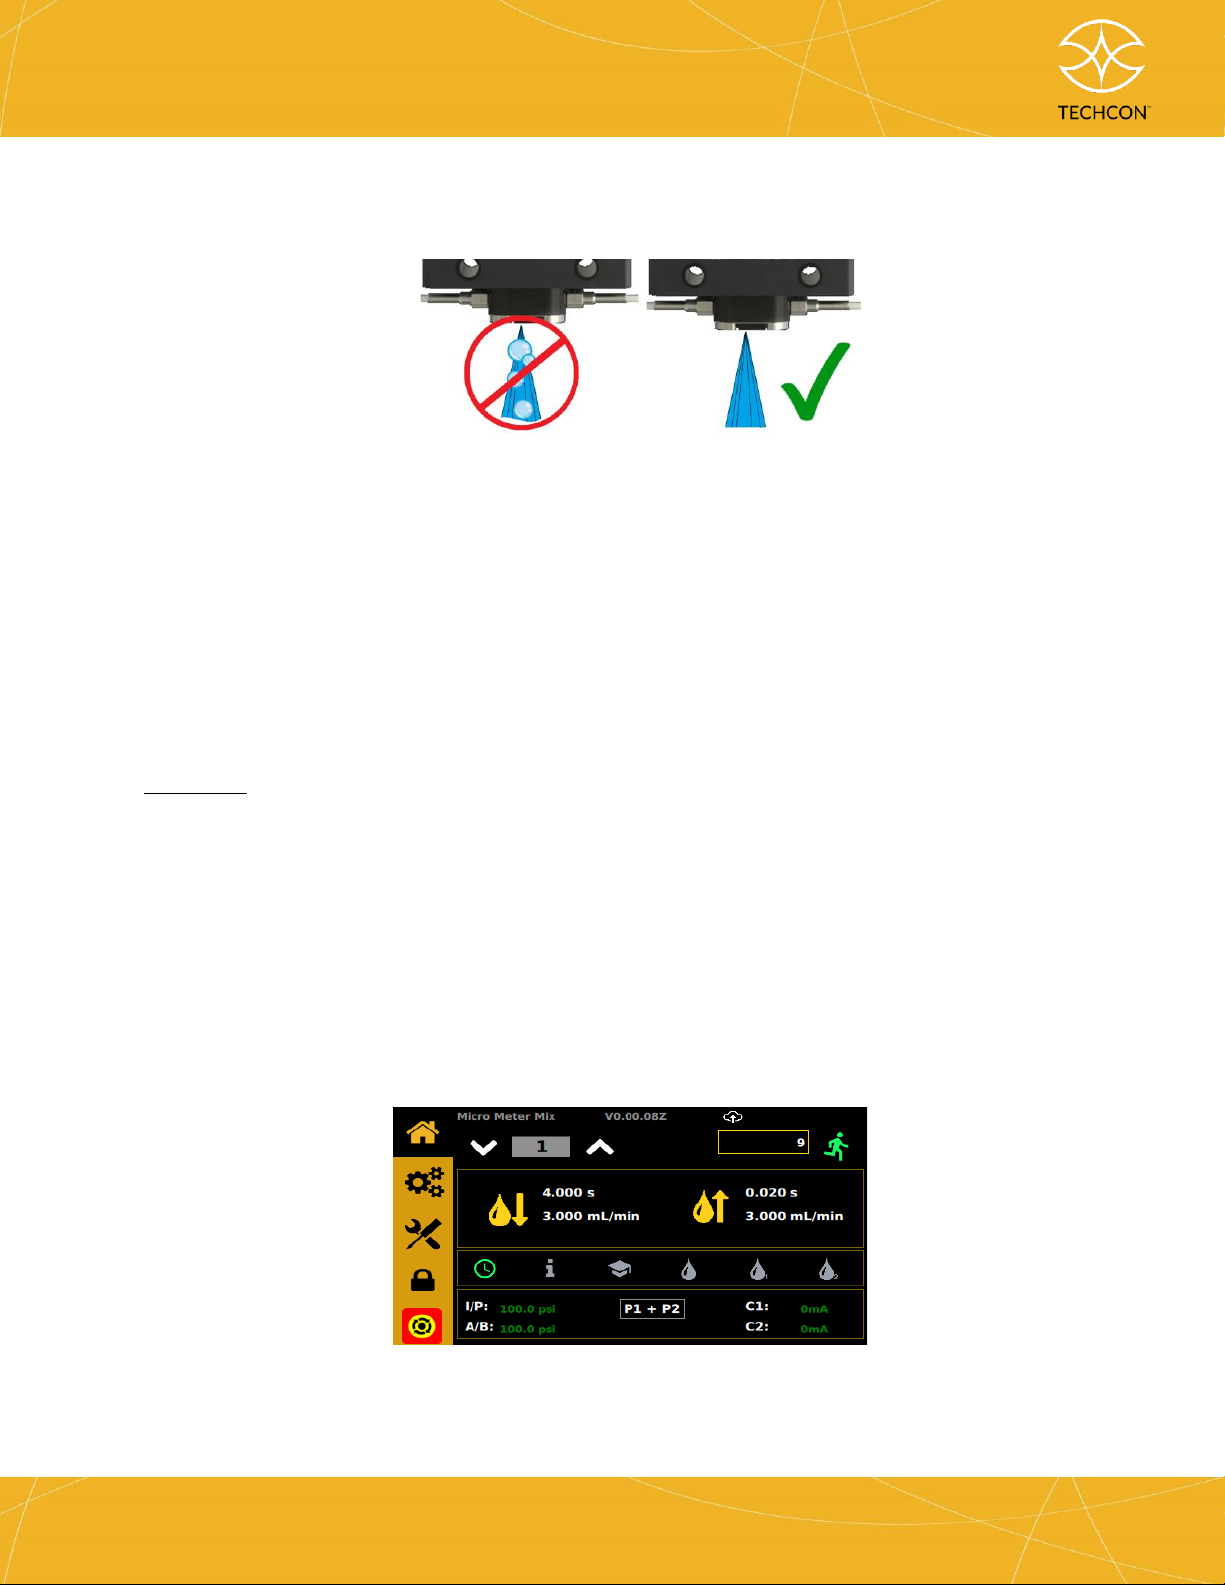
2. DISPENSING
Tip: Avoid over-tightening vent screws. Over-tightening may lead to tears to the
vent seal O-ring.
a. Connect the fluid supply to the fluid inlet of the pump. If
using a fluid reservoir, reference the “Accessories”
Section for information on compatible fluid lines. Make
sure the resin is connected to the pump with the “RESIN”
label and the hardener is connected to the pump with the
“HARDENER” label.
b. Connect the pump to the controller.
4

TS8200D Series
Micro-Meter Mix Quick Start Guide
techcon.com/contact-us
1. Air Filter, 2. Pump, 3. Pressure Tank, 4. Pressure Tank
2.1 Venting and Purging the Pumps
Venting and purging the pumps is recommended before placing them into
operation. Failure to vent and purge during the initial setup may lead to dispensing
issues.
Set the fluid pressure to around 0.3 bar (5 psi). The fluid pressure will depend on the
viscosity of the material. Increase fluid pressure if needed.
A. Purging and Venting “RESIN” – Pump 1
To purge the resin though the manifold:
1. Navigate to the Home page.
2. Unlock the unit by clicking lock icon. Default password = 0000.
3. Select the Purge Pump 1 icon.
4. Press the foot switch.
Using Fluid Reservoir
Using Syringes
5
TS8200D Series
Micro-Meter Mix Quick Start Guide
techcon.com/contact-us
5. Allow the fluid to flow from the manifold until a steady stream of air-free
material is observed.
6. Release the foot switch.
7. We are now done purging Pump 1.
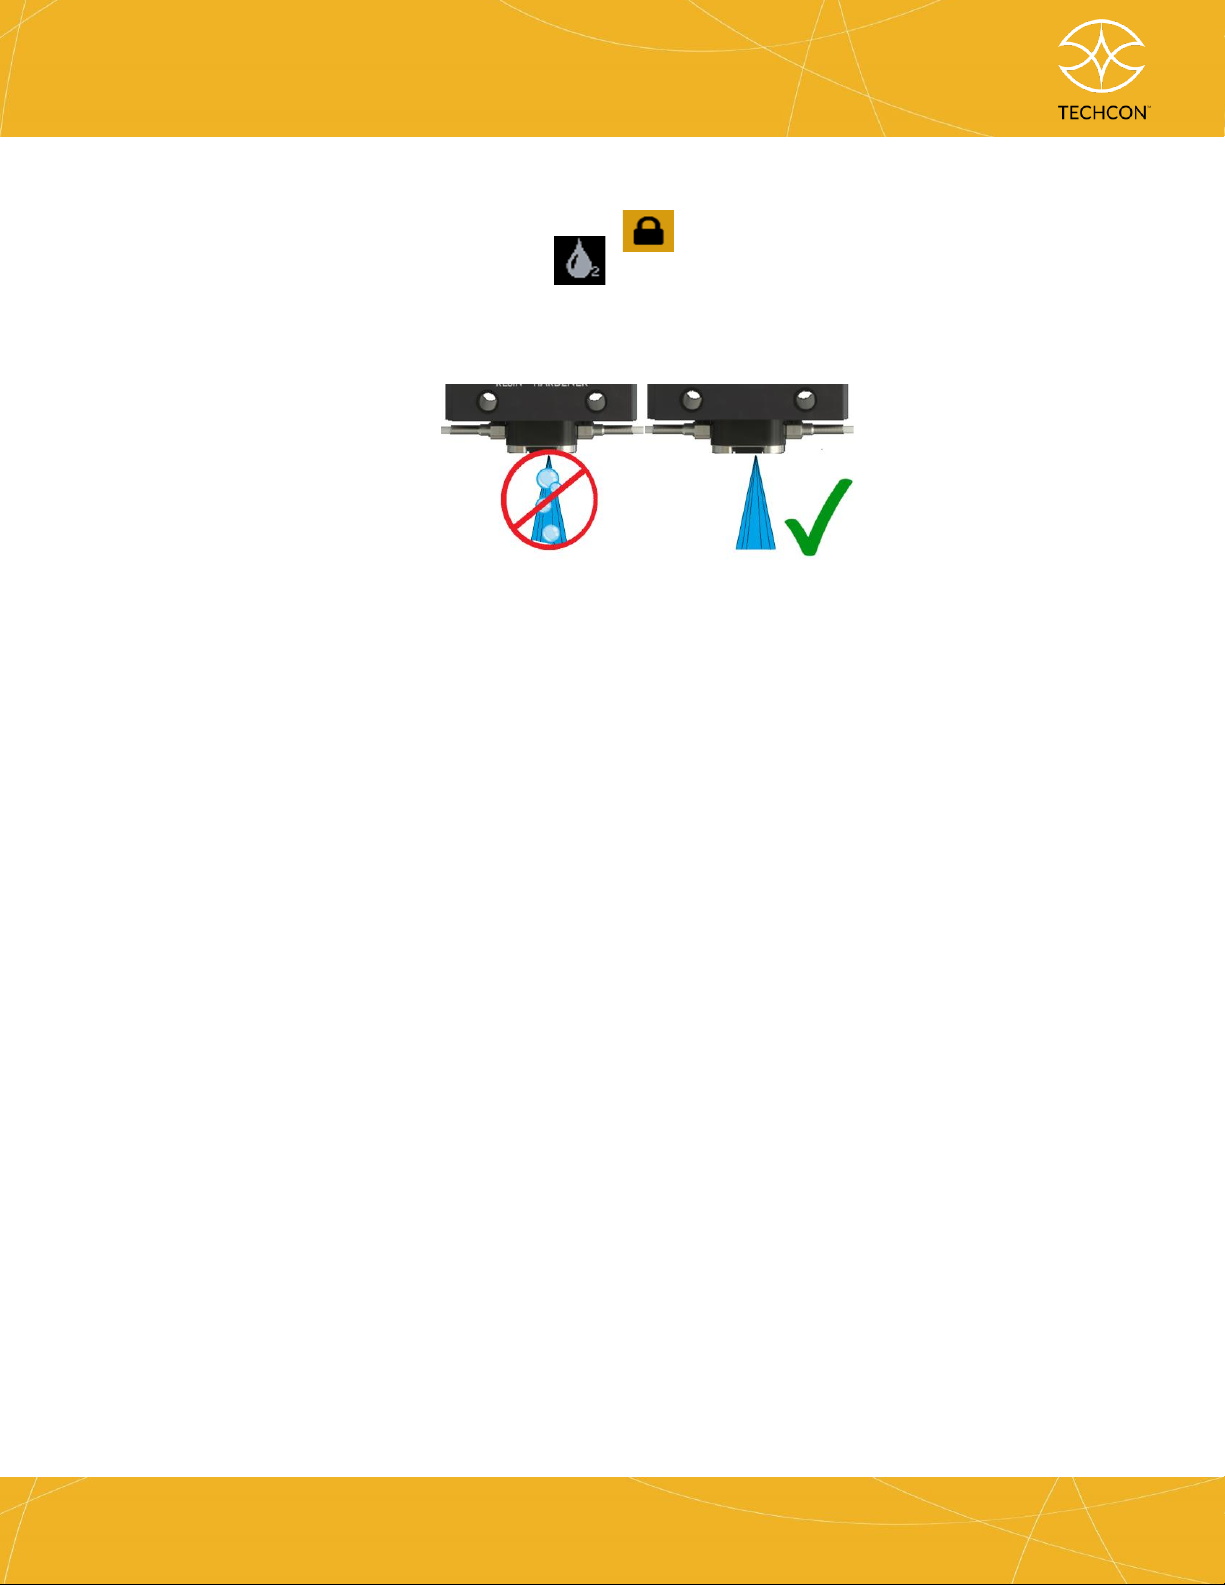
To vent the resin:
8. Using a Phillips head screwdriver, loosen the front vent screw by turning it in
the counterclockwise direction. Loosen screw in one-revolution increments.
At around the 6th –7th revolution, you should begin to see material seep out.
Allow material to escape until no more air bubbles are observed.
Warning: Do not loosen to more than eight (8) complete revolutions. Doing so will
unfasten the screw allowing pressurized material to spray out.
9. Fasten the venting screw. Avoid over tightening the screw. Over tightening
may lead to tearing of the vent seal O-ring.
B. Purging and Venting “HARDENER” – Pump 2
To purge the hardener though the manifold:
1. Navigate to the Home page.
TS8200D Series
Micro-Meter Mix Quick Start Guide
techcon.com/contact-us
2. Unlock the unit by clicking lock icon. Default password = 0000
3. Select the Purge Pump 2 icon.
4. Press the foot switch.
5. Allow the fluid to flow from the manifold until a steady stream of air-free
material is observed.
6. Release the foot switch.
7. We are now done purging Pump 2.
To vent the hardener:
8. Have a cleaning towel or container under the pump ready to
catch material.
9. Using a Phillips head screwdriver loosen front vent screw by turning in the
counterclockwise direction. Loosen screw in 1 revolution increments. At
around the 6th –7th revolution you should begin to see material seep out. Allow
material to escape until no more air bubbles
are observed.
Warning: Do not turn more than eight (8) complete revolutions. Doing so will
unfasten the screw allowing pressurized material to spray out.
10. Fasten the venting screw. Avoid over tightening the screw. Over tightening
may lead to tearing of the vent seal O-ring.
6

TS8200D Series
Micro-Meter Mix Quick Start Guide
techcon.com/contact-us
2.2 Calibrating the Pumps
The TS8200D Micro-Meter Mix needs to be calibrated before operation. Go to the
TS580D Controller User Guide for calibration instructions. Return here once
calibration has been completed.
3. DETERMINING CONTROLLER SETTINGS AND FINAL SET-UP
To determine and enter the correct settings and ratio for Resin (Pump 1) and
Hardener (Pump 2), please refer to TS580D Controller User Guide for
instructions on setting up the forward run settings, reverse run settings, ratio
settings, and dispense mode settings.
a. Remove calibration adapter.
b. Install dispense adaptor required for
corresponding static mixing nozzle.
For using 1:1/2:1 bayonet socket type
The static mixing nozzle can be mounted directly onto the pump using the
already installed 1:1/2:1 K-type nozzle locking plate.
c. Align the holes and rotating cap of the mixing nozzle with the holes of the
fluid manifold and “keyed” entry of the base plate adaptor.
d. Insert the nozzle and make sure it rests evenly with the base of the fluid
manifold. Lock into place by rotating the mixing nozzle’s rotating cap
counterclockwise.
e. Pull on the nozzle to confirm it is securely locked into place.
7
TS8200D Series
Micro-Meter Mix Quick Start Guide
techcon.com/contact-us
If using a 4:1/10:1 bayonet socket type
a. Remove bayonet socket base plate adapter.
b. Confirm 4:1/10:1 base plate adapter has x2 O-
ring seals.
c. Mount 4:1/10:1 base plate adapter followed by
the bayonet socket base plate adapter.
d. Align the holes and rotating cap of the mixing nozzle with the holes of the
fluid manifold and “keyed” entry of the base plate adaptor.
e. Insert the nozzle and make sure it rests evenly with the base of the fluid
manifold. Lock into place by rotating the mixing nozzle’s rotating cap
counterclockwise.
f. Pull on the nozzle to confirm it is securely locked into place.
8
TS8200D Series
Micro-Meter Mix Quick Start Guide
techcon.com/contact-us
If using a bayonet mixing nozzle:
a. Remove bayonet socket base plate adapter.
a. Confirm that the bayonet base plate contains x2
O-rings.
b. Install bayonet base plate adaptor.
c. Twist and lock.
d. Pull on the nozzle to confirm it is securely locked
into place.
The pump is now ready for use.
For complete information on the TS8200D Micro-Meter Mix System:
Micro-Meter Mix
User Guide
Micro-Meter Mix
Data Sheet
TS580D-MM Controller
User Guide
9
Other TECHCON SYSTEMS Medical Equipment manuals


Popular Medical Equipment manuals by other brands


Halyard
Halyard FLUIDSHIELD 3 N95 Directions for use

Lifelines
Lifelines trackit T4 user manual

Benchmark Scientific
Benchmark Scientific MyGel E1201-E operating manual

ZOLL
ZOLL Propaq M Operator's guide

Terumo
Terumo Pinnacle Precision Access System Series Instructions for use

Invacare
Invacare H2080 quick guide

Olympus
Olympus OLYMPUS BF TYPE 160 Operation manual

Integra
Integra CUSA Clarity Cleaning Instruction Guide

Graham Field
Graham Field Hausted 6200 Series Assembly and operation instructions

Bestcare
Bestcare BestLift Luna Technical Service

ORTHOSERVICE RO+TEN
ORTHOSERVICE RO+TEN fixalker quick start guide

Dermlite
Dermlite DL4 instructions