Dirigere la scanalatura del riscaldatore verso la
parte sporgente del saldatore
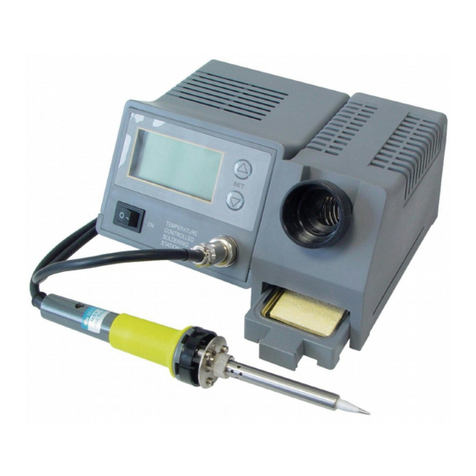
CARATTERISTICHE
• Stazione di saldatura a temperatura controllata con intervallo di temperatura regolabile da
160°C a 480°C.
• Un display LED a due righe visualizza contemporaneamente la temperatura impostata e la
temperatura effettiva.
• Si riscalda velocemente e può sciogliere lo stagno in 20 secondi.
• Finitura lucida per un design più gradevole.
• Saldatore compatto e leggero con cavo in silicone.
• Manico del saldatore pratico da usare completo di rivestimento morbido.
• Entra in modalità standby a temperatura di 200°C quando non viene utilizzato per 10 minuti.
Estraendo il saldatore dal supporto è possibile riattivarlo.
• Conversione da °C/°F facile tramite il pulsante asterisco.
• Tasto M: pulsante per preimpostare la temperatura. Toccare e tenere premuto il pulsante
M per 2 secondi finché l'impostazione della temperatura non lampeggia. Quindi toccare il
pulsante " " o " " per preimpostare la temperatura. Infine toccare nuovamente il pulsante
M per confermare.
SPECIFICHE
• Parte che si riscalda: provvista di rivestimento di alta qualità, 160°C-480°C (320°F-896°F)
• Voltaggio in ingresso: AC 220-240V 50Hz
• Voltaggio in uscita: 24V
• Potenza: 25W(Max 50W)
ATTENZIONE
Si prega di osservare le seguenti indicazioni di sicurezza per evitare malfunzionamenti, danni
o lesioni fisiche:
• Al primo utilizzo il saldatore può produrre fumo, si tratta semplicemente di grasso utilizzato
nella produzione. Non è dannoso per il prodotto o per l'utente.
• Questo articolo non è destinato all'uso da parte di persone (compresi i bambini) con capacità
fisiche, sensoriali o mentali ridotte, o con mancanza di esperienza e conoscenza, a meno
che non abbiano ricevuto supervisione o istruzioni relative all'uso dell'articolo da una
persona responsabile della loro sicurezza.
• Tenere l'articolo oi materiali di imballaggio fuori dalla portata dei bambini.
• Non lasciare l'oggetto incustodito mentre è acceso. Tenere lontani i bambini mentre l'articolo
è in uso.
• Non utilizzare l’articolo se quest’ultimo o il cavo di alimentazione risultano danneggiati.
• Non far passare il cavo di alimentazione attorno a bordi taglienti o su superfici calde.
• Attenzione alle ustioni: non toccare la parte metallica del ferro quando è in uso poiché la sua
temperatura sarà piuttosto elevata.
• Prestare particolare attenzione quando si utilizza il saldatore vicino a materiali combustibili.
• Posizionare la stazione di saldatura su una superficie solida e piana.
• Durante la saldatura possono fuoriuscire fumi nocivi. Lavorare solo in luoghi ben ventilati.
• Proteggere gli occhi e il corpo dagli spruzzi di saldatura calda indossando indumenti
protettivi adeguati.
• Spegnere l'apparecchio e scollegarlo quando non è in uso o prima di pulirlo. Non tirare il
cavo di alimentazione, afferrare sempre la spina per scollegarlo dalla presa di corrente.
• Lasciare raffreddare l'oggetto prima di pulirlo o riporlo.
• Non utilizzare l'articolo all'aperto.
• Non immergere l'oggetto in liquidi di alcun tipo. Non utilizzare l'articolo per riscaldare
plastica o liquidi.
• Non smontare l'articolo né tentare di ripararlo da soli. Non contiene parti riparabili dall'utente.
FUNZIONAMENTO
• Disimballare la stazione di saldatura e controllare tutte le parti. Le parti danneggiate non
devono essere messe in funzione.
• Installare il supporto per lo stagnatore e inumidire la spugna di pulizia con acqua.
• Mettere il saldatore nel supporto.
• Posizionare la stazione di saldatura su una superficie solida e asciutta
• Collegare la stazione di saldatura e accenderla (I=ON/0=OFF).
• Regolare la temperatura tramite i pulsanti " " e " ".
• Testare la temperatura toccando la punta del ferro con lo stagno. Se lo stagno si scioglie
facilmente, si può iniziare a saldare.
• Stagnare la punta del ferro caldo con la lega per saldatura; rimuovere lo stagno in eccesso
utilizzando la spugnetta bagnata.
• Riscaldare il punto di saldatura con il ferro e aggiungere lega.
• Attendere che la saldatura si raffreddi.
• Pulire la punta con la spugna bagnata dopo ogni saldatura.
• Una volta terminato il lavoro, rimettere il saldatore nel supporto per raffreddarlo e spegnere
la stazione di saldatura.
• Per punti di saldatura più grandi, impostare la temperatura più alta per eseguire meglio la
saldatura.
• Abbassare la temperatura durante le pause, risparmiando energia e prolungando la durata
della punta.
• Non limare la punta di saldatura, altrimenti verrà danneggiata.
• Riporre sempre il saldatore sul supporto durante il riscaldamento o durante le pause.
• Utilizzare solo stagno specifico per l'elettronica. La lega di saldatura acida può danneggiare
la punta o l'oggetto.
• Scollegare sempre l'articolo prima di pulirlo. Non è consentito svitare l'alloggiamento.
• Rivolgersi a un professionista per la sostituzione o la manutenzione del cavo.
• ATTENZIONE - Questo strumento deve essere posizionato sul suo supporto quando non
viene utilizzato.
• Questo apparecchio non può essere utilizzato da bambini e da persone con ridotte
capacità fisiche, sensoriali o mentali o con mancanza di esperienza e conoscenza. Chi usa
l’apparecchio deve avere conoscenze e istruzioni relative all'uso sicuro dell'apparecchio
comprendendo anche i rischi coinvolti. I bambini non devono giocare con l'apparecchio.
MANUTENZIONE
Se il cavo di alimentazione è danneggiato, deve essere sostituito dal produttore, dal centro di
assistenza o da persone qualificate per evitare pericoli.
SOSTITUZIONE DELLA PUNTA E DEL RISCALDATORE
Sostituzione punta
La sostituzione della punta deve essere fatta solamente quando lo stagnatore è completamente
raffreddato e presenta una temperatura ambiente. Svitare la punta con un attrezzo (per esempio
una pinza) e sostituire la vecchia punta con una nuova.
PULIZIA GENERALE
L'involucro esterno dello stagnatore o della stazione può essere pulito con un panno umido
utilizzando piccole quantità di detersivo liquido. Non immergere mai l'oggetto in liquidi e non
consentire a liquidi di entrare nell'involucro della stazione. Non utilizzare mai solventi per pulire
l'involucro.
Sostituzione del riscaldatore
La sostituzione del riscaldatore deve essere effettuata solo quando il ferro si è completamente
raffreddato fino a raggiungere la temperatura ambiente.
1. Svitare la punta con uno strumento (ad esempio una pinza). Estrarre la punta, il tubo esterno
e il riscaldatore.
2. Prima di installare il nuovo riscaldatore, assicurarsi che i perni del nuovo riscaldatore siano
tutti diritti. Non dovranno mai essere piegati.
3. Puntare la scanalatura del riscaldatore verso la parte sporgente del saldatore, quindi inserire
delicatamente il riscaldatore nel ferro.
4. Riposizionare il tubo esterno e la punta, quindi serrare la vite.
Con il marchio CE, Techly® garantisce che il prodotto è conforme alle norme e
direttive europee richieste.
In conformità alla normativa RAEE, le apparecchiature elettriche ed
elettroniche non devono essere smaltite con i rifiuti domestici. Il presente
prodotto deve essere consegnato ai punti di raccolta preposti allo
smaltimento e riciclo delle apparecchiature elettriche ed elettroniche.
Contattate le autorità locali competenti per ottenere informazioni in merito
allo smaltimento corretto della presente apparecchiatura.
WWW.TECHLY.COM
STAZIONE DI STAGNATURA
CON CONTROLLO TEMPERATURA
IT


