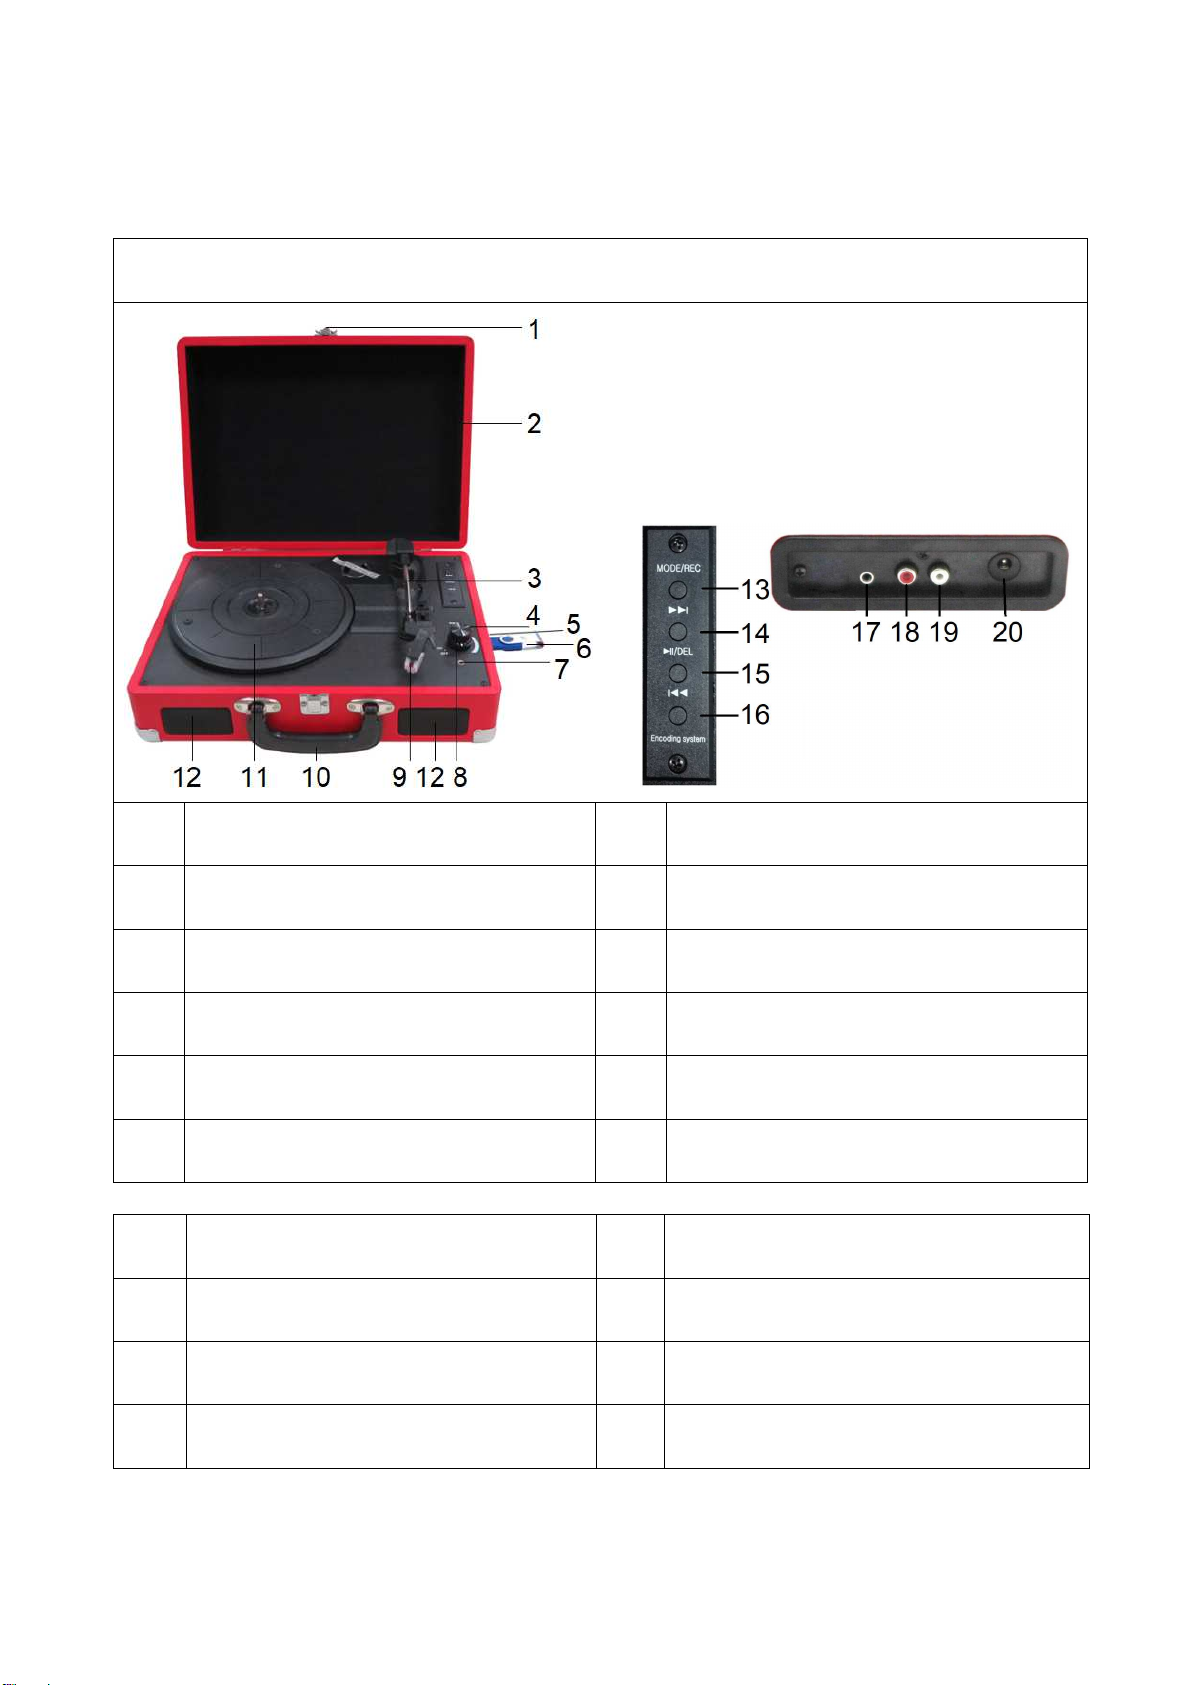
Technaxx TX-101 User manual

1
Technaxx®* Gebrauchsanleitung
Nostalgie Bluetooth Plattendigitalisierer TX-101
Hiermit erklärt der Hersteller Technaxx Deutschland GmbH & Co.KG, dass sich dieses
Gerät, zu dem diese Bedienungsanleitung gehört, in Übereinstimmung mit den
grundlegenden Anforderungen der Normen gemäß Richtlinie RED 2014/53/EU. Hier finden
Sie die Konformitätserklärung: www.technaxx.de/ (in der unteren Leiste unter
“Konformitätserklärung”). Vor dem ersten Gebrauch lesen Sie die Gebrauchsanleitung
sorgfältig durch. Telefonnummer für den technischen Service: 01805 012643 (14
Cent/Minute aus dem deutschen Festnetz und 42 Cent/Minute aus Mobilfunknetzen).
Die Gebrauchsanleitung für zukünftige Bezugnahme oder eine Produktweitergabe
sorgfältig aufbewahren. Verfahren Sie ebenso mit dem Originalzubehör dieses Produktes.
Im Garantiefall wenden Sie sich bitte an den Händler oder das Ladengeschäft, wo Sie
dieses Produkt gekauft haben. Garantie 2 Jahre
Vor dem Gebrauch
Wählen Sie den Standort Ihres Geräts sorgsam aus. Setzen Sie das Gerät keiner
direkten Sonneneinstrahlung aus, und platzieren Sie es nicht in der Nähe von
Wärmequellen. Vermeiden Sie Standorte, an denen das Gerät Schwingungen sowie
übermäßigem Staub, Hitze, Kälte und Feuchtigkeit ausgesetzt ist.
Stellen Sie das Gerät nicht auf eine unebene Fläche, da es nur für eine Verwendung in
horizontaler Position konzipiert wurde.
Wurde das Gerät direkt Kälte oder Wärme ausgesetzt, kann Feuchtigkeit im Gerät
kondensieren und es beschädigen. Wenn Sie das Gerät zum ersten Mal installieren, oder
wenn Sie es von einem kalten Ort an einen warmen Ort bringen, warten Sie 30 Minuten,
bevor Sie das Gerät in Betrieb nehmen.
Die Lüftungslöcher dürfen nicht verdeckt sein. Vergewissern Sie sich, dass ausreichend
Platz über und neben dem Verstärker/Receiver gegeben ist. Stellen Sie weder einen
CD-Player noch andere Geräte auf das Gerät.
Öffnen Sie nicht das Gehäuse. Dies könnte Schäden am Schaltkreis oder einen
Stromschlag verursachen.
Wenn Sie das Gerät längere Zeit nicht benutzen, trennen Sie es von der Stromquelle.
Um den Stecker von der Steckdose zu trennen, niemals am Kabel ziehen.
Um Feuer oder einen Stromschlag zu vermeiden, trennen Sie das Gerät vor dem
Reinigen von der Stromquelle. Seien Sie vorsichtig, während Sie die Kunststoffteile
reinigen und abwischen. Das Gerät nicht mit chemischen Reinigungsmitteln reinigen, da
diese die Oberfläche beschädigen könnten.

2
Besonderheiten
Digitalisieren von LPs auf USB oder SD-Karte bis 32GB
Musikwiedergabe & Aufnahme via Bluetooth 2.0
Wiedergabe von MP3/WMA-Musikdaten von USB oder SD-Karte bis 32GB
Kein Computer/Notebook erforderlich
Cinch-Ausgänge (RCA) zum Anschluss an HiFi-Systeme
Plattenspieler: automatischer Stopp, 3 Geschwindigkeiten: 33, 45, 78 U/Min.
Eingebaute Stereo-Lautsprecher
Transportabler Koffer im Nostalgie-Design
Funktionale und einfache Bedienung
Technische Daten
Bluetooth V2.0 / Profil A2DP & HFP / Reichweite ~10m offene Bereiche
Modus LP, USB, SD-Karte, AUX–IN, Bluetooth
Lautsprecher 2x 1W stereo (Ø= 7cm), SNR ≦80dB, Impedanz 4Ω
Frequenzbereich Lautsprecher 80Hz–15kHz
Aufnahme MP3-Musikdaten auf USB oder SD-Karte bis 32GB
Musikwiedergabe MP3-, WMA-Musikdateien von USB & SD-Karte bis zu
32GB
Mechanik Riemenantrieb
Halbautomatischer Tonarm
Keramischer Tonabnehmer mit Saphirabtastnadel
Netzteil Eingang AC 100~240V/0.3A/50~60Hz
Ausgang DC 5V/1A
Verbindungen
3,5mm AUX-IN & 3,5mm Kopfhöreranschluss
2x Cinch-Ausgänge (RCA) zum Anschluss an
HiFi-Systeme
USB-Anschluss & SD-Kartenfach (bis 32GB)
Eingang-Gerät DC 5V / 1A
Farben Schwarz – Lederoptik oder
Braun - Holzoptik
Gewicht / Maße 2,63kg / (L) 35,0 x (B) 25,0 x (H) 11,0cm
Verpackungsinhalt Nostalgie Bluetooth Plattendigitalisierer TX-101, Adapter
für Single-Schallplatten mit 45 U/min, USB Netzteil, USB
Ladekabel, Gebrauchsanleitung

3
Produktübersicht
Achtung: Produktfarbe kann von der Abbildungen unten abweichen.
Produktansicht
1 Sperrriegel 7 Kopfhöreranschluss
2 Abdeckhaube 8 Stromanzeige
3 Tonarm 9 Tonkopf
4 Lautstärkeregelung 10 Tragegriff
5 SD Kartenfach 11 Plattenteller
6 USB-Anschluss 12 Lautsprecher
13 USB/Bluetooth/REC 17 AUX–IN Anschluss
14 Nächster Titel 18 RCA-R Kanalausgang
15 Pause/Wiedergabe/Löschen 19 RCA-L Kanalausgang
16 Vorheriger Titel 20 DC-Anschluss

4
Inbetriebnahme
Lesen Sie das Handbuch sorgfältig durch. Stecken Sie das USB-Netzteil des
Gerätes in eine Steckdose mit AC 220–240V Wechselstrom. Denken Sie
daran: "Nicht angeschlossene Geräte funktionieren immer fehlerhaft!"
Verstärkeranschluss (falls erforderlich)
Anstatt Musik über die eingebauten Lautsprecher des Plattenspielers zu
hören, können Sie diesen auch mit Ihrer bestehenden HiFi-Anlage verbinden.
Verbinden Sie die Audio-Stecker mithilfe eines Cinch (RCA)-Kabels (*nicht
im Lieferumfang enthalten) an den Line-Eingang Ihres Mixers oder
Verstärkers.
Roter Stecker in R-Kanal-Eingang
Weißer Stecker in L-Kanal-Eingang.
Phono-Modus
WICHTIG! Bei Verwendung des Plattenspielers:
Vergewissern Sie sich, den Nadel-Schutz zu entfernen, wie auf der
Abbildung links dargestellt. (Er sollte leicht vom Tonabnehmer abgleiten.)
Achten Sie darauf, die Tonarmverriegelung vor Gebrauch zu entriegeln und
nach Gebrauch wieder zu sichern.
1 Tonkopf 2 Nadelschutz

5
Wiedergabe im Phono-Modus (Vinyl)
1. Öffnen Sie die Schutzabdeckung. Drehen Sie den Lautstärkeregler (4), um
das Gerät einzuschalten. # 2. Stellen Sie den Geschwindigkeitsschalter auf
die entsprechende Position ein: 33, 45 oder 78, abhängig von der
entsprechenden Schallplatte. # 3. Stellen Sie die automatische
Stopp-Steuerung auf ON (EIN), wenn der Plattenspieler sich nicht mehr
drehen soll, nachdem er das Ende der Schallplatte erreicht hat. Ist der
Schalter auf OFF (AUS) gestellt, dreht sich der Plattenspieler am Ende der
Schallplatte weiter. # 4. Legen Sie die Schallplatte auf den Plattenspieler
(verwenden Sie den Adapter für 45 U/min, falls erforderlich). # 5. Entfernen
Sie den Nadelschutz. Bewegen Sie den Hubhebel nach hinten, um den
Tonarm aus dessen Halterung zu heben, und setzen Sie dann langsam den
Tonarm auf der Schallplatte ab, wie auf der Abbildung oben rechts dargestellt.
Der Plattenspieler fängt an sich zu drehen. # 6. Bewegen Sie den Hubhebel
nach vorne, der Tonarm wird sanft auf der Schallplatte aufsetzen, und die
Wiedergabe beginnt. # 7. Um die Wiedergabe zu stoppen, bewegen Sie den
Hubhebel nach hinten, um den Tonarm anzuheben. Der Plattenspieler wird
sich weiterhin drehen, aber die Schallplatte hört auf zu spielen. Um die
Wiedergabe fortzusetzen, bewegen Sie den Hubhebel nach vorne. # 8. Um
einen anderen Titel auf der Schallplatte zu spielen, bewegen Sie den
Hubhebel nach hinten, setzen Sie den angehobenen Tonarm auf den Anfang
des Titels und bewegen Sie den Hubhebel nach vorne, um den Tonarm zu
senken und die Wiedergabe zu starten. # 9. Um die Lautstärke einzustellen,
drehen Sie den Lautstärkeregler nach rechts oder links. # 10. Am Ende der
Schallplatte den Hubhebel nach hinten bewegen, um den Tonarm zu heben
und ihn in Richtung der Halterung zu führen und dann den Hubhebel nach
vorne bewegen, um den Arm auf der Halterung abzusetzen. # 11. Alternativ
heben Sie den Tonarm von der Schallplatte ab und führen Sie ihn manuell zur
Halterung zurück. # 12. Haben Sie die Schallplattenwiedergabe
abgeschlossen, lassen Sie den Sperrriegel einrasten, um den Tonarm vor
unbeabsichtigter Bewegung zu schützen. Drehen Sie den Lautstärkeregler, um
das Gerät auszuschalten. Trennen Sie es von der Stromversorgung, wenn Sie
es für eine Weile nicht verwenden. HINWEIS: Sollte Ihre Schallplatte stoppen,
bevor der letzte Titel beendet ist, stellen Sie die automatische
Stopp-Steuerung auf OFF (AUS). Ihre Schallplatte wird jetzt bis zum Ende
spielen, aber Sie müssen danach die Schallplattendrehung manuell anhalten.

6
(Legen Sie den Tonarm auf die Halterung und, falls der Plattenspieler sich
noch dreht, schalten Sie ihn aus, indem Sie den Lautstärkeregler drücken.
Setzen Sie dann die automatische Stopp-Steuerung wieder auf ON (EIN).)
Aufnahme im Phono-Modus (Vinyl)
Zuerst das Speichermedium einlegen (USB-Stick oder SD-Karte). Wenn der
Plattenspieler läuft, drücken Sie die REC (Aufnahme)-Taste auf der oberen
Steuereinheit des Gerätes (zw. Schritt 4 und 5 der "Schallplattenwiedergabe")
1-2 Sekunden lang drücken. Jetzt beginnt die Aufnahme, und die REC LED
(Aufnahme-Anzeige) blinkt. Um die Aufnahme zu stoppen, drücken Sie kurz
die Pause/Wiedergabe/Löschen Taste kurz oder führen Sie den Tonarm
wieder auf die Ausgangsposition
Löschen einer aufgenommenen Musikdatei
Nachdem Sie die Aufnahme beendet haben, drücken Sie auf USB/BT/REC für
die Wiedergabe. Wenn Sie nun die Aufnahme löschen möchten, drücken Sie
die Pause/Wiedergabe/Löschen Taste. Die Datei wird gelöscht. HINWEIS:
Wenn Sie sowohl den USB-Stick als auch die SD-Karte einsetzen, wird die
aufgenommene Datei auf dem später eingelegten Medium gespeichert.
Die aufgenommene Datei hat ein MP3-Format mit 128Kbps.
Nadelaustausch
Entfernen der Nadel aus dem
Tonkopf: Einsetzen der Nadel:
1. Führungsstifte (innen)
Legen Sie einen Schraubenzieher an
die Spitze des Nadelkopfes und
drücken Sie nach unten in die auf
Zeichnung "A" dargestellte Richtung.
Entfernen Sie den Nadelkopf, indem
Sie ihn nach vorne ziehen und nach
unten drücken.
Halten Sie die Spitze des Nadelkopfs
fest und fügen Sie ihn ein, indem Sie
auf den mit "B" bezeichneten Punkt
drücken. Schieben Sie den Nadelkopf
nach oben in die mit "C" bezeichnete
Richtung, bis die Nadel in der
Spitzenposition einrastet.

7
Wiedergabe von Bluetooth kompatiblen Smartphones
Achtung: Heben Sie den Tonarm an und legen Sie ihn auf der Halterung ab!
1. Öffnen Sie die Schutzabdeckung und schalten Sie den Lautstärkeregler ein.
2. Die USB/BT/REC-Taste drücken zum Umschalten zw. USB- und BT-Modus
3. Bluetooth auf Ihrem Smartphone aktivieren. Nach "Technaxx TX-101"
suchen, um eine Verbindung herzustellen.
4. Bei erfolgreicher Verbindung hören Sie ein Bestätigungssignal.
5. Die Taste Nächster (15), Vorheriger (17) oder Wiedergabe/Pause (16)
wählen, um Ihre Wiedergabeliste abzuspielen.
Hinweis: Wenn Sie das Gerät einschalten und den "Bluetooth-Modus" wieder
aktivieren, wird das zuletzt angeschlossene Smartphone automatisch
verbunden!
AUX-IN-Modus
Die Schutzabdeckung öffnen und den Lautstärkeregler einschalten.
Schließen Sie das externe Audiogerät über ein 3,5 mm breites Kabel (wie
CD-Player, Smartphone, etc.) an die AUX-IN-Buchse auf der Rückseite des
Gerätes an.
Das Audiosignal des externen Audiogeräts wird nun über die
Lautsprecher wiedergegeben.
USB-Port und SD-Kartenfach
1. Öffnen Sie die Schutzabdeckung und schalten Sie den Lautstärkeregler ein.
2. Stecken Sie einen USB-Stick in den USB-Port und stellen Sie sicher, dass
er vollständig eingelegt ist. Alternativ können Sie eine SD-Karte einlegen und
darauf achten, dass sie ohne Biegen gerade feststeckt. WICHTIG: Wenn Sie
den USB-Stick seitenverkehrt verbinden, könnten das Audiosystem oder das
Speichermedium (USB-Laufwerk, SD-Karte) beschädigt werden. Überprüfen
Sie vor dem Anschluss, ob die Richtung korrekt ist.
3. Wählen Sie den USB-Modus. (Sind sowohl ein USB-Stick als auch eine
Speicherkarte eingelegt, entfernen Sie eines der Speichermedien!) Die
Anlage wird nach der Modus-Auswahl automatisch das Speichermedium
ablesen. # 4. Die Anlage startet dann automatisch die Audiowiedergabe vom
Speichermedium (USB-Stick oder SD-Karte).
5. Das Gerät unterstützt MP3- und WMA-Formate. Während der Wiedergabe

8
die PLAY (Wiedergabe)/PAUSE-Taste einmal drücken, um die Wiedergabe
anzuhalten, und erneut, um fortzufahren.
6. Drücken Sie Vorheriger (17) einmal, um den vorherigen Titel abzuspielen.
Kontinuierlich gedrückt halten, um die Auswahl rückwärts zu beschleunigen.
Drücken Sie Nächster (15) einmal, um den nächsten Titel abzuspielen.
Kontinuierlich gedrückt halten, um die Auswahl vorwärts zu beschleunigen.
Wiedergabesteuerung
WIEDERGABE/PAUSE (16): Drücken Sie diese Taste einmal, um die
Wiedergabe zu beenden, drücken Sie sie erneut, um fortzufahren.
NÄCHSTER (15): Drücken Sie diese Taste einmal, um den nächsten Titel
abzuspielen, und halten Sie diese Taste für den Schnellvorlauf durch den Titel
gedrückt.
VORHERIGER (17): Drücken Sie diese Taste einmal, um den vorherigen Titel
abzuspielen, und halten Sie diese Taste für den Schnellrücklauf durch den
Titel gedrückt.
USB/BT/REC (14): Drücken Sie diese Taste, um zwischen USB/SD- und
Bluetooth-Modus zu wechseln.
Wichtige Hinweise:
Das System kann Dateien im MP3-/WMA-Format nur über den USB-Port
oder das SD-Kartenfach erkennen und lesen. Sie können einen MP3-Player
über die USB-Buchse an die Anlage anschließen. Allerdings ist bei einigen
MP3-Playern die Wiedergabe über die USB-Buchse nicht möglich. Dies ist auf
Abweichungen im MP3-Kodierungsformat zurückzuführen. Es handelt sich
nicht um eine Fehlfunktion des Systems. Es gibt zahlreiche USB- und
SD-Gerätehersteller, und ihre Produkte variieren bzgl. der Auflösung und des
Formats. Wir können daher nicht garantieren, dass dieses Gerät alle USB-
und SD-Speicher jeder Marke unterstützt. Dieses System unterstützt
USB/SD-Karten bis zu 32GB. MP3-/WMA Spurformatanforderungen:
MP3-Bitrate: 32Kbps~256Kbps; WMA-Bitrate: 32Kbps~320Kbps.
Entfernen des USB-Stick oder der SD-Karte
Um den USB-Stick zu entfernen, ziehen Sie ihn aus dem USB-Anschluss.
Um eine Speicherkarte zu entfernen, ziehen Sie sie aus dem
SD-Kartenfach.

9
FAQ – Häufig gestellte Fragen
Probleme mit dem Klang
Den Lautstärkeregler im Uhrzeigersinn drehen zur Lautstärkenerhöhung.
Vergewissern Sie sich, dass das Netzkabel des Geräts an eine geeignete
Steckdose angeschlossen ist und dass die Steckdose eingeschaltet ist.
Beim Abspielen von Schallplatten ist darauf zu achten, dass Sie die richtige
Geschwindigkeit gewählt haben (33, 45 oder 78 U/min).
Wenn Sie Musik von einem USB-Stick oder einer SD-Karte abspielen,
stellen Sie sicher, dass das Speichermedium ordnungsgemäß in den
USB-Port bzw. in das SD-Kartenfach eingelegt ist.
Elektrische Sicherheit und Kabelhandhabung
Bevor Sie dieses Gerät installieren, stellen Sie sicher, dass Ihre
Ausgangsspannung der Spannung entspricht, die auf dem Typenschild des
Gerätes angegeben ist.
Um den Kontakt mit Hochspannungskomponenten im Inneren zu vermeiden,
versuchen Sie nicht, das Gerät zu öffnen.
Beim Anschließen des Gerätes den Stecker richtig ausrichten und
vollständig einstecken, um einen Stromschlag zu vermeiden.
Verwenden Sie dieses Gerät nur mit dem mitgelieferten Kabel und Stecker
und überladen Sie die Steckdose nicht.
Wenn das Netzkabel beschädigt ist, das Gerät nicht benutzen. Es muss es
durch den Hersteller oder ähnlich qualifizierte Dienstleister ersetzt werden, um
Gefahren zu vermeiden.
Hinweis:
Wir empfehlen Ihnen, Ihre Schallplatten für einen vollen und dauerhaften
Klanggenuss mit einem antistatischen Tuch zu reinigen. Wir möchten darauf
hinweisen, dass die Nadel aus dem gleichen Grund periodisch ausgetauscht
werden sollte (ca. alle 250 Stunden). Entstauben Sie die Nadel von Zeit zu
Zeit mit einem sehr weichen Pinsel, der in Alkohol getränkt ist (den Tonkopf
von hinten nach vorne abbürsten).
Beim Transport Ihres Plattenspielers nicht vergessen: 1. Schutzkappe auf
die Nadel aufsetzen. 2. Den Halteclip am Tonarm anbringen.

10
Wiederanbringen des Plattenspielerantriebriemens
Der Plattenspielerantriebsriemen ist werksseitig montiert - verwenden Sie
diese Anleitung nur, wenn sich der Drehteller nicht dreht.
SCHRITT 1
Die Antirutschmatte vom Plattenteller
entfernen. Durch eines der Löcher im
Plattenteller schauen und überprüfen, ob
sich der Riemen von der Riemenscheibe
gelöst hat. Mit einem Schraubenzieher
die schwarze eiserne Clipschelle (Eisen-
klammer) entfernen. Dann den Drehteller
vom Plattenspielerantrieb abnehmen.
SCHRITT 2
Den Antriebsriemen (schwarzes Gummi-
band) entnehmen und um den Platten-
teller legen, dann den Riemen sanft
ziehen, ohne ihn zu überdehnen. Den
Plattenteller ankippen, während der
Riemen festgehalten wird.
SCHRITT 3
Durch eines der Löcher im Plattenteller
schauen und suchen nach der kleinen
Messing-Riemenscheibe suchen (sie ist
am Plattenspielermotor befestigt). Dann
den herausgezogenen Teil des Gummi-
bandes von Hand um die Riemen-
scheibe wickeln. Die Mitte des Platten-
tellers mit der silbernen Drehtellerspindel
in Übereinstimmung bringen. Den
Plattenteller sanft auf den Untersatz
absenken und loslassen, sobald er sich
in der richtigen Position befindet.
SCHRITT 4
Wenn sich der Plattenteller wieder in der
richtigen Position befindet kontrollieren,
ob der Riemen um die Riemenscheibe
gezogen ist. Dann die Clipschelle wieder
anbringen, um den Drehteller an der
Spindel zu befestigen.
Hinweise zum Umweltschutz: Verpackungen sind
recycelbares Rohmaterial. Alte Geräte nicht im Hausmüll
entsorgen. Reinigung: Gerät vor Verschmutzung schützen (mit
sauberem Tuch reinigen). Keine rauen, groben Materialien
oder Lösungsmittel oder andere aggressive Reinigungsmittel
verwenden. Gereinigtes Gerät gründlich abwischen.
Inverkehrbringer: Technaxx Deutschland GmbH & Co.KG,
Kruppstr. 105, 60388 Frankfurt a.M., Deutschland
Rubber
Drive Belt
Pull belt out gently
Brass Pulley

1
Technaxx®* User Manual
Nostalgia Bluetooth Vinyl Record Converter TX-101
The manufacturer Technaxx Deutschland GmbH & Co.KG hereby declares that this device,
to which this user manual belongs, complies with the essential requirements of the
standards referred to the Directive RED 2014/53/EU. The Declaration of Conformity you
find here: www.technaxx.de/ (in bar at the bottom “Konformitätserklärung”). Before using
the device the first time, read the user manual carefully.
Service phone No. for technical support: 01805 012643 (14 cent/minute from German
fixed-line and 42 cent/minute from mobile networks).
Keep this user manual for future reference or product sharing carefully. Do the same with
the original accessories for this product. In case of warranty, please contact the dealer or
the store where you bought this product. Warranty 2 years
Before usage
Choose the installation location of your unit carefully. Avoid placing it in direct
sunlight or close to a source of heat. Also avoid locations subject to vibrations and
excessive dust, heat, cold or moisture.
Do not install the unit in a inclined position, It is designed to be operated in a
horizontal position only.
If the unit is brought directly from a cold to a warm location, moisture may condense
inside the player, and cause damage it. When you first install the unit, or when you
move it from a cold to a warm location, wait for 30 minutes before operating the unit.
The ventilation holes should not be covered. Make sure there is enough space
above and beside the amplifier/receiver. Do not place a CD player or other equipment
on top of the device.
Do not open the cabinet. This might cause a damage to circuitry or electrical shock.
If you are not going to use the player for long time, be sure do disconnect the player
from the AC power source. When removing the power plug, never yank the cord.
To prevent fire or shock hazard, disconnect your unit from the AC power source
when cleaning. Use caution when cleaning and wiping the plastic parts. Do not attempt
to clean the unit with the chemical solvents as this might damage the finish.

2
Features
Digitizing vinyl records to USB or SD card up to 32GB
Music playback & recording via Bluetooth 2.0
Playback of MP3/WMA music files from USB or SD card up to 32GB
No computer/notebook required
RCA outputs for connection to HiFi systems
Record player with automatic stop & 3 speeds: 33, 45, 78 rpm
Built-in stereo loudspeakers
Portable suitcase in nostalgia design
Functional and easy handling
Technical specifications
Bluetooth V2.0 / profil A2DP & HFP / distance ~10m open areas
Mode Phono, USB, SD card, AUX–IN, Bluetooth
Lautsprecher 2x 1W stereo (Ø= 7cm), SNR ≦80dB, impedance 4Ω
Frequency range Speakers 80Hz–15kHz
Recording MP3 music files on USB or SD card up to 32GB
Playback MP3/WMA music files from USB or SD card up to 32GB
Mechanics Belt-drive
Semi-automatic play tone pickup arm
Ceramic stereo cartridge with sapphire stylus
Power adapter Input AC 100~240V/0.3A/50~60Hz
Output DC 5V/1A
Connections 3.5mm AUX-IN jack & 3.5mm headphone jack
2x RCA outputs for connection to HiFi systems
USB port & SD card slot (up to 32GB)
Input device DC 5V / 1A
Colours Black – leather look or
Brown – wooden look
Weight/Dimensions 2,63kg / (L) 35.0 x (W) 25.0 x (H) 11.0cm
Package Contents Nostalgia Bluetooth Vinyl Record Converter TX-101,
45rmp single Puck adapter, USB power adapter. USB
charging cable, User Manual

3
Product Overview
Attention: Product colour can differ from the picture below.
Product View
1 Lock catch 7 Headphone jack
2 Dust cover 8 Power light
3 Tone arm 9 Cartridge
4 Volume control 10 Carrying
5 SD cart slot 11 Turnable
6 USB port 12 Loudspeaker
13 USB/Bluetooth/REC 17 AUX–IN jack
14 Next title 18 RCA-R channel output
15 Pause/Play/Delete 19 RCA-L channel output
16 Previous title 20 DC jack

4
First start
Carefully read the user manual. Insert the USB power adapter of the device
into a socket with AC 220–240V. Be reminded: “Non-connected devices
always work faulty!”
Amplifier connection (if required)
While listening to your new turntable using the built in speakers you may
wish to connect it to your existing HiFi system.
Connect the audio plugs to the Line input on your mixer or amplifier using an
RCA cable (*not included)
Red plug into R channel input.
White plug into L channel input.
Phono Mode
IMPORTANT! When using the turntable:
Make sure to remove the stylus protector, as illustrated on the left picture (it
should easily slide off the stylus assembly).
Make sure to unclip the tone arm lock before use and to secure it again after
use.
1 Cartridge
2 Needle protection

5
Playing in Phono mode (Vinyl)
1. Open the dust cover. Turn the volume knob (4) to turn the equipment on.
2. Set the speed selector to the appropriate position: 33, 45 or 78, depending
on the record to be played.
3. Set the auto stop control to ON if you want the turntable to stop turning
when it has reached the end of the record. If the switch is set to OFF, the
turntable will continue turning at the end of the record.
4. Place the record on the turntable (use the 45 rpm adaptor, if required).
5. Remove the needle protection. Move the lift lever towards the back to raise
the tone arm from the arm park, then slowly move the arm to the record, as
illustrated on the right picture above. The turntable will start rotating.
6. Move the lift lever towards the front, the tone arm will gently drop onto the
record and playback will start.
7. To stop playback, move the lift lever towards the back to raise the tone arm.
The turntable will still be rotating but the record will stop playing. To continue
playback, move the lift lever towards the front.
8. To play a different piece on the record, move the lift lever towards the back,
move the raised tone arm to the start of the piece and then move the lift lever
towards the front to lower the tone arm and start playback.
9. To adjust the volume level, turn the volume knob to the right or left.
10. At the end of the record, move the lift lever towards the back to raise the
tone arm and move it back to the tone arm park, and then move the lift lever
towards the front to lower the arm onto its rest.
11. Alternatively, lift the tone arm off the record and return it to the arm rest
manually.
12. When you have finished playing records, engage the tone arm lock to
protect it from accidental movement. Turn the volume knob switch the unit off.
Unplug it from the power supply if you are not going to use it for a while.
NOTE: Should your record stop before the last track finishes, set the auto stop
control to OFF. Your record will now play to the end, but you will have to stop
the turntable rotation manually. (Return the tone arm to its rest manually and if
the turntable is still rotating, switch off the unit by pressing the volume control
knob. Then set the auto stop control back to ON.)

6
Recording in Phono mode (Vinyl)
Firstly insert memory device (USB drive or SD card). When turntable is
working, press the REC key for 1-2 seconds on the top control board of the
unit, (between step 4 and 5 from “Playing a record”) now recording will begin
and REC LED is flashing. To stop the recording press the Pause/Play/Delete
key short or set the tone arm back on the his start position.
Delete recorded music file
After you have finished the recording press USB/BT/REC for playback. If you
now want to delete the recording press Play/Pause/Delete button. The file is
deleted.
NOTE: When you insert both USB drive and SD Card, the recorded file will
be saved into the later inserted device. Recorded file in MP3 format with
128Kbps.
How to replace a needle
Removing the needle from the
cartridge: Inserting the needle:
1. Guide Pins (inside)
Place a screwdriver at the tip of the
needle heads hell and push
downwards in the direction shown in
sketch “A”. Remove the needle head
shell by pulling it forwards and pushing
downwards.
Hold the tip of the needle head shell
and insert it by pressing in the direction
illustrated by “B”. Push the needle
head shell upwards in the direction
illustrated by “C” until the needle locks
into the tip position.

7
Playback of Bluetooth enabled Smartphone’s
Attention: Lift up the tone arm and put it on the rest!
1. Open the dust cover and turn the volume knob to on.
2. Press the USB/BT/REC button to toggle between USB and BT mode.
3. Open the Bluetooth on your Smartphone and search for the name
“Technaxx TX-101“ to connect.
4. When successfully connected you hear a confirmation sound.
5. Select Next (15), Previous (17) or Play/Pause (16) key, to play your playlist.
Note: When you turn on the equipment and activate “Bluetooth mode” again,
the last connected Smartphone will be connected automatically!
AUX-IN Mode
Open the dust cover and turn the volume knob to on.
Connect the external audio device via 3.5mm cable (such as a CD player,
Smartphone, etc.) to the AUX-IN socket at the back of the equipment.
The audio signal from the external audio device will now be played
through the loudspeakers.
USB port and SD card slot
1. Open the dust cover and turn the volume knob to on.
2. Insert a USB device into the USB port, making sure it is fully inserted.
Alternatively, insert a SD card, making sure to insert it straight without bending.
IMPORTANT: Connecting the USB device upside down or backwards could
damage the audio system or storage media (USB drive, SD card). Check to
ensure the direction is correct before connection.
3. Set the function to USB mode. (If you have both a USB device and a
memory card inserted, remove one!) The system will start reading the storage
medium automatically after mode selection.
4. The system will then start audio playback from the media storage device
(USB or SD card) automatically.
5. The device supports for MP3 and WMA formats. During play status, press
PLAY/PAUSE button once to halt playing, press it again to continue.

8
6. Press Previous (17) once to play the preview song. Hold it down
continuously to speed up selecting backward. Press Next (15) once to play
next one. Holds it down continuously to speed up selecting forward.
Playback controls
PLAY/PAUSE (16): Press this button once to stop playing, press it again to
continue.
NEXT (15): Press this button once to play the next track, press and hold this
button to fast forward through the track.
PREVIOUS (17): Press this button once to play the previous track, press and
hold this button to fast reverse through the track.
USB/BT/REC (14): Press this button to toggle between USB/SD and
Bluetooth mode.
Important notes
The system can detect and read files in MP3 / WMA format only via the USB
port or SD card slot.
You can connect an MP3 player to the system via the USB socket; however,
some MP3 players may not be able to play via the USB socket. This is due to
variances in the MP3 encoding format; it is not a malfunction of the system.
There are numerous USB and SD device producers and their products vary
in solution and format. We therefore cannot guarantee that this unit will
support all USB and SD devices from every brand.
This system supports USB drives/SD cards up to 32GB.
MP3 / WMA track format requirements: MP3 bit rate: 32 Kbps~256 Kbps;
WMA bit rate: 32 Kbps~320 Kbps.
Removing the USB flash drive or SD card
To remove the USB flash drive, pull it out of the USB port.
To remove the SD memory card, pull it out of the SD card slot.

9
FAQs
Problems with sound
Clockwise rotate the power/volume knob to increase the volume.
Make sure the power cord of the device is connected to an appropriate
electrical outlet and make sure the wall socket is switched on.
When playing records, make sure you have selected the correct speed (33,
45 or 78 rpm).
When playing music from a USB device (or SD card), make sure the
memory device is properly inserted in the USB port (SD card slot).
Electrical safety and cord handling
Before installing this equipment, make sure your outlet voltage corresponds
to the voltage stated on the appliance rating label.
To prevent contact with high voltage components inside, do not attempt to
open the equipment.
When connecting the equipment, align the plug properly and insert it fully to
prevent electric shock.
Only use this equipment with the cord and plug supplied, and do not
overload the power outlet.
If the power cord is damaged, do not use the equipment. The cord must be
replaced by the manufacturer or similarly qualified personnel in order to avoid
a hazard.
Note:
We advise you to clean your records with an anti-static cloth to gain
maximum enjoyment from them and to make them last. We would also point
out that for the same reason your stylus should be replaced periodically
(approximately every 250 hours) Dust the stylus from time to time using a very
soft brush dipped in alcohol (brushing from back to front of the cartridge).
When transporting your LP player do not forget to: 1. Replace the protective
cap on the stylus. 2. Put the rest clip into the pick-up arm.

10
Reattaching the turntable belt-drive
The turntable drive belt is factory fitted - use these instructions only if the
turntable fails to revolve.
STEP 1
Remove the turntable anti-slip mat
from the platter. looking through one
of the holes in the platter, check if
the belt has indeed come off the
turntable pulley. Use a screwdriver
to remove the black iron ‘C’-clip (iron
binder) and lift the turntable off the
Turntable mechanism.
STEP 2
Retrieve the dropped black rubber
band (the drive belt) and place it
around the platter base - then pull
the belt out gently without
overstretching. Turn the platter over
while holding on to the belt.
STEP 3
Looking through one of the holes in
the platter, locate the small Brass
Pulley (the pulley is attached to the
turntable motor). Then proceed to
hook the pulled out part of the rubber
belt by hand around the Pulley and
then line up the Centre of the platter
with the silver turntable spindle.
Lower the platter gently onto the
deck and let go until it is back in
position.
STEP 4
When the urntable platter is in the
correct position, check the belt is still
around the pulley and then replace
the ‘C’-clip to secure the turntable to
the spindle.
Rubber
Drive Belt
Pull belt out gently
Brass Pulley
Hints for Environment Protection: Packages materials are
raw materials and can be recycled. Do not disposal old devices
or batteries into the domestic waste. Cleaning: Protect the
device from contamination and pollution (use a clean drapery).
Avoid using rough, coarse-grained materials or
solvents/aggressive cleaner. Wipe the cleaned device
accurately. Distributor: Technaxx Deutschland GmbH &
Co.KG, Kruppstr. 105, 60388 Frankfurt a.M., Germany
Table of contents
Languages:
Other Technaxx Media Converter manuals