TechniDog PetSafe User manual
PetSafe®Wireless
Pet Containment System™
Operating Guide / Guide d’emploi
Betriebsanleitung / Bedieningsgids
Guía para el uso / Guida per l’uso
Please read this entire guide before beginning
Veuillez lire entièrement le guide avant de commencer
Bitte lesen Sie die gesamte Betriebsanleitung vor dem
Trainingsbeginn
Lees a.u.b deze gids in zijn geheel door voordat u begint
Por favor, antes de comenzar, lea completamente esta guía
Per favore leggere interamente questa guida prima d’iniziare
2 1-800-732-2677 (US) / 1-800-457-3911 (Canada)
How the SystemWorks
The PetSafe
Wireless Pet Containment System
™
has been proven
safe, comfortable, and effective for all pets over 8 pounds.The system
works by transmitting a radio signal up to 90 feet in all directions.You
temporarily define the Pet Area with Boundary Flags for a visual aid in
training your pet.Your pet wears a Receiver Collar with Contact Points
that touch his neck, and, once trained, is allowed to roam freely in the
Pet Area.When your pet reaches the Boundary Zone, the Receiver Collar
gives a warning beep before delivering a safe Static Correction through
the Contact Points to get his attention until he returns to the Pet Area.
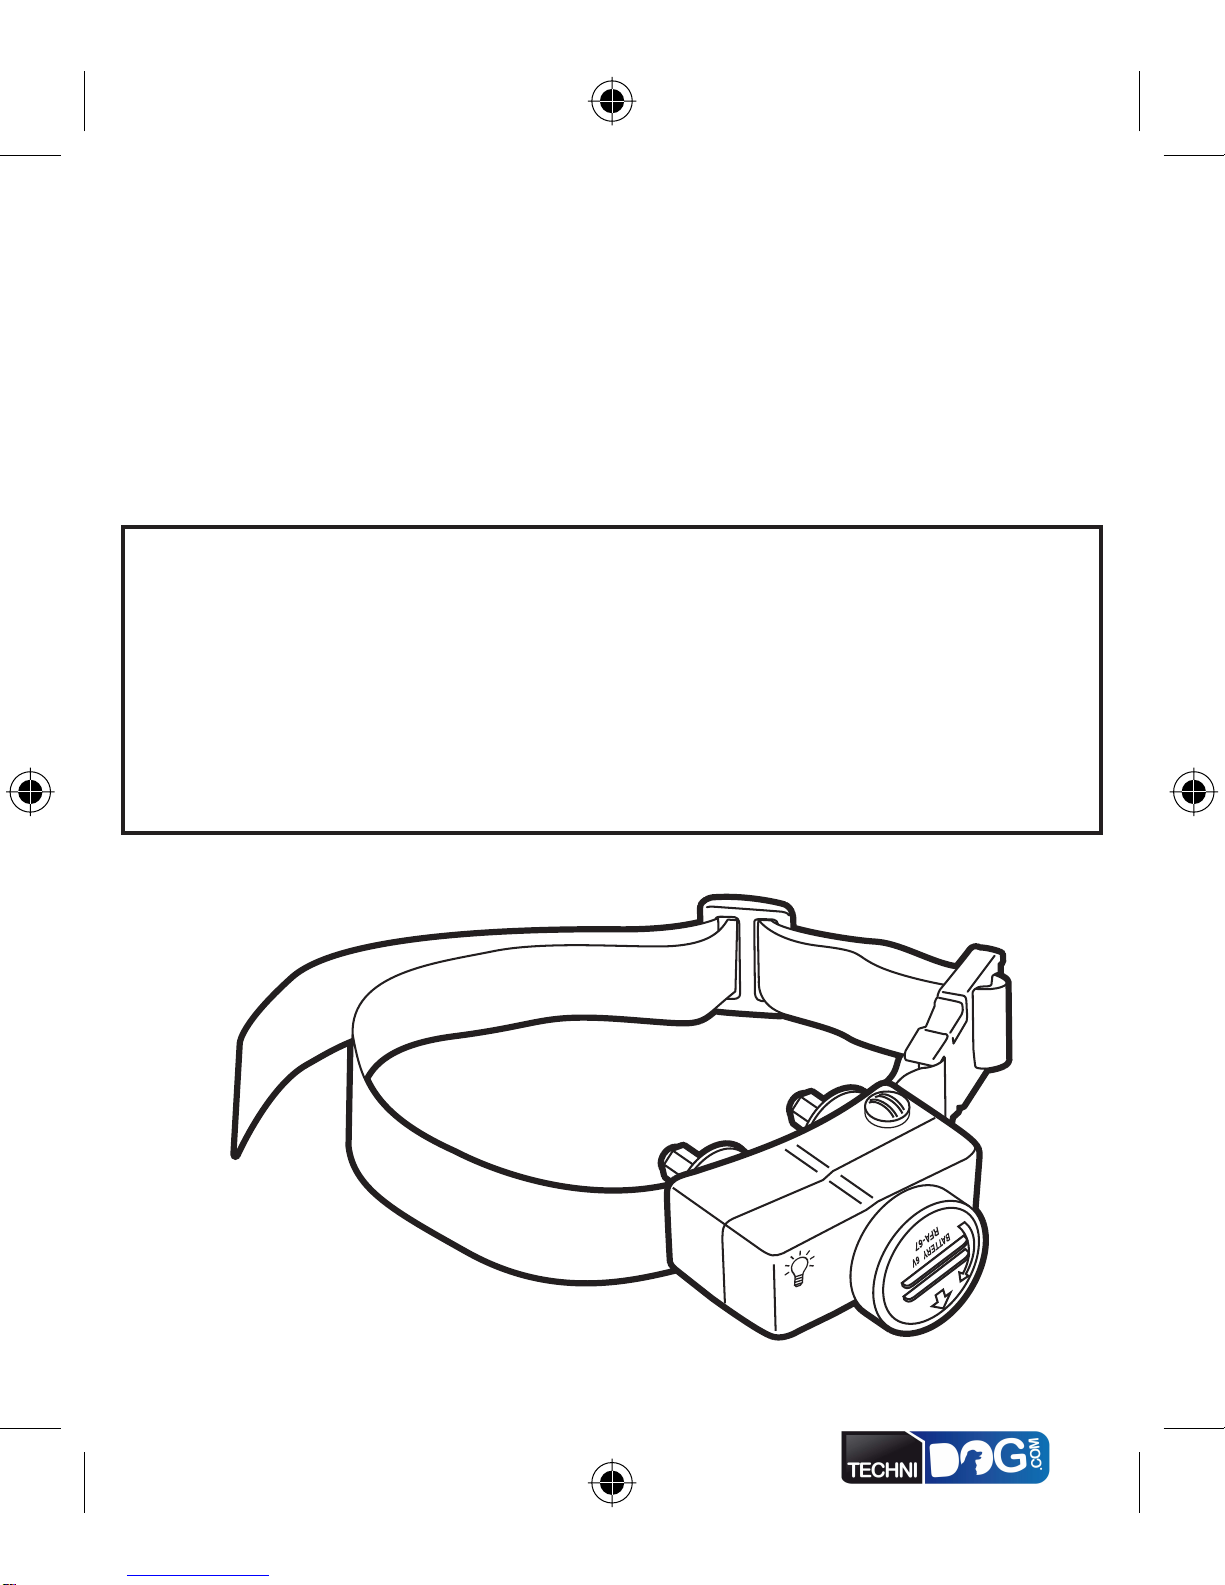
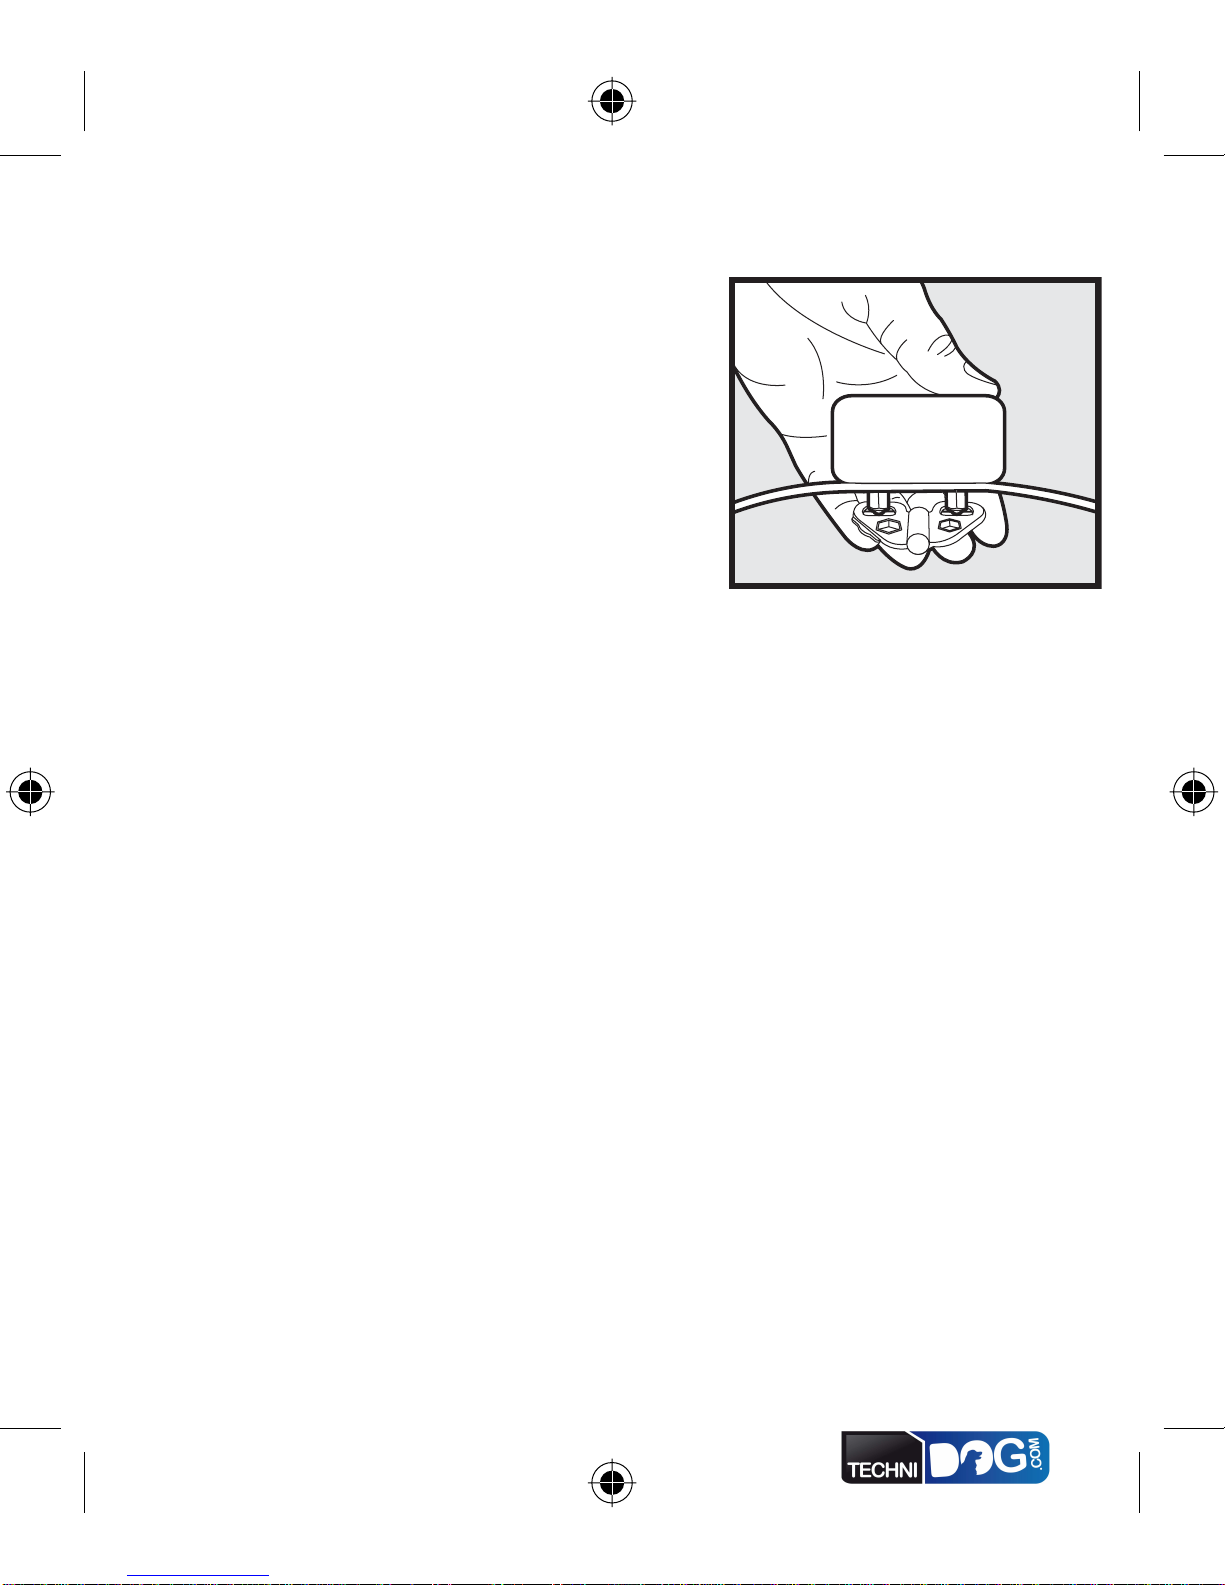
Prepare the Receiver Collar
Your Receiver Collar comes with short
Contact Points installed. Use the long
Contact Points for pets with long or thick
hair.Tighten the Contact Points with the
Contact PointWrench portion of theTest
LightTool (A) one-half turn beyond finger
tight (B). Check the tightness weekly.
Receiver Collar
Contact Points
Battery
Receiver
Indicator
Light
Washers
Correction
Level
Button
Contact PointWrench
Battery
Wrench
Test
Light
Test Light
Contacts
A
B
www.petsafe.net 3
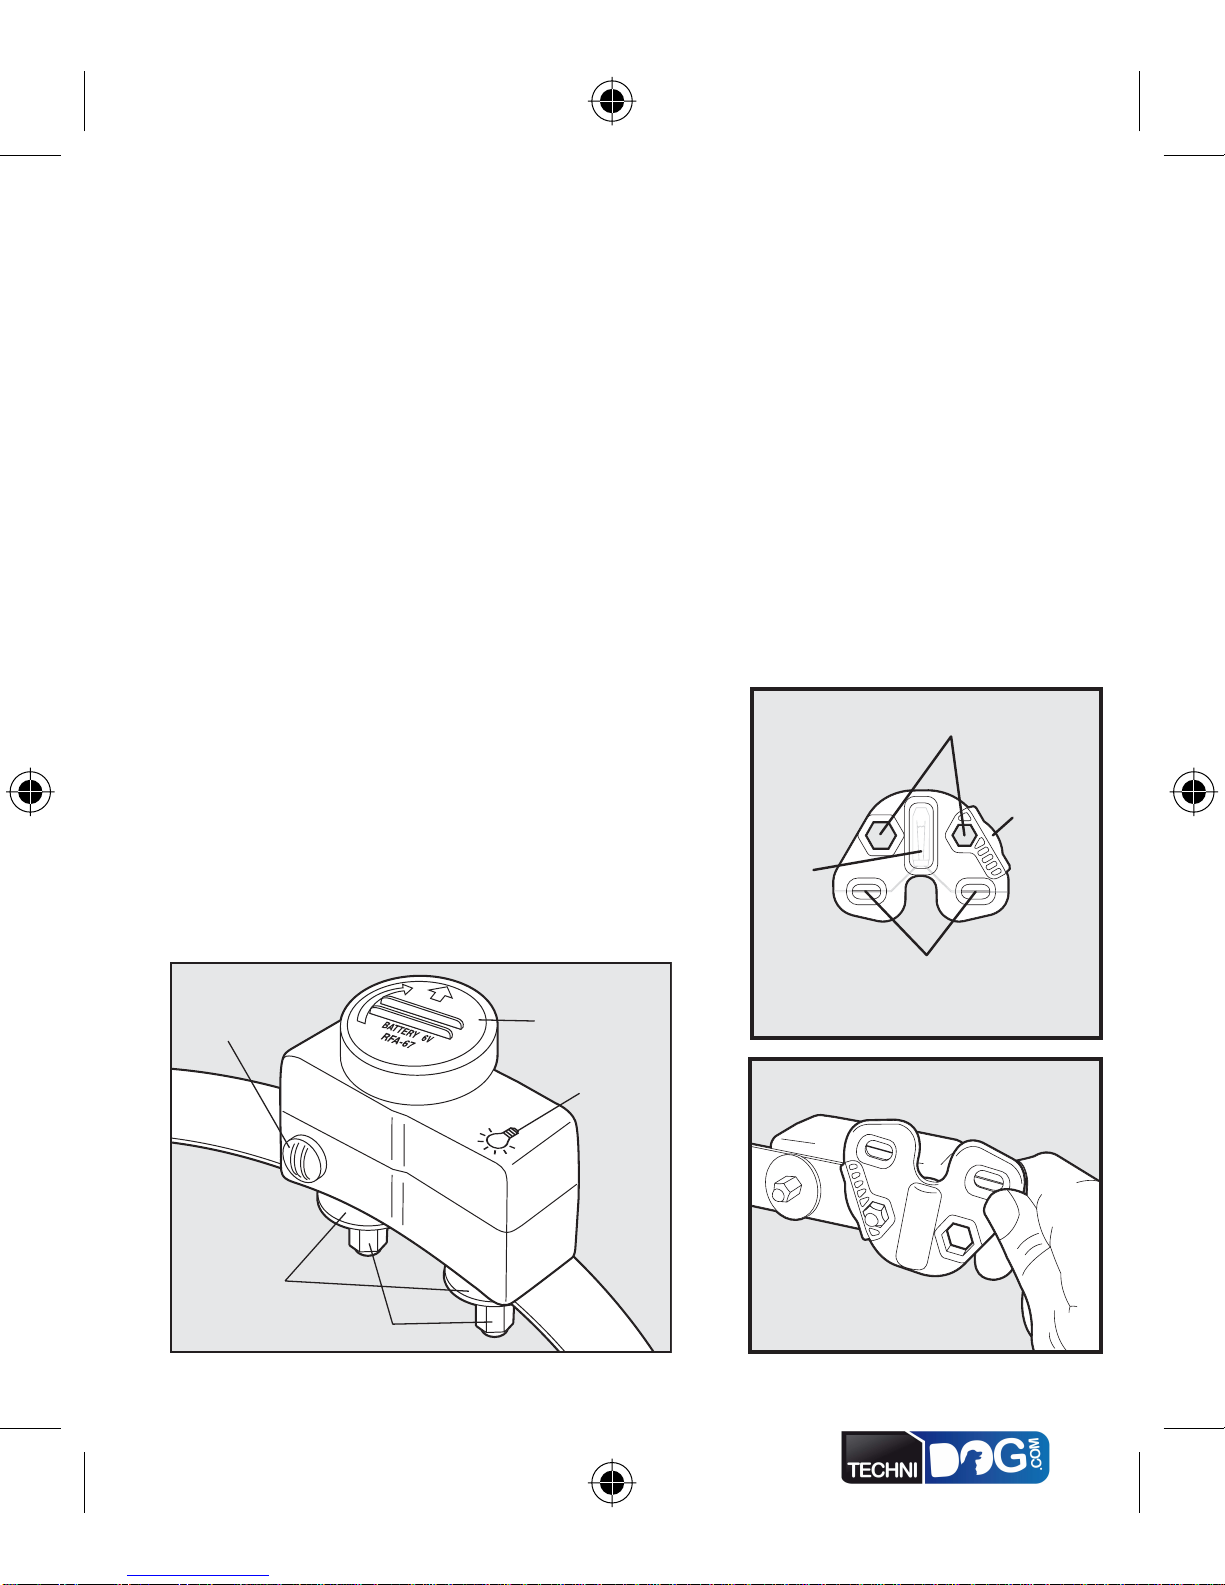
To Insert and Remove the Battery
Note:Do not install the battery while the Receiver Collar is on your pet.
This Receiver Collar utilizes a replaceable PetSafe
®
battery (RFA-67).
This unique battery is designed to make battery replacement easier and
increase water protection.
To insert the battery, align the symbols
on the battery (arrow) and Receiver
Collar (triangle) (C). Use the Battery
Wrench portion of theTest LightTool
(A) to turn the battery clockwise until
the arrow lines up with the lock symbol
on the housing (C).
To remove the battery, turn the battery
counter-clockwise using the Battery
Wrench portion of theTest LightTool
(D). DO NOT attempt to cut into or
pry open the battery. Be sure to discard
the used battery properly.
A replacement PetSafe
®
battery (RFA-67) can be found at many
retailers. Contact the Customer Care Center at
1-800-732-2677 (US)
/ 1-800-457-3911 (Canada)
or visit our web site at www.petsafe.net to
locate a retailer near you.
C
D

4 1-800-732-2677 (US) / 1-800-457-3911 (Canada)
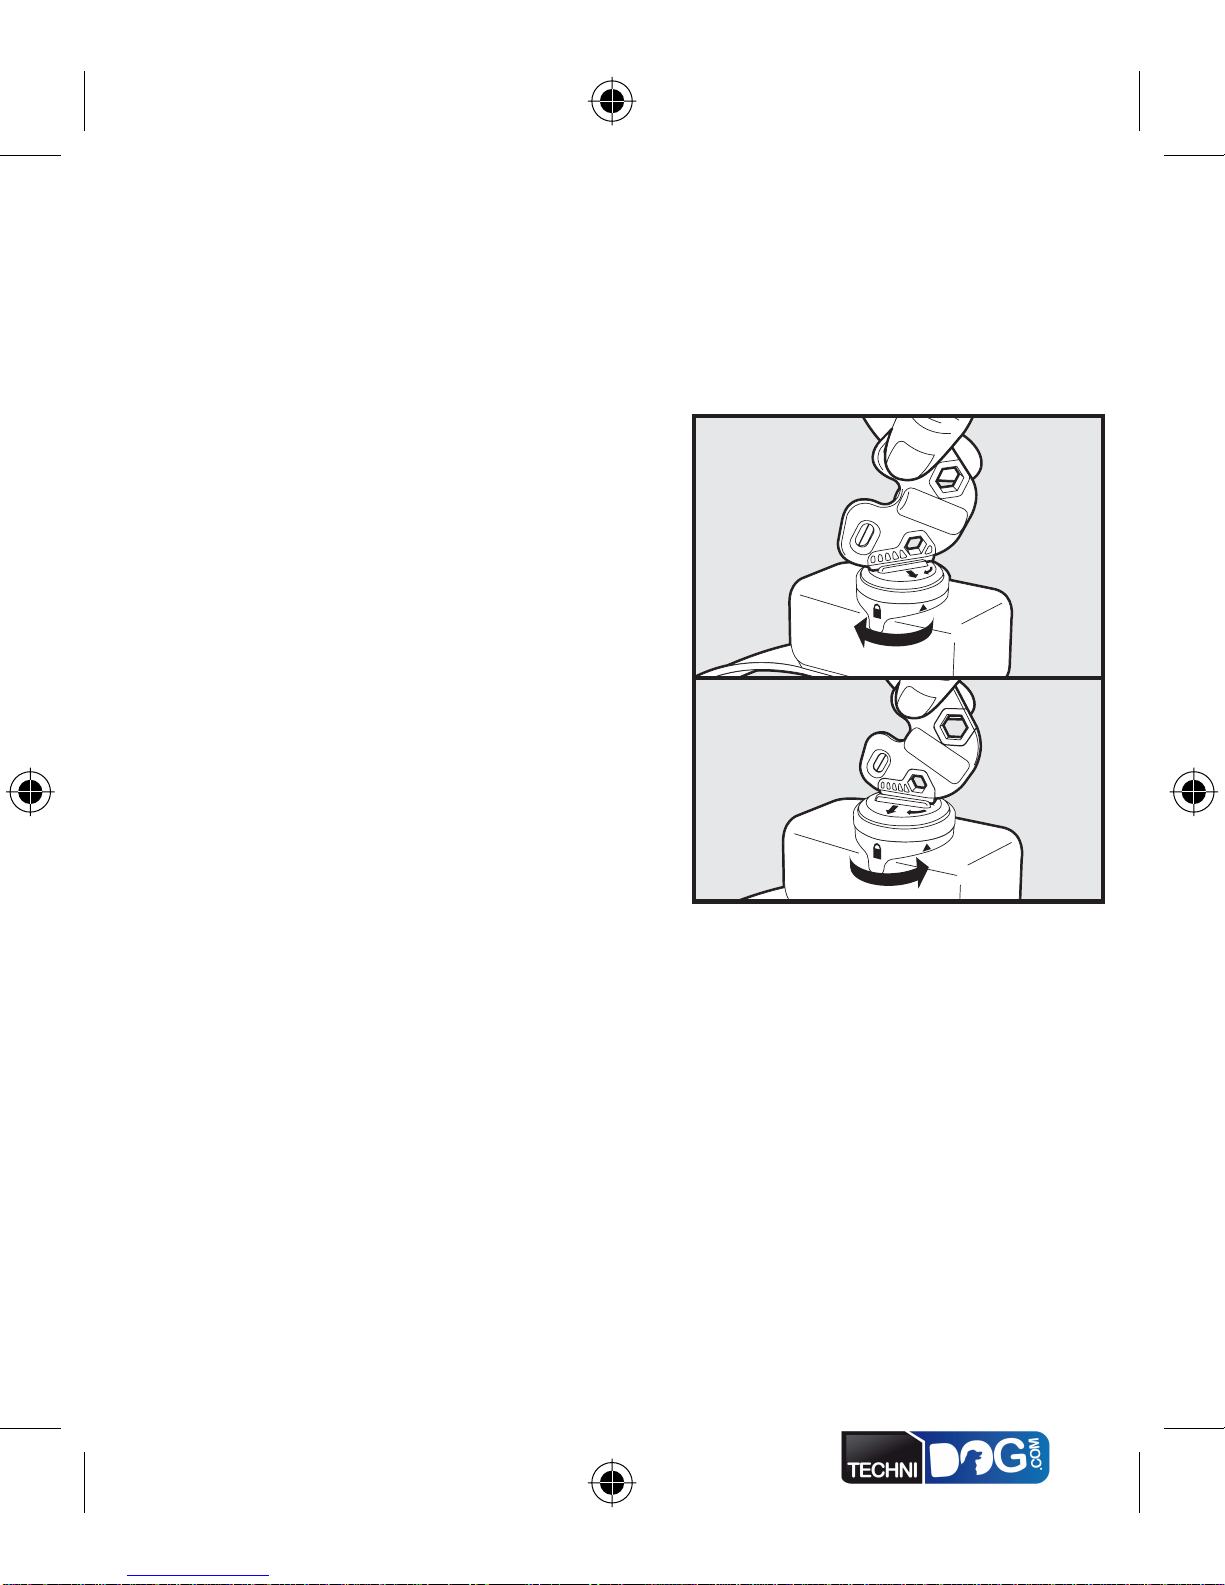
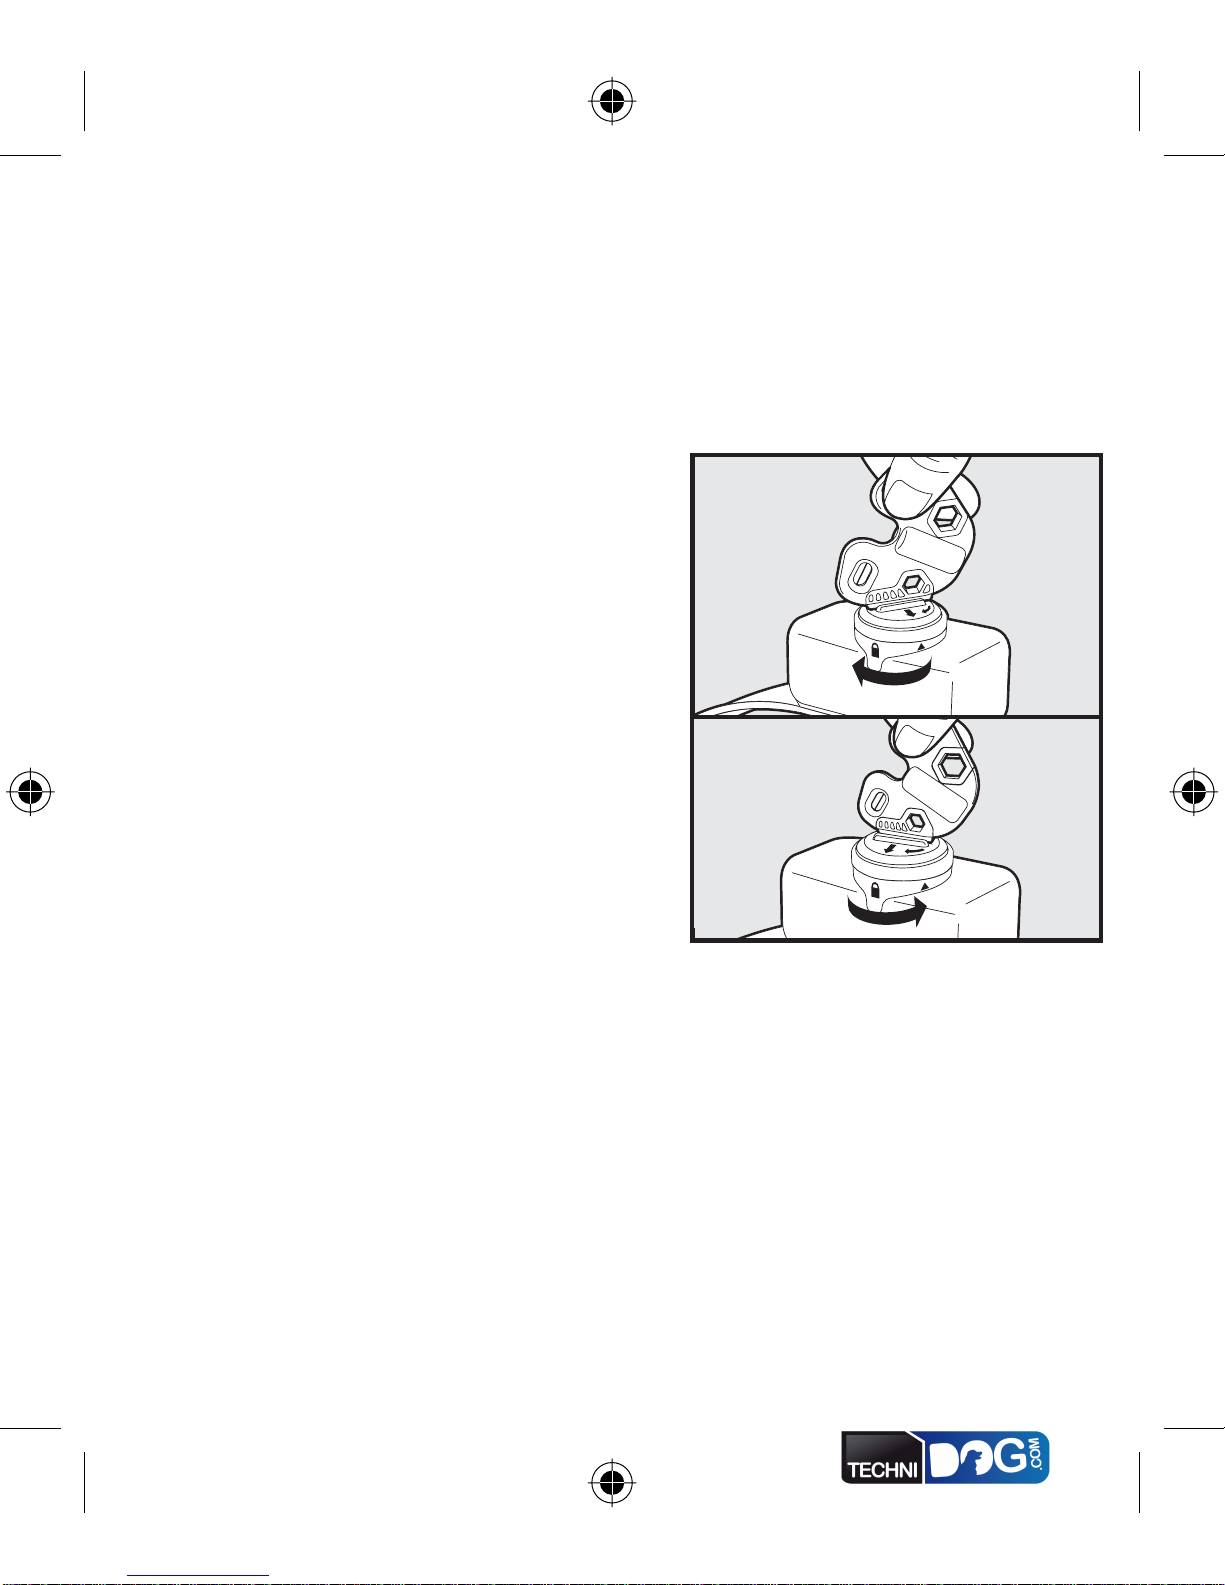
To Set the Static Correction Level
Note:Your Receiver Collar has been factory-set to Beep Only.
Read all steps before attempting to set the Static Correction Level.
1. Remove the clear plastic cover with the BatteryWrench portion of theTest
LightTool to expose the Correction Level Button (E).
2.With the battery installed, press the Correction Level Button and release
when the Receiver LED Indicator Light lights up (F).
3.The Receiver LED Indicator Light will emit a series of flashes representing
the Static Correction Level.
4. Increase the Static Correction Level by pressing and releasing the
Correction Level Button within 5 seconds of the previous series of flashes.
5.After setting the Static Correction Level,replace the cover to protect the
Correction Level Button.
EF
The Static Correction levels increase in strength from 1 to 6. Pushing
the Correction Level Button while the Receiver Collar is on level 6 will
cause the Receiver Collar to revert to level 1. Refer to the Function and
ResponseTable to choose the Static Correction level that best fits your pet.
The Receiver LED Indicator Light acts as a low battery indicator,
flashing every 4 to 5 seconds when replacement is required.
www.petsafe.net 5
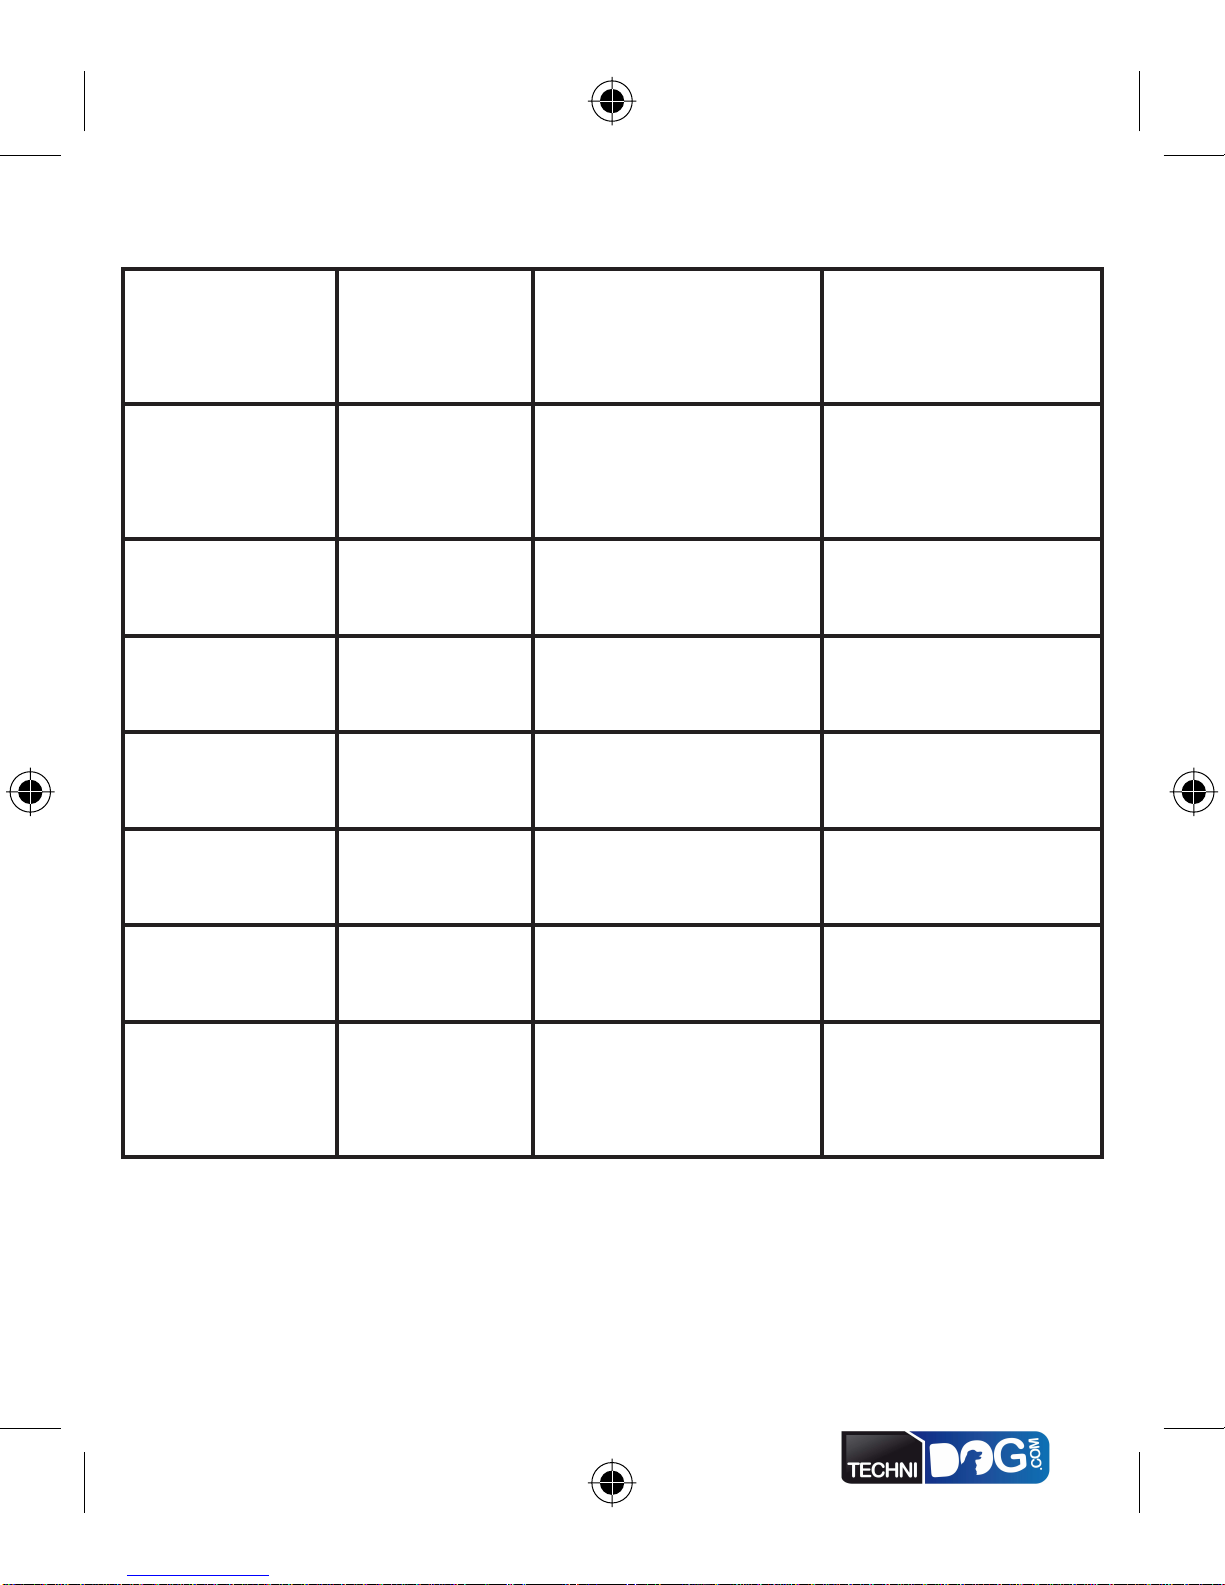
Function and ResponseTable
Indicator
Light
Response
Static
Correction
Level
Receiver Collar
Function Temperament
of Pet
1 Flash 1 No Static
Correction, Beep
Only
2 Flashes 2 Low Static
Correction Timid
3 Flashes 3 Medium-Low
Static Correction Timid or Average
4 Flashes 4 Medium Static
Correction Average Energy
5 Flashes 5 Medium-High
Static Correction Average or High
Energy
6 Flashes 6 High Static
Correction High Energy
Flashes once
every 4 to 5
seconds
Indicates Low
Battery
Note:Begin training with Correction Level 2 and only increase if your pet
does not respond to the Static Correction.
6 1-800-732-2677 (US) / 1-800-457-3911 (Canada)
Fit the Receiver Collar
Important:The proper fit and placement of your Receiver Collar
is important for effective training.The Contact Points must have
direct contact with your pet’s skin on the underside of his neck.
To assure a proper fit, please follow these steps:
1. Make sure that the battery is not installed in the Receiver Collar.
2. Start with your pet standing comfortably.
3.To make it easier to hear the warning beep,
place the Receiver Collar on your pet with
the logo side of Receiver facing up.
4.
Center the Contact Points underneath your
pet’s neck, touching the skin. If your pet has
a long or thick coat, use the enclosed long
Contact Points to
reach through the hair.
Note:It is sometimes
necessary to trim
the hair around the
Contact Points to make
sure that contact is
consistent.
5. Check the tightness
of the Receiver
Collar by inserting
one finger between the end of a Contact Point and your pet’s
neck.The fit should be snug but not constricting.
6. Allow your pet to wear the collar for several minutes then recheck
the fit. Check the fit again as your pet becomes more comfortable
with the Receiver Collar.

www.petsafe.net 7
7.Trim the collar as follows:
a.
Mark the desired
length of the
Receiver Collar with
a pen. Allow for
growth if your pet
is young or grows a
thick winter coat.
b.
Remove the Receiver
Collar from your pet and cut off the excess.
c. Before placing the Receiver Collar back onto your pet, seal the
edge of the cut collar by applying a flame along the frayed edge.
Important: For comfort, safety and effectiveness of product,
please ensure the following:
• During the first 2 weeks of training, do not use the training
device on your pet without direct supervision.
•
Check the fit to prevent excessive pressure by being able to
insert one finger between the Contact Point and your pet’s skin.
•Your pet must be carefully examined daily for any signs of a
rash or sore.
• If a rash or sore is observed, discontinue the use of the
Receiver Collar for a few days.
•
If the condition persists beyond 48 hours, see your veterinarian.
•Your pet’s neck and the Contact Points must be washed
weekly with a wash cloth and mild hand soap, then rinsed
thoroughly.
A condition called Pressure Necrosis, which is a devitalization
of the skin due to excessive and prolonged contact against the
Contact Points, may occur if the steps above are not followed.

8 1-800-732-2677 (US) / 1-800-457-3911 (Canada)
To Re-Thread the Collar
Slide Buckle
Ridges
The slide buckle pre-
vents the collar from
becoming loose around
your pet’s neck.
The ridges must be
facing up; the collar will
slip if it is not properly
threaded.
www.petsafe.net 9
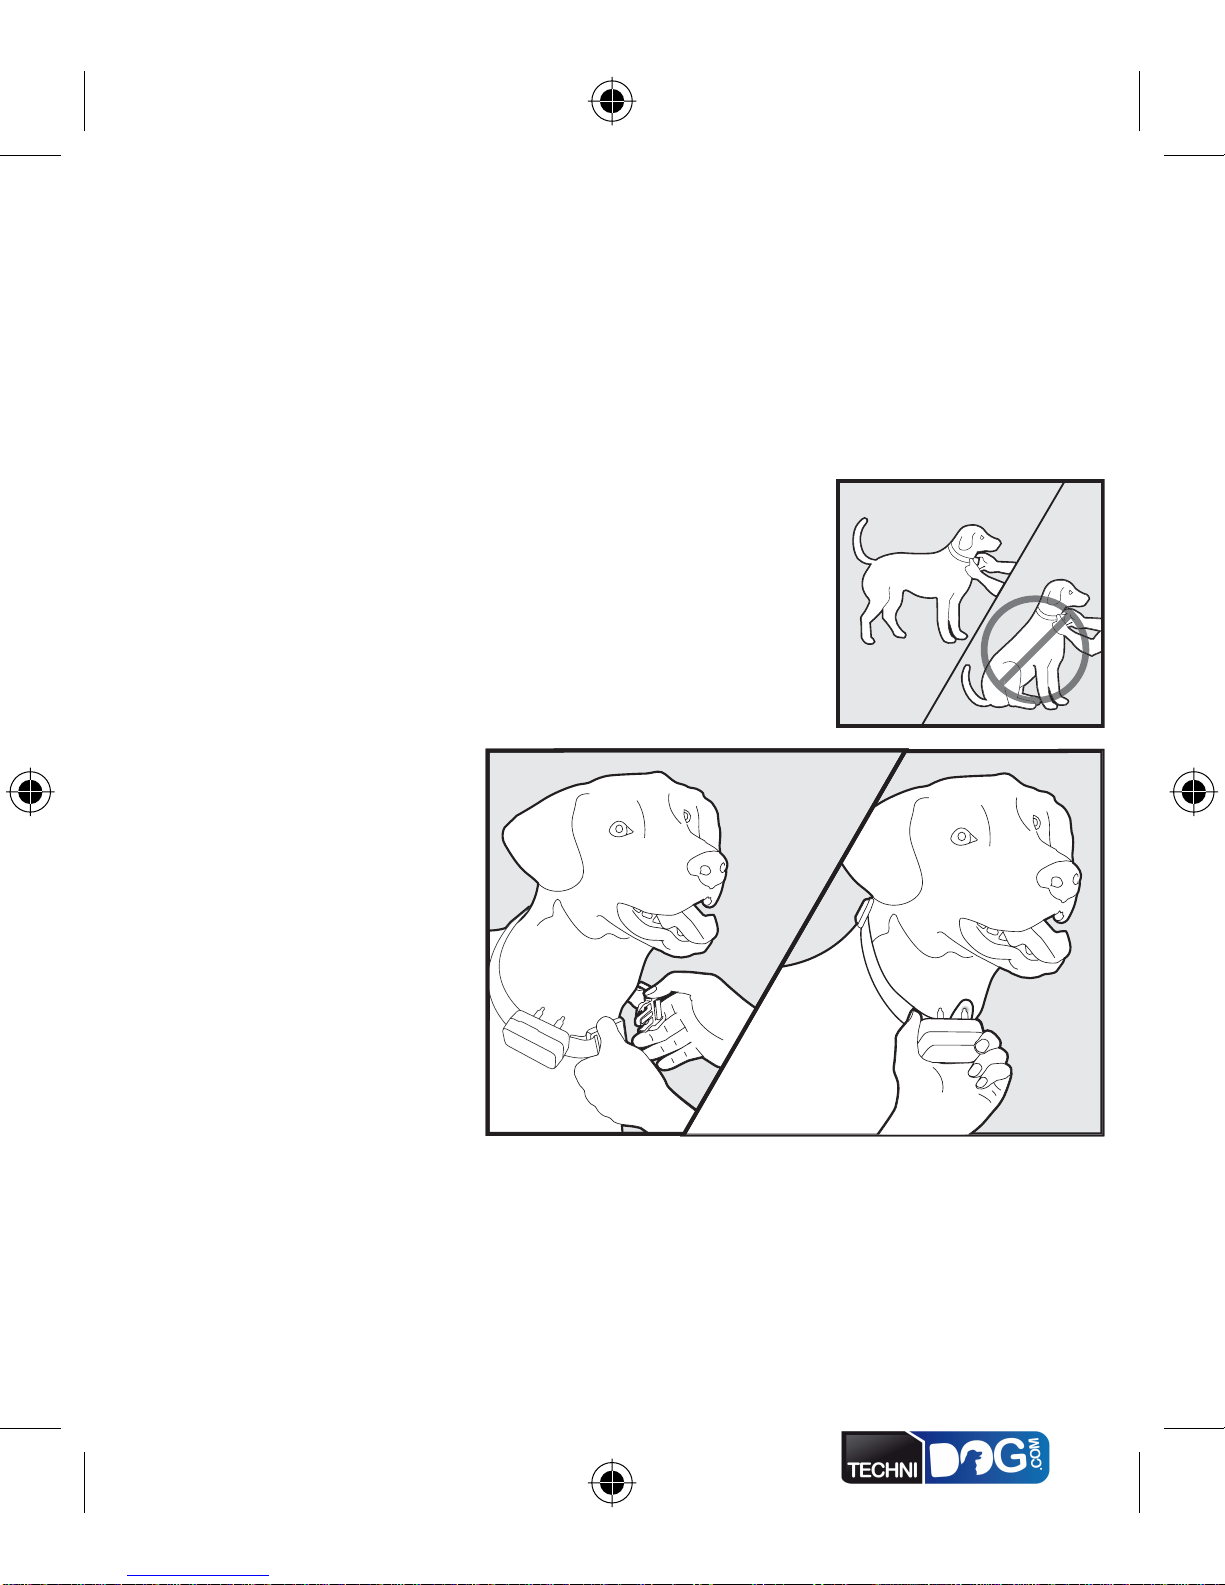
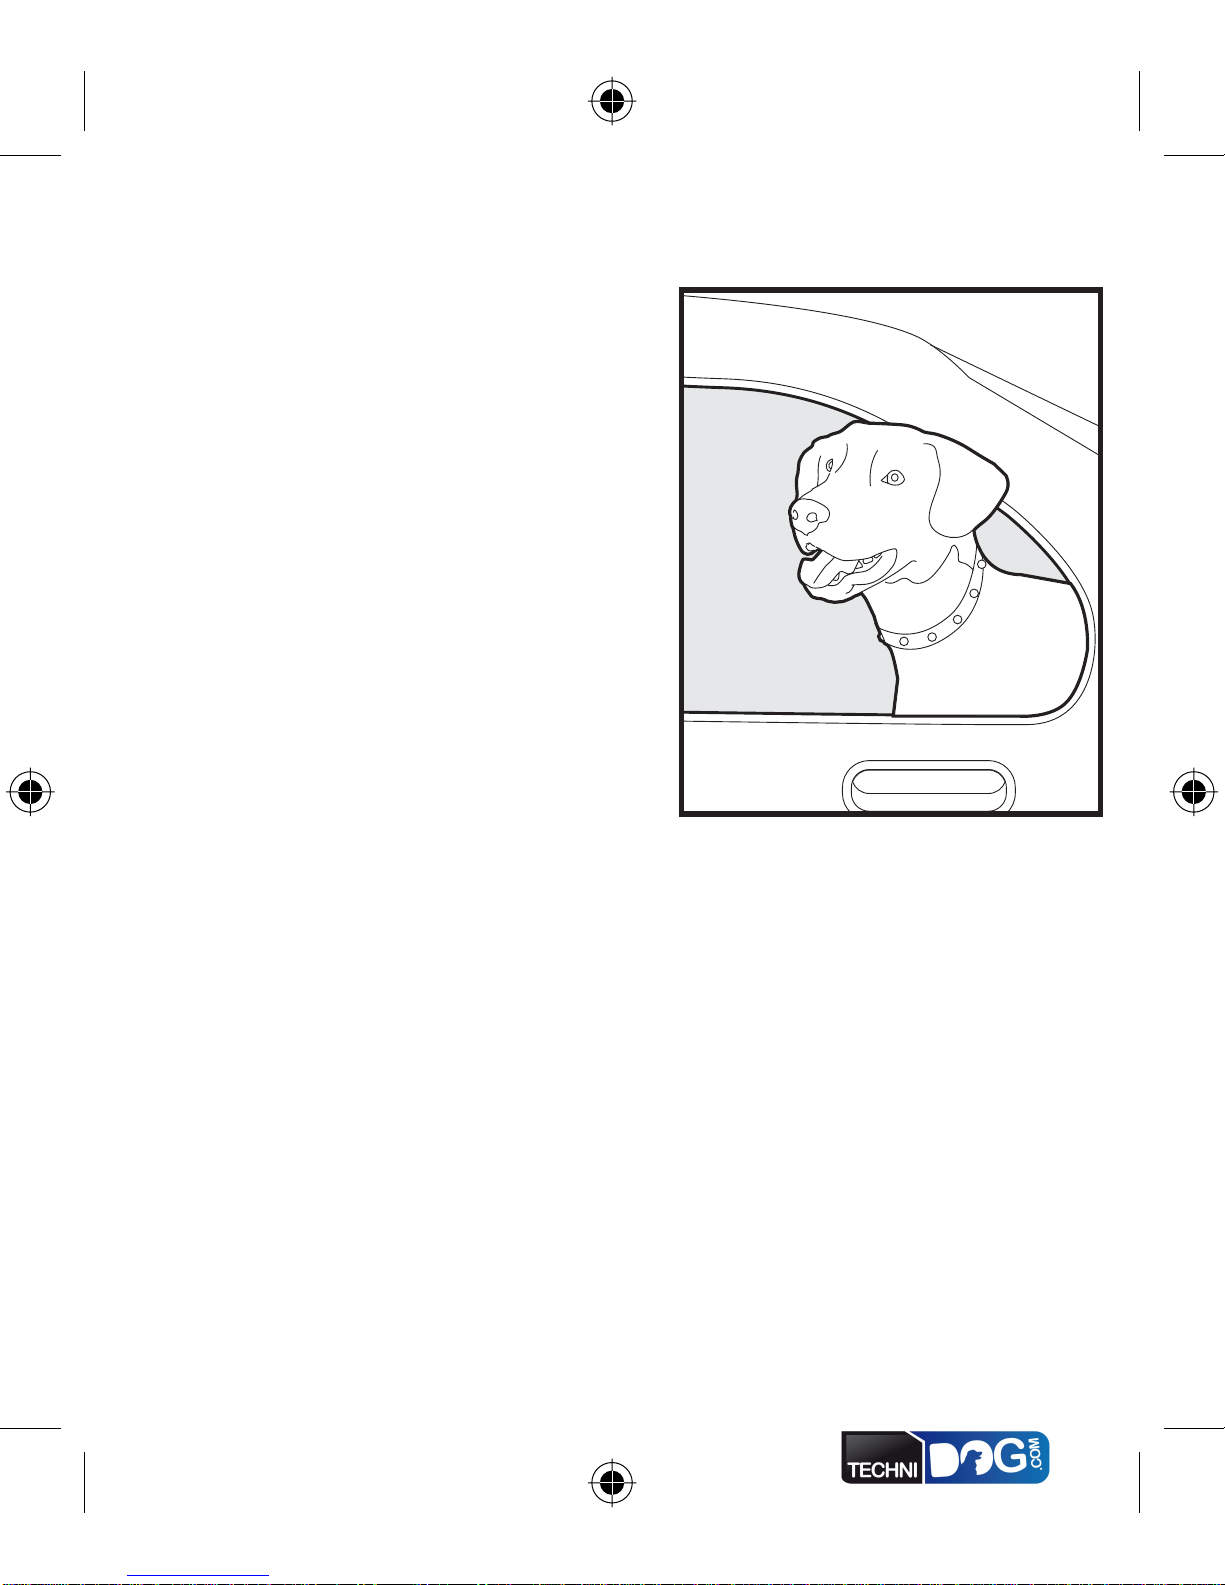
TakingYour Pet Out of the Pet Area
Important: Remove the Receiver
Collar and leave it in the Pet Area.
Once your pet learns the Boundary
Zone, he will be reluctant to cross it
for walks or car rides.
Option 1: Replace the Receiver
Collar with a regular collar. Put your
pet in a car that is within the Pet Area
and drive him out of the Pet Area.
Option 2: Replace the Receiver
Collar with a regular collar and
leash.Walk your pet out of the Pet
Area while giving a command such
as “OK” at a specific place of the Boundary Zone (the end of your
driveway, sidewalk, etc.). Always leave the Pet Area with a leash at
this place and your pet will associate leaving the Pet Area only on
a leash, only at this place, and only with a person.You may initially
need to convince your pet to leave the Pet Area with a food treat and
lots of praise.
Note:You may also carry your pet out of the Pet Area.
10 1-800-732-2677 (US) / 1-800-457-3911 (Canada)
Troubleshooting
The Receiver
Collar is not
beeping when
setting up the
Boundary
Zone.
•The beep may be difficult to hear in a noisy
environment.
• InstallTest Light as explained in the “Test Light
Instructions” section, and use it to determine
the location of Boundary Zone.
• Check that theTransmitter is set up according
to directions and install a new battery within 5
feet of theTransmitter.
The Receiver
Collar is not
beeping or
administering
a Static
Correction.
• Check that theTransmitter is plugged into a
working outlet, turned on, the Power Light is
on, and theTransmitter controls are set at your
desired settings.
• Check Receiver battery to make sure it is
installed properly.
•When replacing the battery, do so within 5 feet
of theTransmitter.
The Receiver
Collar is
beeping
everywhere.
• Check that theTransmitter is plugged into a
working outlet, turned on, the Power Light is
on, and theTransmitter controls are set at your
desired settings.
• Bring Receiver Collar within 5 feet of the
Transmitter to reset.
www.petsafe.net 11
The Receiver
Collar is
beeping inside
the house.
• Make sure theTransmitter is on and set up
according to the directions.
• Ensure the entire house is within the Pet Area.
TheTransmitter may need to be moved to
adjust the Pet Area to include the entire house.
• If relocating theTransmitter, remove the
Receiver Collar from your pet before turning the
Transmitter off.
The Receiver
Collar activates
in the middle
of the yard.
•
The Receiver Collar activates when it loses the
Transmitter signal.This sometimes occurs if a
large metal object is between the Receiver Collar
andTransmitter, if the orientation of the Receiver
Collar changes near the Boundary Zone, or if the
surrounding “electronic noise” interferes with the
signal. If this continues to occur, consider relocating
theTransmitter and resetting the Pet Area.
The Receiver
Collar is
beeping but
my pet is not
responding
to the Static
Correction.
• Make sure the Static Correction Level is set at 2
or above.
•Test the Receiver Collar with theTest Light.
• If theTest Light flashes, check the fit of the
Receiver Collar.
•Trim your pet’s fur where the Contact Points
touch the neck and/or switch to the longer
Contact Points.
• Increase the Static Correction Level.
• Repeat training steps to reinforce training.

12 1-800-732-2677 (US) / 1-800-457-3911 (Canada)
My pet reacts
strongly to
the Static
Correction and
has become
fearful.
• Lower the Static Correction Level.
• Make sure you are in control of the situation
when your pet receives his first Static Corrections
(have him on a leash attached to a separate,
non-metallic collar) and lead him into the Pet
Area and praise him. If your pet remains fearful,
suspend training and start again the next day.
Make sure to end all training sessions on a
positive note with lots of praise and play.
I was setting
up the Pet
Area and after
I turned down
the Boundary
Control Dial,
the Receiver
Collar would
no longer beep
or correct.
•You may have turned the Boundary Control Dial
down too quickly, causing the Receiver Collar
to go into power-fail mode.This is a safety
feature designed to protect your pet when power
to theTransmitter goes out.With the Receiver
Collar within 5 feet of theTransmitter, turn the
Boundary Control Dial to “8” and reset the
Boundary Zone, making sure to turn the dial
down slowly.
www.petsafe.net 13
Test Light Instructions
1. If your Receiver Collar has adjustable
Correction Levels, set the Correction
Level to 2 or above.
2. Hold theTest Light Contacts to the
Contact Points.
3.Walk toward the BoundaryWire
holding the Receiver collar at your pet’s
neck level until theTest Light flashes.
Save theTest Light for future testing.
Note:If theTest Light does not flash,install a new battery and re-test.IfTest
Light still does not flash,contact the Customer Care Center at
1-800-732-2677 (US) / 1-800-457-3911 (Canada)
.
Terms of Use and
Limitation of Liability
1.Terms of Use
This Product is offered to you conditioned upon your acceptance
without modification of the terms, conditions and notices
contained herein. Usage of this Product implies acceptance of all
such terms, conditions, and notices.
2. Proper Use
This Product is designed for use with pets where training is
desired.The specific temperament of your pet may not work with
this Product.We recommend that you not use this Product if your
pet is less than 8 pounds or if your pet is aggressive. If you are
unsure whether this is appropriate for your pet please consult your
veterinarian or certified trainer.
Proper use includes reviewing the entire Guide provided with your
Product and any specific Caution statements.

14 1-800-732-2677 (US) / 1-800-457-3911 (Canada)
3. No Unlawful or Prohibited Use
This Product is designed for use with pets only.This pet training
device is not intended to harm, injure or provoke. Using this
Product in a way that is not intended could result in violation of
Federal, State or local laws.
4. Limitation of Liability
In no event shall Radio Systems Corporation be liable for any
direct, indirect, punitive, incidental, special or consequential
damages, or any damages whatsoever arising out of or connected
with the use or misuse of this Product. Buyer assumes all risks and
liability from the use of this Product.
5. Modification ofTerms and Conditions
Radio Systems Corporation reserves the right to change the terms,
conditions and notices under which this Product is offered.
Caution
The PetSafeWireless Pet Containment System™ is NOT a solid
barrier.The system is designed to act as a deterrent to remind pets by
Static Correction to remain in the boundary established. It is important
that you reinforce training with your pet on a regular basis. Since
the tolerance level to Static Correction varies from pet to pet, Radio
Systems Corporation CANNOT guarantee that the system will, in all
cases, keep a pet within the established boundary. Not all pets can be
trained to avoid crossing the boundary!Therefore, if you have reason to
believe that your pet may pose a danger to others or harm himself if he
is not kept from crossing the boundaries, you should NOT rely solely
upon the PetSafeWireless Pet Containment System™ to confine your
pet. Radio Systems Corporation shall NOT be liable for any property
damage, economic loss or any consequential damages, sustained as a
result of any animal crossing the boundary.
www.petsafe.net 15
Compliance
This equipment has been tested and found to comply with relevant
EU Electromagnetic Compatibility, LowVoltage and R&TTE
Directives. Before using this equipment outside the EU countries,
check with the relevant local R&TTE authority. Unauthorised
changes or modifications to the equipment that are not approved
by Radio Systems Corporation are in violation of EU R&TTE
regulations, could void the user’s authority to operate the equipment,
and void the warranty.
Important Recycling Advice
Please respect theWaste Electrical and Electronic Equipment
regulations in your country.This equipment must be recycled. If
you no longer require this equipment, do not place it in the normal
municipal waste system. Please return it to where it was purchased
in order that it can be placed in our recycling system. If this is not
possible, please contact the Customer Care Centre for further
information.
Radio Standards Specifications (RSS)
The frequency of operation for this device is 27.145 MHz.The field
strength is: 138 uV/m @ 3m.
Operation is subject to the following two conditions: (1) this device
may not cause interference, and (2) this device must accept any
interference, including interference that may cause undesired operation
of the device.
This unit is in compliance with the limits found in RSS-310.
16 1-800-732-2677 (US) / 1-800-457-3911 (Canada)
FCC
This equipment has been tested and found to comply with the limits
for a Class B digital device, pursuant to Part 15 of the FCC Rules.
These limits are designed to provide reasonable protection against
harmful interference when the equipment is operated in a residential
environment.This equipment generates, uses, and can radiate radio
frequency energy and, if not installed and used in accordance with
the instruction guide, may cause harmful interference to radio
communications. However, there is no guarantee that interference will
not occur in a practical installation. If this equipment causes harmful
interference to radio or television reception, which can be determined
by turning the equipment off and on, the user is encouraged to try to
correct the interference by one or more of the following measures:
• Relocate the interfered receiving antenna.
• Increase the separation between the equipment and receiver.
• Connect the equipment into an outlet on a circuit different to that to
which the receiver is connected.
• Contact the Customer Care Center at 1-800-732-2677.
Unauthorized changes or modifications to the equipment, not approved
by Radio Systems Corporation, could result in not meeting compliance
with FCC regulations and could void the user’s authority to operate the
equipment.

www.petsafe.net 17

18 1-800-732-2677 (US) / 1-800-457-3911 (Canada)
Fonctionnement
Le système de retenue sans fil pour animaux domestiques PetSafeWireless Pet
Containment SystemMC est un système sûr, confortable et efficace qui convient
pour tous les animaux domestiques de plus de 3,6 kg. Son fonctionnement
est simple: il envoie un signal radio dans toutes les directions avec une portée
maximale de 27 mètres.Vous déterminez provisoirement la zone réservée à
l’animal domestique à l’aide des fanions de délimitation qui constituent un
support visuel au dressage de votre animal. Ce dernier porte un collier récepteur
muni de points de contact qui touchent son cou. Une fois l’animal dressé, il
peut se promener librement dans la zone qui lui est réservée. Lorsque votre
animal arrive au niveau des limites prédéterminées, le collier récepteur émet un
signal d’avertissement avant d’administrer une correction statique inoffensive
pour attirer son attention et le faire retourner dans la zone qui lui est réservée.
Préparation du collier récepteur
Les points de contact courts sont installés d’origine sur
le collier récepteur. Utilisez les points de contact longs
si votre animal domestique a un pelage long ou épais. À
l’aide de la clé de serrage des contacteurs se trouvant sur
la clé multifonctions, resserrez les contacteurs (A) d’un
demi tour
après les
avoir serrés
au maximum
avec les
doigts (B). Une fois
par semaine, assurez-
vous que les points de
Collier récepteur
Points de contact
Pile Voyant
lumineux
du récepteur
Rondelles
Bouton de réglage
de l’intensité
de la correction
Français
Clé de serrage
des contacteurs Clé de
serrage
de la pile
Lampe
test
Electrodes
A
B
www.petsafe.net 19
Insertion et retrait de la pile
Remarque:n’insérez jamais la pile lorsque votre animal porte le collier récepteur.
Le collier récepteur fonctionne à l’aide d’une pile jetable PetSafe
MD
(RFA-67). Cette pile spécifique garantit une plus grande facilité de
remplacement de la pile et une meilleure étanchéité.
Pour installer la pile, alignez la flèche de
la pile sur le triangle (C) du récepteur.
Utilisez la clé pour tourner la pile dans
le sens (A) des aiguilles d’une montre
jusqu’à ce que la flèche soit placée en vis-
à-vis du symbole représentant un cadenas
sur le récepteur (C).
À l’aide de la clé de serrage de la pile
se trouvant sur la clé multifonctions,
tournez la pile dans le sens des aiguilles
d’une montre jusqu’à ce que la flèche
soit placée en vis-à-vis du symbole
représentant un cadenas sur le récepteur
(D).Veillez à jeter la pile usagée comme
il se doit.
Vous trouverez une pile de rechange PetSafe
MD
(RFA-67) chez la plupart
des distributeurs. Pour connaître le distributeur le plus proche, veuillez
contacter notre service clientèle au numéro 1-800-732-2677 (US)
1-800-457-3911 (Canada) ou visitez notre siteWeb à l’adresse www.
petsafe.net.
C
D

20 1-800-732-2677 (US) / 1-800-457-3911 (Canada)
Réglage de l’intensité de la correction statique
Remarque:le collier récepteur est réglé d’usine uniquement pour l’émission du signal sonore.
Veuillez lire toutes les étapes ci-dessous avant de régler l’intensité de la correction statique.
1. À l’aide de la clé de serrage de la pile se trouvant sur la clé multifonctions, retirez
la protection en plastique transparent pour exposer le bouton de réglage de
l’intensité de la correction statique (E).
2. Une fois la pile insérée, appuyez sur le bouton de réglage de l’intensité de la
correction statique et maintenez-le enfoncé jusqu’à ce que le voyant lumineux du
collier s’allume (F).
3. Le voyant lumineux du collier récepteur émet alors une série de clignotements
reflétant l’intensité de la correction statique.
4.Augmentez l’intensité de la correction statique en appuyant puis en relâchant le
bouton de réglage de l’intensité de la correction statique dans les cinq secondes
suivant la série de clignotements précédente.
5. Une fois l’intensité de la correction statique réglée, remettez la protection en place
afin de protéger le bouton de réglage de l’intensité de la correction statique.
Les niveaux d’intensité de la correction statique vont de 1 à 6. Si vous appuyez
sur le bouton de réglage de l’intensité de la correction statique alors que le collier
récepteur est réglé sur le niveau 6, le collier repasse au niveau 1. Reportez-vous
au tableau des fonctions et réactions ci-dessous pour choisir le niveau d’intensité
de la correction statique le mieux adapté à votre animal.
EF
Table of contents
Languages:
Popular Pet Care Product manuals by other brands


Petsafe
Petsafe ULTRALIGHT SONIC BARK CONTROL quick guide

Frisco
Frisco 309370 instruction manual

SmartPets
SmartPets SP 207 user manual

DogWatch
DogWatch Performance Series owner's guide

Pebble Smart
Pebble Smart Doggie Doorbell Installation and training

Radio Systems
Radio Systems Deluxe Remote Trainer owner's manual