TECHNIMOUNT Bracket Pro Series 92-GR3 User manual
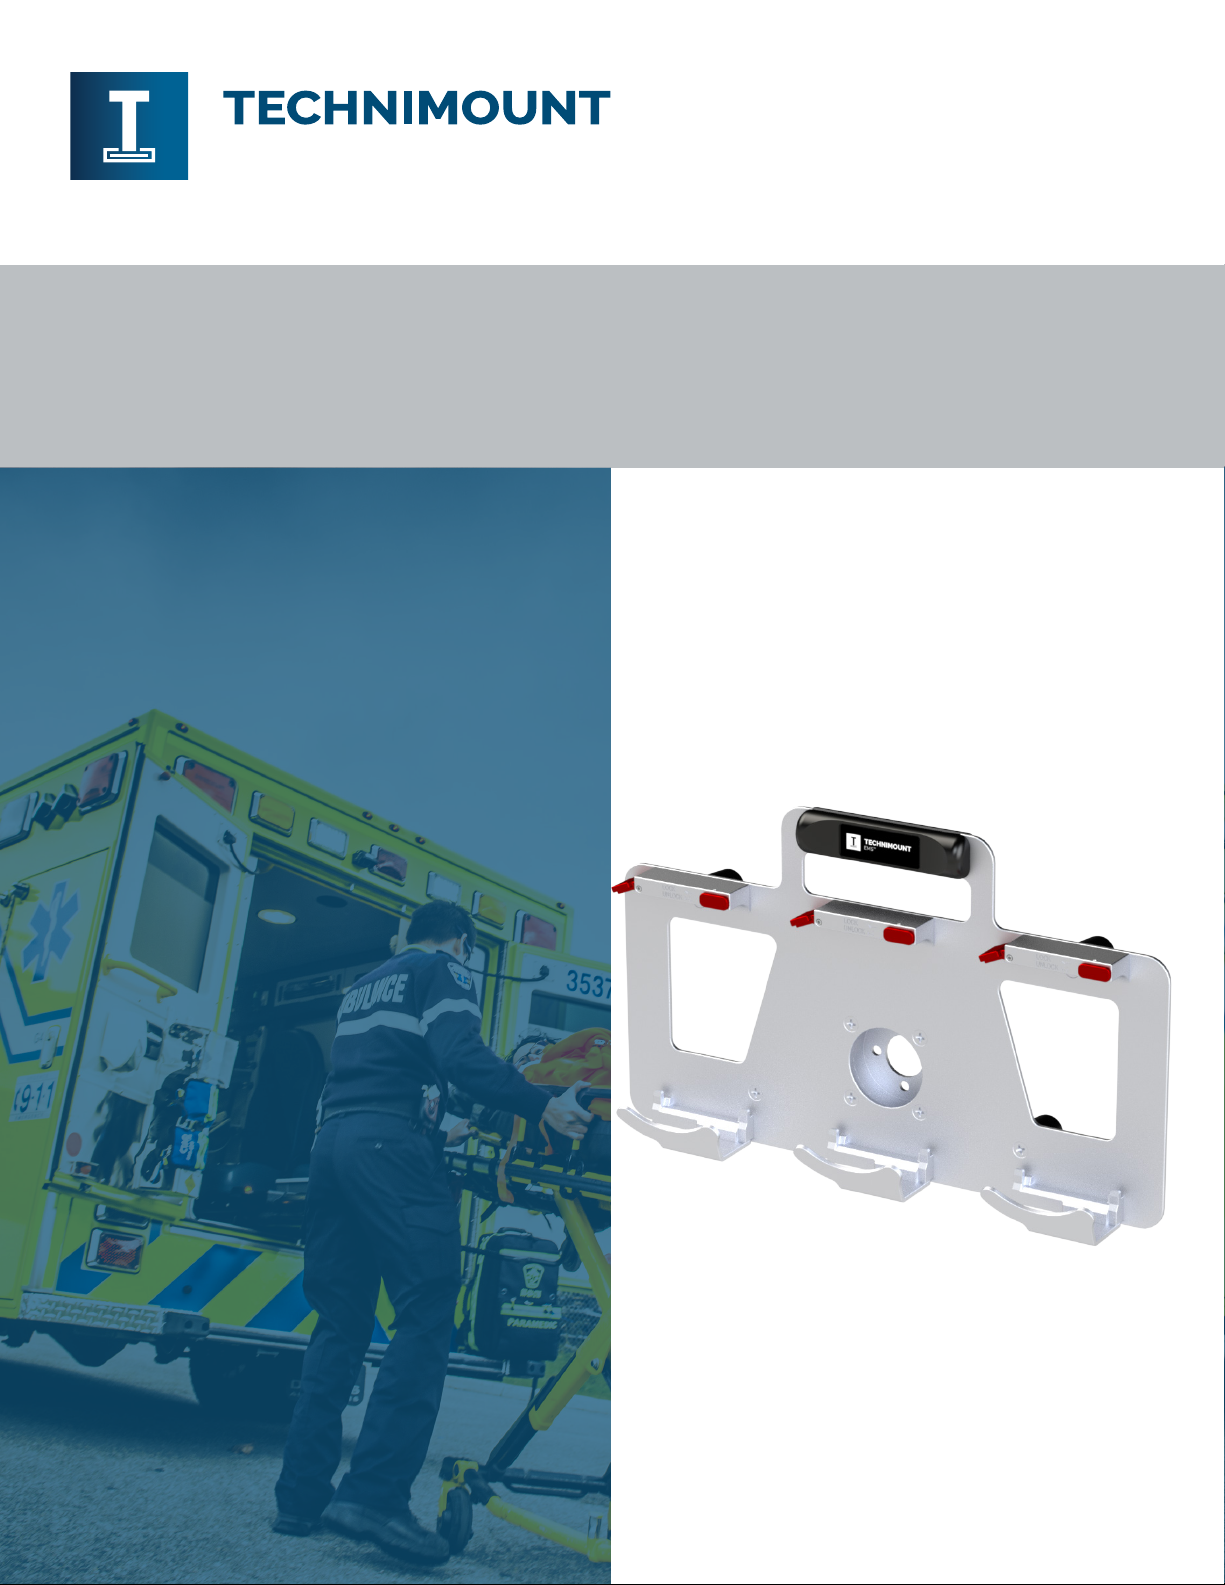
BRACKET PRO SERIE® 92 - GR3
OPERATING GUIDE
EMSTM
SAFETY AND FLEXIBILITY
WHERE IT MATTERS MOST

BRACKET PRO SERIE® 92 - GR3
Operating Guide
EMSTM
© 2023 Technimount E.M.S. Holding Inc. OG-BP92-GR3-202305EN-01 | Page ii of iii
Copyrights
Copyright 2023 Technimount E.M.S. Holding Inc. (Technimount EMS) is an affiliated company of Technologies
CGC Inc. All Rights Reserved. No part of this publication may be reproduced, transmitted, transcribed, stored in a
retrieval system, translated in any language, modified in any form or by any means, without the written permission
of Technimount EMS or its affiliate companies.
Trademarks
Product and medical equipment manufacturer names are Trademarks™ or Registered Trademarks®of their
respective holders.
-Technimount EMS™ is a trademark of Technologies CGC Inc.
-Bracket Pro Serie®is a registered trademark of Technologies CGC Inc.
-Sapphire®is a trademark of Eitan Medical Ltd.
For any issues with your Technimount product, its components, or for any technical questions during the
Contact Information
Technimount E.M.S. Holding Inc.
C/O: Regulatory Affairs
3770 Jean Marchand Street, Suite 100-C
Quebec (QC) G2C 1Y6
Canada
techsuppor[email protected]
www.technimount.com
T + 1 581.700.6613
TF + 1 888.639.2758 (North America)

BRACKET PRO SERIE®92 - GR3
Operating Guide
EMS
TM
© 2023 Technimount E.M.S. Holding Inc. OG-BP92-GR3-202305EN-01 | Page iii of iii
Table of Contents
Copyrights .......................................................................................................................................................... ii
Trademarks ........................................................................................................................................................ ii
Contact Information ........................................................................................................................................... ii
1. Safety Guidelines............................................................................................................................................ 4
2. Operate the Bracket Pro Serie 92 - GR3.......................................................................................................... 5
........ 2.1. Install the Infusion Pump in the Bracket Pro Serie 92 - GR3 ...............................................................................6
........ 2.2. Remove the Infusion Pump from the Bracket Pro Serie 92 - GR3......................................................................8
........ 2.3. Install the Bracket Pro Serie 92 - GR3 on a Micro Base........................................................................................9
........ 2.4. Remove the Bracket Pro Serie 92 - GR3 from the Micro Base............................................................................10
3. Perform the Daily Safety Checks.................................................................................................................... 11
........ 3.1. Required Tools..............................................................................................................................................................11
........ 3.2. Daily Safety Checks.....................................................................................................................................................11
........ 3.3. Illustrated Inspections Points ....................................................................................................................................14
BRACKET PRO SERIE® 92 - GR3
Operating Guide
EMSTM
© 2023 Technimount E.M.S. Holding Inc. OG-BP92-GR3-202305EN-01 | Page 4 of 16
1. Safety Guidelines
WARNING -General Warning
-Do not perform safety checks on Technimount products, before receiving proper training.
-Perform the safety checks, as described in the operating guide. Failing to follow the recommended
guidelines could cause premature damage to the product.
CAUTION -Safe Handling and Operation
Improper use of the Technimount product may damage the equipment or cause injury to the patients or
EMS personnel.
CAUTION -Safe Practice
-Always pay close attention to the condition of the safety mechanisms to prevent undue risk to the
equipment, patients, and EMS personnel. Follow the recommended guidelines described in this
document.
-Always ensure that the medical device is secured in the bracket and that the locking mechanism is
properly engaged before use, to prevent it from falling from the mounting system.
-Keep this document with the product at all times.
-If any serious incident occurs with the mounting system, immediately stop using the product and
regulatory agency.
CAUTION -Working Load/Load Balance
Do not overload the system. The Safe Working Load (SWL) is 3.4 lbs (1.5 kg).
CAUTION -Follow Instructions for Use
-Always read and abide by all the safety guidelines identified, as well as follow the instructions
provided within this document.
-Refer to the medical device’s user manual for safety precautions and user instructions for the safe
use of the Sapphire Infusion pumps.

BRACKET PRO SERIE®92 - GR3
Operating Guide
EMS
TM
© 2023 Technimount E.M.S. Holding Inc. OG-BP92-GR3-202305EN-01 | Page 5 of 16
2. Operate the Bracket Pro Serie 92 - GR3
This Operating Guide is used to help EMS personnel effectively secure the Sapphire Infusion pumps in the
Bracket Pro Serie 92 - GR3 during critical care transport. For detailed product information that is not user related,
refer to your supervisor or the user manual when required.
NOTE: Always perform the Safety checks BEFORE using the Bracket Pro Serie 92 - GR3. Refer to the
"Daily Safety Checks" on page 11 before each use.
NOTE: Technimount continually seeks advancements in product design and quality. While this
operating guide contains the most updated product information available at the time of printing,
it may contain minor differences from the current version. For more information, please contact
1 2 7
9
8
3
6
5
4
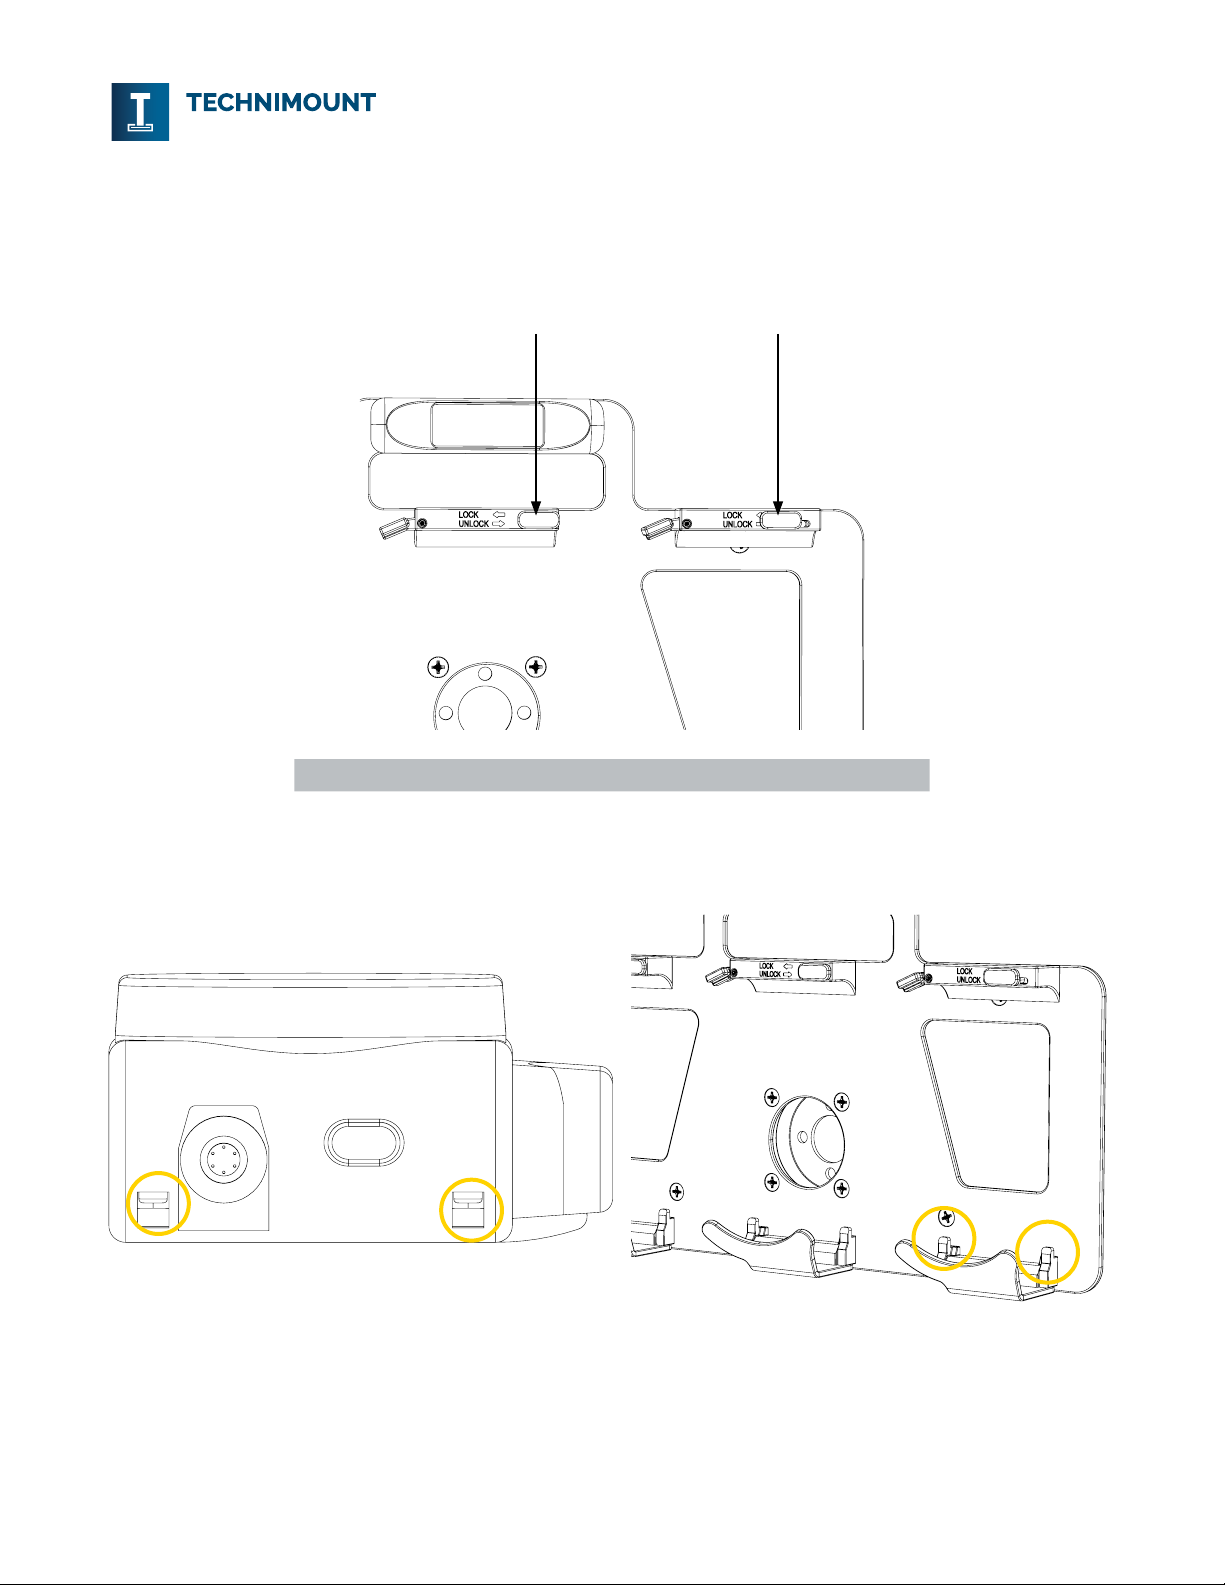
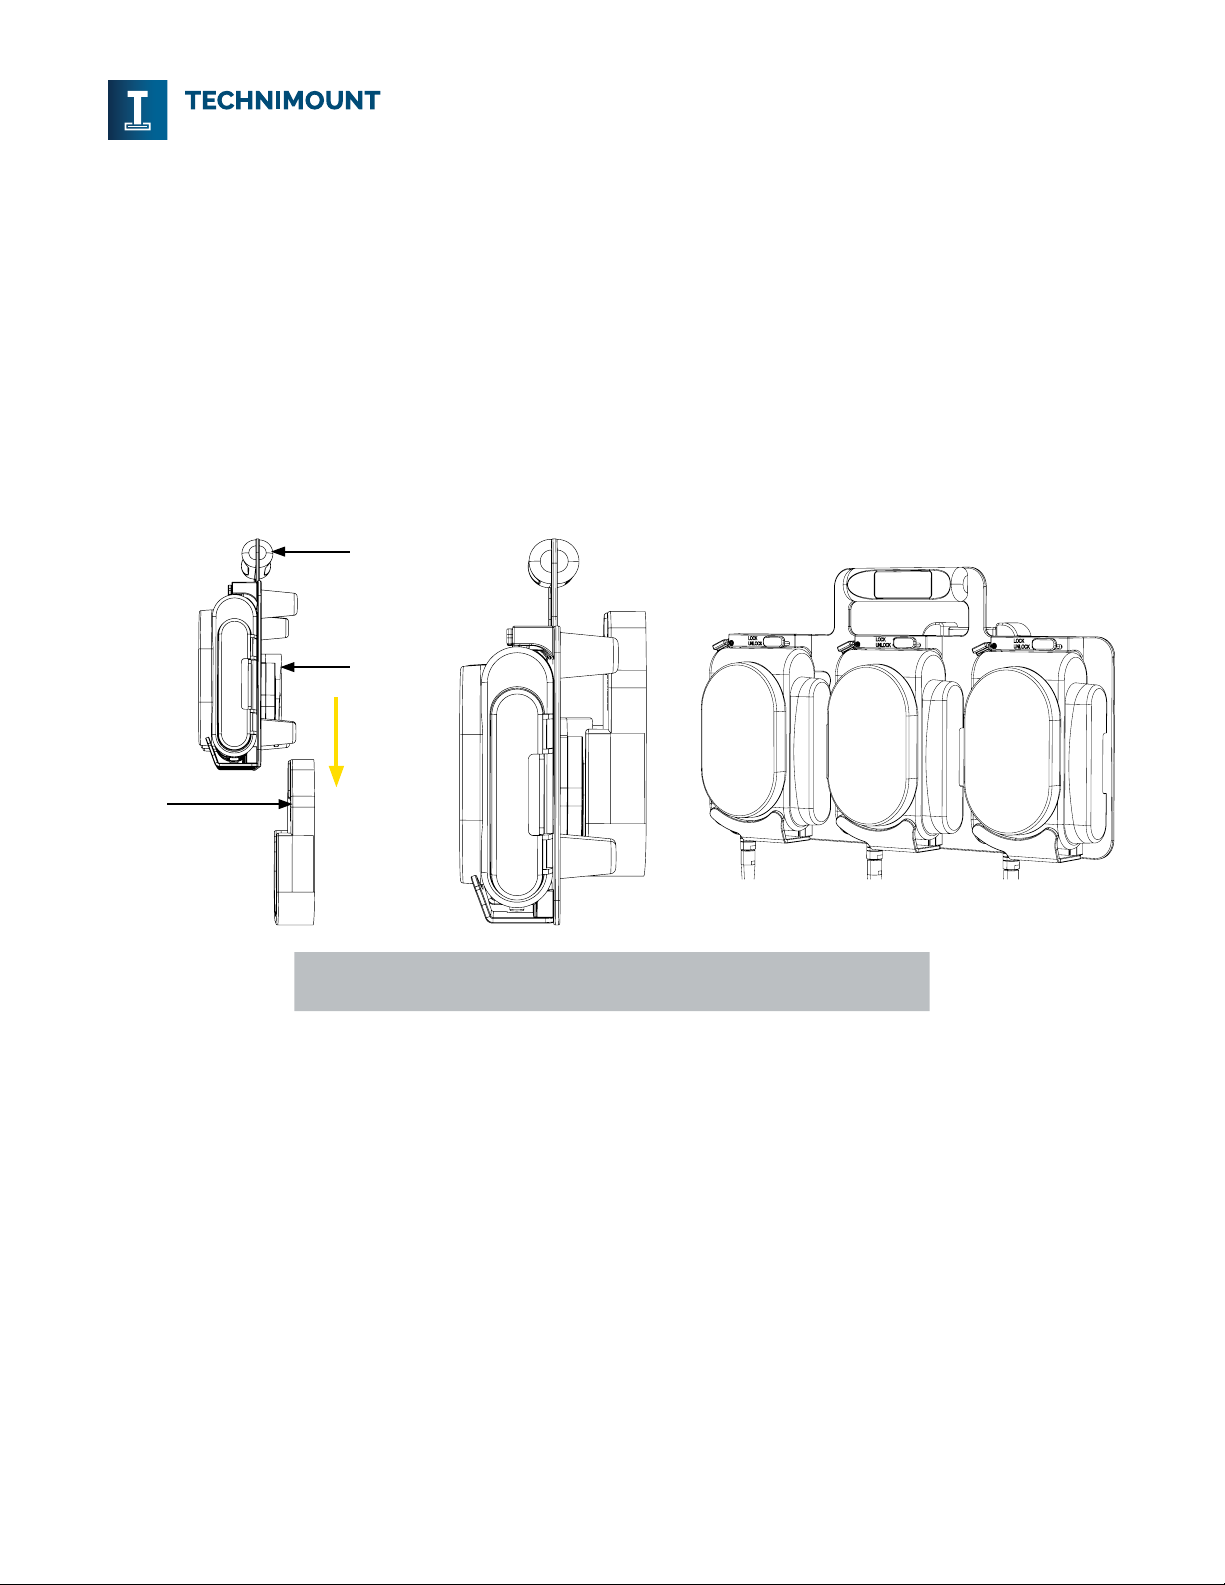
1. Quick release lever (3X)
2. Lock/unlock slider button (3X)
3. Top of pump holder
4. Pump cradle
5. Insert for pump
6. Bottom of pump holder
7. Handle
8. Anti-rotation micro disc
9. Foot
Figure 1: Bracket Pro Serie 92 - GR3 (front and back of bracket shown)
BRACKET PRO SERIE® 92 - GR3
Operating Guide
EMSTM
© 2023 Technimount E.M.S. Holding Inc. OG-BP92-GR3-202305EN-01 | Page 6 of 16
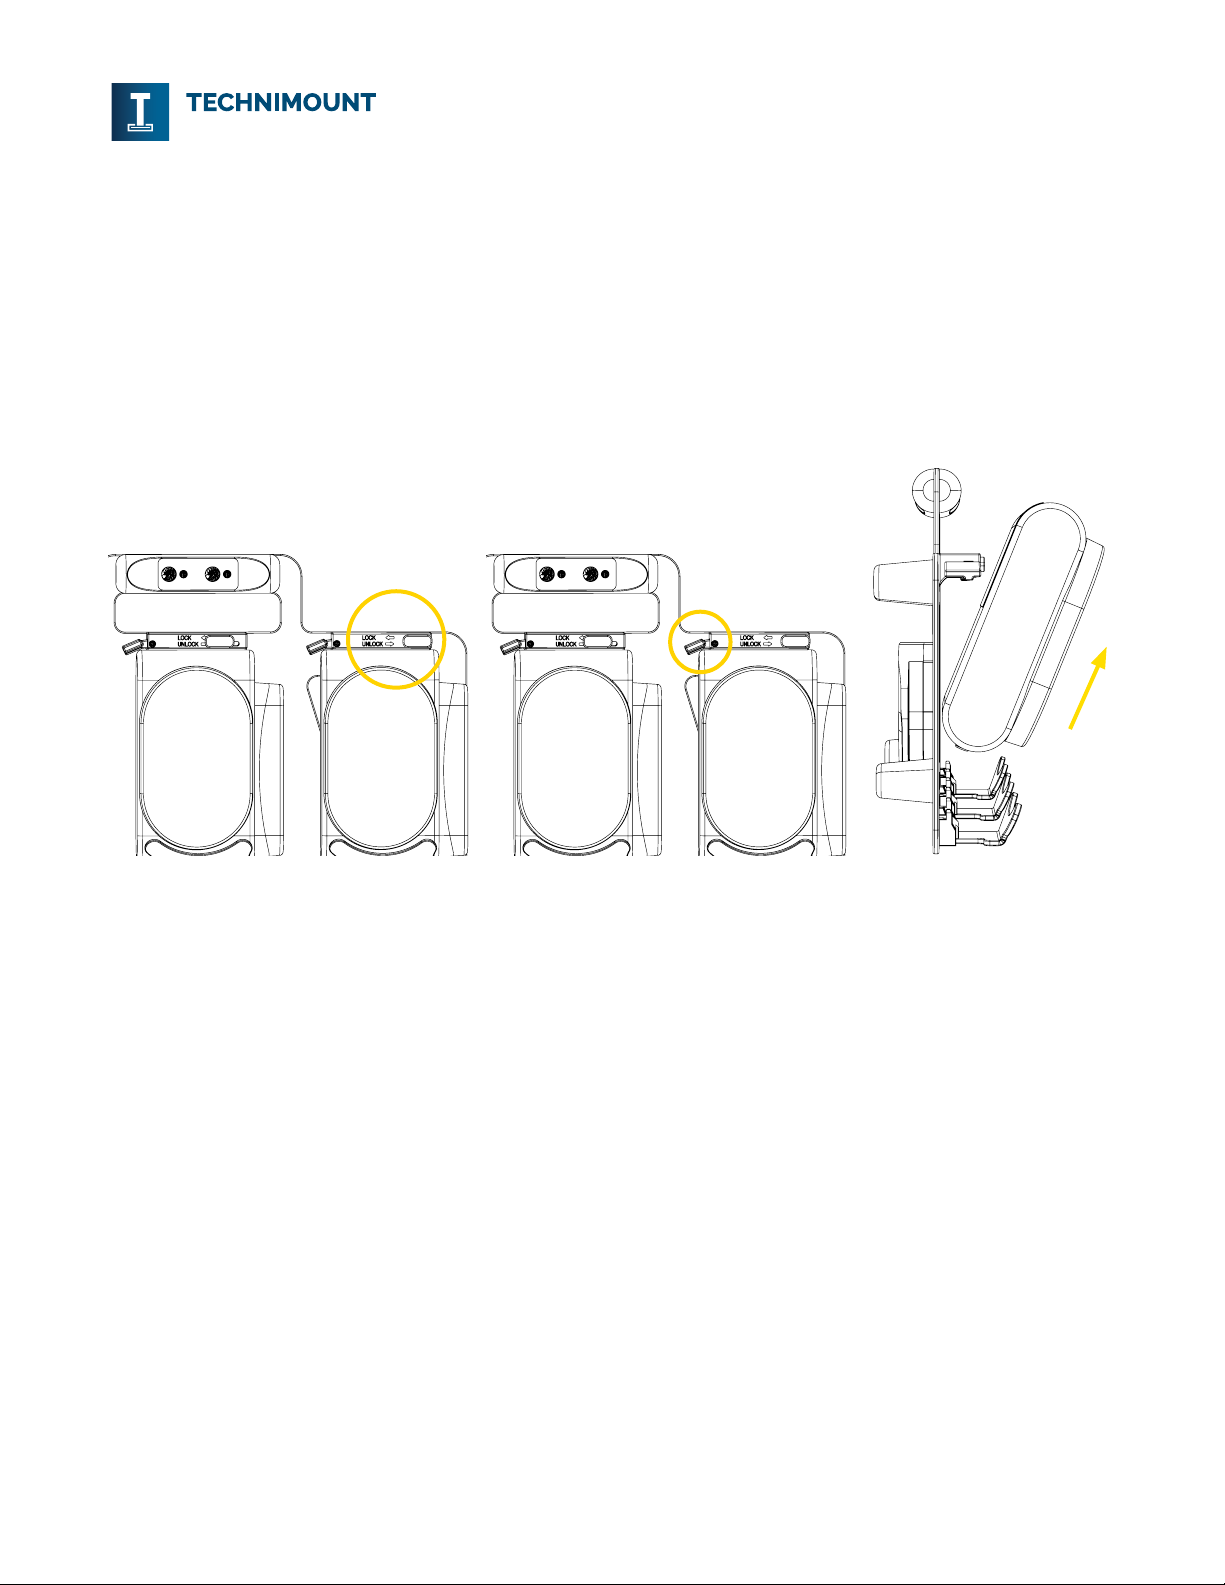
2.1. Install the Infusion Pump in the Bracket Pro Serie 92 - GR3
1. Ensure that the infusion pump holder is unlocked. If locked, Move the lock/unlock slider button to the right
to unlock it (Figure 2).
1 2
1. Unlocked position 2. Locked position
Figure 2: Infusion pump holder in locked and unlocked positions
2. Locate the two (2) cavities at the bottom of the infusion pump (Figure 3 A) and two (2) inserts at the
bottom of the pump holder (Figure 3 B).
(A) (B)
Figure 3: Infusion pump installation (1 of 2)
BRACKET PRO SERIE®92 - GR3
Operating Guide
EMS
TM
© 2023 Technimount E.M.S. Holding Inc. OG-BP92-GR3-202305EN-01 | Page 7 of 16
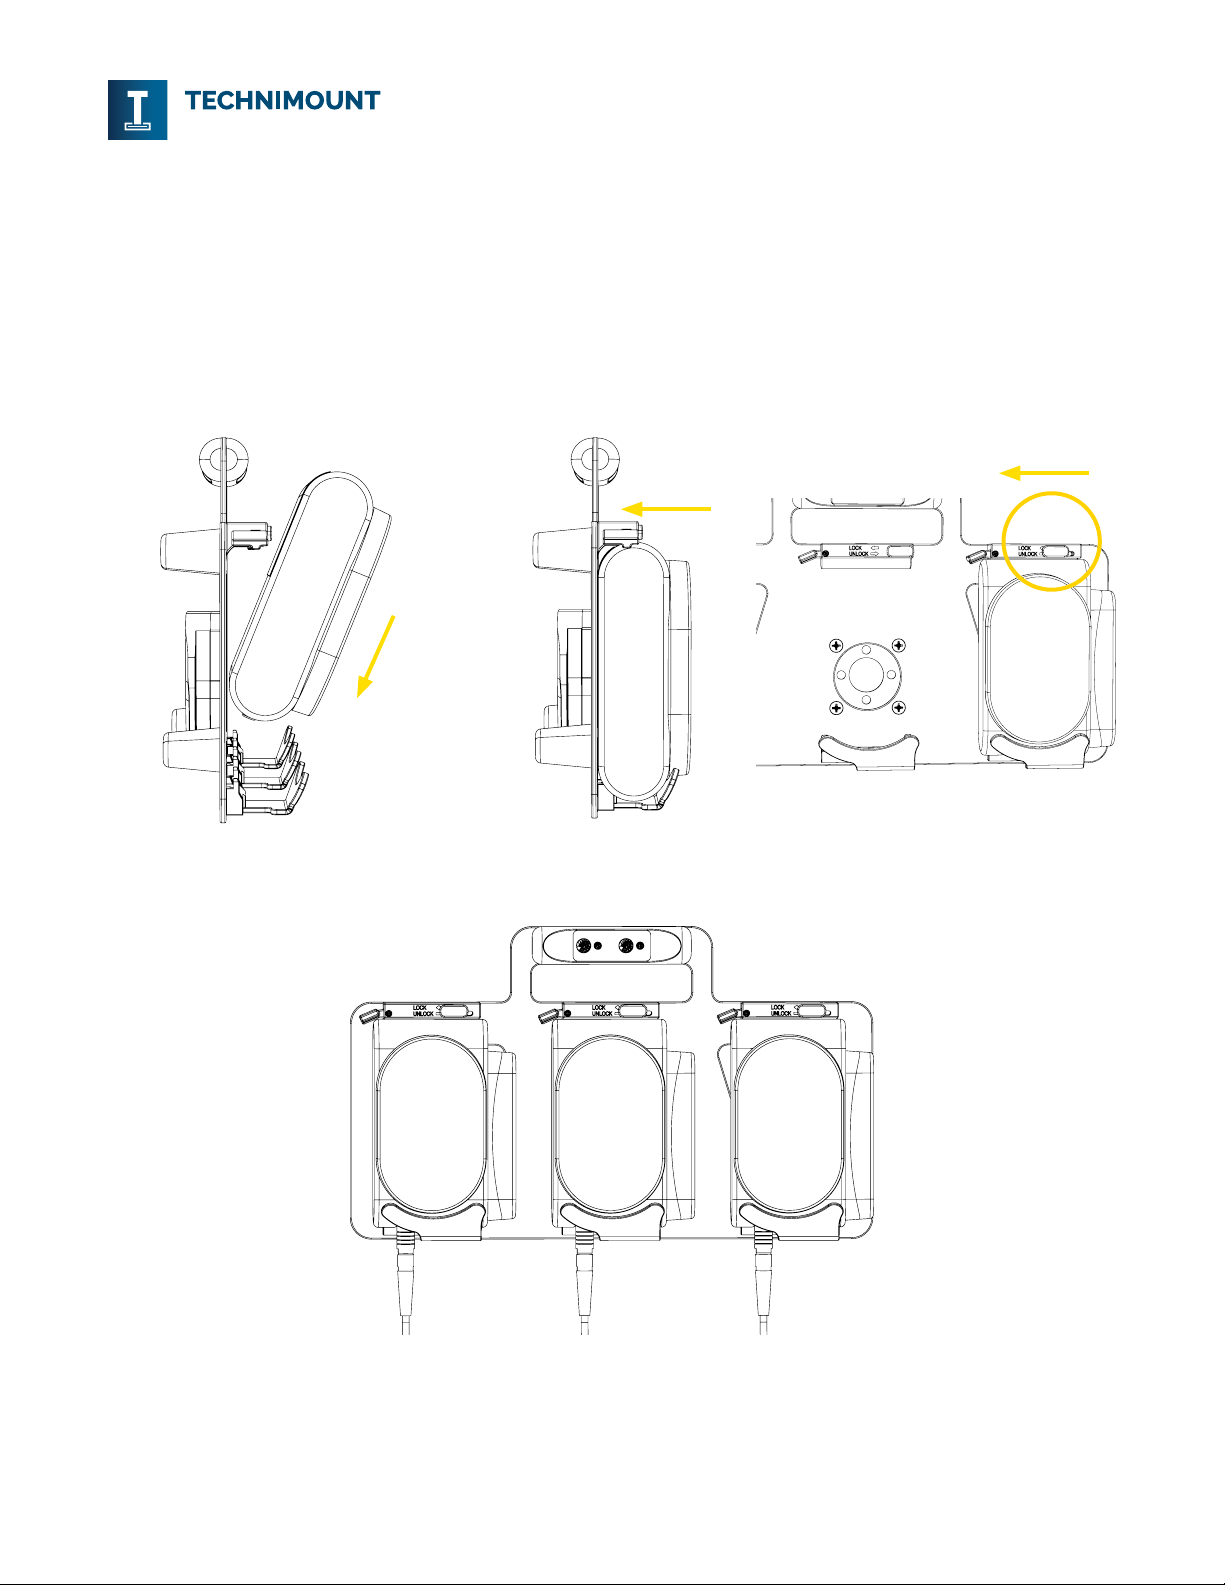
3. Angle the pump and lean it against the front fold of the pump holder, aligning the cavities with the inserts at
the bottom of the pump holder (Figure 4 A).
4. Tilt the pump in an upright position in the pump holder, until you hear the click sound of the quick release
mechanism engaging (Figure 4 B).
5. Move the lock/unlock slider button to the left until you hear the click sound of the locking mechanism
engaging (Figure 4 C).
6. Move the pump up and down a few times to make sure the pump is locked in the holder.
(A) (B) (C)
Figure 4: Infusion pump installation (2 of 2)
7. Repeat steps 3 to 6 until all pumps have been installed (Figure 5).
Figure 5: Infusion pumps installed in the Bracket Pro Serie 92 - GR3
BRACKET PRO SERIE® 92 - GR3
Operating Guide
EMSTM
© 2023 Technimount E.M.S. Holding Inc. OG-BP92-GR3-202305EN-01 | Page 8 of 16
2.2. Remove the Infusion Pump from the Bracket Pro Serie 92 - GR3
1. Unplug the infusion pump.
2. Move the lock/unlock slider button to the right to unlock the pump (Figure 6 A).
3. Press and hold down the quick release lever (Figure 6 B).
4. Grab the pump and tilt it, leaning the pump against the front fold of the holder (Figure 6 C).
5. Lift and pull out the pump, then set it aside on a flat surface.
6. Repeat steps 1 to 5 to remove other pumps if needed.
(A) (B) (C)
Figure 6: Infusion pump removal
BRACKET PRO SERIE®92 - GR3
Operating Guide
EMS
TM
© 2023 Technimount E.M.S. Holding Inc. OG-BP92-GR3-202305EN-01 | Page 9 of 16
2.3. Install the Bracket Pro Serie 92 - GR3 on a Micro Base
NOTE: Only a Technimount bracket with an anti-rotation micro disc or micro bottom disc can be
installed on a Micro Base.
1. Lift the Bracket Pro Serie 92 - GR3 using the handle and align the anti-rotation micro disc located at the
back of the bracket with the Micro Base opening (Figure 7 A).
2. Insert the disc completely into the base (Figure 7 B), until you hear the click sound of the quick release
button of the base engaging.
3. Pull up and press down on the handle a few times to make sure that the bracket is properly locked in the
Micro Base. Once locked in the Micro Base, the Bracket Pro Serie 92 - GR3 is ready for EMS transport
(Figure 7 C).
(A) (B) (C)
3
1
2
1. Handle
2. Anti-rotation micro disc
3. Micro Base
Figure 7: Installing the Bracket Pro Serie 92 - GR3 on a Micro Base

BRACKET PRO SERIE® 92 - GR3
Operating Guide
EMSTM
© 2023 Technimount E.M.S. Holding Inc. OG-BP92-GR3-202305EN-01 | Page 10 of 16
2.4. Remove the Bracket Pro Serie 92 - GR3 from the Micro Base
1. Press and hold down the quick release button of the Micro Base (Figure 8 A), then lift and pull out the
bracket from the base (Figure 8 B and Figure 8 C).
2. Set the bracket aside on a flat surface or store it until future use.
(A) (B) (C)
2
1
1. Quick release button 2. Handle
Figure 8: Removing the Bracket Pro Serie 92 - GR3 from the Micro Base

BRACKET PRO SERIE®92 - GR3
Operating Guide
EMS
TM
© 2023 Technimount E.M.S. Holding Inc. OG-BP92-GR3-202305EN-01 | Page 11 of 16
3. Perform the Daily Safety Checks
Daily safety checks on Technimount products are recommended to keep them in good condition and avoid failure
or injury to the patient or EMS personnel. EMS personnel should perform the daily safety checks at the beginning of
each work shift.
NOTE: Always keep records of your all maintenance activities and immediately remove defective or
expired products from your inventory.
Please contact Technical Support at [email protected] for replacement parts or repair related issues.
3.1. Required Tools
-Clean dry cloth
3.2. Daily Safety Checks
Refer to the illustrated inspection points (Figure 9), if needed.
NOTE: In case of a non-conformity, alert the maintenance supervisor of all non-compliances and
immediately cease use.
DAILY SAFETY CHECKS COMPLIANT
INSPECTIONS YES NO
Bracket Pro Serie 92 - GR3 (Figure 9)
-Visually inspect all the components of the bracket to ensure that there is no damage or
chemical attack, that the hardware is in good condition and there are no loose screws.
-Visually inspect the bracket and make sure there are no lodged particles. If so, immediately
remove using a clean dry cloth.
-Visually inspect the quick release lever and lock/unlock slider button of each pump holder
and make sure there are no lodged particles in the cavities. If so, immediately remove using
a clean dry cloth.
-Move the lock/unlock slider button of each pump holder from side to side, from the initial
position to the final position to ensure of proper functioning. The button should move from
side to side without any resistance and lock in the start and final positions.
-Install/remove a pump in each pump holder to ensure the proper functioning of the quick
release lever and lock/unlock slider button. The pump should be easily inserted and locked
in position after the click sound of the quick release lever lifting and easily removed by
pressing the quick release lever while the slider button is in the unlock position.
Anti-Rotation Micro Disc (Figure 9)
-Visually inspect all the components of the anti-rotation micro disc to ensure there is no
damage or chemical attack and that the hardware is in good condition.
-Visually inspect the rim of the anti-rotation micro disc and make sure there are no lodged
particles. If so, immediately remove using a clean dry cloth.

BRACKET PRO SERIE® 92 - GR3
Operating Guide
EMSTM
© 2023 Technimount E.M.S. Holding Inc. OG-BP92-GR3-202305EN-01 | Page 12 of 16
DAILY SAFETY CHECKS COMPLIANT
INSPECTIONS YES NO
-Insert/remove the anti-rotation micro disc on the Micro Base a few times to ensure proper
functioning. The Bracket Pro Serie 92 - GR3 should be easily inserted and locked in position
after the click sound of the quick release button of the base engaging and easily removed
when pressing the button.
Acetal Feet (Figure 9)
-Visually inspect the (4) feet to ensure there is no damage or chemical attack, loose parts
and that the hardware is in good condition.
Daily Safety Checks completed on (dd/mm/yyyy), by
Comments and observations:

BRACKET PRO SERIE®92 - GR3
Operating Guide
EMS
TM
© 2023 Technimount E.M.S. Holding Inc. OG-BP92-GR3-202305EN-01 | Page 13 of 16
DAILY SAFETY CHECKS COMPLIANT
INSPECTIONS YES NO

BRACKET PRO SERIE® 92 - GR3
Operating Guide
EMSTM
© 2023 Technimount E.M.S. Holding Inc. OG-BP92-GR3-202305EN-01 | Page 14 of 16
3.3. Illustrated Inspections Points
1 2
4
3
1. Quick release lever (3X)
2. Lock/unlock slider button (3X)
3. Anti-rotation micro disc
4. Foot (4X)
Figure 9: Bracket Pro Serie 92 - GR3 Inspection points (front and back of bracket shown)

BRACKET PRO SERIE®92 - GR3
Operating Guide
EMS
TM
© 2023 Technimount E.M.S. Holding Inc. OG-BP92-GR3-202305EN-01 | Page 15 of 16

EMSTM
Technimount EMS offers Mounting systems that can be installed
on ambulance counters, walls and stretchers which allows for the
device to follow the patient throughout the continuum of care. Our
unparalleled level of flexibility allows for maximum operability in
EMS, hospital and military environments.
Technimount EMS is driven to offer innovative solutions that
respond to the unique device management needs of emergency
and Critical Care Transport (CCT) teams for ground and air
ambulances. Safety is at the core of our values, all Technimount
systems are tested in compliance with the highest industry
standards for impact resistance. Technimount EMS is committed
to developing innovative solutions as healthcare practices evolve.
TECHNIMOUNT E.M.S. HOLDING INC.
3770 Jean Marchand Street, Suite 100-C
Quebec (QC) G2C 1Y6
Canada
T + 1 581.700.6613
TF + 1 888.639.2758 (North America)
technimount.com
Table of contents
Popular Medical Equipment manuals by other brands

Krober
Krober O2 technical information

Joerns
Joerns CairTurn RT User & service manual

BIOMET
BIOMET OnPoint Operation and care manual

Ring Rescue
Ring Rescue CompressionDevice Technical reference manual

Prytime Medical
Prytime Medical STAAR Assemble, Disassemble & Troubleshooting Instructions

Vermeiren
Vermeiren 631 instruction manual


Amico
Amico Reflection Series installation instructions

LegWorks
LegWorks ALL-TERRAIN KNEE user guide

Shofu
Shofu EyeSpecial C-V Important safety instructions

Verathon
Verathon GlideScope Go 2 Operation & maintenance manual

Halyard
Halyard MIC Series Instructions for use

Pierenkemper
Pierenkemper PierenPlus basic operating manual