Tecnai F20 User manual

CSBCryoEMFacilityTF20OperatingInstructionsSEC
05/02/16
The Tecnai F20 cryo electron microscope is a high resolution electron microscope that can be operated at
120 or 200kV. This microscope is equipped with a Field Emission Gun (FEG) as its illumination source and is
suitable for data collection of negative stained as well as cryo preserved samples. Three different types of
holders are available for use: a room temperature (RT) for setup and 0degree tilt data collection, a Fischione
RT holder for collecting random conical tilt negativestained images, and two cryo TEM holders for vitrified
samples (Gatan 626). The TF20 is equipped with a 4k by 4k Gatan UltraScan CCD camera for digital image
collection.Thecompustageofthemicroscopeallowsforprecisemovementsandtiltstoupto+/70degrees.
Themicroscope’smainpartsareshownbelow:

CSBCryoEMFacilityTF20OperatingInstructionsSEC
05/02/16
The microscope is controlled by a computer seating underneath the desk. It is critical that no foreign objects
are inserted in this computer (software and especially thumb drives or any external drive) as they could
containviruses/malwarethatwouldputthecomputerandmicroscopeatrisk.
A user account will be created for you when you have completed training and proven that you can safely
operate the microscope. Data can ONLY be retrieved the next day as it is copied nightly to the support
computer that is behind the curtain. This computer is supported by the CSB and external drives can be
installed on it to save data. Each micrograph is ~65MB in size, thus, data retrieval and removal of it is
important to keep data collection uninterrupted. Each month (or as needed) the Lab Manager will send a
reminder for people to remove their data. Both the support computer and the microscope computer have
limitedstoragespaceandtheyarenotforlongtermdatastorage.
Two pieces of software control the microscope and digital camera, the Tecnai User Interface which connect
the user with the microscope, and Gatan Digital Micrograph (DM). Each day a cryo cycle (or bake out cycle) is
runattheendofthedayandthecameramustberetracted.
Before leaving the room: Close the Column Valves and put the screen down. This ensures that
contaminationandirradiationtothesamplesarekeptataminimumandalsoprotectsthemicroscope.
The Lab Manager is available to assist with data collection when needed and is always available for
troubleshooting. Any problems or concerns must be notified immediately, this ensures that repairs happen in
atimelymannerandkeepsdowntimetoaminimum.
F20ProtocolforinsertingRTholderandGatan626cryoholder
I. StartUp
II. Sampleloading(atRT)
III. Alignments
IV. Sampleloading(cryo)
V. EndofSession

CSBCryoEMFacilityTF20OperatingInstructionsSEC
05/02/16
I. StartUp(Donotproceediftheseconditionsarenotmet.PleaseremembertonotifyEMmanagerof
anyconcernsorproblems)
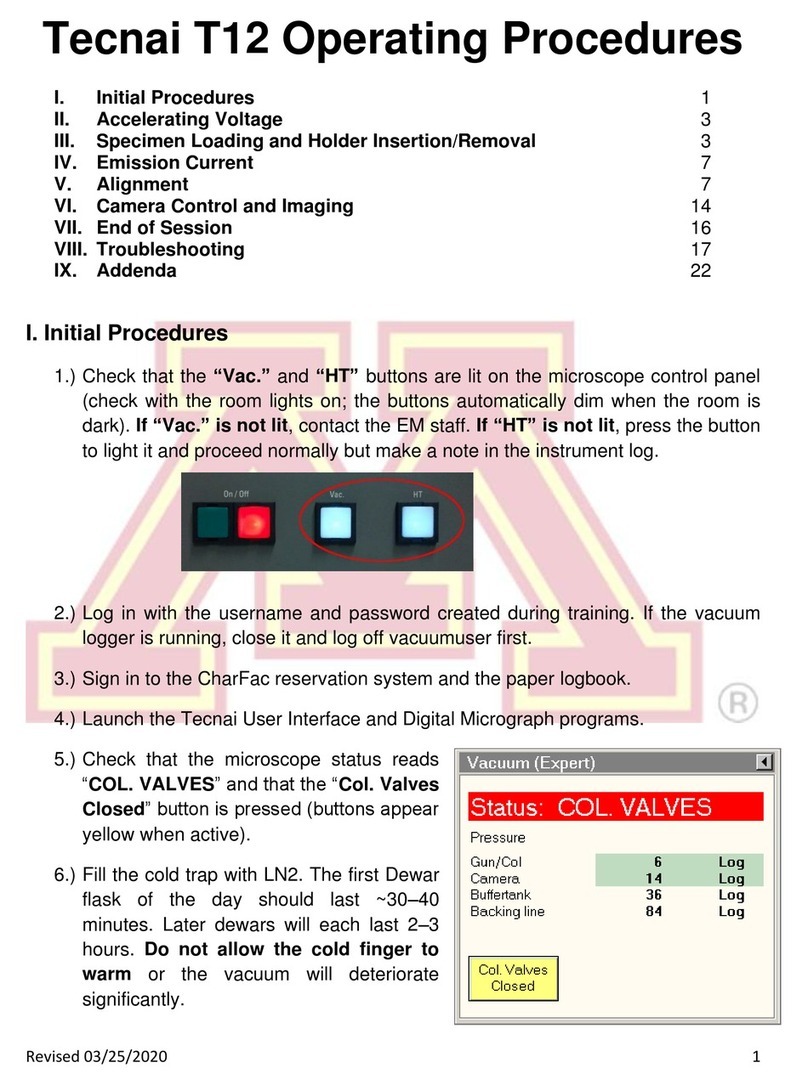
1. Check that the Vac and HT buttons are lit on microscope
panel. If the Vac and/or HT buttons are not lit, please contact
labmanagerimmediately,donotproceedanyfurther.
2. Ensure that the camera unit is on (check side cabinet, on the
left of the microscope). All 3 switches on the box should be
on (in the up position) and temperature should read 25°C.
(DoublecheckwithEMManagerifunsure)
3. Log in to the microscope computer using your username
and password. Do not insert foreign objects on this computer,
it is essential for controlling the microscope (do not
charge your phone or other electronic devices; do not insert
USB or external hard drives; only retrieve data from support
computersittingbehindthecurtain(dataiscopiednightly)).
4. Open the Tecnai User Interface and Digital Micrograph applications by double clicking on the
icons.
5. Check that the High Tension (HT), Operate and Power buttons are lit (yellow) on the Tecnai User
Interface. If they are not, please contact the lab manager immediately, do not proceed any
further.
6. Verify that the microscope is at the appropriate operating voltages (HT at 200kV and extraction
voltageat3850V).
7. Check that the microscope status says Column
Valves (button on user interface is yellow). This
means that the column valves are closed (For
the column valves, yellow = closed; grey =
open).
8. Check the Vacuum Overview page by clicking
on the Tecnai User Interface lower right menu.
IGP1 should read 6 and IGP4 should be at or
near 1 (unless it's the summer, in which case it
will be hovering around 610). The IGPs
maintain the vacuum on different parts of the
microscope. IGP1 and IGP 4 maintain the
vacuum on the column itself, therefore, to
minimize contamination of the sample and
(more importantly) of the column, the
microscopeshouldONLYbeoperatedwhenthesevaluesareintheoptimalrange.

CSBCryoEMFacilityTF20OperatingInstructionsSEC
05/02/16
9. Fill the liquid nitrogen dewar. You'll need to fill it 2x initially. The first time a lot of LN2 will quickly
boil off. Wait 1015 mins after initial fill up and then top off. This should last ~4hrs. In total, for an
8hr work day, you'll need to fill the anticontaminator 3x. Check every 24 hours and add nitrogen
asneeded.
10. Ifalltheseconditionsaremet,youareOKtoproceed.

CSBCryoEMFacilityTF20OperatingInstructionsSEC
05/02/16
II. Roomtemperature(RT)holderinsertion:
Thecompustage:
The compustage is composed of the airlock and the stage itself. The stage is computer controlled (can move
in X, Y and Z as needed, and also tilt). The airlock separates the holder from ambient. A timer is set when
inserting samples so as to evacuate (with assistance from the Turbo pump) the airlock and ensure that the
vacuum of the microscope is maintained. The part of the holder beyond the Oring will be in contact with the
high vacuum of the scope. Do not, under any circumstances touch this area. The oil from your fingers will
contaminate the vacuum as well as your sample. This will cause the vacuum to crash or at the very least
degrade(thereadingsinIGPs1and4willnotbeoptimal).DonottouchanythingbeyondtheOring.
Schematicofthecompustage(from:http://zhanglab.net/tem_help/tem/spechand.htm)
• Alignments should be done with either a platinum iridium specimen (PtIR) or a waffle grid (with
or without latex spheres). This grid should be carefully mounted on the room temperature (RT)
holder and returned to its proper receptacle once you're done aligning the microscope. If you
can't find either grid or you lose it, notify the EM manager immediately. Do not touch anything
in the rod with your bare hands, especially beyond the Orings, or you’ll contaminate the
rod,yoursampleandthemicroscope.

CSBCryoEMFacilityTF20OperatingInstructionsSEC
05/02/16
Procedure:
During specimen insertion and retraction you should not need to use considerable force to load
specimens. Do not force or jam anything.It could damage the compustage and/or holder. Contact
the EM manager if you notice anything unusual (noises, smells, sounds, anything out of the ordinary
couldsignaltrouble.Whenindoubt,pleaseask).
1. MakesurethattheColumnValvesareclosed(SetupTab,ColumnValvesclosedisyellow).
2. Verifythattheredlightonthecompustageisoff.
3. Make sure the stage is at 0,0,0 in X, Y and Z by going to the Search Tab, Stage 2 menu, flaput
window,andclickonHolder.Thiswill'Home'thestage.
4. Turn on the Turbo pump on the Setup Tab (click on Turbo On, the button will go from grey to
orangeandwhentheturboisready,itwillbeyellow).
5. GettheRTholder,removetheplasticcoveringattheend.
6. With the tool that's in the back part of the mounting station, place it in the small orifice in the tip
area(seepicture)andcarefullylifttheclamp(from3o'clockto12o'clock).

CSBCryoEMFacilityTF20OperatingInstructionsSEC
05/02/16
7. Carefully place your grid in the opening on the tip. Make sure it resides in the circular recess of
thetip.
8. With the tool, carefully bring down the clamp until it securely fastens the grid and clamp. Do
thiswithcaresoastoavoidjammingtheringontothegrid.
9. Return the tool to its resting place. Replace the plastic covering on the tip. Turn the holder
upside down and gently tap the back (black part) a few times to verify that the clamp was
positionedproperlyandthatthegridismountedcorrectlyandstaysinplace.
10. Taketheholderoutoftheplasticcoverandalignitspintothe3o’clockposition.

CSBCryoEMFacilityTF20OperatingInstructionsSEC
05/02/16
11. Carefully insert the holder in this position, then turn to the 5 o’clock position (this aligns the pin
tothe‘Close’wordontheoutsideofthecompustage.

CSBCryoEMFacilityTF20OperatingInstructionsSEC
05/02/16
12. If the airlock is engaged, the red light will light up on the compustage. Once the airlock is
engaged,donotpush,jamorotherwiseforcetheholderintothecompustage.
13. SelectSingleTiltHolderontheTecnaiUserInterface.
14. Therewillbeawaittimeof6090swhiletheairlockisevacuated.
15. WatchoutforwhentheredlightturnsoffandthecounterontheUserInterfacereaches
0s.
16. Securely turn the RT holder from the 5 o'clock position to the 12 o'clock position and gently
guidetherestoftheholderintothecolumn.

CSBCryoEMFacilityTF20OperatingInstructionsSEC
05/02/16
17. Makesuretheblackpartoftheholderisflushwiththecompustage.
18. TurnofftheTurbopump.
19. Wait~10minutestoopenthecolumnvalves,soastogivetimetothestagetostabilize

CSBCryoEMFacilityTF20OperatingInstructionsSEC
05/02/16
III. Alignments
• Thepurposeofthealignmentofthemicroscopeistoensurethatthebeamisparalleltothecolumn
andthattheaperturesareproperlycentered.
• Alignmentsshouldbedonebeforeeveryimagingsession.
• Onlyloadthemostrecentalignmentsfile,madebytheFEIengineer.Donotsaveyourown
alignmentfile.Itwillbedeleted.TherecentalignmentmadebyFEIwillonlyneedtobetouchedup
andit'sagoodplacetostart.
1. DONOTDOALIGNMENTSINLOWDOSE
2. Makesurethat“LowDose”isturnedoff(theboxwillbegray)
3. RemovetheObjectiveAperture:MovethesmallpinontheObjectiveaperturetotherightortowhere
thepointispointingtothespecimenholder.Thisallowsyoutodoanalignmentwithouttheobjective
interfering
4. Addaspacertothesampleholderinthecompustage.*thismustbedonewiththecolumnvalves
closed!ThespaceristypicallyaBICpencap.Thisspacerallowsforthesampletoberemovedfrom
thebeampathwithoutbreakingthesealofthesamplechamber.Thespacermakesthealignment
processeasier.
5. Waitforthecolumnvacuumtorecoverafterinsertingasample.Thistakes~10minutes.Youwant
IPG1=6andIGP4=1.Thesevaluescanbefoundin“VacuumOverview.”Thisisdisplayedonthe
rightsideoftheleftcomputermonitor(Ifitisnottherethenitcanbeselectedinthebottomright
corneroftheleftcomputermonitor).
6. Opencolumnvalves.
Checkforthebeam;Ifthereisnobeamtryoneofthefollowing:
1) Movethestage(onlyifasampleisinthescope/beampath)
2) Lowerthemagnification
3) Ifyoucan’tfindthebeamcall/findme.Theremaybeabiggerproblem
7. EucentricFocus:ClickonEucentricFocusbuttonlocatedontherightpanel,thisshouldtakeyou
withinafewmicronsoftruefocus.
8. LoadAlignmentfile:GototheAlignmentstab,clickontheflapoutwindowandunderFile,findthe
mostrecentalignmentsfilefortheappropriatevoltage(120or200kV).Clickonthefile,onthe
Availableboxunderthealignmentsfile,doubleclickontheallthealignments,thenclickapply.*The
beammaygoawaybutwillcomebackwhenyouloadtheFEGregistry.
9. LoadFEGregistry:GototheSearchtab.UnderRegistries,findthemostrecentfile.Clickonthefile,
thenclickSet.Thiswillchangeyourspotsizeto3.Changethespotsizebackto5.
10. VerifySettings:Verifythatyouyoursettingsarecorrect(magnification,spotsize,beamposition).
*TypicallyIuseMag=135,000x,Spotsize=5,andcenterthebeamusingthetrackball.**The
intensityofthebeamwillneedtobeadjustedwhenchangingthemagnification
11. Makethebeamround.Checkthisathighmagnification(~135kx).Condensethebeamusingthe
intensityknobtothesizeofadimeorslightlysmaller.Athighmagnification(~135kx)thebeammay
looktriangular.GotoAlignmenttabandclickonCondenser.Rightclickonthecurrentsettingand
copythesettingtoanotherlocation(ie.copy3to1).UsetheMultifunctionXandYknobsonthe
controlpaneltomakethebeamround.Onlyadjustonemultifunctionknobatatime.Click“none”
whenfinished.

CSBCryoEMFacilityTF20OperatingInstructionsSEC
05/02/16
12. SelectC2aperture:DeterminewhichC2aperturetouse(asof3/28/16).
Position1=50
Position2=70
Position3=100*mostcommonlyusedfornegativestain
Position4=150
13. CentertheCondenseraperture(C2):Usingtheintensityknob,condensethebeamandgothrough
crossoverandmonitorthatthebeamspreadsevenlyaboutthecenter.Ifadjustmentsareneeded,
centerthecondenseraperture(C2manually)byveryslightlyturningthecenterandleftsideknobsof
theC2Apertureuntilthebeamiscenteredonbothsidesofcrossover.
14. Checkthatthebeamisstillround.Ifnotfollowtheprocedureoutlinedinstep#11
15. GunTilt:Lowerthemagnificationto~10,000x.Toadjusttheguntilt(minimizeexposuretime)goto
theTunetabandselect“GunTilt”underDirectAlignments.Bringthelargescreendown,movethe
smallscreenintothebeampath(physicaltabtotheleftofthemicroscope).Usingthemultifunction
knobs(settoguntilt)adjustthebrightness.Keepaneyeontheexposuretime(“Meas.Exp.”onthe
monitor)tomakeitaslowaspossible.Clickdonewhenfinishedwithalignment.Movethesmall
screenbacktoitsoriginalposition(outofthebeampath).
16. GunShift:PerformthegunshiftinAlignments.ClickonGunShiftandfollowthedirections.The
magnificationandspotsizewillbesetautomatically.Theideabehindthisalignmentistocondense
thebeamandusingthemultifunctionXandYknobstocenterthebeam.Followtheinstructioninthe
lefthandpanelintheFEIuserinterface.Inordertogetamoreaccuratealignmentbesuretoclick
“NormalizeAll”(typicallysettoL2ontheleftcontrolpad)beforeandaftereachstep.Repeatthe
entireprocedure23timesuntilthebeamremainsinthecenter.Click“done”whenfinishedwith
alignment.
*Thegunshiftneedstobedonewithasampleinthemicroscope(orasampleinthescopewitha
spacer/pencapinplace).IFnotthenthethemicroscopewillbeepandyouwillgetanerrormessage
whichsays“xraysafety:Spotsizeclippedto5.”
17. BeamTiltXandY:Adjustbeamtiltpivotpoints.Changethemagnificationto10,000x.Condensethe
beamtoadot.ClickonBeamTiltppXunderDirectAlignments.Adjustthebeamsothatthebrightest
spotisaroundthecenter,nottheedges(withmultifunctionknobs).Click“done”whenfinished.Do
thesameforppYandclick“done”whenfinished.Changethemagnificationto135,000xandredo
bothpivotpointsXandY.
18. BeamShift:AdjustbeamcenterbyclickingonBeamShiftunderDirectAlignments,thencenterwith
multifunctionknobs.Click“done”whenfinished.
19. Removespacer:Closethecolumnvalvesandthenremovethespacer/pencapfromthecompustage
20. Wobbler:GototheSearchtab,flapoutmenuandclickonWobbler.Thisistosetuptheproper
Zheight(eucentricheight).Thegoalistominimizethemovement(wobbling)andonlyhavethe
samplemoveevenlyabouttheZaxis.AdjustZbyclickingonthe+/buttonsontherightcontrolpad
untilthemovementisminimized(itissuggestedthatyoufindafeatureonthegridoragridbarto
keeptrackofthemovement).Oncedone,clickonWobbler(thebuttonwillgofromyellowtogrey,it
takesamomenttocometoafullstop).
21. Rotationcenter:Withthescreendownandthesmallscreeninserted,clickonRotationCenterunder
DirectAlignmentsandminimizethebeammovement,makingitwobbleevenlyaboutthecenter.Set
themultifunctionknobstothelowestmovementpossibleandcarefullyminimizethewobbling.

CSBCryoEMFacilityTF20OperatingInstructionsSEC
05/02/16
22. SelectObjectiveaperture:Determinewhichobjectiveaperturetouse(asof3/28/16).
Position1=10
Position2=20
Position3=40*mostcommonlyusedforNegativestain
Position4=100
23. Diffraction:Iftheobjectiveapertureisnotinserted,insertittotheappropriatesetting(ifthesmallpin
ispointingtotheright/towardthespecimenholderthentheobjectiveisout,ifthesmallpinpointsto
thelefttheobjectiveisin).ClickontheDiffractionbuttonontherightcontrolpanelandcondensethe
beamtoasmallpoint.Verifythattheapertureiscenteredappropriatelybyobservingthehaloaround
thesmallpoint(itshouldbeevenandcontinuous).Adjustasneeded(usuallyveryminimalchange)
andexitdiffractionmodebyclickingthediffractionbutton.
24. CheckC2stigmation:Condensethebeam,gothroughcrossoverandverifythatthebeamisround
andeven.CorrectifneededbygoingtoTuneandselectCondenser.(Toensurethatyoucanget
backtowhereyoustartedrightclickonthehighlightedsettingsandcopythemtoanotherpanelie.
“copy3to1”)Usethemultifunctionknobstoadjustthebeamtomakeitround.Clickdonewhen
finished
25. Checkobjectivestigmation(donewiththeCCD):Findfocus(canbedoneusingtheLiveViewon
DigitalMicrographorbyinsertingthesmallscreenandadjustingthefocusuntilallcontrasthas
disappeared).Oncefocushasbeenfoundselectresetdefocus(typicallyR2ontherightcontrol
board),startliveviewandgobetween0.250.5nmunderfocus(negativevalue).Observetheshapeof
theFFToftheimage.Ifitisn'tround,gotoStigmator,selectObjectiveandadjustwiththe
multifunctionknobsuntiltheFFToftheimageisanevencircle.Selectnonewhenfinished
26. TurnonLowDose(IfworkinginLowDosemode)byclickingontheLDbutton,goesfromgreyto
yellow).Thisiswhereyouwillwanttochange/determinewhichmagnificationtousewhileimaging.
Mostnegativestainprojectswilluseafocusmagnificationof100kxwithanexposuremagnification
of62kx80kx(*Thesevaluesaregoodstartingpoints).Withthelargescreendown,verifythatthe
beamiscenteredinallimagingmodes(Search,Focus,Exposure).*Centerthebeaminexposure
first!!!Verifythatthebeamiscenteredandspreadtothedesiredlevelinallmodesandcheckthatthe
spotsizeiscorrect.Oncethebeamsettingsarecorrect,clickthroughthe3modesafewtimeswhile
centeringthebeamtominimizehysteresis(beammovement),whenchangingfromonemodetothe
next.*Ifthebeamisn’tstayingcenteredaskforhelp!
27. Checktheliquidnitrogeninthedewar(fillevery23hours).
28. Whenleavingthemicroscopeforanyreasondothefollowing:
a Closecolumnvalves
b Stopthecamera
c Retractthecamera
d Putthescreendown

CSBCryoEMFacilityTF20OperatingInstructionsSEC
05/02/16
IV.EndofSession
1. Closecolumnvalves
2. Retractthecampera
3. Putthescreendown
4. Home the stage (go to SearchStage and select the tab Navigate to Control and click on
Holder,thisensuresthatthestageisat0uminX,YandZ.
5. Removetheholdercarefully.
6. Clickoncryocycle.Makesurethecryocyclewillrunfor365minutesormore.
Wait~5minutesorforTurbototurnyellowbeforeremovingtheliquidnitrogendewar
7. Dismountthespecimenfromtheholderanddisposeofit(orsaveit)properly.
8. Once the Turbo turns yellow, remove the dewar from the microscope and dispose of the
remainingLN2inthefoamcontainerunderthetable.
9. Placetheprotectivefabricunderneaththeanticontaminator.
10. IfusingtheRTorRTtomographyholders,returnthemtotheirproperreceptacle.
11. If using the Gatan cryo holder(s), return to the dry pumping station and follow the instructions
thereonhowtowarmitandpumpitproperly.
12. Pleasesignupontheuser'ssheet.Recordtheactualtimespentimaging.
13. Return the next day to retrieve Data. Data will be moved overnight to the computer located
behindthecurtainintheF20room
V. Imaging
1. OpenDigitalMicrograph
2. Setexposuretimeto1second
3. Wantthemeanvaluetoequal~1000

CSBCryoEMFacilityTF20OperatingInstructionsSEC
05/02/16
VI. SampleLoading(cryo)
1. Makesuretheanticontaminatordewarisfilledwithliquidnitrogen(LN2).
2. The cryo holder should be pumped at least 2hrs in the Dry Pumping Station (see separate
protocol)beforeuse.Preferably,you'llhavepumpedtheholderthedaybeforeforatleast6hrs.
3. Place the cryo transfer station on the table top. Insert the cryo holder into the station and
removetheclipringandpreviousgridifpresent.
4. Make sure you have gathered your cryo sample in transfer dewar, forceps, large forceps for
gridboxtransfer,andanythingelseneededandplaceitnearthetransferstation.
5. Add LN2 to both the cryo transfer station and the cryoholder. These will boil at different times.
Do not overfill the holder nor the station, this will only cause the holder to become icy and the
transferstationtofrost.
6. Pluginthecontrolunitcordandturnonthetemperaturecontrolunit.
7. Tilt the compustage to 60° by going to the Search tab, flapout window, Control tab, Alpha
toggle,typein60°andclickSetAlpha.TurntheTurboon.
8. Check that the airlock pump time is set to 6090s (Setup tab, flapout window, Settings tab,
Defaultairlocktime:60s).

CSBCryoEMFacilityTF20OperatingInstructionsSEC
05/02/16
9. Cool the large forceps and transfer the grid box into the position in the transfer station. Cool the
screwdriver if needed and loosen the top on the cryo grid box and place the cover on the
transferstation.
10. Continue adding LN2 as needed. You want to keep the temperature at least 175°C or colder
(to~197°C).
11. Cool the following in the recessed bowl area: clipring tool (silver with black knobs) and attached
clipringandforcepsforthegridtransfer.
12. Open the shield on the cryo holder and transfer a grid from the grid box to the recessed grid
location on the cryo holder. Place the clip ring on (you should hear a click) and then hold the
shaft and turn the knob until both feet of the tool are together. Gently pull up with the clipring
tool.

CSBCryoEMFacilityTF20OperatingInstructionsSEC
05/02/16
13. Verify that the clip ring is securely held in place with the cold black rod (clipring should not
move). If clipring is loose, cool down the knob end of the clipring tool and gently press on the
clipring.
14. Closetheshieldonthecryoholderandremovethetoolsfromthetransferstation.
15. ContinueaddingLN2asneededtothecryotransferstationbutdonotoverflow.
16. Tightenthegridboxlidandremovefromtransferstation.
17. Carefully remove the cryo holder from the transfer station and insert it into the microscope.
18. The guide pin on the cryo holder will be at the 12 o’clock position and must be quickly rotated
clockwisetothe3o’clockpositionsothattheairlockistriggeredandthepre
pump begins. When the position of the holder is correct, the holder will slide into the airlock
about1inchfurther.
19. SelecttheSTCryoholderoption(bottomoftheTecnaiUserInterface).
20. Waitfortheairlockpumpingcycletofinish(6090s)asindicatedbythetimerontheUI.
21. When the holder is upright, reset the stage tilt to 0° by going to the Search tab, flapout window,
Controltab,AlphatoggleandclickSetAlpha(thiswillreturnthestageto0°).
22. Gentlyallowthevacuumtopulltheholderintoposition.
23. Refill the dewar on the cryo holder. Use the debubbler (rubber stopper with tubing) to remove
theanyexcessLN2fromtheneckofthecryoholder.
24. Remove any remaining LN2 from the transfer station and allow the tools used to warm up and
dryoff.
25. Wait ~1015 minutes before opening the column valves. Because there is a lot of movement
happening during insertion, the grid will drift a lot until it settles down. Ideally the column
vacuum(IGP1)willreturnto6beforeviewingthesample.

CSBCryoEMFacilityTF20OperatingInstructionsSEC
05/02/16
VII. EndofSession
14. Closecolumnvalves
15. Retractthecampera
16. Putthescreendown
17. Home the stage (go to the Stage tab Control and click on Holder, this ensures that the stage
isat0uminX,YandZ.
18. Removetheholdercarefully.
19. Clickoncryocycle.Makesurethecryocyclewillrunfor365minutesormore.
Wait~5minutesorforTurbototurnyellowbeforeremovingtheliquidnitrogendewar
20. Remove the dewar from the microscope and dispose of the remaining LN2 in the foam
containerunderthetable.
21. Placetheprotectivefabricunderneaththeanticontaminator.
22. Dismountthespecimenfromtheholderanddisposeofit(orsaveit)properly.
23. IfusingtheRTorRTtomographyholders,returnthemtotheirproperreceptacle.
24. If using the Gatan cryo holder(s), return to the dry pumping station and follow the instructions
thereonhowtowarmitandpumpitproperly.
25. CloseDigitalMicrographandtheTecnaiUserInterfaceandlogout.
26. Pleasesignupontheuser'ssheet.Recordtheactualtimespentimaging.
27. Return the next day to retrieve Data. Data will be moved overnight to the computer located
behindthecurtainintheF20room
Table of contents
Other Tecnai Microscope manuals
