Tecnogas EXPLORER PREMIUM 8802AL User manual

MANUALE D’USO
USER MANUAL
Telecamera Wireless per Ispezione
Con Monitor per registrare
Wireless Inspection Camera
with Recordable Monitor
Versione 1.2
Per cortesia leggere attentamente questo manuale d’uso prima di utilizzare questo dispositivo.
Errori nella comprensione delle procedure operative possono risultare dannosi.
Version 1.2
Please read this user manual carefully before using this product.
Failure to understand operation procedures may result in injury.
Modello / Model: 8802AL, 8803AL

01
INDICE
Informazioni generali di sicurezza
Benvenuto
Caratteristiche
Contenuto confezione
Composizione
Installazione
Funzionamento
Di base
Registrazione
Fotografie
Riproduzione video/foto
Cancellazione video/foto
Cancellazione cartella
Come entrare nel modo di programmazione
Selezione lingua
Programmazione del sistema video
Formattazione
Programmazione di default
Informazioni sul formato video
Programmazione quadro
Programmazione tempo memorizzazione
Tipo di registrazione
Programmazione data/ora
Riproduzione
Specifiche
Risoluzione problemi
Informazioni FCC
CONTENTS
General Safety Information 02
Welcome 03
Features 03
Packing List 03
Structure 04
Installation 05
Operation 08
Basic Operation 08
Recording Video 09
Taking Photos 09
Playback Video/picture 09
Deleting Video/picture 10
Deleting Folder 10
How to Enter the Setting Mode 11
Language Setting 11
Video System Setting 11
Formatting 11
Default Setup 11
View Version Information 12
Frame Rate Setting 12
Time Stamp Setting 12
Recording Type 12
Date/time Setting 12
Event Playback 12
Specifications 13
Troubleshooting 14
FCC Information 14

02
INFORMAZIONI GENERALI DI SICUREZZA
ATTENZIONE! Leggere e comprendere tutte le istruzioni. Errori
nella comprensione di tutte le istruzioni riportate di seguito
possono provocare corto circuito elettrico, fuoco e /o danni
personali seri.
CONSERVARE QUESTE ISTRUZIONI!
•Evitarecheentrinooggettieliquidi.Mairovesciareliquididiogni
tipo sull’unità video. I liquidi aumentano il rischio di corto circuito
elettrico e di danno al prodotto.
•L’articolononèresistenteagliurti.Nonusarlocomeunmartello
ed evitare ogni tipo di impatto.
•Non immergere l’impugnatura della camera o il monitor
nell’acqua. Evitare l’umidità e conservare il prodotto in ambiente
secco. Queste misure riducono il rischio di corto circuito elettrico
e di danneggiamento. Le lenti e il cavo sono resistenti
all’acqua se l’articolo è correttamente e completamente
assemblato mentre il monitor e l’impugnatura no.
•Non usare la camera in presenza di condensa nelle lenti.
Lasciare evaporare l’acqua prima di usarla.
•Spegnereildispositivosenonsiusa.
•Questoprodottopuòesserecompletamentedisconnessodalla
propria alimentazione di corrente elettrica staccando il carica
batteria.
•Non tagliare il cavo CC fornito con il prodotto per adattare
un’altra alimentazione di corrente.
•Porre la necessaria attenzione ambientale nello smaltimento
delle batterie.
•Toglierelabatterieprimadipulireilprodotto.
•Toglierelabatterieincasodiunnonutilizzoprolungato.
•Senecessario,sostituireTUTTEE4LEBATTERIEenon1o2
batterie alla volta.
•Usaresolamenteiltipodibatterieindicato.
•Assicurarsidiinstallarelebatterieconlagiustapolaritàcome
indicato nel vano delle stesse.
•Smaltirelebatteriecorrettamente.L’esposizionedellestessead
alte temperature può farle scoppiare. Non gettarle quindi nel
fuoco. Coprire i terminali delle stesse per prevenire contatto
diretto con altri oggetti.
•Alcunipaesihannoregolamentiriguardantilosmaltimentodelle
batterie. Per cortesia seguire tutti i relativi regolamenti.
GENERAL SAFETY INFORMATION
WARNING! Read and understand all instructions. Failure to follow
all instructions listed below may result in electric shock, fire and/
or serious personal injury.
SAVE THESE INSTRUCTIONS!
•Prevent object and liquid entry. Never spill liquid of any kind
on the video display unit. Liquid increases the risk of electrical
shock and damage to the product.
•Theunitisnotshock-resistant.DonotuseExplorerStandardas
a hammer and avoid high impact resultant from things such as
dropping the unit from height
•Do not immerse camera handle or monitor in water. Avoid
moisture, and store product in a 10 dry place. Such measures
reduce the risk of electric shock and damage. The lens
and the tube are water resistant when the unit is fully
assembled, but the monitor and handle are not.
•Donotusethecameraifcondensationformsinsidethelens.Let
the water evaporate before using again
•Turnoffthesystemifitisnotinuse.
•Thisproductcanonlybecompletelydisconnectedforfromits
power source by unplugging the power adapter.
•DonotcuttheDCpowercableofprovidedwiththisproductto
fit with another power source.
•Attention should be given to the environmental aspects of
battery disposal.
•Removethebatterieswhencleaningtheunit.
•Removethebatteriesbeforestoringtheunitforalongtime.
•Whennecessary,REPLACEALLFOUR(4)BATTERIESinthisunit
withnewones,notone(1)ortwo(2)batteriesatatime.
•Useonlythesizeandtypeofbatteryspecied.
•Besuretoinstallthebatterywiththecorrectpolarityasindicated
in the battery compartment.
•Properly dispose of batteries. Exposure to high temperatures
cancausebatteriestoexplode,sodonotdisposeofinare.
Place tape over the terminals to prevent direct contact with
other objects.
•Somecountrieshave regulationsconcerningbattery disposal.
Please follow all applicable regulations.
03
>>BENVENUTO
CongratulazioniperaveracquistatoEXPLORERPREMIUM,la
telecamera wireless per ispezione con il monitor LCD a colori
per registrare. Per cortesia leggete attentamente il manuale
d’uso prima di usare il prodotto. Questo articolo è stato
progettato come un dispositivo remoto di ispezione in grado
di registrare video e di scattare foto. Adatto per essere usato
per ispezionare tubazioni o altri posti difficili da raggiungere
quali installazioni di elettrodomestici, riparazioni di automobili,
ecc. E’ dotato di lenti LED resistenti all’acqua, registrazione in
tempo reale e una micro scheda SD per la memorizzazione.
>>CARATTERISTICHE
•Consentediispezionarepiccoliedifciliangolieposizioni
•MinilentiLED9/17mmresistentiall’acqua,cavoessibile
da 1 metro
•GradodiprotezioneIP67
•Monitor3,5”TFT-LCDportabile,batteriericaricabiliallitio
incluse
•Possibilitàdiregistrare,supportaunamicroschedaSDda
32GB
•Luminositàregolabile
•3utiliaccessoriinclusi:uncino,specchioemagnete
•Menùmultilingue
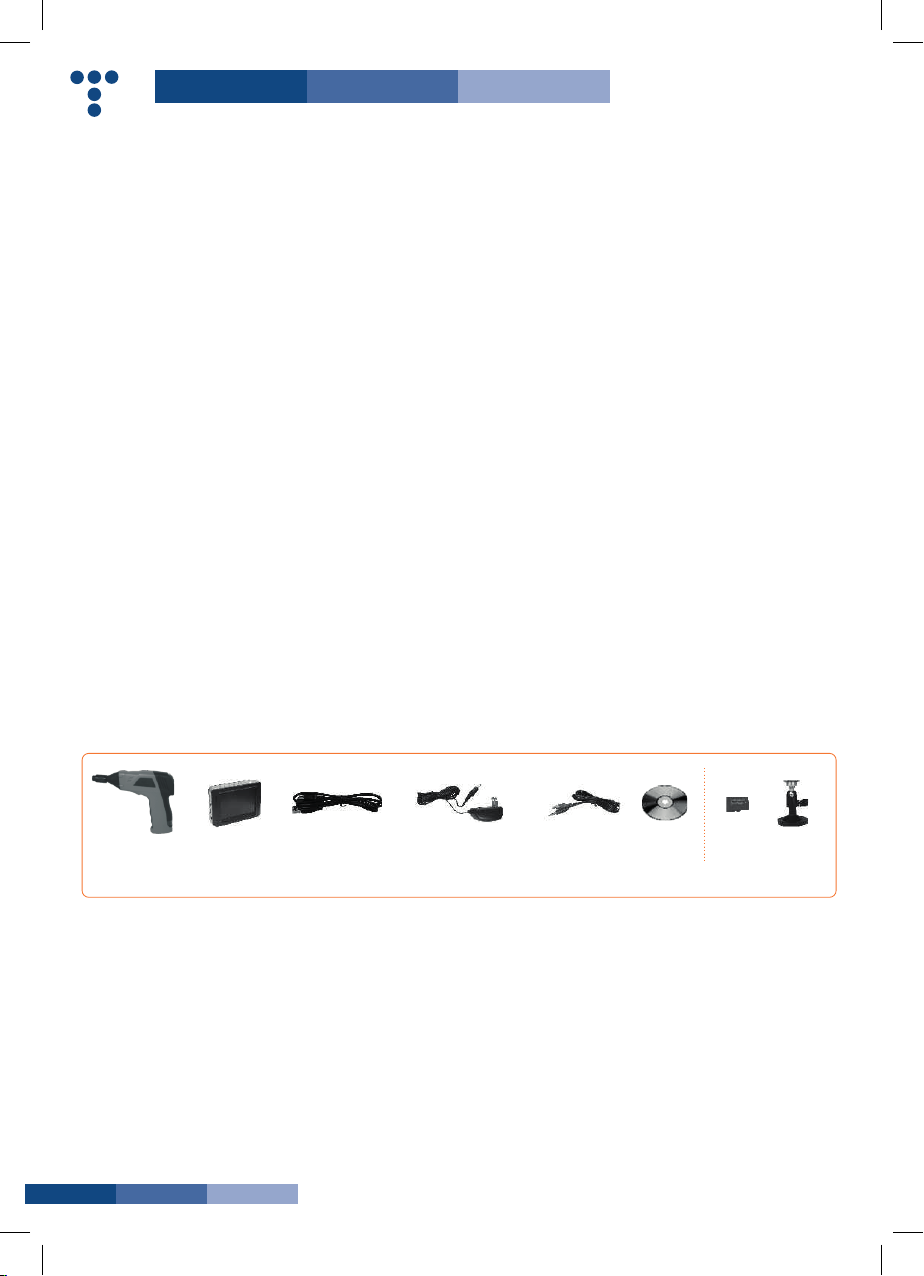
>>CONTENUTO CONFEZIONE
>>WELCOME
Congratulations on your purchase of our inspection video
camera with recordable color LCD monitor, the EXPLORER
PREMIUM.Pleasereadtheusermanualcarefullybeforeusing
this product. This product is designed as a remote inspection
device, capable of recording video/taking pictures. Appropriate
for use in surveying pipes or other hard-to-reach places,
equipment or furnishing installation, car repair, etc. Features
includewaterproofLEDlens,real-timerecording,andmicro
SD card storage.
>>FEATURES
•Allowsforeasysurveyingofsmall,hard-to-reachplaces.
•Mini9/17mmwaterproofLEDlens,1.0meterexibletube.
•ManufacturedandtestedtoIP67waterproofstandard.
•3.5”TFT-LCDdetachable/mountablemonitor,built-in
rechargeableLi-battery.
•Videorecordingcapability,supportsupto32GBmicroSD
card.
•Adjustablebrightnessonlens-mountedLEDlight.
•3usefulaccessoriesincluded:Hook,mirrorandmagnet.
•Lightweight,handhelddesign,exibleandconvenientto
use.
•Multi-languagesupport.
>>PACKING LIST
Impugnaturax1
Handlex1
MonitorLCDx1
LCDMonitorx1
CavoUSBx1
USBcablex1
Caricabatteriex1
PowerAdapterx1
Cavovideox1
Videocablex1
CDsoftwarex1
softwareCDx1
Micro
scheda SD
micro SD
card
Staffa
magnetica
Magnetic
Bracket
Optional
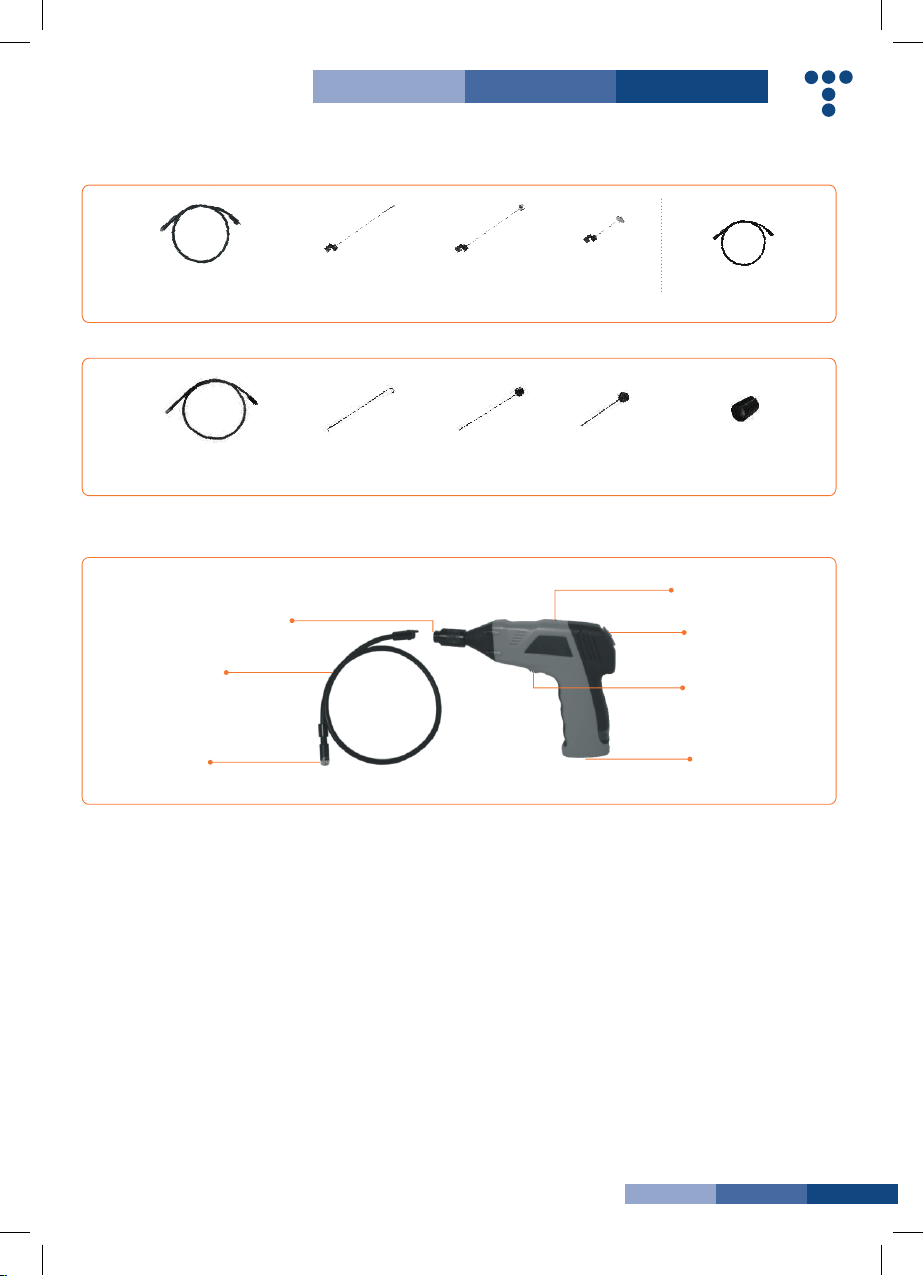
04
MinilentiLED17mmresistentiall’acqua
Mini17mmWaterproofLEDLens
Mini lenti LED 9 mm resistenti all’acqua
Mini 9 mm Waterproof LED Lens
Interfacciacavoessibile
FlexibleTubeInterface
Spia di accensione
Power Indicator
Segnale uscita
Signal Output
Interruttore di accensione
Power Switch
Vano batterie
Battery Slot
Cavoessibile
FlexibleTube
MinilentiLED17mmresistentiall’acqua
Mini17mmWaterproofLEDLens
Uncinox1
Hookx1
Uncinox1
Hookx1
Magnetex1
Magnetx1
Magnetex1
Magnetx1
Specchiox1
Mirrorx1
Specchiox1
Mirrorx1
Prolunga cavo
ExtensionTube
Guarnizione in
gommax1
Rubberringx1
Optional
Solamente per GB8802 / Only for GB8802
Solamente per GB8803 / Only for GB8803
CAMERA
COMPOSIZIONE / STRUCTURE

05
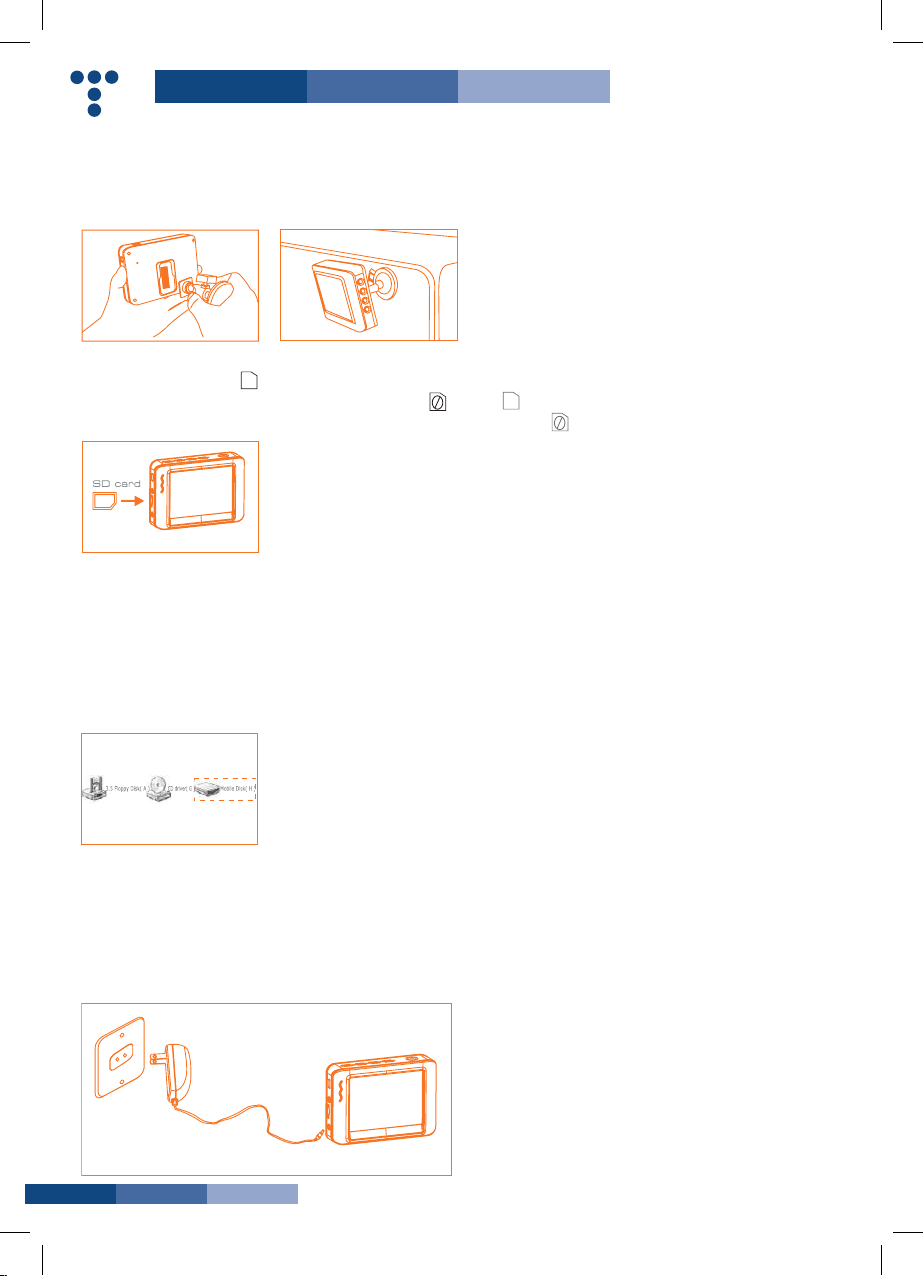
INSTALLAZIONE
Installazione delle batterie(asciugarelevostremaniprima
diinstallareosostituirelebatterie).
1. Svitare il coperchio come da seguente illustrazioni:
2. Togliere l’alloggiamento delle batterie ed inserire 4 batterie
tipo AA come indicato nel vano
3. Reinserire l’alloggiamento delle batterie e avvitare il
coperchio
Installazione cavo flessibile all’impugnatura
Perinstallareilcavoessibiledellatelecameraall’impugnatura
assicurarsi che il terminale del cavo sia allineato all’attacco
dell’impugnaturae innestarli.Unavolta innestati,avvitarela
manopola in senso orario per assicurare l’aggancio.
INSTALLATION
To Install Batteries (Dry your hands before installation or
replacingbatteries.)
1.UsingaPhilipsheadscrewdriver,removescrewandcover
as illustrated below:
2. Remove battery compartment and insert four (4) AA
batteries into their appropriate slots, with proper orientation,
as indicated on the battery compartment.
3. Reinstall battery compartment and replace battery cover
and screw
To Attach Flexible Tube with Handle
Toconnecttheexibletubecamerawithcontrolhandle,rst
make sure that the keyed end of the tube is aligned with the
slot in the handle, then use slight force to push them together.
Once properly aligned, twist the treaded knob clockwise until
the connection is securely in place.
MONITOR
Interruttore di accensione/Power Switch
Conferma/Confirm
Su/ToggleUp
Menù/Menu
Giù/Toggle Down
Terminale cavo nell’attacco
Keyed end plugs into socket
Stringere la manopola
Fasten the treaded knob
Spia accensione/Power Indicator
PortaUSB/USBPort
Uscitavideo/Video Output
Vano micro scheda SD/ MicroSD Card Slot
Attacco carica batterie/ Power Jack
Tasto reset/ Reset Button
Aggancio monitor/ Monitor Docking Station

06
Installazione accessori
I tre accessori inclusi (specchio, uncino e magnete) si
attaccano tutti e quanti allo stesso modo alla telecamera
come sotto illustrato:
Per GB8802: per preparare gli accessori all’installazione,
spingere dalla parte dello stelo dell’interfaccia nera e
contemporaneamente tirare via dalla parte adiacente. Si
aprirà la base degli accessori. Poi, allineare internamente
dalla parte dello stelo entrambe le parti filettate alla base della
testa della telecamera. Stringere per assicurare l’installazione
degli accessori.
Installazione del monitor
EXPLORER PREMIUM funziona collegando il monitor
all’impugnatura della telecamera.
Installazione della prolunga
Per installare la prolunga, allineare il terminale del cavo con
l’attacco dell’impugnatura e innestarli. Una volta innestati,
avvitare la manopola in senso orario per assicurare l’aggancio.
Ripetere la procedura per collegare l’altro terminale della
prolungaalcavoessibiledellatelecamera.
To Install Accessories
Thethree(3)includedaccessories(mirror,hookandmagnet)
are all attached to the camera in the same way as illustrated
below:
For GB8802: to prepare accessory for installation, push
downonstem-sideofblackinterfacewhilepullingawayfrom
adjacentside.Thiswillopenthebaseoftheaccessory.Next,
aligninsideofstem-sidetoeithertreadedsurfaceatthebase
of camera head. Tighten to secure the accessory in place.
To Install Monitor for Wired Use
EXPLORERPREMIUM supportswired usebyconnecting the
monitor to the camera handle.
To Install Extension Tube
Toconnecttheextensiontube,rstalignthekeyedendwith
theslotinthehandle.Useslightforcetopushthemtogether.
Once properly aligned, twist the treaded knob clockwise until
the connection is securely in place. Repeat this process to
connect the other end of extension tube to exible camera
tube.
Innestare nella fessura
dell’alloggiamento
Aim at the cut of slot
Far scivolare il
monitor in basso
Slide the monitor
downward
Installato
correttamente
Installed
successfully
Agganciare il foro
Hook the hole
Click per chiudere
Click to lock up
Inserire la guarnizione in gomma
Wear the rubber ring
per GB8802 for GB8802 per GB8803 / for GB8803
07
Installazione della staffa al monitor
Attaccare la staffa magnetica al monitor usando lo stesso
procedimento del collegamento del monitor all’impugnatura.
Inserimento scheda SD
Dopo che la scheda SD è stata inserita correttamente
nel vano, apparirà nel monitor l’icona della scheda SD ;
altrimenti,senonc’èlascheda,appariràl’icona.
Connessione cavo USB
Usare in cavo USB in dotazione per collegare il monitor a
qualsiasi PC con la periferica USB. Il computer riconoscerà
automaticamente il nuovo hardware che si apre cliccando
sull’icona Risorse Computer del desktop e quindi entrando
nella cartella Mobile Disk.
NOTA! Se il computer non riproduce i file video, installare il
software video player dal CD in dotazione
To Install Monitor Mounting Bracket
Attach the magnetic mounting bracket to the monitor using
the same method used to attach the monitor to the camera
handle.
To Insert SD Card
After SD card is inserted into SD card slot successfully, an SD
card icon will appear on the monitor screen; otherwise, the
‘no SD card’ icon will show.
To Connect USB Cable
UsetheprovidedUSBcabletoconnectthemonitortoanyPC
withaUSBslot.Yourcomputershouldautomaticallyrecognize
thenewhardware,whichyoumaybrowsebydouble-clicking
on the My Computer icon on your desktop, and then navigating
into the Mobile Disk directory.
NOTE! If your computer is unable to playback desired video
files, please first install the video player software from the
included CD.
Ricarica del monitor
Collegare il monitor ad una presa di corrente appropriata
(100-240V/50-60Hz)conilcaricatoreindotazione.IlLEDdi
accensione si illuminerà di rosso e l’icona della carica della
batteria inizierà a lampeggiare nel monitor indicando che la
batteria si sta ricaricando. Quando la luce rossa si spegne, la
batteriasièricaricatacompletamente.
To Connect Monitor Power
Connectthemonitortoanappropriate(100-240V~50/60Hz)
power source with the provided adapter. The power indicator
LED will illuminate red and the battery capacity icon on the
LCDwillicker,indicatingthatthebatteryischarging.When
the red indicator light disappears, the battery has been fully
charged.
Monitor
adapter
power
source
08
Uscita video
Inserire il cavo video nella presa video del monitor e nella
presa video di una qualsiasi TV.
3. Durante l’uso, il tubo dovrebbe snodarsi facilmente. Non
applicare forza eccessiva.
SUGGERIMENTO!
A:iltuboessibilesisnodainnumeroseposizionicheaiutano
ad esplorare zone altrimenti impossibili da vedere
B: gli accessori inclusi nell’EXPLORER PREMIUM possono
essere usati per recuperare piccoli pezzi caduti come
guarnizioni o viti.
Video Output
Insert video cable into the video out socket of the monitor,
insert the other end of the cable into the video in jack of
any compatible TV or display device. The LCD monitor is now
capable of outputting high quality video to another display
3. When in use, the tube should easily maneuver itself into
position.Donotapplyexcessiveforce.
TIP!
The exible tube can be bent into numerous shapes
that may help you explore areas you otherwise thought
were impossible to see. B: The accessories included with
EXPLORER PREMIUM can be used to retrieve small items
like dropped rings or screws.
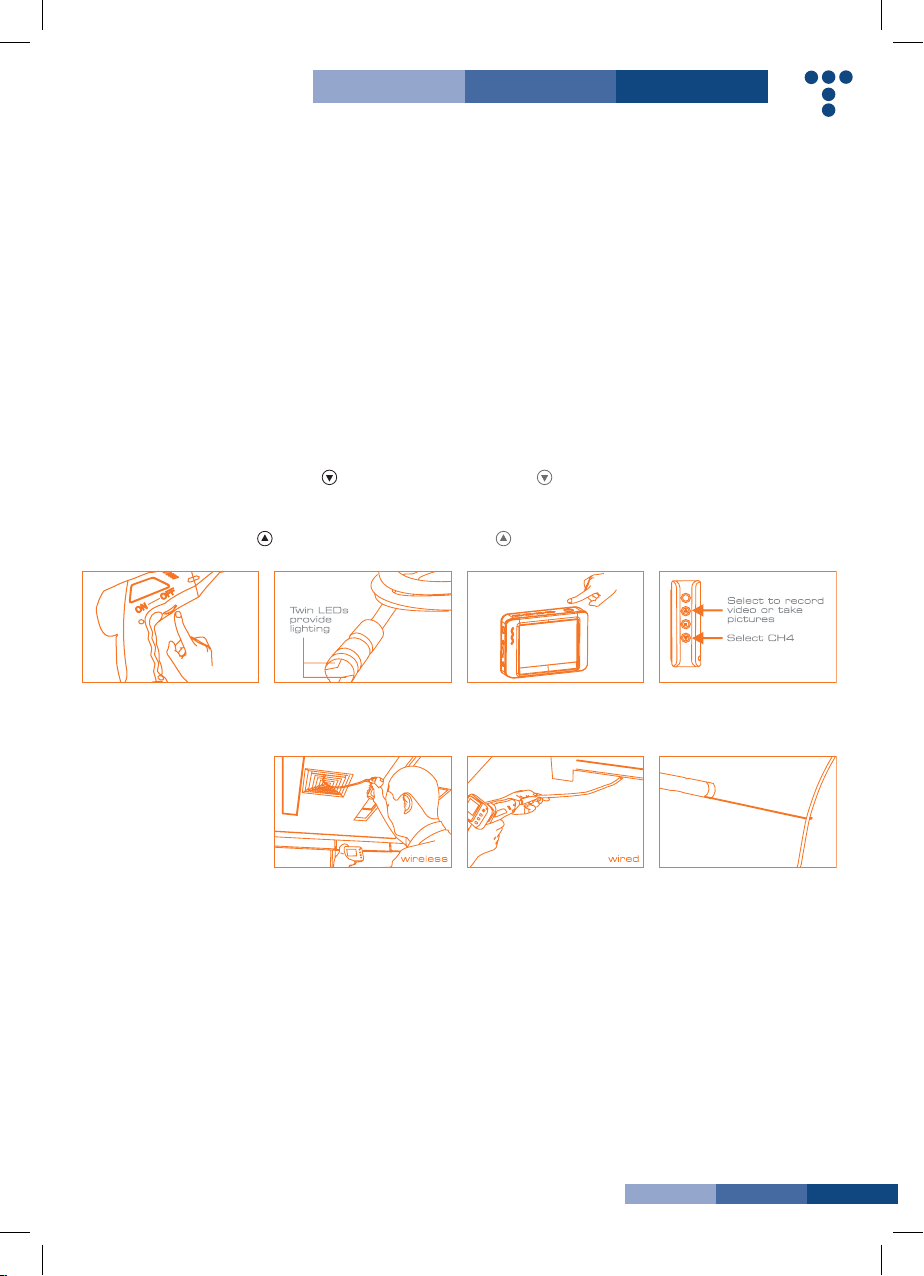
>>FUNZIONAMENTO
Funzionamento base
1. Girando l’interruttore di accensione della telecamera, si
accenderà la spia di accensione nella telecamera. La rotellina
servirà poi come variatore di luminosità delle doppie lenti LED
cheavvolgonolatelecameraallanedeltuboessibile.
2. Tenere premuto l’interruttore di accensione del monitor
per 2 secondi fino a che la spia di accensione diventa verde.
Quindi premere il tasto freccia in giù per selezionare il
canale 4 CH4 o fino a che l’immagine compare nel monitor.
Per passare dalla registrazione alla funzione di fotocamera,
premere il tasto freccia in su a lato del monitor.
>>OPERATION
Basic Operation
1. As you roll the power switch to turn on the camera, the
power indicator on the camera handle will light. The rolling
switch then acts as a dimmer for the twin LEDs that surround
thecameraontheendoftheexibletube.
2. Press and hold the power switch for 2 seconds on the
monitor until the power indicator illuminates green. Then
press the button to select CH4 (channel 4), or until the
picture from the lens is displayed on the monitor. To toggle
between video recording and picture taking functions, press
the button on the side of the monitor.
09
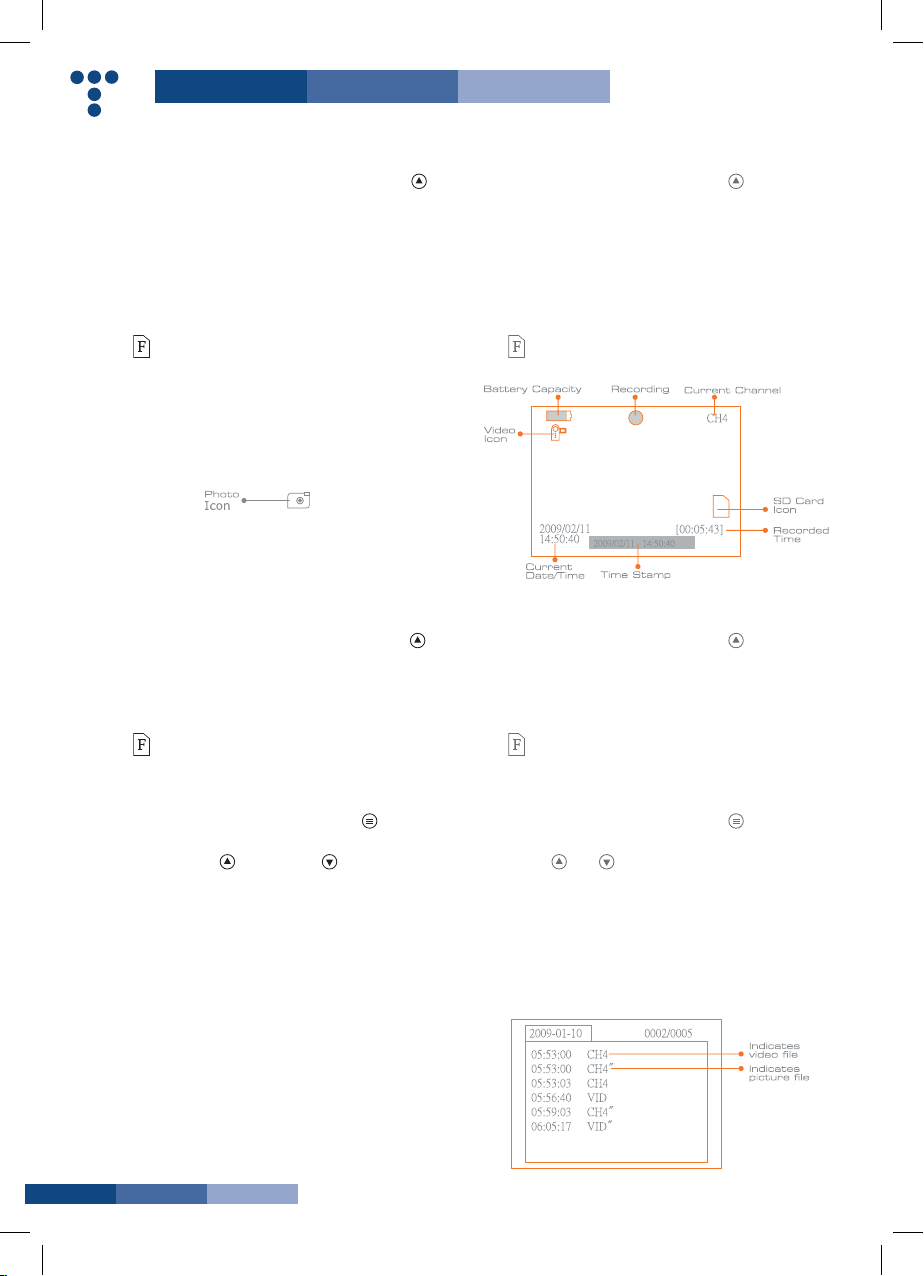
Registrazione
1. Dalla funzione monitor, premere il tasto freccia in su per
passare alla funzione registrazione.
2. Premere il tasto OK per iniziare a registrare.
3. Premere ancora OK per finire la registrazione.
Nota!
La registrazione video sarà automaticamente salvata ogni 30
minuti
*L’icona indicachelaschedadimemoriaSDèpiena.
Scattare fotografie
1. Dalla funzione monitor, premere il tasto freccia su per
passare alla modalità fotocamera.
2. Premere OK per scattare una fotografia
Nota!
*L’icona indicachelaschedadimemoriaSDèpiena.
Riproduzione video/foto
1. Dalla funzione monitor, premere il tasto righe per passare
alla cartella video/foto.
2. Premere freccia su efrecciagiù per selezionare la
cartella desiderata e quindi premere OK per selezionare.
Nota!
Ilsimbolo“aancodelnomedelleindicacheilleèvideo.
Recording Video
1.Inreal-timemonitoringmode,pressthe button to toggle
to video recording mode.
2. Press the ‘OK’ button to begin recording:
3. Press again to stop recording.
Notice!
* The video will be automatically saved as an individual file
every 30 minutes.
* The icon indicates that the SD card memory is full.
Taking photos
1.Inreal-timemonitoringmode,pressthe button to toggle
to photo capturing mode.
2. Press the ‘OK’ button to take a photo.
Notice!
* The icon indicates that the SD card memory is full.
Playback Video/Picture
1.Inreal-timemonitoringmode,pressthe button to toggle
to the video/picture folder.
2. Press the and buttons to select your desired folder,
and then the press ‘OK’ to toggle to the right interface:
Notice!
Adoublequotationmarks(”)nexttoalenameindicates
thattheleisavideo.Nodoublequotationmarksnexttoale
indicates that the file is a picture.
10
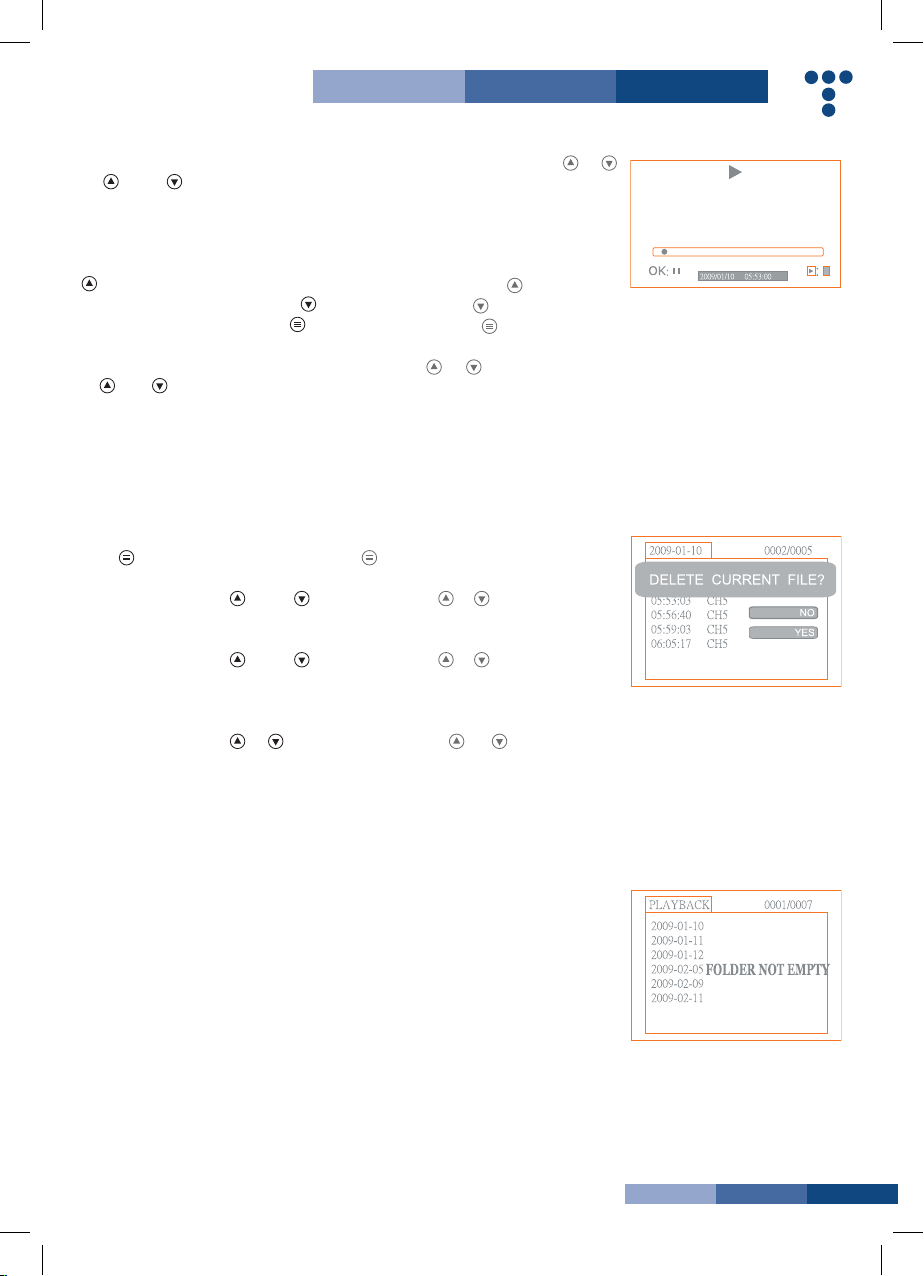
3. Per riprodurre un video: premere freccia
su o giù per selezionare il video
desiderato o premere OK per riprodurlo.
Pausa: premere il tasto OK per fermare il
video e ripremerlo per farlo ripartire
Avanzamento veloce: premere freccia su
Riavvolgimento:premerefrecciagiù
Stop/Uscita:premereiltastorighe
Per vedere le fotografie: premere freccia
su ogiù per selezionare la fotografia
desiderate, premere OK per vederla e
premere ancora OK per uscire.
Cancellazione video/foto
1. Dalla funzione monitor, premere il tasto
righe per passare alla cartella video/
foto.
2. Premere freccia su o giù per
selezionare la cartella desiderata e
premere il tasto OK.
3. Premere freccia su o giù per
selezionare il file desiderato e poi premere
il tasto righe per 2 secondi o fino a che
appare la schermata delete current file ?
4. Premere freccia su o giù per
selezionareYESoNOpercancellare.Una
volta selezionata la scelta, premere OK.
Cancellazione cartella
Si cancella una cartella allo stesso modo di
un file assicurandosi prima che sia vuota
altrimenti apparirà il messaggio di errore
FOLDERNOTEMPTY
3. for playback video: Press the or
button to select your desired video, and
then press ‘OK’ to playback.
Pause: press the ‘OK’ button once to
pause, press again to
resume play;
Fast Forward: press the button;
Rewind: press the button;
Stop/Exit:pressthe button.
For view pictures:
Press the or button to select your
desired video, press
‘OK’ button to view and press again to
exit.
Deleting Video/Picture
1.Inreal-timemonitoringmode,pressthe
button to toggle to the video/picture
folder.
2. Press the or button to select your
desired folder, and
then press ‘OK’ button.
3. Press the or button to select your
desired file, and then press and hold the
button for 2 seconds, or until the right
interface appears:
4. Press the or button to toggle
betweenYESandNO,thatis,todeleteor
cancel. Once you have highlighted your
desired selection, press the ‘OK’ button.
Deleting folder
Deleting a folder is done in the same way as
deleting a single file, however, make sure
that the folder is empty first, otherwise the
following error message will appear.

11
Come entrare nel menù di
programmazione
Dalla funzione monitor, tenere premuto il
tasto righe per1-2secondionoache
compare la schermata.
How to enter
the Setting Mode
In real-time monitoring mode, press and
hold the button for 1~2 seconds, or
until the right interface appears:
Selezione lingua
1.Dalmenùdiprogrammazionepremere
freccia su o freccia giù per
selezionare SYSTEM SETTING e premere
OK.
2. Premere freccia su ofrecciagiù
per selezionare la lingua e poi premere OK;
apparirà la seguente schermata:
3. Premere freccia su ofrecciagiù
per selezionare la lingua desiderata.
4. Premere OK per confermare ed uscire.
Language Setting
1. In the setting mode, press the or
button to select ‘SYSTEM SETTING’, and
then press ‘OK’ button.
2. Press the or button to select
‘Language’, and then press ‘OK’ button,
the following interface will appear:
3. Press the or button to select your
desired language.
4.Press‘OK’buttontoconrmandexit.
Programmazione video
1. Dal menù di programmazione, premere freccia su o
frecciagiù perselezionareSYSTEMSETTINGepremere
OK.
2. Premere freccia su ofrecciagiù per selezionare il
Sistema Video e poi premere OK.
3. Premere freccia su ofrecciagiù perpassaredaNTSC
a PAL. Premere OK per confermare ed uscire
Video System Setting
1. In the setting mode, press the or button to select
‘SYSTEMSETTING’,andthenpress‘OK’button.
2. Press the or button to select ‘Video System’ and then
press ‘OK’ button.
3. Press the or buttontotogglebetweenNTSCandPAL.
Once your desired system is selected, press ‘OK’ button to
conrmandexit.
Formattazione
1. Dal menù di programmazione, premere freccia su o
frecciagiù perselezionareSYSTEMSETTING e premere
OK.
2. Premere freccia su o freccia giù per selezionare
Format e poi premere OK.
3. Premere freccia su ofrecciagiù perscegliereSI’oNO
cioèformattareocancellare.PremereOKperconfermare.
Formating
1. In the setting mode, press the or button to select
‘SYSTEMSETTING’,andthenpress‘OK’button.
2. Press the or button to select ‘Format’, and then press
‘OK’ button.
3. Press the or buttontotogglebetweenYESandNO,
that is, to format or cancel. Once you have highlighted your
desired selection, press the ‘OK’ button.
Programmazione di default
1. Dal menù di programmazione, premere freccia su o
frecciagiù perselezionareSYSTEMSETTING e premere
OK.
2. Premere freccia su o freccia giù per selezionare
Default Setup e poi premere OK.
3. Premere freccia su o freccia giù per scegliere SI’
oNOcioèritornarealleimpostazionididefaultocancellare.
Premere OK per confermare.
Default Setup
1. In the setting mode, press the or button to select
‘SYSTEMSETTING’,andthenpress‘OK’button.
2. Press the or button to select ‘Default Setup’ and then
press ‘OK’ button.
3. Press the or buttontotogglebetweenYESandNO,
that is to restore default or cancel. Once you have highlighted
your desired selection, press the ‘OK’ button.
12
Informazioni sul formato video
1. Dal menù di programmazione, premere freccia su o
frecciagiù perselezionareSYSTEMSETTING e premere
OK.
2. Premere freccia su o freccia giù per selezionare
Version e poi premere OK per vedere i dettagli della versione
del prodotto.
View Version Information
1. In the setting mode, press the or button to select
‘SYSTEMSETTING’,andthenpress‘OK’button.
2. Press the or button to select ‘Version’ and then press
‘OK’button.Youwillnowbeabletoviewtheversiondetails
of your product.
Programmazione quadro
1. Dal menù di programmazione, premere freccia su o
frecciagiù perselezionareRECORDERSETTINGepremere
OK.
2. Premere freccia su o freccia giù per selezionare
Frame Rate e poi premere OK.
3. Premere freccia su o freccia giù per selezionare
differenti formati. Premere OK per confermare ed uscire.
Frame Rate Setting
1. In the setting mode, press the or button to select
‘RECORDERSETTING’,andthenpress‘OK’button.
2. Press the or button to select ‘Frame Rate’ and then
press ‘OK’ button.
3. Press the or button to toggle between different frame
rates. Once your desired rate is selected, press ‘OK’ button to
conrmandexit.
Programmazione tempo memorizzazione
1. Dal menù di programmazione, premere freccia su o
frecciagiù perselezionareRECORDERSETTINGepremere
OK.
2. Premere freccia su ofrecciagiù per selezionare Time
Stamp e poi premere OK.
3. Premere freccia su o freccia giù per selezionare
differenti formati. Premere OK per confermare ed uscire.
Time Stamp Setting
1. In the setting mode, press the or button to select
‘RECORDERSETTING’,andthenpress‘OKbutton’.
2. Press the or button to select ‘Time Stamp’ and then
press ‘OK’ button.
3. Press the and buttons to toggle between on and
off. Once your desired selection is made, press ‘OK’ button to
conrmandexit.
Tipo di registrazione
1. Dal menù di programmazione, premere freccia su o
frecciagiù perselezionareRECORDERSETTINGepremere
OK.
2. Premere freccia su o freccia giù per selezionare
Recording Type e poi premere OK.
3. Premere freccia su ofrecciagiù per selezionare tra
fermo e video. Premere OK per confermare ed uscire.
Recording Type
1. In the setting mode, press the or button to select
‘RECORDERSETTING’,andthenpress‘OK’button.
2. Press the or button to select ‘Recording Type’ and then
press ‘OK’ button.
3. Press the or button to toggle between ‘still’ and
‘video’. Once your desired selection is made, press ‘OK’
buttontoconrmandexit.
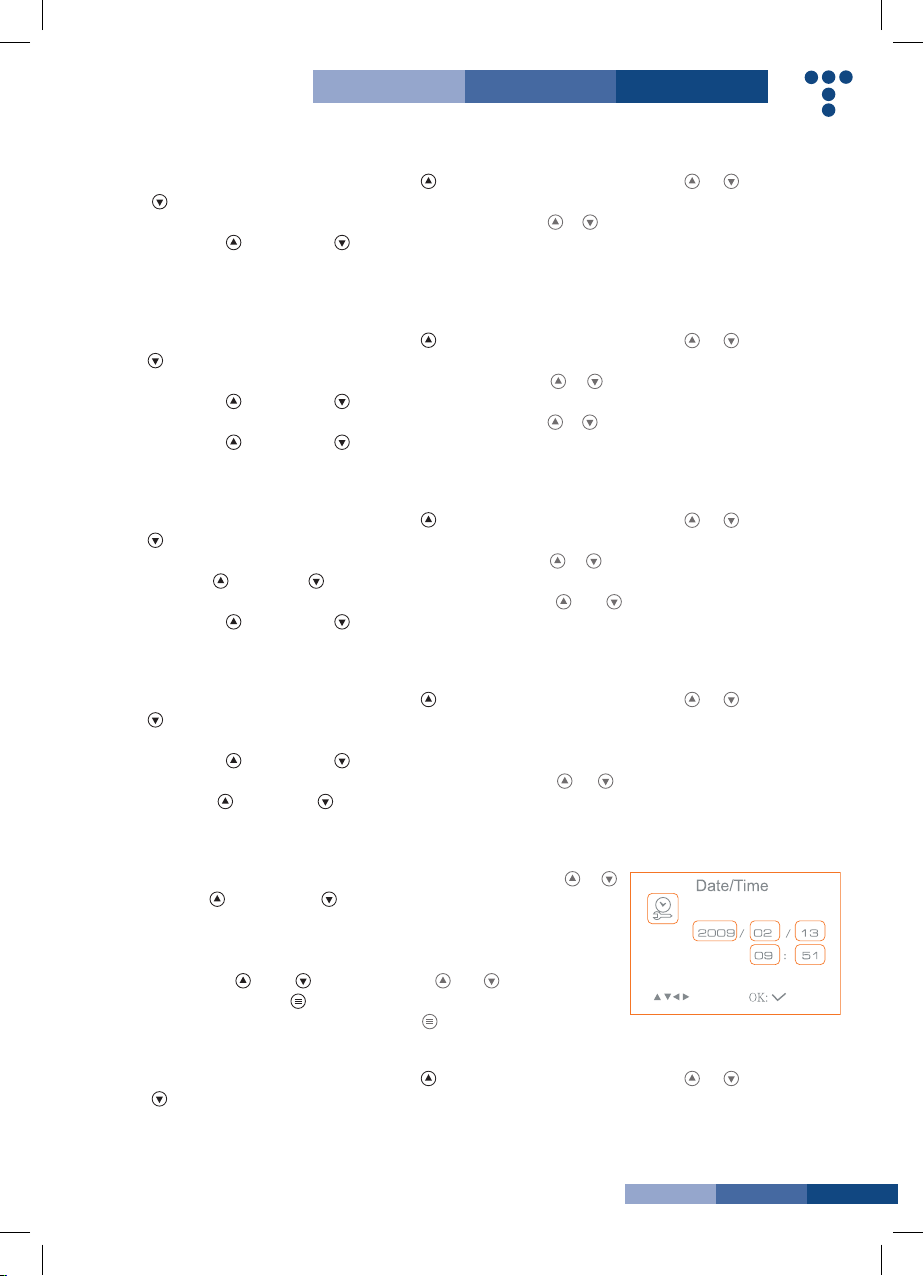
Programmazione data/ora
1. Dal menù di programmazione,
premere freccia su o freccia giù
per selezionare Date/Time e premere OK.
Apparirà la seguente schermata:
2. Premere OK per selezionare data o
ora; premere freccia su o giù per
regolare; premere tasto righe per
confermare e uscire.
Date/Time Setting
1. In the setting mode, press the or
button to select ‘Date/Time’ and then press
‘OK’, The right interface will appear:
2. Press ‘OK’ button to select Date or
Time;
Press the or button to adjust
selection;
Press the buttontoconrmandexit.
Riproduzione
1. Dal menù di programmazione, premere freccia su o
frecciagiù perselezionareEVENT PLAYBACK epremere
OK.
2. Vedere le istruzioni nel paragrafo Riproduzione video/foto,
Cancellazione video/foto e Cancellazione cartella
Event Playback
1. In the setting mode, press the or button to select
‘EVENTPLAYBACK’,andthenpress‘OK’button.
2. Refer to user manual instructions on Playback of Video/
Picture, Deleting Video/Picture, and Deleting Folder for
guidance.

13
Modello No. Model No. 8802AL 8803AL
CAMERA
Sensore immagine Imaging Sensor CMOS
Pixeltotali TotalPixels 704x576(PAL)
712x486(NTSC)
640x480(PAL)
640x480(NTSC)
Angolo orizzontale di veduta Horizontal Viewing Angle 50° 45°
Frequenza di trasmissione Transmission Frequency 2468MHz
Illuminazione minima Minimum Illumination 0Lux
Tipo modulazione Modulation Type FM
Larghezza banda Bandwidth 18MHz
Alimentazione Power Supply 4xAAbatteries
Campo visivo effettivo UnobstructedEffectiveRange 10m
Grado di protezione Waterproof Capacity IP67(forlens/tubeonly)
Diametro tubo Tube Diameter 17mm 9mm
Dimensioni Dimensions(WxDxH) 186x145x41(mm)(ExcludingFlexibleTube)
Peso approssimativo Approx.Weight 530g 450g
MONITOR
Tipo schermo LCD LCD Screen Type 3.5”TFT-LCD
Pixeleffettivi EffectivePixels 960x240
Sistema video Video System PAL/NTSC
Frequenza trasmissione Transmission Frequency 2414MHz,2432MHz,2450MHz,2468MHz
Alimentazione elettrica esterna ExteriorSupplyVoltage 5VDC
Assorbimentomax ConsumptionCurrent(Max.) 500mA
Tempo di ricarica Charging Time 3 hours
Durata di ricarica Working Time 2 hours
Pixelvideo/foto Picture/VideoPixels 640x480
Dimensione video Video Size 27Mbyte/minute
Frequenza immagini Frame Rate 30 frame/second
Livello uscita video Video Output Level 0.9-1.3VP-P@75ohm
Sensibilità di ricezione Receiving Sensitivity ≤-85dBm
Dimensioni Dimensions(WxDxH) 100x70x25(mm)
Peso approssimativo Approx.Weight 140g
Temperatura di funzionamento Operating Temperature -10°C~50C/14°F~122°F
Umiditàmaxdifunzionamento OperatingHumidity(Max.) 15~85%RH
>>SPECIFICHE >>SPECIFICATIONS
*Il range di trasmissione wireless può variare secondo il
tempo, il luogo, l’interferenza o la costruzione di un edificio
*Tutte le specifiche sono soggette a variazioni senza
preavviso
*Actual transmission range of wireless monitoring may vary
according to the weather, location, interference or building
construction.
*All specifications are subject to minor change without prior
notice.
14
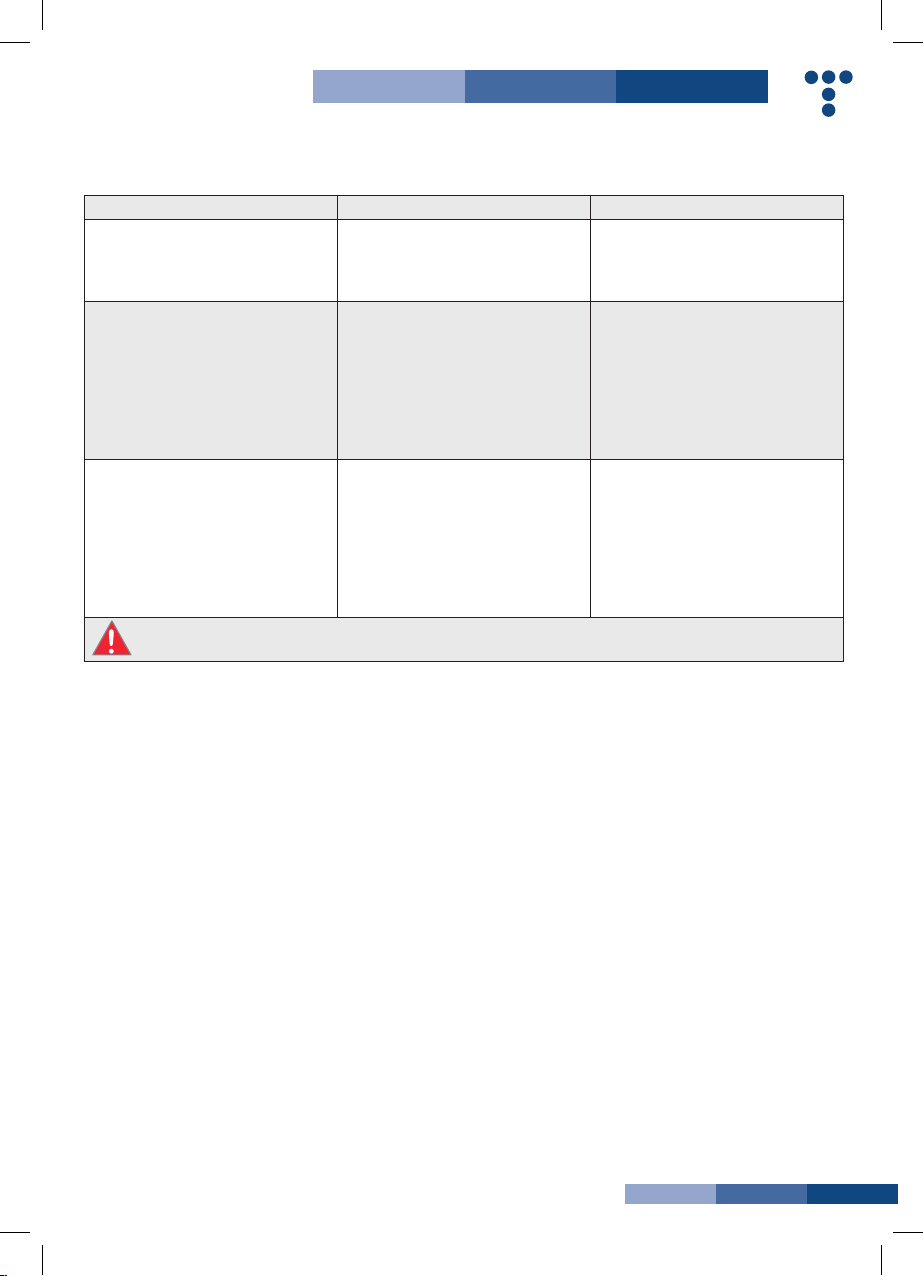
Problema - Problem Possibili cause - Possible Causes Soluzioni probabili - Likely Solutions
Il dispositivo non parte
Tool will not start
1. monitor non caricato
2. batterie necessitano di ricarica
1. monitor not charged.
2. batteries need charging
1. caricare monitor
2. sostituire le batterie nella telecamera
1. charge monitor
2. replace batteries in control handle
Il monitor non si ricarica
Monitor will not charge
1. cavo del caricatore non inserito
correttamente
2. caricatore scollegato dalla presa di
corrente
1. adapter cable not attached properly
2. adapter not connected to power
1. assicurarsi che il cavo del caricatore sia
collegato tra monitor e caricatore
2. assicurarsi che il caricatore sia ben
inserito nella presa di corrente
1. make sure adapter cable is connected
between monitor and adapter.
2. make sure adapter is securely plugged
into wall socket
Immagine troppo scura o chiara
Image too dark or light
1. Le lenti devono essere regolate
2. il display del monitor deve essere
regolato
1. LEDs near camera need adjustment
2. monitor display needs adjustment
1. regolare le lenti attraverso la rotella
della telecamera
2. regolare l’immagine con i tasti contrasto
e chiaro sul monitor
1. use dial on control handle to adjust
brightness of LEDs
2. use contrast and brightness buttons on
monitor to adjust image.
Seguire tutte le precauzioni di sicurezza quando si usa l’apparecchio. Scollegare dalla corrente prima della manutenzione.
Follow all safety precautions whenever diagnosing or servicing the tool. Disconnect power supply before service.
>>RISOLUZIONE DEI PROBLEMI >>TROUBLESHOOTING
Questodispositivoèconformeallaparte15delleNormeFCC.
Ilfunzionamentoèsoggettoalleseguentiduecondizioni:
(1)Questodispositivononcauseinterferenzepericolose
(2)Questodispositivodeveaccettareogniinterferenzaricevuta
incluse interferenze che possono causare funzionamenti
indesiderati.Variazioni non approvate espressamente dall’ente
notificato possono far sì che l’associazione dei consumatori
possa impedire l’utilizzo del dispositivo.
Lagracadiquestomanualeèsoggettaavariazione senza
preavviso
This device complies with part 15 of the FCC Rules. Operation
is subject to the following two conditions:
(1)Thisdevicemaynotcauseharmfulinterference
(2) This device must accept any interference received,
including interference that may cause undesired operation.
Changesormodicationsnotexpresslyapprovedbytheparty
responsible for compliance could void the user’s authority to
operate the equipment.
The graphics included in this user manual are subject to minor
change without notice.
>>INFORMAZIONI FCC >>FCC INFORMATION

Modello / Model: 8802AL, 8803AL
EU Protezione Ambientale
I rifiuti di prodotti elettrici non possono essere gettati
nell’immondizia di casa.
Per cortesia utilizzare gli appositi centri comunali di riciclo.
EU Environmental Protection
Waste electrical products should not be disposed of with household waste.
Pleaserecyclewherefacilitiesexist.
Check with your local authority or retailer for recycling advice.
TECNOGAS srl
35020 Albignasego - Padova - Italy - Viale L. Da Zara, 10
Tel +39 049 8625910 - Fax +39 049 8625911
This manual suits for next models
1
Table of contents
Popular Analytical Instrument manuals by other brands

Powerfix Profi
Powerfix Profi KH 2927-1 operating instructions

General Pipe Cleaners
General Pipe Cleaners Gen-Eye Micro-Scope2 operating instructions

PCE Health and Fitness
PCE Health and Fitness PCE-VE 700 Instructions for use

Teslong
Teslong WF200 user manual

Triplett
Triplett BR400 user manual

Teledyne
Teledyne 3500 Series operating instructions


