Tecto Protection Airtec PAPR User manual

Powered Air Purifying
Respirator (PAPR) PA1000
AIRTEC
USER
MANUAL
RE5001
www.tecto.co.uk
Tel: 0344 567 7423
For complete instructions and understanding of this product please read thoroughly.
Keep these user instructions for reference.
Decontamination Donning and Doffing in Airborne Pathogen Environments are
covered separately

2
Contents page
Preface 3
1. Approvals and Safety Precautions and Limitations 3
1.1 Compulsory Information 3
1.2 Safety 3
1.3 Filter Safety 4
1.4 Lithium-ion battery safety
4
1.5 Alarm Safety 5
1.6 Leaving Contaminated Area 5
1.7 Limitations 5
2. System Description 5
3. Preconditions for use 6
4. Unpacking -Assembly -Usage 7
4.1 Unpacking 7
4.2 Assembly 9
4.3 Fitting and charging the battery 9
4.4 Removing visor protector 10
4.5 Particulate filter 10
4.6 Removing filter
11
4.7 Fitting new filter
12
4.8 Changing the Pre-filter if fitted 13
4.9 Attaching the hose to blower unit 13
4.10 Attaching and checking the hood 14
5.
Activating and Testing 15
5.1 Control panel activation 15
5.2 Adjusting air flow rate
15
5.3 Air flow regulation alarm
16
5.4 Alarm system checking 16
6 Before Use Assessments 17
6.1 Air flow test 17
6.2 Batteries 17
6.3 Battery Charging
18
7 Battery changing
19
8 Disclaimer
19
9 Maintenance and cleaning 19
9.1 Cleaning in non-airborne pathogen environment 19
9.2 Maintenance 20
9.2 When to change filters 20
10 Fault finding
21
11 Storage and Transportation
22
12 List of parts and assembly drawings
22
13 Technical Data 23
14. Symbols 24
2
AIRTEC

3
Preface Important:
Please read these user instructions carefully before unpacking your product(s).
This user instruction manual must be read and fully understood before using the Powered Air unit. The
user instruction manual must be retained for future reference. The product(s) are designed to protect
your health and wellbeing. Failure to comply with these user instructions may also adversely affect
your health or wellbeing.
No recommendation is given as regards the suitability of this product for your needs. If you have any
questions regarding the suitability of this product to your task, please contact your Infection Prevention
team, or your health and safety specialist for a risk assessment.
1.Approvals, Safety Precautions and Limitations
Approvals:
CE Approved to BS EN12941: 1998 +A1 ;2003 +A2: 2008
RESPIRATORY PROTECTIVE DEVICE - POWERED FILTERING
DEVICE, INCORPORATING A
CLASS TH 3 P R SL
PA100 has been designed and manufactured to comply with EN12941: 1998+A1:2003+A2:2008 as a
TH 3 P R SL device.
BS4275 (Guide to implementing an effective respiratory protective device program), which the user
is advised to read, defines an EN12941: 1998+A1:2003+A2:2008 TH 3 P R SL device as offering an
Assigned Protection Factor of 40.
The PA100 can only provide this level of protection when used with filters provided by the manufacturer
marked EN12941: 1998+A1:2003+A2:2008 TH 3.
PA100 is certified with the hood 4WGMSHO1W which is certified to EN 166 F.
The PA100 is manufactured under ISO 9001:2000 Quality System.
1.1Compulsory Information.
It is imperative that these user instructions are strictly followed when using / operating the product(s)
in question. Failure to follow these instructions may invalidate any warranty protection that is offered
or available to you in respect of the product(s). Please refer to the terms of your purchase contract in
respect of the product(s) for the specific details of such warranty cover.
1.2 Safety
User Safety:
PAPRs do not provide oxygen and must not be used in oxygen deficient atmospheres of less than
19.5%.
This style of PAPR does not provide protection against airborne chemical hazards.
Do not remove headgear in contaminated areas.
Donning and doffing are recommended with the help of a trained observer.
Do not put the headgear on without having the filtered air blowing first, a risk of carbon dioxide buildup
inside the headgear may occur, if this is not adhered to.
If the filtered air is not turned on, little or no protection may be offered from airborne pathogens.
Cleaning and disinfection is recommended between use.
Always wear in accordance with your facilities infection prevention policy, including the concurrent
donning and doffing of other protective PPE.
Do not wear in unconfined spaces, or areas of high winds.
See our full range of products and services online at www.tecto.co.uk
33
USER MANUAL

4
Do not wear near to flames or sparks, or areas at risk of explosion.
If the blower unit stops working the wearer must leave the contaminated area immediately.
1.3 Filter Safety:
The filter has been developed especially for this unit.
It is used to filter the air the user will breathe.
It is essential that the user checks the filter for any signs of damage or deformation that could
potentially let contaminated air into the unit.
The filter must be disposed of if the filter is damaged or if clogged to the point of triggering the systems
alarm mechanism.
Always correctly use and maintain the filter assembly. Failure to do so may reduce respirator
performance, overexpose you to contaminants, and may result in sickness or death.
Inspect filter before first installation or reinstallation of a filter, replace if damaged.
Always properly install the filter into the blower unit.
Any attempt to clean the filter will invalidate the warranty and put the user at risk.
Store the filter as described in these User Instructions within the recommended storage temperature
conditions and observe filter expiration dates.
1.4 Lithium-ion battery safety:
Always correctly insert and charge with the supplied 3W Medical charger. Failure to do so may cause
fire or explosion or could adversely affect respirator performance and result in injury, sickness, or
death.
Do not charge batteries with the supplied 3W Medical chargers, in enclosed cabinets without
ventilation, in hazardous locations, or near sources of high heat.
Charge in an area free of combustible material and readily monitored.
Do not immerse.
Do not use, charge, or store batteries outside the recommended temperature limits.
Dispose of lithium-ion battery packs according to local environmental regulations. Do not crush,
disassemble, dispose of in standard waste bins, in a fire or send for incineration.
Failure to properly dispose of battery packs may lead to environmental contamination, fire or
explosion.
To reduce exposure to hazardous voltage do not attempt to service the chargers. There are no user-
serviceable parts inside. Do not substitute, modify or add parts to the chargers. Inspect the chargers
and power cords before use. Replace if any parts are damaged. Do not use the chargers outdoors or
in wet environments.
1.5 ALARM SAFETY:
The Airtek PA100 unit will warn the user when
Low battery or blocked filter, as well as an audible alarm the unit has visual alarm. Depending on the
fault, re-charge or change the battery for a fully charged one. If the blocked filter alarm continues to
sound the filter should be changed. The user should only return to the workplace, when the
functionality of the system and the flow rate has been tested to be acceptable, and the alarm has
switched off
4
AIRTEC

5
1.6 The user is advised to leave the contaminated area immediately if:
The Manufacturer’s Minimum Design Flow (MMDF) warning Alarm sounds 170 LPM
Breathing becomes difficult.
Dizziness or distress occurs.
Any part of the system becomes damaged.
Airflow into the Head-Unit decreases or stops.
Contaminant can be smelt or tasted inside the Head-Unit.
Materials that may come into contact with the user’s skin are not known to cause allergic reactions to
the majority of individuals but in the unlikely event of a reaction, the user should immediately leave
the contaminated area, remove the unit and seek medical advice
1.7 Limitations: Failure to follow these User Instructions:
Could possibly reduce respirator performance, overexpose you to contaminants, and may result in
injury, sickness, or death.
Do not use with parts or accessories other than those supplied and as described in these User
Instructions.
The Powered Air Purifying Respirator Assembly is one component of your respiratory protection
system. Always read and follow all User Instructions supplied with your system components in order
to ensure correct system operation.
2. System Description the PA100 Airtek Powered Air Purifying Respirator (PAPR).
The PA100 PAPR assemblies are designed to be used with the headgear listed as approved respiratory
system. The system is certified with the PA100 hood suspension system fitting head sizes from 535
to 600mm circumference. When used in accordance with its instructions the PA100 PAPR assemblies
help provide respiratory protection against particulates. The PA100 does not provide protection against
vapors or gases.
The belt mounted assemblies consist of a motor/blower unit, high efficiency particle filter, waist belt,
and an 8-hour rechargeable lithium-ion battery pack. The removable rechargeable battery used is a
Lithium-ion cell. When supplied the battery may hold a small charge, the unit should be run flat and
then charged for sixteen hours before the first use.
The motor/blower unit draws ambient air through its high efficiency filter and, is based on the principle
of over pressured air to the headgear. The supplied filtered air to the headgear is via a breathing tube
to the headgear suspension unit inside the hood. The filtered positive pressure air to the wearers
breathing zone via the head suspension units’ ducts, prevents contaminated air from entering the
hood.
The blower unit is equipped with automatic flow control; the motor speed is regulated during operation
to compensate for the charge state of the battery pack and the increasing level of airflow resistance
caused by filter loading.
Should the airflow fall below the minimum design flow rate of the MMDF of 170 L/min, its audible
alarm and flashing LEDs. will sound. The user should immediately leave the contaminated
environment. Similarly, an audible and visual low battery alarm will activate when the battery pack
has approximately 10-15 minutes of charge remaining to warn the user to leave the contaminated
area.
See our full range of products and services online at www.tecto.co.uk
55
USER MANUAL

6
3. Preconditions for use:
This Respirator must be used strictly in accordance with this user instruction manual and the
instructions supplied with the corresponding head-units (hoods).
The user must read and understand all the following "Instructions for Use" well to be able to use the
respiratory protective system correctly. Any questions should be directed to the manufacturer contact
points noted below.
Nothing can touch the moving parts.
There is no attempt to modify or alter the unit or filter in any way
No water or other liquids enter the unit in any way – in particular the motor and fan, the filter or the
battery.
Make sure that the headpiece fits the user comfortably. Only then is the efficiency of the system
enough. The protective factor of the complete system is reduced if the headpiece is not fitted correctly.
There is a possibility that the hose to the head unit may become caught up in use. The blower unit
should be positioned on the person in such a way as to reduce this possibility.
Correct respiratory protection will not be provided if any parts of the equipment is modified in any
way.
At very high work rates the pressure in the device may become negative at peak inhalation flow.
Airtek PA100 systems are for use only by competent, trained personnel.
ATTENTION! If any of these conditions is not kept or followed, your warranty protection in
respect of the product(s) will be automatically invalidated.
6
AIRTEC
7
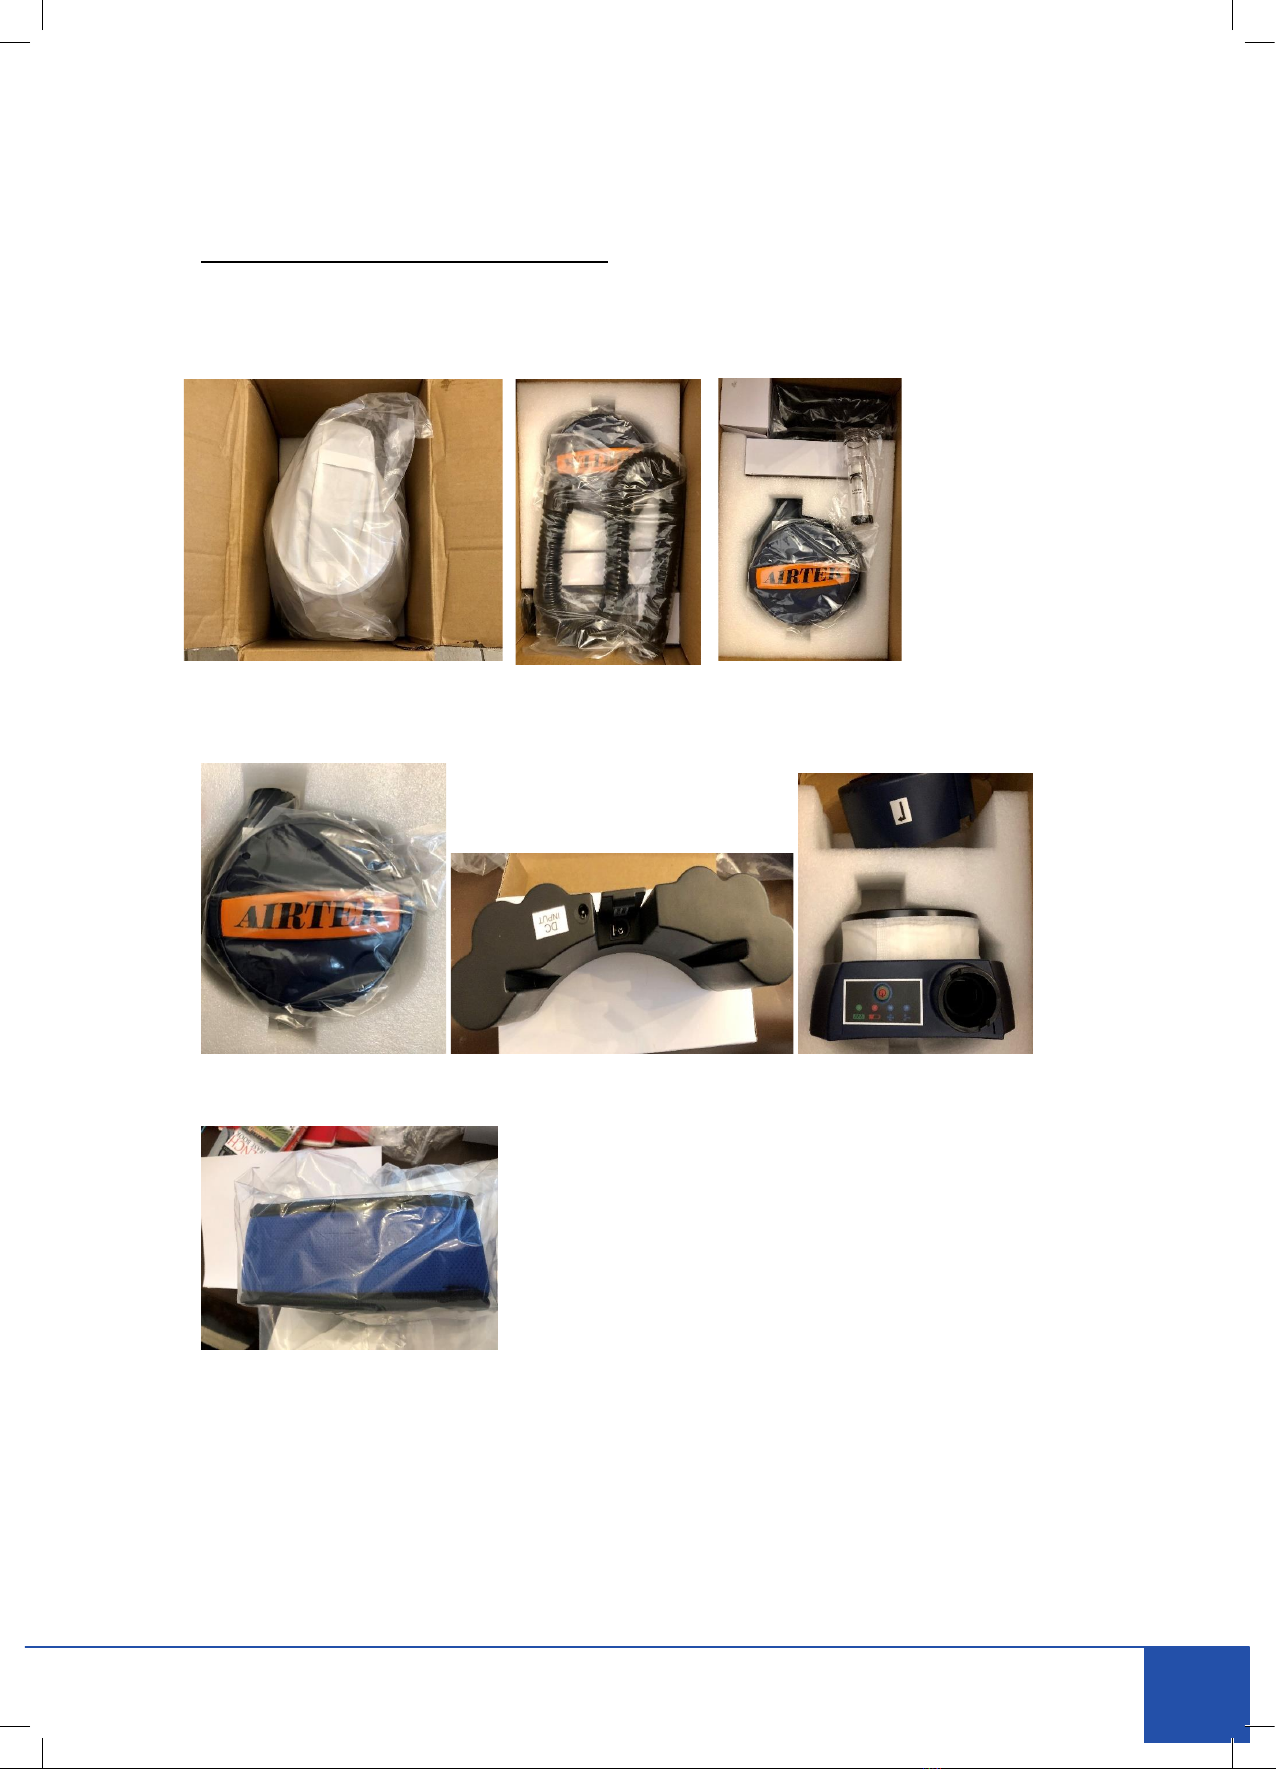
4. Unpacking / Assembly / Usage:
4.1 Unpacking:
Check that the package is complete and that no part is damaged due to the transport or for other
reasons.
A package with the complete system including accessories contains:
1. Blower unit incl. Battery and P R SL Filter and Pre-Filter
2. Belt (Belt supplied may vary from the one shown)
See our full range of products and services online at www.tecto.co.uk
77
USER MANUAL
8
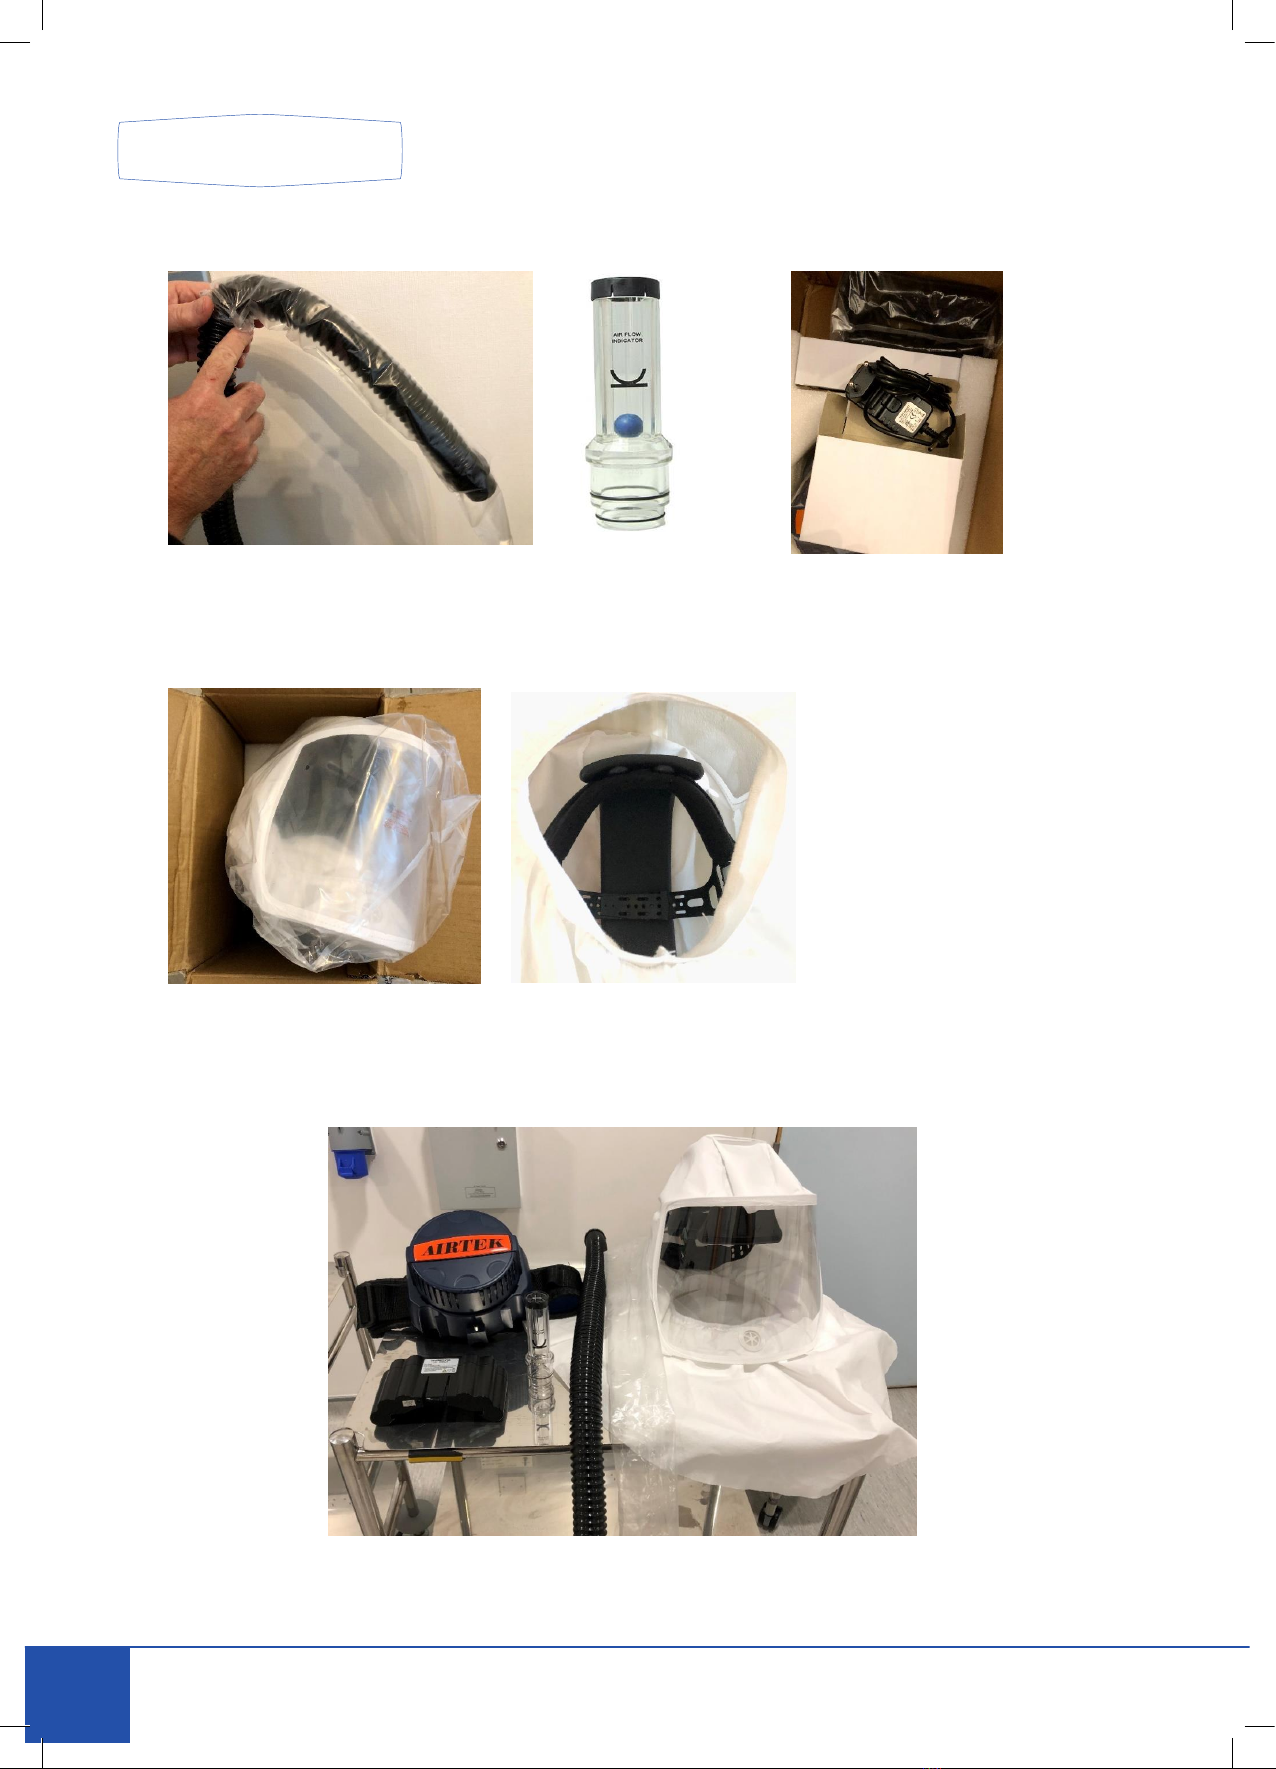
3. Air hose (shown with optional cover) Air flow indicator and Battery charger
4. Hood and inner cradle with comfort band
7. User Instructions
System unpacked
8
AIRTEC
9
4.2 Assembly:
Install the belt by threading the end of the belt through the retaining slots on the back side of the
motor/blower. Pass the inner strap through the back of the blower loops. Then pass through the 2 belt
loops and then through the buckle
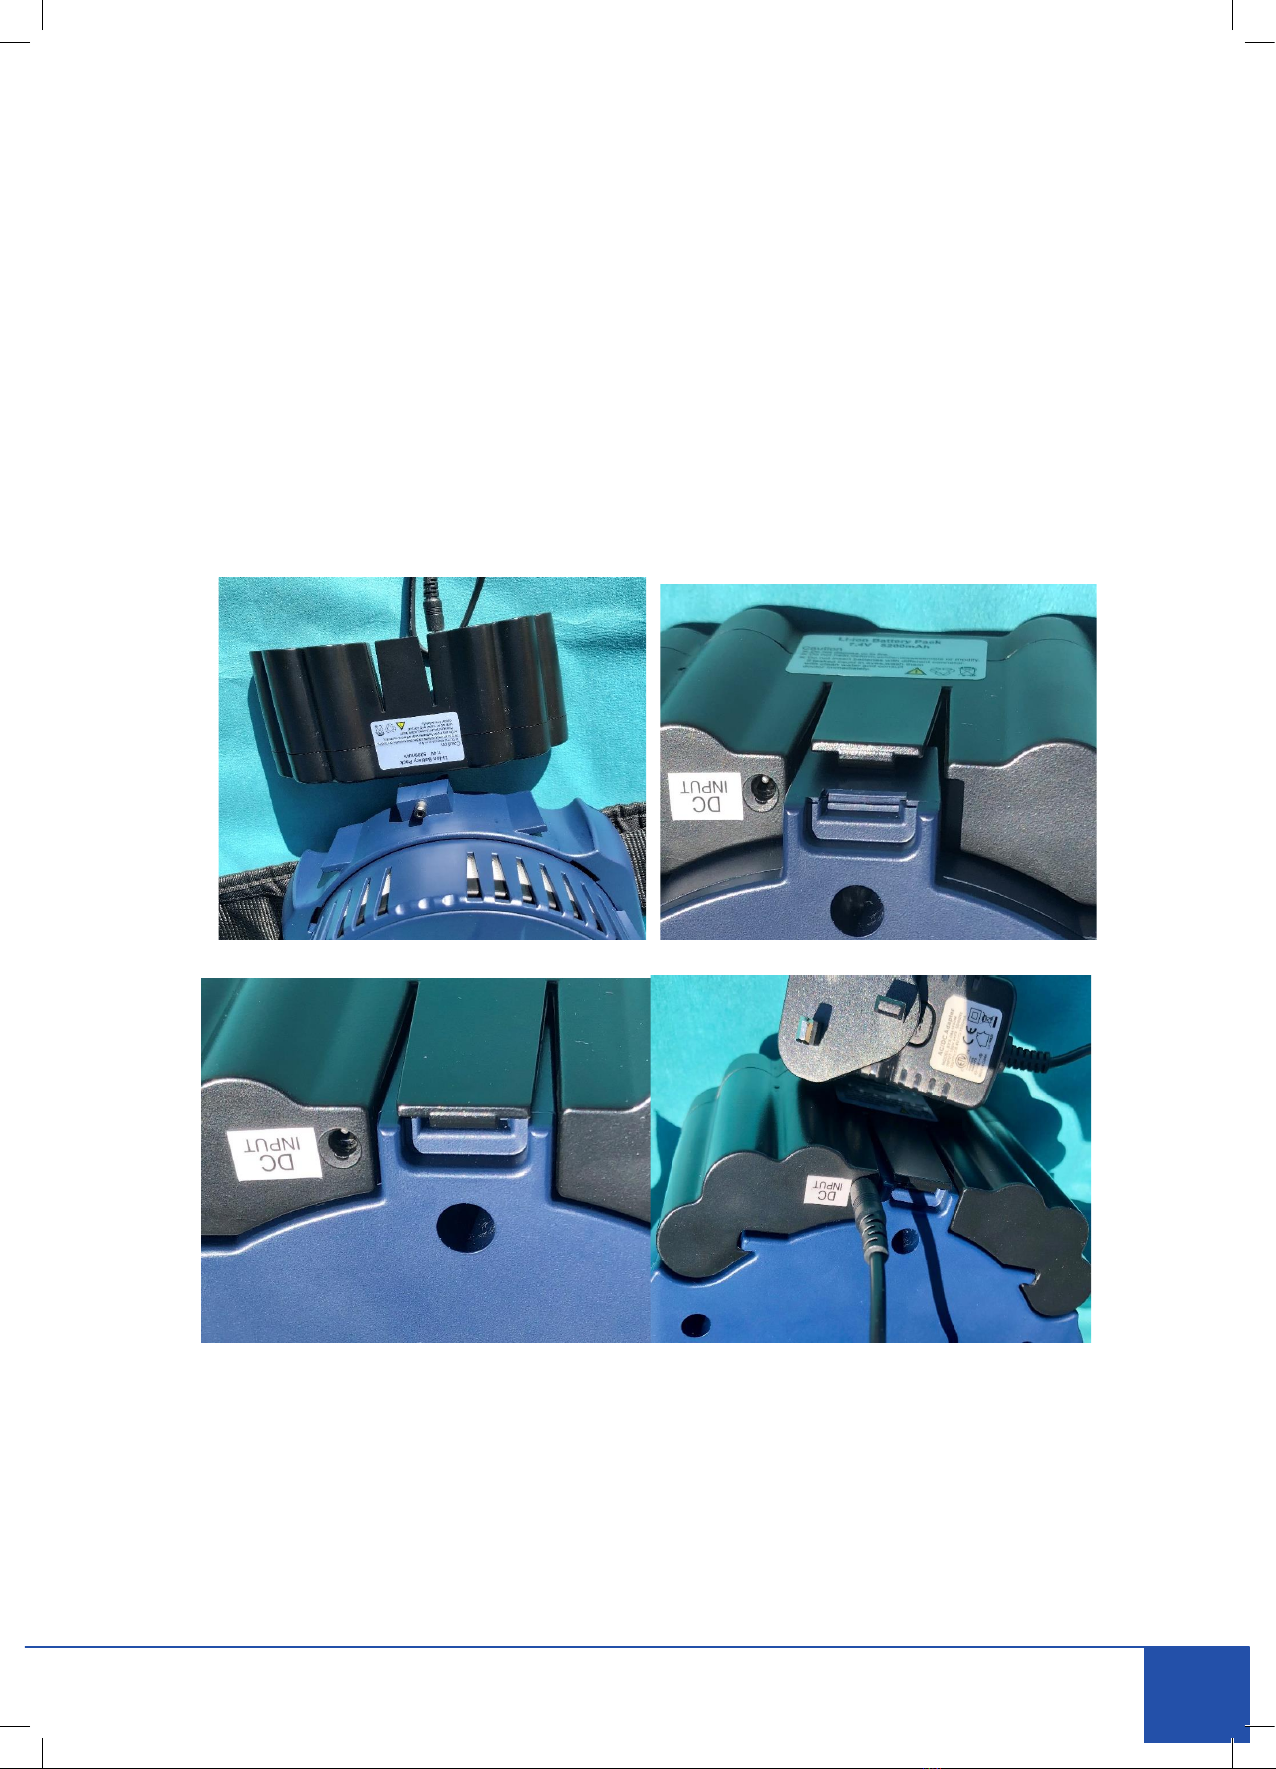
4.3 Fitting and Charging the battery:
When supplied the battery may hold a partial charge, the battery when fitted to the unit should be
run flat, then re-charged until full before first use.
Fit the battery to the Blower unit ensuring it ‘clicks’ the battery securing catch. Choose the correct
country plug adaptor and connect to charging unit. The indicator on the charging plug, Green-Red-
Flashing Green-Solid Green. It may take 6 hours minimum
See our full range of products and services online at www.tecto.co.uk
99
USER MANUAL
10
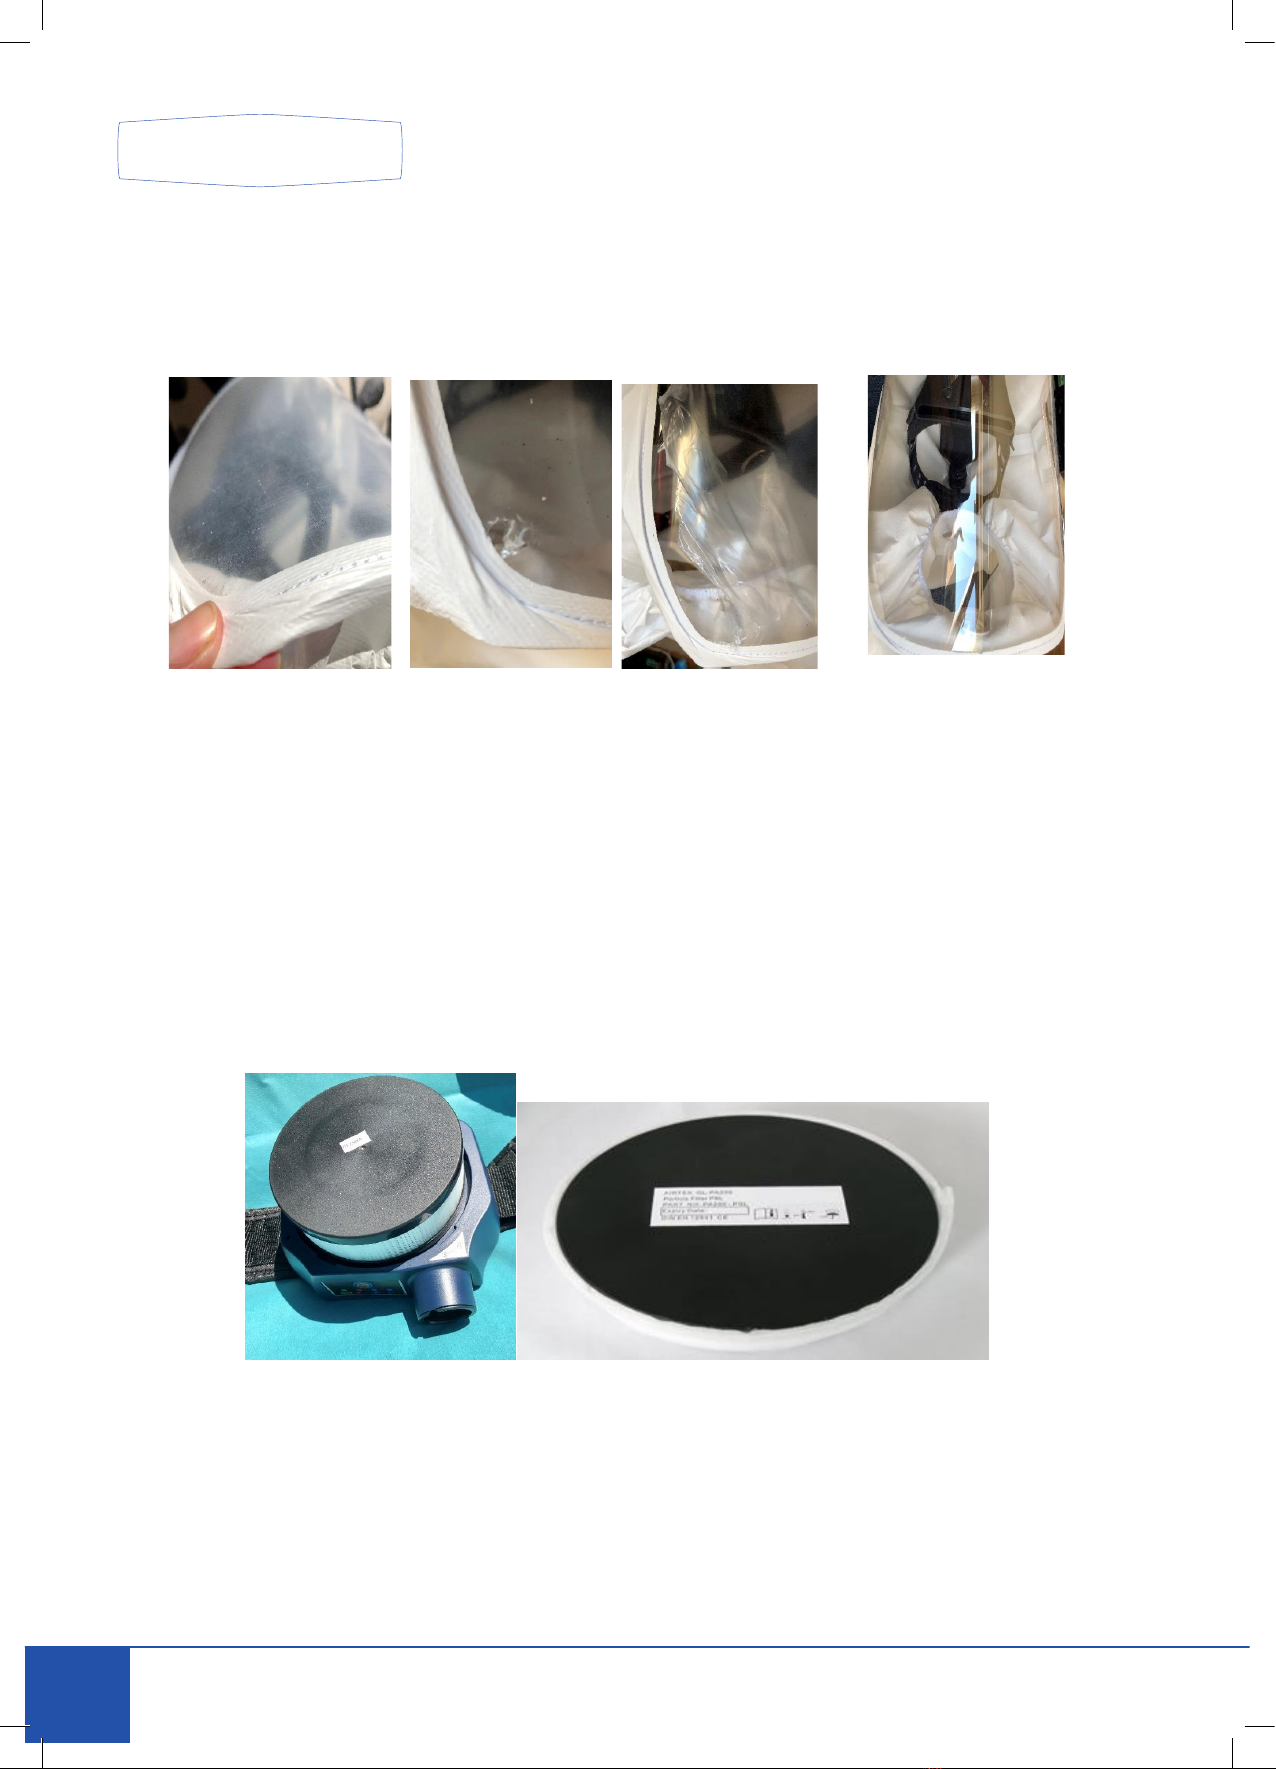
4.4 Remove visor protector: The visor has a film protector on the front to protect during transit.
Carefully peel all of this off and dispose of.
Visor with protection film Gently remove film Inspect Visor
4.5 Particulate Filter:
Use only Airtek PA100 and Pre-Filters as supplied by 3W Medical Ltd. Using any other filter will cause
invalidation of any warranty protection and / or a serious risk to the health of the user operating the
product(s).
It should first be ascertained by consulting Infection Prevention or an occupational hygienist or
calling the manufacturer’s technical help line as to whether the Airtek PA100 Filter will offer suitable
protection from the hazard. The respiratory power unit is equipped with a high efficiency particle
filter of class P R SL and a Pre-Filter.
As soon as the warning alarm sounds, the pre filter should be exchanged or checked. In very dusty
area's this can be necessary on a frequent basis.
The filters must be regularly checked (see Air Flow Test) and replaced. Filters are intended to be
replaced and no attempt must be made to clean the filter, Remember airborne particulate
may still be viable on the filter.
Make sure that the new filters are within their expiry date, unused and not evidently damaged.
10
AIRTEC

11
From the industrial hygienic point of view the maximum working time of a main filter could be 90
hours. But for the avoidance of any doubt please check with your Infection Prevention team or your
Health and Safety specialist for a risk assessment.
Warning !
It is essential that the user must not confuse the markings on the filter relating to any other
standard other than EN12941: 1998+A1:2003+A2:2008 with the classification of the device
when used with this filter.
4.6 Removing the Filter: After Use.
ATTENTION!
You must not use any tools to open the filter cover.
Remember to follow your facilities Occupational Hazard and Infection Prevention
Guidelines. The wearing of PPE is recommended.
Opening the filter cover: Twist the filter cover anti clockwise approximately 25mm unit it reaches its
stop, then pull off the filter cover.
To remove the filter, pull it out of the unit. Dispose of the used filter in the bio-hazard waste.
Decontaminate the housing, follow infection prevention guidelines. Do not allow fluid to ingress the
housing.
See our full range of products and services online at www.tecto.co.uk
1111
USER MANUAL

12
4.7 Fitting a new Filter:
Inserting a new filter: Align the filter with the aperture and push into position
Closing the filter Cover; Ensure the locking lugs are aligned with the location slots and the arrow
indicator is aligned with the position shown above, then push the cover into the blower, then rotate
clockwise until the cover locks. Pay special attention to snap the cover properly into the blower
Locking Lugs and filter cover. Align bent arrow symbol to the open closed padlock symbol
12
AIRTEC

13
4.8 Changing the Pre-Filter if fitted.
The pre filter is cover which is fitted over the main filter. Simply lift off the soiled pre filter and lay a
new one in its place.
4.9 Attaching the Hose to the Blower Unit:
Align the pins of the Hose Bayonet connector with the slots in the air outlet of the blower. Push the
Bayonet connector into the blower until it reaches the bottom of the hole and then twist in a clockwise
direction until the locating pins clips into place.
Blower unit showing female hose connector Hose with male connector
See our full range of products and services online at www.tecto.co.uk
1313
USER MANUAL
14
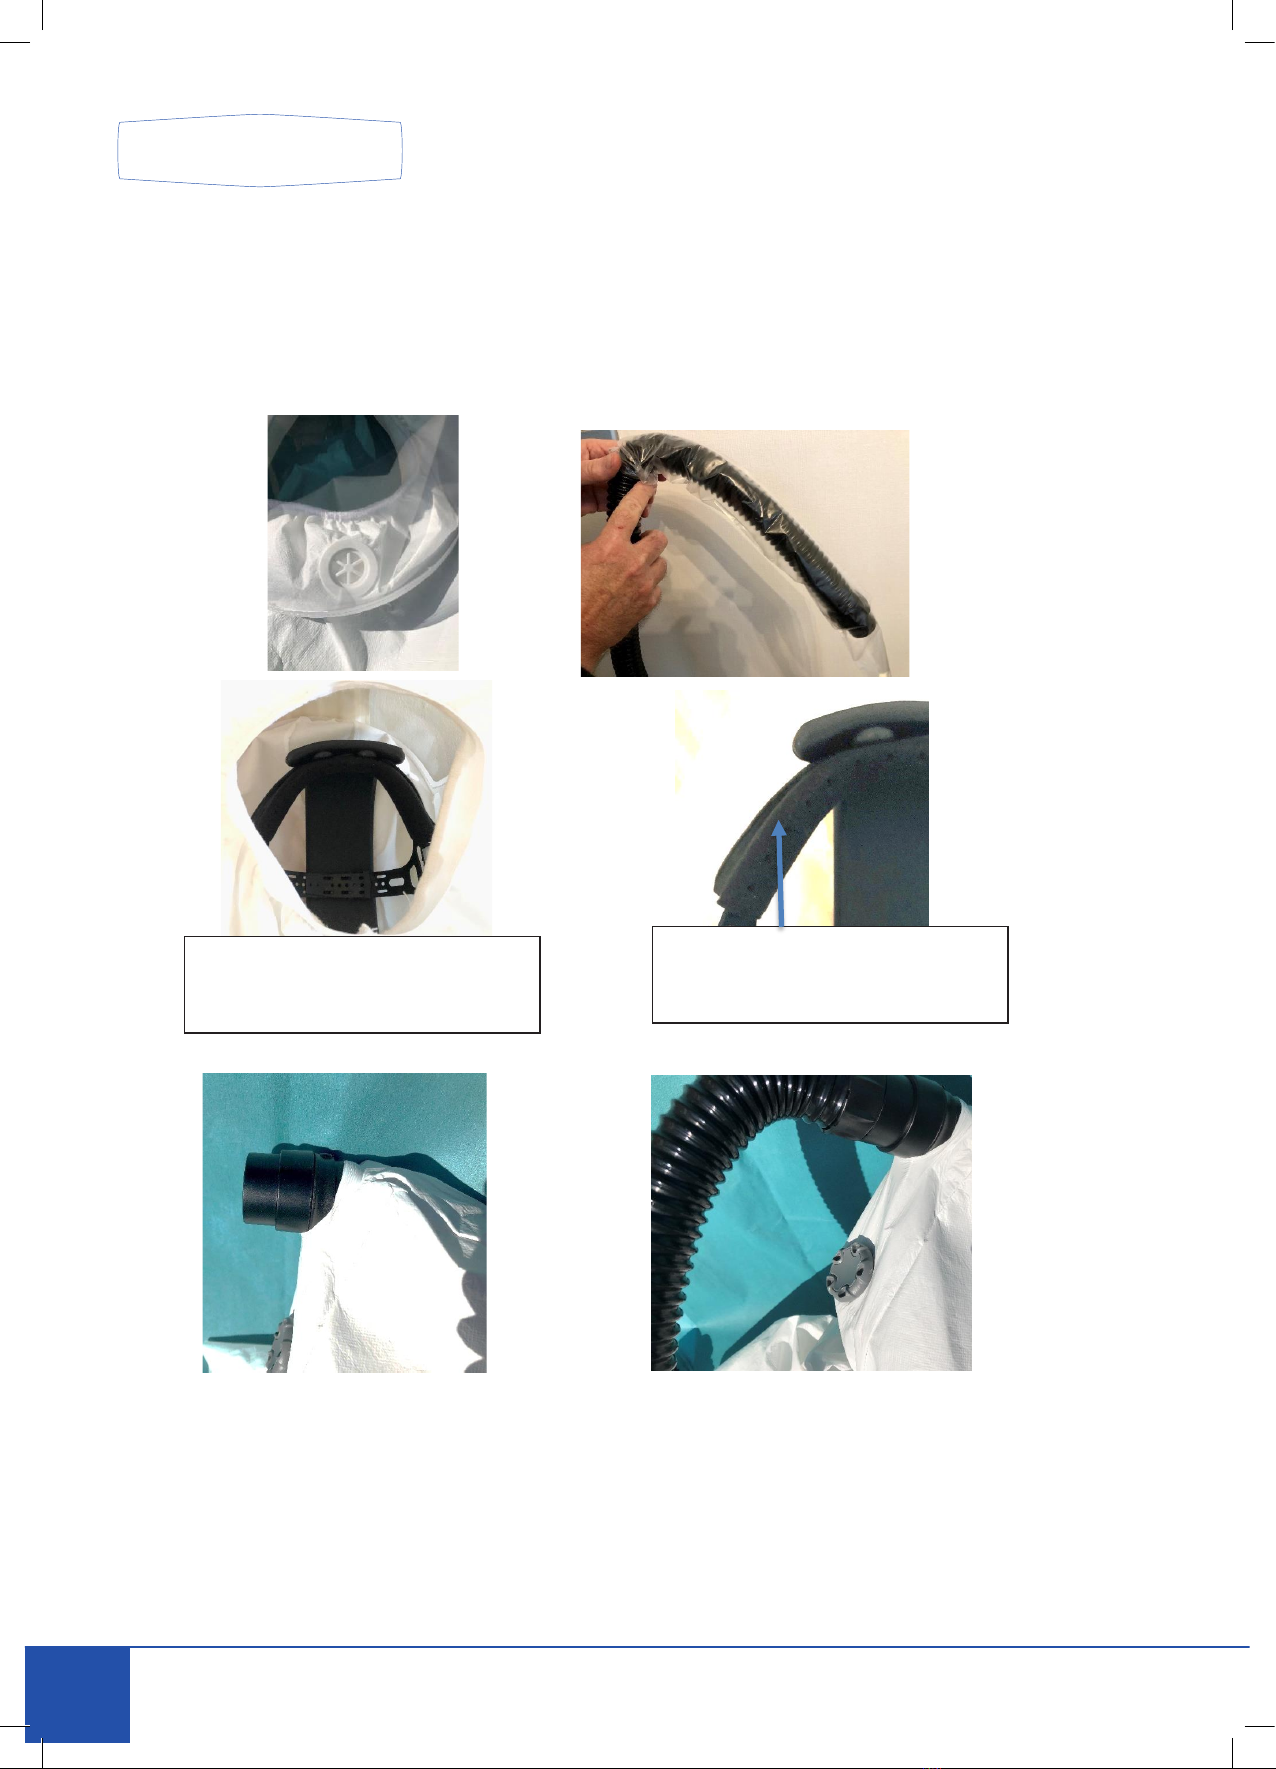
4.10 Attaching and checking the hood
Visually inspect over pressure release portal inside the hood. A plastic hose cover may be added as
an accessory if the unit is being used in a toxic environment to protect the outside of breathing hose
from contaminants, and safely disposed of post use.
The hose cover can be placed over the hose at this point if using. Tape it to the blower unit.
Attach hose to the rear of the hood by aligning the two male pins to the female outlets on the hood
hose connector, turn anti-clockwise. To remove the hose, turn the connector clockwise. The hose ends
are interchangeable between the hood and blower.
Ensure the grey cogwheel on the rear of the hood will loosen and tighten the inner suspension cradle.
Open hood underneath, and check
that all the inner suspension is in
good condition
Check that comfort band is in place.
If not replace the comfort band for
new.
14
AIRTEC

15
5.Activating and Testing
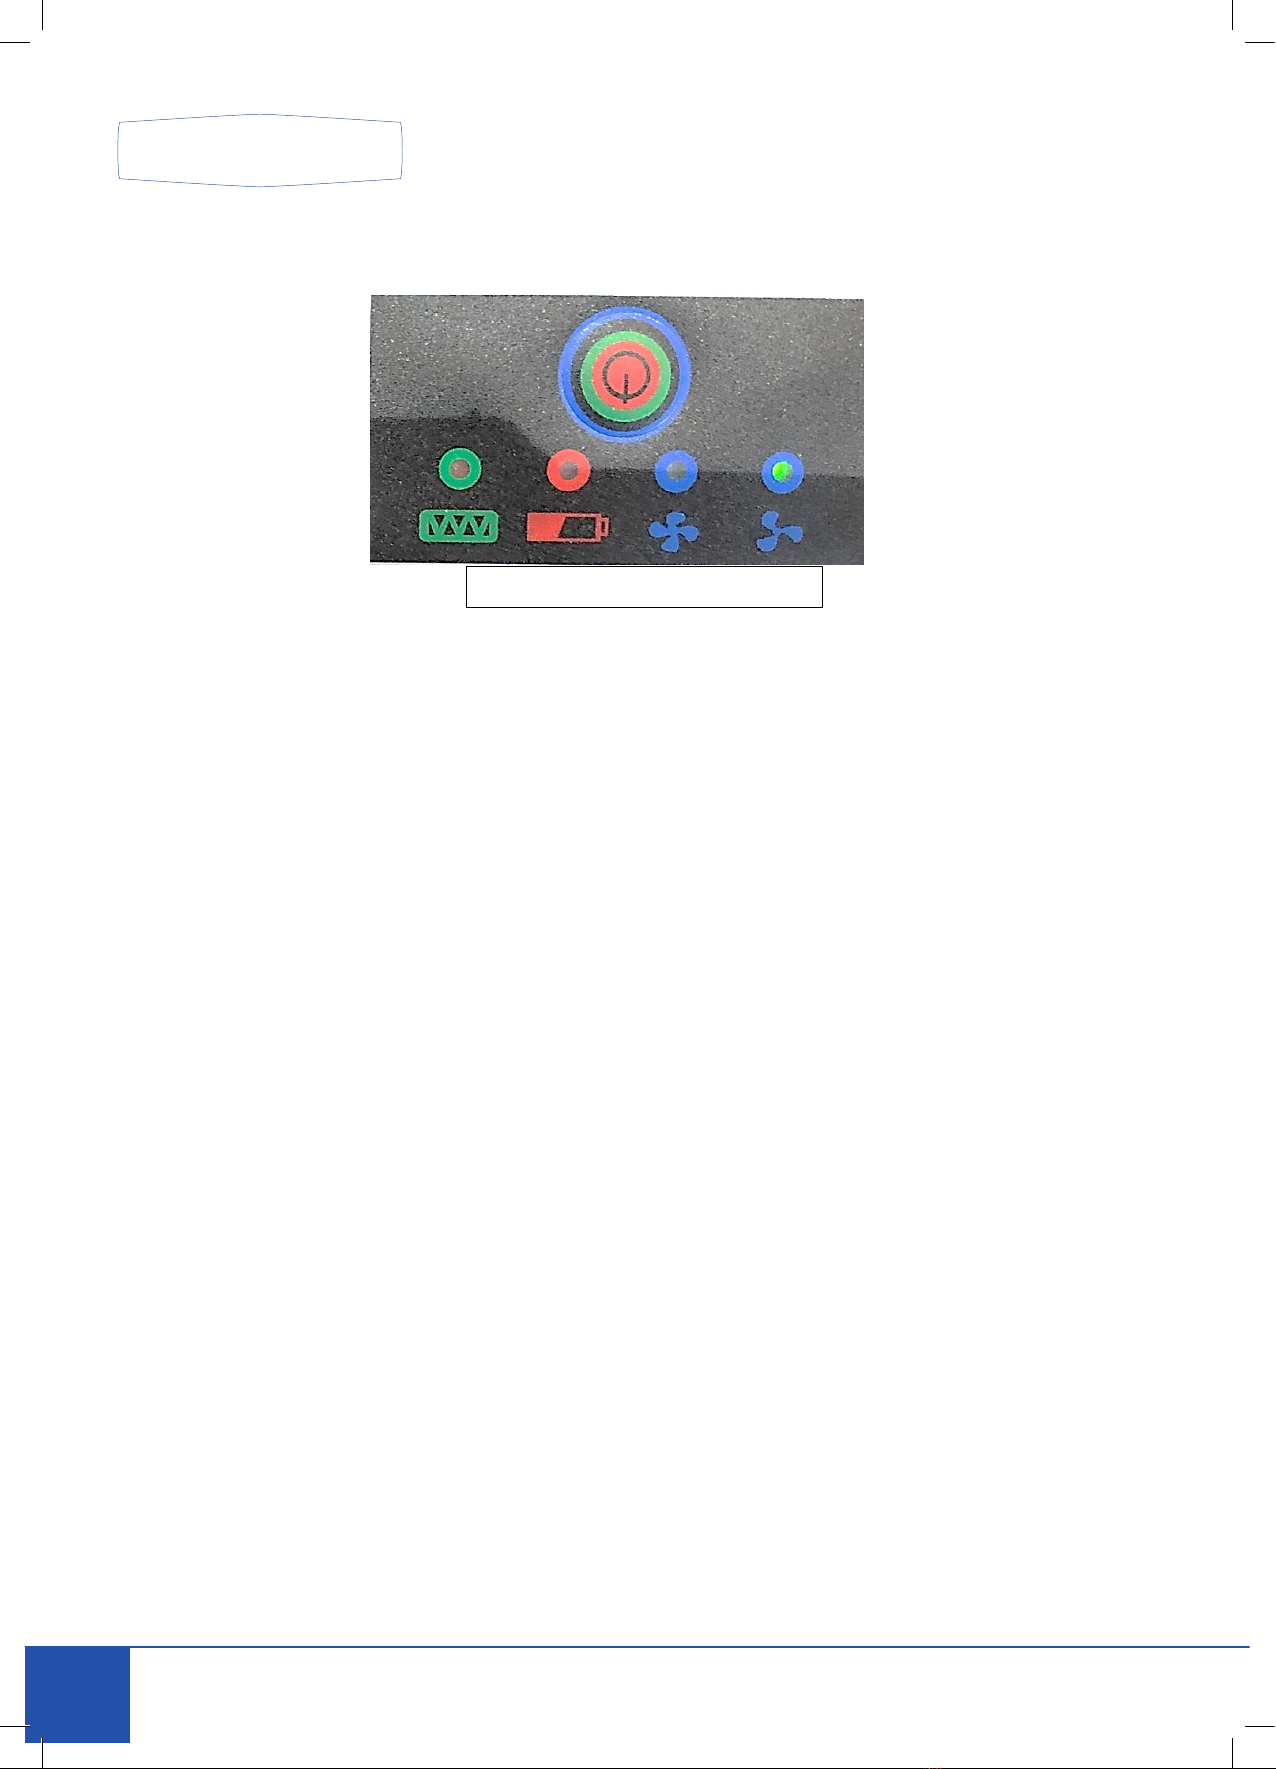
5.1 Control panel Activation
Activate the unit by pressing the central ON/OFF button on the control panel for a few seconds.
All the indicators will light for a few seconds during test phase, accompanied by an audible test alarm.
5.2 Adjusting Air Flow rate
The normal air flow rate can be adjusted between 170 and 220 Liters per minute (Lpm) by pressing
the ON/OFF button in a single push, the flow will toggle between the two.
LOW BATTERY
INDICATOR
BLOCKED FILTER
INDICATOR
AIR SPEED INDICATORS 220/170 lpm
ON/OFF AND AIR SPEED CONTROL
220 LPM FLOW RATE
See our full range of products and services online at www.tecto.co.uk
1515
USER MANUAL
16
5.3 Air Flow Regulation and alarm
The unit ensures a constant supply of air. The microprocessor inside the unit automatically regulates
the motor speed to compensate the filter clogging and the battery state. If the microprocessor cannot
keep the adjusted airflow, the unit will sound a 'beeping' alarm (an acoustic signal can be heard). At
which point the user must check the blower unit and must stop working at once, leave the working
environment and reach an area nominated to be safe and change the filter or recharge/change the
battery.
5.4 Alarm System Checking
To check the alarms, it is necessary to bock off the air outlet with the palm of a hand or by
another suitable means. Then with the unit switched on, the motor will try to compensate
by increasing the speed until the microprocessor sounds the alarm as described above.
To check the battery: when first starting the LED’S will flash in their own colour. Depending on the
battery state, the LED flashing red will indicate the amount of charge – a fully charged battery will
show a constant red LED. It is recommended that only a fully charged battery should be used when
starting a work shift
With a fully charged battery in place, the unit should function normally, but if the audible alarm still
sounds, the user must change the filter. If the problem persists, see chapter (10) for additional
suggestions.
170 LPM FLOW RATE
16
AIRTEC

17
6.Before Use Assessments:
These must be completed prior to using the system
6.1 Air Flow Test:
Disconnect the air hose from the Blower unit.
Insert the Airflow indicator into the air hose connector and keep the hose in vertical position at about
the eye level.
Switch the power unit on. The airflow is enough only if the ball indicator reaches the minimum flow
rate level. If the indicator sinks below the minimum flow rate level, it is necessary to charge the
battery or change the filter. If the problem persists, see chapter 10 for additional suggestions.
Inspection before use, must be done prior to every use, if not you may be at risk from
contamination:
All components are in good condition with no visible damage (holes, tears etc.). Replace any damaged
or worn parts. Carefully examine the air hose, hood, comfort bands, filter housing
There is a good connection between the air hose and the headpiece as well as the blower unit.
There is enough air flow. (see 6.1)
The air is supplied through the whole respiratory system from the blower to the hood.
Charge the battery before the first use and check that the battery has enough charge prior to every
subsequent use. (see 6.3.)
Ensure the alarms are working correctly (5.4)
6.2 Batteries:
NOTE ! Batteries are delivered only partially charged. All batteries must be charged before
they are used for the first time. The battery can be charged separately or on the blower
unit.
It is imperative that the battery charger used to charge the product(s) is the one that was
delivered to you at the time of receipt of the product(s) and is a manufacturer approved
See our full range of products and services online at www.tecto.co.uk
1717
USER MANUAL

18
battery charger. Using any other battery charger will cause invalidation of any warranty
protection and / or a serious risk to the health of the user operating the product(s) from
fire or explosion.
The charger must not be used for any other purpose than that for which it was manufactured. Do not
charge the battery in a potentially explosive atmosphere. The battery charger is intended for indoor
use. It must be protected against damp. The charger controls the charging automatically. After the
battery has been charged, the charger switches to the trickle charging regime and keeps the battery
fully charged. The charging time is 4 to 6 hours.
6.3 Battery charging:
1. Check that the voltage of the electrical power supply is correct.
2. Check that the battery charger being used to charge the product(s) is the one that was
delivered to you at the time of receipt of the product(s) and is a manufacturer approved
battery charger.
3. Plug the charger into the socket. Either direct into the blower when the battery is fitted or into the
battery directly.
4. Connect the battery to the charger. The socket of the battery is positioned on the back side.
The charging state is indicated by a red LED diode light.
5. After charging has been completed, the trickle charging regime is activated: - red LED
diode goes out, the green LED diode comes on at the moment of trickle charging.
6. Disconnect the charger from the power supply.
Do not leave the battery charger in the power supply if not in use!
18
AIRTEC
19
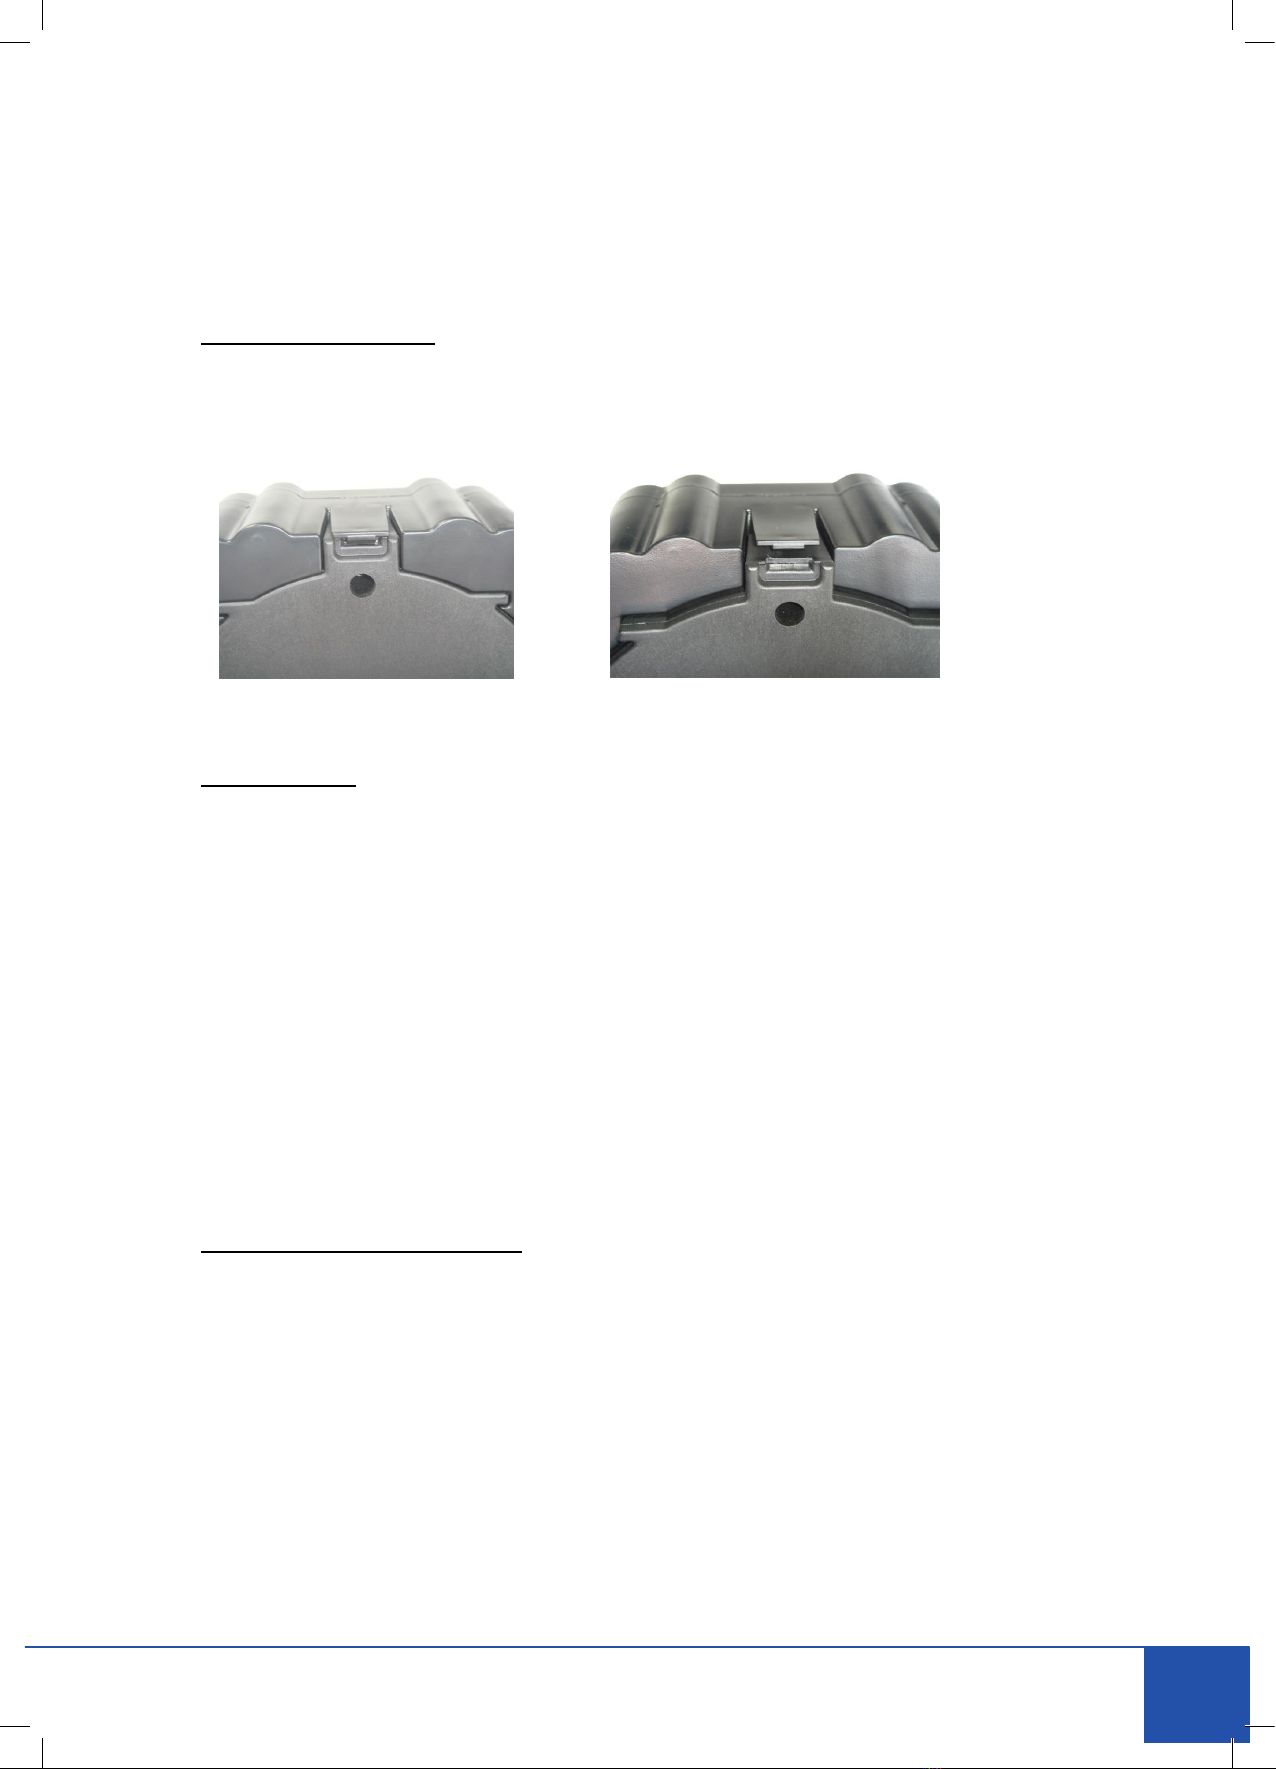
7.Battery changing:
Removing the battery: Take the blower unit in both hands facing the rear side of battery towards you.
Open the battery latch with your thumb. The latch is positioned in the middle of the battery. Push the
battery off the unit using your thumbs.
8. Disclaimer
Before using any of the products or information detailed herein, you must evaluate it and
determine if it is suitable for your intended use. You assume all risks and liability associated
with such use. 3W Medical makes no warranties relating to the efficacy of any of the
products detailed herein in preventing the spread and/or contraction of Airborne
pathogens. 3 W Medical will not be liable for any loss or damage arising from any
information contained herein, whether direct, indirect, special, incidental or consequential,
regardless of the legal or equitable theory asserted, including warranty, contract,
negligence or strict liability.
Technical information provided by 3W Medical is based on experience and/or test data
believed to be reliable, but the results may not be relevant to every user’s application. For
this reason, 3W Medical does not accept any responsibility or liability, direct or
consequential, arising from reliance upon any information provided. The user should
determine the suitability of any disinfectant product for compatibility for use with 3W
Medical products.
9. Maintenance / Cleaning:
Maintenance and cleaning in an environment which may contain airborne pathogens are
covered in 3W Medical additional guidance material for Disinfection, Donning and Doffing.
Important the pre and main filter should never be cleaned only replaced for new!
9.1 Cleaning in non-hazardous environment
The Blower unit, filter housing and head units must all be regularly cleaned to keep them in good
working order.
For single users, the units can all be cleaned with a cloth moistened with lukewarm water and ph.
neutral detergent.
See our full range of products and services online at www.tecto.co.uk
1919
USER MANUAL

20
For multiple users and following infection prevention guidelines, the units should be disinfected after
decontamination.
Liquids must not be allowed to enter the workings of the blower unit or get on to the element of the
f i l t e r.
Parts should be allowed to air dry. Under no circumstances should any solvents or abrasive cleaning
agents be used. The unit must not be dried using hot air or radiant heat.
Prior to each use the user should check that the unit is free from defects, such as cracks, split filters
and hoses, cracked visors and hood components as appropriate.
9.2 Maintenance
Examine the condition of the fabric, head suspension, visor, outer shroud and as applicable, inner
shroud, collar. Check that there are no cracks, rips, dents, holes, tears, or other damage.
• Look closely at the seams. Ensure seams are intact and there are no gaps in the seams. There should
be no tears or holes that could permit contaminated air to enter the hood or headcover.
• Look for scratches or other visual distortions that could make it difficult to see through the visor.
• Examine the head suspension for cracks or other damage.
• Examine the entire breathing tube. Look for tears, holes, cracks, distortions, or any other sign of
wear or damage. Bend the tube to verify that it is flexible. The breathing tube should fit firmly into
the air source connection.
If you discover any signs of wear and/or damage, discard the component and replace it with a new
one. Failure to do so may affect respirator performance and reduce the degree of protection provided,
this may result in sickness or death.
9.3 When to Change PAPR Filters Used to Help Reduce Exposure to Airborne
Biological Aerosols
Particulate filter change schedules for PAPRs are determined by two main considerations: filter loading
(clogging of the filter from captured particulates) and a facility’s infection control policy.
If the PAPR system is being used to reduce exposure to airborne biological aerosols such as droplets
containing viruses or bacteria, the filter will not typically load from these particles to the point that
they will affect the airflow for the PAPR as determined by the airflow indicator or the PAPR airflow
indicator alarm. As a result, loading or clogging of PAPR filters is typically not an issue when used for
biological aerosols.
In healthcare facilities, PAPR filter change schedules for airborne biological aerosols are primarily
determined by the facility’s infection control policy. The infection control policy should be developed
based on applicable national and local guidelines. Most healthcare organizations develop their filter
use and reuse policy based on the biological agent of concern, likelihood of the filter becoming
contaminated, and potential for patient-to-patient and patient-to-worker cross-contamination. While
the outside filter body can be wiped down for cleaning, do not attempt to clean the filter media inside
the filter body. When changing the PAPR filter, follow the hygiene and infection control practices
established by your employer based on the specific contaminants to which the respirator assembly
has been exposed and the cleaning agent used. Dispose of the filter according to your infection control
policy and all applicable requirements.
Close consideration needs to be given to the policies and practices used for cleaning the PAPR. It is
important to remember that a PAPR is used to filter out contaminants from the air, and therefore
contaminants are concentrated on the filter/cartridge itself, and potentially on other surfaces of the
PAPR system.
20
AIRTEC
This manual suits for next models
1
Table of contents


