Teekanne K-fee 21 User manual

Pred používaním prístroja si najprv prečítajte návod.
Před použitím tohoto přístroje si nejprve přečtěte návod k obsluze.
DE
GB
FR
ES
IT
PL
SK
CZ
NL
RUS
Bedienungsanleitung_Titel Umschlag.indd 1-2 22.05.15 15:17

GB
FR
ES
IT
PL
SK
CZ
NL
RUS
GBDE

Symbols and warnings
The warning triangle is used in the
instructions, in the places where
disregarding the safety instructions
can create risks for the user or the
device.
Warning:
Electric shock
Warning:
Risk of scalding
Prohibited:
Do not reach inside
Prohibited:
Do not drink
Requirement:
Read instructions
General information
Recommendations
General safety instructions
Disregarding the safety instruc-
tions for the device can be
hazardous.
Please keep the instruction
manual on hand, with the
device.
This device is used for making
hot drinks, according to this
manual.
The manufacturer assumes no
liability for the consequences
of improper use, or non-com-
pliance with the instruction
manual.
Do not use the device if it is
not functioning properly, or
if there are signs of damage.
In this instance, pull the power
cord and contact your service
centre (Your service centre con-
tact information can be found
on page 63).
Commercial use
This device is intended for use by
professionals or trained personnel
in businesses and in related elds,
such as
– Hotels, motels and other accom-
modations,
– Ofces, conference rooms,
sports facilities, waiting rooms
and reception areas.
• This device may only be oper-
ated by trained users.
• This device may only be installed
in places where it can be over-
seen by trained personnel.
Household use
This device is intended for house-
hold use and in related elds, such
as
– in kitchens for shop employees,
ofces and in other working envi-
ronments,
– for guests in hotels, motels and
other accommodations with
breakfasts.
Special safety instructions
• Do not leave the device unat-
tended during operation. This
device can be used by children
aged 8 years and above and by
persons with reduced physical,
sensory or mental capabilities or
lack of experience and knowl-
edge, if they are supervised or
have been instructed in the safe
use of the device and have un-
derstood the resulting risks.
• Cleaning and maintenance may
not be performed by children,
unless they are 8 years or older
and are supervised.
• Keep the device and its con-
necting cable away from children
younger that 8 years old. Children
may not play with the device.
• This device is solely intended for
use in enclosed spaces.
• For longer periods of disuse,
holidays, etc., empty the de-
vice, clean and unplug the power
cord. Read the chapter "Clean-
ing, descaling and changing the
lter, as needed" (Page 56).
• Do not damage the power cord
with hot or sharp contact, letting
it hang down (tripping hazard) or
by touching it with wet hands.
• Never lift the device by the lever.
• Never forcefully open or close the
lever – risk of breaking!
• Don't use the device without drip
trays, drip grids and capsule col-
lection containers.
• For health reasons, ll the water
tank with fresh, cold drinking wa-
ter. Do not overll the water tank.
• Only use the beverage capsules
intended for this device, which
are marked with the K-fee® Sys-
tem Logo. Never use a damaged
or deformed capsule.
• Before drink preparation, always
check that there are no used
capsules in the brewing cham-
ber, and that the new capsule is
in the correct position after being
loaded.
Positioning the device
• Always place the machine on a
stable, level and water-resistant
surface. Do not place the unit on
the power cord.
• Do not place the device on a hot
surface (ex. a hob) or near any
heat sources or re.
• Do not place the device in any ar-
eas, where a water jet is used for
cleaning.
Electrical safety
• Do not continue to use the de-
vice, if the cord or plug is dam-
aged. Contact your Service Cen-
tre (your service centre contact
information is on page 63).
• Keep cord out of the reach of
children.
• Make sure that the size shown on
the name plate matches the rated
voltage of your power supply. For
more details on your device, see
also "Technical data and service"
on page 63.
• Only connect the device to a
socket with a protective ground.
A awed connection can
terminate your warranty rights.
GBGB

Avoid the danger of an electric
shock
• The live parts are inside of the
device. Therefore, do not open
the enclosure, under any circum-
stances. Opening the cabinet is
permitted only by trained service
personnel.
• Protect the device against mois-
ture and splashes.
• Do not pour any liquid over the
unit.
• Do not pull the plug from the
socket, by the cable.
Avoid the risk of heat or cold
• Risk of burning when dispens-
ing. When completing a process
and then opening the lever, do
not keep your nger not under
the spout – risk of scalding, due
to dripping residual liquid! After
completing the brewing process,
slowly open the lever to eject
the capsule, and do not bend
past the capsule opening (risk of
splashing hot liquid!).
• Be careful when emptying the
drip tray – the water can be very
hot.
• During operation, do not remove
the lower drip tray – risk of scald-
ing!
• Never open the lever on the ma-
chine during the brewing, rinsing,
cleaning or descaling. When
completing a process and then
opening the lever, do not keep
your nger not under the spout
– risk of scalding, due to dripping
residual liquid!
• Do not stick ngers into the cap-
sule insertion opening.
• Protect the appliance from frost.
• Only operate the unit within the
appropriate temperature range
(10 - 45 ° C).
• Evaporate the unit, if it is to be
transported or stored at freez-
ing temperatures (temperatures
below 0 °C) (see "evaporation of
the device" on page 61). Caution,
risk of scalding! The steam can
reach up to 120° C.
Hygiene and Cleaning
• Only use capsules that are within
the expiration date.
• Store the capsules in an appro-
priate location.
• For hygienic reasons, ush the
device 5x before the rst use and
1x after each beverage prepara-
tion. Refer to the "Daily cleaning"
instructions on page 46.
• Before cleaning the unit with a
damp cloth, disconnect the pow-
er cord and let the device cool
down.
• Do not clean the device under
running water or with a water jet.
• Clean the device regularly and
consider the information in the
manual, to avoid hygiene risks.
• Only use cleaning and descaling
materials and water lters that
are suitable for the device. More
information about the products
and/or authorized dealers can be
found on our website.
• Health risk! – Read through the
instructions for using the clean-
ing and descaling materials, as
well as the water lter, and follow
the safety instructions.
The use of non-original capsules
has the following risks:
1. Health risks
Because of differences in the brew-
ing process and capsule structure,
hot water and steam can escape
under high pressure, with the use
of non-original capsules – risk of
scalding!
2. Damaging the device and
the guarantee
With the use of non-original cap-
sules, damage to the unit and
changes in the brewing process
and capsule structure may occur
and the warranty may be voided.
The manufacturer and his dis-
tributors can by no means be
held liable for any injury or
damage to property, which oc-
curs directly or as a result of
non-original capsules being
used with this unit.
This manual is also available for
download on our website:
www.tealoungesystem.com
Service and Repair
• The manufacturer declines all re-
sponsibility for internal or external
modications to the device.
• Never open the device to make
modications.
• Apart from the normal use, all
other activities, such as repairs
and the replacement of the pow-
er cord, may only be performed
by an authorized service centre.
• If the device, cable or plug is
damaged, you may no longer
use the machine. Contact your
Service Centre (your service
centre contact information is on
page 63).
Capsules to be used!
Only use original K-fee® Sys-
tem capsules! Look for the red
K-fee® System logo and the
characteristic grooved capsule
shape.
GBGB

Symbols
Description
• All beverage symbols blink after turning on, as long as the device is
heating up.
• All beverage symbols light up when the device is heated up and ready
for use.
• When a beverage is prepared, the associated beverage symbol
ashes.
• The respective beverage symbol blinks quickly when a lling quantity
is programmed.
• This symbol lights up when
– a rinsing is necessary
– or hot water is possible.
• This symbol blinks during the rinsing process or for hot water
• This symbol lights up when the device needs to be cleaned
(according to the pre-set cleaning interval).
• The symbol lights up until the cleaning is executed.
• This symbol lights up when the device needs to be descaled.
• The symbol lights up until the descaling is executed.
• This symbol lights up when the capsule container needs to be
emptied (after 29 capsules are used).
• The symbol lights up until the capsule counter is reset.
• This symbol lights up when the water tank is empty.
• The water tank holds about 3,5 litres of water.
• This symbol lights up when the water lter needs to be changed
(after 50 litres of water).
• The symbol lights up until the lter is changed.
13
3
8
4
10
11
5
9
7
12
14
6
2
1
Button
Description
Capsule Button
Description
Capsules
Black Tea Fruit/Herbal Tea
Green Tea Chai Latte
Rinse button —On/Off button —
Symbol arrangement on the
display
Cleaning, descaling and
lter symbols light up
until the appropriate actions are
executed.
Defaults:
Black tea ............. approx. 210 ml
Green tea ............ approx. 210 ml
Fruit/Herbal tea .... approx. 210 ml
Chai Latte approx. 105 ml per
capsule
1 Bobber
2 Lower drip tray
3 Drip tray wall
4 Adjustable dispenser
5 Capsule insertion opening
6 Lever
7 Water tank
8 Water tank cover
9 Water lter
10 Display
11 Control buttons
12 Capsule container
13 Drip grid
14 Upper drip tray
Risk of injury!
Four sharp needles open
the capsule on the device. To
avoid injury, do not reach into the
capsule insertion opening.
The package includes all
of the parts of the tea ma-
chine shown here, a water lter
and two cleaning capsules and
this manual. Please check that
the package is complete before
using the equipment.
Remove the protective
lm from the drip tray (13)
before the rst use.
The colour of the beverage
buttons and symbols are
matched to the respective cap-
sules.
GBGB

Adjust the drip tray to the
desired cup size.
With the upper drip tray. With the lower drip tray.
If present, remove the bottom
ap of the capsule. Open
lever and insert capsule.
Adjust height of the spout.
Close lever and press bev-
erage button.
Brewing process runs, with dif-
ferent brewing cycles, depend-
ing on the button pressed.
Beverage preparation con-
cludes.
Open lever, capsule falls
into capsule container.
To shut off, briey press the
on/off button.
First, check the voltage on
the nameplate (see under-
side of machine).
Remove the water tank. Fill the water tank with
fresh water.
Re-insert the water tank. Briey press the on/off but-
ton. Device heats up.
Close lever completely.
Situate container.
Press rinsing button,
rinsing runs.
Wait for the end of the rins-
ing process. Then, empty
the container.
Device is ready.
Please read the safety information
before operating.
Rinse the device 4x before
the rst use. Press the rinse
button again, after the completion
of the rinsing process.
If you decide to use the wa-
ter lter: screw in the lter
only after the water tank starts up
and the device has been rinsed,
once again, with at least 200 ml of
water. Activate the set-up of "Wa-
ter lter – on" Refer to the instruc-
tions in "Setting the parameters:
water lter" (see page 58).
The spout can be shifted up
or down with a pushing de-
vice (both sides of the spout)
.
Risk of scalding!
Very hot beverage. Do not
open the lever during the brewing
process. Do not reach under the
spout.
By repeatedly pressing
any button, the brewing
process can be stopped.
For hygienic reasons, rinse
the device once after every
beverage preparation.
The device will automati-
cally operate according
to the default, when it is not
used. If necessary, turn on and
clean the device again, before
beverage preparation, with the
on/off button (see page 42).
Important: only insert the capsule
after rinsing takes place.
Risk of scalding!
Very hot water.
If the device was exposed
to freezing temperatures,
please wait at least 3 hours before
turning on, so that the device can,
once again, warm up to room
temperature. A frozen or very cold
device may not function correctly.
Risk of injury!
Do not reach into the
capsule insertion opening.
GB GB

Device is ready. Place de-
sired cup under the spout.
Open lever and insert
desired capsule (ex. black
tea).
Close lever completely.
Press the same button
again, when the desired
cup volume has been
reached. The machine
stops the brewing process
and saves the new cup
volume.
Hold down the beverage button
for the inserted capsule (ex.
black tea) for at least 3 sec.
The corresponding symbol
will start quickly blinking
on the display. After that,
release the button and the
machine will continue to
brew.
Open lever, capsule falls
into capsule container.
Capsule is lled with hot
water
Black Tea
Green Tea
Fruit/Herbal Tea
Chai Latte
Brewing pause:
20 s let steep
Tea is ready to
brew
Capsule is lled with
hot water
Brewing pause:
25 s let steep
Tea is ready to
brew
1. Interval
Brewing pause:
5 s let steep
Tea is ready to
brew
2. Interval
Brewing pause:
5 s let steep
1. Milk / Latte 2. Tea / Chai
Chai Latte is prepared with
2 capsules, without the
brewing pause.
There are different brewing
cycles for optimal prepara-
tion, depending on the type of tea.
But-
ton Factory settings
[ml]
Setting range
[ml]
210 120 – 300
210 120 – 300
210 120 – 300
105
(per capsule) 70 – 130
45 (not programmable)
Always insert a new cap-
sule in the device before
programming.
Newly programmed vol-
umes remain saved (even
after a power failure).
It is also possible to reset the cup
volumes to the factory settings.
Refer to the Frequently Asked
Questions on page 62.
GB GB

Move spout to uppermost
position.
Remove drip trays, capsule
container and water tank.
Take apart drip trays.
Empty all containers. Clean all parts. Fill the water tank with
fresh water.
Insert drip trays, capsule
container and water tank
back into the device.
Wipe clean device with a
slightly damp cloth.
Place container under
spout. Open and close
lever.
Briey press button, device
rinses once.
Drain container and open
lever.
Reset capsule counter:
Press on/off button for at
least 3 seconds.
To shut off, briey press the
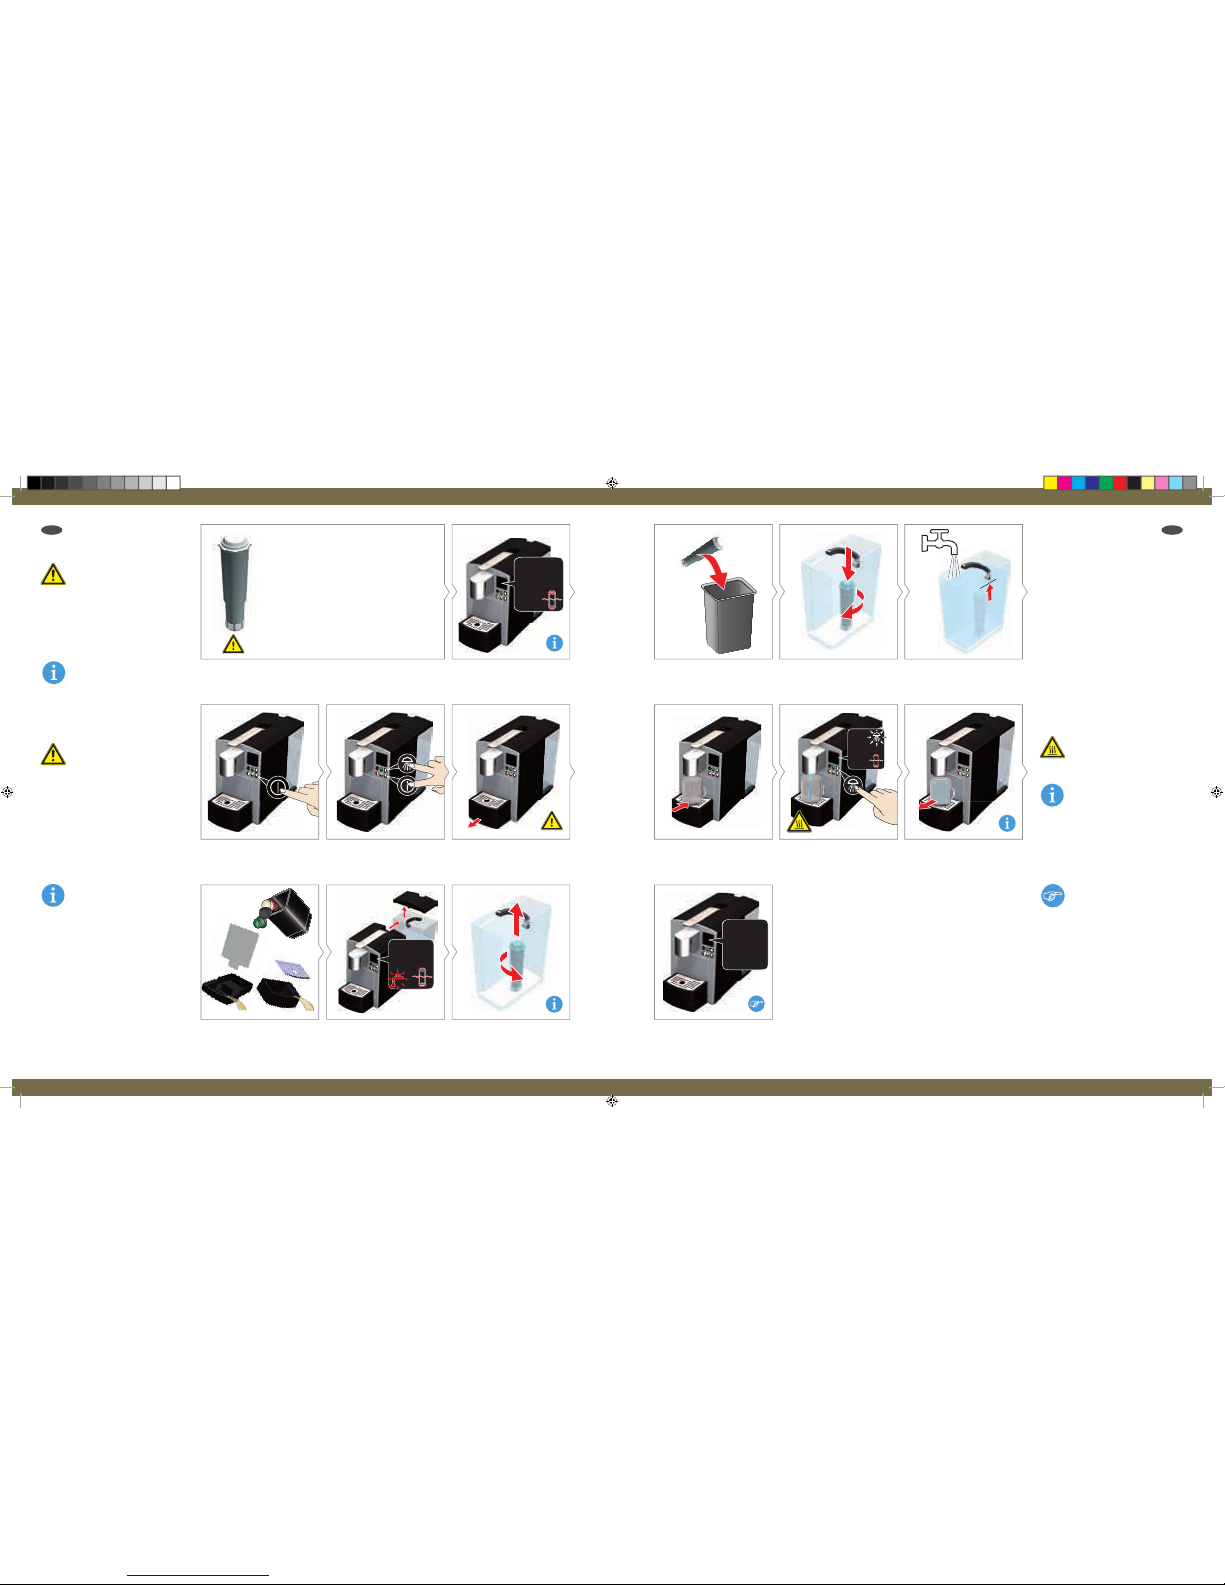
on/off button once again.
Loosen nozzle with a
quarter turn.
Remove nozzle. Clean nozzle thoroughly
under warm water.
Replace nozzle again and
secure it with a quarter
turn.
For hygienic reason,
we recommend rinsing the
device:
– 5x before the rst beverage
preparation,
– 1x after each beverage prepa-
ration.
Risk of scalding!
Very hot water.
Risk of burns!
Let the device cool down
before removing the nozzle.
Risk of damage!
Before removing the drip
trays, it must be ensured that the
spout is in the uppermost posi-
tion.
Resetting the capsule
counter is described in de-
tail on page 48.
Risk of damage!
Only use a damp cloth and
a mild detergent if necessary (do
not use abrasive or aggressive
cleaning agents). Do not put any
parts of the device in the dish-
washer.
GB GB
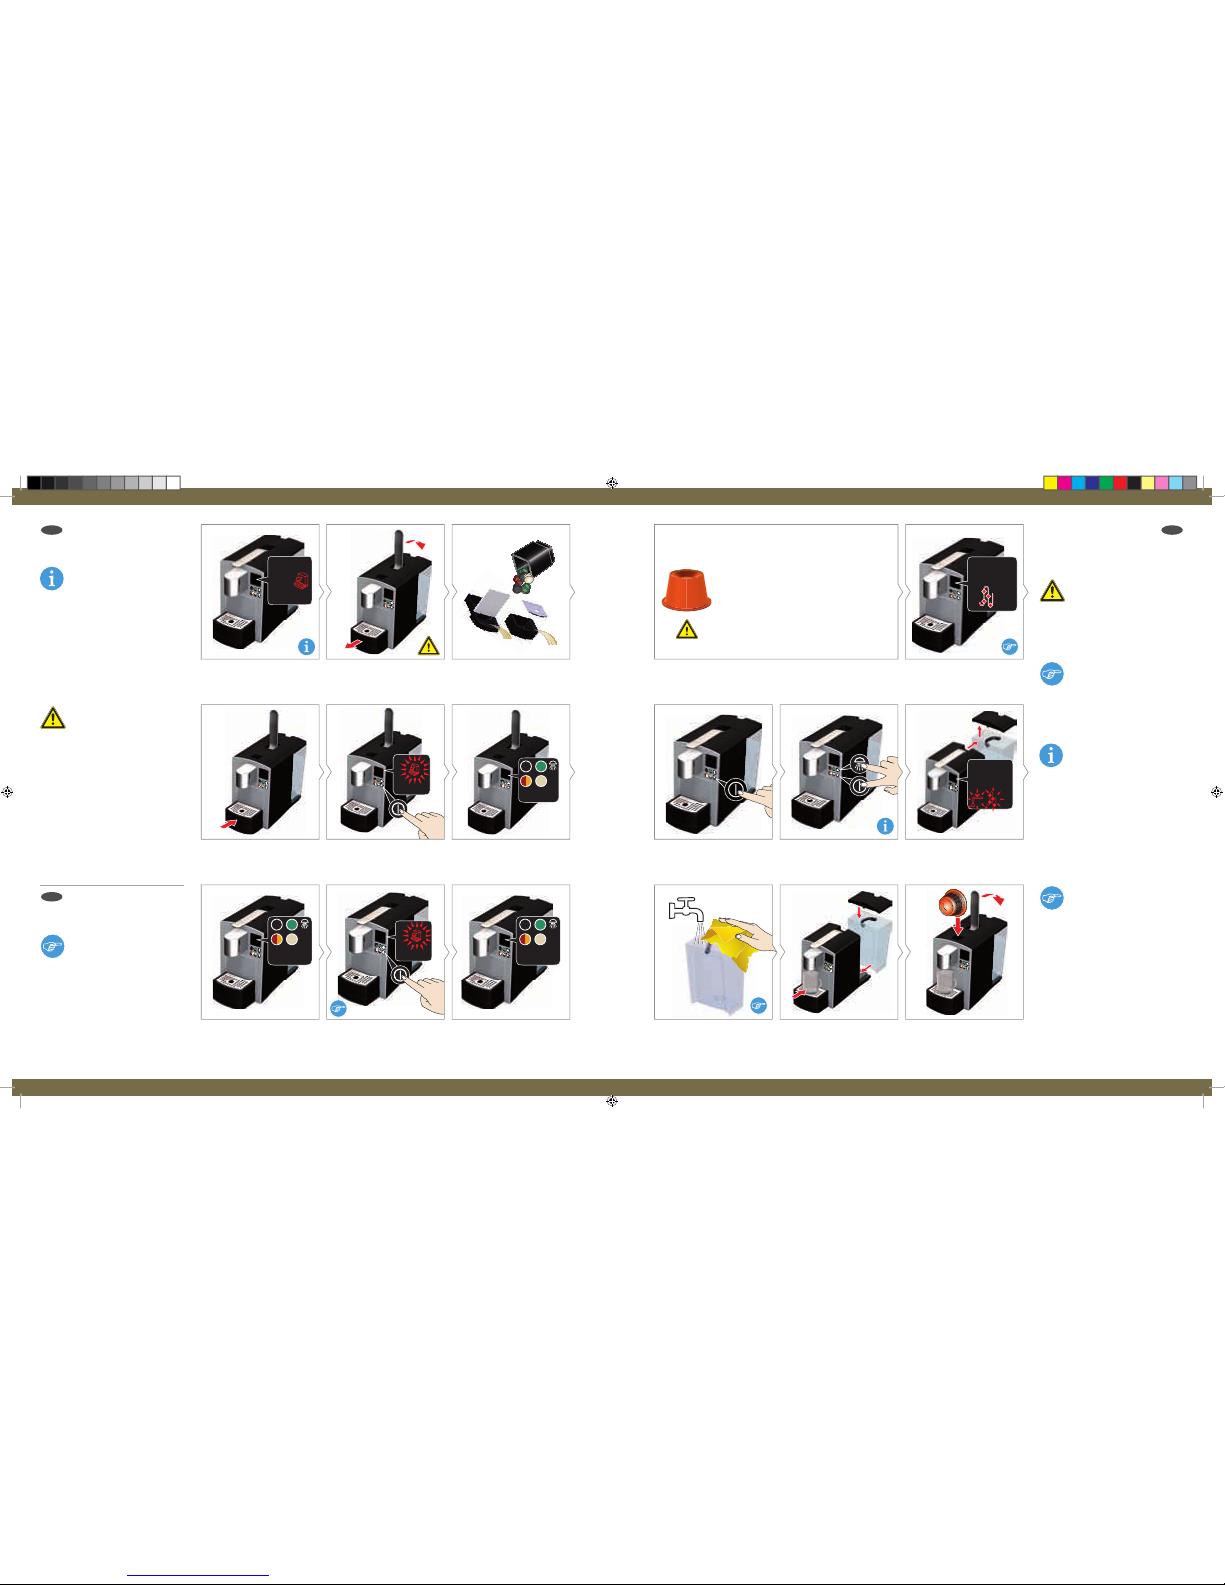
Device indicates a full
capsule container.
Open lever. Remove drip
trays and capsule container.
Empty all containers.
Reinsert drip trays and
capsule container.
Keep the on/off button pressed
for at least 3 seconds to reset
capsule counter.
The container symbol will blink
briey. After that, the device is
ready for use again.
Device is ready. Keep the on/off button
pressed at least 3 seconds
to reset capsule counter.
The container symbol will blink
briey. After that, the device is
ready for use again.
Devices shows cleaning
prompts on the display.
To shut off, briey press the
on/off button.
Press the on/off and rinsing
button together.
Remove the water tank.
Clean water tank and ll it
with fresh water (at least
0.4 litres).
Replace the water tank.
Place a container under the
spout.
Open lever, insert cleaning
capsule and close lever
again.
After using milk-based beverage capsules (Chai Latte), a
daily cleaning with the cleaning capsule is recommended.
Once 29 used capsules are
in the capsule container, a
warning symbol lights up. After
descaling, cleaning or changing
the lter, the capsule counter is
reset automatically.
In order to avoid a display
error, always reset the cap-
sule counter as soon as the cap-
sule counter is emptied (ex. for
the daily cleaning).
Risk of damage!
Before removing the drip
trays, it must be ensured that the
spout is in the uppermost posi-
tion.
The water lter (optional)
can remain in the water
tank.
After using milk-based bev-
erage capsules (Chai Latte),
a daily cleaning with the cleaning
capsule is recommended.
Health risk!
Read the instructions for
the cleaning capsule carefully and
follow the safety instructions.
If the cleaning is cancelled
by pressing the on/off but-
ton, the device will automatically
return to cleaning mode the next
time it is turned on.
GB
GB GB
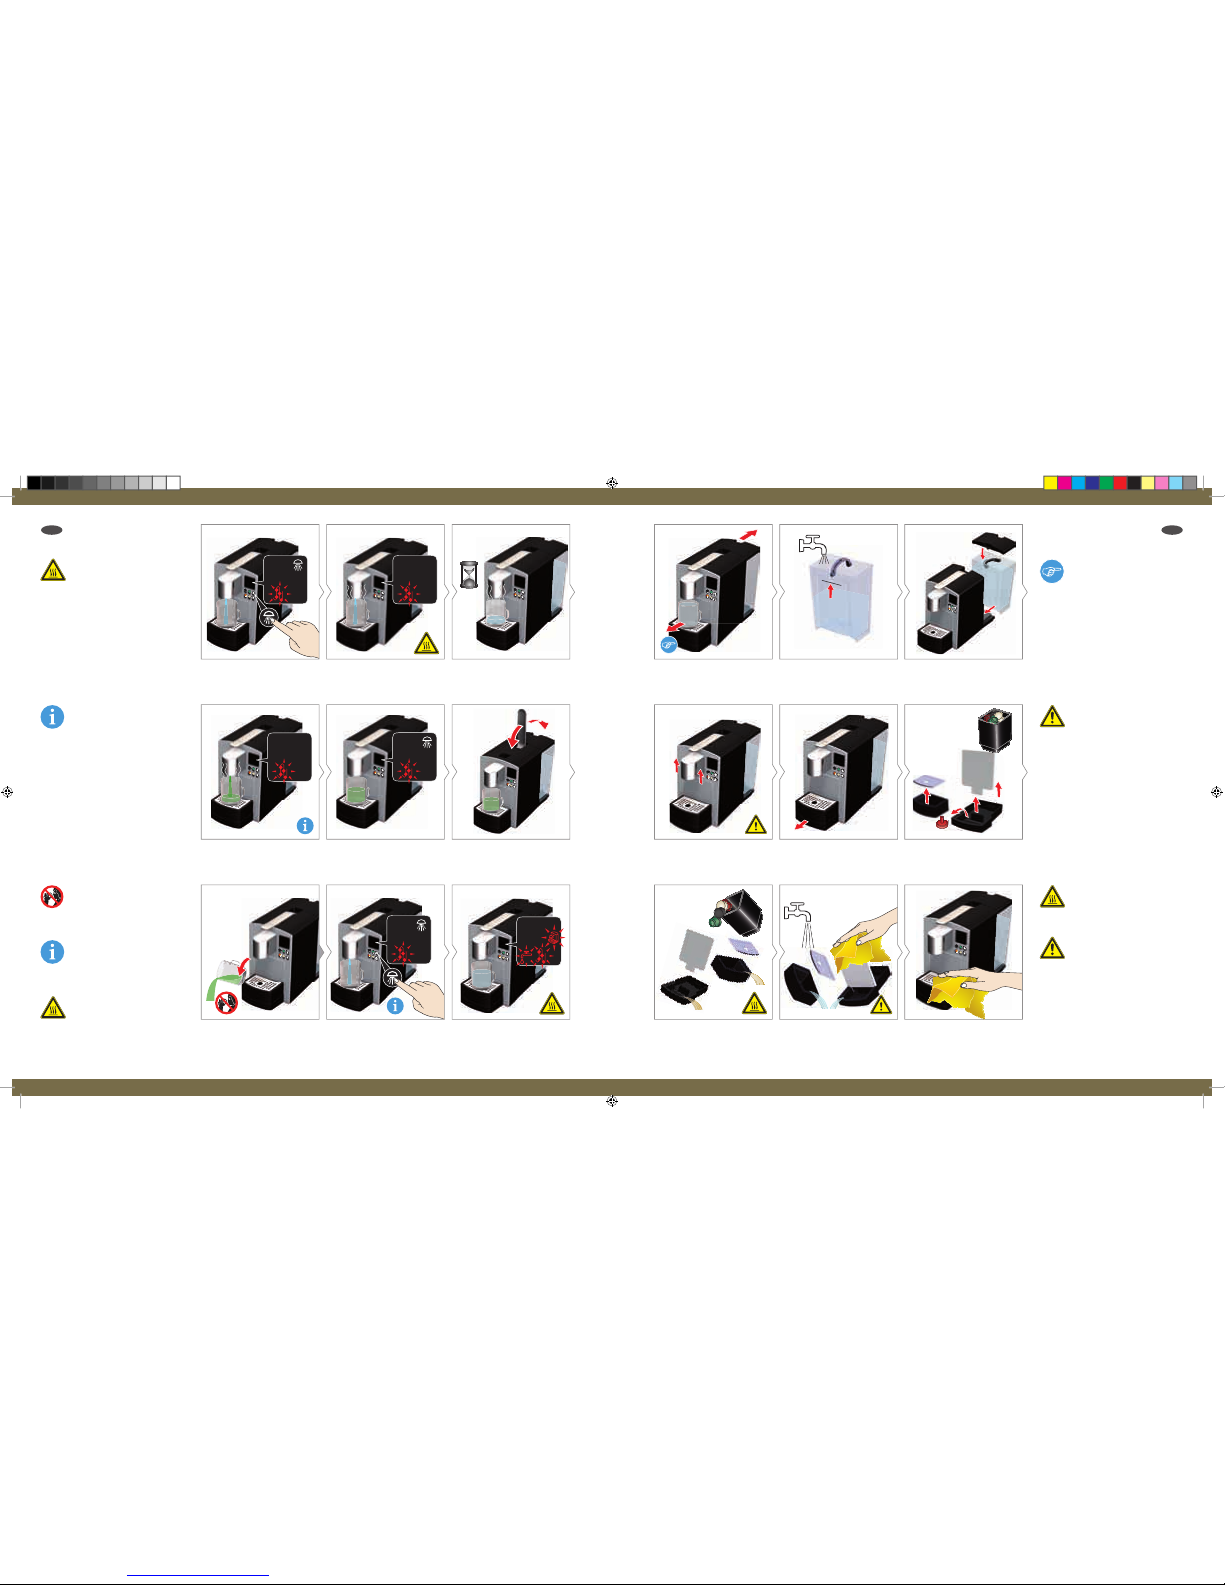
Remove and empty con-
tainer. Remove water tank.
If needed, ll the tank with
fresh water.
Insert water tank into the
device.
Move spout to uppermost
position.
Remove drip trays and
capsule container.
Take apart drip trays.
Empty all containers. Clean all parts. Place drip
trays and capsule container
back into the device.
Wipe clean device with a
slightly damp cloth.
Risk of scalding!
Very hot cleaning uid.
Risk of scalding!
Very hot water.
The blue-green water is
characteristic of the current
cleaning process.
The device rinses with 200
ml of water.
Health risk!
Do not drink cleaning uid.
Risk of damage!
Before removing the drip
trays, it must be ensured that
the spout is in the uppermost
position.
Risk of damage!
Only use a damp cloth
and a mild detergent if necessary
(do not use abrasive or aggressive
cleaning agents). Do not put any
parts of the device in the dish-
washer.
To nish the cleaning
process, the water tank
must be removed and reinserted.
Subsequently the device will
switch off automatically.
Risk of scalding!
Very hot water.
Press rinse button. Cleaning capsule is lled
with hot water.
2 min. pause for the expo-
sure of the cleaning uid.
Cleaning process
continues.
Wait until rinse symbol
ashes.
Open lever, eject cleaning
capsule and close lever
again.
Empty the container and
replace it back under the
spout.
Press rinse button. Wait until the rinsing
process is complete.
GB GB

Devices shows descaling
prompts on the display.
To shut off, briey press the
on/off button.
Press the on/off and rinsing
button together.
Remove drip trays with
capsule container.
Empty container and
reinsert in machine.
Remove and empty the
water tank.
Fill water tank with descal-
ing agent (100 ml) and 0,4
litres of water.
Re-insert the water tank.
Place a container under
the spout.
Press rinse button. Wait until the rinsing
process is complete.
Then, empty the container.
Remove drip trays. Empty drip trays, clean
and replace with capsule
container.
Place a container under
the spout.
Press rinse button.
Wait until the rinsing
process is complete.
Then, empty the container.
Remove the water tank, ll
up and replace. The descal-
ing symbol disappears.
The device automatically prompts for descaling.
It takes into account the set water hardness and
whether a water lter is used.
Clean water tank, ll (at
least 0.3 litres) and re-insert
it into the device.
Health risk!
Read the instructions for
descaling carefully and follow the
safety instructions.
If descaling is cancelled by
pressing the on/off button,
the device will automatically return
to descaling mode the next time it
is turned on.
To nish the descaling
process, the water tank
must be removed and reinserted.
Rinse the device with 250
ml of water.
Risk of scalding!
Very hot water.
The machine rinses, in
intervals until the water
tank is empty.
Health risk!
Do not drink descaling
uid.
Risk of damage!
Before removing the drip
trays, it must be ensured that
the spout is in the uppermost
position.
The water lter must be
removed before descaling.
Risk of scalding!
Very hot water.
Risk of damage!
Before removing the drip
trays, it must be ensured that
the spout is in the uppermost
position.
GB GB
Devices shows lter
change prompts on the
display.
To shut off, briey press the
on/off button.
Press the on/off and rinsing
button together.
Remove drip trays with
capsule container.
Empty all containers and
replace.
Remove and empty the
water tank.
Unscrew the used water
lter.
Dispose of the used water
lter.
Screw in new water lter. Completely ll the reservoir
and insert it into the device.
Place a container under
the spout.
Press rinse button. Wait until the rinsing
process is complete.
Then, empty the container.
The water lter symbol
goes out. The device then
switches off automatically.
With the previously activated option "Water lter – on",
the device automatically prompts you to change the
water lter, after a water consumption of 50 litres.
With the rst use of a water
lter, set the corresponding
parameter to "on". Refer to the in-
structions in "Setting the param-
eters: water lter" on page 58.
The setting is retained even after
a power failure.
Rinse the device with 200
ml of water.
Risk of scalding!
Very hot water.
The lter symbol lights up
as red until the water lter
is changed.
If lter change is cancelled
by pressing the on/off but-
ton, the device will automatically
return to lter change mode the
next time it is turned on.
Risk of damage!
Before removing the drip
trays, it must be ensured that
the spout is in the uppermost
position.
Health risk!
Read the operating and
safety instructions for the water
lter thoroughly. For hygienic rea-
sons, we advise you to replace
the water lter at least every 3
months.
GB GB
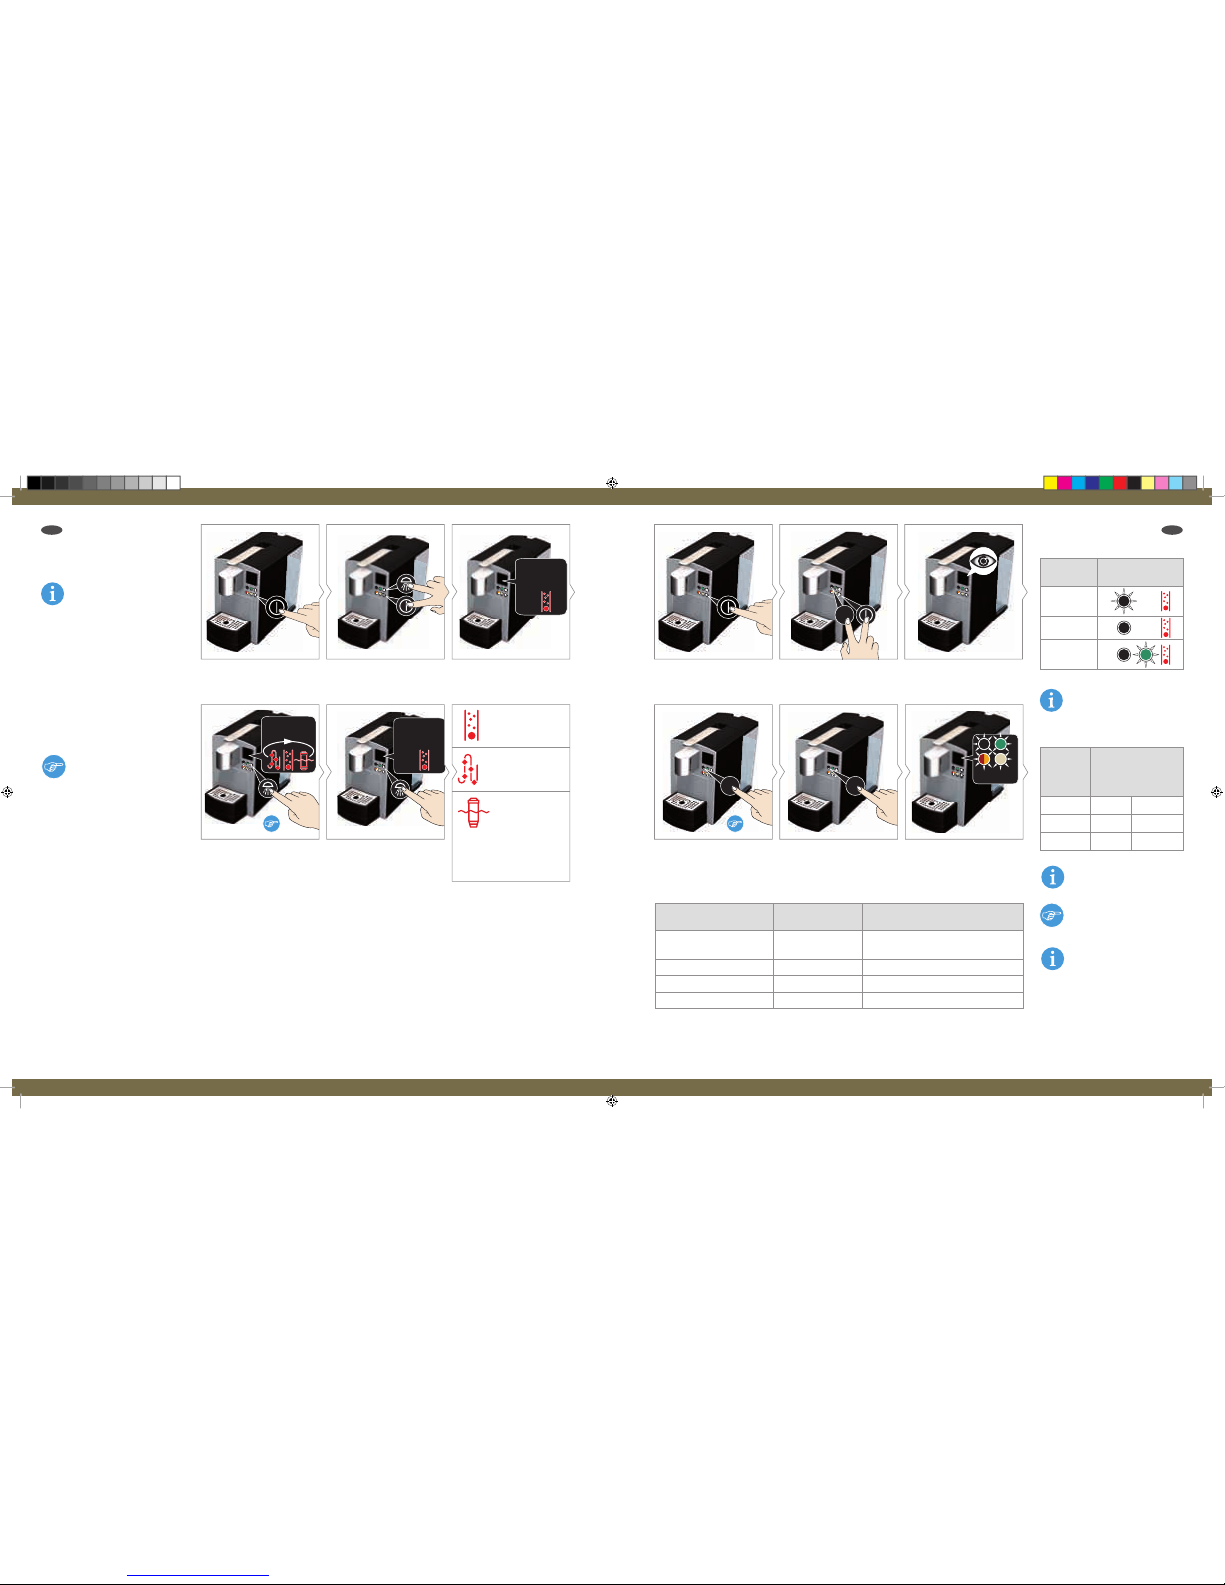
Switch off the device rst. Press the on/off and rinsing
button together.
Descaling symbol lights up
on the display.
Briey press rinse button
repeatedly, if necessary,
until the desired symbol
lights up.
Keep rinse button pressed
for at least 3 seconds, to
start the selected function.
Switch off the device rst. Press the black tea button
and on/off button at the
same time.
Current water hardness is
displayed (see table).
Briey press black tea
button repeatedly until the
desired water hardness
appears.
To save, press the black
tea button for at least 3
seconds.
To conrm, all beverage
symbols will blink once.
6Descaling: see
steps on page 52
from image 5.
Cleaning: see
steps on page 49
from image 5.
Filter change:
see steps on
page 54 from
image 5. The lter symbol
only appears, if the
parameter "water lter -
on" was previously set.
Hardness range Water hardness in
mmol
Water hardness in German degrees
of hardness (° d)
1 – soft < 1.3 < 7
2 – medium 1.3 – 2.5 7–14
3 – hard 2.5 – 3.8 14 – 21
With this function, descaling
or cleaning can be started
at your own discretion or a lter
replacement can be carried out.
This display can be ex-
ited by pressing the On/Off
button, without starting a
function.
The set water hardness and
the water lter determine
the amount of water used for
descaling:
Water
hardness
Water Consumption
[l]
with/without water
lter
soft 120 1200
medium 80 800
hard 40 400
Water hard-
ness Display symbols
soft
medium
hard
To cancel the setting, press
the on/off button.
Factory setting: hard
Ask your water company for
more detailed information
about your water hardness. The
water hardness entered in the
device determines the necessary
descaling frequency for optimal
operation.
GB GB

Switch off the device rst. Press "Fruit/Herbal tea"
button and on/off button
together.
The current setting is
shown on the display
(see table).
Press the "Fruit/Herbal tea"
again briey to change the
setting.
To save, press the "Fruit/
Herbal Tea" button for at
least 3 seconds.
To conrm, all beverage
symbols will blink once.
Switch off the device rst. Press the green tea button
and on/off button at the
same time.
Current switch-off appears
on the display (see table).
Briey press green tea
button repeatedly until the
desired sleep time appears.
To save, press the green
tea button for at least 3
seconds.
To conrm, all beverage
symbols will blink once.
Factory setting: Off
No water lter present.
Water lter Display symbol
Off
On
To cancel the setting, press
the on/off button.
For more information about
the automatic switch-off,
see page 63.
Switch-off
time Display symbol
9 Min.
30 Min.
60 Min.
240 Min.
480 Min.
To cancel the setting, press
the on/off button.
Factory setting: 30 Min.
GB GB

Switch off the device rst. Press "Chai Latte" button
and on/off button together.
Current cleaning interval is
displayed (see table).
Briey press "Chai Latte"
button repeatedly until the
desired cleaning interval
appears.
To save, press the "Chai
Latte" button for at least 3
seconds.
To conrm, all beverage
symbols will blink once.
If necessary, let device
warm up to room tempera-
ture.
Device must be turned
off: Briey press the on/off
button.
Press Black Tea button and
Chai Latte button at the same
time for at least 3 seconds.
Remove and empty the
water tank.
Evaporation begins. Wait until evaporation is
complete and the unit
shuts down.
Re-insert the empty water
tank.
Wipe the front side of the
device dry with a cloth.
The cleaning interval de-
termined by how much the
used capsules cleaning symbol
lights up on the display.
To cancel the setting, press
the on/off button.
Capsules
used Display symbol
100
200
Off
Factory setting: 100.
With the setting "off" the
cleaning request is turned off. For
hygienic reason, we recommend
that you keep the factory setting.
With this function, the
remaining water in the
device is evaporated and
removed. This prevents residual
water leak or stops the device
from possible freezing.
Risk of scalding
The steam may reach a
temperature of up to 120° C. Do
not reach under the spout. Keep a
sufcient distance from the spout.
The evaporation takes a
maximum of 2 minutes.
GB GB

All these symbols are blinking quickly?
Switch off the unit, unplug the mains plug and allow to cool to room temperature. After
that insert the mains plug and switch on again. If error occurs again, contact Service
Centre.
All these symbols are blinking quickly?
Switch off the device and unplug it. Wait at least 1 minute, Then insert the the mains
plug and switch on again. If error occurs again, contact Service Centre.
Beverage output is not working properly?
Lever fully down. If necessary, device descaling – see section "cleaning, descaling and
changing the lter as required".
Beverage discharge occurs with delay?
Device heats after.
Capsule container is crowded and jammed?
By gently shaking, try to remove the capsule container.
After inserting a capsule, the lever can not be closed completely?
Make sure that there isn't an already used capsule in the brewing chamber, the capsule
is not crowded and the newly inserted capsule is in the correct position.
Beverage is not hot enough?
If necessary, device descaling – see section "cleaning, descaling and changing the lter
as required".
All of the beverage symbols won't stop blinking slowly?
In such a case, turn off the device and let it cool down before it is put back into service.
Reset device to factory settings?
Switch off the device and unplug it. Hold rinse button and black tea buttons simultane-
ously. Insert the power cord and release both buttons. To conrm, the beverage symbols
briey light up on the display twice.
What is the Eco Mode?
The device switches off automatically and returns to the eco mode when it is not used
within 30 minutes (factory setting). In Eco Mode, the device consumes signicantly less
power (less than 0.5 W) compared to an operational, heated state.
Information for automatic switch-off
The device switches off auto-
matically and returns to the eco
mode when it is not used within
30 minutes (factory setting). For
the environment, we recommend that you
keep the factory setting.
In Eco Mode, the device consumes
220 – 240 V ~, 50 Hz, max. 1455 W
1 m
Pmax. 19 bar
approx. 3.5 l
approx. 4.5 kg
A = 200 mm
B = 406 mm
C = 316 mm
max. 160 mm
10 °C – 45 °C
~ 94 °C
Noise less than 70 dB (A)
signicantly less power (less than 0.5 W)
compared to an operational, heated state.
If you still want to change these param-
eters, please observe the instructions in
the chapter "Setting the parameters: auto-
matic switch-off".
If you have any questions and
suggestions, please contact us through
www.tealoungesystem.com/service
AB
C
Caution!
The device is designed for
beverage capsules of all those
brands that are marked with the
K-fee® System Logo.
The use of non-original cap-
sules may involve the follow-
ing risks: Health hazards, dam-
age to the device and the
possible loss of warranty claims.
GB GB

The packaging is recyclable. Ask the com-
petent authority/recycling centre in your
area for more information about recycling.
Protecting the environment takes
precedence!
The device contains valuable mate-
rials which can be recycled and re-
used. Therefore, dispose of the device, at
a public recycling centre in your area.
The unit is provided with a marking, in
accordance with the European Directive
2002/96 / EC (WEEE) for electrical and
electronic equipment. This Directive regu-
lates the return and recycling of waste
equipment within the EU.
GB
Table of contents


