TEFAL Beertender VB310 User manual

VB310
www.tefal.com
EN
KO

4
8
5
6
7
10
14
13
9
3
2
12
1
11

12°C
30°C
12
1 2 3
4 5 6
7 8 9
10 11 12

13 14 15
16 17 18
19 20 21
22 23 24

25 26 27
28
29 30 31
DO NOT

6
SAFETY RULES
• This appliance is not intended for use by persons
(including children) with reduced physical, sensory
or mental capabilities, or lack of experience
and knowledge, unless they have been given
supervision or instruction concerning use of the
appliance by a person responsible for their safety.
• Children must be supervised to ensure that they
do not play with the appliance.
• This appliance is only intended for domestic
use, within households and at an altitude below
2000m.
• It is not designed to be used in the following
cases, which are not covered by the warranty:
– In staff kitchen areas in shops, offices and
professional environments
– On farms
– By customers of hotels, motels and other
residential environments
– In bed-and-breakfast settings.
• Do not store explosive substances such as
aerosol cans with a flammable propellant in this
appliance.
• If the power cord is damaged, do not use the
appliance. The Power cord must necessarily be

7
EN
replaced by the manufacturer, by its after-sales
service or by similarly qualified persons in order
to avoid all risks.
• This appliance can be used by children over 8 years
old and by persons with reduced physical, sensory
or mental capacities, or lacking experience or
knowledge, only if they are properly supervised
or if they have received instructions as to how to
use of appliance safely and they understand the
implicit risks.
• Children must not play with the appliance.
• Childrenshouldnot clean or perform maintenance
procedures on the appliance unless they are
supervised by a responsible adult.
• WARNING: When positioning the device, ensure
that the power cord is not jammed or damaged.
• WARNING: Do not place any power bars or power
blocks behind the appliance.
• Only connect the machine to a mains voltage
supplythatcoincideswiththevoltageindicatedon
the sign plate of your appliance. The connection
to an incorrect supply voltage will invalidate the
guarantee and could be dangerous.
• In case of inappropriate use or failure to follow
the instructions, the manufacturer guarantee is

8
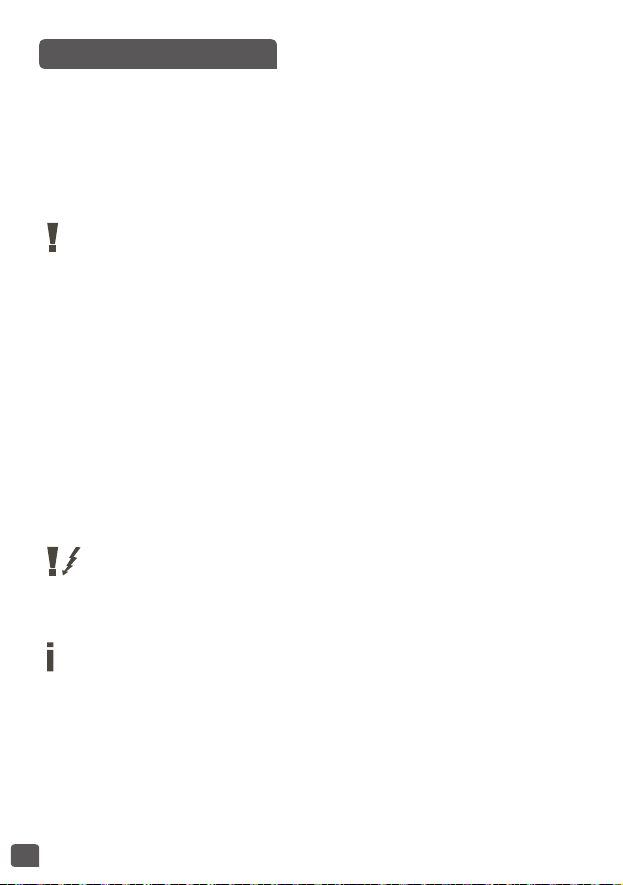
declared void. Use only «Beer Tender Compatible»
barrels.
• Always use the machine on a flat, stable, heat-
resistant surface which is protected from other
heat sources or water splashes.
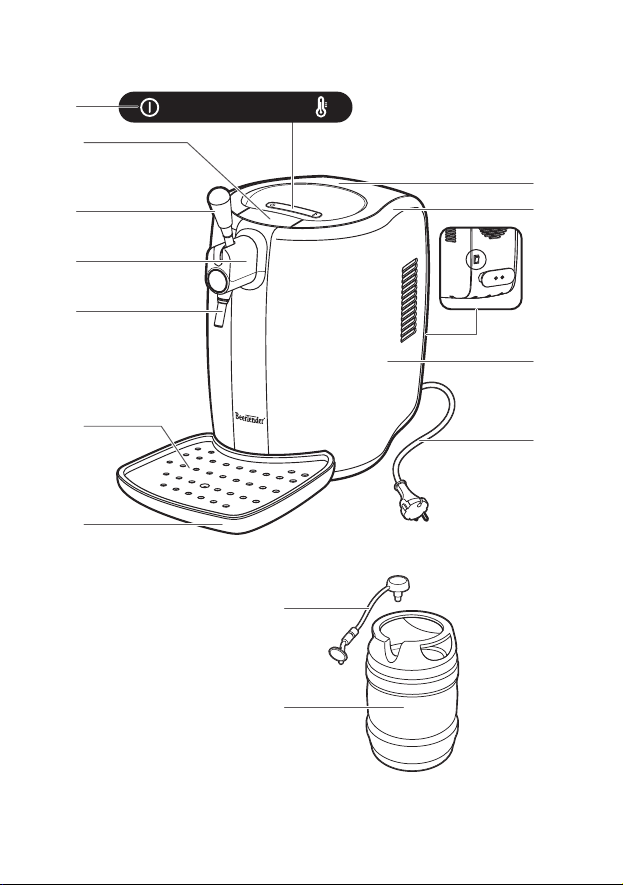
• WARNING: Keep the ventilator grill located
behind the machine clean and dust it regularly
using a vacuum cleaner.
• To protect individuals against fire, electric shock and personal injury,
refrain from immersing the mains cable, the appliance’s plug or the
appliance in water or other liquids. Never unplug the appliance with wet
hands. In case of an emergency, unplug the the appliance immediately.
• Do not use the appliance without its draining tray and grill.
• After use, empty and clean the draining tray every day.
• Unplug the machine from the mains whenever you are not using it.
• Unplug the machine from the mains before cleaning. The machine may
be cleaned using a damp cloth, but not using a sponge saturated with
water, and do not soak it in a liquid. Never use detergents to clean the
machine. Clean the machine using only soft sponges and brushes.
• In case of a prolonged period without use (vacations, storage, etc.),
unplug, empty and clean the machine.
• Any functioning, cleaning or maintenance which is outside the limits
of normal use should be reserved to the staff at the local authorized
service centres. Do not disassemble the appliance or place any objects
in any of its openings.
• The use of accessories not recommended by the manufacturer
• could cause fires, electric shocks or wounds.
• Do not let the power cord hang from the edge of a table or work top, nor
come into contact with hot surfaces or sharp edges.
• Do not let the electric cord hang (to avoid the risk of stumbling).
• Never touch the cord with wet hands.
• Do not place the machine on a gas or electric stove, nor near such heat
sources, nor inside a hot oven.

9
EN
• Before unplugging the appliance, make sure the ON/OFF button is set to
OFF, then remove the plug from the outlet. Do not unplug the machine
by pulling on the cord.
• In case you need to use the machine with an extension cord, respect the
corresponding load recommendations for the extention.
• If the wall outlet does not correspond to the machine plug, have the
plug replaced by the after-sales service or by similarly qualified persons
in order to avoid all risks.
• The wrapping is made up of recyclable materials. Contact the local
authorities for more information on recycling programs. Your machine
contains materials that can be recovered or recycled.
• IMPORTANT: Always leave the beer engine on if you have a barrel inside
the machine.
Never place powered components in contact with water. There is a danger that
this may cause ashortcircuit.
Intended use
• This appliance has been manufactured exclusively for dispensing beer
in a domestic setting.
• Only original Beertender®Kegs mentioning “Compatible Beertender®”
can be used with the appliance; you should not use any other
commercially available beer containers.
• Before using a keg, check the “best before end” date shown at the
bottom of the keg. Do not insert or use Beertender®Kegs after the date
shown.
• You should not use the appliance for purposes or with containers other
than those specified above.
• You should not introduce any materials other than Beertender®Kegs
inside the appliance.
• You should not make technical changes or use the appliance in any
manner other than as directed!
• The appliance should be used solely by adults in full possession of their
mental and physical capacities.

10
• The Beertender®is designed to dispense cool beer from a special
container (Beertender®Keg) fitted inside the appliance itself.
• This machine was intended for household use and is contraindicated for
professional continuous operation. Any commercial use, inappropriate
use or failure to comply with the instructions, the manufacturer accepts
no responsibility and the guarantee will not apply.
Warning: The manufacturer will accept no liability for damage
caused as a result of:
– Improper use and use for purposes other than those envisaged;
– Repairs not performed at authorised service centres;
– Tampering with the power cord;
– Tampering with any Beertender®appliance component;
– Use of spare parts and accessories other than those supplied by
the manufacturer;
– Attempts to access internal parts of the appliance.
The guarantee will be invalidated in such cases.
Please see full guarantee terms and conditions in the leaflet enclosed or
on our web site: www.tefal.com
Guidelines for reading these instructions
The warning indicates instructions that are important for the
user’s safety.
• Strictly follow these instructions to avoid any usage errors and serious
injuries.
This symbol highlights information that is especially important for
getting the best out of the machine.
GENERAL INFORMATION
* depending on model

11
EN
Using these operating instructions
• Keep these operating instructions in a safe place and make them
available to any other person who uses the appliance.
• If you have any problems or queries please contact our Customer
Relations Team first for help and advice.
(see details at the end of this manual)
The manufacturer reserves the right to make constructive and engineering
changes as warranted by technological advances.
Appliance complying with European Directive 89/336/EEC (Legislative
Decree 476 of 04/12/92) concerning electromagnetic compatibility.
Machine Components
Beertender®
1. Beertender®dispensing system
2. Cooling chamber
3. Lid
4. Lid opening handle
5. LED control panel
6. Upper part of the dispensing head
7. Dispensing spout
Technical specifications
Rated voltage See plate on bottom of appliance
Rated power See plate on bottom of appliance
Power supply See plate on bottom of appliance
Insulation class II
Cooling class SN
Casing material Thermoplastic
Size (w x h x d) (mm) VB31 : 273 x 453 x 505
Weight 5.5 kg. (5.3 kg. without drip tray)
Cord length 1.1 m
Beer container Beertender®Keg
Control panel Top
Operating conditions With 80% R.H. min 12°C max 30°C

12
8. Serving handle
9. Grill*
10. Drip collection tray
11. Main switch
12. Power cable
Beertender®keg
13. Beertender®keg
14. Tube
Using the Beertender®system
To obtain draft beer of optimal quality you should keep two
basic factors in mind, the temperature of the beer and hygienic
conditions.
1. Pre-chill the beer keg to prevent excess foam. Always use a
chilled keg. If you fail to chill the keg sufficiently too much foam
will be produced when you start to pour your beer.
2. Always clean the appliance after use. Beer is a natural product
that can spoil. Therefore, you should always keep the appliance
clean to maintain the quality of the beer dispensed and prevent
unpleasant odours (see “Cleaning”). The dispensing spout
should be cleaned before a new keg is installed and the drip
tray and grate should be emptied after every use - fig.3.
CAUTIONARY NOTES
• You should also follow these other rules when using the Beertender®
system:
1. Do not cool the Beertender®keg in the freezer; the Beertender®keg
may explode. Moreover, freezing diminishes the quality of the beer -
fig. 29.
2. Use your Beertender®in a place where the temperature is between
12°C and 30°C. At colder temperatures the appliance cooling system
could be damaged, whereas at warmer temperatures the system will
not be able to reach the ideal beer dispensing temperature. Store the
beer keg at room temperature - fig. 4.

13
EN
Warning! To avoid overheating, keep the Beertender®Keg out of
direct sunlight - fig.30.
3. Always hold the appliance by the bottom edge when lifting it - fig. 5.
Warning! Do not use the handle or power cord to lift the Beertender®
- fig.31.
Using the Keg
• Make sure that you chill the keg before using it. If you fail to chill the
keg sufficiently too much foam will be produced when you start to pour
beer.
• Please also be aware that the first glass that you pour from every new
keg will contain mostly foam. Draught beer in a bar behaves in exactly
the same way!
• The Beertender®Keg “Compatible Beertender®” features a patented
system for storing and dispensing beer. It guarantees beer of higher,
long-lasting quality and a Beertender®system that is very easy and
pleasant to use.
IMPORTANT: before installing a keg inside the appliance, check the
“best before end” date shown at the bottom of the keg. This date is
a reliable indication if the keg has been stored at room temperature.
• The use of kegs “Compatible Beertender®” in the Beertender®system
necessitate the use of beer tubes - fig.7. A bag of tubes is delivered
with the Beertender®appliance. To receive additional tubes, contact our
after-sales service or the La Bière Pression website. (See details at the
end of this manual).
Warning: contents under pressure. Do not shake or drop. Do
not expose to sunlight or temperatures above 30°C. Even
when the keg is empty, do not force it open and do not
expose to flame or fire.

14
For your own and others’ safety, please keep meticulously to
the “Safety rules”.
Cooling the Beertender®Keg
• Beertender®kegs must be chilled before use.
• Using a Beertender®keg that is too warm will result in too much foam.
• There are two ways to chill the Beertender®Keg:
1. inside the Beertender®(see “Using the Beertender®”). It will take
about 15 hours to cool the keg down to 4°C if the Beertender®Keg
and the appliance are stabilized at a room temperature of 20°C.
2. in a refrigerator. This will take about 12 hours depending on the
cooling capacity of your refrigerator.
Tip: we recommend that you always keep an extra Beertender®
Keg in the refrigerator. That way you will always have a chilled keg
available.
We also recommend that you switch the appliance on at least one hour
before intended use to get full benefit from the pre-cooling of the keg.
Warning! Do not attempt to chill the keg in a freezer. The kegs are
at risk of exploding if they are frozen. Moreover, freezing diminishes
the quality of the beer - fig. 29.
Installing the Beertender®appliance
• The original packing is designed and made to protect the appliance. It
is recommended that you keep it for future transport.
• Remove the Beertender®appliance from the packaging and place it on a
dry, clean, level, stable surface that is sufficiently large to accommodate
it.
• Remove all packaging, stickers or various accessories both inside and
outside the product.
• The temperature of the room must be between 12°C and 30°C. At
temperatures above 30°C, the system will not be able to sufficiently cool
the beer. - fig. 4.
GETTING THE BEERTENDER®READY

15
EN
• Set the drip tray and grate in place at the front of the appliance. Make
sure the drip tray is properly fitted and positioned.
• Do not install the appliance near sources of heat or in places exposed
to direct sunlight.
Note: keep in mind that during use the drip tray will have to be
emptied and rinsed regularly. When the Beertender®system is not
in use, you can remove the drip tray and place it elsewhere to save
space.
Note: The drip tray must be positioned on a level surface and must
not jut out from the surface it is resting on.
• After installing the Beertender®appliance you must clean the dispensing
spout; this is the only part of the appliance that will come into contact
with the beer - fig. 8.
• It is essential that you wash the dispensing spout before using
the appliance for the first time and at least every time a new keg is
connected inside the Beertender®system. The nozzle is dishwasher-safe
- fig. 9.
• To clean the spout, remove it from its housing by turning it clockwise.
After washing the spout, screw it back into place - fig. 8.
Connecting to the power supply
Electricity can be dangerous! Therefore you must always
scrupulously abide by the safety rules.
• The appliance must be plugged into a suitable, properly installed electric
socket.
• The voltage of the appliance has been set in the factory. Check that the
mains voltage matches the voltage indicated on the rating plate on the
rear of the appliance.
• Make sure the main switch on the rear of the machine is set to “0”
before connecting the Beertender®to the mains. Insert the plug into a
socket with the correct voltage and turn on the appliance by moving the
main switch to “I” - fig. 10.
The appliance will immediately start cooling the inner chamber as soon
as the main switch is set to “I”.

16
Inserting a Beertender
®
Keg
• Note: the Beertender®may only be used with Beertender®Kegs
“Compatible Beertender®” containing beer sold by the Heineken group.
• The appliance can only be used if it contains a Beertender®Keg and
only if the main switch is set to “I”.
• The LED on the left side of the control panel, when illuminated, tells you
that the appliance is switched on.
• You can open the appliance by pressing the handle on top of the lid.
When the handle is released, you can lift the lid up - fig. 11-12.
Note: do not force the lid beyond the set opening position as this could
damage it.
• When the lid is completely open, insert a Beertender®Keg as shown in
the figure - fig. 13.
• Remove the upper part of the dispensing head (6) by lifting it upwards
as indicated in the illustration - fig.14.
Note: this cover can be removed for cleaning.
• Install the Beertender®keg tap.
Note: Do not try to actuate the tap of the Beertender®Keg by hand.
• Position the beer tube as shown on drawing - fig. 15.
• Return the upper part of the dispensing head in its initial position.
Note: The upper part of the dispensing head cannot be repositioned
(fig.16) if the Beertender®keg tap has not been properly set up.
• Ensure that the upper part of the dispensing head is positioned in the
beer pump mechanism before closing the lid.
• Ensure that the positioning of the upper part of the dispensing head
conforms to the one in the illustration so as not to damage the beer
pipe -fig. 16.
• Gently close the appliance lid again until it lock - fig. 17.
Control panel
• Two LEDs on the top of the lid provide important indications:
• Green ON LED on the left of the panel: when lit, it indicates that the
appliance is operating - fig. 18.
USING THE BEERTENDER®SYSTEM

17
EN
Green beer-temperature LED on the right side of the panel: when the
Beertender®Keg has reached the ideal temperature the LED switches on
and the appliance goes into “stand-by” cooling mode - fig. 19.
Sound emitted by the Beertender®appliance
• The cooling function of the Beertender®produces sound.
• The Beertender®features a cooling system which controls the
temperature of the Beertender®Keg. There are two cooling modes:
1. stand-by cooling corresponds to the main operating conditions. In
this mode the cooling fan produces a barely audible noise;
2. active cooling is triggered when temperature inside the cooling
chamber is too high. Once the beer keg reaches the target temperature,
the beer pump shifts into standby cooling mode.
Note: always check the “best before end” date shown on the bottom of
the Beertender®Keg. Do not use the Beertender®Keg beyond this date.
Note: the beer must be dispensed into suitable containers; the dispensing
function is started and stopped manually by the user.
Step 1 – Preparing a glass
• To pour a perfect glass of beer, it is essential to use a clean, fresh glass.
Rinse the glass in cold water before dispensing beer (the colder the glass
the better) - fig. 20.
Tip: we recommend that you use your beer glasses for drinking beer
alone. Some beverages, like milk, leave a small residue in the glass which
will reduce the head on your beer.
Step 2 – Dispensing beer
Tip: Look at the control panel to check that the beer has reached
the right drinking temperature.
• Position a glass beneath the tap, holding it at an angle of 45 degrees
(see picture) - fig. 21.
DISPENSING BEER

18
• In addition to routine cleaning, the Beertender®should be cleaned after
daily use and when you install a new Beertender®Keg.
• Keep the ventilator grill located behind the machine clean and dust it
regularly using a vacuum cleaner.
CLEANING
• Firmly and quickly pull the handle down as far as it will go. Let the beer
run into the glass.
• Avoid contact between the dispensing spout, the glass and the beer
already in the glass. This could cause excessive foaming.
Note: every time you install a new keg in the Beertender®, the first
glass of beer will fill up with too much foam. When this occurs, allow
the glass to stand on the drip tray. As soon as the foam has settled,
continue filling the glass.
Note: too much foam will also be generated if the tap handle is
opened just slightly or slowly; several beers can be dispensed in
sequence when the tap handle is open. The beer will flow out more
slowly after the first glass has been filled.
Step 3 – Beer in the glass
• Place the glass of beer on the drip tray and wait for the foam to settle
- fig.22.
Step 4 – The quality of a glass of beer
• An excellent draft beer has the following characteristics:
1. a head of about 3 cms;
2. a head evenly distributed around the wall of the glass that adheres to
the surface of the beer;
3. The beer must be clear with bubbles.
4. a temperature of 4°C to 6°C (in the glass).
Note: to prevent excessive foam from forming, always use a pre-
chilled Beertender®Keg and a clean glass rinsed in cold water.

19
EN
Cleaning after daily use
• The drip tray and grate should be cleaned after every use. Remove the
grate before emptying out the drip tray. The grate must be set back in
place during normal use of the Beertender®- fig. 23.
Note: You can wash the drip tray with warm water and a mild
detergent.
Note: Never use aggressive cleaning agents such as vinegar, acids,
solvents or petrol.
Cleaning after installation of a new Beertender®Keg
• When you install a new Beertender®Keg you must clean the dispensing
spout. The spout is the only part of the appliance that comes into
contact with the beer - fig. 24.
It is essential to wash the tap nozzle using hot water.
Note: the dispensing spout comprises plastic and metal parts that are
permanently joined together and do not pose any problems of hygiene.
Do not attempt to separate these parts.
• The beer dispensing mechanism must be cleaned using a damp cloth
and a mild detergent - fig. 25.
Note: the upper part of the dispensing head may be washed with water
if it is then properly dried - fig. 26.
Note: Do not try to clean the mechanism using hard and/or sharp
objects, since doing so would risk damaging the machine.
Routine cleaning
Clean the appliance cooling chamber on a regular basis using a damp
cloth and mild detergent - fig. 27.
Note: Do not fill the cooling chamber with water as this may
result in permanent damage. Never use aggressive agents such as
vinegar, acids, solvents or petrol.
• The upper part of the cooling head must be removed. Wash the cooling
head with hot water and a gentle detergent.

20
Note: Do not wash the upper part of the dispensing head in a
dishwasher, as doing so could damage it and eliminate its shine.
• To prevent children from using it, the tap’s handle may be removed.
• To remove the handle, make sure it is in an upright position and pull it
upwards - fig. 28.
CHILDREN’S SAFETY
• These operating instructions contain the necessary information for the
proper use and upkeep of the appliance.
• It is essential to read this information and comply with these instructions
in order to use and maintain the appliance in complete safety.
• Please note, moreover, that the contents of these operating instructions
do not form part of a previous or already existing legal agreement or
contract, hence they do not affect the terms of the latter.
• The manufacturer’s obligations are based solely on the contract of
sale, which also contains complete an exclusive terms pertaining to the
warranty service provided.
• The warranty conditions as set forth in the contract are neither limited
nor extended on the basis of the explanations herein.
• These operating instructions contain information protected by
copyright.
• They may not be photocopied or translated into another language
without the manufacturer’s prior written consent.
LEGAL INFORMATION
Table of contents
Languages:
Other TEFAL Dispenser manuals