Teka LP 800 S User manual

Code: 0120504404
Manual de Uso y Mantenimiento
Manual de Utilização e Manutenção
Use and Maintenance Manual
Manual d'Emploi et Entretien
Bedienungsanleitung und pilegehinweise
LP 800 S


.1.
Close-up View (control panel)
A
B
C
D
E
F
ON-OFF Light
ON-OFF Button
Low Salt Indicator Light
Low Rinse Aid Indicator Light
G
H
I
J
K
L
Cycle select button
Half-load indicator light
Handle For Opening Door
GB
Half-load Button
Delay select Button
Display delay time
Cycle indicator light
Start/Pause button
Safety Is a Good Habit to Get Into
NOTICE
Carefully read the instructions contained in this manual,as they
provide important information which is essential to safe and
proper installation, use and maintenace of the appliance.
This appliance complies with the following EEC
directives:
-73/23/EEC of 19/02/73(Low Voltage)and subsequent
modifications;
- 89/336/EEC of 03/05/89 (Electromagnetic
Compatibility) and subsequent modifications.
- Carefully dispose of the packing material.
- After removing the packing,check to make sure that the appli-
ance is not damaged.If in doubt,contact a qualified professional.
- The dishwasher must only be used by adults for the washing of
household dishes and cooking utensils.
- Fundamental rules to follow when using the appliance:
* Never touch the dishwasher when barefoot or with wet hands
or feet;
* We discourage the use of extension cords and multiple sockets;
* During installation,the power supply cord must not be exces-
sively or dangerously bent or flattened;
* If the appliance is not operating properly or maintenance must
be performed, disconnect the appliance from the power supply.
- The appliance is not intended for use by young children or
inform persons without supervision.
- Young children should be supervised to ensure that they do not
play with the appliance.
- Keep detergents out of the reach of children,who must also be
kept away from the dishwasher when it is open.
- This appliance cannot be installed outdoors,not even if the area
in which it is installed is covered by a roof;it is also very dangerous
to leave it exposed to the rain and elements.
- Do not touch the heating element during or after a wash cycle.
- Do not lean or sit on the door when it is open ,as this could over
turn the dishwasher.
- If the appliance malfunctions,turn off water supply to the appli-
ance and disconnect the plug from the wall socket.Then,con-
sult the section entitled, "Troubleshooting".If you cannot solve
the problem,contact a service centre.
- Only specialised personnel are authorised to make repairs.
- Appliances which are no longer being used must be made inoperable
by cutting the power supply cord and removing the door lock.
- If the supply cord is damaged, it must be replaced by a special
cord or assembly available from the manufacturer or its service
agent.
- After installation, the power plug must be accessible.
To maintain the EFFICIENCY and SAFETY of this appliance,we
recommend:
- call only the Service Centers authorized by the manufacturer.
- always use original Spare Parts.

.2.
Close-up View (Interrior)
A
B
C
D
Upper Rack
Rack Height Adjustor
Top Spray Arm
Lower Rack
E
F
G
H
I
Washing Filter
Bottom Spray Arm
Detergent and Rinse Aid Dispenser
Third Sprayer
Technical characteristics
Width 60cm
Depth 60cm
Height 85cm
Capacity 12 standard place settings
Mains water pressure 0.03-0.6MPa
Power voltage 220-240V~ 50Hz
2150W
Total absorber power
Salt Container Cap
GB

Salt
Salt
The hardness of the water varies from place to place. If hard
water is used in the dishwasher,deposits will form on the dishes
utensils.
The appliance is equipped with a special softener that uses a
salt specifically designed to eliminate lime and minerals from the
water.
Loading the Salt into the Softener
Always use salt intended for use with dishwashers.
The salt container is located beneath the lower rack and should
be filled as follows:
- Remove the lower rack and then unscrew and remove the cap
from the salt container;
- If you are filling the container for the first time, fill it with water;
- Place the end of the funnel(supplied) into the hole and intro-
duce about 2 kg of salt.It is normal for a small amount of water
to come out of the salt container.
- Carefully screw the cap back on.
The salt container must be filled when the "low salt" indica-
tor light (located on the control panel) comes on.
To prevent the formation of rust,load the salt just before begin-
ning a wash cycle.
Adjusting Salt Consumption
The dishwasher is designed to allow for adjusting the amount of
salt consumed based on the hardness of the water used.This is
intened to optimize and customize the level of salt consumption
so that it remains at a minimum.Your local Water Board can sup-
ply the degree of hardness of the water in your area.
To adjust salt consumption,proceed as follows:
- Unscrew the cap from the salt container;
- There is a ring on the container with an arrow on it (see figure to
the side), If necessary, rotate the ring in the anticlockwise
direction from the "-" setting towards the "+" sign,based on the
hardness of the water being used.
It is recommended that adjustments be made in accordance with
the following scheme:
.3. GB
Water Hardness
Clarke
degree
dH mmol/l Selector
position
Salt
consumption
(Grams/cycle)
Autonomy
(cycles/2kg)
014 MNT MNIT
NIUQIQ
NUQQ
NQPS
PSTN QRUV QIRUIV
[UV
[TN [UIV
L
=?J?
jba
L
M
OM
QM
SM
?H?
SM
QM
OR

.4.
GB
Detergent and Rinse Aid
Detergent
Detergent specifically intended for use with dishwashers must
be used.The dispenser must be refilled before the start of each
wash cycle following the instructions provided in the "Wash Cycle
Table". The detergent dispenser is located on the inside panel
the door.
Loading the detergent
To open the "A" cover on the dispenser,press the "B" button.The
detergent for the wash cycle should be poured into the "C"
compartment.
After the detergent has been placed in the dispenser, close the
cover and press down until it clicks in place.
Notice:To facilitate closing the cover, remove any excess
detergent on the edges of the dispenser.
Rinse Aid
This product makes dishes sparkle and helps them to dry with-
out spotting.The dispenser is located on the inside panel of the
door and should be filled after every 80 wash cycle (or when the
rinse aid indicator light comes on for those models with this
feature).
Loading the Rinse Aid
To open the dispenser,turn the "C" cap in the anti-clockwise
dierction and then pour in the rinse aid,making sure not to overfill.
The amount of rinse aid used for each cycle can be regulated by
turning the "F" dose adjustor ,located beneath the "C" cap, with
a screwdriver.There are 6 different settings; the normal dosage
setting is 3.
Important
Proper dosage of the rinse aid improves drying.
If drops of water remain on the dishes or spotting occurs,the
dosage adjustor should be turned to a higher setting.
If the dishes have white streaks,turn the dosage adjustor to a
lower setting.
C
C
F
Extended wash
Pre-wash
C
B
A

.5. GB
Loading the Dishwasher
Before placing the dishes in the dishwasher, remove the large
food particle to prevent the filter from becoming clogged,which
results in reduced performance.
If the pots and pans have baked-on food that is extremely hard
to remove, we recommend that they be allowed to soak before
they are washed.This will eliminate the need for extra wash
cycles.
Pull out the rack to facilitate loading the dishwasher.
How to Use the Lower Rack
We recommend that you place the most difficult to clean items
on the lower rack:pots ,lids,serving dishes and bowls,as shown
in the figure on the right.
It is preferable to place serving dishes and lids on the sides of
the racks in order to avoid blocking the rotation of the top spray
arm.
- Pots,serving bowls,etc.must always be placed top down.
- Deep pots should be slanted to allow the water to flow out.
- The silverware basket can be doubled(see Fig.A) so that only
one section may be used when the silverware load is light. This
also makes space for additional pots and pans,and it can also
be placed in the upper rack.
- Silverware should be placed in the silverware basket with the
handles at the bottom;if the rack has side baskets,the spoons
should be located individually into the appropriate slots.
Especially long utensils should be placed in the horizontal
position at the front of the upper rack.
How to Use the Upper Rack
The upper rack is designed to hold more delicate and lighter
dishware,such as glasses,coffee and tea cups and saucers,as
well as plates,small bowls and shallow pans(as long as they are
not too dirty).
- Position the dishes and cookware so that they do not get moved
by the spray of water.
The upper rack can be adjusted for height by using the knobs
located on the sides of the rack itself (see Fig.B).
Lower Rack Upper Rack
Load for 12 Standard Settings
Fig.A Fig.B
12
34

.6.
GB
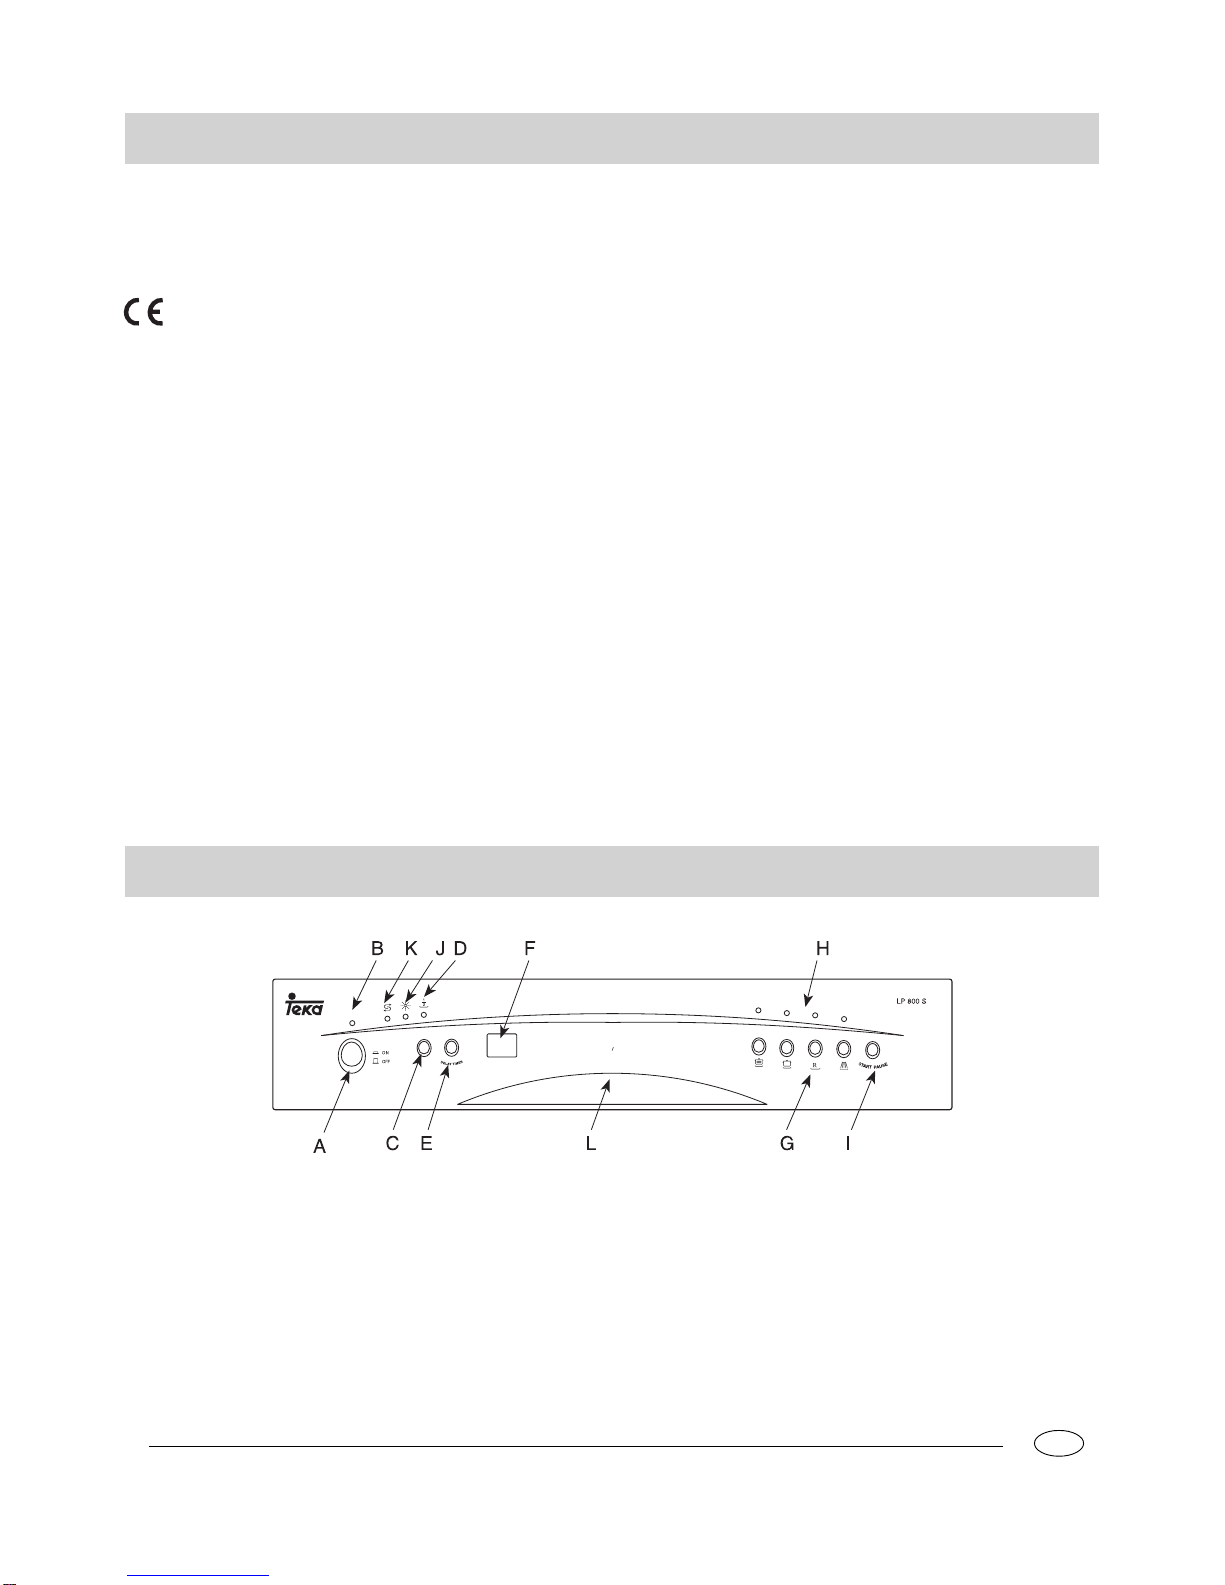
Turning on the Appliance
Starting a wash cycle
After having completed all of the installation steps in the pre-
ceding paragraphs, turn on the water all the way and press the
ON-OFF button (A) located on the control pannel. The "B" indi-
cator light will come on. At this point, the appliance is on but you
must wait a few seconds before programming the setting for the
cycle.
Cancelling or modifying a cycle while underway
Premise
:
A cycle that is underway can only be modified if it has
only been running for a short time.Otherwise, the detergent may
have already been used,and the appliance mayhave already
drained the wash water. If this is the case,the detergent dis-
penser must be refilled (see the paragraph entitled,"Loading the
Detergent").
To modify a cycle that is already underway, press the ON-OFF
button (A) ,then all of the settings will be cancelled.
If you forget to load some of the dishes
The wash cycle can be interrupted by pressing the Start/Pause
button.You can then load additional dishes and turn the appli-
ance back on.The cycle will start where it left off.
Premise: After selecting the wash cycle as indicated in the para-
graph entitled ,"Setting and Starting a Wash Cycle..."the delay
time can be set.
1/2 load Button
This button(see "close-up View - Control Panel",letter"C") make
it possible to wash dishes using only the upper rack if there are
not enough dishes for a full load.This will allow you to save on
water and eletrical energy. It can be used before setting any of
the wash cycle, except for the intensive cycle ( if included in the
wash cycle table). Please keep in mind that the amount of deter-
gent should also be cut in half.
During the delay period ,it is preferable not to change any of the
settings.
a) If it is necessary ,all of the settings must be cancelled by press-
ing the ON-OFF button (A) to indicate that all of the settings
have been cancelled.
At this point,all of the steps for"Setting the Wash Cycle with a
delayed Start Time" and "setting and Starting a Wash Cycle"must
be repeated,following the instructions contained in the corre-
sponding sections.
b)If the door is opened during the delay period, the indicator will
blink and acoustic signal will sound, and the countdown will stop.
It will begin again when the door is closed .
At the end of the wash cycle
Six acoustic signal will indicate that the wash cycle has finished
and the cycle indicator light (H) for the cycle will begin to die out.
Turn off the appliance using the ON-OFF button.Turn off the
water supply to the appliance and open the door. Wait a few
minutes before unloading the dishwasher to avoid handling the
dishes and utensils while they are still hot and more susceptible
to breakage. They will also dry better.
Setting and Starting a wash Cycle
Select the desired cycle by pressing the selector button (G). Each
time the button is pressed, one of the"H" cycle indicator lights
will come on in succession. Choose the wash cycle you feel is
most appropriate for the type of dishes that need washing (consult
the wash cycle table contained in this manual, especially when
first using the appliance).
Press the Start/Pause button(I), and after a few seconds a short
acoustic sound will indicate that the wash cycle has begun and
can no longer be changed. If necessary ,read the paragraph
entitled " Cancelling or modifying a cycle while underway..."
Wash cycle Program Light
The wash cycle is running and the cycle indicator light (H) for
the cycle will begin to blink.
By pressing the "E" button (see close-up view-'Control panel")
the start of wash cycle can be delayed for between 1 to 12 hours.
Each time the button is pressed,the display (F) will show the
number of hours for the delay period.Choose the amount of
time desired.When the appliance is started with "I" button,a short
acoustic signal will sound and the delay time on the display will
blink ,indicating that the countdown has begun.
After the time has elapsed,the cycle will start.
NOTE:
Wash Cycle adjustment Buttons
Setting the Wash Cycle with a Delayed Start Time

.7. GB
- It is important to try and run the dishwasher when it is fully loaded
to save on enery.In order to prevent odours from forming and
food from caking onto the dishes,you can run the soak cycle.
- Choose the right wash cycle: the choice of cycle depends on
the type of dishware, cookware and utensils being washed and
how dirty they are.
Energy Saving Tips
- Use the right amount of detergent: if you use too much detergent,
the result will not be cleaner dishes,but,rather,a greater nega
tive impact on the enviroment.
- There is no untility in rinsing dishes ,cookware and untensils before
placing them in the dishwasher.
How to Keep Your Dishwasher in Shape
After Every Wash
After every wash, turn off the water supply to the appliance and
leave the door slightly ajar so that moisture and odours are not
trapped inside.
Remove the Plug
Before cleaning or performing maintenance, always remove the
plug from the socket.Do not run risks.
No Solvents or Abrasive Cleaning Products
To clean the exterior and rubber parts of the dishwasher, do not
use solvents or abrasive cleaning products.Rather, use only a
cloth and warm soapy water.
To remove spots or stains from the surface of the interior, use a
cloth dampened with water and a little white vinegar,or a clean-
ing product made specifically for dishwasher.
When You Go on Holiday
When you go on holiday,it is recommended that you run a wash
cycle with the dishwasher empty and then remove the plug from
the socket ,turn off the water supply and leave the door of the
appliance slightly ajar.This will help the seals last longer and
prevent odours from forming within the appliance.
Moving the Appliance
If the appliance must be moved,try to keep it in the vertical
position.If absolutely necessary,it can be positioned on its back.
Seals
One of the factors that cause odours to form in the dishwasher
is food that remains trapped in the seals.Periodic cleaning with
a sponge will prevent this from occuring.

Pre-wash: 5g
Extended wash:
25g
Wash Cycle Table
Cycle Cycle Selection
Information Description of Cycle Detergent Rinse Aid
Normal wash
(IEC-EN50242)
Intensive
Wash
Rapid Wash
Soak
Normally dirty dishes,pots
and pans without dried-on
residue
Very dirty dishes,pots and
pans.(not to be used with
delicate items)
Economic,fast cycle to be
used on not very dirty dishes
right after they are used.No
drying cycle.
Pre-wash of dishes, pots and
pans while waiting for the load
to be complete after the sub-
sequent meal.
Short wash at 40K
=Cold rinse .
Short cold wash to prevent food
residue from drying on the dishes K
15g
30g
.8.
GB
Pre-wash with cold water
Extended wash at 70K
Rinse with cold water.
Rinse with hot waterK
Drying.
Pre-wash with cold waterK
Extended wash at 50K
Rinse with cold waterK
Rinse with hot waterK
Drying.
( 5 )

.9. GB
Cleaning and Special Maintenance
Filter Assembly
For best performance and results, the filter assembly must be
cleaned.
The filter efficiently removes food particles from the wash water,
allowing it to be recirculated during the cycle.For this reason ,it
is a good idea to remove the larger food particles trapped in the
filter after each wash cycle by rinsing the"A"semi-circular filter
and cup under running water.To remove the filter assembly,pull
on the cup handle in the upward direction. The entire filter as-
sembly (made up of the "A" semicircular filter and the"B" fine
filter)should be cleaned at least once a month.To clean the filter
and the fine filter,use a cleaning brush .Then,reassemble the
filter parts as shown in the figures below and reinsert the entire
assembly in the dishwasher,positioning in its seat and pressing
downward.
The dishwasher must not be used without the filters.Improper
replacement of the filters may reduce level of the appliance and
damage dishes and utensils.
Cleaning the Spray Arms
It may happen that food particle become encrusted on the sprayer
arms and block the hole (see "Close up view [interior]",letters C-
F ).Check the sprayer arms periodically and clean them when
needed.
It may occur that the dishwasher does not function or does not
function properly.Before calling for assistance,Iet us see what
can be done first:have you forgotten to press one of the buttons
or to perfom an essential operation?
The Dishwasher Does Not Start
Have you checked whether:
- the plug is pushed into the socket correctly;
- the power is on in the house;
- the door is closed properly;
- the ON-OFF swith is on "ON";
- the water supply is turned on.
A
B
The Dishwasher Does Not Load Water
Have you checked whether:
- the water is turned on and the hose is connected properly;
- the water supply to the house on and has sufficient pressure;
- the water supply hose is crimped or bent;
- the filter for the water supply hose is clogged.
The Dishes Are Not Clean
Have you checked whether:
- the water is turned on and the hose is connected properly;
- the water supply to the house on and has sufficient pressure;
- the water supply hose is crimped or bent;
- the filter for the water supply hose is clogged.
The Dishwasher Does Not Drain
Have you checked whether:
- the drain hose is crimped or bent.
Lime Deposits or a White Film Form on the Dishes
Have you checked whether:
- the lid to the salt container is closed properly;
- the rinse aid dosage is correct.
If,despite all these checks,the dishwasher still does not function
and/or the problem persists,contact the nearest authorised ser-
vice centre and provide them with the following information:
- the nature of the problem;
- the model type number (Mod...)and the serial number (S/N...),
which are indicated on the plate located on the side of the inner
part of the door.
Never call on unauthorised technicians and allow the
parts which are not original spare parts to be installed .
Troubleshooting

.10.
GB
Installation
Positioning the Appliance
Position the appliance in the desired location.The back should
rest against the wall behind it,and the sides,along the adjacent
cabinets or wall.The dishwasher is equipped with water supply
and drain hoses that can be positioned on the right or the left to
facilitate proper installation.
Levelling the Appliance
Once the appliance is positioned,adjust the feet (screw them in
or out) to level the dishwasher.In any case,the appliance should
not be inclined more than 2. If the appliance is level,it will help
ensure proper performance.
Cold Water Connection
Connect the cold water supply hose to a threaded 3/4(gas) connec-
tor and make sure that it is fastened tightly in place (see Fig 1).
If the water pipes are new or have not been used for an ex-
tended period of time,let the water run to make sure that the
water is clear and free of impurities.If this precaution is not taken,
there is a risk that the water inlet can get blocked and damage
the appliance.
The connection must be made to the hot water line following the
same procedures as those for the connection to the cold water
line.
Anti-Flooding Protection
The dishwasher is equipped with a system that stops the supply
of water in the event of a problem with the water supply hose,or
leaks within the unit,in order to prevent damage to your home.If
for any reason the box containing the electrical components hap-
pens to get damaged,remove the plug for the appliance from the
socket immediately.In order to guarantee that the anti-flooding
feature operates properly, the"A" box with water supply hose
must be attached to the water supply tap as shown in Fig .1.No
other type of connection is acceptable.The water supply hose
must not,under any circumstances,be cut,as it contains electri-
cal parts which are live.If the length of the hose is not adequate
to make a proper connection,the hose must be replaced with
one which is long enough.This hose is available upon request
from specialised retailers and service centres.
Drain Hose Connection
Insert the drain hose into a drain pipe with a minimum diameter
of 4cm,or let it run into the sink,making sure to avoid bending or
crimping it.Use the speical plastic support that comes with the
appliance (see Fig.2).The free end of the hose must be at a
height between 40 and 100 cm and must not be immersed in
water.
Attention:
The special plastic hose support must be solidly fastened to the
wall to prevent the drain hose from moving and allowing water to
spill outside the drain.
Electrical Connection
After making sure that the voltage and frequency values for the
current in the home correspond to those on the rating plate
(located on the stainless steel inner door of the appliance) and
that the electrical system is sized for the maximum voltage on
the rating plate,insert the plug into an electrical socket which is
earthed properly (the earthing of the appliance is a safety re-
quirement mandated by law).
If the electrical socket to which the appliance must be connected
is not appropriate for the plug,replace the plug ,rather than us-
ing adpators or the like as they could cause overheating and
burns.
Hot Water Connection
The water supply to the appliance can also be connected to the
house's hot water line (centralised system,heating system),as
long as it does not exceed a temperature of 60.
In this case,the wash cycle time will be shortened by about 15
minutes and the wash efficiency slightly reduced.
Fig.2
Fig.1

.11.
ATTENTION
Lisez attentivement cette notice, son contenu vous fournira des
indications importantes concernant la sécurité d'installation,
d'utilisation et d'entretien de votre appareil.
Cet appareil est conforme aux Directives
Communautaires suivantes:
- 73/23/CEE du 19/12/73 (Basses Tensions) et modifi-
cations successives;
- 89/336/CEE du 03/05/89 (Compatibilité
Electromagnétique) et modifications successives.
- Eliminez avec soin le matériel d'emballage.
- Après avoir élevé l'emballage, vérifiez si l'appareil est en bon
état. En cas de doute, adressez-vous à un technicien qualifié.
- Le lave-vaisselle ne doit être utilisé que par des adultes et
uniquement pour le lavage de vaisselle à usage ménager.
- Quelques règles fondamentales à suivre:
* ne touchez jamais la machine pieds nus ou avec les mains
ou les pieds mouillés,
* nous déconseillons vivement l'utilisation de rallonges et de
prises multiples,
* pendant l'installation, le cable d'alimentation ne doit pas subir
de grosses pliures ou des compressions dangereuses,
* en cas de mauvais fonctionnement ou de travaux d'entretien,
débranchez l'appareil de la ligne électrique.
- Gardez les enfants loin des produits détergents de du lave-
vaiselle quand il est ouvert.
- La machine ne doit jamais être installée à l'extérieur, même
si l'endroit est réparé par un auvent, il est très dangereux de
la laisser exposé à la pluie et aux orages.
- Ne touchez jamais à la résistance pendant et tout de suite
après un cycle de lavage.
- Ne vous appuyez jamais à la porte ouverte et ne vous y asseyez
pas dessus, vous pourriez faire basculer le lavevaisselle.
- En cas de panne, fermez le robinet d'arrivée de l'eau et
débranchez la fiche de la prise murale. Consultez ensuite le
chapitre "Des problème: que faire?" et si vous ne trouvez
pas de solution, adressez-vous à votre service après-vente.
- Des réparations ne doivent être faites que par les techniciens
qualifiés.
- Les appareils hors d'usage doivent être inutilisables, coupez
par conséquent leur cable d'alimentation et enlevez le dispositif
de blocage de la porte.
Pour garantir l'efficacité et la sécurité de ce produit:
· adressez-vous exclusivement aux Centres d'assistance
technique agrées.
· demander toujours l'utilisation de pièces détachés originales.
Vue de près (tableau de bord)
A
B
C
D
E
F
Voyant allumé-éteint (ON-OFF)
Bouton allumé-éteint (ON-OFF)
Voyant manque de produit de sel
Voyant manque de produit de rin?age
G
H
I
J
K
L
Bouton sélection programmes
Voyant "1/2 Charge"
Poignée ouverture porte
FR
Bouton "1/2 Charge"
Bouton séection départ différé
Voyant départ différé
Indicateur lumineux phase programme
Bouton démarrage/remise àzero
La sécurité, une bonne habitude

.12.
Vue de près (Intérieur)
A
B
C
D
Panier supérieur
Réglage hauteur panier
Gicleur supérieur
Panier inférieur
E
F
G
H
I
Filtre lavage
Gicleur inférieur
Distributeur produits lavage et rinçage
Bouchon distributeur sel
Caractéristiques techniques
Largeur 60 cm
Profondeur 60 cm
Hauteur 85 cm
Capacité 12 couverts standard
Pression eau alimentation 0.03-0.6MPa
Tension d'alimentation 220-240V~ 50Hz
2150W
Puissance totale absorbée
FR
Troisième gicleur

Sel
Le sel
La quantité de sel dans l'eau varie en fonction du lieu. Plus le
contenu en sels est élevé plus l'eau est dure. Si de l'eau dure
entrait dans le lave-vaisselle, les sels formeraient des incrusta-
tions sur les couverts.
Un adoucisseur qui utilise du sel spécial lave-vaisselle permet
d'éliminer le calcaire présent dans l'eau.
Introduction du sel dans l'adoucisseur
Utilisez toujours du sel spécial pour lave-vaisselle.
Le réservoir à sel est situé sous le panier inférieur et doit être
rempli comme suit:
- Sortez le panier inférieur, dévissez et enlevez le bouchon du
réservoir.
- Si vous approvisionnez le réservoir pour la première fois,
remplissez le d'eau.
- A l'aide de l'entonnoir fourni introduisez environ 2 Kg de sel. Il
est normal qu'un peu d'eau déborde du réservoir.
- Revissez soigneusement le bouchon.
Le réservoir à sel doit être rempli dès que le voyant lumineux
"manque de sel" (se trouve sur le bandeau de commande)
s'allume.
Pour éviter toute formation de rouille, nous conseillons
d'approvisionner en sel juste avant de démarrer un cycle de
lavage.
Réglage de la consommation en sel
Ce lave-vaisselle prévoit un réglage modulable de la
consommation en sel selon la dureté de l'eau. Ceci permet
d'optimiser et de personnaliser la consommation en sel qui est
réduite à son niveau minimal indispensable.
Les Services Locaux de Distribution des eaux peuvent vous
préciser le degrée de dureté de votre eau.Pour le réglage,
procédez comme suit:
- Dévissez le bouchon du réservoir à sel;
- Une flèche est située sur le collier du réservoir ( voir fig.), si
nécessaire, tournez, dans le sens inverse des aigu illes d'une
montre, la flèche du signe "-", vers le signe "+" selon la dureté
de l'eau d'alimentation.
Nous conseillons de procéder au réglage suivant
.13. FR
Dureté de l'eau
çÇe mmo/l Positi-on
sélect-eur
Consomma-
tion sel
(grammes/-
cycle)
Autono-mie
(cycles/2kg)
010 MNT MNIT
NIUQIQ
NUQQ
NMOR
ORRM QRUV QIRUIV
[UV
[RM [UIV
L
=?J?
jba
L
M
OM
QM
SM
?H?
SM
QM
OR
çfH

.14.
FR
Produits lavage et rinçage
Le détergent
N'utilisez que du détergent spécial lave-vaisselle. II faut introduire
le détergent avant le démarrage de chaque cycle de lavage
suivant les indications fournies dans le "Tableau cycles de
lavage". Le distributeur à détergent se trouve à l'intérieur de la
prote.
Introduction du détergent
Pour ouvir le couvercle "A" appuyez sur la touché "B". Le
détergent pour le lavage doit être placé dans le bac "C". Après
avoir versé le détergent, fermez le couvercle en appuyant à fond
jusqu'au déclic.
Attention: pour simplifier l'accrochage du couvercle,
éliminez, avant la fermeture, tous les résidus de détergent
sur les bords du bac.
Le produit de rinçage
Ce produit rend les couverts plus brilliants et améliore leur
séchage. Le réservoir à produit de rinçage est situé à l'intérieur
de la porte; il faut le remplir tous les 80 lavages environ (pour
les modèles dotés d'indicateur lumineux manque de produit de
rinçage, il faut le remplir quand le voyant correspond s'allume).
Inroduction du produit de rinçage.
Pour ouvrir le distributeur, tournez le bouchon "C" dans le sens
inverse des aiguilles d'une montre et évitez tout débordement.
Pour régler la quantité de produit débitée agissez avec un
tournevis sur le régulateur "F" situé sous le couvercle "C". 6
positions sont possibles, normalement il est taré sur 3.
Important:
Le r
é
glage du d
é
bit du produit de rin
ç
age permet d'am
é
liorer le
s
é
chage.
S'il reste des gouttes d'eau ou des taches, il faut tourner le
r
é
gulateur vers les chiffres plus
é
lev
é
s. Si les couverts lav
é
s
ont des rainures blanches, tournez le r
é
gulateur vers les chiffres
plus bas.
C
C
F
Lavage prolongé
Prélavage
C
B
A

.15. FR
Rangement des couverts
Avant de ranger la vaisselle dans les panniers, éliminez les
déchets les plus gros pour éviter de boucher les filtre ce qui
réduirait l'efficacité du lavage.
Si vos casseroles et vos poêles sont très incrustées, nous vous
conseillons de les mettre tremper avant leur lavage.
Vous éviterez ainsi des lavages supplémentaires.
Sortez les panniers pour faciliter les opérations de rangement
de la vaisselle.
Comment utiliser le panier inférieur
Nous vous conseillons de ranger dans le panier inférieur la
vaisselle la plus difficille :
Casseroles, couvercles, assiettes plates et creuses comme
illustré dans les figures à droite.
Rangez les plats et les grands couvercles de préférence sur les
côtés du panier, en veillant à ne pas bloquer la rotation du gicleur
supérieur.
casseroles, saladiers etc. doivent toujours être rangés sens
dessus dessous.
- les pièces de vaisselle très creuses doivent être placées
en biais pour permettre à l'eau de s'écouler.
- le panier à couverts peut être séparé en deux (voir Fig. A)
afin de n'en utiliser qu'une partie quand il y a peu de couverts
à laver ; vous aurez ainsi plus de place pour vos casseroles et
vous pourrez aussi le placer dans panier supérieur.
- les couverts doivent être rangés, manches tournés vers le bas;
si le panier est doté de rangements latéraux, les petites cuillères
doivent être rangées une par une dans les fentes
correspondantes.
Les couverts très longs doivent être placés à plat à l'avant du
panier supérieur.
Comment utiliser le panier supérieur
Le panier supérieur est indiqué pour le rangement de la vaisselle
fragile et légère comme verres, tasses à thé et à café, soucoupes,
mais aussi assiettes, saladiers bas, poêles et casseroles basses
peu sales.
- Rangez les pièces de vaisselle légères de manière à ce qu'elles
ne puissent pas être déplacées par les jets d'eau. Il est
possible de régler le panier en hauteur à l'aide des dispositifs
placés sur les côtés mêmes du panier (voir Fig.B)
panier inférieur panier supérieur
Chargement 12 couvers standard
Fig.A Fig.B
12
34

.16.
Mise en service
Pour démarrer un programme de lavage.....
Après avoir effectué toutes les opérations indiquées dans les
paragraphes précédents et après avoir complètement ouvert le
robinet de l'eau, appuyez sur le bouton ON-OFF 'A' situé sur le
bandeau ; le voyant 'B' s'allumera.La machine est à présent sous
tension mais il faut attendre quelques seconds avant de com-
mencer à la programmer.
Pour annuler ou modifier un programme en cours.....
Avis : un programme en cours ne peut être modifiéque s'il a
démarrédepuis peu car la machine risque d'avoir déjà prélevé
le détergent et d'avoir même évacué l'eau de lavage, dans ce
cas il faut rajouter du détergent (voir paragraphe 'chargement
du détergent').
Pour modifier un programme en cours, appuyez sur le bouton
ON-OFF 'A' et toutes les programmations ont été annulées.
Avis : après avoir sélectionné le programme de lavage comme
indiqué dans le paragraphe 'Mise en marche et programmation...
' vous pouvez programmer le départ différé.
En appuyant sur le bouton 'E' (voir vue de près 'tableau de bord')
vous pouvez différer le démarrange d'un cycle de lavage de 1 à
12 heures. A chaque pression sur le bouton, l'écran 'F' affichera
successivement les heures de retard choisissez le temps préféré.
En branchant la machine à l'aide de la touche 'I', vous entendrez
un bref signal sonor et l'affichage des heures de retard
programmées pour indiquer que le compte à rebours du délai
d'attente a commencé.
Au bout du délai d'attente programmé, le cycle démarrera.
Bouton '1/2 CHARGE'
Ce bouton (voir 'vue de près tableau de bord' à la lettre 'C') permet
de laver uniquement au niveau du panier supérieur s'il n'y a pas
suffisamment de vaisselle pour effectuer un chargement complet.
Vous ferez ainsi des économies d'eau et d'électricité. Il peut être
utilisé avant la programmation de n'importe que cycle de lavage,
exclusion faite du cycle de lavage intensif ou énergique (s'il est
prévu dans le tableau des programmes). Seule condition : réduire
de moitié la quantité de détergent prévue pour le programme
choisi.
a) pendant le délai d'attente, il vaut mieux ne rien modifier. En
cas de besoin, annulez la programmation en appuyant sur la
touche ON-OFF 'A' : un bip signalera que toutes les
programmations ont été annulées.Rvpétez les opérations de
'programmation départ différé du lave-vaisselle' et de 'mise
en marche et programmation' en suivant les instructions
contenues dans les paragraphes correspondants.
b) Si, au cours du délai d'attente, vous ouvrez la porte, le comptre
à rebours s'interrompra et ne repartira que quand vous
fermerez la porte.
Voyants déroulement du cycle
Le lave-vaisselle est équipé de voyants 'H' qui s'allument au fur
et à mesure que la machine procède à la phase de lavage qu'ils
indiquent.
En fin de lavage...
La fin du cycle de lavage est signalée par un six bip et par
l'extinction du voyant 'H'. Coupez l'alimentation électrique de la
machine en appuyant sur le bouton ON-OFF ; fermez le robinet
de l'eau et ouvrez la porte. Attendez quelques minutes avant de
sortir votre vaisselle, vous éviterez ainsi de manipuler de la
vaisselle chaude qui casse plus facilement, et vous obtiendrez
un meilleur séchage.
Mise en marche et programmation.
Sélectionnez le programme désiré en appuyant sur le bouton de
sélection des programmes 'G'. A chaque pression sur le bouton,
les voyants programmes 'H' s'allumeront les uns après les autres.
Choisissez le programme que vous estimez le plus approprié au
type de vaisselle que vous devez laver (consultez, surtout au
début, le tableau des programmes que vous trouverez dans ce
mode d'emploi).
Appuyez sur le bouton de Démarrange/Remise à zéro 'I'. Au
bout de quelques seconds, un bref signal sonore vous indiquera
que le cycle de lavage a démarré et que vous ne pouvez plus le
modifier. En cas de besoin, consultez le paragraphe 'Annulation
ou modification d'un programme en cours'.
NOTE :
Boutons modificateurs de programme
Programmation départ différé du lave-vaisselle
FR
Si vous avez oublié d'introduire de la vaisselle....
Vous pouvez interrompre le cycle de lavage en appuyant sur le
bouton ON-OFF. Introduisez la vaisselle et dès allumage de la
machine, le cycle repartira de l'endroit où il a été interrompu.

.17.
- Faites travailler la machine à plein chargement si possible pour
optimiser la consommation d'eau et d'électricité ; pour éviter
qu'il se forme, entre-temps, de mauvaises odeurs et des
incrustations, vous pouvez utiliser le cycle trempage.
- Choisissez le programme approprié : le choix du programme
dépend du type de vaisselle et de son degré de salissure.
Quelques conseils pour faire des économies
- Utilisez une juste dose de détergent : si vous exagérez, non
seulement vous n'obtiendrez pas des couverts plus propres
mais vous polluerez un peu plus l'environnement.
- Inutile de rincer les couverts avant de les ranger dans la machine.
Comment garder votre lave-vaisselle en forme
Après chaque lavage
Après chaque lavage, fermez le robinet de l'eau et laissez la
pote entrebaillée pour éviter la formation d'humiditéet de
mauvaises odeurs.
Débranchez la fiche
Avant toute opération d'entretien ou de nettoyage, débranchez
la fiche de la prise : vous ne risquerez ainsi aucun danger.
Ni solvants ni abrasifs
Pour nettoyer l'extérieur et les parties en caoutchouc du lave-
vaisselle, n'utilisez ni solvants ni abrasifs mais uniquement un
chiffon imbibé d'eau tiède savonneuse.
Pour éliminer toute tache sur la surface de la cuve, utilisez un
chifffon imbibé d'eau et de vinaigre blanc ou un produit de
nettoyage spécial lave-vaisselle.
En cas de déménagement
En cas de déménagement, essayez de garder l'appareil le plus
possible à la verticale ; si nécessaire, inclinez-le vers l'arrière.
Les joints
L'un des facteurs responsables de la stagnation des mauvaises
odeurs à l'intérieur du lave-vaisselle est représenté par les
déchets d'aliments qui se nichent dans les joints. Il suffira de
nettoyer périodiquement ces derniers à l'aide d'une éponge
mouillée.
Si vous partez en vacances
Quand vous partez en vacances, il est counseillé d'effectuer un
lavage à vide, après quoi débranchez la fiche, fermez le robinet
de l'eau et laissez la porte entrebaillée : les joints dureront plus
longtemps et vous éviterez la formation de mauvaises odeurs.
FR

Indications pour le choix
des programmes Description du cycle Détergent
lavage Produit de
rinçage
Lavage
intensif
Lavage
Rapide
Trempage
Vaisselle et casseroles
normalement sales sans
résidus secs.
Vaisselle et casseroles
normalement sales.
(déconsillépourlavaisselle
délicate).
Cycle économique et
rapide à utiliser pour de
la vaisselle peu sale
immédiatement après
l'emploi. Sans séchage.
Lavage préliminaire de
casseroles et de couverts
dans l'attente de
compléter le chargement
au repas suivant.
Prélavage eau froide.
Lavage prolongé à 50 °C.
Rinçage eau froide.
Rinçage chaud.
Séchage
Lavage bref à 40 °C.
Rinçage froid.
Lavage bref et froid pour
empêcher que les résidus
ne sèchent sur la
vaisselle.
15g
Prélavage eau froide.
Lavage prolongé à 70 °C.
Rinçage eau froide.
Rinçage chaud.
Séchage .
30g
Programme
Tableau programmes
.18.
FR
Lavage Normal
(IEC-EN 50242)
Prélavage:5g
Lavage prolongé:
25g
( 5 )
Other manuals for LP 800 S
2
Table of contents
Languages:
Other Teka Dishwasher manuals

Teka
Teka LP9 850 VR01 User manual

Teka
Teka DW8 57 FI VR02 User manual

Teka
Teka LCZ 837 User manual

Teka
Teka DW8 41 FI User manual

Teka
Teka Dishwasher User manual

Teka
Teka LP 400 User manual

Teka
Teka DW6 42 FI User manual

Teka
Teka LP2 140 User manual

Teka
Teka LP8 440 VR02 User manual

Teka
Teka DW7 56 FI User manual