Teka LX710 User manual

LX 710
ÿÿ孙宏
28
9
1
1

Code: 0120505911
1
2
3
4
5
6
7
Use and Maintenance Manual
Manual de Uso y Mantenimiento
Manual de Utilização e Manutenção
LX 710

1
Index
Safety information
Installation
Getting to know your dishwasher
How to fill the salt
How to fill rinse aid
How to fill the detergent dispenser
Not suitable for the dishwasher
Arranging crockery, glasses, etc. in the dishwasher
Programme overview
Washing dishes
How to keep your dishwasher in shape
Care and maintenance
Fault finding
Technical data
Important information
2
4
7
8
10
11
12
13
15
17
19
20
21
25
25
en

2
Safety information
The dishwasher must only be used by adults for the washing of household dishes and cooking utensils.
This appliance cannot be installed outdoor, not even if the area in which it is installed is covered by a
roof; it is also very dangerous to leave it exposed to the rain and elements.
Do not place any heavy objects or stand on the door when it is open. The appliance could tip forward.
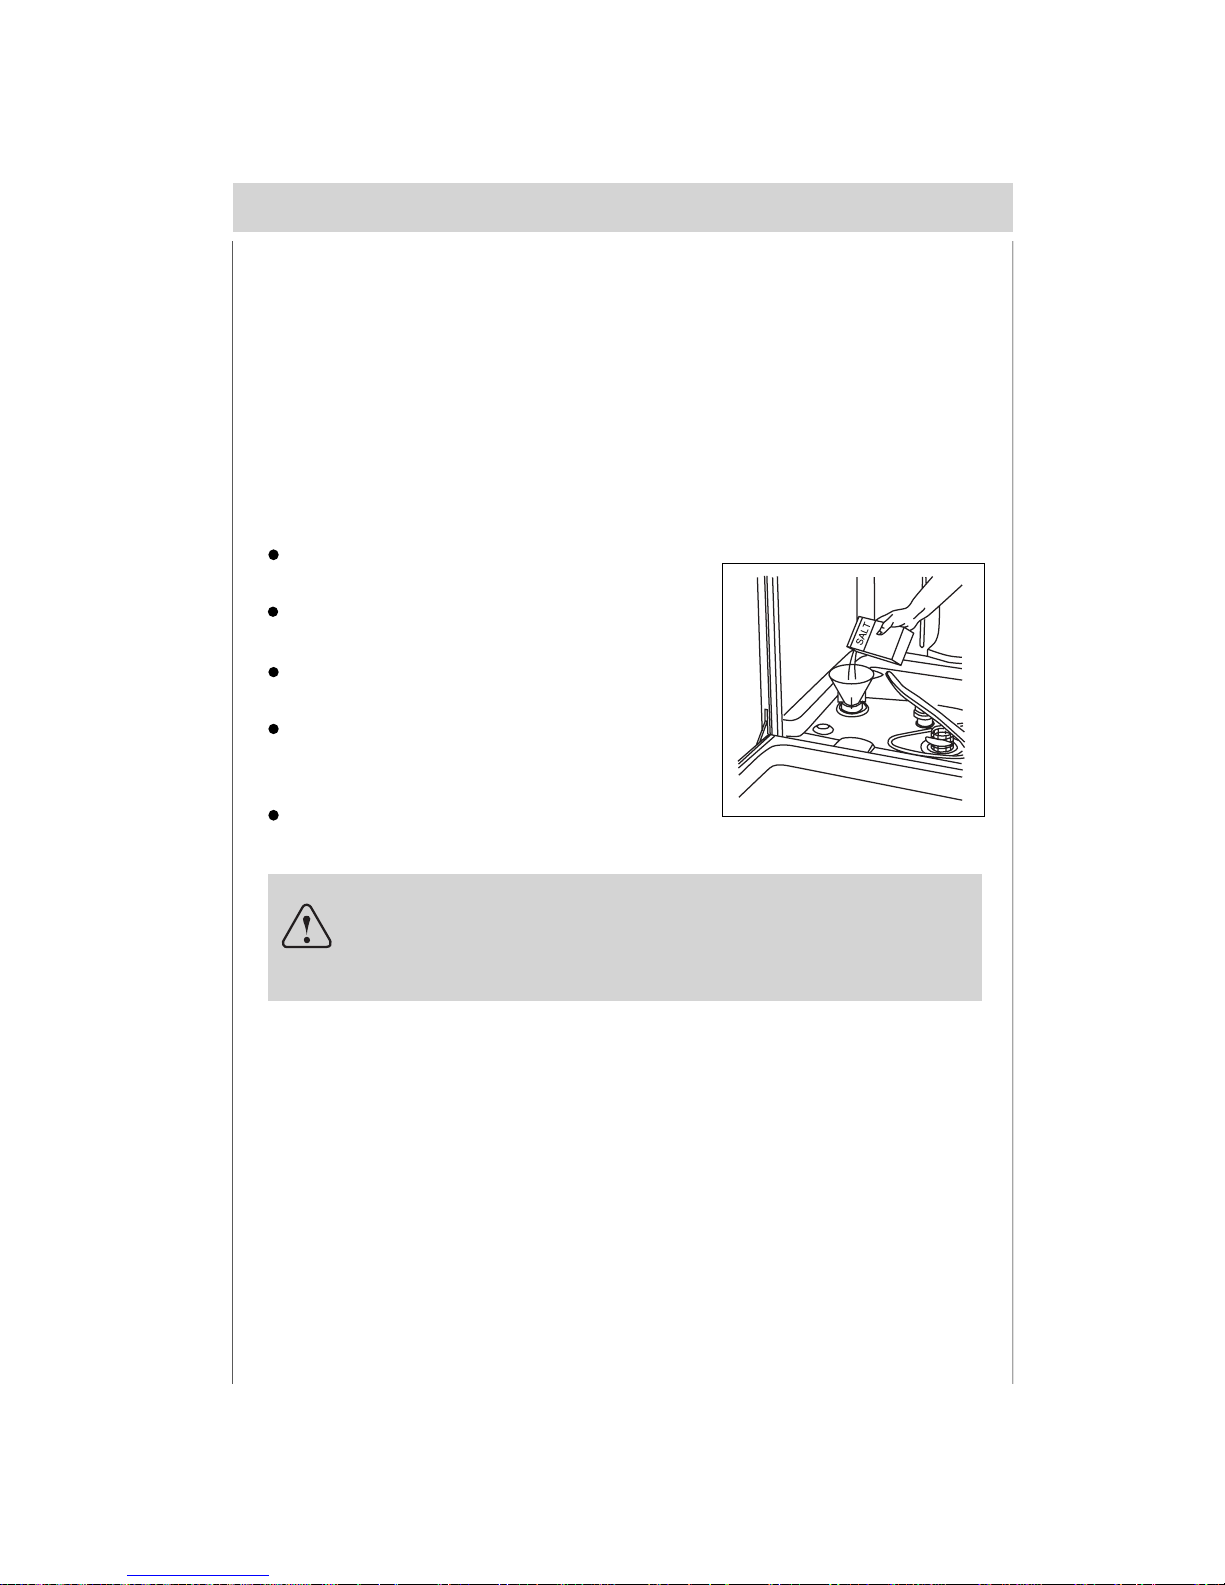
The water inside the dishwasher is not suitable for drinking.
Do not use solvents of any kind inside your dishwasher. They could cause an explosion danger.
Open the door very carefully if the dishwasher is operating. There is a risk of water squirting out.
During normal use
Do not touch the heating element during or after a wash cycle.
Fundamental rules to follow when using the appliance:
- Never touch the dishwasher when barefoot or with wet hands or feet;
- We discourage the use of extension cords and multiple sockets;
- If the appliance is not operating properly or maintenance must be performed, disconnect the
appliance from the power supply.
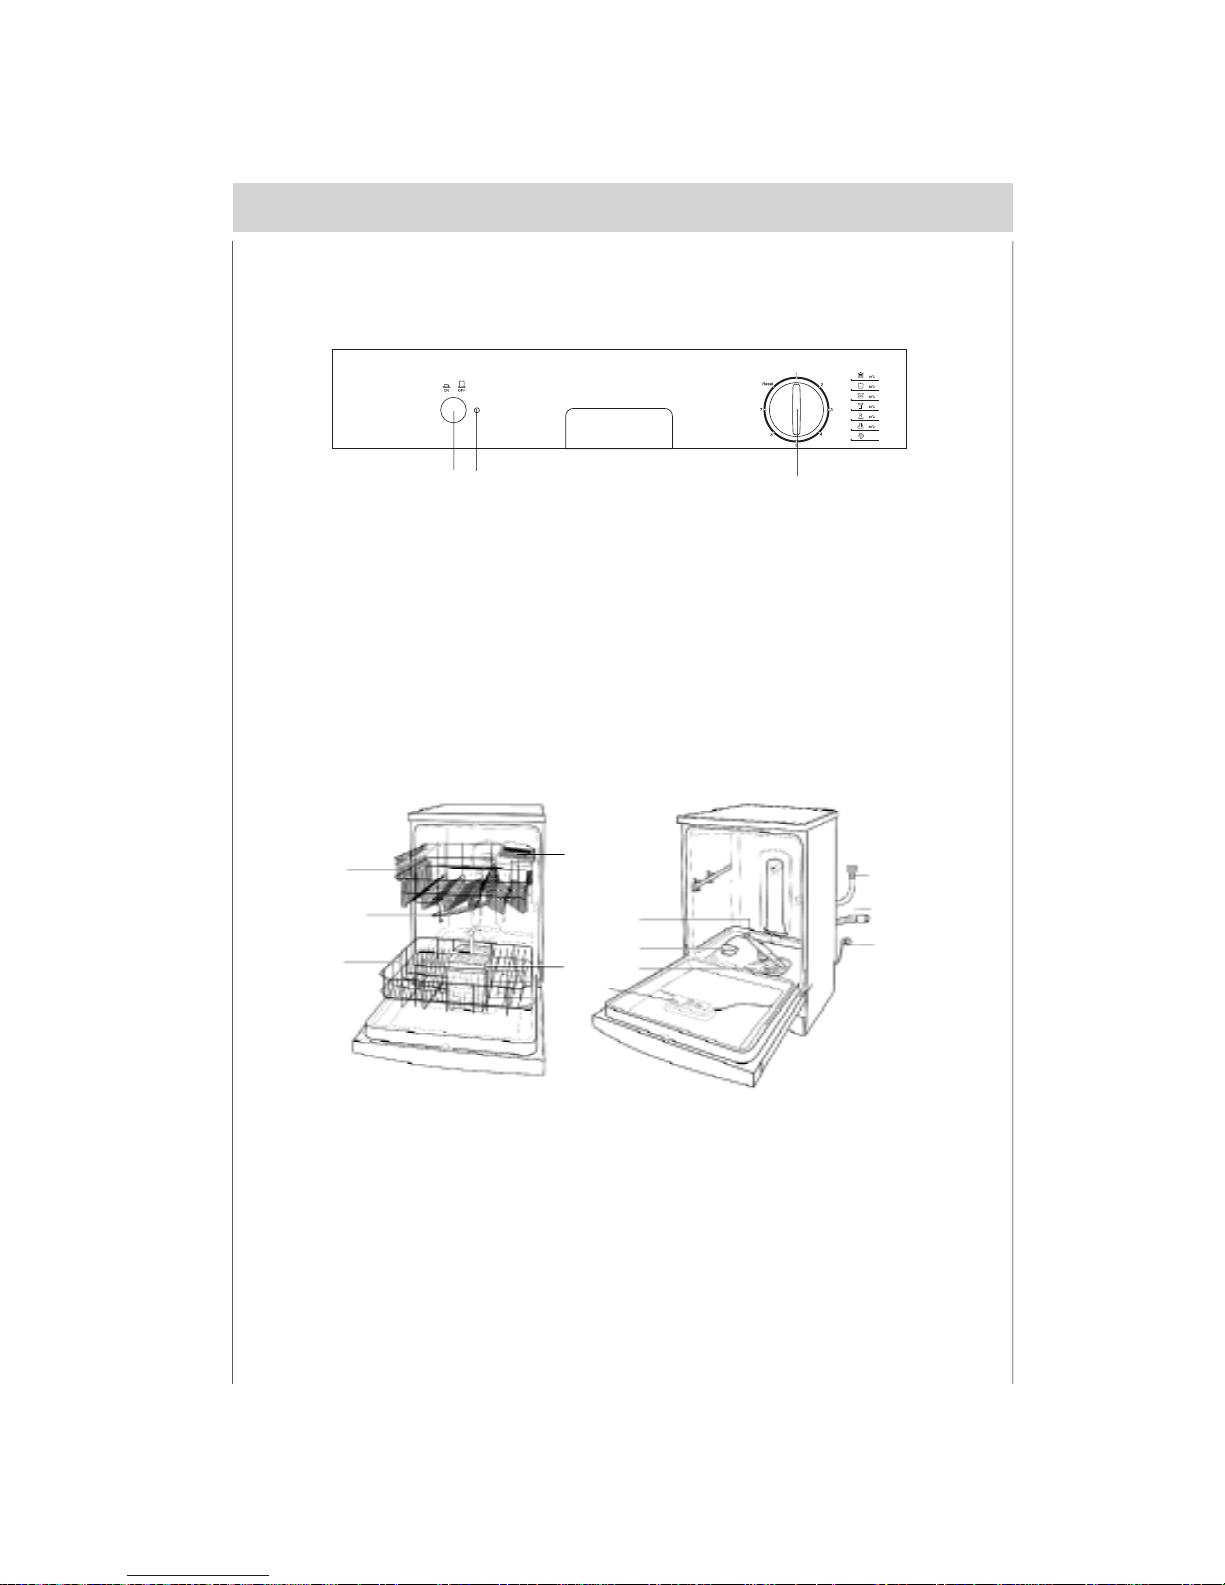
Place the dishwasher and connect it up in accordance with the installation instructions.
The dishwasher must not be connected to the electricity supply while installation is being carried out.
Ensure that the domestic wiring is properly earthed.
The mains electricity supply must conform to the details shown on the dishwasher nameplate.
Do not connect the dishwasher to the electricity supply via an extension cable.
Built-under and built-in appliances should always be installed under a continuous work surface which
is attached to the adjacent cupboards, in order to ensure that the appliance is entirely stable.
After the appliance has been installed,the mains plug should still be easily accessible.
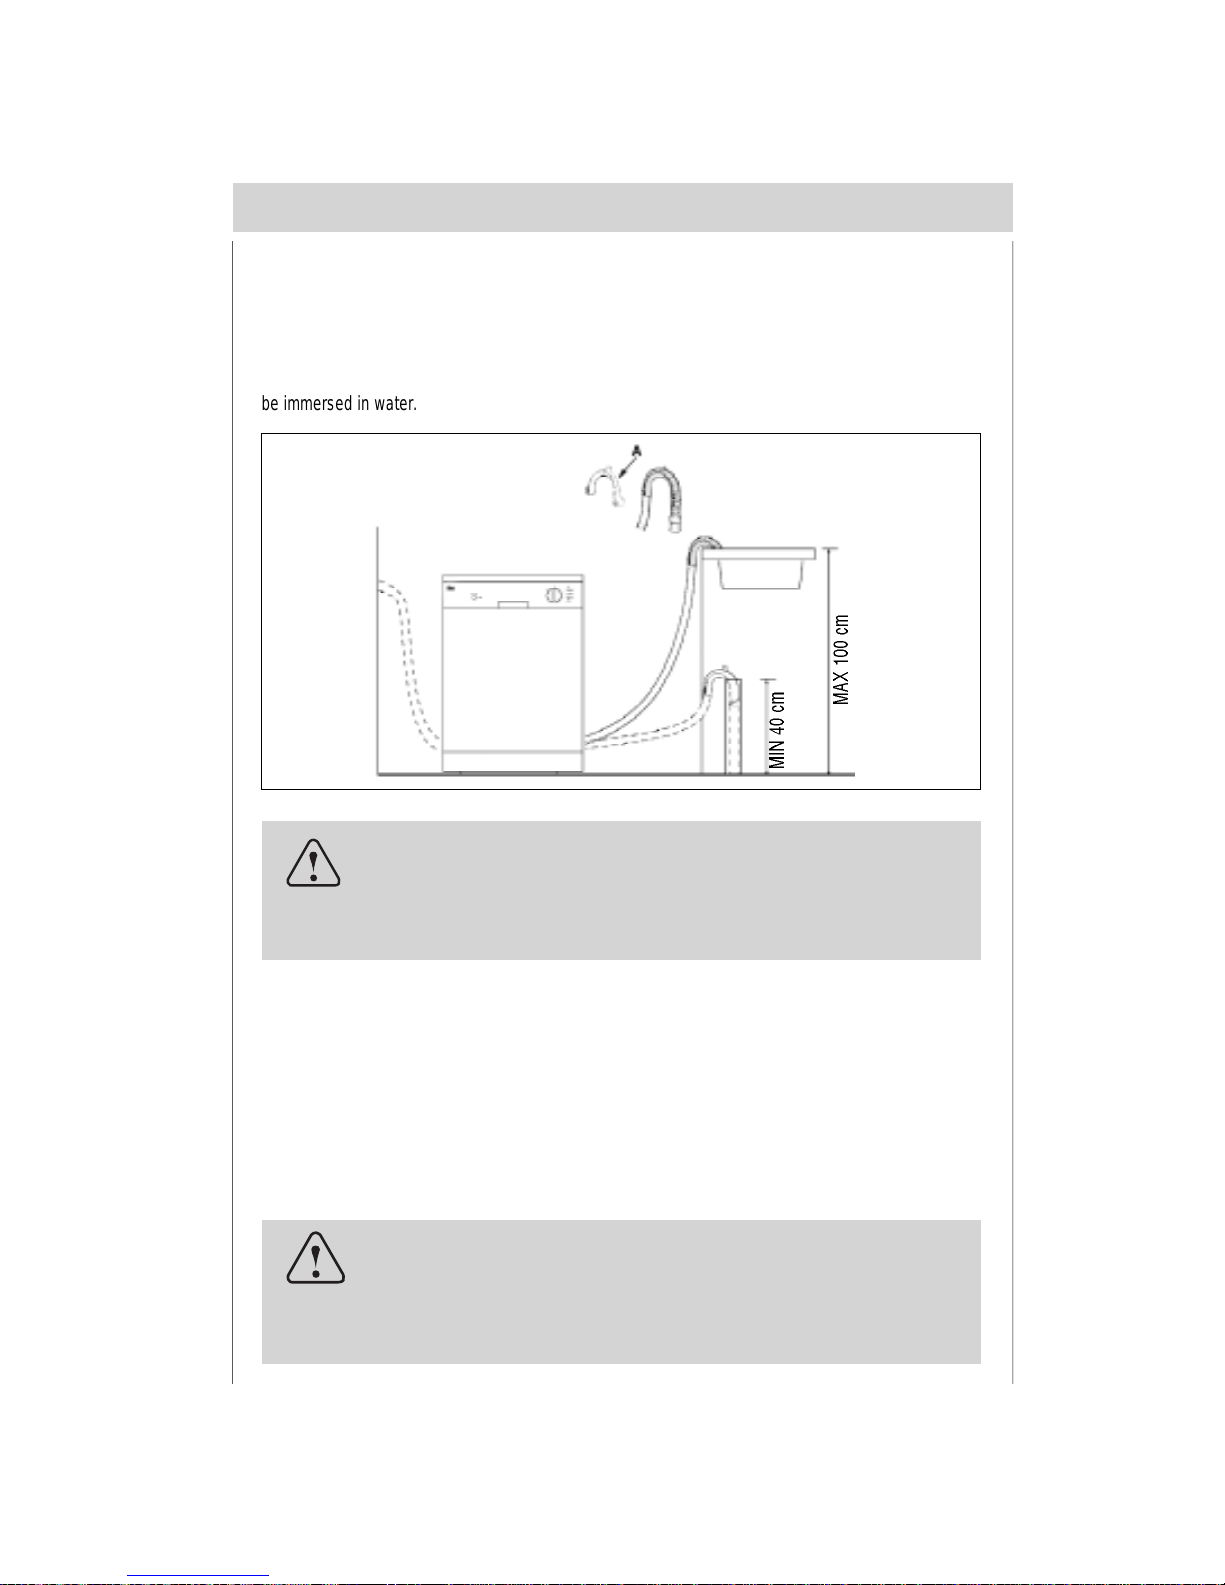
The plastic housing on the water inlet contains an electrically operated valve.The connecting wires
are inside the inlet hose.Do not cut through this hose and do not immerse the plastic housing in water.
During installation, the power supply cord must not be excessively or dangerously bent or flattened.
During installation
For Switzerland only:
There are no restrictions on installing the appliance between wooden or plastic walls as part of a fitted
kitchen. If the appliance is not plugged into a wall socket, it must be connected to the mains via a
separator for all poles within the domestic wiring system. This device must have a gap of at least 3mm
between open contacts, in order to conform with relevant safety regulations.
At time of delivery
Check packaging and dishwasher immediately for signs of transport damage. If the appliance is
damaged, do not put it into use but contact your supplier or customer service without delay.
Please dispose of packaging materials properly.
en

3
Dangerous voltage
If your family includes children
This appliance is not intended for use by persons (including children) with reduced physical,sensory
or mental capcabilities, or lack of experience and knowledge,unless they have been given supervi-
sion or instruction concerning use of the appliance by a person responsible for their safety.
Children should be supervised to ensure that they to not play with the appliance.
Keep detergents out of the reach of children, who must also be kept away from the dishwasher when
it is open.
If a fault occurs
If the appliance malfunctions, turn off water supply to the appliance and disconnect the plug from the
wall socket. Then, consult the section entitled, "Fault finding" .If you cannot solve the problem, con-
tact a service center.
Only specialised personnel are authorised to make repairs.
If the supply cord is damaged ,it must be replaced by the manufacture ,its service agent of similarly
qualified persons in order to avoid a hazard.
To maintain the EFFICIENCY and SAFETY of this appliance,we recommend:
- call only the Service Centers authorized by the manufacturer.
- always use original Spare Parts.
When disposing of old appliances
Appliances which are no longer being used must be made inoperable by cutting the power supply
cord and removing the door lock.
Take the appliance to a designated waste disposal center.
en
Warning
Children could get locked in the appliance (risk of suffocation)
or get stuck in other positions. Therefore: Remove the mains
plug, cut the mains wire and set aside. Damage the door lock so
that the door can no longer be closed.

4
Cold water connection
Connect the water supply hose to a threaded 3/4 (gas) connector,
making sure that it is fastened tightly in place (see fig.A).
If the water pipes are new or have not been used for an extended
period of time, let the water run to make sure that the water is
clear and free of impurities. If this precaution is not taken, there
is a risk that the water inlet can get blocked and damage the
appliance.
Positioning the appliance
Positioning the appliance in the desired location. The back should rest against the wall behind it, and the
sides, along the adjacent cabinets or wall. The dishwasher is equipped with water supply and drain
hoses that can be positioned to the right or the left to facilitate proper installation.
fig.A
Levelling the appliance
Once the appliance is positioned, adjust the feet (screwing them in or out) to adjust the dishwasher,
making it level. In any case, the appliance should not be inclined more than 2˚. If the appliance is level, it
will help ensure proper performance.
Installation
en
Warning
The appliance is to be connected to the water mains using new hose-
sets and that old hose-sets should not be reused.

5
Drain hose connection
Insert the drain hose into a drain pipe with a minimum diameter of 4cm, or let it run into the sink, making
sure to avoid bending or crimping it. If necessary, fit a syphon trap (U-bend) with a connecting piece for
the drain hose (fig.B). The free end of the hose must be at a height between 40and 100 cm and must not
be immersed in water.
fig.B
Electrical Connection
After making sure that the voltage and frequency values for the current in the home correspond to those
on the rating plate (located on the stainless steel inner door of the appliance) and that the electrical
system is correct for the maximum voltage on the rating plate, insert the plug into an electrical socket
which is earthed properly (the earthing of the appliance is a safety requirement mandated by law).
If the electrical socket to which the appliance must be connected is not appropriate for the plug, replace
the whole cable, rather than using adaptors or the like as they could cause overheating and burns.
en
Attention:
The connecting piece for syphon trap (U-bend) must be solidly
fastened to the wall to prevent the drain hose from moving and
allowing water to spill outside the drain.
Caution:
The dishwasher plug must be accessible even when the appli-
ance is installed as a built-in unit so that maintenance can be
done safely.

ELECTRICAL CONNECTION (UK ONLY)
For your safety please read the following information.
Warning: This appliance must be earthed.
The appliance must be connected to a 220-240 volts 50 cycle AC supply by means of a three pin socket,
suitably earthed and should be protected by a 13 amp fuse in the plug or a 15 amp fuse in the consumer
unit.
The appliance is supplied with a moulded 13 amp 3 pin mains plug fitted with a 13 amp fuse. Should the
fuse require replacement, it must be replaced with a fuse rated at 13 amp and approved to BS1362.
The plug contains a removable fuse cover that must be refitted when the fuse is replaced. In the event of
the fuse cover being lost or damaged, the plug must not be used until a replacement cover has been
obtained.
If the moulded mains plug is unsuitable for the socket outlet in your home or is removed for any other
reason, then the fuse should be removed and the cut off plug disposed of safely to prevent the hazard of
electric shock.
There is a danger of electric shock if the cut off plug is inserted into any 13 amp socket outlet.
Caution:
The dishwasher plug must be accessible even when the appliance is installed as a built-in unit so that
maintence can be done safety.
en
6

Getting to know your dishwasher
Close-up view (control panel)
7
Upper Rack
Detergent and Rinse Aid Dispenser
a
b
c
d
e
f
g
h
i
j
k
l
Top Spray Arm
Salt Container Cap
Silverware Basket
Bottom Spray Arm
Washing Filter
Water Inlet Hose
Drain Hose
Power Supply Cord
Lower Rack
Knife Rack
Dishwasher interior
AC
CA
B
“ON-OFF” Button Knob For Selecting Cycle
B
State Indicator
a
e
f
g
i
b
c
j
k
l
h
d
en
1
2
3
4
5
6
7

Salt
The hardness of the water varies from place to place. If hard water is used in the dishwasher, deposits
will form on the dishes and utensils.
The appliance is equipped with a special softener that uses a salt specifically designed to eliminate lime
and minerals from the water.
According to the “Water Hardness Tabel”, you can calcu-
late the time of use, then load the salt .
Remove the lower rack and then unscrew and remove
the cap from the salt container.
If you are filling the container for the first time, fill it with
water.
Place the end of the funnel (supplied) into the hole and
introduce about 2 kg of salt. It is normal for a small amount
of water to come out of the salt container.
Carefully screw the cap back on.
How to fill the salt
Loading the salt into the container
Always use salt intended for use with dishwashers.
The salt container is located beneath the lower rack and should be filled as follows:
8
en
Important
To prevent the formation of rust, load the salt just before beginning a
wash cycle.

Adjusting salt consumption
The dishwasher is designed to allow for adjusting the amount
of salt consumed based on the hardness of the water used.
This is intended to optimize and customize the level of salt
consumption so that it remains at a minimum.
To adjust salt consumption, proceed as follows:
Unscrew the cap from the salt container;
There is a ring on the container with an arrow on it (see
figure to the side),
If necessary, rotate the ring in an anticlockwise direction
from the "-" setting towards the "+" sign, based on the
hardness of the water being used.
It is recommended that adjustments be made in accordance with the following table:
9
Water Hardness
Clarke
degrees
ºdH
mmol/l Selector
position Salt
consumption
(Grams/cycle) Autonomy
(cycles/2kg)
0-14 0-17 0-1,7
1,8-4,418-4414-36
36-71 45-89 4,5-8,9
>89>71 >8,9
/
"-"
Middle
/
0
20
40
60
"+"
60
40
25
Level
1
2
3
4
en

Rinse aid
This product makes dishes sparkle and helps them to dry without spotting. The dispenser is located on
the inside panel of the door .
Loading the rinse aid
Regardless of the type of detergent dispenser installed on
your appliance, you must proceed as indicated below when
loading the rinse aid.
To open the dispenser, turn the "2"cap in an anti-clockwise
direction and then pour in the rinse aid, making sure not to
overfill. The amount of rinse aid used for each cycle can be
regulated by turning the " 3"dose adjustor, located beneath
the "2"cap, with a screwdriver. There are 6 different settings;
the normal dosage setting is 3.
How to fill rinse aid
1
Low
Full
When the low rinse aid indicator “ 1” is bright, it means the
rinse aid is low, you must load rinse aid .
10
23
en
Important
Proper dosage of the rinse aid improves drying.
If drops of water remain on the dishes or spotting occurs, the dosage adjuster
should be turned to a higher setting.
If the dishes have white streaks, turn the dosage adjuster to a lower setting.

Detergent
Detergent specifically intended for use with dishwashers must
be used. The dispenser must be refilled before the start of
each wash cycle following the instructions provided in the
"Programme overview". The detergent dispenser is located on
the inside panel of the door.
Loading the detergent
Notice:
To facilitate closing the cover, remove any excess detergent on
the edges of the dispenser.
5
4
To open the " 4 "cover on the dispenser, press the " 5 "
button.
The detergent for the wash cycle should be poured into
the " 6 "compartment.
The detergent for the pre-wash cycle should be poured
into the “ 7 ”compartment.
After the detergent has been placed in the dispenser,
close the cover and press down until it clicks in place.
6
7
How to fill the detergent dispenser
en
Notice:
The usage of 3 in 1 or similar tablets is forbidden when Rapid Wash
Heat wash and Soak programmes are selected.
11
Warning
Do not place the tablets in the tub or the cutlery basket as this will result in
poorer wash results. The tablets should be placed in the detergent doser.

Not suitable for the dishwasher
What you should not put into the dishwasher
Cutlery and tableware manufactured in whole or part from wood.They become faded and unsightly in
appearance.Furthermore,the adhesives that are used are not suitable for the temperature that occur
inside the dishwasher.Delicate decorative glassware and vases,special antique or irreplaceable china.
The decorative patterns on such items will not be dishwasher-proof.
Plastic objects that are not resistant to hot water, copper and pewter utensils are also not suitable.
Decorative patterns printed or painted onto the surface of crockery, glasses, etc.,aluminium and silver
items tend to become discolouredor faded if washed in the diswasher. Some types of glass can become
opaque in appearance after they have been washed many times in a dishwasher. Highly absorbent
materials, such as sponges and towels,should never be placed in the dishwasher.
Our recommendation
In future, only purchase table or kitchenware that has been confirmed as being dishwasher-proof.
Damage to glassware and other dishes
Possible causes
type of glass or manufacturing process
chemical composition of detergent
water temperature and duration of dishwasher programme.
Use glassware or porcelain dishes that have been marked ‘dishwasher-proof’ by the manufacture.
Use a mild detergent that is described as ‘kind to dishes’. If necessary, seek further information from
detergent manufacturers.
Select a programme with a low temperature and a short duration as possible.
To prevent damage, take glass and cutlery out of the dishwasher as soon as possible after the
programme has ended.
Suggested remedy
12
en
Important
Dishes or cutlery that have been soiled by tobacco ash, wax,
Iubricating grease or paint, should not be put in the dishwasher.

Arranging crockery, glasses, etc. in the dishwasher
Before placing the dishes in the dishwasher, remove larger food particles to prevent the filter from be-
coming clogged, which results in reduced performance.
If the pots and pans have baked-on food that is extremely hard to remove, we recommend that they are
soaked before washed. This will eliminate the need for extra wash cycles.
Pull out the rack to load the dishwasher.
13
fig.C
Normal daily load
en
Warning
knives and other utensils with sharp points must be loaded in the
basket with their points down or placed in a horizontal position.
How to use the lower rack
We recommend that you place the most difficult to clean items
on the bottom rack: pots, pans, lids, serving dishes and bowls,
as shown in the figure to the right.
It is preferableto place serving dishes and lids on the sides of the
racks in order to avoid blocking the rotation of the top spray arm.
Pots, serving bowls, etc. must always be placed face down.
(see fig.C)
Deep pots should be slanted to allow the water to flow out.
Silverware should be placed in the silverware basket with
the handles at the bottom; if the rack has side baskets, the
spoons should be located individually into the appropriate
slots. Especially long utensils should be placed in the hori-
zontal position at the front of the upper rack.(see fig.D)
The silverware basket can be doubled (see fig.D)so that
only one section may be used when the silverware load is
light. This also makes space for additional pots and pans
and it can also be placed in the upper rack.
Ⅰ Ⅱ
Ⅲ Ⅳ
Ⅴ

fig.E
fig.F
14
Shelf
Lean tall glasses and those with long stems against the shelf-
not against other items to be washed.
Place glasses, cups and small bowls on the additional cup rack.
The additional cup rack can be swivelled in or out as required
(see fig.E).
Knife rack
The knife rack clips onto the side of the top basket, giving you
the freedom to wash your large sharp knives separately and
out of harm’s way (see fig.F).
en
The upper rack is designed to hold more delicate and lighter
dishware, such as glasses, cups and saucers, plates, small
bowls and shallow pans (as long as they are not too dirty).
How to use the upper rack
fig.D
Adjust the upper basket to the higher level and you have
more space to accommodate those taller pans and trays in
the bottom basket.
Position the dishes and cookware so that they do not get
moved by the spray of water.
The upper rack can be adjusted for heightby using the knobs
located on both sides of the rack itself (see fig.D).

15
en
Programme overview
Wash
programme
Type of
crokery e.g.
china, pots/
pans,
cutlery,
glasses, etc
Amount of
food
remains Description of cycle
Condi-
tion of
food
remains
Pre-wash with warm water.
Extended wash at 70°C.
Rinses with cold water.
Rinse with hot water.
Drying.
Pre-wash use cold water.
Extended wash at 55°C.
Rinse with cold water.
Rinse with hot water.
Drying.
Short wash at 40°C.
Cold rinse.
Short cold wash to pre-
vent food residue from
drying on the dishes .
Pre-wash use cold water.
Extended wash at 50°C.
Rinse with cold water.
Rinse with hot water.
Drying.
Wash at 45°C.
Rinse with warm water.
Hot rinse.
Drying.
Soups,
casseroles,
sauces,
potatoes,
pasts, rice,
eggs, roast or
fried food.
a lot
a little
stuck
on hard
Soups,
potatoes,
pasta, rice,
eggs, roast or
fried food.
loosely
attached
Coffee,cakes,
milk, sausage,
cold drinks,
salads
Very little loosely
attached
Rinse off if the dishes have been
stacked for several days in the dish-
washer prior to washing.
Type of
food
remains
Non-
delicate
Mixed
Intensive
Wash
Normal
Wash
Light Wash
Glass ware
Soak
Rapid wash
Heat wash
Hot rinse at 65°C.
Drying.
For dishes that need to be rinsed
and dried only.

16
en
Detergent Rinse Aid Duration in
minutes
Energy
consump-
tion in kWh
Water
consump-
tion in litres
112
102
162
92
32
54
12
1.62
1.24
1.05
1.12
0.40
0.50
0.02
18
16
15
12
9
5
3
Prewash
5g
5g
5g
Extended
Wash
25g
25g
25g
15g
15g
15g

Washing dishes
Programme selection
The most appropriate programme can be identified by comparing the type of crockery, cutlery, etc., as
well as the amount and condition of food remains, with the details contained in the wash cycle table.The
corresponding programme sequence, duration and consumption details are shown in the right half of the
overview. For example:
Use the«normal» programmefor dishes and utensils which have plenty of food remains stuck on hard.
Earn savings
If only a small number of dishes have been loaded into the dishwasher,selecting a programme that
operates at the next lowest temperature will usually be sufficient.
Programme data
The stated programme data are based on standard operating conditions. The values can vary consider-
ably according to:
different amounts of dishes
temperature of mains water supply
pressure of mains water supply
ambient temperature
fluctuations in mains voltage
machine-related factors (e.g. temperature, water volume,...)
17
en
Turning on the Appliance
Starting a wash cycle...
Make sure that the plug for the appliance is inserted into the wall socket.
Make sure that the water supply is turned on to full pressure.
Load the dishwasher .
Pour in the detergent.
Press the ON-OFF button, and the State Indicator will turn on.
Turn the knob located on the right of the control panel until the number or symbol for the cycle setting
is aligued with the refrence mark (see the section entitled, program overview).If the knob rightly
aligned with the refrence mark you want to choose, you must turn the knob to with the mark of
“Reset” .Then back to first step.
After 3 seconds the State Indicator will turn off, the wash cycle will begin.

18
en
A cycle that is underway can only be modified if it has been running for a short time. Otherwise, the
detergent may have already been used, and the appliance may have already drained the wash
water. If this is the case, the detergent dispenser must be refilled (see the paragraph entitled,
"Loading the Detergent").
When the buzzer constantly beeps six times, the State Indicator will turn on and the cycle has finished.
Turnoff theappliance using theON-OFF button,turnoffthe watersupplyandopenthedoor ofthedishwasher.
Wait a few minutes before unloading the dishwasher to avoid handling the dishes and utensils while
they are still hot and more susceptible to breakage. They will also dry better.
Cancelling or modifying a wash cycle setting...
At the end of the wash cycle...
Rotate the knob to the mark of “Reset”,the appliance
will take a few minute drain phase.During this process,
you can select right programme.
Table of contents
Languages:
Other Teka Dishwasher manuals

Teka
Teka LP8 410 VR01 User manual

Teka
Teka LP2 400 User manual

Teka
Teka LP8 700 VR02 User manual

Teka
Teka LP8 840 VR03 User manual

Teka
Teka LP8 810 VR02 User manual

Teka
Teka DW6 42 FI User manual

Teka
Teka LX821 User manual

Teka
Teka DW 455 S User manual

Teka
Teka DW7 41 FI User manual

Teka
Teka LP2 140 User manual

Teka
Teka LP 800 S User manual

Teka
Teka DW8 41 FI User manual

Teka
Teka LP 800 S User manual

Teka
Teka DW8 45 S User manual

Teka
Teka LP 800 S User manual

Teka
Teka DW9 70 FI User manual

Teka
Teka DW7 41 FI User manual

Teka
Teka DW8 57 FI VR02 User manual

Teka
Teka DFI 46950 120/60 User manual

Teka
Teka LP8 440 VR02 User manual