Teka HSB 545 User manual

User Manual
HSB 543 / HSB 545
EN
teka.com

2
User´s guide
ENGLISH
Before using your oven for the first time, please carefully read the installation and
maintenance instructions that come with it.
Depending on the model, the accessories included in your oven may vary from those
shown in the pictures.

English
Description of the oven
1 Control panel
2 Door lock (only for
pyrolytic models)
3 Grill element
4 Tray supports
5 Grid shelf
6 Tray
7 Hinge
8 Inner Glass
9 Air cooling outlet
10 Unit mounting
11 Lamp
12 Back Wall Panel
13 Fan
14 Oven Seal
15 Door
Control panel
1 Function control dial
2 Electric clock/timer
3 Temperature control dial
1 Function control dial
2 Electric clock/timer / Selected temperature
3 Temperature control dial
4 Heating indicator light.
Indicates that the oven is transmitting
heat to the food
1 2 3
HSB 545 Model
1 3 3333334
HSB 543 model
1
10
12
13
14
15
5
6
7
8
3
2
4
9
11
2
User’s Guide 3

User’s Guide
Function selector symbols
Oven functions
OVEN SWITCH-OFF
GRILL
INFORMATION
For a description of how to use each of the
features, see the cooking guide that comes
with your oven.
ECO
DEFROSTING
HSB 5 , HSB 5 Models
CONVENTIONAL
LOWER ELEMENT
TURBO
FAST PREHEATING
LOWER WITH FAN

TIMER CONTROL
Oven use
MODELS WITH TIMER
Manual Operation
1. Turn the timer dial to the left to setting .
2. Select a temperature and a cooking function.
3. Set the controls to the position to turn off
the oven.
Oven Timer Operation
This function allows the cooking time to be
pre-set. To do so:
1. Select a cooking function and temperature.
2. Turn the timer knob clockwise to the “120”
minutes setting and then turn it in the oppo-
site direction to select the cooking time.
3. When the time is up, the alarm will go off and
the oven will stop heating.
4. Set the controls to to turn off the oven.
English
User’s Guide 5

6
User’s Guide
Electronic clock/timer description
1KEYS
, and : Enable you to programme the
electronic clock/timer functions.
: For models with electronic temperature
control, press this button to see the tem-
perature during cooking.
2SYMBOLS
Clock Settings
ALARM: Lights up when the clock/
timer is selected. Generates an acoustic
signal when the time is up. The oven does
not turn off at the end of the timer period.
This function can also be used while the
oven is cooking.
and PROGRAMMING: Light up to indi-
cate that the oven is programmed (cooking
time, stop time or total).
• Cooking Time: This function allows you
to programme the cooking time, after which
the oven will turn off automatically.
• Cooking Stop Time: This setting al-
lows you to programme the time for cook-
ing to stop, after which the oven will turn off
automatically.
• and Cooking Time and Cooking
Stop Time: This setting allows you to pro-
gramme the cooking time and cooking stop
time. The oven switches on automatically
at the set time and operates for the select-
ed cooking time (Cooking Time). It then
switches off automatically at the indicated
time (Cooking Stop Time).
CLOCK/TIMER LOCK: Indicates that the
touch keys for the clock/timer are locked,
preventing modifications by small children.
Other functions
HEATING: Indicates that the oven is trans-
mitting heat to the food.
HYDROCLEAN: Lights up while the Teka
Hydroclean® function is in progress.
PYROLYSIS: For pyrolytic models only.
Lights up while the Pyrolytic function is in
progress.
DOOR LOCK: For pyrolytic models
only. Indicates that the door is locked,
either manually or automatically while the
pyrolytic function is in progress.
WARNING
The sensitivity of the touch keys adapts
continually to environmental conditions.
Make sure the surface of the control panel is
clean and free of obstacles when plugging
in the oven.
If the clock does not respond correctly
when you touch the keys, unplug the oven
for a few seconds and then plug it in again.
Doing this causes the sensors to adjust au-
tomatically so that they will react once more
to fingertip control.
SETTING THE TIME
• To set the time on the oven, the function and
temperature dials must be in the posi-
tion.
• When you plug in the oven, you will see the
clock flashing 12:00.
• Touch or to adjust the hours and
then the minutes. You will hear a double
beep confirming the time is set.
2 1 2

• If you wish to modify the time, touch or
until the time starts flashing. Touch
and and follow the instructions in the previ-
ous point.
NOTE
The clock light has a night mode so the display
light will dim between 00:00 and 6:00 hours.
WARNING
In the event of a power failure, your elec-
tronic clock/timer settings will be erased.
If this happens, turn the function and tem-
perature dials to theposition.
The indication 12:00 will show, and you will
then be able to set the time as described
above.
If the oven door was locked before the pow-
er cut, the locked symbol will show until it is
unlocked.
This may take several minutes, depending
on the temperature inside the oven, and
during this time you cannot reset the time.
Once the door is unlocked, you can set the
time as described above.
Oven use
•You will notice that the symbol lights up
during cooking to indicate that heat is being
transmitted to the food. This symbol disap-
pears when the selected temperature has
been reached.
• Set the controls to to turn off the oven.
INFORMATION
When you start cooking, your oven will
show the time the oven has been cooking.
MANUAL OPERATION
• After setting the clock, the oven is ready for
use. Select a cooking function and tempera-
ture.
INFORMATION
In models with an electronic temperature
control, when the selector switch is turned,
the clock display will show the temperature.
After selecting the temperature, the clock
display will automatically reappear.
To see the temperature again during cook-
ing, press the button and turn the tem-
perature dial if you want to change it.
English
User’s Guide 7

User’s Guide 8
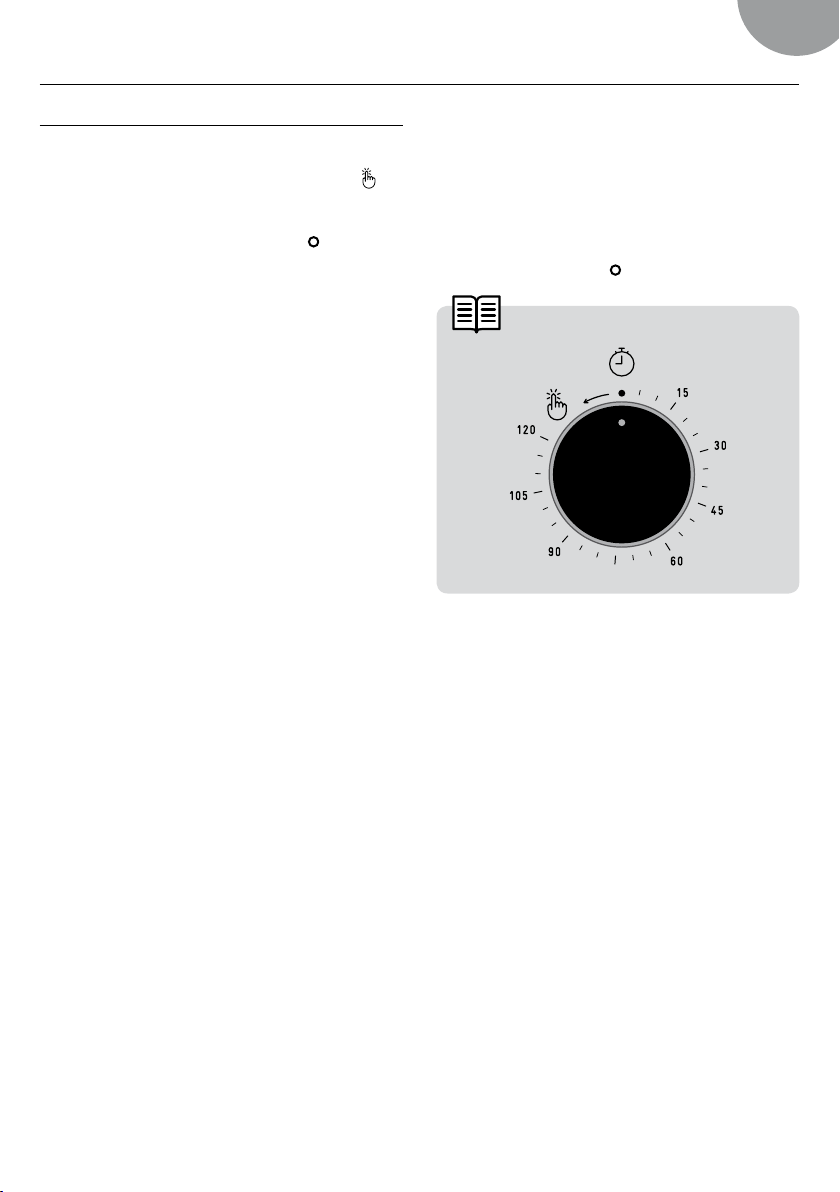
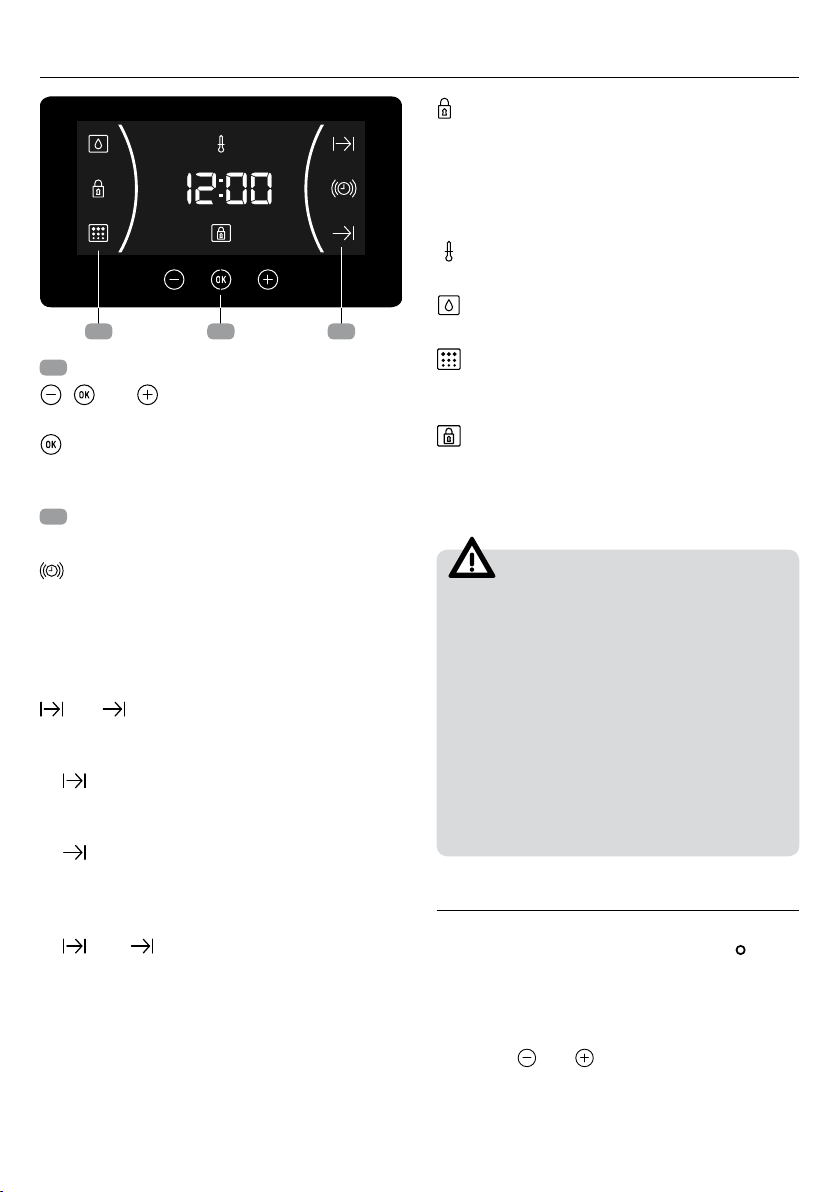
OVEN TIMER OPERATION
Programming the Buzzer
1. Touch or until the symbol on the
display starts flashing, then press . The
indication ‘00:00’ will appear on the display.
2. Select the time after which you want the
alarm to sound by pressing or . You
will hear 2 beeps to confirm that the time has
been set and the clock will start counting
down from the selected time. The sym-
bol will flash slowly.
3. Once the time has expired, an acoustic sig-
nal will sound for 90 seconds and the
symbol will flash quickly.
NOTE
With the Buzzer function, the oven will not
turn off when the time expires.
4. Touch any key to stop the alarm. The
symbol will then disappear.
If you wish to modify the time on the buzzer, re-
peat the steps shown. Upon entering the timer
control, the time currently remaining will appear,
which you will be able to adjust.
NOTE
With the Buzzer function, the remaining time
will show permanently on the display. With
this programmed function, it is not possible
to view the time or the total programmed
cooking time.
Programming Cooking Time
1. Touch or until the symbol on the
display starts flashing, then press . The
indication ‘00:00’ will appear on the display.
2. Select the time after which you want the
alarm to sound by pressing or . You
will hear 2 beeps to confirm that the time has
been set and the clock will start counting
down from the selected time.The sym-
bol will flash slowly.
3. Select a function and a cooking temperature
using the oven commands.
4. Once the cooking time is up, the oven will
turn off, an alarm will sound and the
symbol will flash quickly.
5. Touch any key to stop the alarm and turn off
the symbol. The oven will switch on again.
6. Set the controls to the position to turn off
the oven.
You can change the remaining cooking time at
any time by touching or until the
symbol starts to flash quickly. Now press to
change the time.
NOTE
With the Cooking Time function, the remain-
ing time will show permanently on the dis-
play. You cannot see the current time on the
display when this function is set.
Programming the Cooking Stop Time
1. Touch or until the symbol on the
display starts to flash and press . You will
see the current time on the timer display.
2. Select the time after which you want the
alarm to sound by pressing or . You
will hear 2 beeps to confirm that the time has
been set and the clock will start counting
down from the selected time. The sym-
bol will flash slowly.
3. Select a cooking function and temperature.
4. When the cycle is finished, the oven will turn
itself off, a buzzer will sound and symbol
will flash quickly.
5. Touch any sensor to stop the alarm and to
turn off the , symbol. The oven will switch
on again.
6. Set the controls to the position to turn off
the oven.

You can change the remaining cooking time at
any time by touching or until the
symbol starts to flash quickly. Now press to
change the time.
Programming Cooking Time
and Cooking Stop Time
1. Touch or until the symbol on the
display starts flashing, then press . The
indication ‘00:00’ will appear on the display.
2. Select the cooking time by touching or
. Next, a double beep will sound, the re-
maining time will appear on the display and
the symbol will flash slowly.
3. Touch or until the symbol on the
display starts flashing, then press . You
will see the expected completion time on the
timer display.
4. Select the cooking end time by touching
or . Next, a double beep will sound and the
current time will be displayed on the display.
5. Select a cooking function and temperature.
The oven will remain disconnected with the
and symbols lit up. The oven is now
programmed.
6. When it is time to start cooking, the oven will
turn on and will operate for the programmed
cooking time.
7. While cooking, the cooking time remaining
will be displayed and the symbol will
flash slowly.
8. When the cooking time is up, the oven will
turn off, a buzzer will sound, and the
symbol will flash quickly.
9. Touch any sensor to stop the buzzer and
turn off the symbol. The oven will
switch on again.
10. Set the controls to the position to turn
off the oven.
You can change the remaining cooking time at
any time by touching or until the
symbol starts to flash quickly. Now press to
change the time.
Safety instructions
SAFETY CHILD LOCK
This function can be selected at any time while
using the oven.
To activate the function, touch and hold key
for several seconds until you hear a beep and
the symbol appears on the display. The
clock/ timer is locked.
If the oven is off and you activate the child
safety function, the oven will not work even if a
cooking function is selected.
If this function is activated while you are
cooking, it will only lock the electronic clock/
timer settings.
key for sever-
To disable the function, press
al seconds until you hear a
English
beep.
User’s Guide 9

User’s Guide 10
Teka Hydroclean®function
This function makes it easy to remove grease
and other food debris that may have stuck to
the sides of the oven.
For easier cleaning, do not allow dirt to accu-
mulate. Clean the oven frequently.
PROGRAMMING THE TEKA
HYDROCLEAN PRO®FUNCTION
WARNING
Do not pour water into a hot oven as this can
damage the enamel of the oven.
Always run the cycle on a cold oven. The result
could be affected and the varnish damaged if it
is run when the oven is too hot.
First remove the trays and all accessories from
the oven interior, including the tray supports
and telescopic guide rails.
To do this, follow the instructions in the in-
stallation and maintenance guide accom-
panying the oven.
1. With the oven cold, spread a cloth out on the
bottom of the oven
2. Gently pour 200 ml of water into the bottom
of the oven cavity.
INFORMATION
For best results, add a teaspoon of mild
washing up detergent to the glass of water
before pouring onto the cloth.
3. Turn the control dial to the position.
4. You will hear a beep indicating that the Teka
Hydroclean® cycle has started. The sym-
bol will flash slowly and the time remaining to
complete the cycle will appear on the display.
IMPORTANT
The duration of this cycle cannot be changed.
To stop the cycle before it is finished, turn
the control dial to the position.
5. When the cycle is finished, the oven will turn
itself off, an alarm will sound and the
symbol will flash quickly.
IMPORTANT
Do not open the oven door until the Hydro-
clean® function is complete.
The cooling cycle is necessary for the func-
tion to work properly.
6. Touch any sensor with your fingertip to stop
the alarm and turn off the symbol.
7. Turn the control dial to the position.
8. Any traces of dirt and excess water can now
be removed from the oven with the damp
cloth.
The Hydroclean® function takes place at a low
temperature. However, cooling times can vary
depending on the room temperature.
If a deeper clean is required after using the Hy-
droclean® function, use neutral detergents and
non-abrasive sponges.
WARNING
Before touching the inside surface of the
oven, make sure that it has cooled properly.

User’s Guide 11
English
PROGRAMMING THE TEKA HYDROCLEAN
ECO®FUNCTION
WARNING
Do not pour water into a hot oven as this can
damage the enamel of the oven.
Always run the cycle on a cold oven. The result
could be affected and the varnish damaged if it
is run when the oven is too hot.
First remove the trays and all accessories from
the oven interior, including the tray supports
and telescopic guide rails.
To do this, follow the instructions in the in-
stallation and maintenance guide accom-
panying the oven.
1. With the oven cold, spread a cloth out on
the bottom of the oven.
INFORMATION
For best results, add a teaspoon of mild
washing up detergent to the glass of water
before pouring onto the cloth
.
3. Turn the control dial to position
4. Set the temperature to 90º C
5. Programme a duration of 4 minutes on the
timer.
6. After 4 minutes, an alarm will sound and the
oven will stop heating.
7. Turn the control dial to position .
8. Wait for about 20 minutes for the interior of
the oven to cool.
IMPORTANT
Do not open the oven until the cooling phase
is complete.
This is necessary for the Hydroclean® func-
tion to work properly.
9. Any traces of dirt and excess water can now
be removed from the oven with the damp
cloth.
The Hydroclean®function takes place at a low
temperature. However, cooling times can vary
depending on the room temperature.
WARNING
Before touching the inside surface of the
oven, make sure that it has cooled properly.
If a deeper clean is required after using the Hy-
droclean®function, use neutral detergents and
non-abrasive sponges.
2. Gently pour 200 ml of water into the bottom
of the oven cavity.
.

kWh/cycle*
L
*
*
0.68
70
81
1
26kg
HSB 545
0.89 kWh/cycle*

kWh/cycle*
L
*
*
0.72
70
85,7
1
27 kg
HSB 543
0.89
kWh/cycle*
kWh/cycle*


teka.com
Cod. 3371211-01
This manual suits for next models
2
Table of contents
Other Teka Oven manuals

Teka
Teka HLC 847 C User manual

Teka
Teka HLD 45.15 User manual

Teka
Teka HE-435 Owner's manual

Teka
Teka HSC635 Maintenance and service guide

Teka
Teka HI-735 User manual

Teka
Teka Combo HX 45.15 User manual

Teka
Teka HR-750 Owner's manual

Teka
Teka HA-845 Owner's manual

Teka
Teka HL-890 User manual

Teka
Teka HK-700 Owner's manual

Teka
Teka HPX-750 Owner's manual

Teka
Teka HI-659 Specification sheet

Teka
Teka HX 760 User manual

Teka
Teka HKE-635 Owner's manual

Teka
Teka HS-735 User manual

Teka
Teka HLB 8550 SC BK Maintenance and service guide

Teka
Teka HE-615 E Owner's manual

Teka
Teka HS-615 User manual

Teka
Teka HL-846 User manual

Teka
Teka DHA-718 User manual