Tekron TCG 01 User manual

TCG 01
TIME CODE GENERATOR
User Manual
9th Edition

www.tekroninternational.com
Page 2 of 49

TCG-01
Time Code Generator
User Manual
9th Edition
February 2007
This document supports all TCG-01 with firmware revision D1—D8
R
Revision History:
R4 For 0, A-B TCG-01
R5 For 0, A-B and C4-C7 TCG-01
R6 All C and D up to D1 version TCG-01
R7 All C and D up to D1 version TCG-01
R8 All C and D up to D4 version TCG-01
R9 (This document) For D up to and including D8 version TCG-01

www.tekroninternational.com
TABLE OF CONTENTS
1 INTRODUCTION....................................................................................................1
2 INSTALLATION ......................................................................................................2
2.1 Packing list..................................................................................................................................... 2
2.2 Mounting ....................................................................................................................................... 2
3 OPERATION ............................................................................................................3
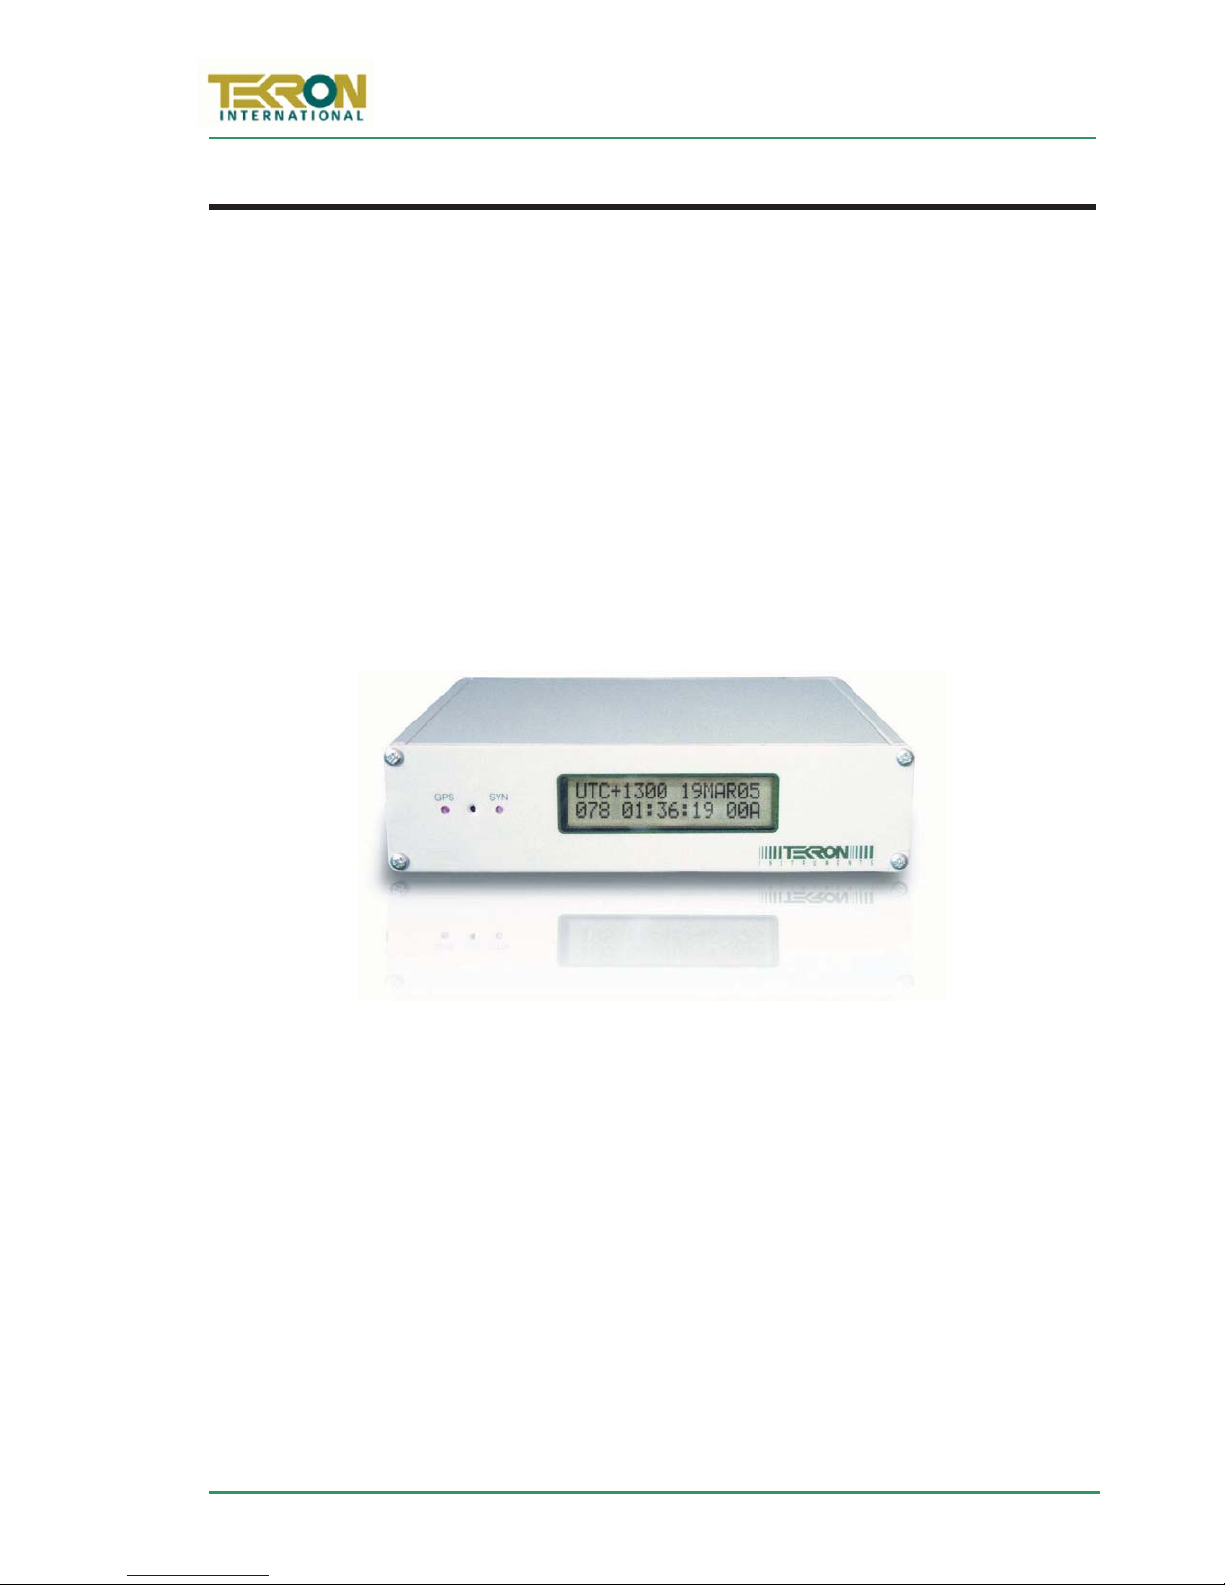
4 FRONT PANEL........................................................................................................3
4.1 LCD Display ................................................................................................................................... 4
4.2 Front Panel LED Indicators: ...................................................................................................... 6
5 CONNECTIONS......................................................................................................7
5.1 P1: Power Input .......................................................................................................................... 7
5.2 Ant: Antenna connector (SMA plug)..................................................................................... 7
5.3 P2, P3: Outputs............................................................................................................................. 8
5.4 P4: RS232 I/O (Serial port plus programmable output) ................................................ 9
5.5 Earth stud.....................................................................................................................................10
5.6 P5: BNC output .........................................................................................................................10
5.7 P6: Event Recording Inputs or External Sync Input........................................................ 11
5.8 P7: Sync Relay .............................................................................................................................11
5.9 P8: NTS – network time-server (optional).........................................................................12
6 SPECIFICATIONS .................................................................................................13
6.1 Dimensions .................................................................................................................................. 13
6.2 Identification............................................................................................................................... 13
6.3 Programmable outputs (P2, P3, P4-pin1) .........................................................................13
6.4 Isolation & Protection ..............................................................................................................14
7 FACTORY HARDWARE OPTIONS...................................................................15
7.1 TCG 01 High Voltage Output Option .................................................................................15
7.2 Power Supply Options .............................................................................................................16
7.3 Lightning Protection Option .................................................................................................16
7.4 Multi-port Hub Option............................................................................................................ 16
8 TCG 01 CONFIGURATION SOFTWARE.........................................................17
8.1 Introduction ................................................................................................................................ 17
8.2 Local Time Settings................................................................................................................... 18
8.3 General Options .........................................................................................................................18
8.4 Programmable Outputs........................................................................................................... 20
8.5 IRIG-B Options ........................................................................................................................... 22

TCG 01 User Manual
9th Edition: February 2007
8.6 Local/UTC Selection ................................................................................................................. 22
8.7 Network Time Server Configuration................................................................................... 23
8.8 Visible Satellites......................................................................................................................... 23
APPENDIX A ANTENNA DETAILS ........................................................................25
A.1 Antenna Cable Specification ................................................................................................. 25
A.2 Antenna Specification ............................................................................................................. 26
A.3 Antenna Assembly.................................................................................................................... 26
APPENDIX B LIGHTNING PROTECTION OPTION...........................................28
B.1 General ......................................................................................................................................... 28
B.2 LPK01 Kit Contents...................................................................................................................28
B.3 Installation................................................................................................................................... 29
B.4 Disclaimer .................................................................................................................................... 31
APPENDIX C EVENT TIME-TAGGING OPTION ................................................32
C.1 Introduction................................................................................................................................ 32
C.2 TCG 01 Command / Response Message structure ......................................................... 33
C.3 TCG 01 Commands related to Event Time Tagging ...................................................... 33
APPENDIX D NETWORK TIME SERVER OPTION .............................................36
D.1 Configuration Requirements................................................................................................. 36
D.2 Methods for Accessing Set-Up Mode ................................................................................ 36
D.3 Using Telnet to access Set-Up Mode.................................................................................. 37
D.4 NTS Set-Up Mode Menu ........................................................................................................ 38
D.5 Time Server Operation ............................................................................................................ 40
APPENDIX E SERIAL OUTPUT STRINGS.............................................................42
E.1 NGTS Time Code O/P on P4.................................................................................................. 42
E.2 IRIG J-17 Time Code O/P on P4 ........................................................................................... 42
E.3 String-A Time Code O/P on P4 ............................................................................................ 43
E.4 String-B Time Code O/P on P4............................................................................................. 43
E.5 String-C Time Code O/P on P4............................................................................................. 44
E.6 String-D Time Code O/P on P4 ............................................................................................ 44
E.7 String-E Time Code O/P on P4 ............................................................................................. 45
E.8 String-F Time Code O/P on P4 ............................................................................................. 45
E.9 NMEA ZDA Time Code O/P on P4....................................................................................... 46
E.10 NMEA RMC Time Code O/P on P4...................................................................................... 47
WARRANTY STATEMENT..........................................................................................48


TCG 01 User Manual
9th Edition: February 2007
Page 1 of 49
1INTRODUCTION
TCG 01 Time Code Generators produce precision time code signals, serial strings and
pulses for use in synchronising industrial control and SCADA equipment. They are ideally
suited to providing time synchronisation simultaneously to many different devices, such
as Remote telemetry Units (RTUs), Protection Relays and other Intelligent Electronic
Devices (IEDs) used in electrical sub-stations and industrial control installations.
The TCG 01 features one AM Modulated IRIG-B output, three programmable outputs
and a serial port which is user-configurable to output serial strings and report events for
units fitted with event recording capability. Factory options include an embedded
Network Time Server, and a choice of output connectors: BNC, 2-pin plug, or ST Fibre.
Non-fibre outputs that can be ordered are TTL, RS422, or high voltage switching.
All TCG 01 units feature a front panel display, giving visual feedback about the time data
being generated on the outputs. LED indicators provide “at a glance” status information.
F
Figure 1 – TCG-01 Front Panel
The optimised receiver/antenna system used by TCG 01 obtains time with similar to
atomic clock precision from the GPS satellite constellation. The result is output timing
accuracy similar to that normally seen only in laboratory instruments.
However, unlike laboratory instruments, TCG 01 is suited for hostile electromagnetic
environments such as sub-stations and electrical switchyards. Each output of the TCG 01
is isolated from every other output, so that attached wiring can feed out to operating
areas in different earth potential zones without compromising the overall site earthing
security. Further isolation protects the internal electronics, and transient suppression
devices protect i/o from both longitudinal and transverse high voltage events.
TCG-01 occupies less than half the width of a 1U rack space. It is supplied complete with
all hardware and software required for installation, including rack-mount kit, connectors,
30m lead-in antenna cable, and antenna.

www.tekroninternational.com
Page 2 of 49
2INSTALLATION
2.1 Packing list
Each TCG 01 kit is shipped with the following:
xTCG 01 Time code generator
xUser Manual – this document
xGPS Antenna optimised for stationary applications, with pedestal for pipe mount
xAntenna lead-in cable fitted with matching connectors
x19” Rack mounting Plate & fasteners
xMatching plug-in connectors
xRS232 Interface cable
xConfiguration Software
2.2 Mounting
The clock is designed to be mounted in a 19” rack, but may be used on a bench. The
unit is attached to the rack mount plate via the four screws shipped installed in the four
corners of the front panel.
G
GPS Antenna:
Detailed antenna mounting instructions are contained in Appendix A on
page 25. The antenna should be located in a position with as clear a view of the sky as
possible, over as wide an angle as possible.
The antenna should also be mounted in a
“lightning-protected zone” as far as is possible.
In practice, this means ensuring that
there is at least one other earth-bonded structure located in the same rooftop area (e.g.
another antenna, or a lightning rod) that reaches significantly higher than the top of the
GPS antenna. The GPS Antenna should be mounted so that it lies within a 45-degree
angle “skirt” from the top of the other earth-bonded structure. The GPS antenna mount
itself should also be securely bonded directly to the building protection earth – and
not
connected via any of the other earthed structures.
A lightning protection kit is available for installation in the antenna lead-in cable for
additional protection of the equipment. (See section 7.3 on page 16 for details.)
All TCG 01 antenna installations should follow the guidelines above.

TCG 01 User Manual
9th Edition: February 2007
Page 3 of 49
3OPERATION
Connect the antenna lead and the antenna (with a good view of the sky). Then connect
the power source to P
P1
.
Check the label on the base for voltage requirements before switching on!
The time required that will achieve tracking and synchronisation given a good “view” of
the sky is typically within a minute. Although reactivating a unit that was previously
synchronised 1000’s of km away from the present position will take longer but not more
than 45 minutes.
4FRONT PANEL
Figure 2 – TCG 01 Front Panel
TCG01featurestwoLEDindicatorsonthefront panel, together with a 2-line by 16-
character LCD display. The display is optimised for viewing straight on, or from below, as
the clock is a lightweight device, normally mounted at eye level or higher in an
equipment bay.
LCD DISPLAY:
The display unit updates every second, displaying day, date, time, and time
offset from UTC. It also provides more information on the GPS receiver
operation. A recessed push-button located on the front panel between the
two indicator LED’s is used to switch between display pages.
SYN LED:
This LED operates in parallel with the Sync Relay, and is active at all times
when the unit is operating with time code outputs accurately tracking the
GPS time signals.
GPS LED:
Flashing cadences indicate the status of the GPS receiver.

www.tekroninternational.com
Page 4 of 49
4.1 LCD Display
The LCD display shows a copyright message, along with the serial number and revision
level of the unit for approximately 10 seconds following power-up, (Figure 3[a]). The
display then automatically changes to the operating default, (Figure 3[b]). The user may
cycle between all four of the screens by pushing the recessed pushbutton on the front
panel between the LED indicators. The display examples below all show the same instant
in time.
[a] Start Up (Clock ID) [b] Operating Default
[c] Local Time [d] UTC Time
F
Figure 3 – LCD display screens
The top line of screen [b] shows the UTC offset in hours and minutes and the local date.
The local day-of-year and time-of-day are on the bottom line.
The rightmost bottom three characters provide satellite tracking information. “UTC”
denotes UTC time (similar to GMT) while “LST” denotes Local Standard Time. If daylight
savings time is active, “LST” in screen [c] changes to “LDT”, denoting Local Daylight Time.
Screen [b] shows that the clock is operating with a local time offset of 12 hours ahead of
UTC. The local date is 17th March 2003, and the local time is 11:16:53 in the morning.
Screen [c] shows the same time and date, but also indicates that the time displayed is
Local Standard Time, and that the day is Monday.
Screen [d] shows the UTC time and date, which is 11:16:53 on the evening of Sunday 16
March 2003.
UTC+1200 17MAR03
076 11:16:53 87A
UTC:SUN 16 MAR03
075 23:16:53 87A
LST:MON 17 MAR03
076 11:16:53 87A
TEKRON TCG01-D:0
(C)2003 Sn02749

TCG 01 User Manual
9th Edition: February 2007
Page 5 of 49
4.1.1 Satellite Tracking Status
Display screens Figure 3: [b], [c] and
[d] all show a three-character status
field at the bottom right-hand side
of the display. This three-character
field provides feedback on the
parameters that affect the operation
of the GPS receiver.
Character Values Description
Satellites
in sky
“0”=0
:
“9”=9
“A”=10
“B”=11
“C”=12
Represents the total number of satellites currently present in the
sky according to the GPS almanac. “0” in this position means that
TCG 01 has lost its knowledge of the GPS satellites’ orbit
geometries. This occurs if the unit has been in storage for an
extended period, or if the GPS receiver has been reset. It may
take up to two hours for the TCG 01 to operate normally again.
Satellites
Tracked
“0”=0
:
“9”=9
“A”=10
“B”=11
“C”=12
This digit represents the number of satellites currently being
used to compute the time solution. A “0” value means that no
updated time solution is available, (“out of lock” condition). If
this condition persists for the “Sync Hold” time (See |section 8.3.1
on page 18) the clock will indicate the “out of sync” condition
described under section 4.2.1 Warning Status Indications below.
“A” TCG 01 in Acquisition mode -
-
attempting to get satellite fixes
“G” “Poor satellite geometry”: Satellites are positioned in almost a
straight line so best accuracy cannot be obtained, but the unit
willstillsynctoUTC.
“2” A 2D position is in use (no height). This may occur before
Position Hold mode has been reached if only 3 satellites are
tracked. Synchronisation is not compromised.
“3” A 3D position is in use, which includes height. A site survey
begins next, so this mode is rarely seen.
“S” Site Survey in progress. TCG-01 is calculating an accurate
position; once complete the mode will change to Position hold.
Receiver
status
“P” “Position hold”: Position is known accurately, and the GPS is
providing its most accurate time, better than 60ns to UTC.
LST:MON 17 MAR03
076 11:16:53 87A
Satellites in sky
Satellites tracked
Receiver status

www.tekroninternational.com
Page 6 of 49
4.2 Front Panel LED Indicators:
The GPS LED shows the status of the GPS receiver, while the SYN LED shows the status
of the time synchronisation to UTC reference time derived from the GPS satellites.
By default, all outputs become active within a few seconds of initial power-up
even when the unit is
not
synced to GPS satellite time! Output time data is not
precise until the unit is synced to the GPS satellite
4.2.1 Warning Status Indications (SYN LED = OFF)
When the SYN LED is off, TCG-01 is not guaranteed to be synchronised to UTC time. The
sync relay is deactivated (“C” is connected to “NC”).
GPS LED SYN LED Interpretation
•••• ••••
4 short flashes/second
OFF Antenna fault: The GPS antenna is not connected,
or is short or open circuited (faulty).
•• •• •• ••
2 short flashes/second
OFF The GPS antenna is good, and the unit is
searching the sky for satellites to begin the sync
process.
On D4 and later version TCG-01s, a “test mode” is available that when activated
will cause all TCG-01 outputs including the sync relay to behave as if they are in
sync, even if they are not. This can be useful for testing the operation of external
IED when a connection to a GPS antenna is not available.
4.2.2 Sync Status Indications (SYN LED = illuminated)
When the SYN LED is on, TCG-01 is synchronised to UTC time. All of the clock outputs
are accurate and are usable for sync purposes and the sync relay output is activated.
GPS LED SYN LED Interpretation
••••••••••••••••••••••••••••••••••••••••••••••••••••••••
Long on – short off
once every second
ON Time accuracy is within 500ns of UTC time.
••••••••••••••
Short on – long off
once every second
ON Time accuracy is certainly within 60ns and is typically
within 40ns of UTC time

TCG 01 User Manual
9th Edition: February 2007
Page 7 of 49
5CONNECTIONS
F
Figure 4 – Rear Panel of TCG 01, with 2-pin connectors (P2 and P3) and NTS output (P8)
5.1 P1: Power Input
Power is applied to the unit via this plug. Maximum steady state power consumption is
6W, and surge protection is provided. Despite the markings on P1, the polarity of the
power connection is
not
important and the unit is fully isolated internally from the
power source. A mating connector is supplied that is suitable for wiring up to 1.5mm2.
The casing is isolated from the power supply inputs so that either (or neither) power
supply polarity can be earthed to station earth.
The input voltage range is marked on the option label that is attached to the underside
of TCG-01. The section Power Supply Options on page 16 has a list of orderable ranges.
Check the label on the unit base for power supply voltage ratings!
5.2 Ant: Antenna connector (SMA plug)
The “ant” antenna input provides an interface for an external active antenna via low-loss
coaxial cable, 50ȍimpedance. 5V DC @ 50mA max is supplied to power an active
antenna. The total combined gain of the antenna system (antenna plus cable and
connectors) should fall in the range of 10 to 35 dB, the optimum being 22dB.
TCG 01 is normally supplied complete with a timing-optimised narrow-band antenna
and 30m of lead-in cable, this combination provides an overall gain near the optimum
of 22dB (see Appendix A on page 25). For lead-in lengths longer than 60m, either
amplification and/or larger diameter, lower loss cable can be supplied to order.
Care should be taken to ensure that the connector is not cross-threaded when
attaching the antenna lead-in cable. The connector should be tightened firmly
by hand only. Do NOT over-tighten!

www.tekroninternational.com
Page 8 of 49
A Lightning Protection device may be inserted into the antenna lead. A suitable device
complete with additional cable connectors, a connector crimping tool and mounting
hardware is available as an option (see Section 7.3 on page 16). Introduction of the
Lightning protector does not degrade the performance of the antenna system.
5.3 P2, P3: Outputs
5.3.1 Electrical and Physical Configuration
F
Figure 5 – 2pin
connectors
Figure 6 – BNC
connectors
Figure 7 – Fibre
connectors
Each output port may be fitted at the factory according to the following:
Electrical Electrical Specification Physical
TTL CMOS/TTL (5V) logic level driver output ports, 150mA sink
and source. The port is fully floating and has independent
electrical isolation to 2.5kV
2-pin
or BNC
RS422 High Speed RS422 compliant output ports. The port is Fully
floating and has independent electrical isolation to 2.5kV.
2-pin
or BNC
HV
MOSFET
Power MOSFET Switch, allowing switching of 300VA, 1A max.
The port is fully floating and had independent electrical
isolation to 2.5kV. See the detail in Section 7.1 on page 15 for
suggested wiring configurations for use with Power MOSFET
switching.
2-pin
Fibre ST fibre transmitters, compatible with ST-terminated 62.5ȝm
fibre diameter, 125ȝm jacket diameter multi-mode fibre optic
cabling. The maximum length of fibre recommended is 700
metres.
ST Fibre

TCG 01 User Manual
9th Edition: February 2007
Page 9 of 49
5.3.2 P2, P2 programmable signals
The user may configure P2 and P2 to output in either inverted or non-inverted polarity:
xA user configurable number of pulses per second, minute, hour, day with
adjustable pulse-width and offset.
xIRIG-B and DCF-77 time codes.
Refer to page 13 for further information:
5.4 P4: RS232 I/O (Serial port plus programmable output)
An RS232 port (+/-9V signal levels) is implemented via 9-way “D”
male connector with signal lines: p
pin 2
(serial data OUT from TCG
01), p
pin 3
(serial data IN to TCG 01) and p
pin 5
(signal ground)
together with a programmable signal output on p
pin 1
.The
programmable output shares the p
pin 5
(signal ground).
Do NOT over-tighten the securing screws of the connector!
TCG 01 is normally shipped as a DCE configuration, a “straight-wired” Socket-to-Socket
9-way data cable can be used to connect directly to a standard PC serial port. (A suitable
2m cable is included with each TCG 01/TCG 01F.) The CTS and DSR functions are
permanently asserted, so the serial port does not support hardware handshake control.
The RS232 signal lines are not HV-isolated from each other, but the port as a whole is
isolated to a level of 2.5kV from all other ports.
5.4.1 P4 serial strings
The serial port can be configured to output any one of a number of different serial time
messages on a broadcast basis. The serial port runs at a fixed baud-rate of 9600 baud.
Message formats typically operate at 8-bit no parity, no flow control, 1 stop bit, and are
transmitted once per second.
A wide range of message strings, and protocols are output on this port. They include:
xNGTS protocol
xIRIG J-17
xSix preset messages, String/Tekron A—F for compatibility with most IED.
xIn TCG 01 version D8 and later, NMEA ZDA and RMC messages are available.
xGPS Binary/Messages, these are subject to change without notice.
See |Appendix E on page 42 for details of each of the message string formats.

www.tekroninternational.com
Page 10 of 49
5.4.2 P4 pin 1 Programmable Output
The user may configure P4 pin 1 to output in with inverted or non inverted polarity:
xA user configurable number of pulses per second, minute, hour, day with
adjustable pulse-width and offset.
xIRIG-B and DCF-77 time codes.
Refer to section 6.3 on page 13 for further information:
5.5 Earth stud
An M4 bolt (to chassis) is provided for earthing of cable shields. This
is located under the serial port to the left of the P4 designator.
5.6 P5: BNC output
P5 provides amplitude modulated IRIG-B (B12x) over a BNC connector.
Use either coaxial cable or shielded twisted pair, to feed signal from P5 to
any connected IED. When using shielded twisted pair, connect the shield
to ground.
The mark/space amplitude modulation ratio is 10:3, and peak to peak
output level is 8 volts (max), 100:impedance. The output is fully floating,
and is transformer-isolated to a minimum of 2.5kV.
This output is
not
programmable for other types of signal, and the IRIG-B code is
present whenever the unit is powered. The particular IRIG-B data content is as specified
by the configuration program (refer to IRIG-B Options on page 22).
Most devices with amplitude-modulated IRIG-B time sync inputs have an input
impedance of between 4k:and 20k:, and maximum allowable peak- to-peak
level of 6V or so. The P5 output on TCG 01 is designed to drive many of these
devices all in parallel, with a terminating resistor (typically 100-180 ohms) fitted
at the far end of the coax line feeding all of the attached loads. In this way P5
can drive at least 20, and typically 30 or more devices without any external
amplification required. The terminating resistor is essential to ensure good noise
immunity.

TCG 01 User Manual
9th Edition: February 2007
Page 11 of 49
5.7 P6: Event Recording Inputs or External Sync Input
Two input channels with common return that may be driven by TTL logic
levels. This port is implemented via a 2-pin plug-able connector. Wiring
size is up to 1.0mm2and the input is isolated to 2.5kV.
“C” is the common reference (0V), and “+2” and “+1” are TTL inputs 2
and 1 respectively. Input burden is 7mA at 5V.
P6 is used for:
xEvent time tagging or “event recording” on units with this option fitted. For a full
description, see Appendix C on page 32.
xSynchronisation of TCG 01 to an external IRIG-B signal, only in D4 or later
firmware. See Section 8.3.7 Sync to IRIG-B Input on page 20 for further
information on using this feature.
5.8 P7: Sync Relay
A set of isolated changeover relay output via 3-pin plug-able connector
– capable of switching up to 2A at 230V AC, or 300mA at 150V DC.
Wiring size is to 1.0mm2using the supplied mating plug. Isolation is
2.5kV minimum.
This relay is active (“C” and “NO” connected) whenever the TCG 01 has
established stable time sync from the GPS satellites. The active relay output indicates
that all of the other output signals are operating within specification. The connector
accommodates 1mm2cabling.
TCG 01 will remain accurate for a time after the loss of satellite sync, and the sync relay
can be configured to remain active (indicating “in sync”) for a period following the loss
of satellite signals. The default period is one minute, but this can be altered up to a
maximum period of 42 minutes and 30 seconds (2550 seconds).

www.tekroninternational.com
Page 12 of 49
5.9 P8: NTS – network time-server (optional)
TCG 01 units fitted with the network time-server option
(NTS), feature an RJ45 connector supporting a 10Mbps
Ethernet port (10baseT). A standard (i.e. non-crossover)
drop lead should be used to connect the TCG 01 to a
convenient port on a local network hub or switch.
Protocols supported by the TCG 01 NTS option are: ARP, UDP, TCP, ICMP, Telnet, TFTP,
DHCP, SNMP and BOOTP. A TCG 01 unit equipped with the NTS option provides a
complete Stratum-1 time-server function while still retaining all other output services.
Specific time-sync client protocols supported are NTP and SNTP. SNMP trap support
allows for status monitoring and NTS alarm reporting to 3rd party network management
packages. Status reporting can be integrated with existing network management
software to provide a complete package.
Provision is made for up to 5 different IP addresses to be specified for SNMP trap
destinations, as well as two “Syslog” IP addresses. Accuracy of the NTS time stamps
produced is to within 1milliSec of UTC.
The RJ45 UTP port is
not
HV-isolated from the TCG 01 chassis, but complies with
the standard balanced nature of a UTP connection for an office network
Each TCG 01 unit equipped with the NTS option is supplied complete with a 2M UTP
cable. This cable is designed to connect directly between the TCG 01 unit and a network
hub/switch/router. The cable is not suitable for direct connection to the network port on
a PC. If such a connection is required, a cross-over cable must be obtained.
The NTS is configurable using the supplied configuration tool and a serial cable, or via a
password protected telnet connection. Appendix D on page 36 contains detail about
how to install and configure the network time server option.

TCG 01 User Manual
9th Edition: February 2007
Page 13 of 49
6SPECIFICATIONS
6.1 Dimensions
Width 160mm
Depth 155mm
Height 40mm (1U)
Weight 0.8Kg
Each TCG 01 unit is supplied complete with antenna, antenna mount, antenna cable and
1U 19” rack-mount hardware. Shipping weight of the complete TCG 01 kit is 4.5Kg.
6.2 Identification
Each TCG 01 unit is shipped with an identification label on the base. The label provides
details of the particular options fitted to the unit, the power supply requirement, and the
serial number.
6.3 Programmable outputs (P2, P3, P4-pin1)
The outputs P2, P3, and P4-pin1 are each independently programmable to provide one
of the following options.
xDCF-77 pulse simulation
xUnmodulated (i.e. DC level-shift) IRIG-B (B00x)
xModified Manchester Modulated IRIG-B (B22x)
xProgrammed pulse sequence
In the case of “Programmed pulse sequence” above, separate settings are provided so
that a differently programmed pulse sequence can be specified for each of the three
outputs. Each of the three programmable outputs can also be inverted in its operation.
Full details on configuring the programmable outputs are contained in section 6.1 on
page 13.
N.B: P4-pin1 is not available on TCG 01's with DTE serial ports. If not specified,
TCG 01 will ship with a DCE serial port.
A common application for the programmable output on P4-pin1 (RS232 level) is to
provide an independent drive to an RS232-Fibre converter unit for use in transporting
the code signals to a distant location. In such cases, p
pin 1
should be “broken out” of the
normal 9-way cable optionally used to connect to an external PC, and used in
conjunction with p
pin 5
(signal return). Tekron manufactures a range of interface devices
(MOFR’s) that includes such converters.

www.tekroninternational.com
Page 14 of 49
6.4 Isolation & Protection
All inputs and outputs feature 2.5kV isolation from each other. In addition, the logic
level outputs (P2 and P3) are each protected against damage from transverse voltage
events via a three-stage network of varistor, auto-resetting fuse, and transient
suppressor diode.
Fuse and varistor protection is
removed
when the switching MOSFET factory
option is fitted. The user
must
provide an external power supply and suitable
fusing to use the MOSFET output option. (See 7.1 TCG 01 High Voltage Output
Option on page 15 for further information on the MOSFET Output option)
Varistor protection and current limiting (nominally 5mA) are employed for protection on
the general-purpose input.
F
Figure 8 – TCG 01 Isolation Zones
Transformer isolation via DC-DC converter is used for the main power supply and for
power to each of the logic output-drive circuits. The serial communications interface is
also separately powered via isolating DC-DC converter. High-speed, fixed delay opto-
isolators are used in each of the time-sensitive signalling paths. The isolation does not
degrade the time accuracy of the output signals, as the fixed delays of the isolating
components (together with the delay associated with the antenna lead-in) are all
internally compensated.
Table of contents
Other Tekron Inverter manuals