TeleAdapt DeskPoint Pro TA-8050 Operating manual

!"#"$%&'()*"+,-./0()-1.)2+"1)3&04&#) ) 5"1+/.0)6787966)
)
6)
DeskPoint Pro™
User and Installation Manual
TA -6950
TA -7950
TA -8050
)
Keeping Your World Connected2

!"#"$%&'()*"+,-./0()-1.)2+"1)3&04&#) ) 5"1+/.0)6787966)
)
7)
Table of Contents
:;$!2<;=88888888888888888888888888888888888888888888888888888888888888888888888888888888888888888888888888888888 >!
LED DEFINITIONS 888888888888888888888888888888888888888888888888888888888888888888888888888888888888888888888888888888888888888 ?!
CONNECTIONS 88888888888888888888888888888888888888888888888888888888888888888888888888888888888888888888888888888888888888888888 @!
HARDWARE RESET 8888888888888888888888888888888888888888888888888888888888888888888888888888888888888888888888888888888888888 @!
AB=!$CCABD)$B*)EFB:AD2<ABD)*;=G-FAB!)-<F888888888888888888888888888888888888888888 H!
PREPARING FOR CONFIGURATION 8888888888888888888888888888888888888888888888888888888888888888888888888888888888888 H!
CONNECTING THE MANAGING COMPUTER8888888888888888888888888888888888888888888888888888888888888888888888888 H!
CHANGING THE TCP/IP SETTINGS OF THE MANAGING COMPUTER8888888888888888888888888888888888 H!
DEFAULT USER NAME AND PASSWORD 88888888888888888888888888888888888888888888888888888888888888888888888888888 I!
J;K)EFB:AD2<$!AFB8888888888888888888888888888888888888888888888888888888888888888888888888888888888 69!
SUMMARY 8888888888888888888888888888888888888888888888888888888888888888888888888888888888888888888888888888888888888888888888888 69!
Menu Structure .......................................................................................................... 11!
Apply Changes, Reset, Reboot and Continue Commands .................................12!
Refresh and Clear Commands................................................................................ 12!
Logout Commands .................................................................................................... 12!
FIRMWARE TOOLS 888888888888888888888888888888888888888888888888888888888888888888888888888888888888888888888888888888888888 6L!
Upgrading Firmware by HTTP or TFTP .................................................................14!
Load Settings by HTTP or TFTP............................................................................. 14!
Save Settings by HTTP or TFTP............................................................................. 15!
Resetting Configuration to Factory Defaults.......................................................... 15!
SYSTEM SETTINGS 88888888888888888888888888888888888888888888888888888888888888888888888888888888888888888888888888888888888886M!
Web Management – Secure and Idle Timeout ....................................................... 15!

!"#"$%&'()*"+,-./0()-1.)2+"1)3&04&#) ) 5"1+/.0)6787966)
)
L)
SYSTEM TOOLS 888888888888888888888888888888888888888888888888888888888888888888888888888888888888888888888888888888888888888888 6?!
Ping ........................................................................................................................ 16!
Arping ........................................................................................................................ 17!
Traceroute.................................................................................................................... 17!
TIME ZONE SETTINGS 88888888888888888888888888888888888888888888888888888888888888888888888888888888888888888888888888888888 6H!
NTP Settings................................................................................................................ 18!
Periodic Reboot........................................................................................................... 19!
SNMP 88888888888888888888888888888888888888888888888888888888888888888888888888888888888888888888888888888888888888888888888888888888 6I!
SNMP V1 &V2 ............................................................................................................. 19!
SNMP V3 Settings ...................................................................................................... 19!
SNMP TRAP TABLE FOR V1 &V2 8888888888888888888888888888888888888888888888888888888888888888888888888888888 79!
CONFIGURING TCP/IP RELATED SETTINGS8888888888888888888888888888888888888888888888888888888888888888888888 76!
LAN…........................................................................................................................... 21!
VLAN Tag..................................................................................................................... 22!
CONFIGURING IEEE 802.11-RELATED SETTINGS 888888888888888888888888888888888888888888888888888888888888 7L!
Basic Settings .............................................................................................................. 23!
Advanced Setting ........................................................................................................ 25!
Security+……………………................................................................................................... 26!
VIEWING STATUS8888888888888888888888888888888888888888888888888888888888888888888888888888888888888888888888888888888888888888 L7!
Network Status Table .................................................................................................32!
Syslog ........................................................................................................................ 32!
Network Status ............................................................................................................ 33!
!;ENBAE$C)=2--F<! 888888888888888888888888888888888888888888888888888888888888888888888888888888888888L>)
$--;B*AO)$P)*;:$2C!)=;!!ABD=888888888888888888888888888888888888888888888888888888888888888888 LM!

!"#"$%&'()*"+,-./0()-1.)2+"1)3&04&#) ) 5"1+/.0)6787966)
)
>)
1. Features
The DeskPoint Pro is designed for use in hotel rooms and combines 802.11n, IEEE 802.11g and
IEEE 802.11b wireless technology to provide the best wireless performance, enabling client
computers to access the resources on the hotel Ethernet network. With the Web-based user
interface or SNMP a network administrator can easily and clearly manage the DeskPoint Pro.
)
Desktop or Under Desk
Desktop -The TA-6960 and TA-7950 are on desk models. The TA-6950 incorporates a
retractable spool whereas the TA-7950 has a RJ45 socket.
Under Desk -The TA-8050 is designed to fit unobtrusively under the a desk in the
guest room and can be used in conjunction with other TeleAdapt cable management
products.)
)
IEEE 802.11n
RF type selection - The RF type of the wireless interface can be configured to work in
IEEE 802.11n only , IEEE 802.11b only, IEEE 802.11g only, or mixed mode (802.11n,
802.11g and 802.11b simultaneously).
64-bit and 128-bit WEP (Wired Equivalent Privacy) -For authentication and data
encryption.
Enabling/Disabling SSID broadcasts -The administrator can enable or disable the
SSID broadcasts functionality for security reasons. The correct SSID has to be
specified on client computers.
IEEE 802.1x/RADIUS - The DeskPoint Pro can be configured to authenticate wireless
users and distribute encryption keys dynamically by IEEE 802.1x Port-Based Network
Access Control and RADIUS (Remote Authentication Dial-In User Service).

!"#"$%&'()*"+,-./0()-1.)2+"1)3&04&#) ) 5"1+/.0)6787966)
)
M)
WPA (Wi-Fi Protected Access) -The DeskPoint Pro supports the WPA standard
proposed by the Wi-Fi Alliance (HQ(('PRRSSS8S/TU/8.1VH). Both WPA-PSK (Pre-Shared
Key) mode and full WPA mode are supported. WPA is composed of TKIP (Temporal Key
Integrity Protocol) and IEEE 802.1x and serves as a successor to WEP for better WLAN
security.
WPA2 (Wi-Fi Protected Access 2) -This advanced protocol implements the mandatory
elements of 802.11i. WPA2 is an improvement on the WPA-PSK standard, and is simply
using a shared password for access to your network. Only users with this password can
access your network.
Client isolation -Wireless-to-wireless traffic can be blocked so that the wireless clients
cannot see each other. This function also blocks wired clients from accessing Wireless
clients.
Transmit power control -Transmit power of the DeskPoint Pro’s RF module can be
adjusted to change RF coverage.
Associated wireless clients status -The DeskPoint Pro can show the status of all
wireless clients that are associated with it.
HDHCP Client -The DeskPoint Pro can automatically obtain an IP address from a DHCP
server.
HPacket Filtering.HThe DeskPoint Pro provides Layer 2, Layer 3, and Layer 4 filtering
capabilities.
Firmware Tools
Firmware upgrade -The firmware can be upgraded by HTTP (Hyper Text
Transfer Protocol).

!"#"$%&'()*"+,-./0()-1.)2+"1)3&04&#) ) 5"1+/.0)6787966)
)
?)
Configuration backup -The configuration settings can be backed up to a file via
HTTP for later restoring.
Configuration reset -Resetting the configuration settings to factory-default values.
Management
Web-based Network Manager for configuring and monitoring the DeskPoint Pro
via a Web browser (Internet Explorer,Firefox or Google Chrome). The management
protocol is HTTP (Hyper Text Transfer Protocol)-based.
SNMP -SNMP (Simple Network Management Protocol) MIB I, MIB II, IEEE 802.1d,
IEEE 802.1x, and Private Enterprise MIB are supported.
System log - For system operational status monitoring.
-Local log - System events are logged to the on-board RAM of the DeskPoint
Pro and can be viewed using a Web browser.
-Remote log by SNMP trap -Systems events are sent in the form of SNMP
traps to a remote SNMP management server.
Power Charging
USB Charging 5V for charging mobile devices
LED Definitions
TA-6950 and TA-7950 -At the front of the device, there are 3 LED indicators. See
Figure 1 below for description of each LED indication.
TA-8050 -On top of the device, there are LED indicators. See Figure 2 below for
description of each LED indication.

!"#"$%&'()*"+,-./0()-1.)2+"1)3&04&#) ) 5"1+/.0)6787966)
)
@)
Connections
The TA-6950 and TA-7950 also provide a wired Guest LAN interface just above the
indicator LEDs. For the TA-6950 this is a retractable spool, for the TA-7950 this is an RJ45
socket. Both models also provide a USB socket that can provide up to 5V/1A for charging
mobile devices. See Figure 3 to the left.
TA-8050 provides an RJ45 jack to be used for offering a wired access point for the guest.
Pair a TeleAdapt Pull-Through Pro or other Internet AP product for best presentation to the
guest. See Figure 4 to the left.
Hardware Reset
The reset button can be found on the bottom of the unit. To perform a factory reset press and hold the
reset button until the LAN LED flashes. When the LAN LED flashes release the reset button and quickly
press and hold the reset button a second time (for at least 10 seconds) until the LAN LED flashes
again.
)

!"#"$%&'()*"+,-./0()-1.)2+"1)3&04&#) ) 5"1+/.0)6787966)
)
H)
2. Installing and Configuring DeskPoint Pro
This section offers information about installing your DeskPoint Pro. Before configuring the DeskPoint
Pro, you need to know the connection information supplied by your service provider and the field
application environment.
)
Preparing for Configuration
To c o n f i g u r e the DeskPoint Pro, a computer with a web browser is needed. For the first-time or
maintenance configuration of the DeskPoint Pro, an Ethernet network interface card (NIC) should have
been installed in the managing computer.
Since the configuration/management protocol is HTTP-based, you have to make sure that the IP
address of the managing computer and the IP address of the managed DeskPoint Pro are in the same
IP subnet (the default IP address of the DeskPoint Pro is 192.168.0.1 and the default subnet mask is
255.255.255.0.)
)
Connecting the Managing Computer
Using Ethernet Cable to connect the managing computer and the Wireless 11n Access Point as
following figure shows. One end of the Ethernet cable must be plugged into the Hotel LAN Ethernet
jack of the DeskPoint Pro for configuration.
)
Changing the TCP/IP Settings of the Managing Computer
Use the Windows Network Control Panel Applet to change the TCP/IP settings of the managing
computer, so that the IP address of the computer and the IP address of the DeskPoint Pro are in the
same IP subnet. Set the IP address of the computer to 192.168.0.xxx (the default IP address of the
DeskPoint Pro is 192.168.0.1) and the subnet mask to 255.255.255.0.
Fig 1. An example of Internet Protocol
(TCP/IP) Properties in Microsoft Windows
Note: For some versions of Windows, the
computer needs to be restarted for the
changes of TCP/IP settings to take effect.

!"#"$%&'()*"+,-./0()-1.)2+"1)3&04&#) ) 5"1+/.0)6787966)
)
I)
!
Default User Name and Password
The default user name is ‘root’ and the default password is ‘root’.
)
)
)
)
)
)
)
)
)
)
)
)
)
)
)
)
)
)
)

!"#"$%&'()*"+,-./0()-1.)2+"1)3&04&#) ) 5"1+/.0)6787966)
)
69)
3. Web Configuration
NOTE: All management services on the DeskPoint Pro are restricted so they are only accessible via the
Hotel LAN port.
)
Summary
)
Fig 1. The Summary page

!"#"$%&'()*"+,-./0()-1.)2+"1)3&04&#) ) 5"1+/.0)6787966)
)
66)
Menu Structure
The left side of the Home page contains a menu for you to carry out commands. Here is a brief
description of the hyperlinks on the menu:
Summary. For configuration setting summary.
Management. System monitoring information
Firmware Tools -For upgrading the firmware of the DeskPoint Pro and backing up and
restoring configuration settings of the DeskPoint Pro.
System Setting -For changing the account info and web access info for the web server of
the DeskPoint Pro.
System Tools -Ping Tool, ARP Tool and trace route tool.
Time Zone -Time zone and SNTP (Simple Network Time Protocol) server settings.
SNMP -Simple Network Management Protocol (SNMP) agent settings and SNMP trap table.
TCP/IP. TCP/IP-related settings.
LAN. IP addressing settings for the DeskPoint Pro.
VLAN Tag. settings.
Wireless. IEEE 802.11n-related settings.
Basic Settings -Basic settings for the IEEE 802.11b/g/n interface of the DeskPoint Pro to
work properly with wireless clients.
Advanced Settings -Advanced settings for the more technically users who have a sufficient
knowledge about the Wireless LAN.
Security -Security settings for authenticating wireless users and encrypting wireless data.
Include the IEEE 802.1x Port-Based Network Access Control and RADIUS (Remote
Authentication Dial-In User Service) settings for better wireless security.
!"#"$%&'()*"+,-./0()-1.)2+"1)3&04&#) ) 5"1+/.0)6787966)
)
67)
Access Control -Wireless Access Control settings.
Status -System monitoring information.
Network Status -Shows the packet counters for transmission and reception regarding to
wireless and Ethernet networks.
System Log -System events log.
Active Clients -Display the status of all wireless clients who associated to the DeskPoint Pro.
Logout -The Logoff page.
)
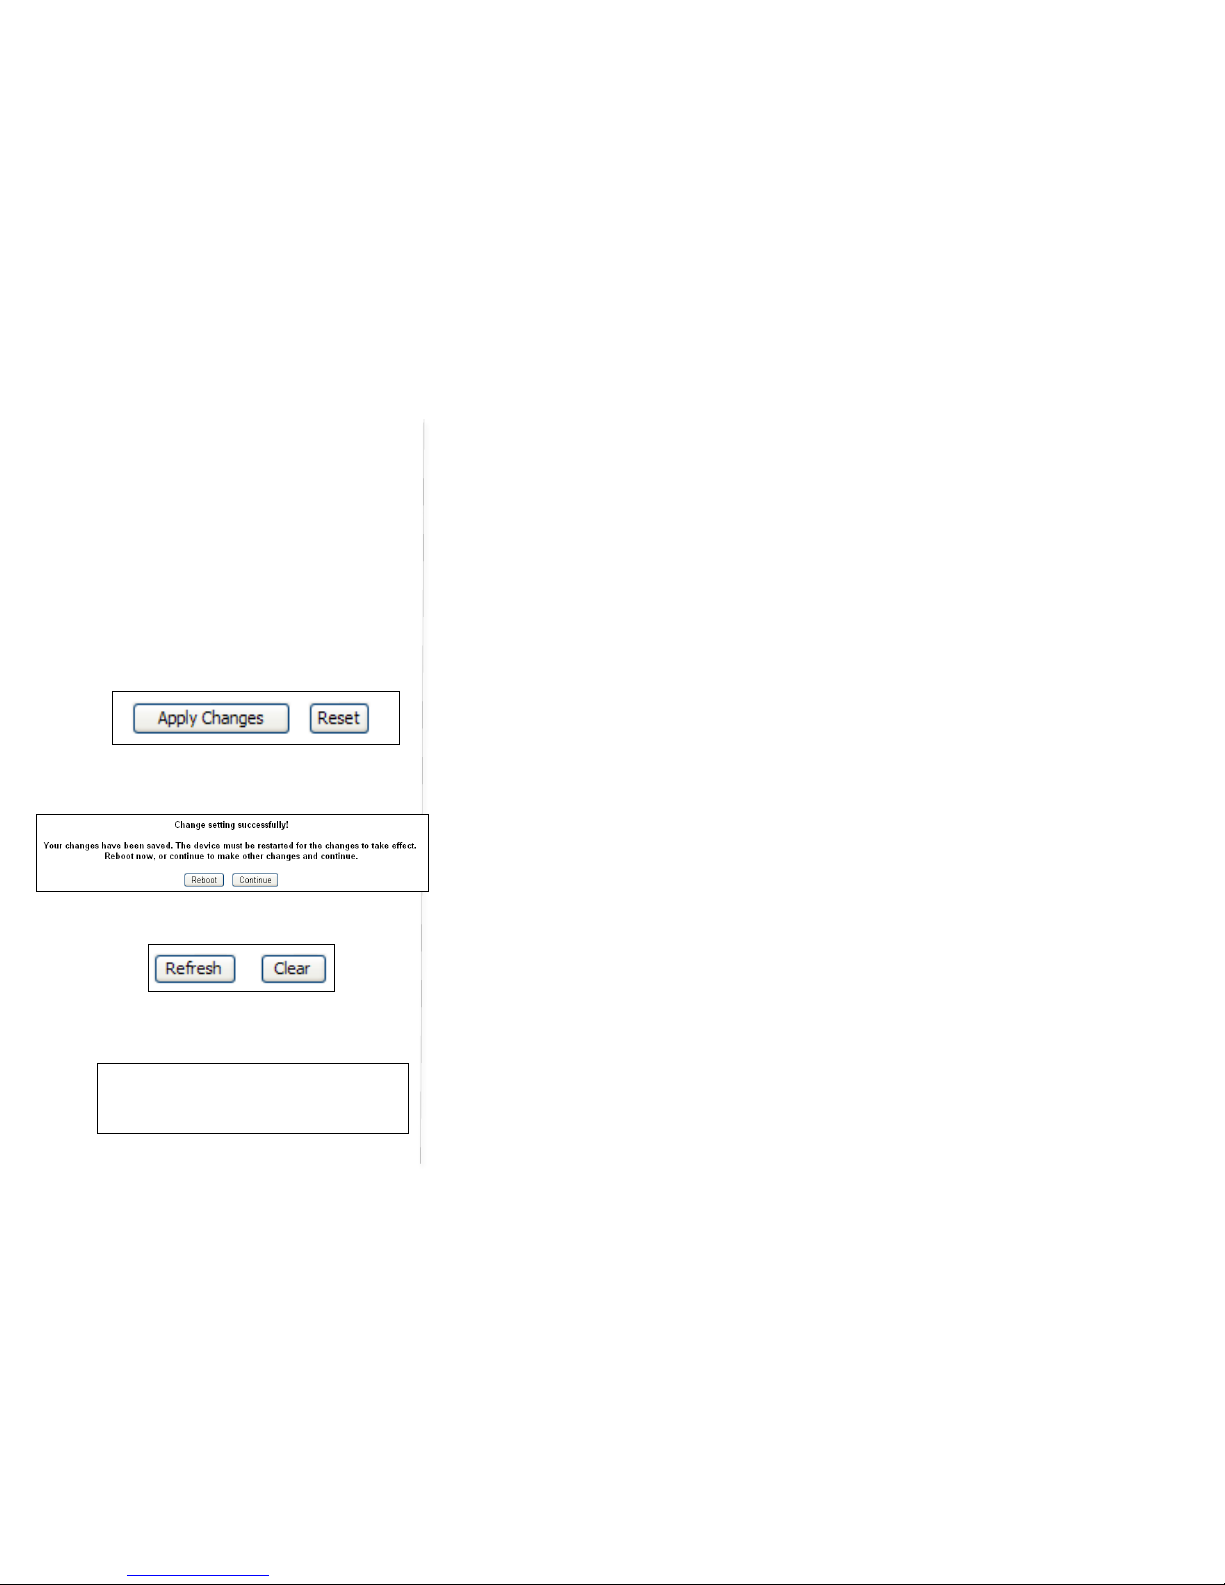
Apply Changes, Reset, Reboot and Continue Commands
Normally at the bottom of each setting page, there are two buttons - Apply Changes and Reset.
Clicking Apply Changes stores the settings changes to the memory of the DeskPoint Pro and brings you
back to the next page to choose the next step. Clicking Reset discards any settings changes and brings
you back to the start page.
Clicking Reboot to restarts the DeskPoint Pro immediately for the settings changes to take effect.
Clicking Continue moves to other page for change other settings.
)
)
Refresh and Clear Commands
At the bottom of each status page that shows read-only information, Clicking Refresh updates the shown
status information. And in the System log page the Clear immediately clean system log.
)
Logout Commands
The page provide user to log off the Web management immediately. User needsapply account and
password again if they want to login again.
Fig 2. Click Apply Changes to store
settings.
)
Fig 3. Save, Save & Restart, and Cancel.
Fig 4. Refresh and Clear
)
Fig 5. Logoff Page
)
!"#"$%&'()*"+,-./0()-1.)2+"1)3&04&#) ) 5"1+/.0)6787966)
)
6L)
)
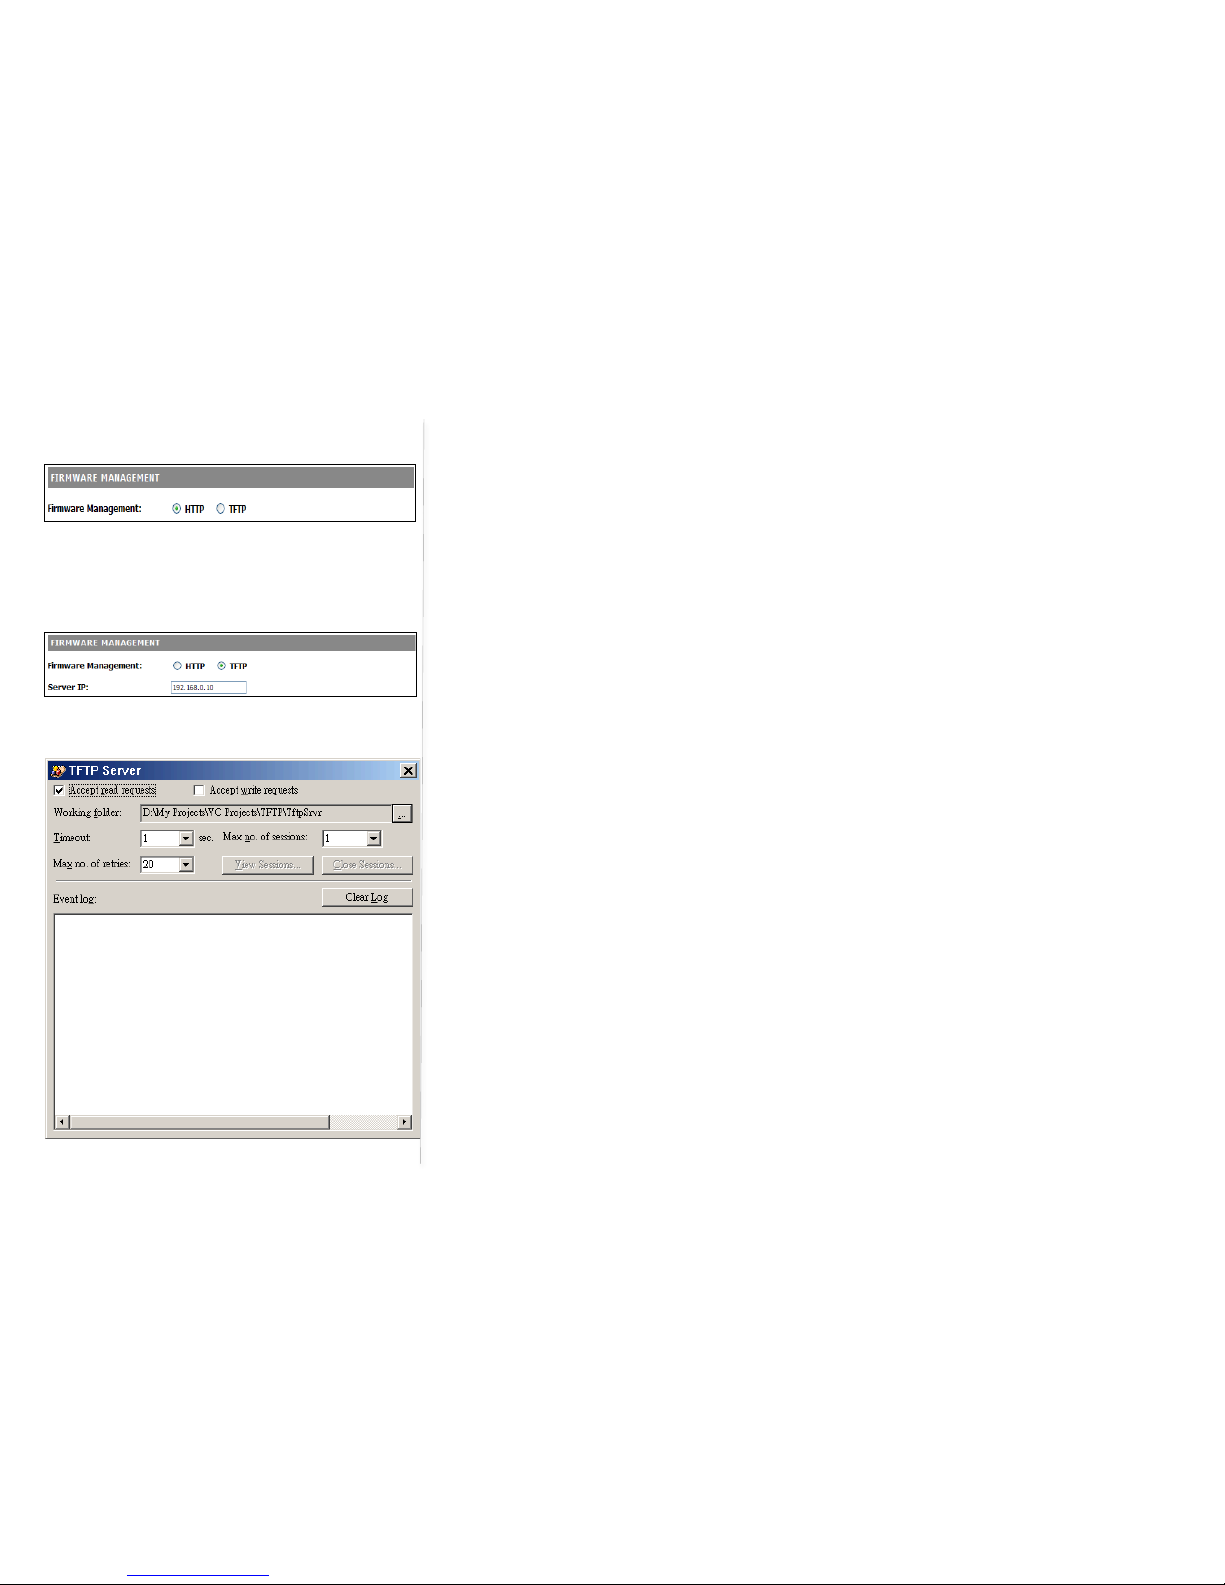
Firmware Tools
Firmware management operations for the DeskPoint Pro include firmware upgrade, configuration
backup(Load Settings), configuration restore (Save Settings), and configuration reset (Load Factory
Default). Firmware upgrade, configuration backup, and configuration restore can be achieved via HTTP
or TFTP. Due to different behavior of different Web browser types and versions, HTTP-based firmware
management operations may not work properly with some Web browsers.
)
When using TFTP as the firmware management protocol, you can configure settings the DeskPoint Pro’s
TFTP client to communicate with a TFTP server. Ensure that the TFTP Server IP uses the same subnet to
prevent errorsarising.
)
Screen capture to the left is the TFTP Server in Windows XP, the TftpSrvr.Please note:
)
After the dialog box of the TFTP server program appears, be sure to specify the
working folder within which the downloaded firmware files reside.
Make sure the Accept read requests check box of TFTP Server is selected.
The LAN IP address of the DeskPoint Pro and the IP address of the TFTP server must
be in the same IP subnet for TFTP to work.
After the firmware is upgraded, be sure to delete the contents of the Web browser
cache, so that the Web management pages can be shown correctly.
A failed upgrade may corrupt the firmware and make the DeskPoint Pro
inaccessible.)
)
Fig 6. Firmware Management via HTTP
)
Fig 7. Firmware Management via TFTP
)
Fig 8. TFTP Server
)

!"#"$%&'()*"+,-./0()-1.)2+"1)3&04&#) ) 5"1+/.0)6787966)
)
6>)
Upgrading Firmware by HTTP or TFTP
To upgrade firmware of the DeskPoint Pro via HTTP:
1. Click Browse and then select a correct firmware .bin file. The firmware file path will be shown in
the Firmware file name text box.
2. Click Upgrade to begin the upgrade process.
)
To upgrade firmware of the DeskPoint Pro via TFTP:
1. Setting TFTP Server IP and then type a correct firmware .bin file.
2. The firmware file will be shown in the Firmware file name text box.
3. Click Upgrade to begin the upgrade process.
)
)
Load Settings by HTTP or TFTP
To!Load!setting!of!the!device!via!HTTP:!
1. Click Browse and then select a correct firmware .dat file. You have to make sure the file name is
the Device’s MAC address. The configuration file path will be shown in the Firmware file name
text box.
2. Click Upload to upload the configuration file to the device.
)
To!Load!setting!of!the!device!via!TFTP:!
1. Setting TFTP Server IP and then type a correct configure file. The default upload file name is
MACName.dat
.
2. The firmware .dat file will be shown in the Firmware file name text box.
3. Click Upload to upload the configuration file to the device.
Fig 9. Firmware upgrade by HTTP
Fig 10. Firmware upgrade by TFTP
)
Fig 11. Lad Settings via HTTP
)

!"#"$%&'()*"+,-./0()-1.)2+"1)3&04&#) ) 5"1+/.0)6787966)
)
6M)
Save Settings by HTTP or TFTP
To!back!up!configuration!of!the!device!via!HTTP!or!TFTP:!
1. You ’l l b e pr o m pt e d t o o p e n o r s ave t he c on fi g u r ati o n f i le. Cl i ck Save.
2. The configuration file is named by the DeskPoint Pro’s MAC address. For example, if the
DeskPoint Pro’s MAC address is 00-01-02-aa-bb-cc, the configuration backup file should be
“000102aabbcc.dat”. Don’t change the configuration file name in the Save As dialog box. Select
a folder in which the configuration file is to be stored. And then, click Save.
)
Resetting Configuration to Factory Defaults
Click the Reset button resets the device configuration to factory defaults.
WARNING: Check before clicking the Reset button before overriding all current configuration setting.
Click the Reboot button to restart the device and waiting 40 to 60 seconds. Newmessagewillprompt:
Change setting successfully!
Do not turn off or reboot the device during this time.
Please wait 35 seconds…
)
System Settings
You c an c h an ge t he U se r N a m e a n d Pa s swo rd o f Ad m i ni s t r ato r (Manager) in the function.
)
Web Management – secure and idle timeout
On this page, you could change the Web Management in HTTP, HTTPS or HTTP & HTTPs both. The
administrator can view and modify the configuration of the DeskPoint Pro.The new password must be
typed twice for confirmation. If you want use SSL to protect and manage the device, you can select
HTTPS for Secure management, https default port number is 443 and http is 80.
Fig 12. Load Settings via TFTP
Fig 13. Save the configuration file
Note 1: The procedure may be a little different
with different web browsers.
Note 2: Make sure to open “Accept acces
requests” in the tftp server.
Fig 14. Resetting configuration to Factory
Defaults
Fig 15. Restart the system
)

!"#"$%&'()*"+,-./0()-1.)2+"1)3&04&#) ) 5"1+/.0)6787966)
)
6?)
)
Fig 20. URL box on IE Browser, use https:// for SSL protection.
)
The setting specifies how long the idle time during which the WEB administrator connection is
maintained during inactivity. The default value is 10 minutes.
)
Notes: HTTPS (Hyper text Transfer Protocol over Secure Socket Layer) is a URI scheme used to indicate
a secure communication such as payment transactions and corporate information systems.
HTTPS is not a separate protocol, but refers to the combination of a normal HTTP interaction
over an encrypted Secure Sockets Layer (SSL) or Transport Layer Security (TLS) connection.
This ensures reasonable protection from eavesdroppers but is weak with man-in-the-middle
attacks.
)
System Tools
Ping
)
Fig 21. Ping Tool

!"#"$%&'()*"+,-./0()-1.)2+"1)3&04&#) ) 5"1+/.0)6787966)
)
6@)
The function will help you to respond to ping requests from a device on Ethernet or Wide Area Network
that are sent to LAN IP.
)
Arping
)
Fig 22. Arping Tool
Arping is a function which is similar in function to ping requests from a device on Ethernet that are sent
to LAN IP, but it operates using Address Resolution Protocol (ARP) instead of Internet Control Message
Protocol.
)
Traceroute
)
Fig 23. Tra c e r o u te To o l
Fig 16. Manager name and password settings
)
Fig 17. Web Management settings
)
!"#"$%&'()*"+,-./0()-1.)2+"1)3&04&#) ) 5"1+/.0)6787966)
)
6H)
The Internet is a large and complex aggregation of network hardware, connected together by gateways.
Tra c e r o u te u ti l izes t h e IP p ro t o c o l t i m e to live field and attempts to elicit an ICMP TIME_EXCEEDED
response from each gateway along the path to some host. This tool is intended for use in network testing,
measurement and management. IP or URL is available. To u s e U R L s e t I P i n t e r f a c e t o D H C P. The results
show the hop addresses numerically rather than symbolically and numerically.
)
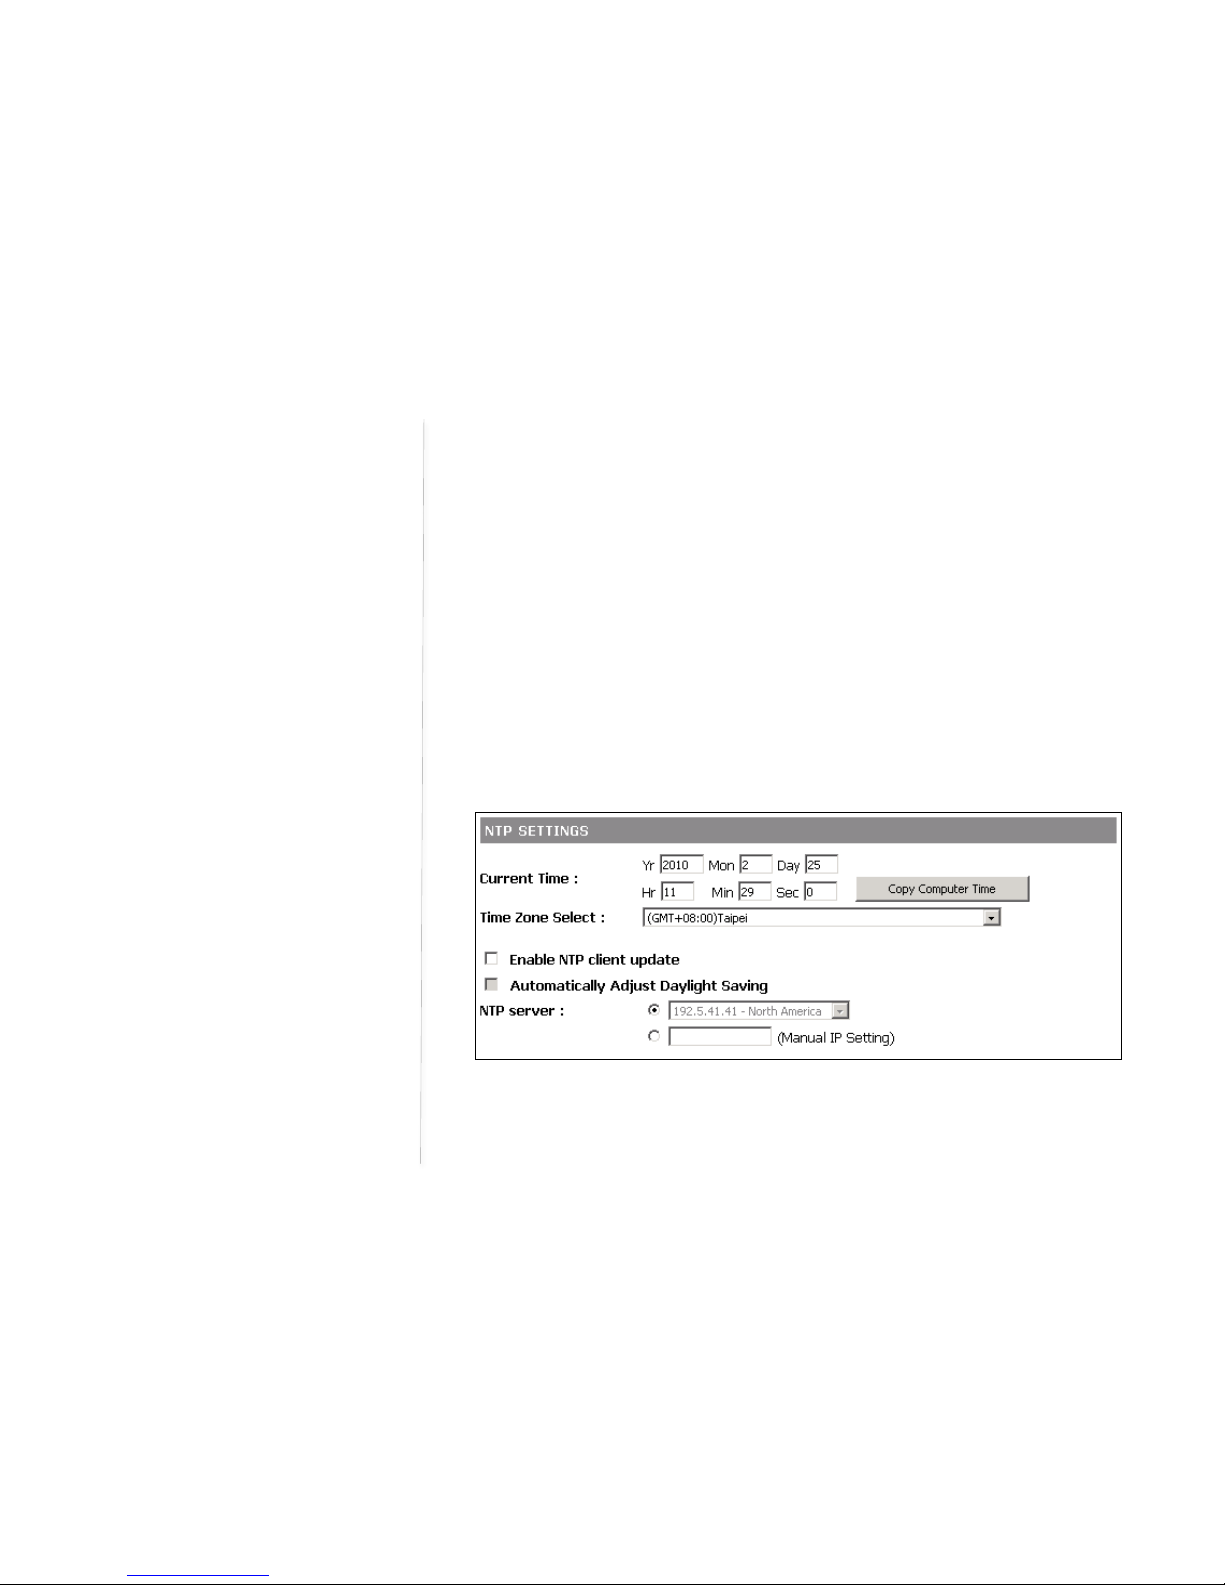
Time Zone Settings
DeskPoint Pro can maintain the system time by synchronizing with a public time server over the Internet.
To schedule a periodic reboot, you can enter the day, hour and min for the system.
)
NTP Settings
In this section, you can set time manually and enable/disable Daylight Saving Time and synchronization
of time upgrading.
)
Fig 24. Daylight Saving Time setting
!"#"$%&'()*"+,-./0()-1.)2+"1)3&04&#) ) 5"1+/.0)6787966)
)
6I)
Periodic Reboot
In this section, you can set a time to order the device to reboot itself automatically.
)
)
SNMP
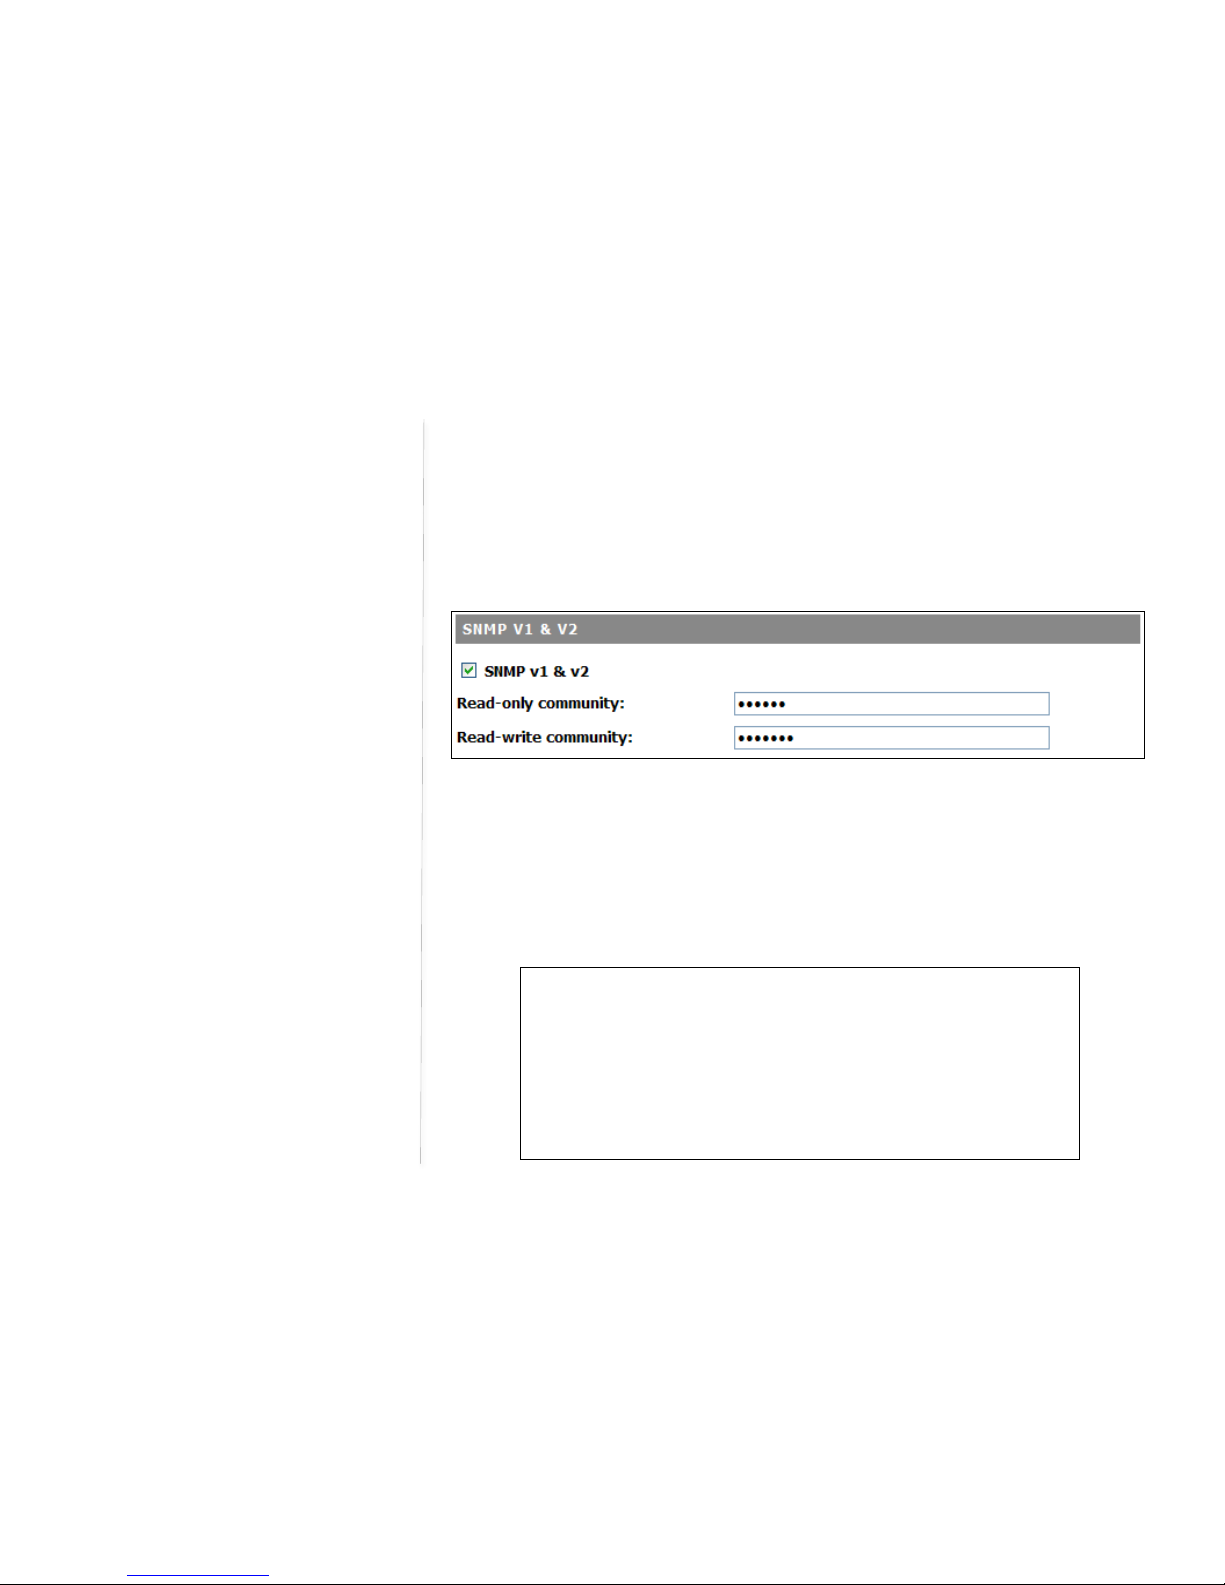
SNMP V1 &V2
)
Fig 26. SNMP settings
The DeskPoint Pro can be managed by SNMP (Simple Network Management Protocol) and the SNMP
management functionality can be disabled. You can specify the name (used as a
password
) of the
read-only and read-write community.
)
SNMP V3 Settings
)
Fig 27. SNMP settings
Fig. 25 Periodic Reboot setting
)

!"#"$%&'()*"+,-./0()-1.)2+"1)3&04&#) ) 5"1+/.0)6787966)
)
79)
SNMPv3 primarily added security and remote configuration enhancements to SNMP. There are three
modes in the Authentication Level. No Auth, Auth and Auth with priv. Only input the User Name in No
Auth mode. Select the Authentication Protocol and apply the user name /password in the Auth Mode.
Select the authentication protocol and privacy protocol if choose the Auth with Priv mode.
Authentication Level
Authentication Protocol
Privacy Protocol
User Name
Password
No Auth)
X
X
○
X
Auth)
○
X
○
○
Auth with Priv)
○
○
○
○
SNMP TRAP TABLE FOR V1 & V2
)
This manual suits for next models
2
Table of contents
Popular Wireless Access Point manuals by other brands


ORiNG
ORiNG TGAP-620-M12 Series user manual

LEGRAND
LEGRAND LUXUL AP-3064 Quick installation guide

Lucent Technologies
Lucent Technologies SLC-2000 Access System Central Office... User & service manual

HP
HP 425 - Notebook PC installation guide

InCoax
InCoax D2501 EU user manual

NETGEAR
NETGEAR prosafe WAC740 installation guide


