Telecom Octopus F50 User manual

================!"§==
Octopus F50
Octophon F640 SIP
Key Module for Octophon F640 SIP
Operating Instructions
Important information
2
Important information
Trademarks
For safety reasons, the telephone should only be supplied
with power:
• using the original power supply unit.
Part number: L30250-F600-C14x (x: 1=EU, 2=US,
3=UK) or
• in a LAN with PoE (Power over Ethernet), which
complies with the IEEE 802.3af standard.
Use only original Siemens accessories. The use of other
accessories may be hazardous and will render the warranty
and the CE marking invalid.
Never open the telephone or a key module. Should you
encounter any problems, contact your administrator.
The device conforms to the EU directive 1999/5/EC as
attested by the CE marking.
All electrical and electronic products should be disposed of
separately from the municipal waste stream via designated
collection facilities appointed by the government or the
local authorities.
Proper disposal and separate collection of your old appli-
ance will help prevent potential damage to the environment
and human health. It is a prerequisite for reuse and recy-
cling of used electrical and electronic equipment.
For more detailed information about disposal of your old
appliance, please contact your city office, waste disposal
service, the shop where you purchased the product or your
sales representative.
The statements quoted above are only fully valid for equip-
ment that is installed and sold in the countries of the Euro-
pean Union and is covered by the directive 2002/96/EC.
Countries outside the European Union may impose other
regulations regarding the disposal of electrical and elec-
tronic equipment.
Q

Important information
3
Location of the telephone
• The telephone should be operated in a controlled environment with an
ambient temperature between 5°C and 40°C.
• To ensure good speakerphone quality, the area in front of the micro-
phone (front right) should be kept clear. The optimum speakerphone
distance is 50 cm.
• Do not install the telephone in a room where large quantities of dust
accumulate; this can considerably reduce the service life of the
telephone.
• Do not expose the telephone to direct sunlight or any other source of
heat, as this is liable to damage the electronic components and the
plastic casing.
• Do not operate the telephone in damp environments such as
bathrooms.
Documentation
These operating instructions can also be found as a PDF file at the
following URL:
http://hilfe.telekom.de > Downloads & Handbücher > Geräte & Zubehör >
Telefonanlagen > Octopus Series
To view or print the operating instructions in PDF format, you need a com-
puter on which the free Adobe Acrobat Reader program is installed.
To view the operating instructions in HTML format, you need a computer
with a Web browser, forexample, Microsoft Internet Explorer.

Contents
4
Contents
Important information. . . . . . . . . . . . . . . . . . . . . . . . . .2
Trademarks . . . . . . . . . . . . . . . . . . . . . . . . . . . . . . . . . . . . . . . . . . . . . . . 2
Location of the telephone . . . . . . . . . . . . . . . . . . . . . . . . . . . . . . . . . . . . 3
Documentation . . . . . . . . . . . . . . . . . . . . . . . . . . . . . . . . . . . . . . . . . . . . 3
General information. . . . . . . . . . . . . . . . . . . . . . . . . . . .9
About this manual . . . . . . . . . . . . . . . . . . . . . . . . . . . . . . . . . . . . . . . . . . 9
Icons used in the manual. . . . . . . . . . . . . . . . . . . . . . . . . . . . . . . . . . 9
Service. . . . . . . . . . . . . . . . . . . . . . . . . . . . . . . . . . . . . . . . . . . . . . . . . . 10
Intended use . . . . . . . . . . . . . . . . . . . . . . . . . . . . . . . . . . . . . . . . . . . . . 10
Telephone type . . . . . . . . . . . . . . . . . . . . . . . . . . . . . . . . . . . . . . . . . . . 10
Speakerphone quality and display legibility . . . . . . . . . . . . . . . . . . . . . . 10
Getting to know the Octophon. . . . . . . . . . . . . . . . . .11
The user interface of your Octophon F640 . . . . . . . . . . . . . . . . . . . . . . 11
Ports on the underside of the phone. . . . . . . . . . . . . . . . . . . . . . . . . . . 12
Using network ports more efficiently . . . . . . . . . . . . . . . . . . . . . . . 13
Key modules . . . . . . . . . . . . . . . . . . . . . . . . . . . . . . . . . . . . . . . . . . . . . 14
Octophon F640 key module . . . . . . . . . . . . . . . . . . . . . . . . . . . . . . 14
Octophon F615 key module . . . . . . . . . . . . . . . . . . . . . . . . . . . . . . 15
Line keys . . . . . . . . . . . . . . . . . . . . . . . . . . . . . . . . . . . . . . . . . . . . . . . . 16
Function keys. . . . . . . . . . . . . . . . . . . . . . . . . . . . . . . . . . . . . . . . . . 16
Audio keys . . . . . . . . . . . . . . . . . . . . . . . . . . . . . . . . . . . . . . . . . . . . 16
Navigator . . . . . . . . . . . . . . . . . . . . . . . . . . . . . . . . . . . . . . . . . . . . . 17
Programmable sensor keys . . . . . . . . . . . . . . . . . . . . . . . . . . . . . . . 18
Dialpad. . . . . . . . . . . . . . . . . . . . . . . . . . . . . . . . . . . . . . . . . . . . . . . 19
Display. . . . . . . . . . . . . . . . . . . . . . . . . . . . . . . . . . . . . . . . . . . . . . . . . . 21
Idle mode. . . . . . . . . . . . . . . . . . . . . . . . . . . . . . . . . . . . . . . . . . . . . 21
Idle-display displays and icons . . . . . . . . . . . . . . . . . . . . . . . . . . . . . 21
Context-dependent displays . . . . . . . . . . . . . . . . . . . . . . . . . . . . . . 22
Telephony interface. . . . . . . . . . . . . . . . . . . . . . . . . . . . . . . . . . . . . . . . 24
Phonebooks. . . . . . . . . . . . . . . . . . . . . . . . . . . . . . . . . . . . . . . . . . . . . . 25
Personal phonebook . . . . . . . . . . . . . . . . . . . . . . . . . . . . . . . . . . . . 25
LDAP directory . . . . . . . . . . . . . . . . . . . . . . . . . . . . . . . . . . . . . . . . 26
Messages . . . . . . . . . . . . . . . . . . . . . . . . . . . . . . . . . . . . . . . . . . . . . . . 27
Voicemail . . . . . . . . . . . . . . . . . . . . . . . . . . . . . . . . . . . . . . . . . . . . . 27
Calls . . . . . . . . . . . . . . . . . . . . . . . . . . . . . . . . . . . . . . . . . . . . . . . . . 28
Telephone menu . . . . . . . . . . . . . . . . . . . . . . . . . . . . . . . . . . . . . . . . . . 30
Program/Service menu . . . . . . . . . . . . . . . . . . . . . . . . . . . . . . . . . . 30
User settings . . . . . . . . . . . . . . . . . . . . . . . . . . . . . . . . . . . . . . . . . . 30
Administration . . . . . . . . . . . . . . . . . . . . . . . . . . . . . . . . . . . . . . . . . 31
Control and monitoring function . . . . . . . . . . . . . . . . . . . . . . . . . . . . . . 31
Contributing towards protecting the environment by saving energy . . 32

Contents
5
Basic functions . . . . . . . . . . . . . . . . . . . . . . . . . . . . . .33
Answering a call . . . . . . . . . . . . . . . . . . . . . . . . . . . . . . . . . . . . . . . . . . 33
Answering a call via the handset . . . . . . . . . . . . . . . . . . . . . . . . . . . 34
Answering a call via the loudspeaker (speakerphone mode). . . . . . 34
Accepting a call via the headset. . . . . . . . . . . . . . . . . . . . . . . . . . . . 35
Switching from handset to speakerphone mode . . . . . . . . . . . . . . . . . 36
Switching from speakerphone mode to the handset . . . . . . . . . . . . . . 36
Switching from headset to speakerphone mode . . . . . . . . . . . . . . . . . 37
In standard mode. . . . . . . . . . . . . . . . . . . . . . . . . . . . . . . . . . . . . . . 37
In US mode . . . . . . . . . . . . . . . . . . . . . . . . . . . . . . . . . . . . . . . . . . . 37
Open listening . . . . . . . . . . . . . . . . . . . . . . . . . . . . . . . . . . . . . . . . . . . . 37
Activating/deactivating the microphone . . . . . . . . . . . . . . . . . . . . . . . . 38
Ending a call. . . . . . . . . . . . . . . . . . . . . . . . . . . . . . . . . . . . . . . . . . . . . . 38
Group call for a team . . . . . . . . . . . . . . . . . . . . . . . . . . . . . . . . . . . . . . . 39
Selected dialing with BLF sensor key . . . . . . . . . . . . . . . . . . . . . . . 39
BLF call pickup. . . . . . . . . . . . . . . . . . . . . . . . . . . . . . . . . . . . . . . . . 40
Listening to voicemail . . . . . . . . . . . . . . . . . . . . . . . . . . . . . . . . . . . . . . 41
Making calls. . . . . . . . . . . . . . . . . . . . . . . . . . . . . . . . . . . . . . . . . . . . . . 42
Off-hook dialing . . . . . . . . . . . . . . . . . . . . . . . . . . . . . . . . . . . . . . . . 42
On-hook dialing . . . . . . . . . . . . . . . . . . . . . . . . . . . . . . . . . . . . . . . . 43
Dialing using the hotline or warmline function. . . . . . . . . . . . . . . . . 44
Redial. . . . . . . . . . . . . . . . . . . . . . . . . . . . . . . . . . . . . . . . . . . . . . . . . . . 45
Consulting a second party . . . . . . . . . . . . . . . . . . . . . . . . . . . . . . . . . . . 46
Switching to the held party (alternating) . . . . . . . . . . . . . . . . . . . . . 47
Putting on hold and retrieving alternately or simultaneously . . . . . . 48
Connecting parties. . . . . . . . . . . . . . . . . . . . . . . . . . . . . . . . . . . . . . 49
Call forwarding. . . . . . . . . . . . . . . . . . . . . . . . . . . . . . . . . . . . . . . . . . . . 50
Programming call forwarding. . . . . . . . . . . . . . . . . . . . . . . . . . . . . . 51
Activating/deactivating call forwarding. . . . . . . . . . . . . . . . . . . . . . . 53
Activating call forwarding for all calls . . . . . . . . . . . . . . . . . . . . . . . . 54
Call forwarding chain . . . . . . . . . . . . . . . . . . . . . . . . . . . . . . . . . . . . 55
Calling back missed calls . . . . . . . . . . . . . . . . . . . . . . . . . . . . . . . . . . . . 55
Programmable sensor keys. . . . . . . . . . . . . . . . . . . .56
List of available functions . . . . . . . . . . . . . . . . . . . . . . . . . . . . . . . . . . . 56
Programming sensor keys. . . . . . . . . . . . . . . . . . . . . . . . . . . . . . . . . . . 57
Initiating programming . . . . . . . . . . . . . . . . . . . . . . . . . . . . . . . . . . . 57
Beginning programming. . . . . . . . . . . . . . . . . . . . . . . . . . . . . . . . . . 58
Programming enhanced functions. . . . . . . . . . . . . . . . . . . . . . . . . . . . . 58
Repertory dialing . . . . . . . . . . . . . . . . . . . . . . . . . . . . . . . . . . . . . . . 58
Forwarding. . . . . . . . . . . . . . . . . . . . . . . . . . . . . . . . . . . . . . . . . . . . 60
BLF sensor keys . . . . . . . . . . . . . . . . . . . . . . . . . . . . . . . . . . . . . . . . . . 61
Configuring BLF sensor keys. . . . . . . . . . . . . . . . . . . . . . . . . . . . . . 61
Using sensor keys . . . . . . . . . . . . . . . . . . . . . . . . . . . . . . . . . . . . . . . . . 62
Example 1: Calling saved number . . . . . . . . . . . . . . . . . . . . . . . . . . 62
Example 2: Activating/deactivating call waiting . . . . . . . . . . . . . . . . 62

Contents
6
Resetting sensor keys. . . . . . . . . . . . . . . . . . . . . . . . . . . . . . . . . . . . . . 63
Enhanced phone functions. . . . . . . . . . . . . . . . . . . . .64
Incoming calls . . . . . . . . . . . . . . . . . . . . . . . . . . . . . . . . . . . . . . . . . . . . 64
Accepting calls via the headset . . . . . . . . . . . . . . . . . . . . . . . . . . . . 64
Deflecting a call . . . . . . . . . . . . . . . . . . . . . . . . . . . . . . . . . . . . . . . . 64
Rejecting a call. . . . . . . . . . . . . . . . . . . . . . . . . . . . . . . . . . . . . . . . . 66
Configuring call forwarding . . . . . . . . . . . . . . . . . . . . . . . . . . . . . . . 66
Placing a call on hold . . . . . . . . . . . . . . . . . . . . . . . . . . . . . . . . . . . . 68
Call waiting (second call) . . . . . . . . . . . . . . . . . . . . . . . . . . . . . . . . . 72
Transferring a call. . . . . . . . . . . . . . . . . . . . . . . . . . . . . . . . . . . . . . . 76
CTI calls . . . . . . . . . . . . . . . . . . . . . . . . . . . . . . . . . . . . . . . . . . . . . . 79
Making calls. . . . . . . . . . . . . . . . . . . . . . . . . . . . . . . . . . . . . . . . . . . . . . 81
Dialing with the selected dialing key . . . . . . . . . . . . . . . . . . . . . . . . 81
Dialing from the local phonebook . . . . . . . . . . . . . . . . . . . . . . . . . . 81
Dialing from the LDAP database . . . . . . . . . . . . . . . . . . . . . . . . . . . 81
Dialing a phone number from a list . . . . . . . . . . . . . . . . . . . . . . . . . 82
Using a system phonebook. . . . . . . . . . . . . . . . . . . . . . . . . . . . . . . . . . 82
Using autodial delay. . . . . . . . . . . . . . . . . . . . . . . . . . . . . . . . . . . . . 83
Conference . . . . . . . . . . . . . . . . . . . . . . . . . . . . . . . . . . . . . . . . . . . . . . 86
Phonebooks and call lists . . . . . . . . . . . . . . . . . . . . .89
Local phonebook . . . . . . . . . . . . . . . . . . . . . . . . . . . . . . . . . . . . . . . . . . 89
Creating a new contact . . . . . . . . . . . . . . . . . . . . . . . . . . . . . . . . . . 89
Editing a contact . . . . . . . . . . . . . . . . . . . . . . . . . . . . . . . . . . . . . . . 89
Deleting a contact . . . . . . . . . . . . . . . . . . . . . . . . . . . . . . . . . . . . . . 90
Deleting all contacts. . . . . . . . . . . . . . . . . . . . . . . . . . . . . . . . . . . . . 90
Searching for a contact . . . . . . . . . . . . . . . . . . . . . . . . . . . . . . . . . . 91
LDAP database . . . . . . . . . . . . . . . . . . . . . . . . . . . . . . . . . . . . . . . . . . . 92
Finding an LDAP entry . . . . . . . . . . . . . . . . . . . . . . . . . . . . . . . . . . . 92
Extended LDAP editing . . . . . . . . . . . . . . . . . . . . . . . . . . . . . . . . . . 93
Quick search . . . . . . . . . . . . . . . . . . . . . . . . . . . . . . . . . . . . . . . . . . 94
Call lists . . . . . . . . . . . . . . . . . . . . . . . . . . . . . . . . . . . . . . . . . . . . . . . . . 95
Editing entries . . . . . . . . . . . . . . . . . . . . . . . . . . . . . . . . . . . . . . . . . 95
Deleting all entries . . . . . . . . . . . . . . . . . . . . . . . . . . . . . . . . . . . . . . 95
Privacy/security . . . . . . . . . . . . . . . . . . . . . . . . . . . . . .96
Deactivating the ringer . . . . . . . . . . . . . . . . . . . . . . . . . . . . . . . . . . . . . 96
Do not disturb . . . . . . . . . . . . . . . . . . . . . . . . . . . . . . . . . . . . . . . . . . . . 97
Enabling "Do not disturb" via a key. . . . . . . . . . . . . . . . . . . . . . . . . . 97
Enabling "Do not disturb" via the idle menu . . . . . . . . . . . . . . . . . . . 97
Allowing "Do not disturb" . . . . . . . . . . . . . . . . . . . . . . . . . . . . . . . . . 98
Security . . . . . . . . . . . . . . . . . . . . . . . . . . . . . . . . . . . . . . . . . . . . . . . . . 99
User password. . . . . . . . . . . . . . . . . . . . . . . . . . . . . . . . . . . . . . . . . 99
Locking the phone . . . . . . . . . . . . . . . . . . . . . . . . . . . . . . . . . . . . . 101

Contents
7
Individual phone configuration . . . . . . . . . . . . . . .103
Display. . . . . . . . . . . . . . . . . . . . . . . . . . . . . . . . . . . . . . . . . . . . . . . . . 103
Adjusting the display to a comfortable reading angle . . . . . . . . . . 103
Setting contrast . . . . . . . . . . . . . . . . . . . . . . . . . . . . . . . . . . . . . . . 103
Adjusting the brightness . . . . . . . . . . . . . . . . . . . . . . . . . . . . . . . . 104
Background lighting . . . . . . . . . . . . . . . . . . . . . . . . . . . . . . . . . . . . 105
Contrast for the Octophon F640 key module . . . . . . . . . . . . . . . . 106
Date and time . . . . . . . . . . . . . . . . . . . . . . . . . . . . . . . . . . . . . . . . . . . 107
Setting the time . . . . . . . . . . . . . . . . . . . . . . . . . . . . . . . . . . . . . . . 107
Setting the date . . . . . . . . . . . . . . . . . . . . . . . . . . . . . . . . . . . . . . . 107
Setting daylight saving time. . . . . . . . . . . . . . . . . . . . . . . . . . . . . . 108
Automatic daylight saving time . . . . . . . . . . . . . . . . . . . . . . . . . . . 109
Time display format . . . . . . . . . . . . . . . . . . . . . . . . . . . . . . . . . . . . 110
Date display format . . . . . . . . . . . . . . . . . . . . . . . . . . . . . . . . . . . . 110
Audio . . . . . . . . . . . . . . . . . . . . . . . . . . . . . . . . . . . . . . . . . . . . . . . . . . 111
Volumes. . . . . . . . . . . . . . . . . . . . . . . . . . . . . . . . . . . . . . . . . . . . . 111
Settings . . . . . . . . . . . . . . . . . . . . . . . . . . . . . . . . . . . . . . . . . . . . . 112
Key click. . . . . . . . . . . . . . . . . . . . . . . . . . . . . . . . . . . . . . . . . . . . . . . . 117
Setting the language and country . . . . . . . . . . . . . . . . . . . . . . . . . . . . 118
Selecting a language . . . . . . . . . . . . . . . . . . . . . . . . . . . . . . . . . . . 118
Country-specific setting . . . . . . . . . . . . . . . . . . . . . . . . . . . . . . . . . 120
Context menu . . . . . . . . . . . . . . . . . . . . . . . . . . . . . . . . . . . . . . . . . . . 121
Activating/deactivating automatic menu display . . . . . . . . . . . . . . 121
Setting the display time . . . . . . . . . . . . . . . . . . . . . . . . . . . . . . . . . 121
Network information . . . . . . . . . . . . . . . . . . . . . . . . . . . . . . . . . . . . . . 123
Resetting user data . . . . . . . . . . . . . . . . . . . . . . . . . . . . . . . . . . . . . . . 124
Initiating the reset . . . . . . . . . . . . . . . . . . . . . . . . . . . . . . . . . . . . . 124
Web interface (WBM). . . . . . . . . . . . . . . . . . . . . . . .125
General . . . . . . . . . . . . . . . . . . . . . . . . . . . . . . . . . . . . . . . . . . . . . . . . 125
Calling up the Web interface . . . . . . . . . . . . . . . . . . . . . . . . . . . . . . . . 125
Administrator Pages. . . . . . . . . . . . . . . . . . . . . . . . . . . . . . . . . . . . 125
User Pages . . . . . . . . . . . . . . . . . . . . . . . . . . . . . . . . . . . . . . . . . . 126
User menu . . . . . . . . . . . . . . . . . . . . . . . . . . . . . . . . . . . . . . . . . . . 127
Fixing problems . . . . . . . . . . . . . . . . . . . . . . . . . . . . .130
Caring for your telephone . . . . . . . . . . . . . . . . . . . . . . . . . . . . . . . . . . 130
Troubleshooting. . . . . . . . . . . . . . . . . . . . . . . . . . . . . . . . . . . . . . . . . . 130
Contact partner in the case of problems . . . . . . . . . . . . . . . . . . . . . . . 131
Labelling keys . . . . . . . . . . . . . . . . . . . . . . . . . . . . . . . . . . . . . . . . . . . 131
Local user menu. . . . . . . . . . . . . . . . . . . . . . . . . . . . .132
Opening the user menu on the phone . . . . . . . . . . . . . . . . . . . . . . . . 132
User menu display. . . . . . . . . . . . . . . . . . . . . . . . . . . . . . . . . . . . . . . . 132
Key functions . . . . . . . . . . . . . . . . . . . . . . . . . . . . . . . . . . . . . . . . . 139

Contents
8
Index. . . . . . . . . . . . . . . . . . . . . . . . . . . . . . . . . . . . . . .141

General information
9
General information
About this manual
This document contains general descriptions of the technical options,
which may not always be available in individual cases. The respective fea-
tures must therefore be individually defined in the terms of the contract.
If a particular function on your phone is not available to you, this may be
due to one of the following reasons:
• The function is not configured for you or your telephone. Please con-
tact your system support representative.
• Your communications platform does not feature this function. Please
contact your Siemens sales partner for information on how to upgrade.
These operating instructions are intended to help you familiarize yourself
with the Octophon and all of its functions. It contains important
information on the safe and proper operation of the Octophon. These
instructions should be strictly complied with to avoid operating errors and
ensure optimum use of your multifunctional telephone in the network.
These instructions should be read and followed by every person installing,
operating or programming the Octophon.
These operating instructions are designed to be simple and easy to under-
stand, providing clear step-by-step instructions for operating the Octo-
phon.
Administrative tasks are dealt with in a separate manual. The Quick
Reference Guide contains quick and reliable explanations of frequently
used functions.
Icons used in the manual
Settings
Operations and settings that can be made both at the phone and over the
Web interface are indicated by an icon and page reference.
Vrefers to an operation or setting performed directly on the phone
zrefers to an operation or setting performed via the Web interface
For your own protection, please read the section dealing with safety
in detail. Follow the safety instructions carefully in order to avoid
endangering yourself or other persons and to prevent damage to the
unit.

General information
10
Voice recording
.Activate recorder (ready to record)
~Deactivate recorder
/Start recording
@Stop recording
Service
If you experience problems or defects with the phone, please dial the
service number for your country.
Intended use
The Octophon phone is a desktop unit designed for voice transmission and
for connection to the LAN. It can also be used as a workstation device. Any
other use is regarded as unauthorised.
Telephone type
The identification details (exact product designation and serial number) of
your telephone can be found on the nameplate on the underside of the
base unit. Specific details concerning your communications platform can
be obtained from your service technician.
Please have this information ready when you contact our service depart-
ment regarding faults or problems with the product.
Speakerphone quality and display legibility
• To ensure good speakerphone quality, the area in front of the telephone
(front right) should be kept clear.
The optimum distance is approx. 50 cm.
• Proceed as follows to optimise display legibility:
– Turn the phone to tilt the display. This ensures you have a frontal view
of the display while eliminating light reflexes.
– Adjust the contrast as required Æpage 103.
The Telekom service department can only help you if you
experience problems or defects with the phone.
Should you have any questions regarding operation, your specialist
retailer or network administrator will gladly help you.
For queries regarding connection of the telephone, please contact
your network provider.

Getting to know the Octophon
11
Getting to know the Octophon
The following sections describe the most frequently used operating ele-
ments and displays.
The user interface of your Octophon F640
1 You can make and receive calls as normal using the handset.
2The graphic display permits intuitive operation of the phone
Æpage 21.
3You can customise your telephone by assigning phone numbers and
functions to the programmable sensor keys Æpage 21.
4
You can use function keys when conducting a call to access fre-
quently used functions (such as Disconnect) or to open the Pro-
gram/Service menu and mailbox Æpage 16.
5Audio keys are also available, allowing you to optimally configure
the audio features on your telephone Æpage 16.
6 The 5-way navigator is a convenient navigation tool Æpage 17.
7The dialpad can be used to enter phone numbers and text
Æpage 19.
8 Incoming calls are visually signalled via the call display.
5
7
1
6
4
3
8
2
Getting to know the Octophon
12
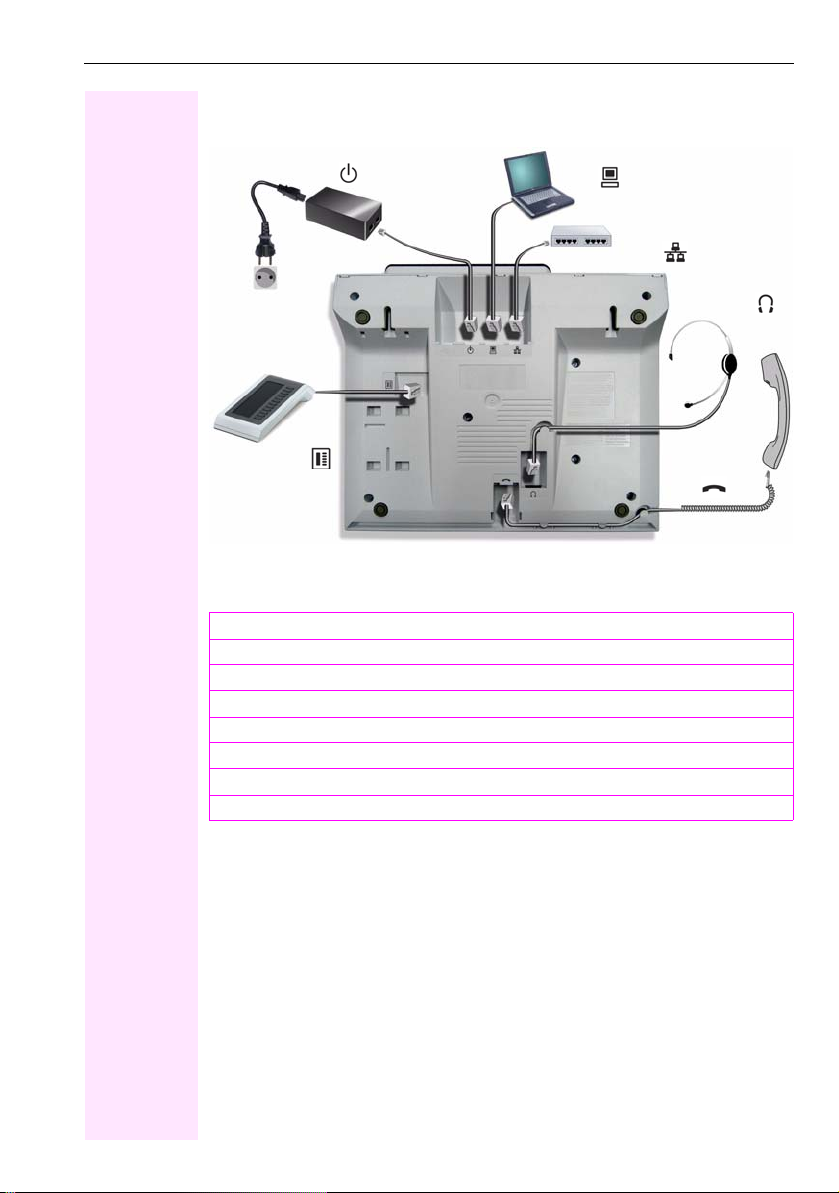
Ports on the underside of the phone
Properties of your Octophon F640
LCD display, 40 x 6 characters
Illuminated display
Programmable sensor keys
Full-duplex speakerphone function
Headset
10/100 Mbps Ethernet switch Æpage 13
Interface for key modules
Wall mounting
Power supply (if necessary) PC
Network switch
Headset
Key module Handset
Country-
specific
cable

Getting to know the Octophon
13
Using network ports more efficiently
The Octophon F640 has a built-in 10/100 Mbps Ethernet switch. This
means that you can connect a PC to the LAN directly via the phone. The
option for connecting the telephone and PC must first be activated on the
telephone by administrator.
Using this connection option saves one network port for each switch used
and requires fewer or shorter network cables when arranged correctly.
Octophon F640Network switch PC

Getting to know the Octophon
14
Key modules
Octophon F640 key module
The Octophon F640 key module is a key module attached to the side of the
phone that provides an additional 12 illuminated, programmable keys.
Like keys on the phone, these keys can be programmed and used
according to your needs Æpage 18.
You can attach up to two Octophon F640 key modules to your Octophon
F640.
To operate an Octophon F640 key module, you always require a
power supply unit Æpage 2.

Getting to know the Octophon
15
Octophon F615 key module
The Octophon F615 key module is a key module attached to the side of the
phone that provides an additional 18 illuminated, programmable function
keys.
Like keys on the phone, these keys can be programmed and used
according to your needs. Labelling keys see Æpage 131.
You can only attach one Octophon F615 key module to your Octophon
F640. You cannot operate the Octophon F615 key module with the
Octophon F640 key module.

Getting to know the Octophon
16
Line keys
Functionkeys
Audio keys
Key Function when key is pressed LED display
sEnd (disconnect) call none
,Open redial list none
rActivate/deactivate forwarding Red: Call forwarding is activated
NOpen phone menu Æpage 30 Red: Menu is active
OView messages Æpage 27 Red: New voicemail or missed
calls
Key Function when key is pressed
pActivate/deactivate microphone (also for speakerphone mode).
oActivate/deactivate the headset.
-Decrease the ring, handset, and loudspeaker volume.
nActivate/deactivate loudspeaker for speakerphone mode and open
listening.
+Increase the ring, handset, and loudspeaker volume.
Getting to know the Octophon
17
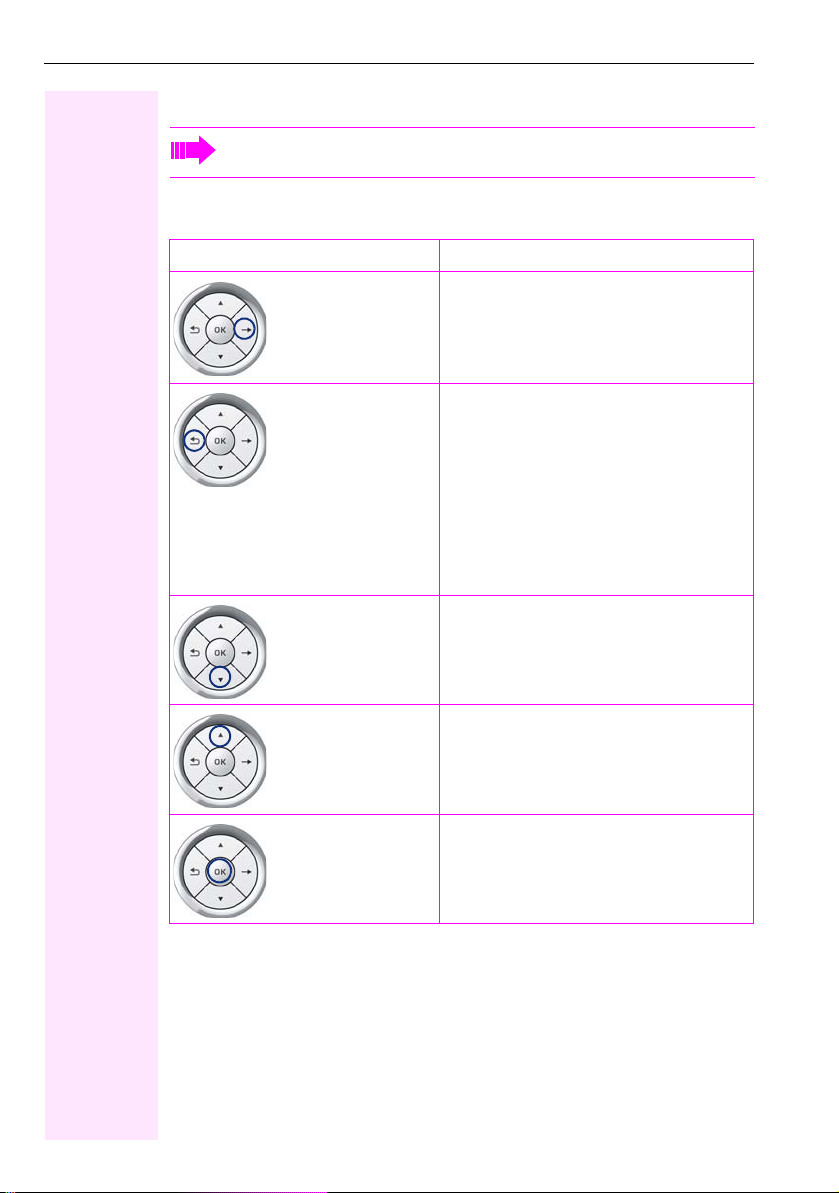
Navigator
With this control, you can manage most of your phone's functions, as well
as its displays.
Before using the telephone, remove the protective covering from
the navigator surface.
Using the function Functions when key is pressed
Press the ckey. • Call up the context menu
• Perform action
• Go down a level
• Call up the context menu in the idle
display and in call state
Press the akey. • Short press: One level back
• Long press (held down): Go back to
the first level of the settings menu
• Cancel function
• Quit the context menu
• In input fields:
Delete character to the left of the
cursor
• Call up the line overview in the idle
menu
Press the dkey. • Scroll downwards
• Select element below
• Long press (held down): Jump to
the end of the list/menu
Press the bkey. • Scroll upwards
• Select element above
• Long press (held down): Jump to
the start of the list/menu
Press the ikey. • Confirm input
• Perform action
• Call up the context menu

Getting to know the Octophon
18
Programmable sensor keys
Your Octophon F640 features six programmable illuminated sensor keys.
Touch the key briefly to activate the programmed function or dial the stored
number Æpage 62.
If you hold the key pressed, you are prompted as to whether to start
programming this function key.
You can label these keys with internal and external phone numbers or
frequently used functions (platform-dependent; please contact the
responsible administrator).
The configured phone number or function name is displayed next to
the key.
The status of a function is shown by the LED on the corresponding sensor
key.
Meaning of LED displays on function keys
Increase the number of programmable sensor keys by connecting a
key module Æpage 14.
If the prompt is not displayed or a programmed function is not
executed, you can only launch key programming via the user menu
Æpage 57 (ask your administrator about the current setting).
Only for selected dialing keys can you also program the second
level for direct destination selection.
LED Meaning of function key
SOff The function is deactivated.
TFlashing1
[1] In this manual, flashing sensor keys are identified by this icon, regardless of the flashing
interval. The flashing interval represents different statuses, which are described in detail in
the corresponding sections of the manual.
Indicates the function status.
ROn The function is activated.
2nd level
Mirea, Ch.

Getting to know the Octophon
19
Dialpad
You can only use the digits 1 to 9 and 0 as well as the * and # characters
when dialing a number. The hnavigation key is used to delete from right
to left.
In cases where text input is possible, you can use the keypad to input text,
punctuation and special characters in addition to the digits 0 to 9 and the
hash and asterisk symbols. To do this, press the numerical keys
repeatedly.
Example: To enter the letter "h", press the number 4key on the keypad
twice. When entering the text, all available characters for this key are dis-
played. After a short while, the character in focus is displayed in the input
field.
Character overview (depends on the current language setting)
To speed up the input, you can confirm your entry by pressing g
on the navigator after you have selected the required character.
To enter a digit in an alphanumerical input field, press the relevant
key and hold it down. You no longer need to scroll through the entire
list of possible characters.
Key 1x 2x 3x 4x 5x 6x
1]1
2a b c 2ä
3d e f 3
4g h i 4
5j k l 5
6m n o 6ö
7p q r s 7ß
8t u v 8ü
9w x y z 9
00
([1]
[1] Next letter in uppercase (active for maxi-
mum one second)
[2]
[2] Switch to digit input
). , ? ! ’ " - ( ) @ / : _

Getting to know the Octophon
20
Multi-function keys:
Alphabetic labelling of dial keys is also useful when entering vanity num-
bers (letters associated with the phone number's digits as indicated on the
telephone spell a name, e.g. 0700 - PATTERN = 0700 - 7288376).
Text editor
A function menu appears under the character selection field in certain
situations (such as when labelling programmable sensor keys). You can
enter punctuation marks and special characters and switch between the
entry of alphanumeric characters in lowercase and uppercase and straight-
forward digit entry.
Additional editor functions can be selected via the navigator:
• OK – Confirm and terminate the entire input
• Cancel – Cancel your entries without saving
• Mode configuration via the ( key
– 123 (# -> ABC) – Numerical entry
– ABC (# -> Abc) – Uppercase characters
– Abc (# -> abc) – Initial character uppercase
– abc (# -> 123) – Lowercase characters
• Move cursor left to add or delete characters
• Move cursor right to add or delete characters
• Copy – Copy a visible character string
• Paste – Insert a copied a character string at a cursor position
Key Function during text input Function when held down
)Type special characters Deactivate the ringtone
(Toggle between uppercase
and lowercase Activate the telephone lock
This manual suits for next models
1
Table of contents
Popular Control Unit manuals by other brands

Lawler
Lawler 67 Series Installation & maintenance manual

StepperOnline
StepperOnline DM456AI user manual

Becker
Becker Centronic SunWindControl SWC445-II Assembly and operating instructions

NuTone
NuTone 82W installation instructions

Johnson Controls
Johnson Controls M300CJ Installation and maintenance instructions

Honeywell
Honeywell SM120 installation instructions


Samsung
Samsung MIM-E03A installation manual

HID
HID Lumidigm M Series Mechanical Integration Guide

Rodix
Rodix FEEDER CUBE FC-200-2 manual

Intermatic
Intermatic K4251 manual

Baker Hughes
Baker Hughes Masoneilan 74000 Series instruction manual

Grundfos
Grundfos PLV Series Installation and operating instructions