Telekonnectors TLK G400 User manual

Instruction Manual
TLK G400 V6 Analog Business Telephone
Following items are included in this package of this Galaxy 400 Analog Business Phone :-
- Phone base unit with handset
- Line cord & coil cord
- Instruction for users
- Headset Stand
- Instructions Manual
Accessories & Content
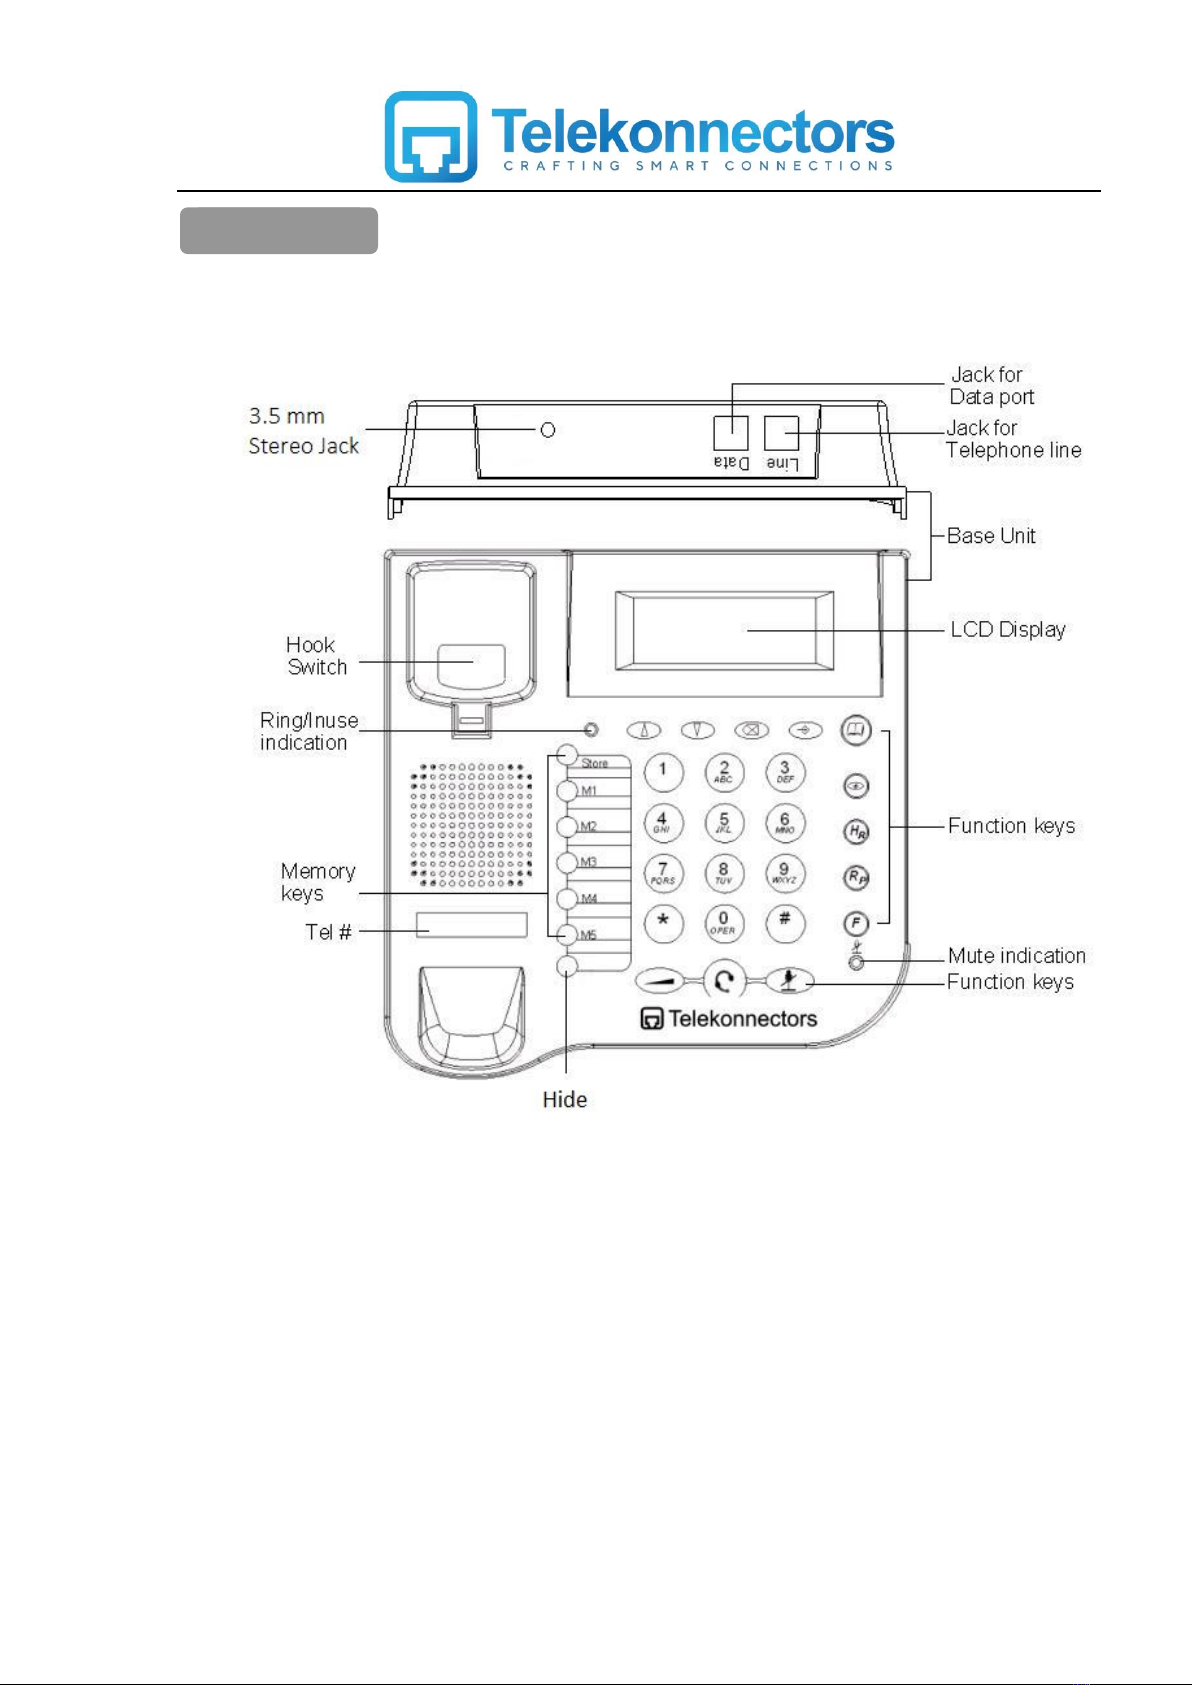
Main Diagram

1. Battery free solution –Works in line power
2. 3.5mm Stereo jack headset port
3. 16 digit Alpha Numeric display
4. 32 digits memory / Redial
5. FSK/DTMF dual system compatible
6. 12 language setting
7. Local area code setting
8. Time, Date,Month and Day setting
9. User selectable flash setting- 100,300,600 and 1000mSec.
10. Tone/Pulse setting
11. PABX code setting
12. Baby call setting
13. DO NOT DISTURB / FILTER function
14. LCD contrast setting- 5 levels
15. Max 80 Incoming call Memory
16. 80 Phone book Memory
17. 50 Dialed number Memory
18. 5 - One Touch Memory –Can be stored even while on a call.
19. Mute with LED indication
20. Music “On Hold”
21. Eight ring tone selections
22. Ringer volume setting –3 levels (HI/LO/OFF)
23. Ring / In use LED indication
24. Pre dial function to avoid wrong calls
25. Call back function
26. Will support Message waiting with indication in display
27. Total Calls and New Calls with indication indisplay
28. Pause -3.6 Sec
29. Hide dialed number for Secret Calls
30. Volume control for headset –4 levels
31. Automatic call timer
32. Headset stand
Features

Function Buttons
Description
0 –9
To enter the Digits 0-9
To enter Alphabets
*
To enter * and Temporary tone
#
To enter #
M1 –M5
One touch memories (24 Digits maximum) Press one of
these keys to make a call to one of the stored telephone
number. Please refer to the instruction for users section
‘One touch memory’
To scroll up/down when browsing selection
(View)
To review the outgoing call numbers.
To view the outgoing call numbers press this button then
use keys to browse
(Delete)
To Delete an entry or a record in the memory. Press and
hold the button for more than 3 seconds, you may
delete all records of the incoming or outgoing calls.
(Set / Dial)
To enter the telephone set up menu.
Dial the numbers in predial mode
(Phone Book)
70 Contact Name and Numbers can be stored
(Headset)
In the on-hook state, when a headset is connected,
conversation can be made via Headset. Switch back to
handset mode,just pickup the handset
(Receive volume)
4 level receive volume control for Headset and Handset.
(Mute)
Press this button to mute, your voice will not pass
through the microphone. To resume,press the button
again. There is a visual LED indicator
Function Buttons

HR
(Hold/Ring)
This button function as music on hold during
conversation.
This button function as ring tone selector in on-hook
state.
RP
(Redial/Pause)
The last dialed numbers (32 Digits maximum) will be
kept in the redial memory. To recall a dialed number
simply press the redial during the off-hook state.
This button function as “Pause” when storing a prefix in
the “one touch memory” for PABX access. The Pause
time is 3.6 sec
F
(Flash)
Flash or Recall
To transfer calls between extensions
Hide
This key is used to hide the dialled numbers. This
feature is utilized by pressing the “hide” key before
dialling the numbers so that the display will not show
any dialled numbers and -- will be diaplayed instead of
the number. To release this feature press the “hide” key
once again.
Congratulations on your purchase of Galaxy 400 analog business phone. This analog business phone
has been ergonamically designed and customised on to suit Indian requirements by Telekonnectors.
This telephone performs all basic functions supported by your service providers. It works with most
PABX switching system (please consult your switching system provider for details ) in analog extension.
In addition, the built-in caller ID decoder and the caller ID memory provide you with great convenience to
manage your phone calls.
The Instruction for users briefly describes the installation procedures and all built-in features.
1) Place the telephone in a dry and well ventilated place.
2) Connect the headset using TLK SmartKonnect cable (SK3) which comes with a 3.5mm stereo
jack pin.
3) Plug the headset stand into the headset stand holes, hang up the headset on the headet stand.
4) Connect one end of the coiled cord to handset and connect the other end to handset jack.
5) Connect one end of the line cord to the jack on the base unit, and the other end to wall outlet
for telephone.
6) Pick up the handset and you will hear the echo from the exchanger or PABX.
Installation
Instruction for users
Press and hold the “Set/Dial” button in on-hook or off hook, the LCD displays “OPTIONS MENU ”.
The following is the key sequence when pressing the “(Up)”button.
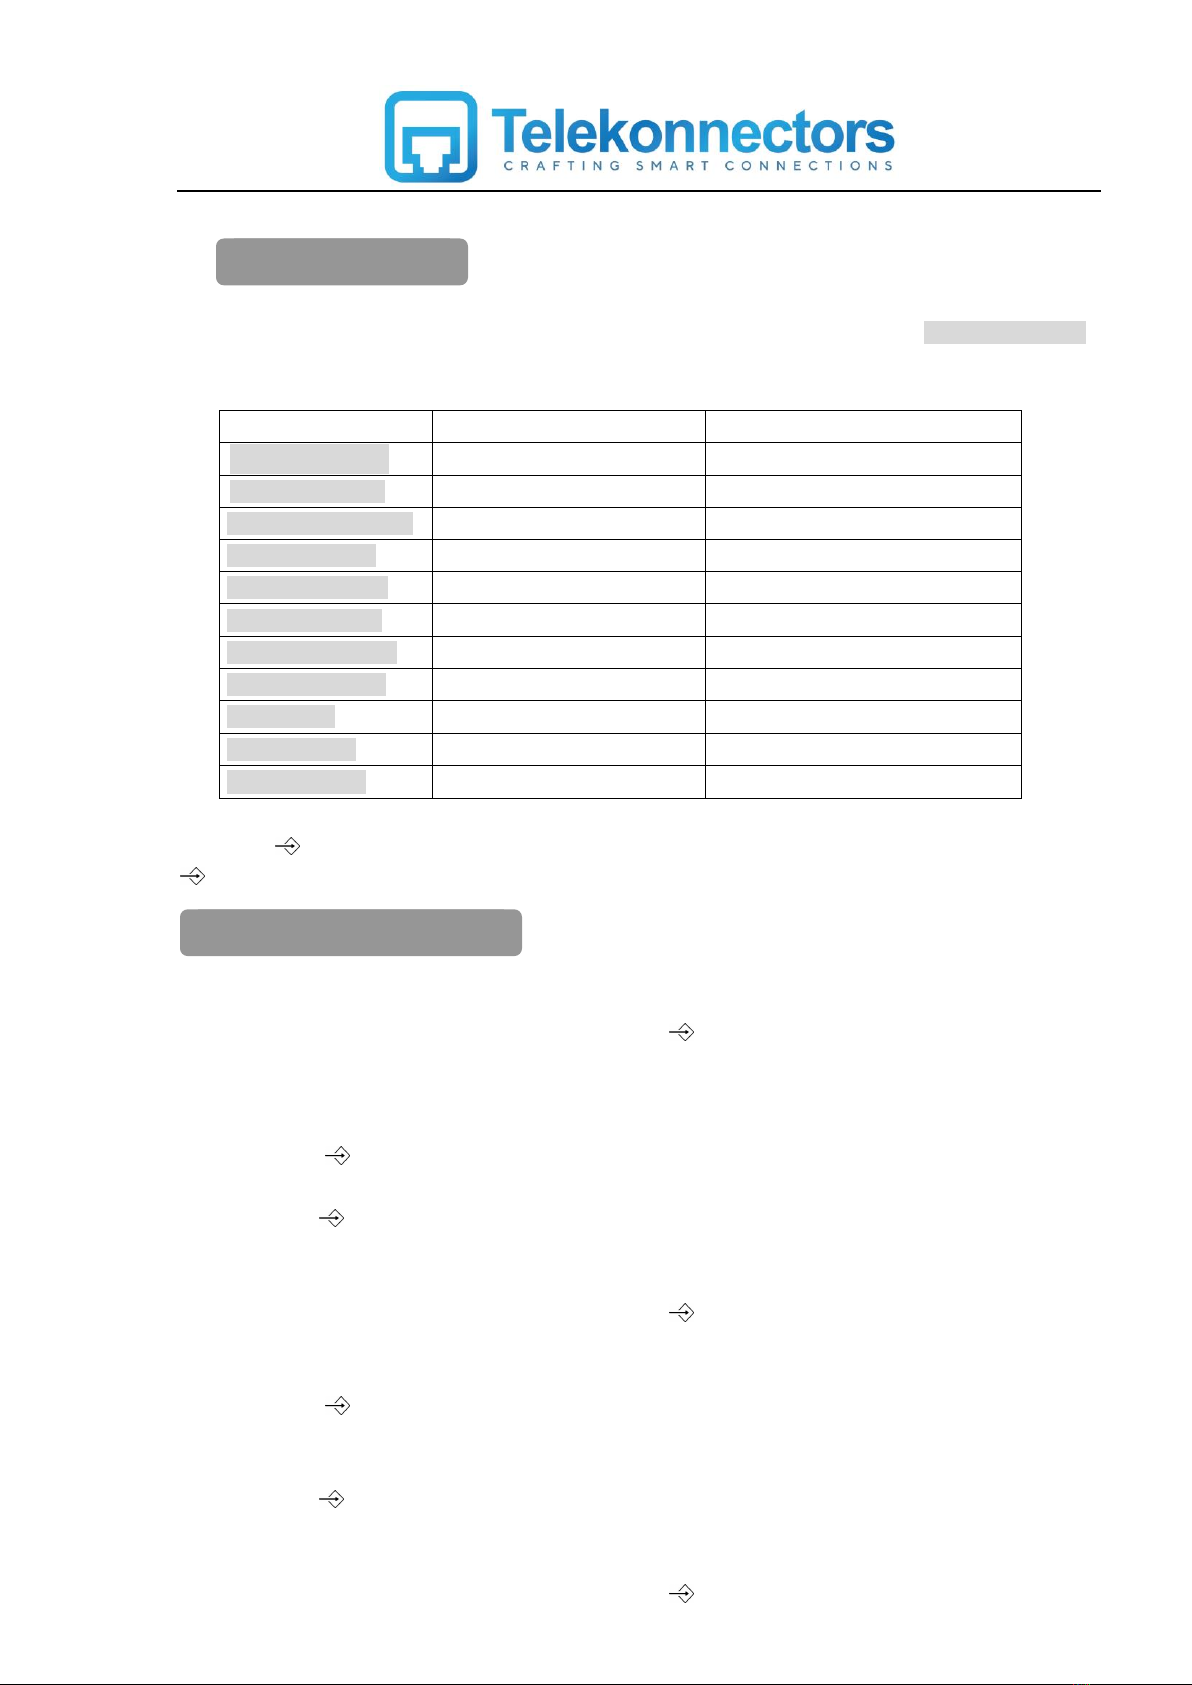
Menu
Default
OPTIONS MENU
SET LANGUAGE
ENGLISH
LOCAL AREA CODE
- - -
SET TIME/DATE
12:00 AM1/01
SET FLASH TIME
300Ms
LCD CONTRAST
3
SET TONE/PULSE
TONE
SET PABX CODE
--
BABY CALL
OFF
FILTER (DND)
FILTER OFF
EXIT OPTIONS
Press the (Set/dial) to visit the submenu, then press the (Up) or (Down) to adjust it. Press the
(Set/dial) to save and return back or press the F(Flash) to exit.
1. Setting language
- In the state of on hook or Off hook, press the (Set/dial) key one time.
- The LCD will show : OPTION MENU
- Press (Up) button
- The LCD will show : SET LANGUAGE
- Press (Set/dial) to enter in to the manu
- Use (Up) or (Down) button to select the language
- Then (Set/dial) button to confirm and set the language
2. Setting local area code
- In the state of on hook or Off hook, press the (Set/dial) key.
- The LCD will show : OPTION MENU
- Using (Up) or (Down) button go to “LOCAL AREA CODE MENU”
- Press (Set/dial) to enter in to the manu
- The LCD will show : AREA CODE - - - -
- Use (Up) or (Down) button to set the area code digits
- Then (Set/dial) button to confirm and set the area code.
3. Setting time&date
- In the state of on hook or Off hook, press the (Set/dial) .
Main manu setting
Preparing your phone before
use

- The LCD will show : OPTION MENU
- Using (Up) or (Down) button go to “SET TIME/DATE”
- Press (Set/dial) to enter in to the manu
- The LCD will show : TIME/DATE
- Use (Up) or (Down) button to adjust the correct hour / Minute / Month / Year
- Then (Set/dial) button to confirm and set the time and date.
4. Setting flash time
- In the state of on hook or Off hook, press the (Set/dial)
- The LCD will show : OPTION MENU
- Using (Up) or (Down) button go to “SET FLASH TIME”
- Press (Set/dial) to enter in to the manu
- The LCD will show : FLASH 300MS,
- Use (Up) or (Down) button to select the required flash timing
- Then (Set/dial) button to confirm and set the flash time.
Note: Available Flash timings –100Ms, 300Ms, 600Ms, 1000Ms
5. Setting LCD contrast
- In the state of on hook or Off hook, press the (Set/dial) key.
- The LCD will show : OPTION MENU
- Using (Up) or (Down) button go to “LCD CONTRAST”
- Press (Set/dial) to enter in to the manu
- The LCD will show : CONTRAST 3,
- Use (Up) or (Down) button to select the required LCD contrast level
- Then (Set/dial) button to confirm and set the LCD contrast level.
6. Setting pulse/tone dialing mode
- In the state of on hook or Off hook, press the (Set/dial) key.
- The LCD will show : OPTION MENU
- Using (Up) or (Down) button go to “SET TONE/PULSE”
- Press (Set/dial) to enter in to the manu
- The LCD will show : TONE,
- Use (Up) or (Down) button to select the required dialing mode.
- Then (Set/dial) button to confirm and set the dialing mode.
7. Setting PABX code
- In the state of on hook or Off hook, press the (Set/dial) key .
- The LCD will show : OPTION MENU
- Using (Up) or (Down) button go to “SET PABX CODE”
- Press (Set/dial) to enter in to the manu
- The LCD will show : PABX CODE - -,
- Use (Up) or (Down) button to set the PABX code.
- Then (Set/dial) button to confirm and set the dialing mode.
8. Setting baby call (Emergency call)
- In the state of on hook or Off hook, press the (Set/dial) key.
- The LCD will show : OPTION MENU
- Using (Up) or (Down) button go to “SET BABY CALL”
- Press (Set/dial) to enter in to the manu
- The LCD will show : BABY CALL OFF,
- Use (Up) or (Down) button to set the emergency call.
- The LCD will show : BABY CALL ON
- Press (Set/dial) to enter in to the manu
- Enter the number
- Then (Set/dial) button to confirm and set the dialing mode.
9. Setting DND function
- In the state of on hook or Off hook, press the (Set/dial) key .
- The LCD will show : OPTION MENU
- Using (Up) or (Down) button go to “SET FILTER ”
- Press (Set/dial) to enter in to the manu
- The LCD will show : FILTER OFF,
- Use (Up) or (Down) button to select the FILTER ON.
- Then (Set/dial) button to confirm and set the dialing mode.
- The LCD will show : FILTER ON 00:00 00:00
- Use (Up) or (Down) button to set the Do Not Disturb timing
- Then (Set/dial) button to confirm and set the DND function.
10. Exit menu
Select the ”EXIT OPTION”then press the or Fto exit.
11. Setting Rings function
- In the state of on hook, press the HRbutton.
- Using (Up) or (Down) button select the required ring tone.
- Press F button to confirm.
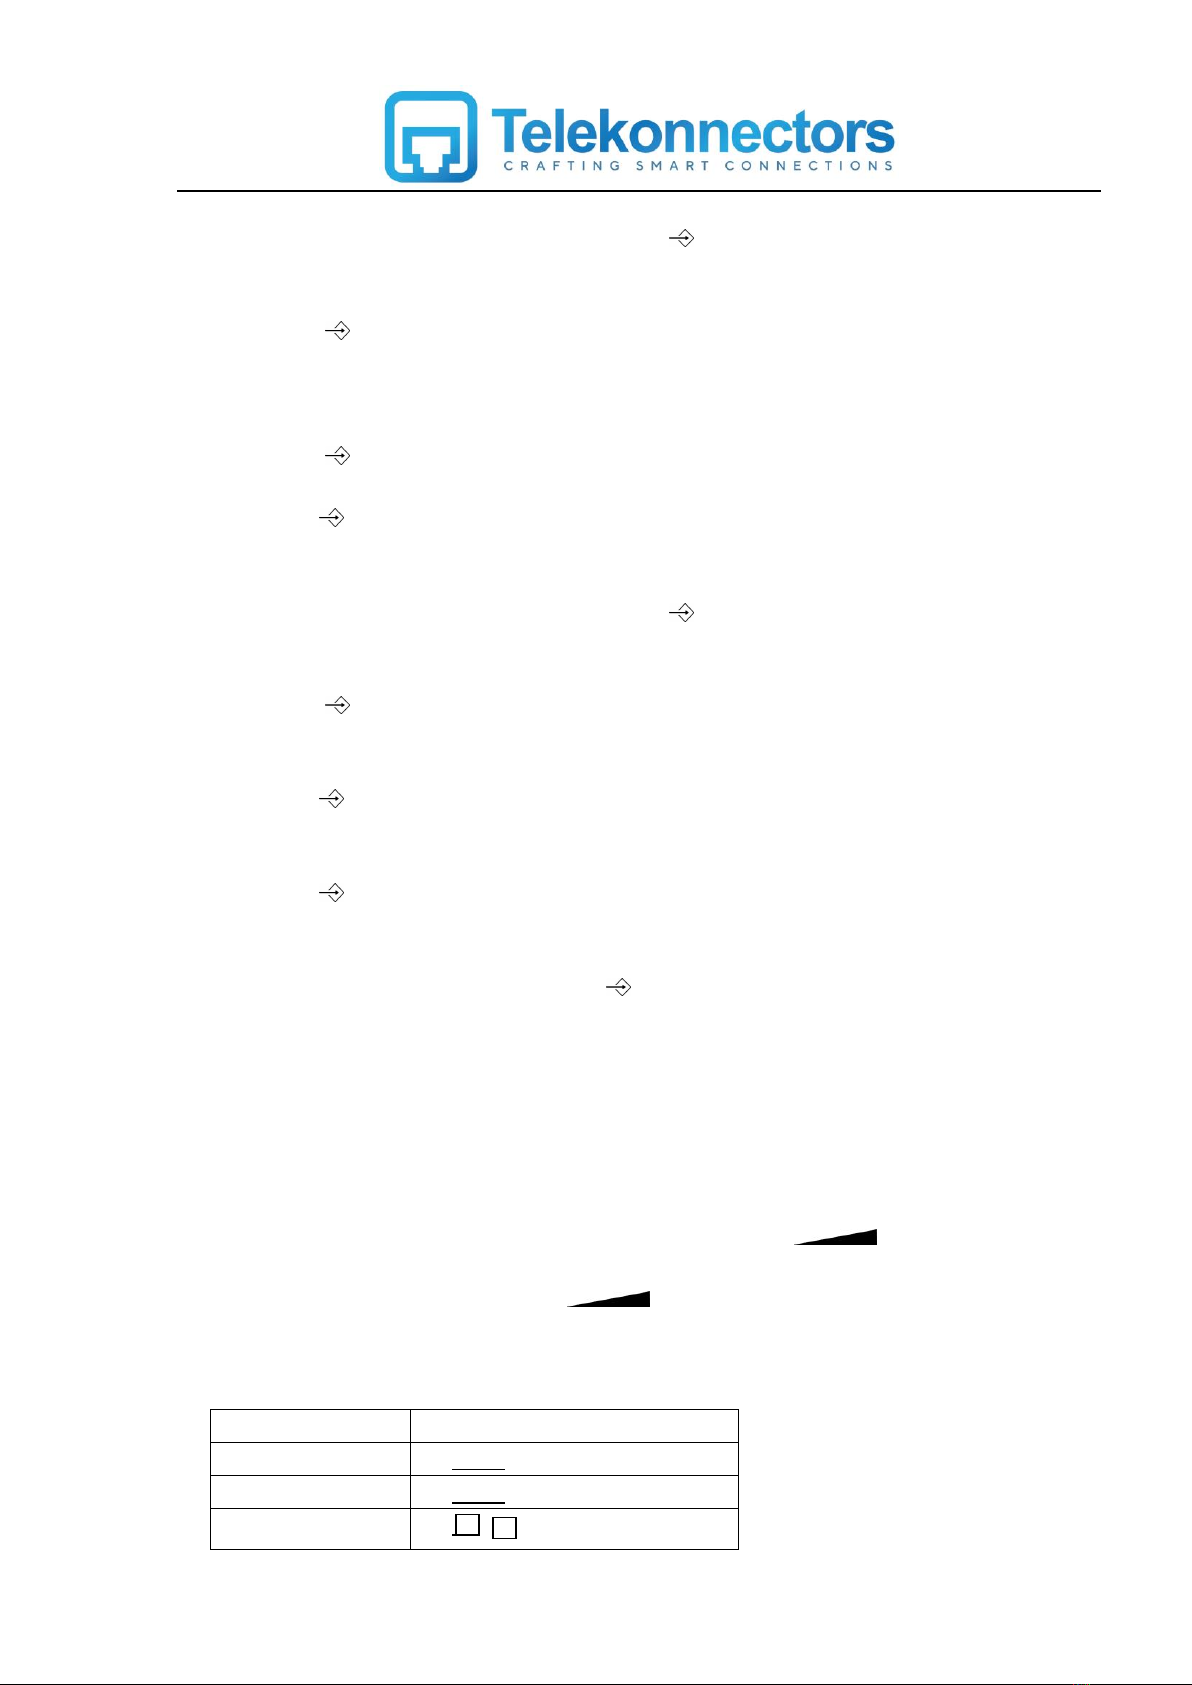
11. Setting Ring volume
The ringer volme level can be set in on-hook by pressing the continuously.
- In the state of on hook, press the button circularly.
There are 3 levels volume control for the rings.
Level
The LCD display
Max level
██
Min level
▂▂
Off
To make a call, simply pick up the handset and wait for the dial tone. Then, dial the desired telephone
number with the numeric keys.
To end a call, put the handset back to the cradle of the base unit, or push the hook switch.
In on-hook enter the phone number to be called, then press the (Set/dial) button to dial out the
number.
Press the (delete)to delete the current wrong number.
Press the F (Flash) to return back.
This Galaxy 400 phone is equipped with a 3.5mm stereo headset jack. With a headset,
conversation can be made via headset.
In on-hook press the (headset) button, wait for the dial tone. Then, dial the desired
number with the numeric keys. The conversation made via headset.
To end a call, press the (headset) button again.
You can switch to handset operation by simply pick up the handset.
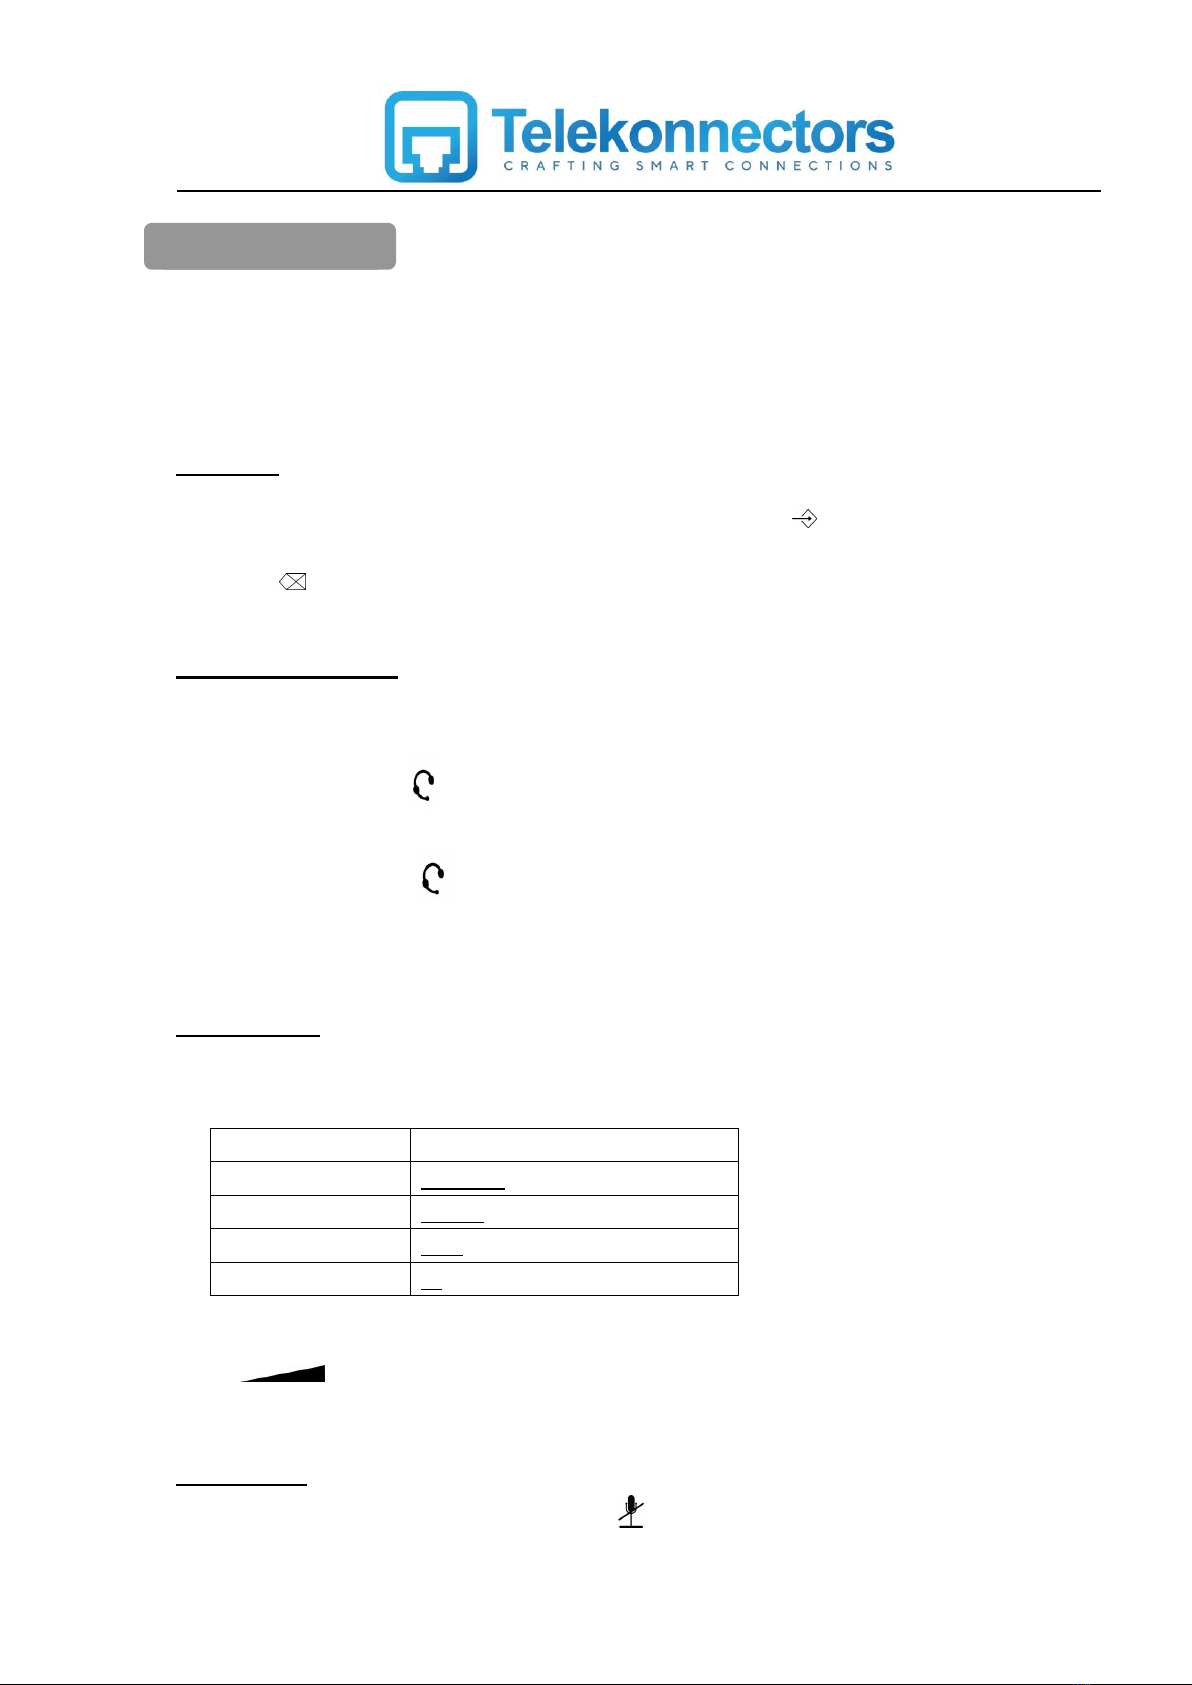
There are 4 levels volume control for the handset and headset
.
level
The LCD display
4th level
▂▄▆█ (Maximum)
3rd level
▂▄▆
2nd level
▂▄
1st level
▂(Minimum)
The volume control can be adjusted during the conversation. When you are on conversation, simply
press volume control circularly to get the confortable level.
To mute your voice during conversation, press (Mute) button and the mute indicator will light up.
(The mute will mute only your voice, it will not suppress the callers voice. So you can hear the callers
voice during on mute. )
Normal operation
Predialling
Operation with headset
Volume control
Mute function

To release the mute, press the (Mute) button again. The conversation could go on and the Mute
indicator will quench.
To put a caller on Hold during the conversation, press the HR(Hold/Ring) button. The caller can hear a
pleasant music tone during the hold.
To release the hold, press HR (Hold/ring) button again.
The default music on hold is “For Elise”.
The last dialed number will be (32 digits maximum) will be kept in the redial memory.
To dial the number in on-hook
- Press RP (Redial/Pause) button
- The dialed number will be displayed in the LCD
- Press (Set/dial) button to dial out the number
To dial the number in off- hook
- Go to off-hook
- Press RP (Redial/Pause) button
The pause feature is useful, when the phone is connected behind the PABX access.
To activate the pause function
- Go to off-hook
- Dial the PABX access number
- Then press RP (Redial/Pause) button
- Dial the caller number.
The flash feature is useful to transfer the calls between extensions, when the phone is connected
behind the PABX access. This feature will work only when the telephone flash timings matches with
the PABX flash timings. So, Consult with the PABX manufacturer and set the flash
timing(100,300,600,1000 msec) accordingly.
The HIDE feature are designed specially for secret dialing use and it can be only used in off-hook
mode.
Hold on Music function
Redial function
Pause function
Flash function
HIDE function

Pick up the handset or Press the (headset) to be in off-hook mode.
Press the HIDE button and then dial the numbders,the LCD will not display the number.Press it
again to resume displaying number.
Please note that the secret dialed number will not be stored in the phone memory.
One touch memory provides you with the easiest way to make a call to a frequently used number.
The maximum 24 digits can be stored in this memory bank
To store a incoming call number
- In on- hook or off-hook
- Press (up) or (down) button to select the number
- Press “Store” button
- The display will show : XXXXXXX STORE NUMBER
- Select the desired memory location M1 / M2 / M3 / M4 / M5
To store a outgoing call number
- In on- hook or off-hook
- Press button
- Press (up) or (down) button to select the number
- Press “Store” button
- The display will show : XXXXXXX STORE NUMBER
- Select the desired memory location M1 / M2 / M3 / M4 / M5
To store a number during conversation
- Go to off-hook
- Dial the required number for conversation
- Press “Store” button
- The display will show : --------- STORE NUMBER
- Select the memory location M1 / M2 / M3 / M4 / M5
To make a call from the one-touch memory
In on-hook
- Press M1 / M2 / M3 / M4 / M5
- Then press (Set/dial) button to dial out
In off-hook
- Go to off-hook
- Press M1 / M2 / M3 / M4 / M5 button to dial out the number
One Touch Memory

This phone is equipped with Caller ID decoder. Caller ID shows and records caller’s available phone
numbers when it rings. Caller iD function only works if your phone line is provided with Called ID
function. Caller ID function must be paid and subscribed seperately from normal phone service. For
details, please consult your phone service provider.
If the number cannot be transmitted, the display will show the text “–E—“ (error in Caller ID signal).
This phone keeps upto 80 incoming call numbers in the Caller ID memory. When the memory is full, the
oldest record will be deleted and replaced by the new one.
- In on-hook or off-hook
- Press (up) / (down) →END OF LIST
When there are new calls, the number of new calls will be displayed in the “NEW XX”. This icon will
continue to show untill the new calls have been reviewed.
- In on-hook or off-hook
- Press (out) button
- Then press (up) / (down) →END OF LIST
press and hold (up) / (down) buttons for 3sec, then the call log will be shown for every
0.5sec and will stop after you release the key.
- In on-hook
- Press (up) / (down) buttons to select the number
- Press (Set/dial) to dial out the number
- In on-hook
- Press (out) button
- Then press (up) / (down) buttons to select the number
- Press (Set/dial) to dial out the number
Operation of called ID
1. To review the incoming calls
To review the outgoing calls
Quick viewing
2. To make a call from the Caller ID memory
To make a call from the dialed out memory

- In on-hook or off-hook
- Press (up) / (down) buttons to select the number
- Press the (delete) button
- The display will show : XXXXXX DELETE CALL?
- Press the (delete) button to delete the number.
- In on-hook or off-hook
- Press (out) button
- Press (up) / (down) buttons to select the number
- Press the (delete) button
- The display will show : XXXXXX DELETE?
- Press the (delete) button to delete the number.
Simply press and hold the (delete) button for more than 3 sec.
- The LCD will show : DELETEALL CALLS?
- Press the (delete) button
You can store 70 contacts name and number in phone book memory
- In on-hook or off-hook
- Press (phone book) button
- The display will show : SEARCH ADD
- Press (up) / (down) buttons to selectADD
- Press (phone book) button
- Enter the contact Name using alpha numeric buttons
- Press (phone book) button
- Enter the contact Number using number buttons
- Press (phone book) button to confirm
- In on-hook or off-hook
- Press (up) / (down) buttons to select the number
- Press (phone book) button
3. To delete a record from the Caller ID memory
To delete a record from the dialed out memory
To delete all record
4. Phone book Memory
To add a contact in phone book
ion
To add the incoming call in to phone book
- Enter the contact Name using alpha numeric buttons
- Press (phone book) button
- Confirm the number
- Press (phone book) button
- In on-hook or off-hook
- Press (out) button
- Press (up) / (down) buttons to select the number
- Press (phone book) button
- Enter the contact Name using alpha numeric buttons
- Press (phone book) button
- Confirm the number
- Press (phone book) button
Press the (delete) button to delete the current wrong letter or digit.
Press the F (Flash) to return back
- In on-hook or off-hook
- Press (phone book) button
- Press (up) / (down) buttons to select the SEARCH function
- Press (phone book) button
- Press (up) / (down) buttons to select the contact
- In on-hook or off-hook
- Press (phone book) button
- Press (up) / (down) buttons to select the SEARCH function
- Press (phone book) button
- Press and hold the (up) / (down) buttons for 3 sec, then the record will be showed for
every 0.5sec and will stop after you release the key.
- In on-hook or off-hook
- Press (phone book) button
- Press (up) / (down) buttons to select SEARCH function
- Press (phone book) button
To add the outgoing call in to phone book
Search function
Quick search function
Edit function

- Press (up) / (down) buttons to select contact
- Press (phone book) button
- Edit the name
- Press (phone book) button
- Edit the name using alpha numeric buttons
- Press (phone book) button
- Edit the number using number buttons
- Press (phone book) button
- Press F (Flash) to exit.
Message waiting indication is a subscription based voice mail service from the network operator.
When there is a message in the voicebox,the mail icon on the LCD will light up and flicker. This
icon will not turn off until you have retrieved your voice mail or delete the caller ID record.
The message waiting feature will be off by pressing the (delete) button for 3 sec
continuously.
For details, please consult your phone service for the availability of this function.
On conversation, the LCD displays “00-00”.The timer will start after 6 sec later.
The LCD will keep displaying the conversation time for 3sec after the call ends.
To reduce the risk of fire, electrical shock and injury, please follow these basic safety
precautions before you use this equipment.
1. Carefully read the instructions in this manual.
2. Follow all warnings and instructions marked on the unit
3. When cleaning, unplug the telephone jack and the adaptor jack from the wall outlet. Use a
damp cloth. Do not use liquid or aerosol cleaners.
4. Do not use this equipment near water, eg. near a kitchen sink, bathtub, washbowl, laundry
rub, swimming pool or in a wet basement.
5. Install in a protected location. Ensure all lines and cords are away from foot traffic. Do not
place objects on the line cord that may cause damage or abrasion.
6. Children don’t recognize the risk of electrical appliances. Therfore use or keep the
appliance only under supervision of adults or out of the reach from children
7. Avoid spilling any liquid on the unit. This may cause internal shorting, fire or shock and is
not covered under your warranty.
8. The appliance should not be placed near hot surfaces e.g. hotplate, oven etc., because this
can melt the material.
5. Message waiting indication
6. Automatic call timer
Safety precautions

9. Do not overload wall outlets and extension cords as this can result in risk of fire or electrical
shock.
10. Never push objects of any kind into this telephone as they can touch dangerous voltage
points or short out parts that could result in a risk of fire or electrical shock.
11. Take the phone to a qualified technician when it requires repair work or service. To reduce
the risk of electrical shock, do not disassemble the telephone. Opening or removing covers
can expose you to dangerous voltages or other risks. Incorrect reassembly can also cause
electrical shock during subsequent use.
12. Avoid using the telephone during an electrical storm.
13. Do not use the telephone to report a gas leak, if in the vicinity of the leak.
14. Unplug this telephone from the wall outlet and refer servicing to qualified service personnel
under the following conditions:
- When the liquid is spllied onto the unit.
- When the unit is exposed to rain or water
- When the unit does not operate normally by following the operating instructions.
- When the unit is dropped or the casing is damaged
- When the unit exhibits a distinct change in performance.
Q1. My phone dos not work!
A1. Make sure that the line cord and the coil cord are connected securly to the jacks.
A1. Push the hook switch once and wait for the dialing tone again.
A1. If you have connected more than one phone to the same telephone line, make sure all
other telephones connected are put on-hook. In some telephone systems, when the first
phone on the telephone line is used, all other telephones are electrically disconnetced.
A1. Try to connect another telephone to the telephone socket, if the problem persists, it
appears that there is a problem with your telephone line system, consult your network
provider.
Q2. My phone does not ring!
A2. Make sure the line cord is connected securely to the jacks.
A2. You may have too many communication devices hooked to a single line. A communication
device can be a phone, Modem or a facsimile (FAX) machine. Contact your phone service
provider for help in calculating the limit for your residence or business line.
A2. Make sure that the ring volume is in high position.
Q3. The memory buttons do not work as expected!
A3. Make sure that you do not enter telephone numbers that are longer the limits mentioned in
Trouble shooting

the one touch memory section.
A3. If your phone is connected behind a PABX system, consult your system provider for
information of timed pause delay required before making an external call. Make sure the
correct prefix is stored in each phone book memory to ensure a sucessful outgoing call.
Q4. Caller’s number does not show on my phone
A4. Make sure that your phone line is provided with caller ID function from the phone service
provider. In most of the countries, caller ID function must be paid for and subscribed to
separately from the normal phone function. For details, please consult your phone service
provider.
A4. Caller’s may suppress their caller’s number when making their phone call, in this case the
Caller’s number may not be necessarily displayed when a call is received. The text “—E—“ will
be shown instead. For details, please consult your phone service provider.
Table of contents


