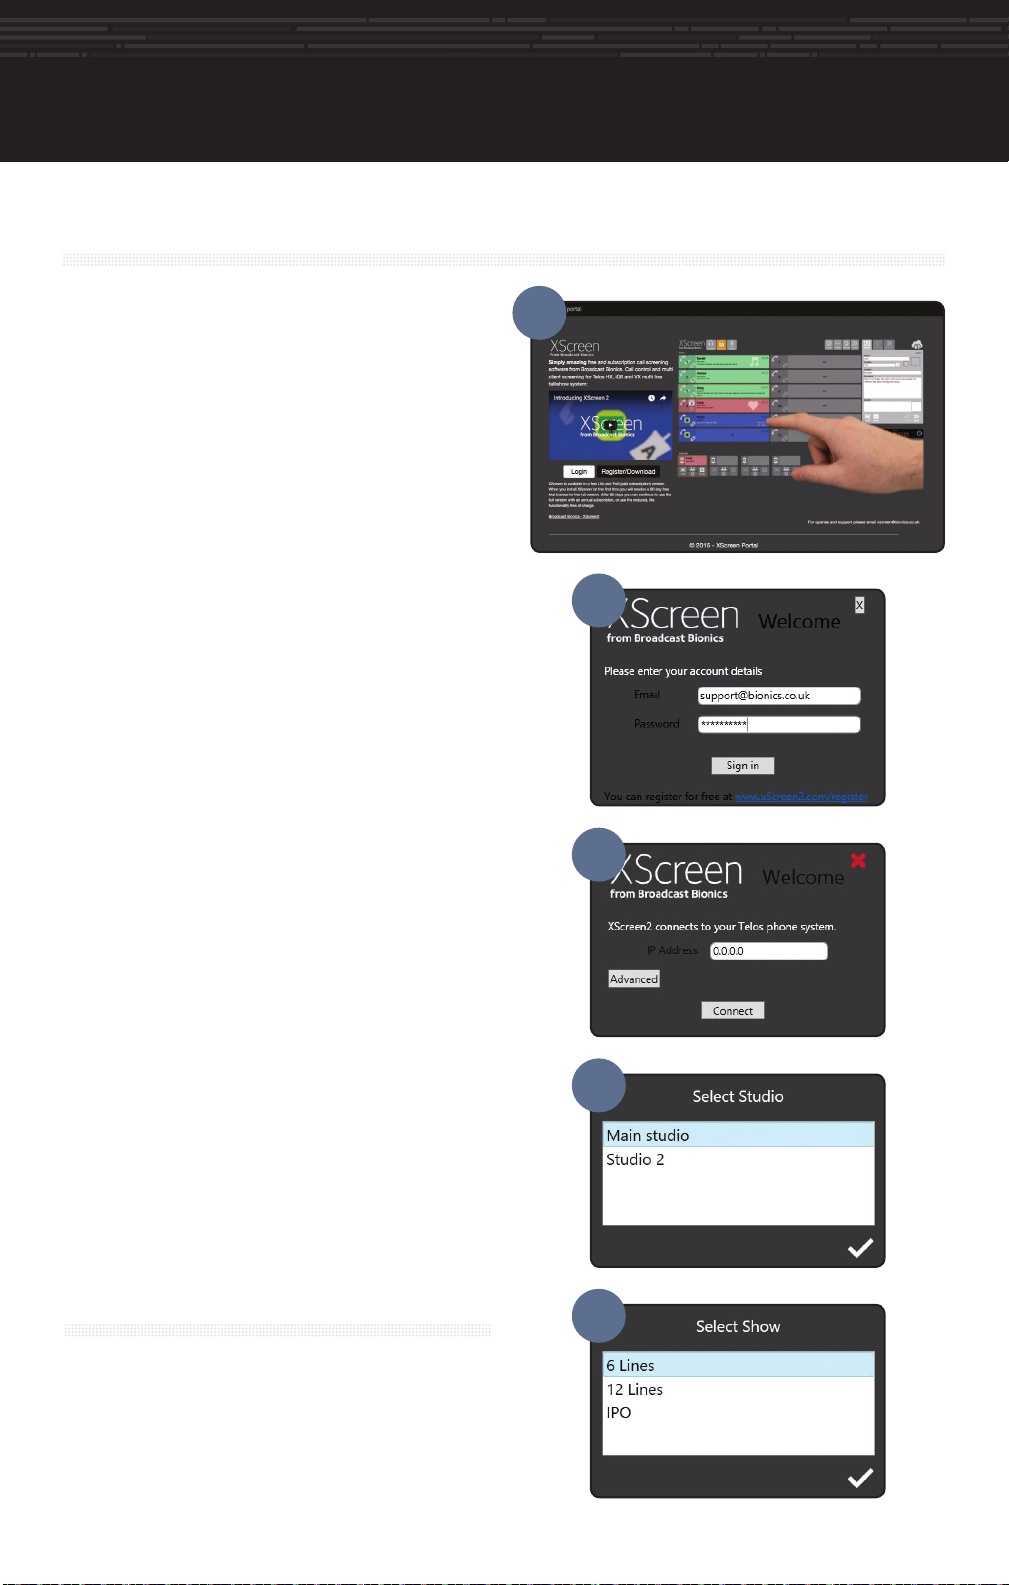
audio conFiGuration For HX6 (HX6 uSerS onlY) audio conFiGuration (cont.)initial Set uP netWork conFiGuration
1. From the statusscreen(C),press anyofthethree
keys to the right of the LCD display to access
configurationoptions.
2. Press the down arrow key (D) until “Telecom”
ishighlighted.Thenpressthe“OK”key(E).
3. Press t h e d o w n a r r o w k e y ( D ) u n t i l “ P O T S ”
ishighlighted.Thenpressthe“OK”key(E).
4. Press the down arrow key (D) until “Country”
is highlighted. Then press the “OK” key (E). Press
the up (F) and down (C) arrow keys to locate and
highlightyourcountry.Thenpressthe“OK”key(E).
Note:Ifyourcountryisnotlisted,useCTR21orUSA.
continue to additional conFiGuration
Hx6 User? Continue to the ”Audio Configuration”
instructions.
iQ6 User? Skip “Audio Configuration” instructions and
continuetothe“NetworkConfiguration”instructions.
eStabliSH a miX minuS outPut on Your conSole
1. Amixminusisamixofallofthesourcesthecallershallhear,minustheoutputoftheTelos.Thisis
necessarybecausethecallerscanalreadyhearthemselvesoverthephoneline,soitisnotnecessary
(andundesirable)tosendthecallers’audiobacktothemviathehybrid.
2. DetermineyourMixMinusconfiguration,thenproceedtotheappropriatestepbelow.
Hx6-Rear
aSSiGn an iP addreSS
1. Fromthestatusscreen(C),pressanyofthethree
keys to the right of the LCD display to access
configurationoptions.
2. Press the down arrow key (D) until “System”
ishighlighted.Thenpressthe“OK”key(E).
3. Press the down arrow key (D) until “Networking”
ishighlighted.Thenpressthe“OK”key(E).
4. Press the down arrow key (D) until “IP Address”
ishighlighted.Thenpressthe“OK”key(E).
5. Press the up arrow key (F) to begin to enter a
value at the cursor position. Press the up/down
arrowkeys(F/D)toselectthedesiredinteger,once
selected,press the “OK” key(E). Besure to note
the IP address for additional configuration. Once
thevalueiscomplete,pressthe“OK”key(E).
1. Install youriQ6orHx6ina1RUhighspaceonastandard19”rack.
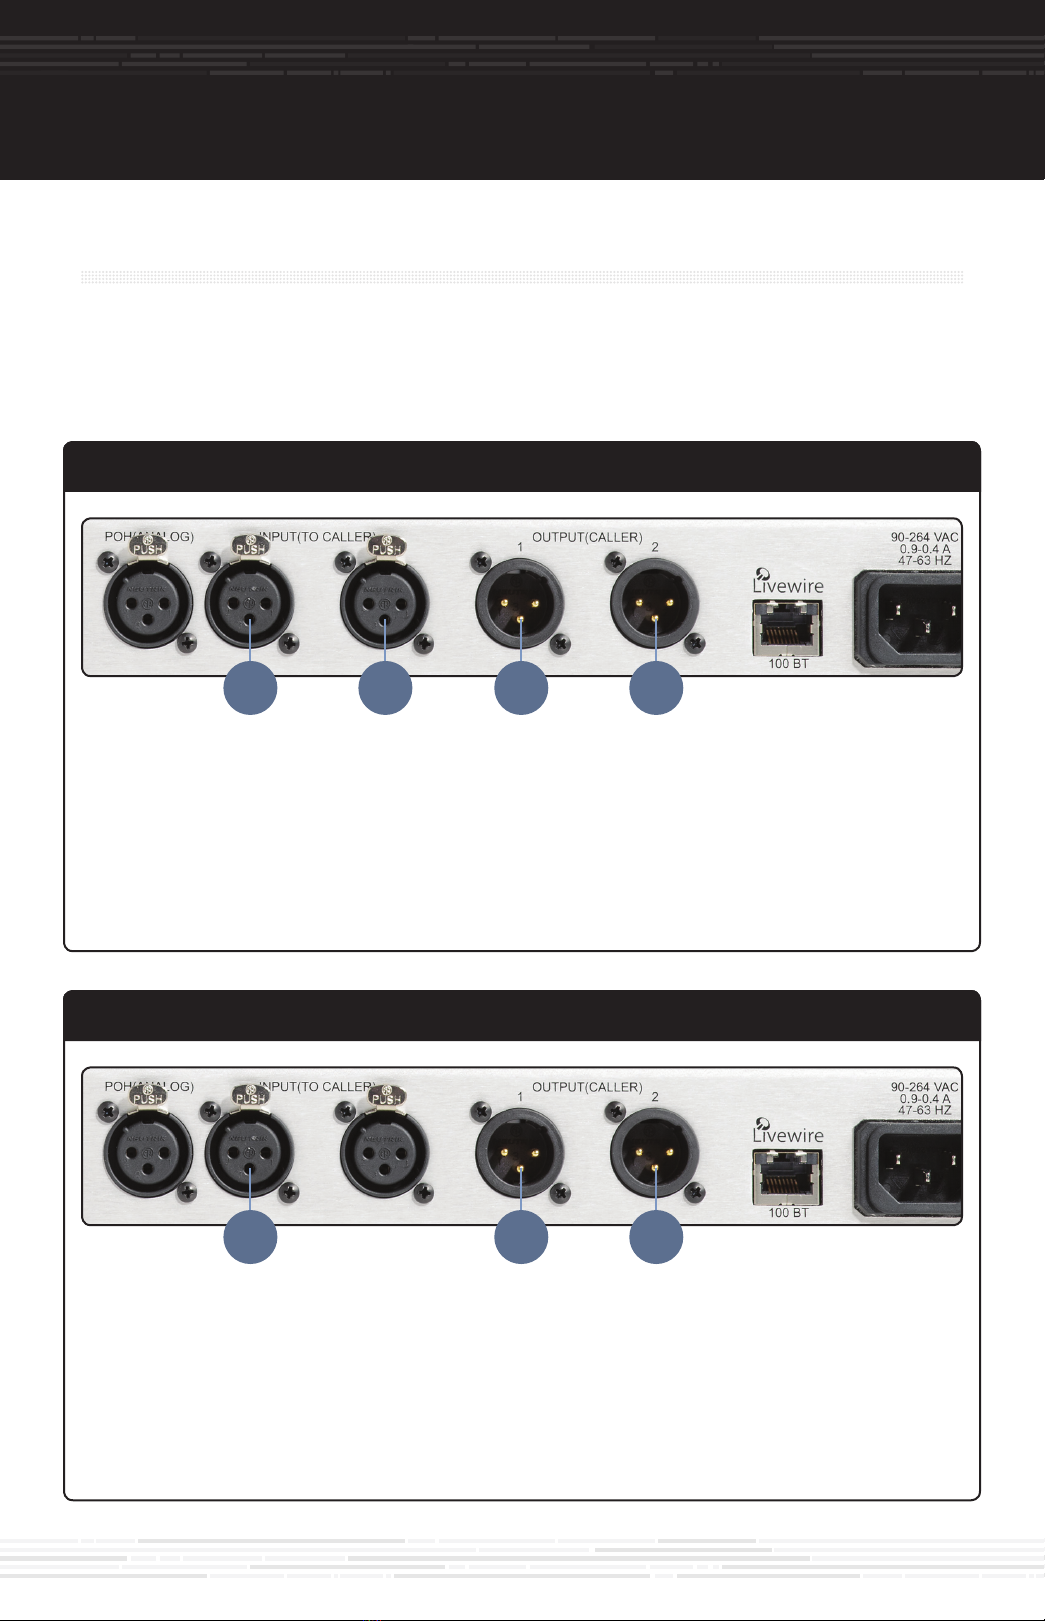
2. Connect upto6RJ-11cablesfromyourPOTSTELCOsystemtothe“TELCOINTERFACE”ports(A).
3. ConnecttheiQ6/Hx6toACMains(B).
PHYSical connectionS
on-board telco Set uP
iQ6-Rear
D
E
D
E
D
E
F
D
E
D
E
D
E
F
C
C
TelosrecommendsconnectingyourHx6toprofessional-gradeaudioequipmentwithbalancedaudioconnections.
IfyourHx6mustconnecttosemi-pro"unbalanced"audioinputsoroutputs,werecommendusingatwo-way,
externalbalanced/unbalancedlinelevelconverter.Commonmodelsincludethe"Matchbox","ProMatch",and
"CleanBoxPro",aswellasothermodelnames.
SEPARATE - (Default) - each hybrid has its own independent input and output.
G H H
SINGLE - mixing console only offers one output bus for mix minus.
H HG
SINGLE MONO OUT - mixing console only offers one output bus for phone mix minus and one input channel for callers.
G H
EthernetSwitch
inStallation HelP
For more details about the Telos iQ6, or to download
thefullmanualpleasevisit:
https://www.telosalliance.com/Telos/iQ6
For more details about the Telos Hx6, or to download
thefullmanualpleasevisit:
https://www.telosalliance.com/Telos/Hx6
Ifyouhavemorequestions,calltheTelosAlliance24/7
Support Team at +1 (216) 622-0247, or email us at
support@telosalliance.com,we’dbehappytohelpyouout.
BoththeTelosHx6andiQ6haveanEthernetconnection
on the rear panel. The iQ6 has no traditional audio
I/O; as such it is used exclusively in Livewire network
installations.AniQ6andanyVSet6'swillbeconnected
onlytoaLivewirenetworkusingqualifiedandproperly
configuredEthernetswitches.IfaTelosHx6isinstalled
using Livewire for audio I/O, then it also must be
connected to a Livewire network using qualified and
properly configured Ethernet switches. Refer to Axia
manualsandotherAxiasupportdocumentsforfurther
information about Livewire networks and qualified
Ethernetswitches.
MostusersofaTelosHx6willusethetraditionalaudio
I/O connections - analog or AES digital. The Livewire
audioI/Ocapabilitywill be disabled (thisisthe default
setting in the Hx6) and the Ethernet jack is used only
to communicate with any VSet6's or PCs running call
screeningsoftware.AsnoLivewireAudiooverIPisused
innon-Livewiresettings,asimple,unmanagedEthernet
switch may be used. This Ethernet switch provides
networkconnectionsfortheHx6tocommunicatewith
any VSet6 phones, as well as call screener PCs. When
using a switch not configured for Livewire AoIP, it's
important to never enable the Hx6's Livewire audio
capabilities, as some or all network communications
maybelostwhenLivewireisenabledontheHx6.
etHernet SWitcH connection noteSmakinG Your oWn cableS?
Ifitisnecessarytomakeyourowncablestopatchthesystemintoyourconsole,
pleaserefertotheillustrationbelowforproperconfiguration.
G
a. ConnecttwocablestotheInput(ToCaller)XLRjacks(G).Connecttheotherendofthecablesto
thephonebusorAux1andAux2lineoutputsofyourconsole.
b. ConnecttwocablestotheOutput(FromCaller)XLRjacks(H).Connecttheotherendtotheline
inputsforthetwochannelsdesignatedforcallersonyourconsole.
tophonebusorAux1andAux2
lineoutputsofyourconsole
tolineinputsforthetwochannels
designatedforcallersonyourconsole
a. ConnectonecabletotheInput(ToCaller)1XLRjack(G).Connecttheotherendofthecableto
thephonebuslineoutputofyourconsole.
b. ConnecttwocablestotheOutput(FromCaller)XLRjacks(H).Connecttheotherendtotheline
inputsforthetwochannelsdesignatedforcallersonyourconsole.
tolineinputsforthetwochannels
designatedforcallersonyourconsole
tophonebuslineoutput
ofyourconsole
a. ConnectonecabletotheInput(ToCaller)1XLRjack(G).Connecttheotherendofthecabletothe
phonebuslineoutputofyourconsole.
b. ConnectonecabletotheOutput(FromCaller)1XLRjack(H).Connecttheotherendofthecableto
thelineinputforthecallerchannelonyourconsole.
tophonebuslineoutput
ofyourconsole
tolineinputforthechanneldesignated
forcallersonyourconsole