Tempest Blizzard DEC3.2 User manual

Blizzard Enclosure User Manual page 1
User Manual and Installation Guide
September, 2011
Blizzard Series Projector Enclosures
Tempest Lighting Inc.
13110 Saticoy Street
North Hollywood, CA 91605, USA
Tel +1 818 787 8984
Fax +1 818 982 5582
info@tempestlighting.com
Covers:
•all Blizzard models with DEC 3.2
control system manufactured after
September 1st, 2011
•All Fan-only Blizzard Enclosures
•Includes supplement covering DEC3
control enclosures manufactured
prior to September 2011
In the interest of continuous product improvement, the information in this document is subject to change without
notice. Neither Tempest Lighting, Inc. nor its representatives or agents may be held liable for expense or injury
arising from it.
© Tempest Lighting Inc. All Rights Reserved
Lamp
Heater Fan RelayOn DMXTemp
ESC OK
You can download a copy of this manual at
http://www.tempestlighting.com/products.html#blizzard
Download
DEC3.2

Blizzard Enclosure User Manual page 2
Declaration of Conformity
This is to certify that the following products
6500.IN Baby Blizzard, force cooled, 230V
6505.IN Baby Blizzard, force cooled, 230V
6510.IN Baby Blizzard, DEC3 Enclosure Control, 230V
6515.IN Baby Blizzard, DEC3 Enclosure Control, 230V
6550.IN Blizzard, DEC3 Enclosure Control, 230V
6555.IN Blizzard Stretch, DEC3 Enclosure Control, 230V
6556.IN Blizzard X-Stretch, DEC3 Enclosure Control, 230V
6560.IN Blizzard, Force-cooled, 230V
6565.IN Blizzard Stretch, Force-cooled, 230V
6566.IN Blizzard X-Stretch, Force-cooled, 230V
are in Compliance with the following standards or specifications according to the EMC Directive
89/336/EEC.
EN55015, EN61000-3-4, EN61000-3-5, EN61000-4-2, EN61000-4-3, EN61000-4-4, pr
EN61000-4-5, EN61000-4-6, EN61000-4-8, EN61000-4-11
and are in compliance with the following standards or specifications according to the Low
Voltage Directive 73/23/EEC.
EN60598-1
This declaration is made by the manufacturer
Tempest Lighting, Inc.
13110 Saticoy Street, Unit C
North Hollywood, CA 91605, USA
This declaration is based on tests that were conducted on the submitted samples of the above
mentioned products. Detailed results can be referred to test reports CET.TE200909 and
LVT.Te200909.
Dated: October 26th, 2009
Signature . . . . . . . . . . . . . .
Tempest Lighting Inc

Blizzard Enclosure User Manual page 3
This is to certify that the following products
6500.US Baby Blizzard, force cooled, 230V
6505.US Baby Blizzard, force cooled, 230V
6510.US Baby Blizzard, DEC3 Enclosure Control, 230V
6515.US Baby Blizzard, DEC3 Enclosure Control, 230V
6550.US Blizzard, DEC3 Enclosure Control, 230V
6555.US Blizzard Stretch, DEC3 Enclosure Control, 230V
6556.US Blizzard X-Stretch, DEC3 Enclosure Control, 230V
6560.US Blizzard, Force-cooled, 230V
6565.US Blizzard Stretch, Force-cooled, 230V
6566.US Blizzard X-Stretch, Force-cooled, 230V
Have been tested and approved to standards UL 508 (electrical) and UL 50 (environmental), as
NEMA 3R enclosures, for use in the United States and Canada.
This declaration is made by the manufacturer
Tempest Lighting, Inc.
13110 Saticoy Street, Unit C
North Hollywood, CA 91605, USA
This declaration is based on tests that were conducted on the submitted samples of the above
mentioned products.
Listing Report No. 3198609LAX-001a refers.
Dated: December 12th, 2010
Signature . . . . . . . . . . . . . .
Tempest Lighting Inc
Tempest Lighting, Inc.,
13110 Saticoy Street, North Hollywood, CA 91605, USA
www.tempestlighting.com info@tempestlighting.com
t: +1 818 787 8984
f: +1 818 982 5582

Blizzard Enclosure User Manual page 4
Table of Contents
Topic Section
Introduction ................................................................................................................ 1
Enclosure Dimensions ............................................................................................. 1.1
Maximum Projector Dimensions and Power........................................................... 1.2
INSTALLATION............................................................................................................. 2
Safety and Warnings ................................................................................................ 2.1
Tools and Equipment............................................................................................... 2.2
Mounting the Enclosure........................................................................................... 2.3
Base-up or Base-down Operation?........................................................................... 2.4
Mounting the Projector............................................................................................ 2.5
Wiring .......................................................................................................................... 3
Wiring for Fan-Only Versions................................................................................... 3.2
DEC3.2 Versions – Wiring and Control ................................................................... 3.3
Operation – Fan-Only Versions................................................................................... 5
Routine Maintenance .................................................................................................. 6
Troubleshooting ......................................................................................................... 7
Warranty ...................................................................................................................... 8
Registration................................................................................................................. 9
DEC3 Control for enclosures manufactured before September 2011........ Appendix

Blizzard Enclosure User Manual page 5
1 Introduction
The Blizzard TM Projector Enclosure Family
Thank you for purchasing the Blizzard digital projector enclosure. It will serve you for many years,
protecting your 5-15,000 ANSI Lumen projectors from the elements. Although primarily intended
for outdoor environments, the design of the Blizzard is such that it can satisfy many other needs.
Not only will it protect against hostile outdoor conditions, but also against particulate, smoke, and
other indoor conditions that can shorten the life of your digital projector. In addition, you may
specify a Blimp option, with soundproofing and a remote fan, for silent operation in theatres and
classrooms.
Products Covered by this Manual
6500 Baby Blizzard, Force-cooled
6505 Baby Blizzard, Force-cooled, Low noise
6510 Baby Blizzard, DEC 3.2
6515 Baby Blizzard, DEC3.2, Low noise
6550 Blizzard, DEC3.2 Enclosure Control
6555 Blizzard Stretch, DEC3.2 Enclosure Control *
6556 Blizzard X-Stretch, DEC3 Enclosure Control *
6560 Blizzard, Force-cooled
6565 Blizzard Stretch, Force-cooled*
6566 Blizzard X-Stretch, Force-cooled*
6590.BK Blizzard Remote Fan/Soundproofing Kit
6590.BK2 Stretch Blizzard Remote Fan/Soundproofing Kit
Notes: Part # suffix .US for North American electrical systems
Part # suffix .IN for European 230V electrical systems
* North American versions are 208VAV as standard. 120VAC available to order
Using This Manual
Please read this manual in its entirety before starting work. All the information contained is
important, and should be read carefully before proceeding. Heed all warnings and advisories.
Icon Key:
Valuable information
Electrical Warning
Safety Information
Blizzard Enclosure User Manual page 6
1.1 Dimensions and Weight – Baby Blizzard
Enclosure Weight: 29lb (13kg)
1.2 Maximum Projector Dimensions and Power
Maximum Projector Power: Standard Versions: 700W
Low-Noise Versions: 350W

Blizzard Enclosure User Manual page 7
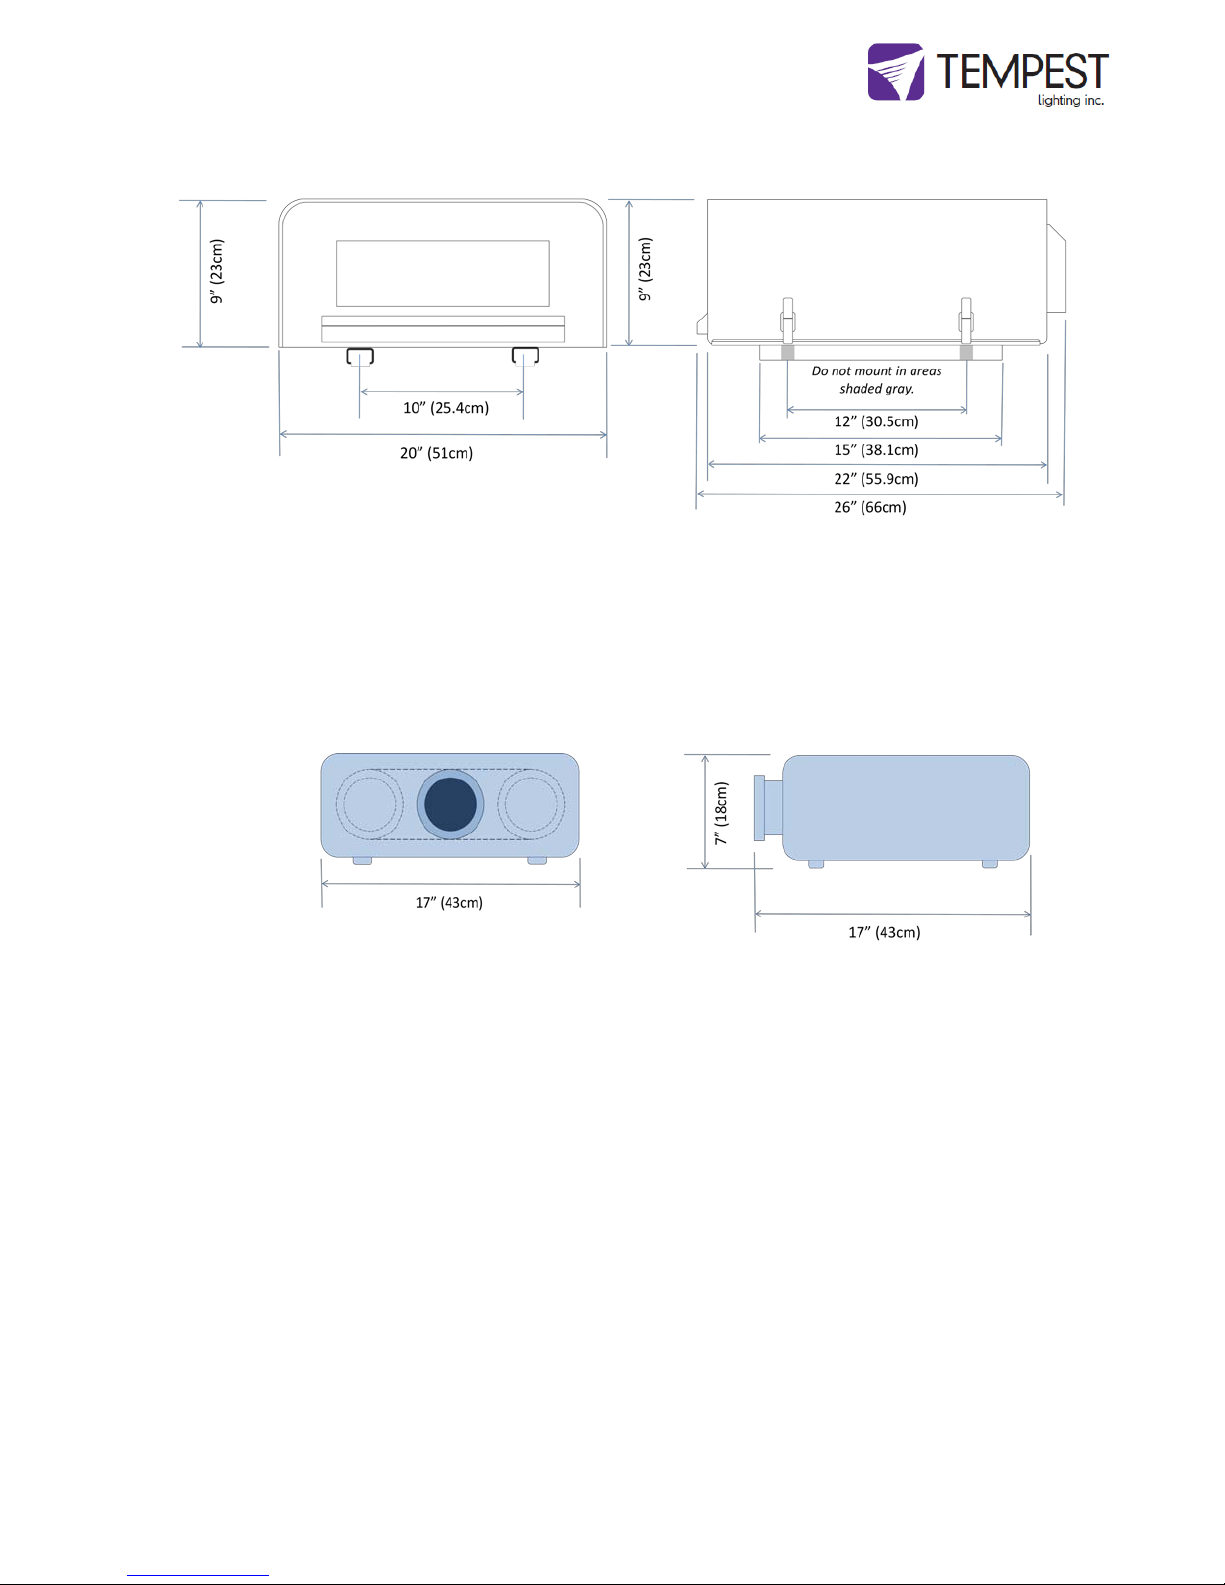
1.1 Dimensions and Weight – Blizzard and Stretch Blizzard
Maximum Projector Dimensions
Model # Description A B C D E F Weight
6550.US Blizzard, DEC3 Enclosure Control, 120V 31"/79c m 33"/84c m 14"/36c m 10"/25c m 24"/61c m 26"/66c m 77lb/35kg
6550.IN Blizzard, DEC3 Enc losure Control, 230V 31"/79c m 33"/84c m 14"/36c m 10"/25c m 24"/61c m 26"/66c m 77lb/35kg
6555.US Blizzard S tretc h, DEC3 Enc losure Control, 120V 41"/104cm 45"/114c m 16"/41c m 12"/30c m 35"/89c m 26"/66c m 97lb/44kg
6555.IN Blizzard S tretc h, DEC3 Enc losure Control, 230V 41"/104cm 45"/114c m 16"/41c m 12"/30c m 35"/89c m 26"/66c m 97lb/44kg
6556.US Blizzard X-Stretc h, DEC3 Enc losure Control, 120V 49"/124c m 51"/130cm 16"/41c m 12"/30c m 42"/107c m 26"/66c m 106lb/48kg
6556.IN Blizzard X-Stretc h, DEC3 Enc losure Control, 230V 49"/124c m 51"/130c m 16"/41c m 12"/30c m 42"/107c m 26"/66c m 106lb/48kg
6560.US Blizz ard, Forc e -c oole d, 120V 31"/79c m 33"/84c m 14"/36c m 10"/25c m 24"/61c m 26"/66c m 67lb/30kg
6560.IN B lizz ard, Forc e-c oole d, 230V 31"/79cm 33"/84c m 14"/36c m 10"/25c m 24"/61cm 26"/66c m 67lb/30kg
6565.US B liz z ard S tre tc h , F orc e -c o ole d , 120V 41"/104c m 45"/114c m 16"/41c m 12"/30c m 35"/89c m 26"/66c m 87lb/40kg
6565.IN B li zz ard S tre tc h , Fo rc e -c o ol e d, 23 0V 41"/104cm 45"/114c m 16"/41c m 12"/30c m 35"/89c m 26"/66c m 87lb/40kg
6566.US B liz z ard X-S tre t c h, Forc e -c o ole d , 120 V 49"/124c m 51"/130c m 16"/41c m 12"/30c m 42"/107c m 26"/66c m 96lb/47kg
6566.IN B li zz ard X-S tre t c h, Forc e -c o ole d , 23 0V 49"/124c m 51"/130c m 16"/41cm 12"/30c m 42"/107c m 26"/66c m 96lb/47kg
Maximum Projector Lamp Power – 1,300 Watts

Blizzard Enclosure User Manual page 8
2 Installation
2.1 Safety and Warnings
These warnings are for your protection. Failure to comply may result in serious injury or death.
Tempest Lighting, Inc. assumes no responsibility for damages or injury incurred by misuse or
mishandling of product.
Do not attempt to install or operate the enclosure before fully reading and understanding this
manual
Never allow anyone who has not read this manual to open the enclosure or perform
maintenance on the projector within.
Never leave the enclosure unattended when open.
Always make sure all bolts and latches are tight and safety locks are in place after performing
any form of maintenance on the unit.
Do not open any electrical boxes until power has been shut off to all supply lines to the
enclosure (including the one powering the projector).
Do not open the enclosure in wet weather.
2.2 Tools and Equipment
To install the enclosure, you will need the following items:
Crescent wrench
Phillips screwdriver
Terminal screwdriver
Proper wiring installation equipment (for line power and signal wiring)
Any equipment listed in the projector manufacturer’s projector-specific installation directions
2.3 Mounting the Blizzard Enclosure
The Blizzard enclosure must be mounted on or under a solid structure rated for the weight of
the enclosure, the projector inside it, and at least one person.
Snow – if installed outside in cold regions, the bottom of the Blizzard enclosure must be at
least 2’ (60cm) above maximum height of any snowfall or drifting snow, subject to local
conditions. If snow is not a consideration, then enclosure may sit on the ground as long as
proper drainage is provided.

Blizzard Enclosure User Manual page 9
LEAVE ADEQUATE CLEARANCE BEHIND ENCLOSURE FOR WIRING AND VENTILATION
Tempest Lighting recommends the use of stainless steel mounting hardware.
The Blizzard enclosure is provided with a pair of Unistrut channels on the enclosure base, for
mounting to your structure. You may use standard Unistrut accessories, or purchase mounting kits
from Tempest Lighting – four kits are required per enclosure.
4900.MB Stainless Steel Unistrut channel nut, bolt and
washer. Four required per enclosure.
4900.MC
Stainless Steel Unistrut channel nut, bolt and
pipe clamp, for pipes 1.5” (38mm) to 2” (50mm) OD.
Four required per enclosure.
4925.MC Stainless Steel Unistrut channel
nut, bolt and pipe clamp, for pipes 2”
(50mm) to 2.5” (64mm) OD. Four required
per enclosure.
Blizzard and Stretch Blizzard
Suggested layout for mounting plate, using four
4900.MB kits.
Baby Blizzard
Suggested layout for mounting plate, using four
4900.MB kits.
10.0”/254mm
15.0”/381mm
Side
Front/Back
Mounting holes
0.532”/13mm, 4
places
10.0”/254mm
12.0”/305mm
Side
Front/Back

Blizzard Enclosure User Manual page 10
2.4 Mounting Base-down and Base-up
All Blizzard enclosures are designed to be mounted base-down, on a solid structure, using Unistrut
mounting hardware. They may also be suspended from an overhang, ceiling or truss, using the same
hardware. Note that in this event it will be necessary to flip the projector image, since the projector
itself will be hanging upside-down. It’s important to be sure that the projector to be used supports this
feature (usually referred to as Ceiling Mount mode) before commencing installation.
Air vents for Base-up operation
When the Blizzard is used base-up, remove the front
and back air vents, invert, and replace, to prevent
rainwater ingress.
IMPORTANT SAFETY NOTICE:
It is the responsibility of the installer to ensure that all mounting points are secure and
conform to local safety regulations. Tempest Lighting Inc. accepts no responsibility for
damage or injury arising from inappropriate or unsafe installation.
Rear air exhaust vent,
inverted for base-up
operation. Do the same
with the front intake
vent.
Blizzard Enclosure User Manual page 11
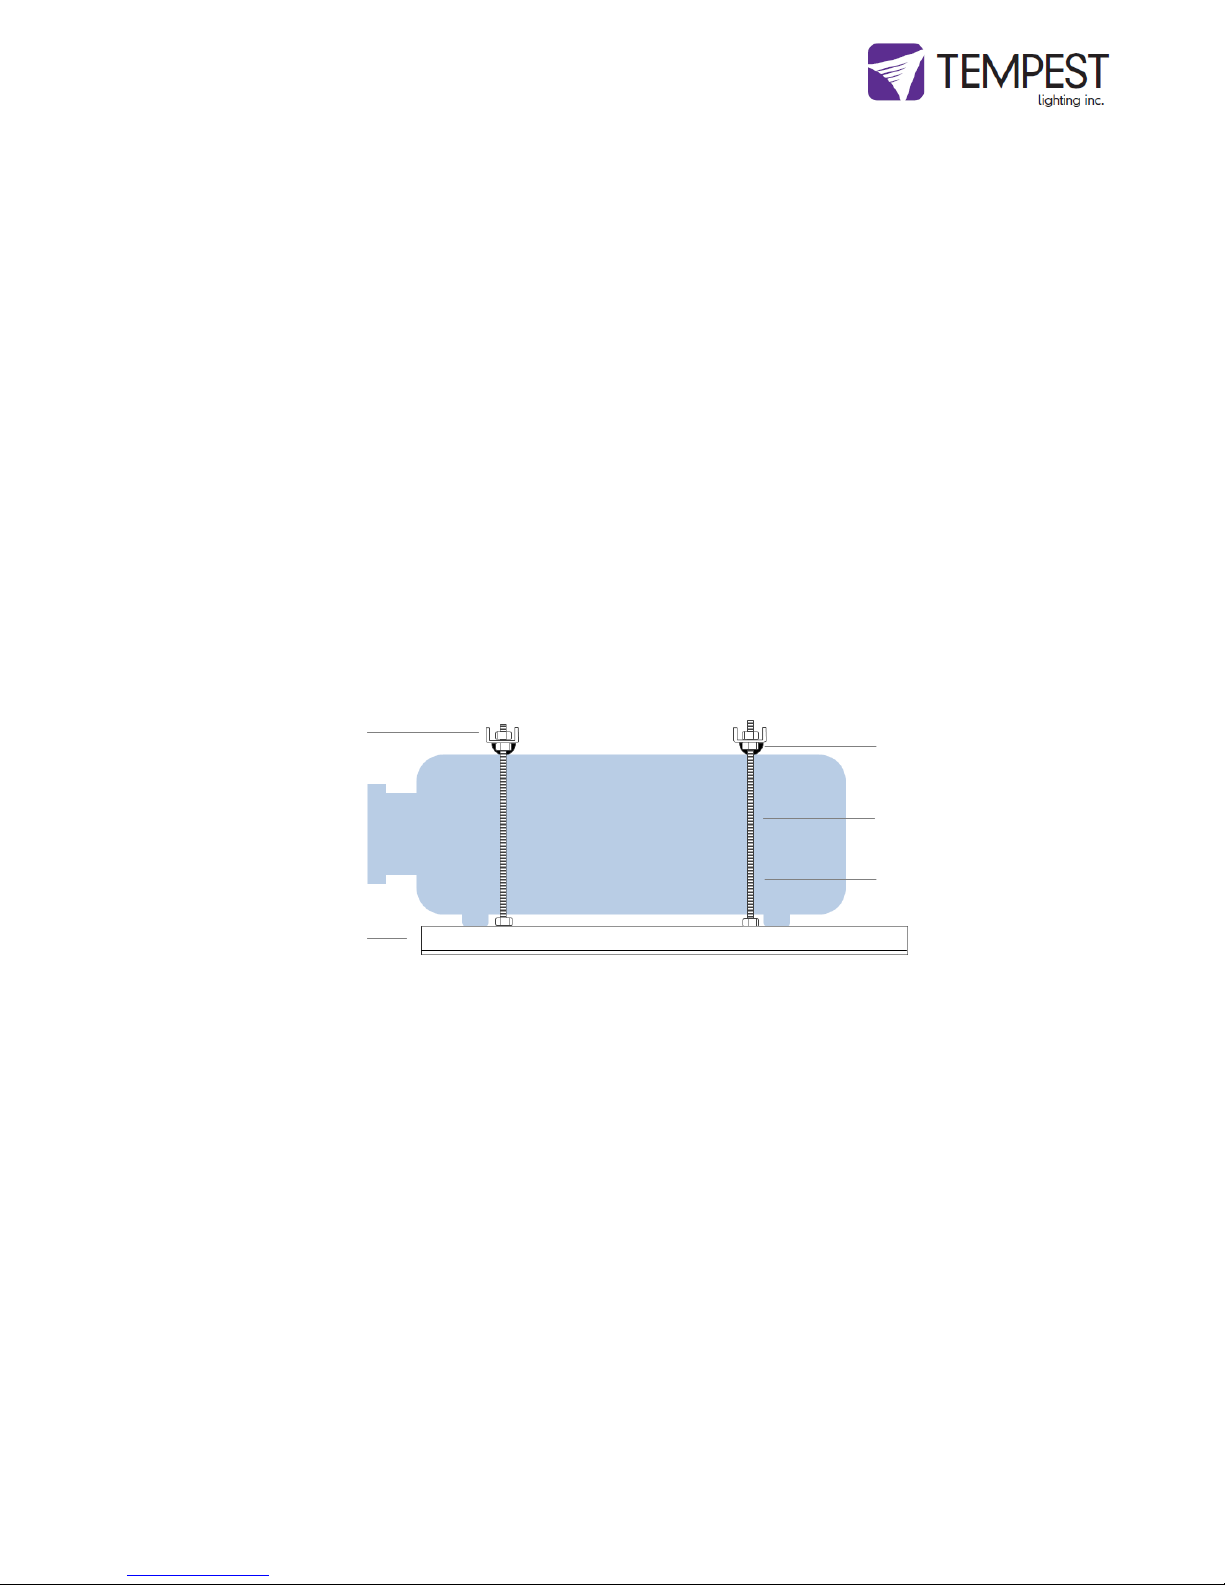
2.5 Mounting the Projector in the Blizzard Enclosure
If the Blizzard enclosure is suspended from a ceiling or overhang, this must be done by two
people.
1. Find the best location for the two projector clamps, avoiding contact with access doors, vents and
control on the projector top.
2. Make sure that all four Projector clamp threaded rods are screwed into the projector tray, and
locked in place with the locknut provided.
3. Remove the projector clamp bars.
4. Place the projector on the projector tray. If hanging the projector upside-down, one person must
hold the projector in position, while another person secures the projector clamp bars in place.
5. Replace the projector clamp bars, with the rubber pads pressing firmly onto the projector cover,
and tighet the nuts above and below each end of each projector clamp.
6. Ensure that the projector is securely held before proceeding further.
Note: You can still adjust the projector pan and tilt by loosening the projector clamp, adjusting the
projector feet, then re-tightening the projector clamp to hold the projector firmly in place.
Note: BABY BLIZZARD is equipped with a load strap to secure the projector in place.
7. Connect the projector power cable to the projector, and plug into the receptacle provided inside the
enclosure:
International Versions (.IN part # suffix) are equipped with CE17 16amp 2P+E receptacles
US Versions (.US part # suffix) are equipped with NEMA L6-20 receptacles
8. Connect projector signal cables
9. Tie down any cables away from the exhaust fan
10. Power up the projector, check functions and adjust focus
11. Replace the enclosure cover
12. Make sure that all latches are securely fastened. The latches are adjustable, and should be checked
periodically, since the rubber seal may compress slightly over time.
13. For additional security, use a bolt or padlock to lock one or more of the latches, using the security ring
provided.
Lock Nut
Projector
Clamp
Threaded
Rod
Rubber
Pad
Projector
Tray
Blizzard Enclosure User Manual page 12
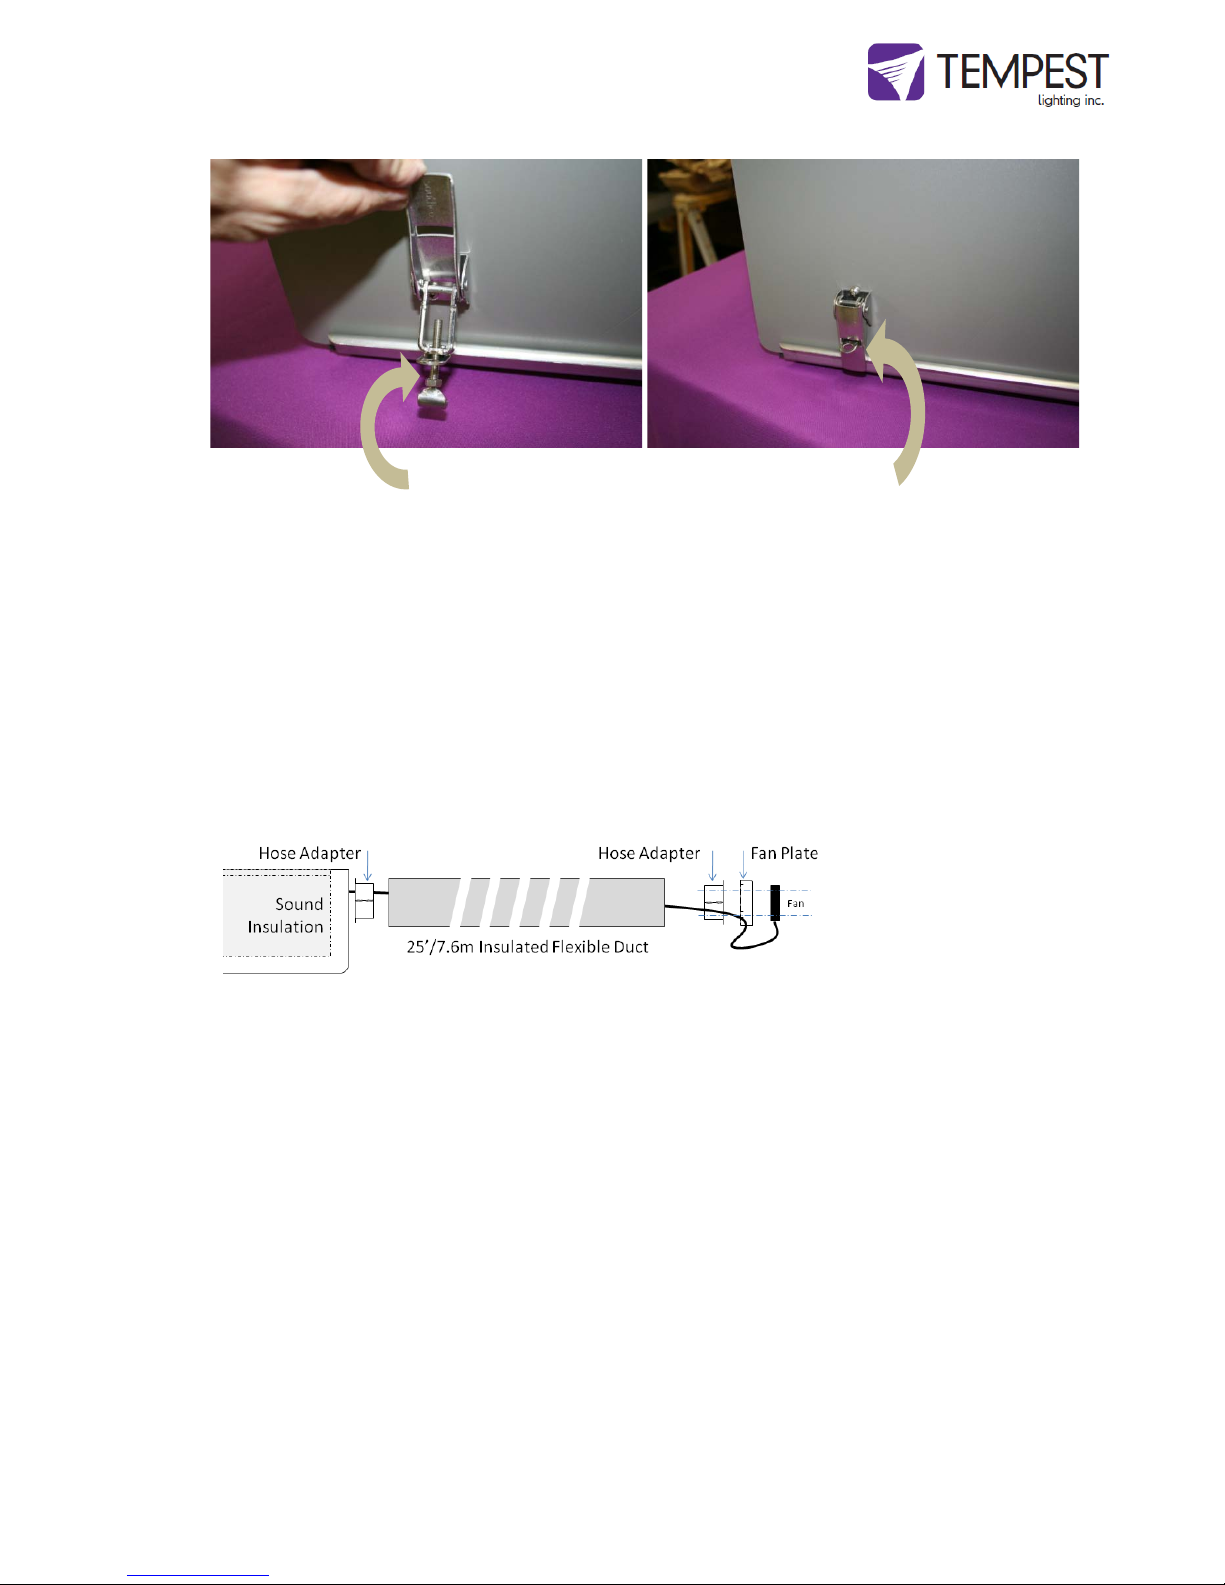
Installing the Blizzard Blimp Accessory
If you ordered a Blimp kit with your Blizzard, the installation is exactly the same, except that the fan is
remote from the enclosure and needs to be installed separately.
The Blimp kit provided with your enclosure comprises additional sound insulation inside the enclosure,
plus a remote fan kit.
1. Attach a Hose adapter plate to the exhaust air location on the right side of the rear panel,
using the four 8-32 screws provided
2. Thread the fan cable through the padded hose provided, using a fish tape
3. Pass the fan cable through the hose adapter, and connect to the FAN terminals inside the
enclosure, passing the fan cable through the rubber grommet in the side of the electrical
cover.
4. Attach one end of the hose to the hose adapter plate, using one of the clamps provided.
5. Attach the other end to the Fan assembly in the same way, taking care not to crimp the fan
cable.
6. Feed the hose through the wall or ceiling to a suitable location and screw in place. This will
normally be either in a large ceiling void, or in a remote location with access to outside air.
7. DO NOT EXTEND the hose beyond its 25’/7.6m length. It has been tested at this length, and
extending it further may reduce cooling efficacy inside the enclosure.
The latch tension is
adjusted by turning the
screw – clockwise to
tension, anti-clockwise to
loosen.
Insert a padlock in
one or more
security rings for
additional security.

Blizzard Enclosure User Manual page 13
3 Wiring
3.1 Electrical Preparation
All electrical work must be carried out by a properly licensed electrician. Failure to
observe this point will void the factory warranty for the Tempest Enclosure and possibly
the projector/projector.
1Before starting work, switch off power to the branch circuit, carefully following lockout and
tag-out procedures. Failure to do so could cause serious injury or death.
2Two or three electrical junction boxes will be required within a short distance of the Blizzard
enclosure for:
•AC Supply wiring (Projector)
•AC Supply Wiring (Enclosure Fan) – may be combined with projector power feed if desired
•Projector picture signal wiring
3 Your Blizzard enclosure is supplied fitted with two cable entry points, suitable for flexible
conduit fittings. US size ½”, international 20mm.
Note the locations of the
cable entry fittings
on the rear panel
3 All junction boxes must be installed in accordance with local electrical codes and should be
located near the permanent installation of the enclosure. Each junction box requires a length
of flexible conduit, long enough to reach from junction box to the enclosure conduit fittings.
Leave slack for positioning of enclosure, and enough space behind the enclosure for
ventilation.
4 The AC supply must be protected by a fuse or circuit breaker of a rating suitable for the
projector. For the DEC3 versions, add max 550W load for the enclosure fan and heater.
5 The user may connect the fan and the projector to the same switched supply, or run them
separately, according to need. If run separately, it is the user’s responsibility to ensure that
the fan is always running when the projector lamp is on.
Power Cable
Entry
Signal Cable Entry

Blizzard Enclosure User Manual page 14
3.1 Fan-Only Versions:
Remove the electrical cover inside the
enclosure. You will see the fan wires
already terminated to the connector
block on the rear panel.
Pass the AC feeder wires through the
rear panel and terminate to the
connector block, using one of the wiring
diagrams below.
Feed the projector power cable through
the grommeted hole in the electrical cover, and terminate as shown in the wiring diagrams
below.
Replace the electrical cover, taking care not to pinch any of the power wires.
Use the second cable entry to run projector signal and control cables to the projector, as
specified by the projector manufacturer.
Wiring Diagrams
120V Dual Feed 120V Single Feed
230V Dual Feed 230V Single Feed
L N L N
PROJECTOR FAN
L N L N
PROJECTOR FAN
L N L N
PROJECTOR FAN
L N L N
PROJECTOR FAN

Blizzard Enclosure User Manual page 15
3.2Wiring for DEC Versions
These instructions are for the installation
of Projector Enclosures featuring
Tempest’s DEC3 Digital Enclosure Control
System (DEC3TM). Your enclosure has
DEC3 control if you see a control panel on
the rear surface like this:
IMPORTANT:
Blizzard enclosures manufactured from September 2011 ship with DEC3.2 control,
described in the following section.
For Blizzard enclosures manufactured before September 2011 with DEC3 control, see
the appendix at the end of this manual.
Lamp
Heater Fan RelayOn DMXTem p
ESC OK
Blizzard Enclosure User Manual page 16
DEC 3.2 Control – Introduction
Tempest Lighting and Projector Enclosures have been in daily use around the world for almost a
decade. Tempest enclosures protect expensive and delicate equipment in all climates, maintaining
a comfortable operating temperature, and preventing condensation – the real outdoor enemy.
DEC3.2TM – that’s Digital Enclosure Control, third Generation, revision 2 – is the brain of your
Tempest enclosure. It will maintain the internal environment in a comfortable temperature and
humidity range, and prevent condensation – the real equipment killer. DEC3.2 monitors internal
temperature, humidity and lamp current at all times, and uses this information to control its lamp
relay, fan(s) and heater(s). It can report back over the DMX cable, using the RDM protocol (Remote
Device Management) if desired.
Unless otherwise specified, this version of the user guide refers to DEC3.2 units fitted with software version
0.1.xxx or later.
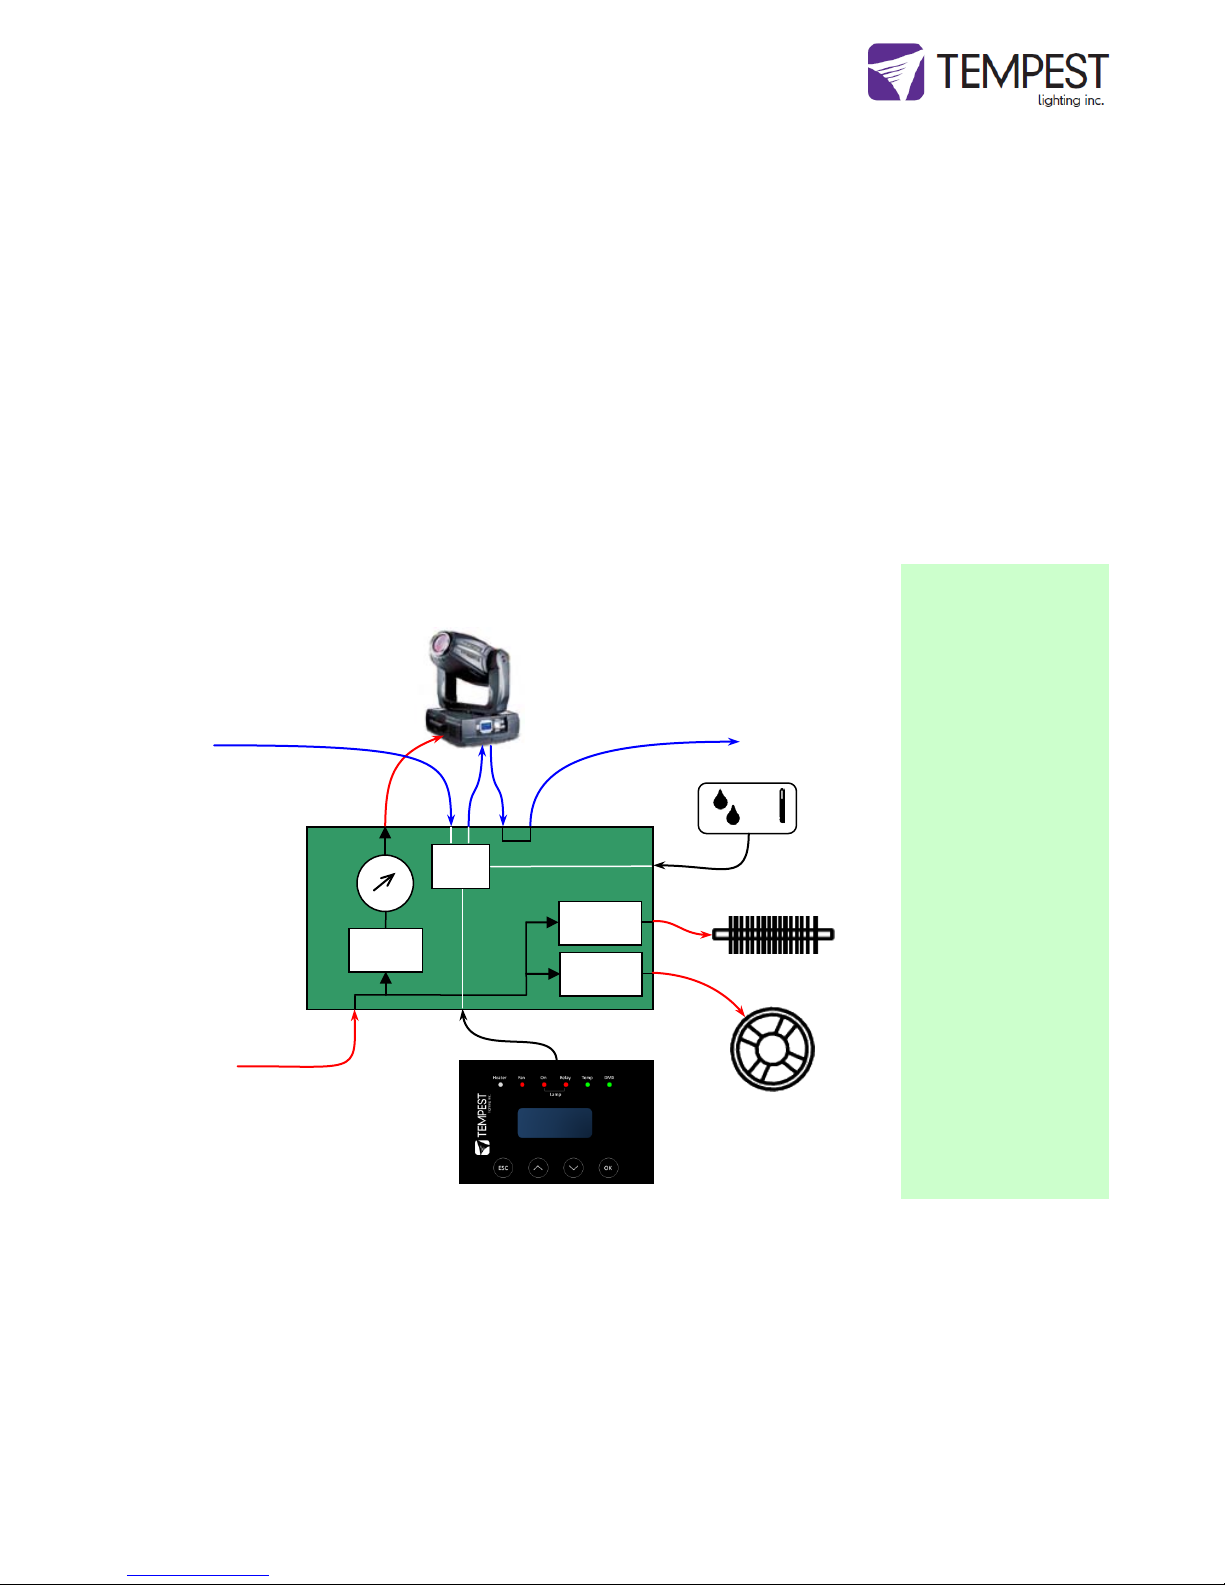
So, what does DEC3.2 actually DO?
The DEC3.2 Engine is the brains of the operation – here’s a layout:
This schematic shows
the relationship between
DEC3.2’s functional
elements.
The power supply is
universal 100-240V, but
fans and heaters are
either 120V or 230VAC,
and must be so
specified.
High-quality, high power
Electro-mechanical
relays provide two pole
power isolation for the
enclosed the
fixture/projector in the
event of an over-
temperature condition.
Fans and heaters are
switched using
generously overrated
Triac devices for
maximum reliability.
4 DMX connections are
provided to facilitate field
termination of DMX
inputs and outputs via
the enclosed fixture and
the controller.
Controller
2 Pole 30A
Lamp Relay
30A Triac
Heater Switch
10A
A
Power Feed
DEC
Link through
DMX/RDM Input
DMX/RDM Output
to next enclosure
User Interface
Sensor Block
Heaters
Fans

Blizzard Enclosure User Manual page 17
DEC3.2’s mission is to maintain temperature and humidity inside the enclosure, within determined
bounds, and to prevent condensation – particularly overnight dew formation – inside the
equipment housed. Condensation is fatal to electronic equipment, particularly in polluted areas or
saline environments, where it brings not only rust and short-circuits, but also a steady buildup of
mineral and/or salt deposits. Incidentally, condensation is very hard to control with air-
conditioning type systems, which is why we don’t use them.
Broadly speaking, DEC3.2’s function depends on whether the fixture/projector lamp is on or off:
Lamp ON
When the projector/fixture is running, the heat from the lamp takes care of humidity, and
DEC3.2 runs the enclosure’s fan(s) to change its air every couple of seconds – ensuring
high-velocity forced-air cooling while the lamp is on.
Lamp OFF
When the lamp is off, DEC3.2 senses temperature and humidity and controls its fan(s) and
heater(s) accordingly. When conditions are within normal bounds (between top and
bottom temperature settings and below the humidity threshold (see below), DEC3.2
pulses the heater at a low level to dry the air and eliminate condensation, and runs the
fans to change the enclosure air every 30 seconds or so. We call this ‘pulse mode’, and it
is the key to preventing damaging condensation inside your equipment.
If the temperature rises above the top set limit (see below), DEC3.2 runs the fans to cool it
down. In cold conditions, DEC3.2 will run the heater as required to maintain the bottom
set temperature.
Thus, DEC3.2 maintains a comfortable operating temperature inside the enclosure, and
prevents damage from condensation. Users all over the world have found that Tempest
enclosures provide an optimal environment for expensive and delicate equipment, in
every climate type.
And while doing all of this, DEC3.2 can tell you what’s happening over your RDM network – a real
boon in larger installations. You may also use RDM to configure your Tempest installation
remotely, using an appropriate RDM front end.
Default Operation
In most lighting and in almost all projector enclosure applications, DEC3.2 will work just fine with
its factory default settings. You do not need to do anything other than connect power and switch
on. We call this Basic mode, and it will apply to most installations. If your needs are more
complex, read on.
If not, you can skip to the Power Connections section below.
Operating Modes
DEC3.2 may be run in one of three basic operating configurations with a fourth configuration for
test and service use by trained personnel only. In the RDM context, these configurations are the

Blizzard Enclosure User Manual page 18
device’s DMX PERSONALITY. The DEC3.2 mode or personality may be configured form the Front
Panel or by using an RDM control. In all configurations, the fixture inside the Tempest enclosure
may also be an RDM enabled device.
Basic Mode
This is the way your DEC3.2 controller will normally ship from the factory. It will
be set up for standalone operation, with settings that will be appropriate for most
installations.
In most cases, Basic Mode will work fine for you. You only need to change it if you
will be using DMX or RDM (and if these terms are not familiar to you, you
probably won’t) or if you have to deal with extreme climate conditions.
You may set temperature and other parameters while using Basic Mode.
Monitor Mode
The enclosure operates independently, and automatically, requiring no user
intervention. Users may set parameters such as temperature and humidity
thresholds, and monitor sensor information and DEC status at the DEC3.2 using
the display, or remotely, using RDM over a DMX512 network. In this mode, the
DEC3.2 does not need to “see” any DMX to operate.
Control Mode
This mode has all of the Monitor Mode features plus control of the Lamp Relay
using a single DMX slot at the address configured as the DEC3.2 DMX start
address.
A DMX slot value (level) > 75% will cause the fixture to be powered and less than
25% will disconnect the power form the fixture. On DMX fail, the Lamp Relay will
default to power the fixture, unless it detects a thermal condition that would
cause it to isolate power from the fixture/projector.
DMX control of the Lamp Relay has the useful attribute of enabling the user to
remotely force a hard reset of the fixture by controlling power to it. This mode is
recommended for show-control applications, where it is desirable to have power
control of the internal fixture and accidental loss of the DMX data is very unlikely
to occur.
To force a hard fixture reset, take the enclosure’s DMX channel to zero (or any
level below 25%), allow time for the fixture’s power supplies to fully discharge,
then restore the enclosure’s DMX channel to full (or a level above 75%).
Service Mode
This mode is intended for test and service use only, giving the user direct control
of the Lamp Relay, fan and heater controls over three DMX slots. Users may NOT
override any of the controls in an unsafe direction – for example, if the DEC3.2
has determined the enclosure is over-temperature and has switched off the power
to the fixture, the Lamp Relay may not be controlled by DMX. In this sense, DMX

Blizzard Enclosure User Manual page 19
‘piles on’ to DEC3.2 operation, within defined safety limits. However, until such
time as the temperature reaches the TOP limit, the heater may be enabled and the
fan disabled, which is why the mode should only be used for Test and Service use
by a trained technician.
DEC3.2 Control Parameters
DEC3.2 will run out of the box with its default parameter settings, which equate to the (fixed)
settings of its predecessor DECs 1 and 2.
Temperature:
Top Set Range 35-45°C, Default = 40°C
Most manufacturers recommend a max temperature for their
equipment of 40°C, though this does vary. When DEC3.2 senses a
temperature higher than Top Set, it indicates an overtemp
condition as a warning. NOTE: in moving light enclosures the
thermal sensor is necessarily placed in the exhaust air path,
which will be higher (sometimes a lot higher) than the actual
fixture ambient. This needs to be kept in mind when adjusting
temperature settings.
Cutoff Temp Range 0-15°C, Default = 15°C
This is a setting abovethe Top Set temperature that determines
the temperature at which the lamp relay is opened cutting off
power from the fixture/projector. User may reduce it as desired,
but should establish before doing so the actual operating
temperatures experienced in hot weather before doing so, to
avoid nuisance tripping.
Bottom Set Range 0-10°C, Default = 10°C
The temperature maintained by the heater in cold conditions.
Most equipment manufacturers recommend a minimum
operating temperature of 0°C, and users may set it lower than the
default if desired.
Humidity Range 50-90%, Default 80%
The threshold at which incoming air is more aggressively heated to remove
moisture.
DMX Address Range 001-510, Default 001
Sets the DMX address for the lamp relay control. In the DMX/RDM service mode,
the subsequent two DMX slots control fan and heater respectively.
Fan Overrun Range 1-15 minutes, Default 5 minutes
This is the time that the enclosure fan(s) will run after the fixture/projector lamp
is turned off. As a general rule, the more powerful the lamp, the longer the
overrun should be, to prevent overheating while the lamp cools down.

Blizzard Enclosure User Manual page 20
Temp C/F Default Celsius
DEC3.2 displays temperatures in Celsius or Fahrenheit.
Lamp Hours Default 0000
DEC3.2 counts the hours your projector/fixture lamp is on, and can report it both
on the user interface display and over RDM. Remember to reset to 0 when
changing lamps. This is provided to allow lamp hours monitoring on devices such
as Video Projectors that have no native RDM or DMX support.
Table of contents


