TENA SmartCare Change Indicator User manual

www.tena.com
110786-5MA003-12
IFU TENA SmartCare
Change Indicator
Professional caregivers
Version: 2020-01-28
TENA SmartCare
Change Indicator™
Professional caregivers
Instructions for use

TENA SmartCare Change Indicator
2 3
TENA SmartCare Change Indicator
REF
SN
IPXX
FCC ID:
IC:
UDI:
MD
10 40
REF
SN
IPXX
FCC ID:
IC:
UDI:
MD
10 40
REF
SN
IPXX
FCC ID:
IC:
UDI:
MD
10 40
This guide is intended for professional caregivers, super users and
managers using the TENA SmartCare Change Indicator™ in a nursing home
environment. The Change Indicator system tracks and displays urine
saturation levels in absorbent TENA incontinence products.
TENA SmartCare Change Indicator is a system consisting of:
• TheTENASmartCare™Professionalsdashboardthatservesasan
information hub for professional caregivers, super users and managers.
• AnappnamedTENASmartCareProfessionalsthatisinstalledonthe
handheld devices of caregivers, super users and managers.
• AreusableChangeIndicatormadeupoftwoparts:asensorstrip
and a transmitter.
• AgatewaythatrelaysdatafromtheChangeIndicatortotheInternet.
The TENA SmartCare Change Indicator is designed for professional caregivers,
super users and managers who care for residents with urinary incontinence
in a nursing home environment. It provides support by helping professional
caregivers decide when it is best to change absorbent incontinence products
without frequent manual checks. The TENA SmartCare Change Indicator
system tracks urine saturation but does not detect faecal episodes.
The TENA SmartCare Change Indicator is attached to the outside of
the incontinence product and tracks the urine saturation levels within.
Caregivers, super users and managers receive Information about
increasing levels of saturation on their handheld devices via the TENA
SmartCare Professionals app and on the dashboard.
TENA SmartCare Change Indicator is designed to alert caregivers, super
users and managers when residents require care and to help them decide
whether the TENA incontinence product needs to be changed or not.
Italsohelpsprovidemoreeective,individualisedincontinencecare.
In this guide, you will nd instructions for how to use:
The TENA SmartCare Change Indicator system including TENA
SmartCare transmitter, TENA SmartCare gateway, TENA SmartCare
sensor strip, TENA SmartCare Professionals app and the TENA SmartCare
Professionals dashboard.
Information Contents
Information 2
Contents 3
Important information 4
Warning 5–6
TENA SmartCare Change Indicator components 7
Installation instructions
Download app and set up account 8–9
Dashboard setup and pages 10
Set up gateway 11
Register transmitter code 12
Install battery & assemble Change Indicator 13
Attach Change Indicator 14
Use Change Indicator 15
Remove Change Indicator 16
Intended use 17
Attachment instructions for supported TENA products
TENA Slip 18
TENA Flex 19
TENA Stretch Brief 20
TENA Pants/TENA Protective Underwear 21
TENA Brief 22
TENA Comfort 23
Change sensor strip & battery 24
Cleaning 25
Gateway lights & buttons 26
Transmitter lights & buttons 27
Water, sand and dirt 28
Troubleshooting 29–35
Technical description
Operating characteristics 36–37
Electromagnetic compability (EMC) 38
Lifetime 38
Disposable parts 39
Labelling symbols 40
WARNING Special care should be taken to ensure safety
andeiciency.Failuretodosocouldcausedamageto
equipment or lead to the receipt of incorrect data.
NOTE/TIP Important information or advice /tips.
CHECK Important information for the device to function.
Symbols used in this guide

TENA SmartCare Change Indicator
4 5
TENA SmartCare Change Indicator
• KeeptheChangeIndicatorandChangeIndicatorbatteriesaway
from children and pets.
• OnlyaCR2032batteryshouldbeusedintheChangeIndicator.
Using the wrong type of battery, including rechargeable batteries,
can damage the Change Indicator.
• TheChangeIndicatorshouldbeattachedtotheoutsideofthe
incontinence product.
• TheChangeIndicatorisnotintendedtobeusedindirectcontact
with the skin.
• CleantheChangeIndicatorwhenfullyassembledtopreventwater
from entering the device. Do not submerge in water or clean in a
washing machine. Do not put the Change Indicator in an autoclave.
• DonotswingtheChangeIndicatorinthedirectionofpeople,pets
or nearby objects. Be aware of the risk of strangulation with the
sensor strip.
• TheChangeIndicatorisnotintendedforuseinanasepticenvironment.
• TheChangeIndicatorisnotmagneticresonance-safeandshouldnot
be brought into a magnetic resonance imaging environment.
• DonotusetheChangeIndicatorwhereX-Raysareperformed.
• IfadebrillatorisusedonaresidentwhoiswearingtheChange
Indicator, the Change Indicator must be replaced.
• Ensureadequatedisinfectionproceduresarefollowedforresidents
with infectious diseases.
• OnlyusetheChangeIndicatoronasingleuser.Ifaresident
is experiencing loose bowel movements or diarrhoea, wait until
the condition has been treated before resuming use of the
Change Indicator.
• Seekimmediatemedicalcareifthebatteryisswallowed.
• DonotattempttorepairormodifytheChangeIndicatororGateway
by yourself.
• IfanypartoftheChangeIndicatorsystemappearstobedamaged
or broken, it should not be used. Contact TENA for support.
Continues on next page
• Ensureyouhavereceivedtrainingand/orhavereadandunderstood
these ‘Instructions for use’ before using the product. Save these
instructions for future reference.
• Intheeventofsystemfailureoranticipatedsystemfailure,revert
to a manual changing routine.
• TENASmartCareChangeIndicatorisintendedfor24/7use.
• Thesystemprovidesinformationonurinesaturationlevelstohelp
guide decision making regarding when TENA incontinence products
should be changed.
• TENASmartCareChangeIndicatordoesnotreplacenormalsafety
checks and routines for repositioning residents, checking for faeces,
administering medication, etc.
• DonotattachtheChangeIndicatortotheinsideoftheincontinence
product. TENA SmartCare Change Indicator should only be attached
to the outside of the incontinence product.
• DonotusetheChangeIndicatorsystemonresidentswhoexperience
frequent faecal incontinence. TENA SmartCare Change Indicator does
not detect faecal episodes.
• DonotusethesameChangeIndicatorformultipleresidents.
• Ifyouencounteranyproblems,equipmentfailureorifanyother
incidents occur, report them to the manufacturer or TENA
SmartCare support.
Important information Warning
TENA SmartCare Change Indicator
6 7
TENA SmartCare Change Indicator
• Donotexposethebatteryathightemperatures,disassembleit,
damageitmechanicallyorputbatteryintothereasthiscancause
anexplosionorare.
• Donotusegatewaysandhandhelddevicechargerswithunapproved
power supplies.
• TheChangeIndicatorandGatewayshouldnotbeusedinanoxygen
rich environment.
• TheChangeIndicatorandGatewayshouldnotbeusedinpresenceof
ammableanaesthetics.
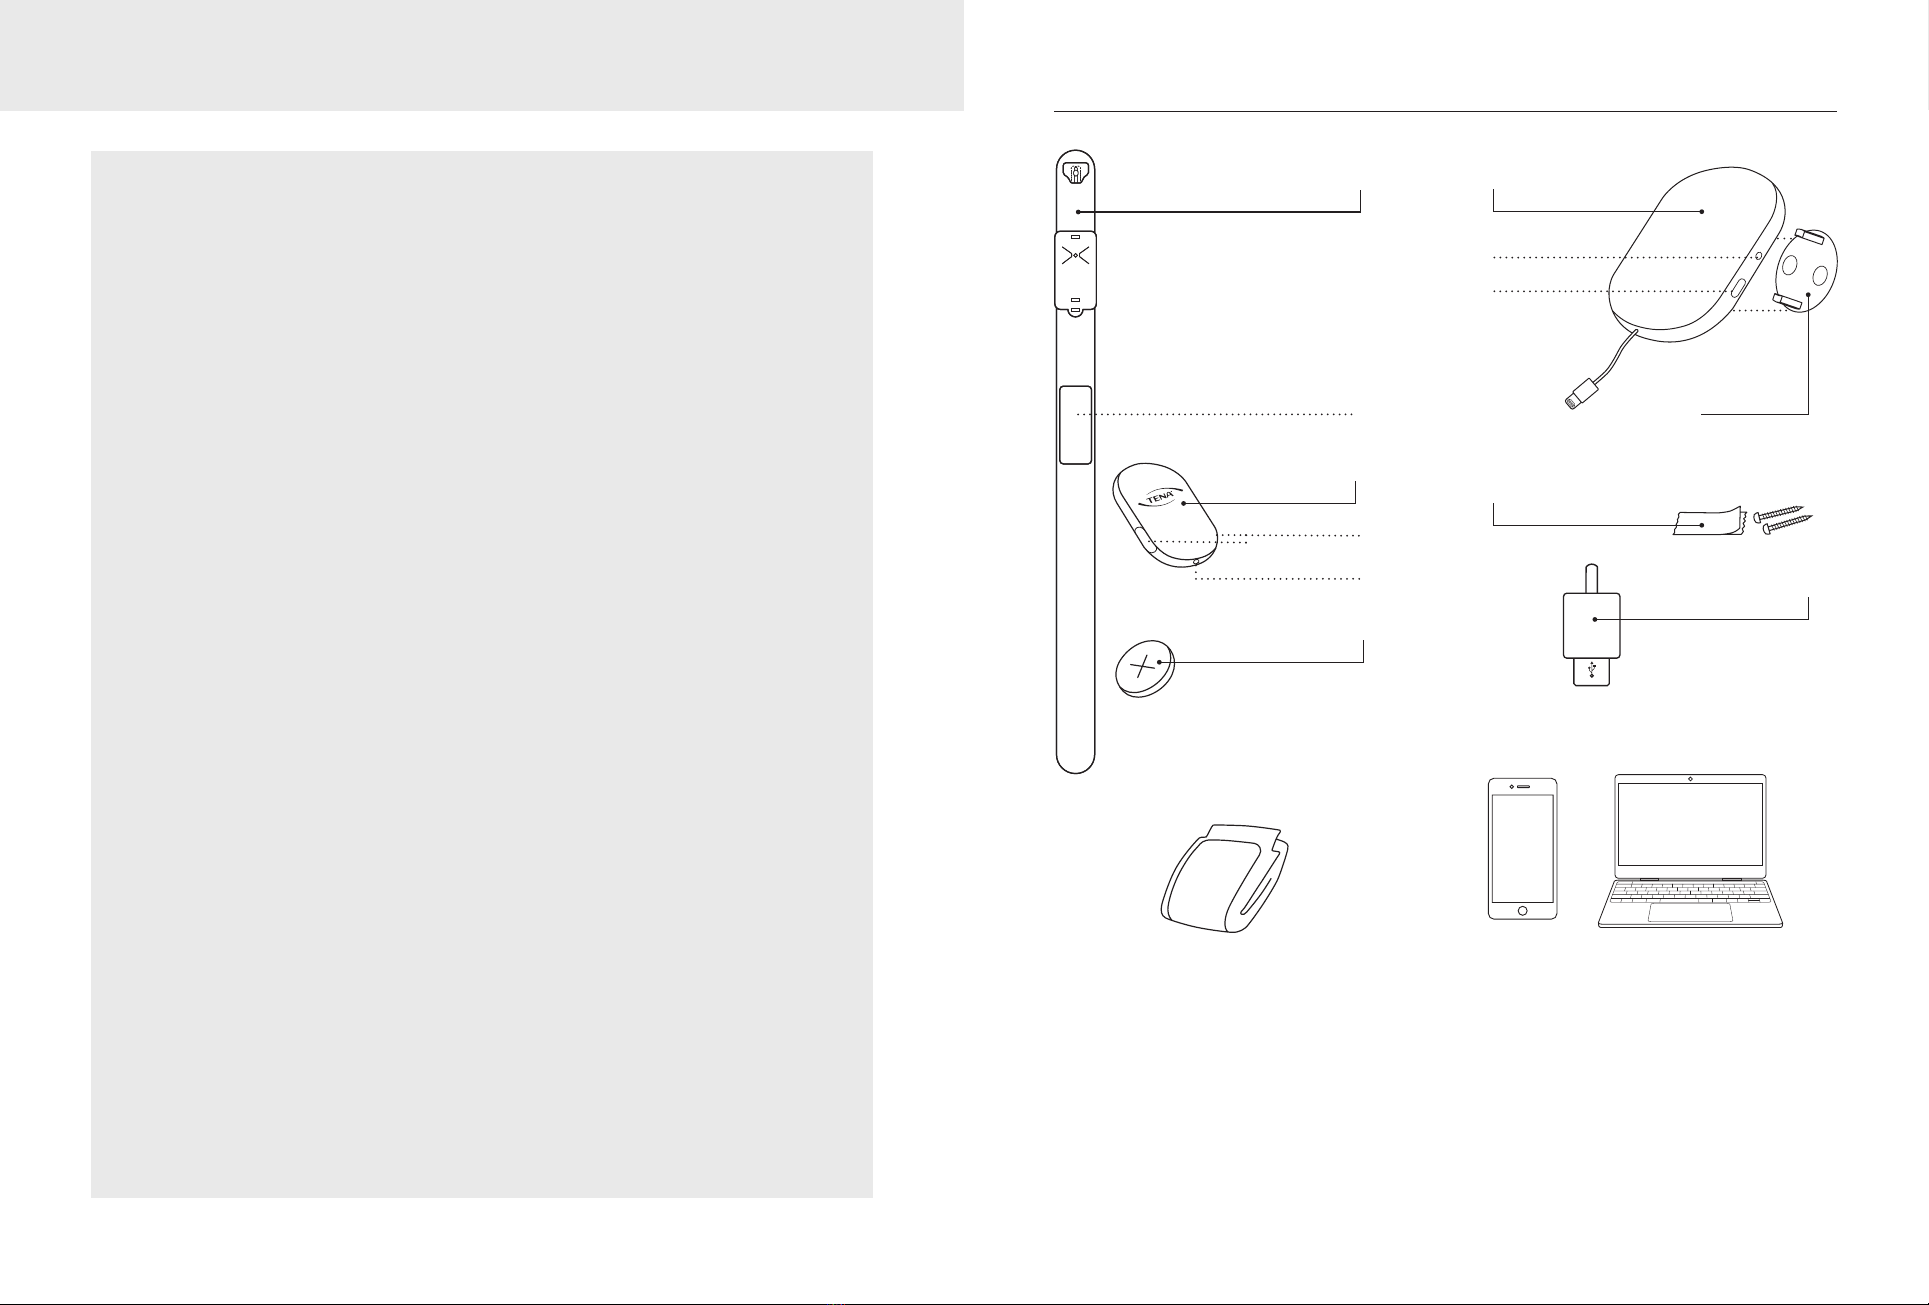
TENA SmartCare Change Indicator componentsWarning
Comes in three lengths
S, M, and L – choose according
to absorbent product. (see
pages 18–23 of this guide. )
SENSOR STRIP
TRANSMITTER
Buttons
LED Light
BATTERY, CR2032
GATEWAY
LED light
Button
POWER ADAPTER
A supported TENA incontinence product.
(See supported TENA products on page
18–23 in this guide or in the TENA
SmartCare Professionals app).
CONSUMABLES:
Sensor strip short, sensor strip medium, sensor strip long, battery.
A handheld device/dashboard with the
TENA SmartCare Professionals
software/app, iOS 11 and later.
TENA
SmartCare
Profession-
als app
TENA SmartCare
Professionals
dashboard
MOUNTING
BRACKET
ADHESIVE STRIPS
OR SCREWS, x2
Place to write

TENA SmartCare Change Indicator
8 9
TENA SmartCare Change Indicator
102A
Your TENA representative will help you
download the TENA SmartCare Professionals
app, register your account and set up users in
both the TENA SmartCare Professionals app
and dashboard.
The dashboard is used by super users and
nursing managers to: monitor the average
response time for changes, add or remove
residents from the system and create
various reports.
Download app and set up account
1 Atthebeginningofeachshift,caregiverscollectahandhelddeviceandlogintothe
TENASmartCareProfessionalsapptoreceivenotications.Thepasswordisprovided
by a super user or manager.
2 Duringtheirshift,caregiversreceivenoticationsregardingurinesaturationlevelsin
residents’ absorbent products.
Toprotecttheirprivacy,residentsareidentiedbytheirroomnumbersratherthantheir
names. In the TENA SmartCare Professionals app, beside each resident’s room number,
caregivers will see a status icon for that particular resident.
Download app and set up account
Saturated
means the resident’s
incontinence product is
nearing capacity.
Consider changing the
incontinence product.
Some Urine
means that the change
indicatorhasidentied
urine in the product. The
surface of the product is
still dry and the product
has not reached
saturation.
Ok
means the resident’s
absorbent product is dry.
O
means the resident’s
incontinence product
is not being monitored
by TENA SmartCare
Change Indicator.
Error
means there is an error with either the resident’s
Change Indicator or the system. The caregiver should click
ontheicontolearnmore.SeetheTROUBLESHOOTING
section of this guide for more information on how errors
can be resolved.
Using the TENA SmartCare Professionals app
The resident’s
bed number.
Team’s average
response time
xx min
TENA
SmartCare
Professionals
app
TENA SmartCare
Professionals
dashboard
Time resident has
had this status.
Saturated Some Urine Ok
Functions in the app and dashboard
O Error
xx min
TENA SmartCare Change Indicator
10 11
TENA SmartCare Change Indicator
REF
SN
IP65
FCC ID:
IC:
UDI:
MD
10
40
1 2
3
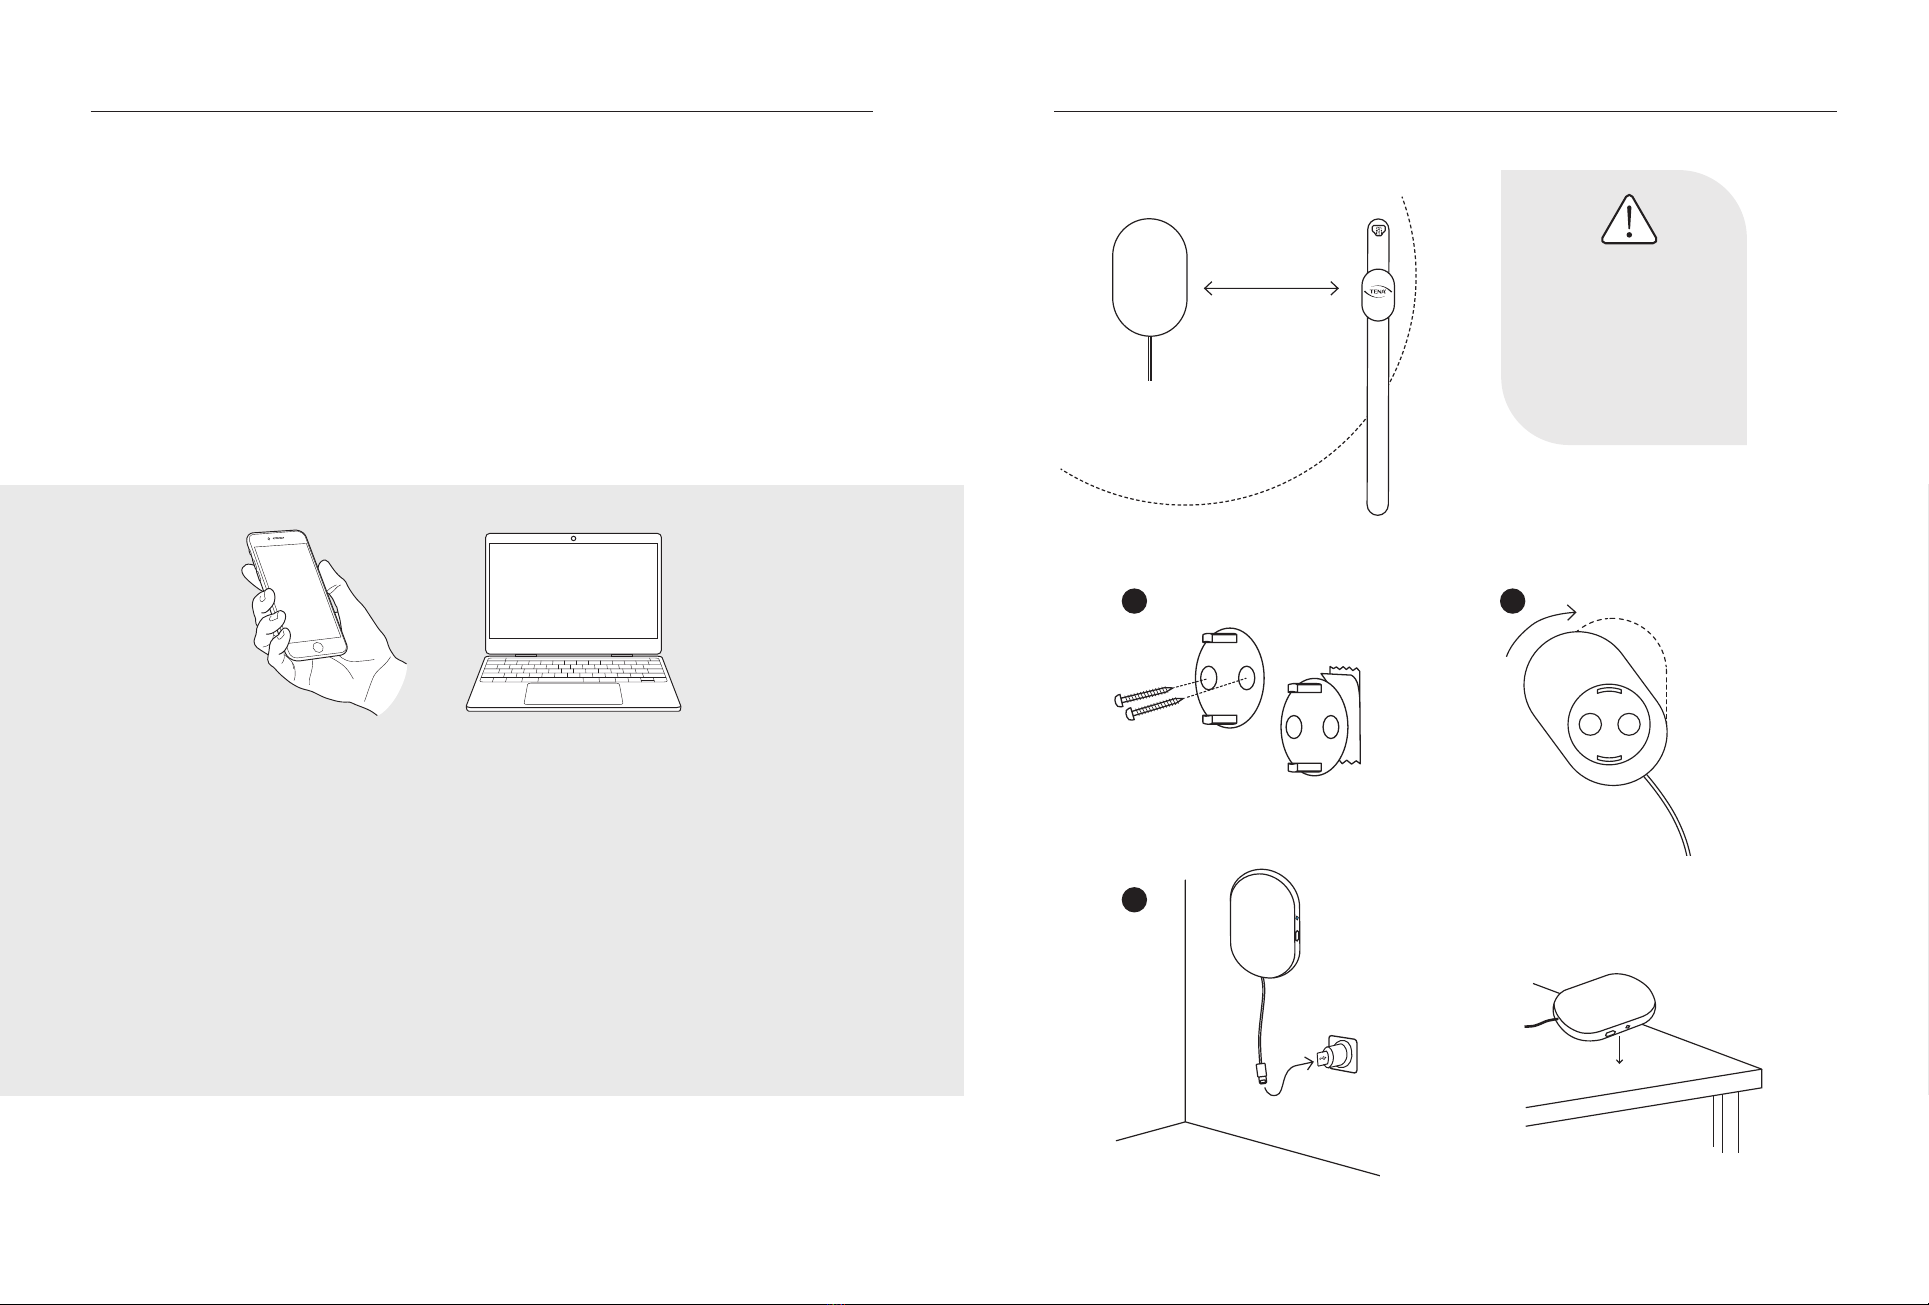
See page 26
Gatewaylights&buttons
Placement
You can also place the gateway
on a at surface
Set up gateway
10 m (33 ft) NOTE
Users must be
within 10 m (33 ft)
from a gateway to
be monitored by
the system.
Click!
Screws or
adhesive tape
or x2
The dashboard
The dashboard serves as an information hub for super users and managers. It provides access
to real-time information as well as information saved from the previous 30-day period. This
informationincludesnoticationsanddetailsonincontinenceproductchanges.Informationon
howlongresidentshavespentinincontinenceproductsafternoticationshavebeensent,the
statusofthesensorsanderrornoticationscanalsobeaccessed.Therearethreetabsonthe
home page: Home, Residents and Statistics. Nurses and Managers can log out or access “Help”
from any of these pages.
The Home page provides an overview of of incontinence product changes throughout
the nursing home. The Residents and Statistics pages allow super users and managers to
monitorperformanceandlevelsofcareinspecicareasofthenursinghomeaswellas
forspecicresidents.
The Residents page page allows super users and managers to quickly view the average
response time per shift over a 30-day period. It also allows them to access the status of a
specicresidentforthelast30days.Toseemoreinformation,clickonthe“History”button
in the “Actions” column.
Dashboard setup and pages
The Statistics pageoerstwodierentwaystoviewresponsetimesto“change”notications
– a bar chart and a grid. Both options enable the user to select a particular day or resident
(byclickingonthe“History”icon)andthenviewnoticationsandresponsetimesrelatingto
this resident.
TENA SmartCare
Professionals
dashboard
TENA
SmartCare
profession
-
als app

TENA SmartCare Change Indicator
12 13
TENA SmartCare Change Indicator
1 2 3
1 2 3
REF
SN
IPXX
FCC ID:
IC:
UDI:
MD
10 40
000 000 000 000 000
000 000 000 000 000
Assemble Change Indicator (transmitter + sensor strip)
Install battery
WARNING Only CR2032 batteries shall be used
in the TENA SmartCare Change Indicator.
Install battery & assemble Change IndicatorRegister transmitter code
1
Find the transmitter code, which
is located on the back of the
transmitter or on the packaging.
2 Enterthetransmittercodein
the dashboard.
CR2032
Light blinks
5times=OK
Steady light for a few
seconds=OK
See page 27
Transmitter lights
&buttons
See page 27
Transmitter lights
&buttons
Click!
Click!
TOP
TOP
TENA SmartCare
Professionals
dashboard

TENA SmartCare Change Indicator
14 15
TENA SmartCare Change Indicator
REF
SN
IPXX
FCC ID:
IC:
UDI:
MD
10 40
12
3 4
2
1
Apply TENA product
on the resident
TENA Slip/
TENA Stretch Brief/
TENA Brief
TENA Pants/
TENA Underwear
TENA Slip/
TENA Stretch Brief/
TENA Brief
TENA Pants/
TENA Underwear
3
TENA Flex
TENA Flex
See list of supported products on page 18–23 in this guide or in the app.
Blinking light:
Change battery, see page 24
You can read more in-depth explanations on page 9.
Steady light for a few seconds:
Continue to step 6
Press both buttons simultaneously for two seconds at every
change. This records the change of incontinence product in
the TENA SmartCare Professionals app and on the dashboard
and resets the system.
Attach Change Indicator Use Change Indicator
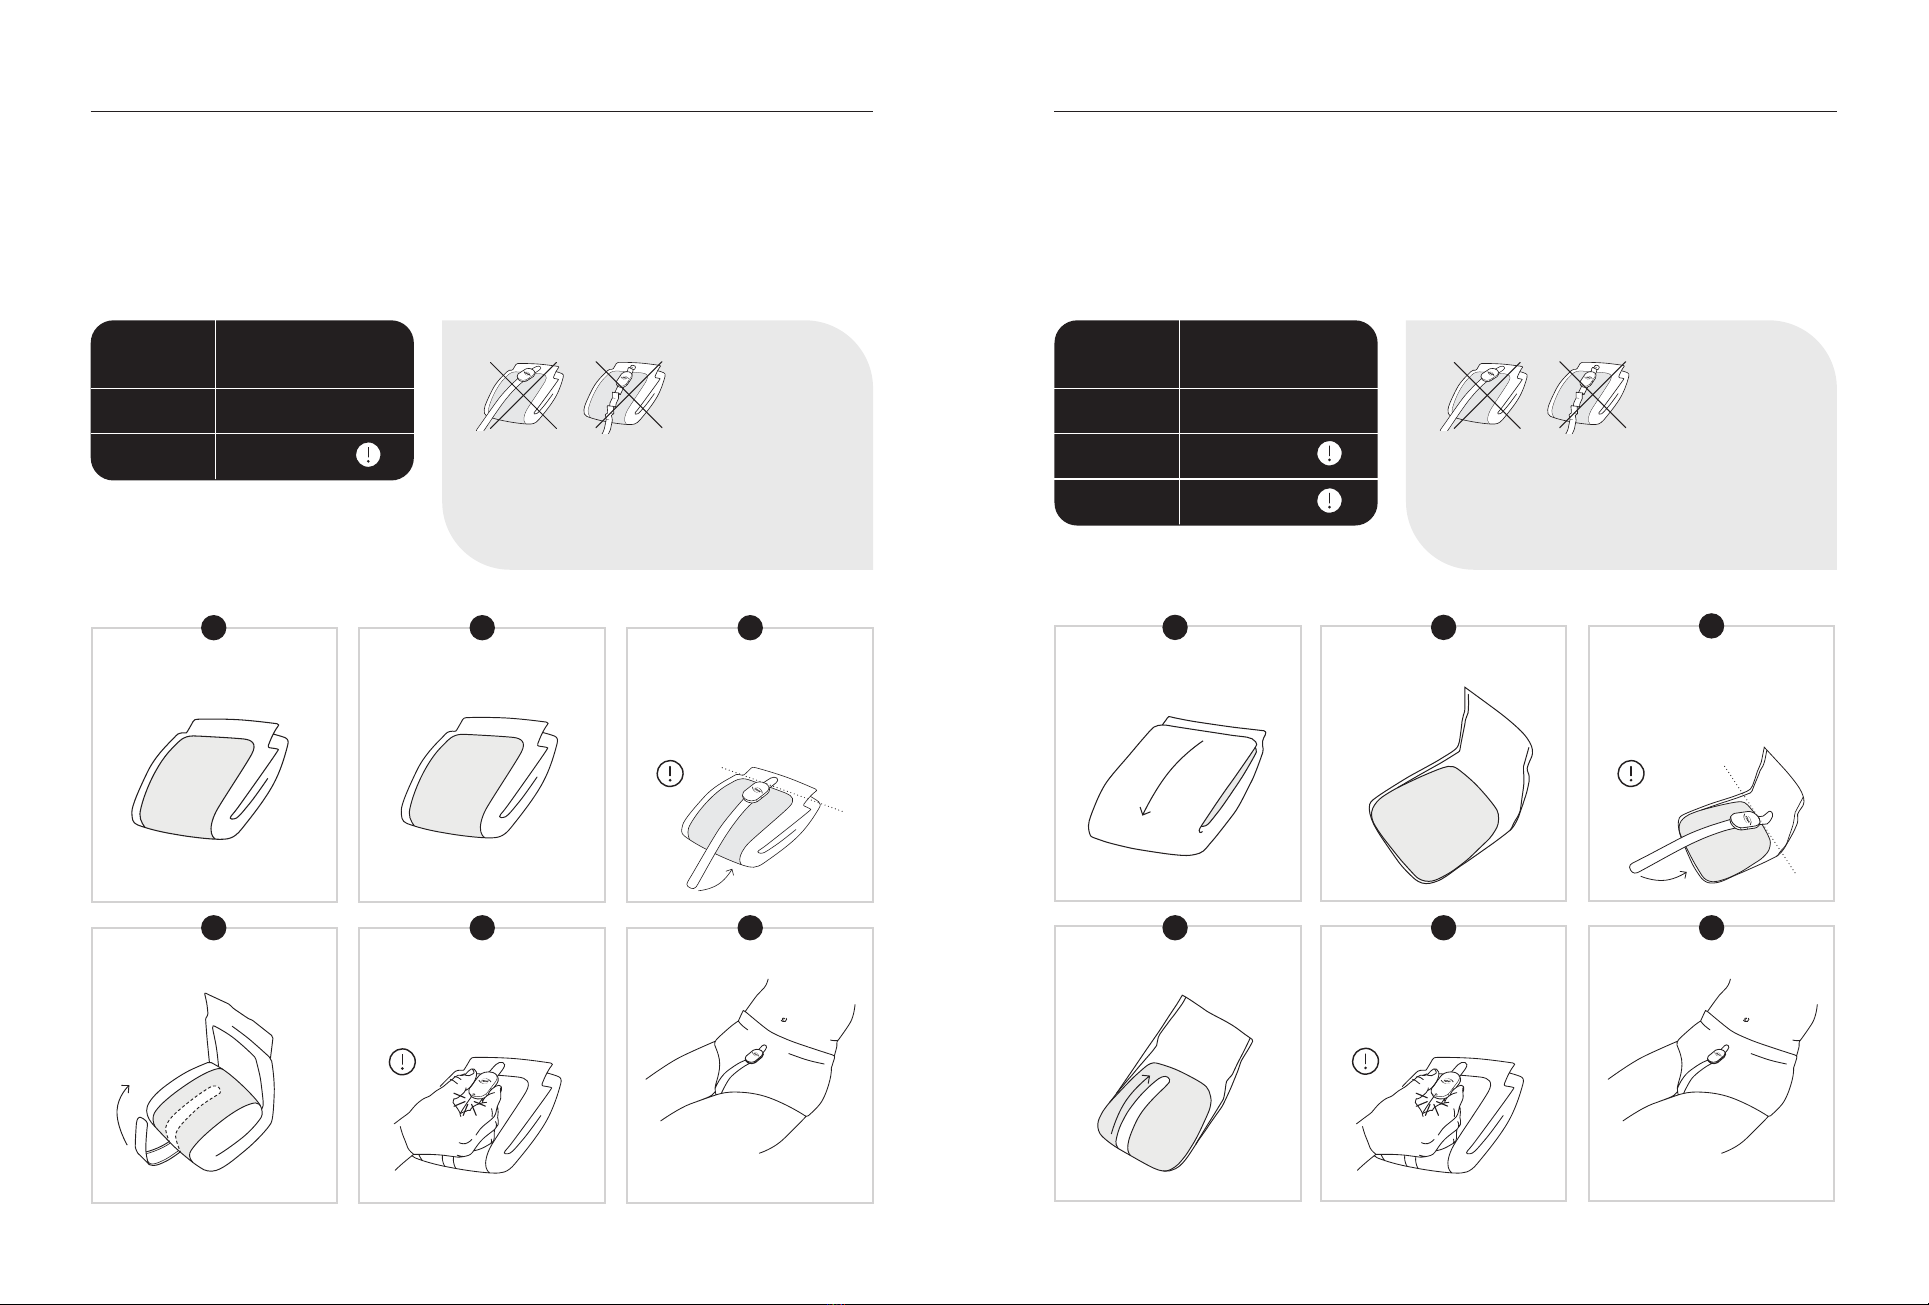
NOTE
Always attach the Change Indicator before you unfold the incontinence
product. Start by placing the Change Indicator at the front of the inconti-
nence product, on the thicker absorbent area, ensuring it is straight. (1)
PressrmlytoensuretheChangeIndicatorhasfullcontactwiththe
whole incontinence product.
Align transmitter with top of the thicker absorbent area of the
incontinence product.
Keep folded
Place tightly
Align with top of thicker
absorbent area
Find the front
Please note that product size and sensor strip length do not always match
REF
SN
IPXX
FCC ID:
IC:
UDI:
MD
10 40
Saturated
– Consider change.
The resident’s absorbent
product is nearing
saturation.
Some Urine
– No action needed.
Some urine detected, but
the surface of the product
is still dry.
Ok
– No action needed.
Resident’s absorbent
product is dry.
O
– Resident’s absorbent
product is not being
monitored by TENA
SmartCare Change
Indicator.
Error
–SeeTROUBLESHOOTINGsectionofthisguide
for more information
TENA
SmartCare
Professionals
app
TENA SmartCare
Professionals
dashboard
THICKER
ABSORBENT
AREA
FRONT
FRONT
TENA SmartCare Change Indicator
16 17
TENA SmartCare Change Indicator
10
40
REF
SN
IPXX
FCC ID:
IC:
UDI:
MD
1
2
3
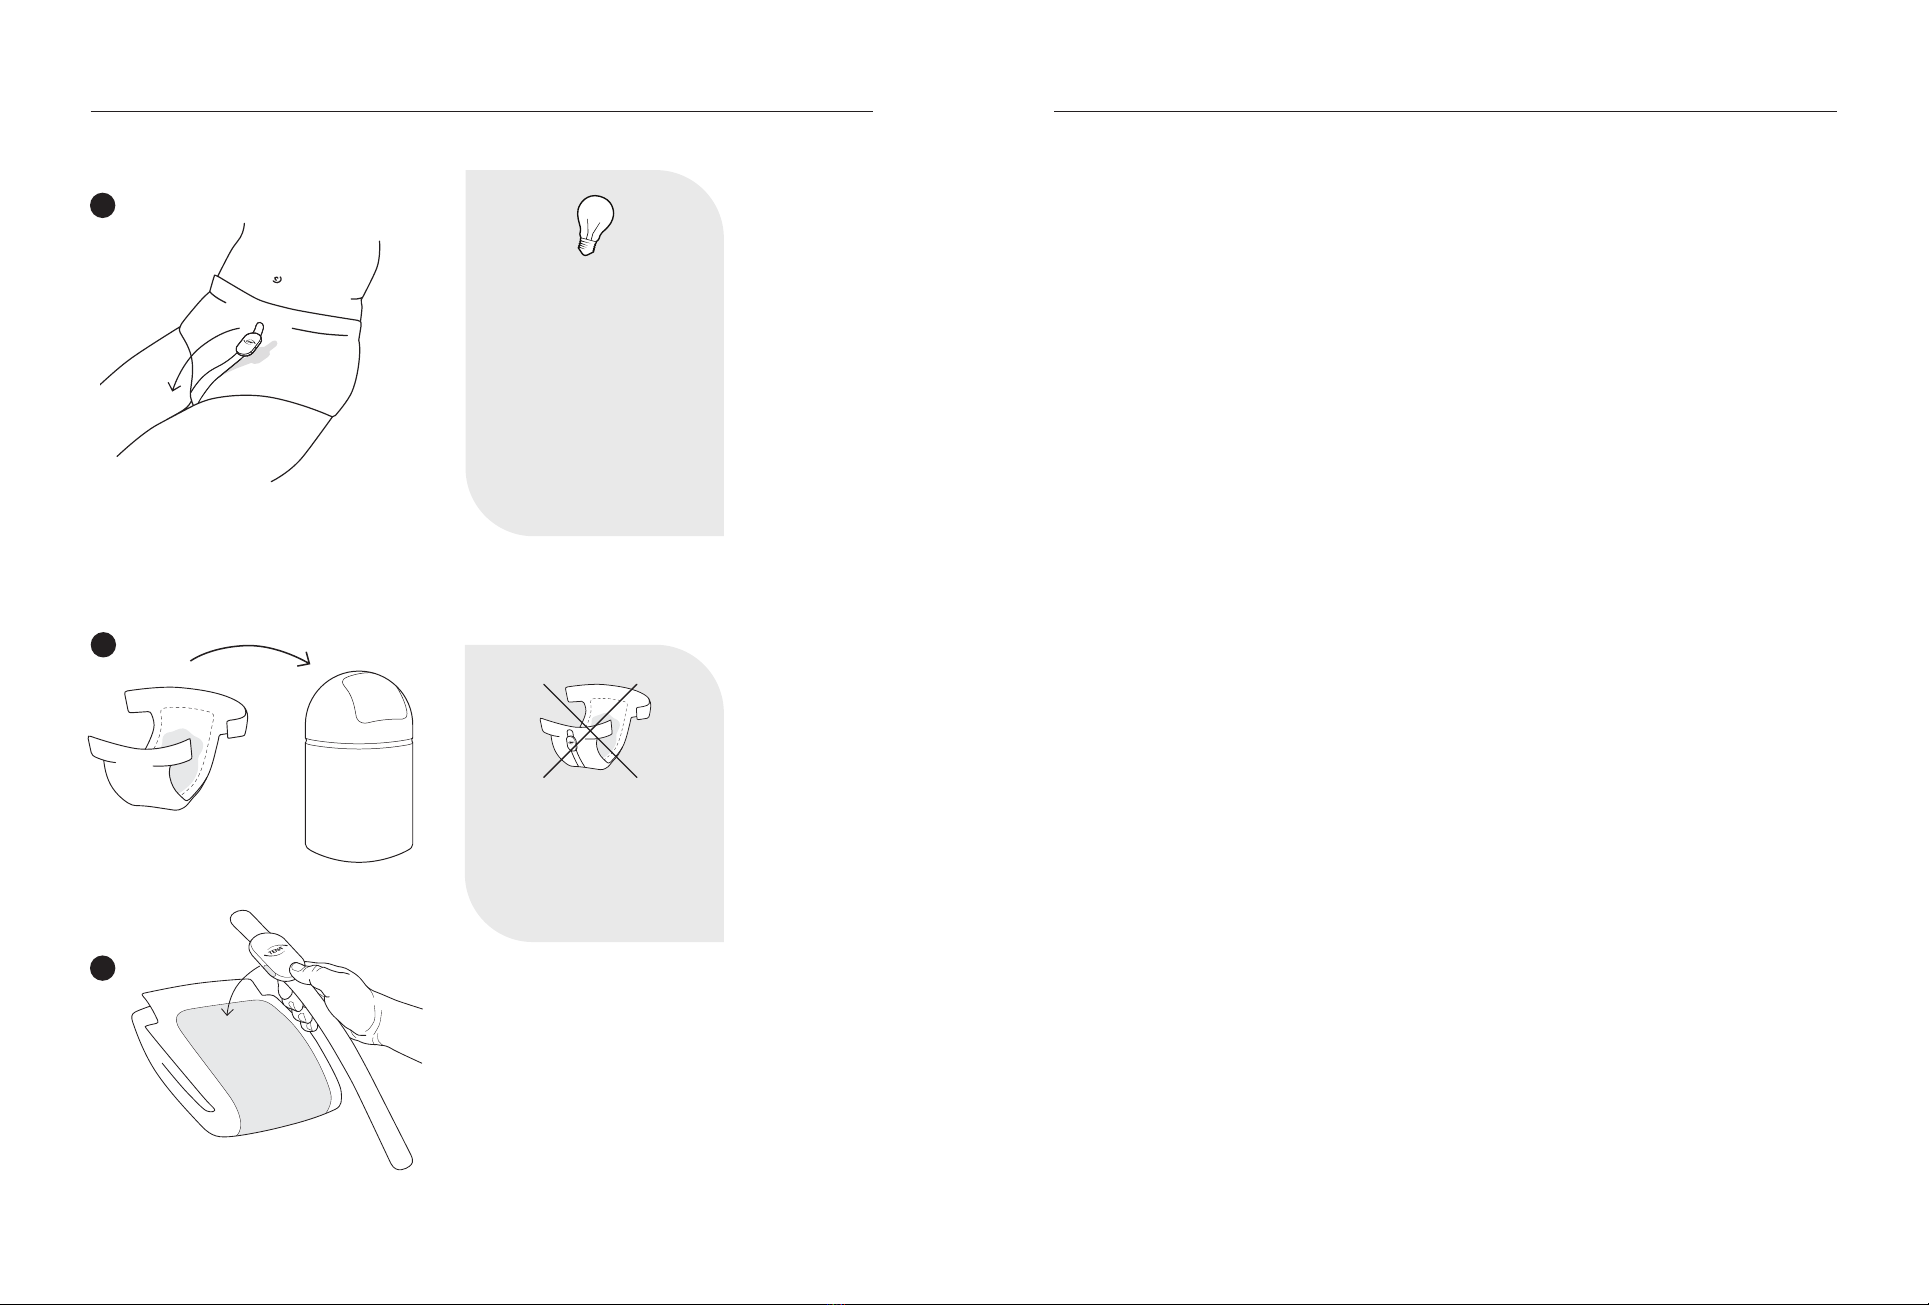
NOTE
The Change Indicator
should be removed while
the user is still wearing
the incontinence product.
Gentlypullthechange
indicator down from the
top, then roll the user onto
his/her side before
completing removal. (1)
Remove Change Indicator Intended use
Intended Use:
The TENA SmartCare Change Indicator is an accessory to absorbent
incontinenceproducts,intendedforuseonindividual(s)sueringfrom
urinary incontinence in a home or professional environment who are
dependent on one or more caregivers to change the absorbent
incontinence products. The TENA SmartCare Change Indicator estimates
the degree of urine saturation in the absorbent incontinence product and
notiesthecaregiver(s).Thisfacilitatesthecaregiverdecisionregarding
when to change the absorbent incontinence product.
Standard operation:
• TheChangeIndicatorshouldnotbeincontactwiththeuser’sskin
during normal use. It should always be attached to the outside of
the incontinence product.
• TheoperatorofthisChangeIndicatoristhecaregiverofthe
incontinent user. The user wears the TENA Change Indicator in
combination with a TENA incontinence product.
• AttachingtheChangeIndicatortotheincontinenceproductis
considered a primary operating function.
• OnlythecaregiverisintendedtointeractwiththeChangeIndicator.
• ToturntheTransmitterOFF,removethebattery.
• TheChangeIndicatorisintendedforresidentswithhealthyskin.
Advanced operation:
• ChangingthebatteryandSensorStripareoperationsthatshould
be carried out infrequently.
Using the TENA SmartCare Change Indicator according to its intended
use does not add any risk compared to not using it.
The medical device complies with emission and immunity standards and
regulations.Ithasbeentestedandfullsrequirementsforbothhome
and professional healthcare environments. The medical equipment is
also compliant for professional healthcare facility environment use.
Always make sure the
Change Indicator has been
removed before disposing of
the TENA incontinence
product.
TENA SmartCare Change Indicator
18 19
TENA SmartCare Change Indicator
Apply TENA product
on the resident
TENA Flex
TENA Flex
1 32
TENA Flex
TENA Flex
TENA Flex
TENA Flex
TENA Flex
BACK
BACK
FRONT
FRONT
FRONT
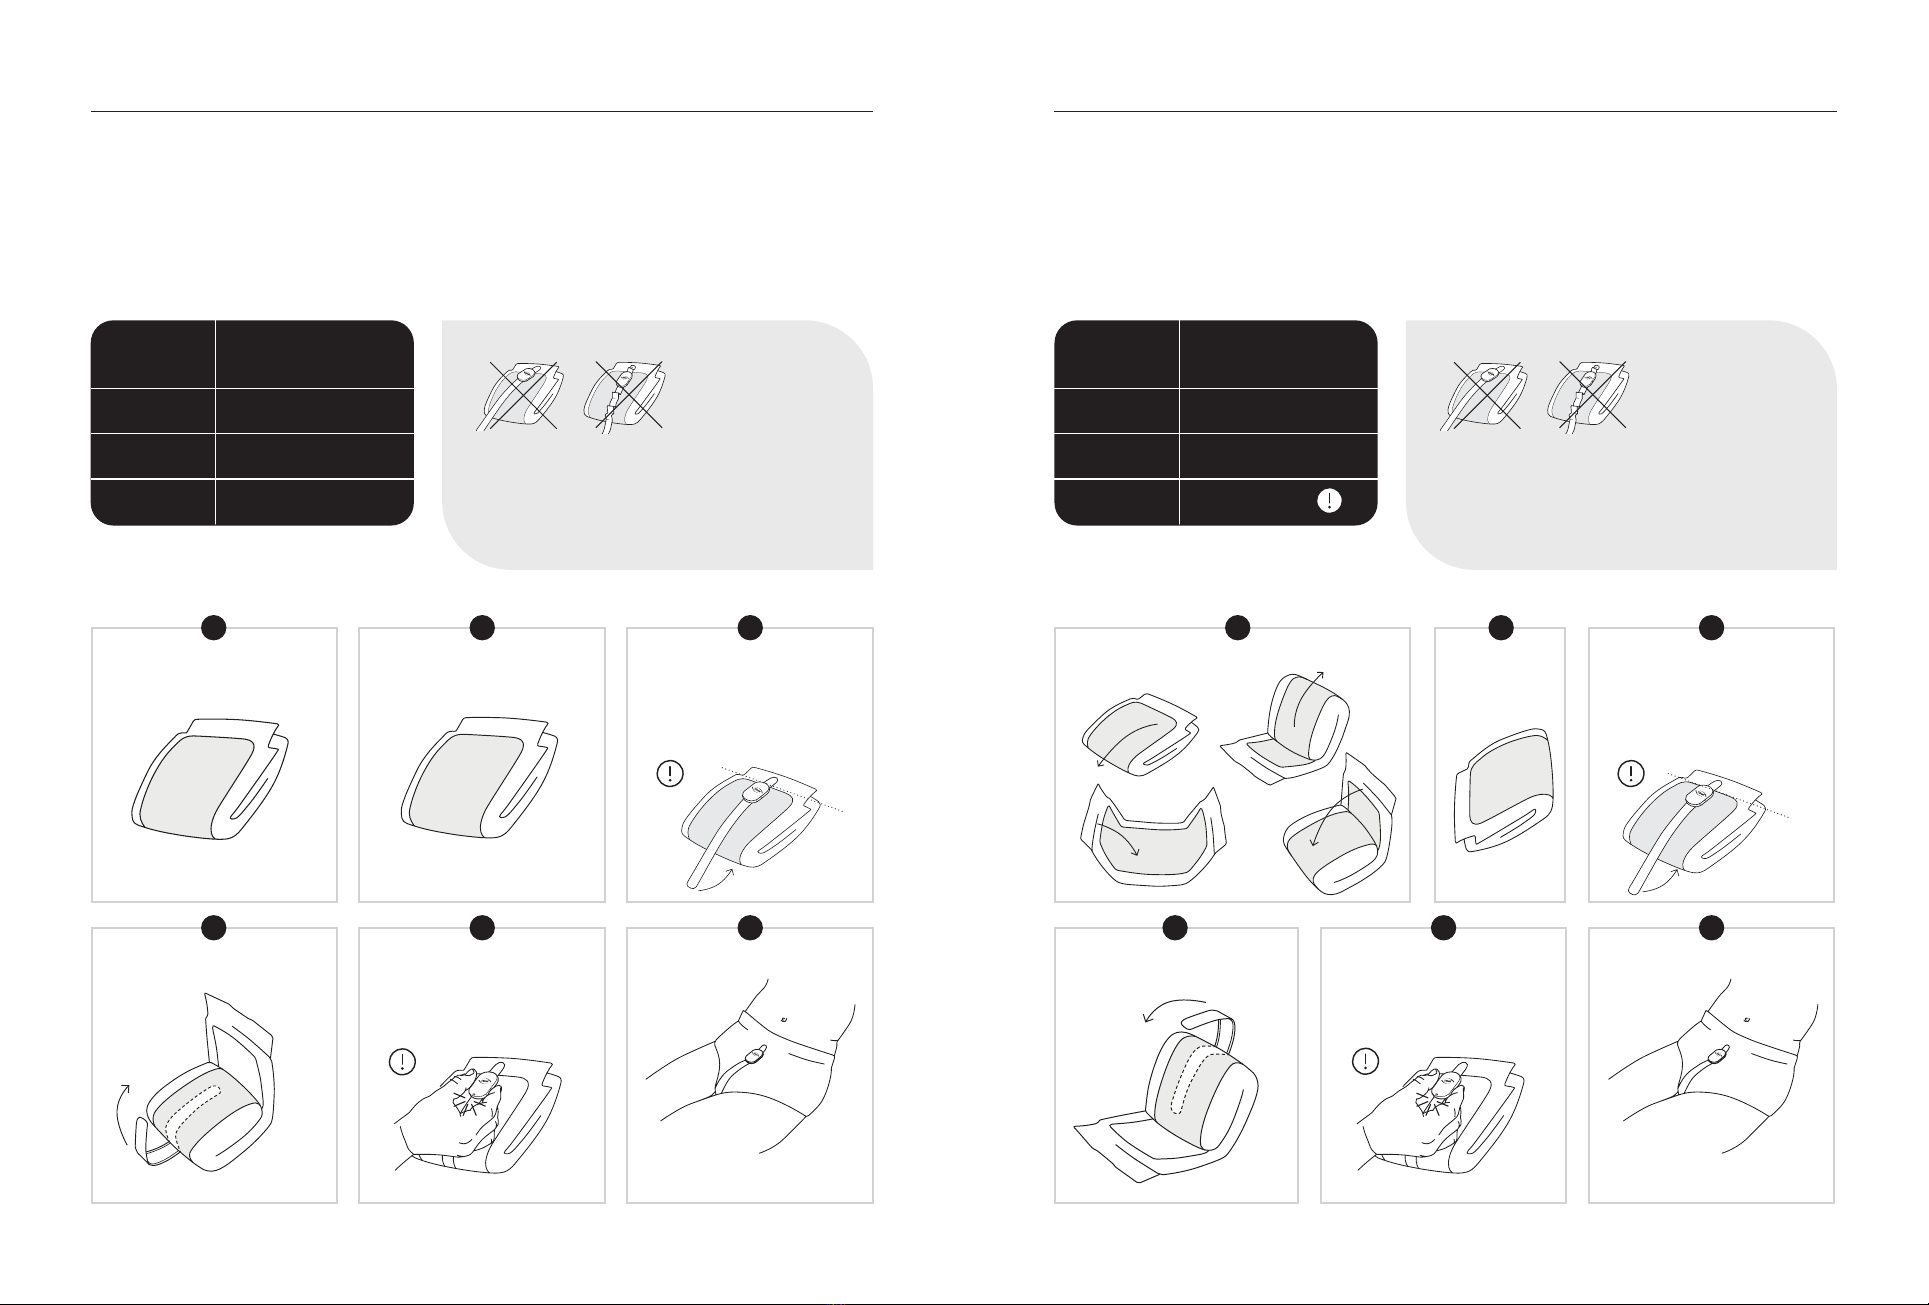
TENA Slip
Plus, Super or Maxi
The TENA SmartCare Change Indicator should always be attached when the
incontinence product is folded and before it has been applied to the user.
TENA Slip TENA SmartCare
sensor strip length
S S
M M
L L
Attachment instructions for supported TENA products
REF
SN
IPXX
FCC ID:
IC:
UDI:
MD
10 40
4 5 6
REF
SN
IPXX
FCC ID:
IC:
UDI:
MD
10 40
Please note that product size
and sensor strip length do not
always match.
Every time you change an
incontinence product, press both
buttons simultaneously for two
seconds to reset the transmitter.
TENA Flex
Plus, Super or Maxi
The TENA SmartCare Change Indicator should always be attached when the
incontinence product is folded and before it has been applied to the user.
TENA Flex TENA SmartCare
sensor strip length
S S
M M
L M
Keep folded
Place tightly
Align with top of
thicker absorbent area
Find the front
REF
SN
IPXX
FCC ID:
IC:
UDI:
MD
10 40
Ensure the Change Indicator is straight.
Smooth any sensor strip wrinkles, then press
rmlytoensuretheChangeIndicatorhasfull
contact with the TENA absorbent product.
Ensure the Change Indicator is straight.
Smooth any sensor strip wrinkles, then press
rmlytoensuretheChangeIndicatorhasfull
contact with the TENA absorbent product.
FRONT
THICKER
ABSORBENT
AREA
BACK
BACK
FRONT
TENA Slip/
TENA Stretch Brief/
TENA Brief
TENA Pants/
TENA Underwear
1
TENA Slip/
TENA Stretch Brief/
TENA Brief
TENA Pants/
TENA Underwear
Apply TENA product
on the resident
2 3
4 5 6
TENA Slip/
TENA Stretch Brief/
TENA Brief
TENA Pants/
TENA Underwear
TENA Slip/
TENA Stretch Brief/
TENA Brief
TENA Pants/
TENA Underwear
Please note that product size
and sensor strip length do not
always match.
Every time you change an
incontinence product, press both
buttons simultaneously for two
seconds to reset the transmitter.
Keep folded
Place tightly
Align with top of
thicker absorbent area
Find the front
REF
SN
IPXX
FCC ID:
IC:
UDI:
MD
10 40
REF
SN
IPXX
FCC ID:
IC:
UDI:
MD
10 40
THICKER
ABSORBENT
AREA
FRONT
TENA SmartCare Change Indicator
20 21
TENA SmartCare Change Indicator
TENA Slip/
TENA Stretch Brief/
TENA Brief
TENA Pants/
TENA Underwear
TENA Slip/
TENA Stretch Brief/
TENA Brief
TENA Pants/
TENA Underwear
TENA Slip/
TENA Stretch Brief/
TENA Brief
TENA Pants/
TENA Underwear
TENA Slip/
TENA Stretch Brief/
TENA Brief
TENA Pants/
TENA Underwear
1 2 3
4 5 6
Apply TENA product
on the resident
REF
SN
IPXX
FCC ID:
IC:
UDI:
MD
10 40
REF
SN
IPXX
FCC ID:
IC:
UDI:
MD
10 40
TENA Stretch
Brief
TENA SmartCare
sensor strip length
M/R M
L/XL L
TENA Stretch Brief
Super or Ultra
The TENA SmartCare Change Indicator should always be attached when the
incontinence product is folded and before it has been applied to the user.
TENA Pants TENA SmartCare
sensor strip length
S S
M S
L S
Please note that product size
and sensor strip length do not
always match.
Every time you change an
incontinence product, press both
buttons simultaneously for two
seconds to reset the transmitter.
Keep folded
Place tightly
Align with top of
thicker absorbent area
Find the front
TENA Pants / TENA Protective Underwear
Plus or Super
The TENA SmartCare Change Indicator should always be attached when the
incontinence product is folded and before it has been applied to the user.
FRONT
REF
SN
IPXX
FCC ID:
IC:
UDI:
MD
10 40
REF
SN
IPXX
FCC ID:
IC:
UDI:
MD
10 40
REF
SN
IPXX
FCC ID:
IC:
UDI:
MD
10 40
Ensure the Change Indicator is straight.
Smooth any sensor strip wrinkles, then press
rmlytoensuretheChangeIndicatorhasfull
contact with the TENA absorbent product.
Ensure the Change Indicator is straight.
Smooth any sensor strip wrinkles, then press
rmlytoensuretheChangeIndicatorhasfull
contact with the TENA absorbent product.
FRONT
FRONT
THICKER
ABSORBENT
AREA
TENA Slip/
TENA Stretch Brief/
TENA Brief
TENA Pants/
TENA Underwear
1
TENA Slip/
TENA Stretch Brief/
TENA Brief
TENA Pants/
TENA Underwear
Apply TENA product
on the resident
2 3
4 5 6
TENA Slip/
TENA Stretch Brief/
TENA Brief
TENA Pants/
TENA Underwear
TENA Slip/
TENA Stretch Brief/
TENA Brief
TENA Pants/
TENA Underwear
Please note that product size
and sensor strip length do not
always match.
Every time you change an
incontinence product, press both
buttons simultaneously for two
seconds to reset the transmitter.
Keep folded
Place tightly
Align with top of
thicker absorbent area
Find the front
REF
SN
IPXX
FCC ID:
IC:
UDI:
MD
10 40
REF
SN
IPXX
FCC ID:
IC:
UDI:
MD
10 40
THICKER
ABSORBENT
AREA
FRONT

TENA SmartCare Change Indicator
22 23
TENA SmartCare Change Indicator
1 2 3
456
Keep folded
Place tightly
Align with top of
thicker absorbent area
Find the front
TENA Brief
Super or Ultra
The TENA SmartCare Change Indicator should always be attached when the
incontinence product is folded and before it has been applied to the user.
TENA Comfort
The TENA SmartCare Change Indicator should always be attached when the
incontinence product is folded and before it has been applied to the user.
Attachment instructions for supported TENA products
Ensure the Change Indicator is straight.
Smooth any sensor strip wrinkles, then press
rmlytoensuretheChangeIndicatorhasfull
contact with the TENA absorbent product.
Ensure the Change Indicator is straight.
Smooth any sensor strip wrinkles, then press
rmlytoensuretheChangeIndicatorhasfull
contact with the TENA absorbent product.
TENA Brief TENA SmartCare
sensor strip length
R M
M M
L L
XL L
TENA
Comfort
TENA SmartCare
sensor strip length
Plus S
Extra S
Super S
Maxi M
Ultima M
REF
SN
IPXX
FCC ID:
IC:
UDI:
MD
10 40
REF
SN
IPXX
FCC ID:
IC:
UDI:
MD
10 40
Every time you change an
incontinence product, press both
buttons simultaneously for two
seconds to reset the transmitter.
FRONT
TENA Slip/
TENA Stretch Brief/
TENA Brief
TENA Pants/
TENA Underwear
1
TENA Slip/
TENA Stretch Brief/
TENA Brief
TENA Pants/
TENA Underwear
Apply TENA product
on the resident
2 3
4 5 6
TENA Slip/
TENA Stretch Brief/
TENA Brief
TENA Pants/
TENA Underwear
TENA Slip/
TENA Stretch Brief/
TENA Brief
TENA Pants/
TENA Underwear
Please note that product size
and sensor strip length do not
always match.
Every time you change an
incontinence product, press both
buttons simultaneously for two
seconds to reset the transmitter.
Keep folded
Place tightly
Align with top of
thicker absorbent area
Find the front
REF
SN
IPXX
FCC ID:
IC:
UDI:
MD
10 40
REF
SN
IPXX
FCC ID:
IC:
UDI:
MD
10 40
THICKER
ABSORBENT
AREA
FRONT

TENA SmartCare Change Indicator
24 25
TENA SmartCare Change Indicator
REF
SN
IPXX
FCC ID:
IC:
UDI:
MD
10 40
REF
SN
IPXX
FCC ID:
IC:
UDI:
MD
10 40
NOTE
Ifyouhavediicultyremovingthebattery,tapthe
transmitter in your hand until the battery falls out.
Battery replacement
If the LED light starts to blink, either the battery needs to be replaced or the transmitter is not
properly attached to the sensor strip. The CR2032 battery will last for up to 4 weeks. However,
the battery can be changed whenever needed.
TENA sensor strip
The sensor strip is designed to withstand approximately 4 weeks continuous use.
Sometimes, however, the hooks on the back of the sensor strip can become covered with
bresorlint.Thispreventsthehooksfromattachingtotheincontinenceproduct.Ifthe
bresorlintcannotberemoved,thesensorstripshouldbechanged.Thesensorstrip
shouldalsobechangedifitbecomessoiledwithfaecesandcannotbecleanedsuiciently.
For cleaning advice, see page 25 of this guide.
Change sensor strip & battery
1 P r e s s
1 P r e s s
2 Remove
transmitter
2 Remove
battery
Change Indicator
Only clean the Change Indicator when it
is fully assembled. The transmitter and
sensor strip should never be cleaned
separately. Clean the Change Indicator
using a disinfectant wipe and/or disinfectant
spray when required, according to your local
infection control protocol. The device can
be rinsed under a tap.
AnybresorlintattachedtotheVelcro
shouldberemovedtoensureasecuret
between the Change Indicator and the
absorbent incontinence product. Fibres can
be removed using the end of the sensor strip
or gently with a lint roller (adhesive paper).
Gateway
Clean the gateway with a dry
cloth when needed.
Cleaning
WARNING
Clean the Change Indicator when fully assembled to prevent
water entering the device.
Ensure adequate disinfection procedures are followed for
residents with infectious diseases.
Do not clean in the washing machine.
Do not submerge in water.
TENA SmartCare Change Indicator
26 27
TENA SmartCare Change Indicator
REF
SN
IPXX
FCC ID:
IC:
UDI:
MD
10 40
REF
SN
IPXX
FCC ID:
IC:
UDI:
MD
10 40
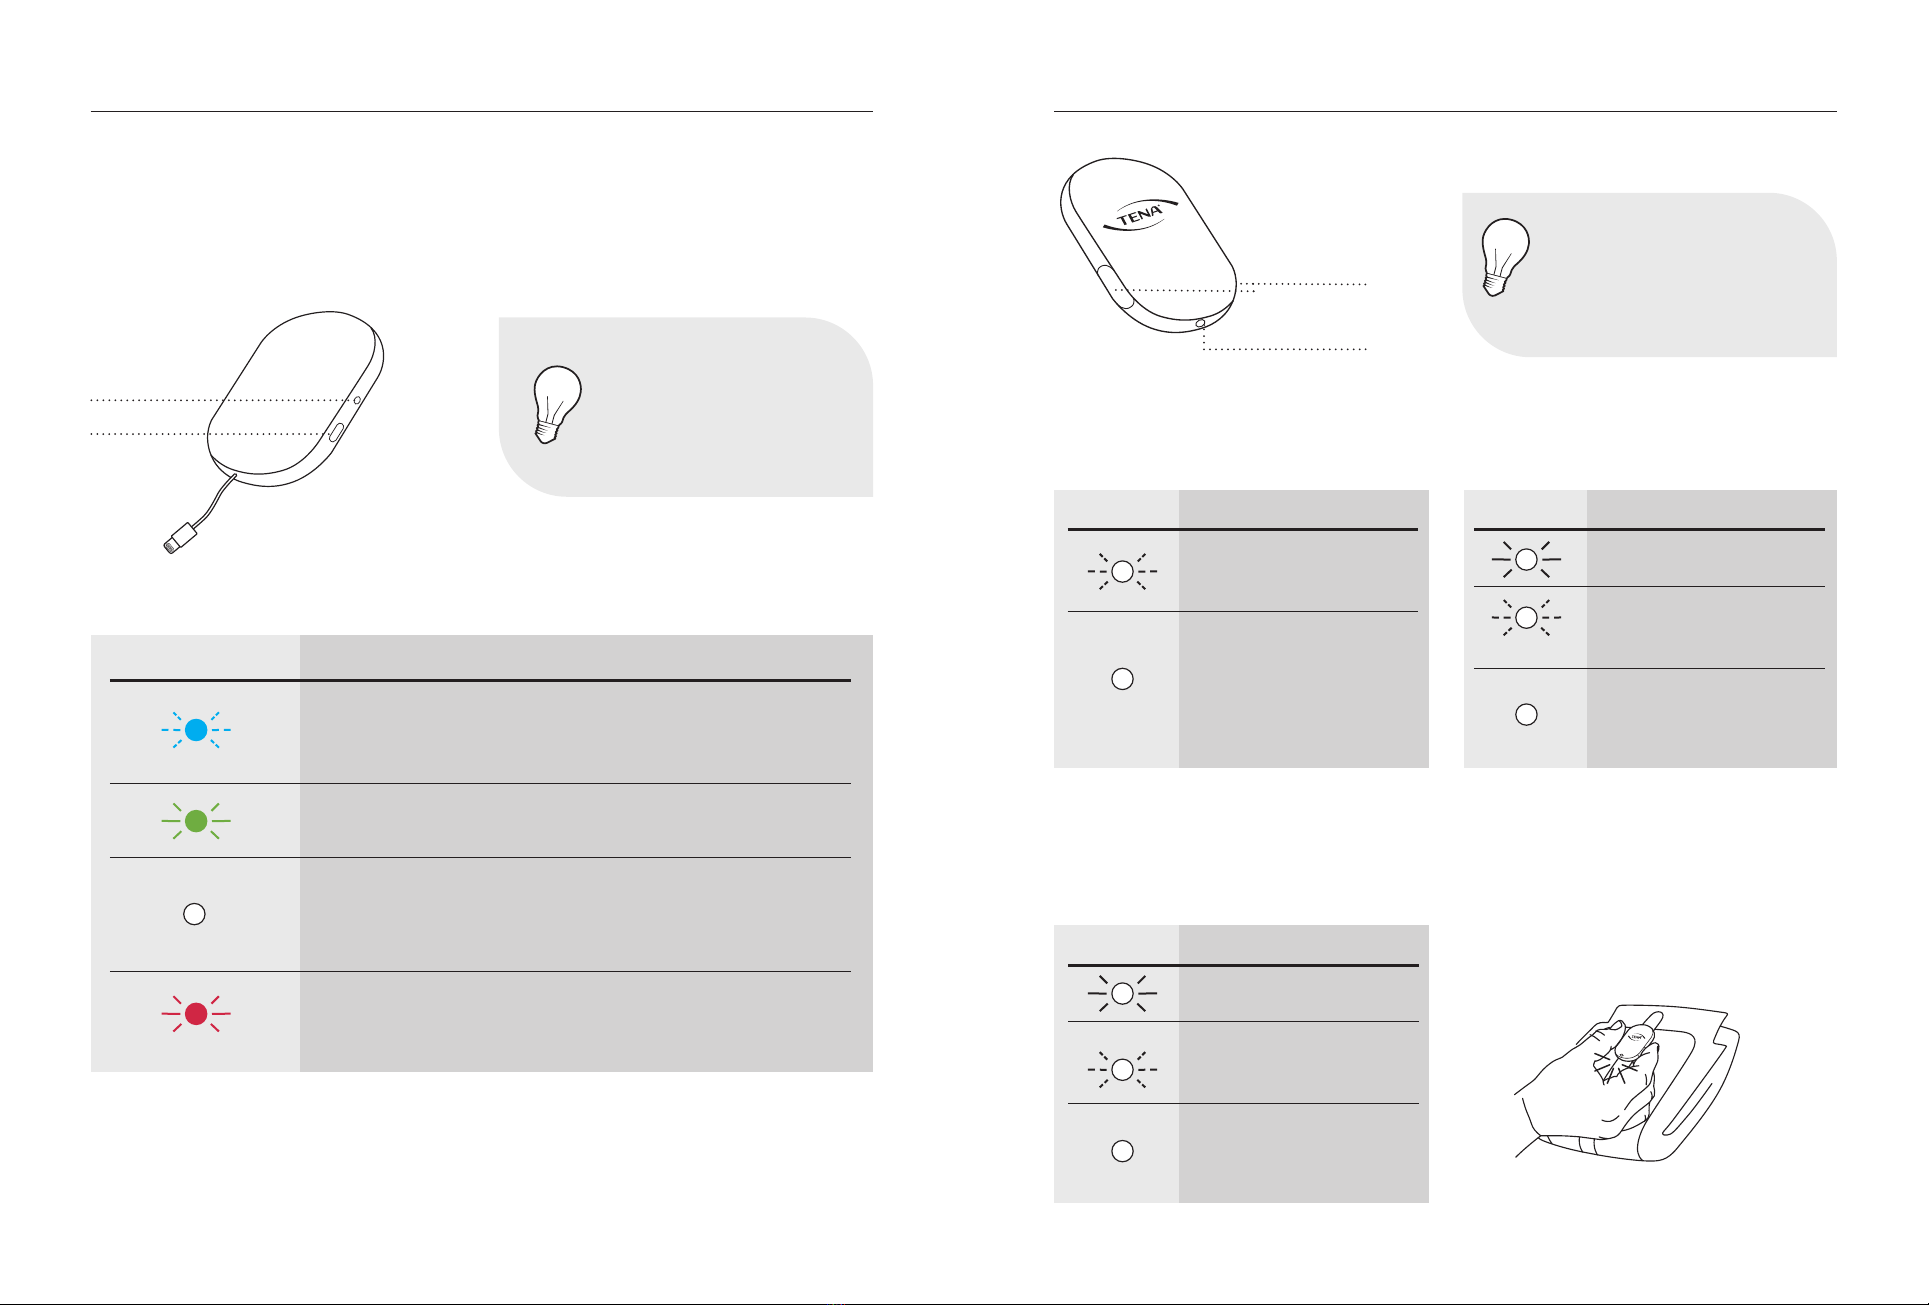
NOTE
TheLEDlightcanbediicult
to see if exposed to strong
sunlight, for example. To
improve visibility, try blocking
out any strong sunlight.
COLOUR LED LIGHT WHAT IT MEANS
Blinking blue light:
Wait. The system is connecting.
Allow up to 60 seconds for light to start blinking.
Steady green light:
EverythingisOK.
No light:
Greenlightdisappearsafterawhileandthesystemgoesinto
dark mode. Push the button to see if it has power and
connection. If no light comes on, check the power connection.
Steady red light:
Error.SeeTROUBLESHOOTINGsection,p.29–35ofthisguide
for more information.
Gateway lights & buttons
Gateway installation
AfterattachingtheGatewaytoapoweroutlet.
LED light
Button
Transmitter lights & buttons
Buttons
LED Light
NOTE
TheLEDlightcanbediicult
to see if exposed to strong sunlight,
for example. To improve visibility,
try blocking out any strong sunlight.
Battery installation
Once the battery has been installed in the
transmitter.
LED LIGHT WHAT IT MEANS
Blinksvetimes:
Battery is in correct position.
Attach transmitter to
sensor strip.
Nolight:OK
The light disappears after a few
seconds. Check for power by
pressing both buttons simulta-
neously for two seconds.
Change Indicator assembly
Once the transmitter has been attached to
the sensor strip.
Applying the Change Indicator to the incontinence product
Press both buttons simultaneously for two seconds at every change. This records the change
of incontinence product in the TENA SmartCare Professionals app and on the dashboard and
resets the system.
LED LIGHT WHAT IT MEANS
Steady light for a few seconds:
EverythingisOK.
Blinksvetimes:
Transmitter is not attached
properly or battery is low.
Try re-attaching transmitter.
Nolight:OK
The light disappears after a few
seconds. Check for power by
pressing both buttons simulta-
neously for two seconds.
LED LIGHT WHAT IT MEANS
Steady light for a few seconds:
EverythingisOK.
Blinksvetimes:
Transmitter is not attached prop-
erly. Try re-attaching. Or: battery
is low. Change battery.
No light at all:
Error.SeeTROUBLESHOOTING
section, p. 29–35 of this guide for
more information.
TENA SmartCare Change Indicator
28 29
TENA SmartCare Change Indicator
REF
SN
IPXX
FCC ID:
IC:
UDI:
MD
10 40
Water, sand and dirt
WARNING
If water has entered the sensor strip or transmitter,
ensure it is completely dry before use.
The Change Indicator (when fully assembled with transmitter and sensor strip) has
aclassicationofIP54.IP54indicatesthatitisprotectedagainstsmallobjectsand
splashing water. While it is safe to clean the Change Indicator with running water,
please follow your Infection Prevention and Control protocols. Use of an approved
disinfectant spray product or wipe is recommended. Always clean the Change Indicator
when fully assembled – never attempt to clean individual parts separately.
PROBLEM ITEM ACTION
Connection
error
Gateway Caregiver:
1. Press the gateway button. If there is a
steadygreenlighteverythingisOK.
2. If there is a blinking blue light, the gateway
is trying to connect.
3. If no light comes on after pressing the
gateway button, check that the power cable
and power adapter are both properly
connected.
4. If this does not help, contact a super user at
your care facility and revert to a manual
changing procedure for residents until the
connection error is resolved.
Super user:
1. Repeat steps 1–4 above
2. If this does not help, contact TENA
SmartCare support.
Connection
error
Change
Indicator
Caregiver:
1. Make sure the transmitter is properly
attached to the sensor strip. (see p. 13 of
this guide)
2. Press both buttons simultaneously for two
seconds. If this does not help, contact a
super user at your care facility and revert to
a manual changing procedure for residents’
incontinence products until the connection
error is resolved.
Super user:
1. Repeat steps 1–2 above
2. If there is no light, change the battery and
re-attach to a sensor strip. Press both buttons
simultaneously again. If there is a steady
lightforafewseconds,everythingisOK.
Troubleshooting

TENA SmartCare Change Indicator
30 31
TENA SmartCare Change Indicator
PROBLEM ITEM ACTION
Connection
error
Change
Indicator
3. If there is a blinking light, check that the
transmitter is properly attached to the sensor
strip. Adjust if needed. Press both buttons
simultaneously again. If there is a steady
lightforafewseconds,everythingisOK.
4. If this does not help, attach to a new sensor
strip. Press both buttons simultaneously
again. If there is a steady light for a few
seconds,everythingisOK.
5. If this does not help, (no light or blinking
light after attaching correctly to the sensor
strip) consider changing the transmitter. If
changing transmitter, make sure to register
the transmitter and assign it to the resident
in the administrative dashboard.
6. If this does not help, contact TENA
SmartCare support.
Connection
error
System
range
Caregiver:
1. Both the user and transmitter should be
in range of the gateway – usually within
10 metres or 33 feet.
2. If the user is within range of the gateway,
see “Connection error” in the
TROUBLESHOOTINGsectionofthisguide.
3. If this does not help, contact a super user at
your care facility and revert to a manual
changing procedure for residents’
incontinence products until the connection
error is resolved.
PROBLEM ITEM ACTION
Connection
error
System
range
Super user:
1. Both the user and transmitter should be in
range of the gateway – usually within 10
metres or 33 feet.
2. If the user is within range of the gateway,
see “Connection error” in the
TROUBLESHOOTINGsectionofthisguide.
3. If this does not help, contact TENA
SmartCare support.
Connection
error
Network
failure
Occasionally, the network may go down.
If this happens, inform a super user at your
care facility and revert to a manual changing
routine until the system is up and running
again.
Super user:
Occasionally, the network may go down. If this
happens, inform the person in charge of your
network at your care facility.
Change
Indicator
falls o
Change
Indicator
1. Firstly, make sure you are using one of the
supported TENA absorbent incontinence
products with a textile-like backsheet
(see p. 18–23 of this guide). The sensor strip
does not attach to absorbent products with
a plastic backsheet.
2. Make sure you attach the Change Indicator
to a folded product, straight from its plastic
packaging. Do not attach it when the user is
already wearing the absorbent product.
3. Check the Velcro-covered side of the sensor
strip to see if it is covered with lint. Remove
any lint.

TENA SmartCare Change Indicator
32 33
TENA SmartCare Change Indicator
PROBLEM ITEM ACTION
Change
Indicator
falls o
Change
Indicator
4. If this does not help, contact a super user
at your care facility and revert to a manual
changing procedure for residents’
incontinence products until the problem
is resolved.
Super user:
1. Repeat steps 1–3 above.
2. If this does not help, attach a new
sensor strip.
3. If this does not help, contact TENA
SmartCare Support
I don’t
understand
the
notications
Status
indication
Caregiver & super user:
1.Thenoticationsaretheretosupportyour
decision making regarding when to change
the absorbent incontinence product without
havingtocheckmanually.Thereareve
dierentnotications:
2. “OK” The resident’s absorbent product is dry
– no action needed
3. “Some urine” Some urine detected, but the
surface of the product is still dry.
4. “Saturated” The absorbent product is near
saturation – consider change
5. “OFF” Resident’s absorbent product is not
being monitored
6. “Error” Check “Connection error” in the
TROUBLESHOOTINGsectionofthisguide.
PROBLEM ITEM ACTION
The system
noties me
too early
Status
indication
You experience that the “consider change”
noticationshowswhenanabsorbentproduct
is still dry or has not been worn for long.
Caregiver:
1. Make sure you are using one of the
supported TENA products (see p. 18–23 of
this guide).
2. Make sure you are using the right sensor
strip length for your TENA product (see
p. 18–23 of this guide).
3. Make sure the Change Indicator is attached
correctly (see p. 14 of this guide).
4. If this does not help, contact a super user at
your care facility
Super user:
1. Repeat steps 1–3 above.
2. If this does not help, make sure the right
TENA product with the right absorption
level is assigned to this resident in the
administrative dashboard.
3. If this does not help, please contact TENA
SmartCare Support.
The system
noties me
too late
Status
indication
You experience that the “consider change”
noticationshowswhenanabsorbentproduct
is already too wet to be comfortable or the
product has already been worn for too long.
Caregiver:
1. Make sure you are using one of the
supported TENA products (see p. 18–23 of
this guide).
2. Make sure you are using the right sensor
strip length for your TENA product (see
p. 18–23 of this guide).

TENA SmartCare Change Indicator
34 35
TENA SmartCare Change Indicator
PROBLEM ITEM ACTION
The system
noties me
too late
Status
indication
3. Make sure the Change Indicator is attached
correctly (see p. 14 of this guide).
4. If this does not help, please contact a super
user at your care facility.
Super user:
1. Repeat steps 1–3 above.
2. If this does not help, make sure the right
TENA product with the right absorption
level is assigned to this resident in the
administrative dashboard.
3. If this does not help, please contact TENA
SmartCare Support.
I don’t
receive any
notications
at all
Status
indication
1. Check “Connection error” in the
TROUBLESHOOTINGsectionofthisguide.
2. If this does not help, contact a super user at
your care facility.
Super user:
1. Check “Connection error” in the
TROUBLESHOOTINGsectionofthisguide.
2. If this does not help, please contact TENA
SmartCare Support.
PROBLEM ITEM ACTION
How often
should the
Change
indicator
be cleaned?
Change
Indicator
Caregiver & super user:
1. Clean the Change Indicator when fully
assembled, to prevent water from entering
the device. Do not submerge in water or
clean in a washing machine. Do not put the
Change Indicator in an autoclave.
2. Ensure that adequate disinfection
procedures are followed for residents with
infectious diseases.
3. Follow your care facility cleaning routines
when required, e.g. if Change Indicator
is soiled.
4. Remove lint from the Velcro-covered side
when required. This will ensure the Change
Indicator stays securely attached to the
incontinence product.

TENA SmartCare Change Indicator
36 37
TENA SmartCare Change Indicator
This value is with recommended battery: CR2032
TYPE CAPACITY / VOLTAGE
CR2032 220 mAh/3.0 V nominal
Battery module
ChangeIndicatorisclassiedasaninternallypowereddeviceforcontinuousoperation.
CHARACTERISTICS VALUE/RANGE
Wireless technology RF communication, BLE
RF frequency 2.4GHz
Max output level (ERP) 0 dBm
Electrical emissions Class B, level 47 dB mV/m
Operating voltage 2.7 – 3.3 V
Power consumption Avg. 135 uW
Peak 75 mW
Remote communication
range
At least 10 metres (33 feet) in open
environment, without obstructions
Processing unit
Transmitter&gateway
Operating characteristics
CONDITION MINIMUM MAXIMUM
Storage&transporttemp. +10 °C +40 °C
Storage&transporthumidity 65% Rh 85% Rh
Operating temp. +15 °C +45 °C
Operating humidity
(non-condensing) 15% Rh 90% Rh
Pressure 700 hPa 1060 hPa
Environmental conditions
Product component dimensions (mm/inch)
ITEM LENGTH WIDTH HEIGHT DIAMETER
Transmitter 51.8 mm / 2.04"34.5 mm / 13.58"13 mm / 0.51"N/A
Sensor strip
(S, M, L) 510–690 mm / 20.08–27. 16"27.5 mm / 1.08"7.6 mm / 0.30"N/A
Battery N/A N/A 3.2 mm / 0.13" 20 mm / 0.79"
Product weight (g/ounce)
COMPONENT WEIGHT
Transmitter 12.6 g / 0.44 oz
Sensor strip (S, M, L) 12.6 – 15.9 g / 0.44 –0.56 oz
Battery 3.0 g / 0.11 oz

TENA SmartCare Change Indicator
38 39
TENA SmartCare Change Indicator
RF communications equipment (including peripherals such as antenna
cables and external antennas) should be used no closer than 30 cm
(12") to the Change Indicator. Otherwise, degradation of the
performance of this equipment could result.
Interference may occur in the vicinity of equipment marked with
this symbol.
Electro magnetic compability (EMC)
• Readbestbeforedateonaccompanyingpackaging.
• Expectedlifetimeofthetransmitteristwoyearsandthesensorstripis4weeks,
aftertherstuse.
• Expectedshelflife(fromthemanufacturingdate)forthetransmitteris
three years and the sensor strip three years.
Lifetime
• CleantheChangeIndicatorbeforedisposal.
• FollowlocalregulationsfordisposaloftheChangeIndicator,thegatewayandthe
batteries.
• Thisdeclarationrelatesexclusivelytotheradioequipmentinthestateinwhichit
was sold and excludes components that are added and/or operations carried out
subsequentlybythenaluser.
WEEE-marking:
• Thisproducthasbeendesignedwithrecycling,reuse,andwastemanagementasa
consideration. Essity will provide the necessary information to recycling facilities
and government agencies as required by WEEE Directive. For more information,
please contact Essity at www.tena.com.
• TheproductwillbelabelledwiththeWEEEmarkingasshownontheside,
in accordance with European Standard EN 50419.
• TheproperdisposalofWEEEproductswillconservenaturalresources
(through re-use and recycling) and protect environmental and human
health through proper disposal.
• WEEE-labelledproductsmustbekeptseparateandreturnedtoa
designated collection point for dismantling, recycling and/or reuse.
• Theseparatecollectionandrecyclingofyourwasteequipmentatthetimeof
disposal will help to conserve natural resources and ensure that it is recycled in
a manner that protects human health and the environment. For more information
aboutwhereyoucandropoyourwasteequipmentforrecyclingpleasecontact
your local government, your commercial, institutional and/or municipal waste
disposal service, or the location where you purchased the product.
Disposable parts
Other manuals for SmartCare Change Indicator
11
Table of contents
Other TENA Medical Equipment manuals


