TENA Identifi User manual
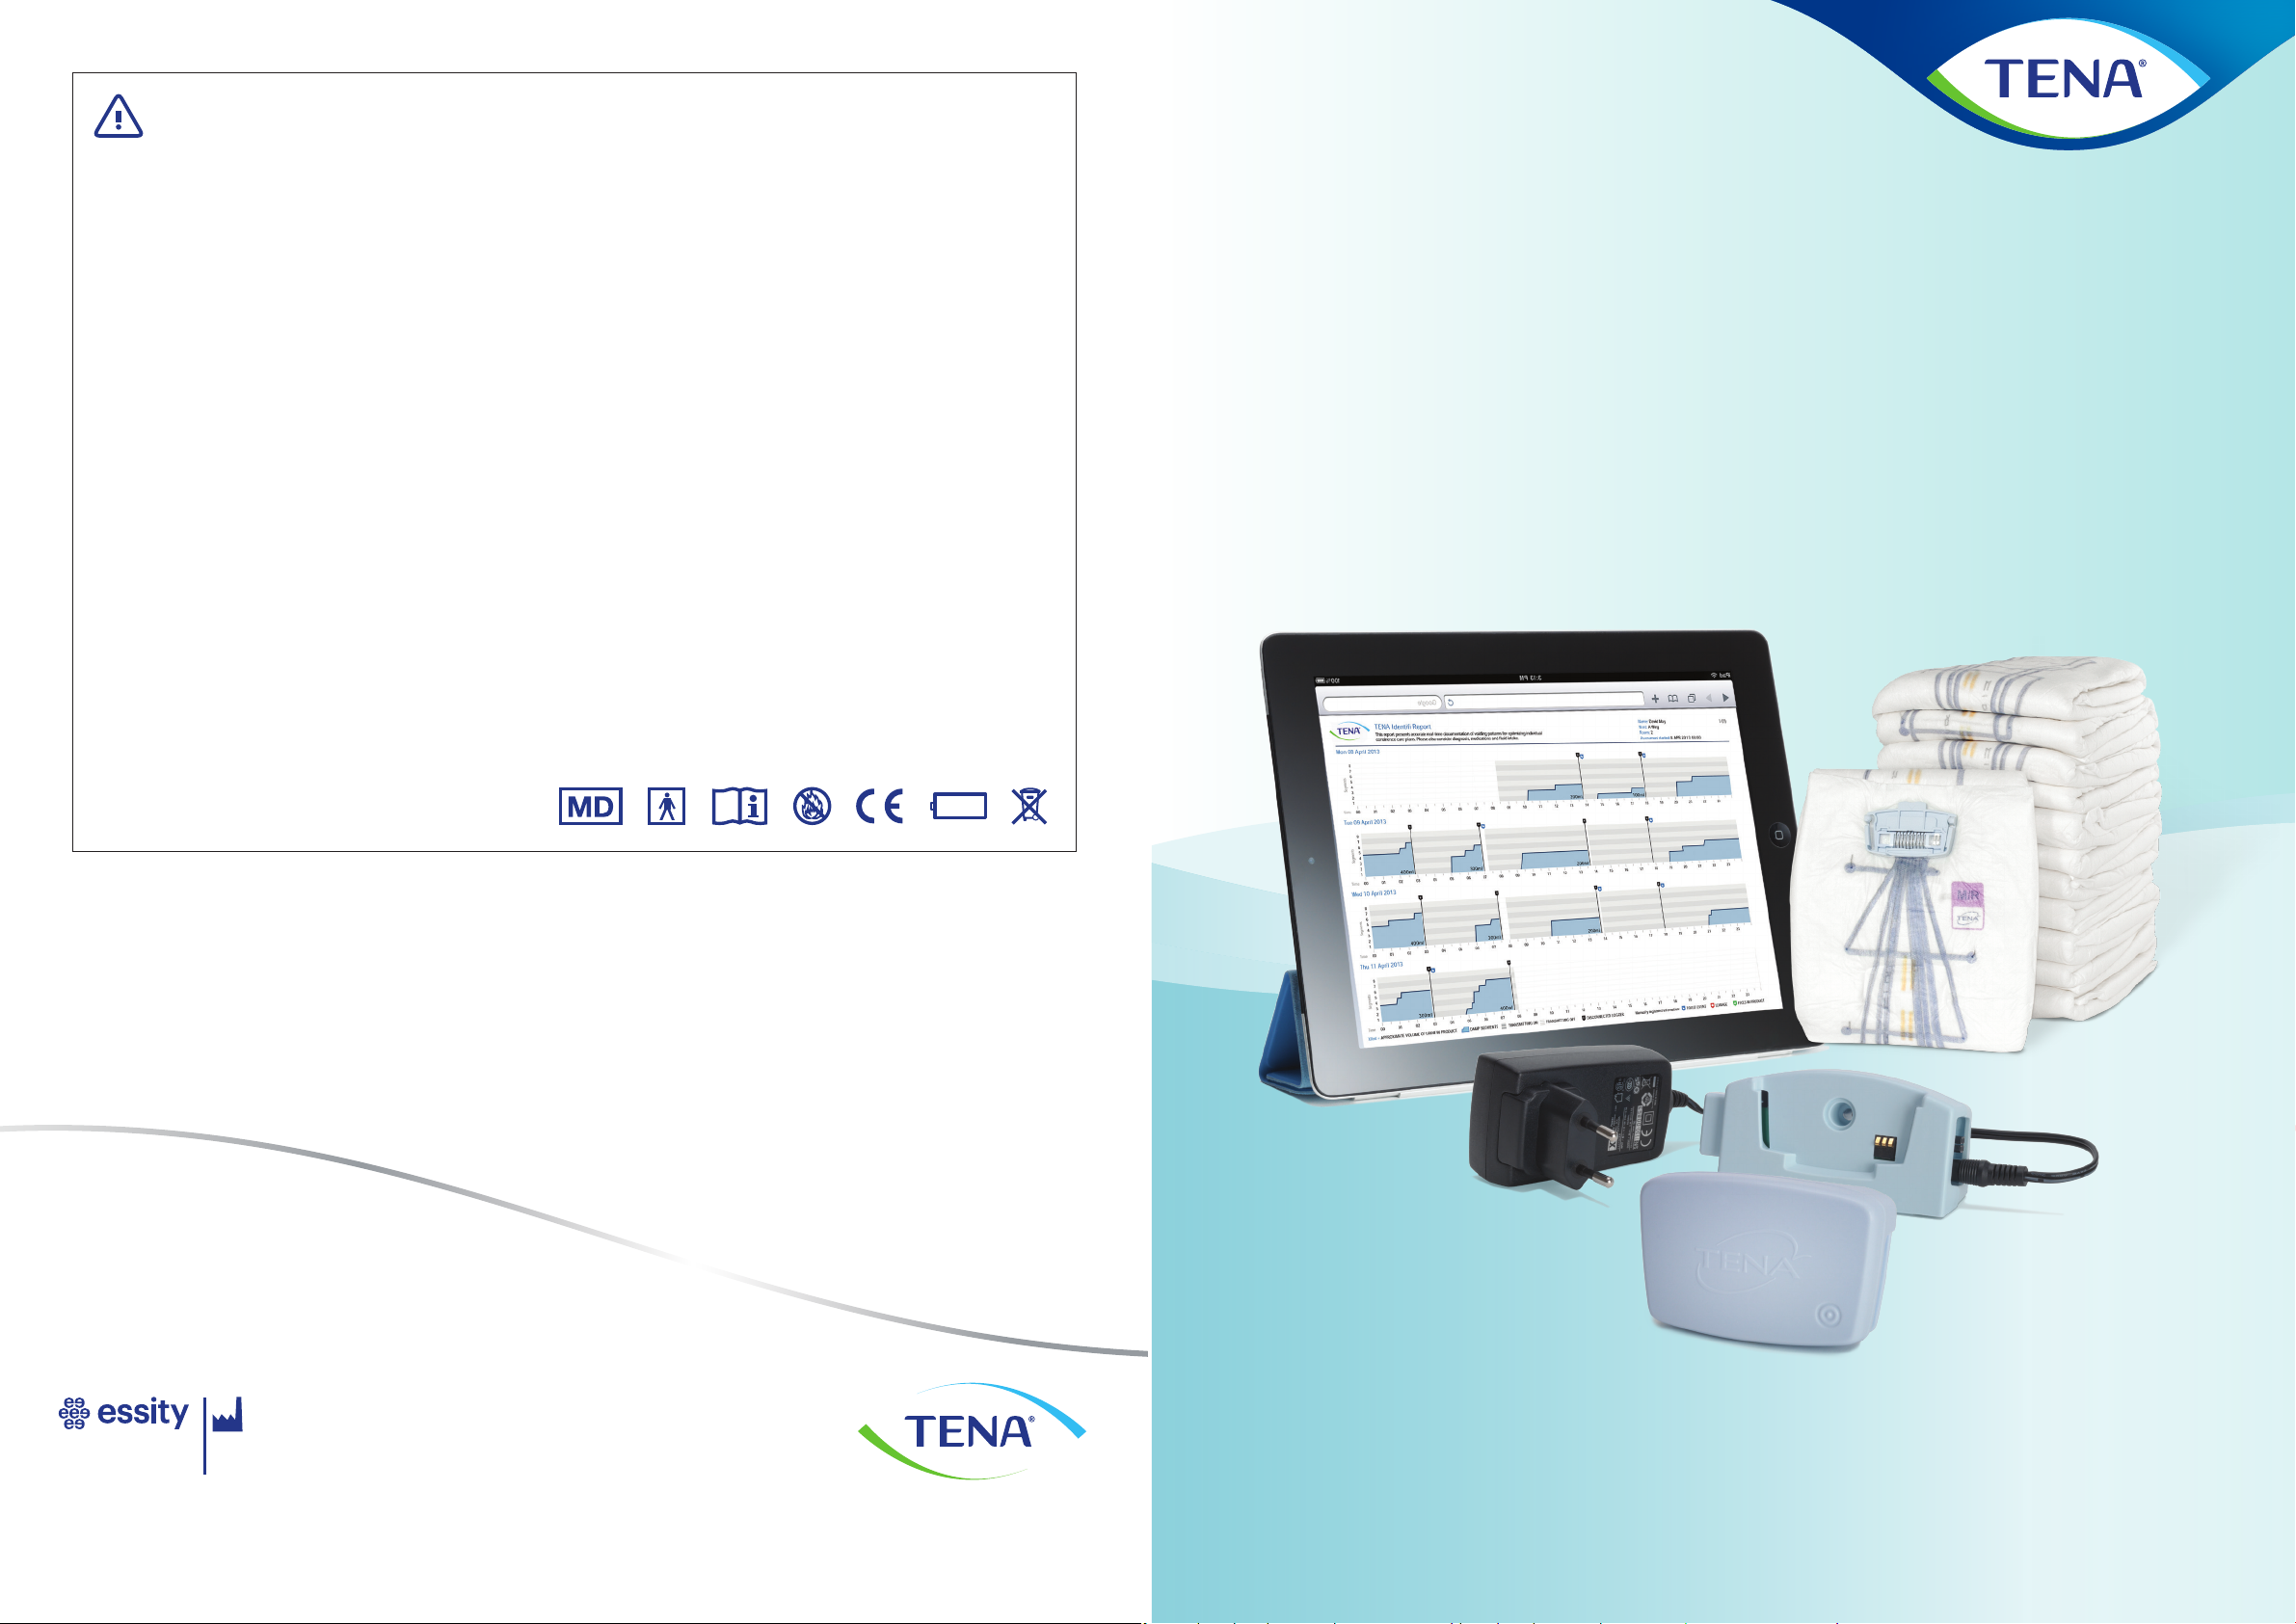
TENA Identi™ System
Instruction Manual
www.tena.com
Warning! Only use the power cord and charging unit provided in the TENA Identi™ Logger Kit.
Warning! Only connect a maximum of 3 charging units in a series to a single power supply.
Warning! If any of the contents of the TENA Identi™ Logger kit appear to be damaged or broken,
contact TENA Customer Service.
Warning! For optimal battery functionality, always store the logger in the charger and connected to a
power source, when not in use. Before extended storage of the logger, always charge the logger rst.
A drained battery severely decreases the battery functionality.
Warning! Do not use the TENA Identi™ Logger on individuals known to carry antibiotic resistant
bacteria or contagious diseases.
Save this instruction manual for future reference.
Read all instructions carefully and completely before initiating an assessment. If in doubt, contact
Essity for support.
Avoid placing the equipment in direct sunlight as it will discolor the plastic casings.
Always clean and disinfect the TENA Identi™ Logger unit in accordance with this manual.
No modication of this equipment is allowed.
IP65 rating: 6 Dust-tight, 5 Protected against water jets.
TENA Identi Logger Kit must be returned to Essity after the end of its service life.
For the latest version of this document please visit https://tenaidenti.essity.com
Cautions:
Important:
Version 1.2
Li
Essity Hygiene and Health AB
SE-405 03 Göteborg, Sweden
Visiting Address: Mölndals Bro 2, Mölndal
www.essity.com, www.tena.com
Computer not included. Web Portal can be accessed from any available computer with internet. Logger and Sensor wear shown are not the actual size. TENA Identi™ Sensor Wear sold separately.
TENA is a registered trademark of Essity Hygiene and Health AB.

TENA Identi™Before you start an assessment
Light indications on the TENA Identi™Logger
Light indication while attached to TENA Identi™Sensor Wear:
Light indication while in charger unit:
Light indication while in charger unit:
TENA Identi™ Logger Kit consists of a reusable logger and charger.
The logger is used for recording and transmitting voiding data from
TENA Identi™ Sensor Wear products.
Do not use TENA Identi™ Logger on individuals known to carry
antibiotic resistant bacteria or contagious diseases.
1. You need access to a computer with the internet browser open.
Have your web portal user ID and password ready to access the
TENA Identi™ Web Portal at this link: https://tenaidenti.essity.com
Protect your personal password. It should not be shared with others.
If you did not receive a user ID and temporary password, contact
Essity Customer Service.
2. Always store the logger in the charger and connected to a power
source when not in use. Make sure the logger has been charged for
at least 2 hours and that it is fully charged. Check as follows:
3. Make sure that you have an adequate supply of TENA Identi™
Sensor Wear to use for the 72 hr. period. Use Sensor Wear in place of
other absorbent products for the 72 hr. assessment period. No other
absorbent products such as pads, liners or briefs should be worn
while Sensor Wear is in use.
4. Distribute TENA Identi™ toileting records, for manual docu-
mentation of the additional events to be captured on the 72 hr.
report.
5. For successful results, do not operate the system without proper
education and training from Essity/TENA sta or a trained designate.
TENA Identi™ Sensor Wear is a disposable absorbent product with a
logger connector and ne, thread-like sensors for collecting voiding
information.
Data from the logger is automatically converted by the TENA Identi™
Reporting System into a report. The graphed report provides care sta
with in-depth voiding patterns and other continence related information,
to help support a more accurate, individualized continence assessment.
TENA Identi™ is a convenient and eective tracking system to support more accurate,
individualized continence care plans.
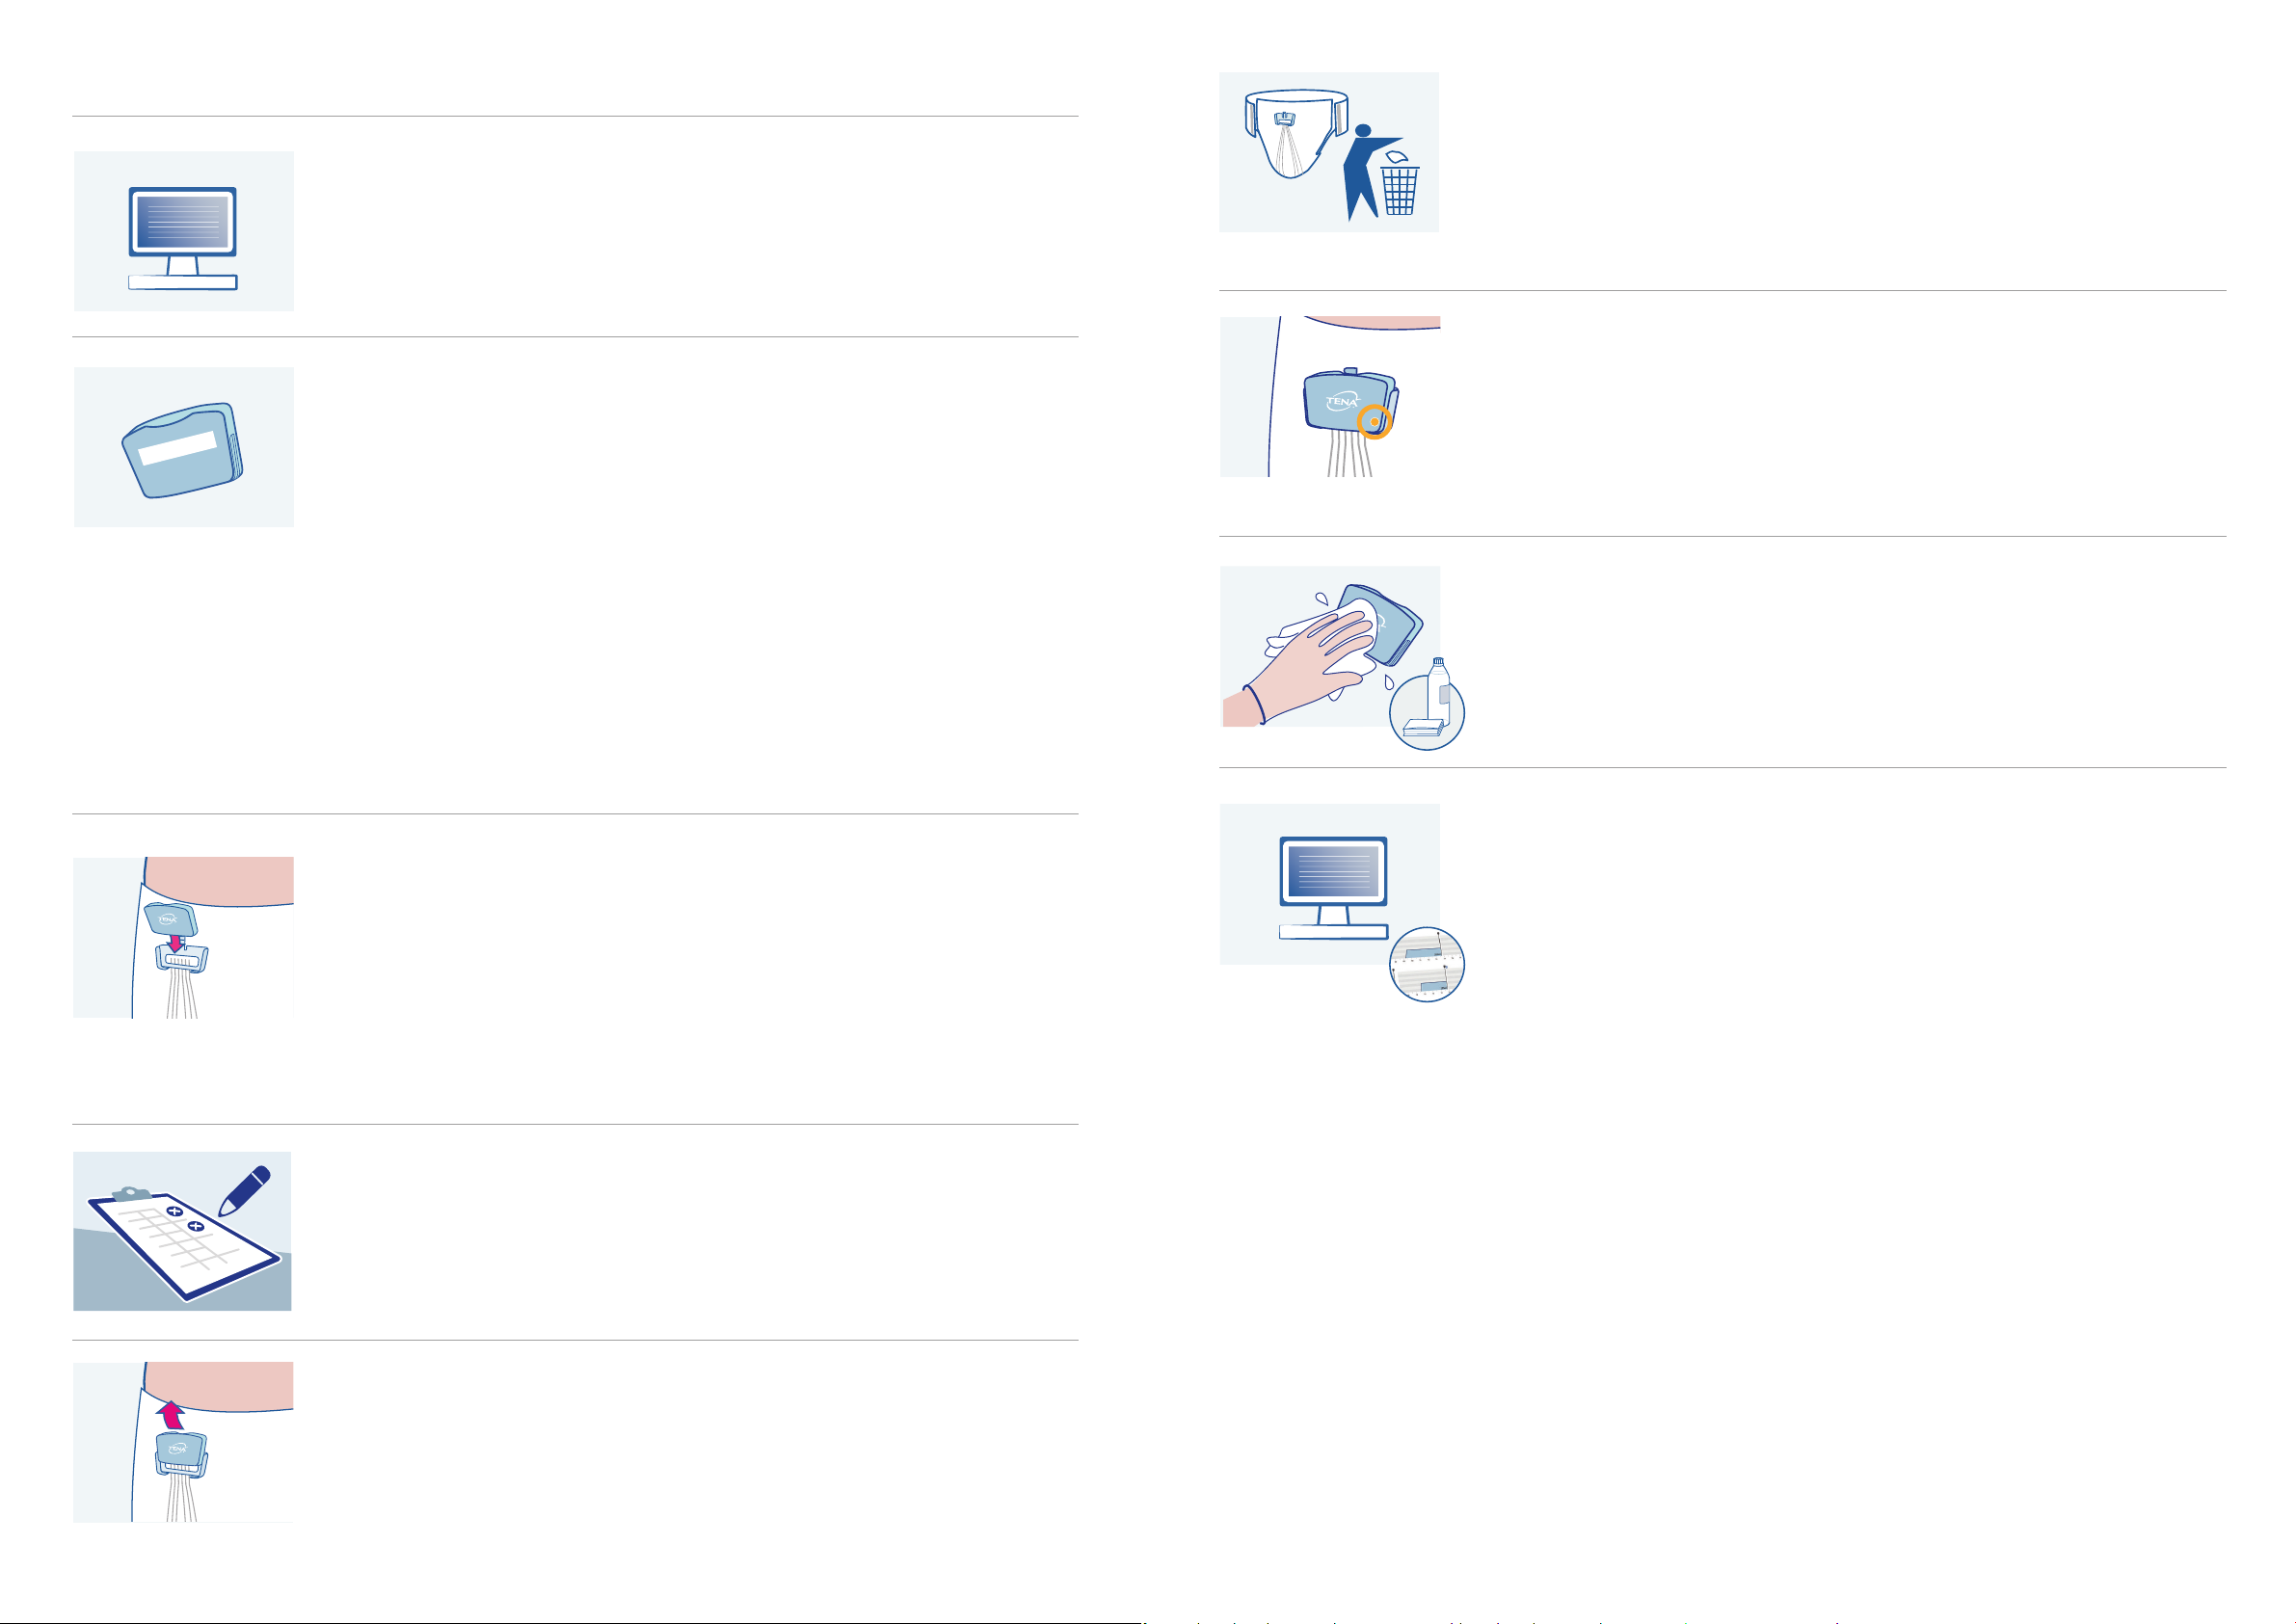
Flashing green (ashes for 15 sec) =
Correctly inserted
Flashing orange =
Charging
Flashing orange =
Charging
Steady red=
Out of order. Support needed, contact Essity Customer Service.
Steady red=
Out of order. Support needed, contact
Essity Customer Service.
Steady orange =
Low battery
Steady green =
Fully charged
Steady green =
Fully charged
2 TENA Identi™ System TENA Identi™ System 3
4 TENA Identi™ System TENA Identi™ System 5
ID no:
Start an assessment
Handling of TENA Identi™Sensor Wear
and Logger during an assessment
Log onto the web portal at https://tenaidenti.essity.com Register
the assessment by connecting the TENA Identi™ Logger ID with the
identier of the person to be assessed. Refer to the TENA Identi™
Web Portal user manual for further instruction on starting the
assessment in the web portal.
The TENA Identi™ Logger ID can be found on the label at the back
of the logger. Make sure that the logger ID selected in the web portal
matches with the logger ID selected for the assessment.
1. Attach TENA Identi™ Logger to TENA Identi™Sensor Wear
Apply Sensor Wear as you would apply ordinary incontinence
protection. Then insert the logger into the blue connector located
at the front.
A ashing green light means the logger is correctly inserted.
It stops ashing after 15 seconds and will remain idle until the
next change. The logger is now ready to transmit data.
2. Record toileting events
Use a mobile device, tablet or diary-table for documentation of the
additional events, e.g. toilet visits or leakage onto clothing/linen, to
be included in the voiding report.
3. The TENA Identi™Logger follows the resident
At next regular product change, apply protective gloves and slide
the logger out of the connector, before taking o the Sensor Wear.
The same logger is used during the whole assessment.
4. Discard used TENA Identi™Sensor Wear.
Be careful not to discard the logger!
Discard soiled Sensor Wear after the logger has been removed.
Apply fresh Sensor Wear and insert the reusable logger into the
connector.
A ashing green light means the logger is correctly inserted.
5. If needed, recharge the TENA Identi™Logger
Check for the solid orange ’low battery’ light during Sensor Wear
changes. If present, sanitise the logger according to the cleaning and
disinfection protocol in this manual and then charge it for 30 minutes,
before reinserting back into Sensor Wear connector.
6. Clean and disinfect TENA Identi™Logger
When the assessment is nished, clean and disinfect the logger
according to the cleaning and disinfection protocol in this manual.
Once cleaned and charged, the logger is ready for a new assessment.
7. Complete voiding report in the TENA Identi™Web Portal
After 72 hours, the residents go back to their regular products. If
not already completed via a mobile device or tablet, register other
continence-related data, such as toileting, leakage etc. in the web
portal.
The TENA Identi™ Report is now ready to be analysed. Integrating
TENA Identi™ into your assessment protocols provides care sta
with more accurate information for improving continence care
outcomes.

6 TENA Identi™ System TENA Identi™ System 7
1 min
Cleaning the logger Cleaning the logger
Apply protective gloves before handling the logger and prior to
cleaning and disinfection. Always clean and disinfect the logger
before placing it back in the charger.
Do not use dishwasher or autoclave.
Do not use the TENA Identi™ Logger on individuals known to carry
antibiotic resistant bacteria or contagious diseases. If the logger
was mistakenly used on such individuals, follow your organization’s
infectious materials handling and infection control protocols.
The plastic surface of the TENA Identi™ Logger is compatible with
the following non-corrosive disinfectants:
• hypochlorous solutions
• quaternary ammonium compound solutions
Do not use chlorine bleach (Sodium hypochlorite solution) on the
logger device.
1. Clean every surface including crevices with water and detergent
or pre-moistened cleaning wipe by rubbing the logger for at least
1 minute.
2. Dry the logger with a paper towel or disposable dry wipe.
Proceed with disinfecting the logger as described below.
4. Allow the logger to air-dry completely. The logger is now ready
to place back in the charger.
3. Disinfect the logger. Use a disinfectant suitable for low risk
equipment to inactivate pathogen microorganisms. Example
disinfectant products are:
• 70% alcohol
• Virkon®containing the active ingredient hypochlorous solution
Rub every surfaces including crevices and make sure surfaces and
crevices are completely saturated with the disinfectant.
Follow the manufacturer’s recommended instructions for use of
the disinfectant.
Virkon is a registered trademark of E. I. du Pont de Nemours and
Company or its ailiates.
Other TENA Medical Equipment manuals


Popular Medical Equipment manuals by other brands


Getinge
Getinge Arjohuntleigh Nimbus 3 Professional Instructions for use

Mettler Electronics
Mettler Electronics Sonicator 730 Maintenance manual

Pressalit Care
Pressalit Care R1100 Mounting instruction

Denas MS
Denas MS DENAS-T operating manual

bort medical
bort medical ActiveColor quick guide

AccuVein
AccuVein AV400 user manual


