Tenergy TB6B User manual

TB6B
Multifunction Balance Charger
Product Manual

1
Table of Content
Introduction 2
Specications 3
Key Features 4
Operating Instructions
Lithium Batteries (Li-Ion/LiPo/LiFe) Pb Battery
6
Warning and Error Messages 17
Safety Message 18
Warranty 18
12
14
15
16NiMH/NiCd Batteries Save and Load Proles

2
Introduction
Please be sure to read this entire operating manual completely before you use this product
for the rst time, as it covers a wide range of information on operation and safety. It can be
dangerous when batteries or chargers are mishandled. There are always risks of batteries
catching re and exploding when they are subjected to improper charging.
DC Input Port
Temperature
Sensor Port
Mode - Main Menu
/ Stop Any Charger Process
Alter Value
/ Status
Enter or Start
Output Port
Banana Plug
Balance Port
JST-XH Socket

3
Specifications
Input Voltage Range
Display
Controls
Charge Current Range
Discharge Current Range
Charge Power Limited
Discharge Power Limited
Balance Current
Balance Tolerance
Battery Types/Cells
Weight
Dimension
DC 10.5 – 18.0V
Blue Backlight LCD
Four Buttons
0.1 – 5.0A
0.1 – 1.0A
Max. 50W
Max. 5W
Max. 250mA
±0.01V
LiPo/Li-ion/LiFe: 1-6 cells
NiMH/NiCd: 1-15 cells
Pb (Lead Acid): 2-20V, 1-10 cells
260g
130 x 85 x 26 mm

4
Key Features
Optimized Operating Software
When charging or discharging, TB6B has an ‘AUTO’ function that sets the feeding current or the cell count of the
battery automatically. Especially for Li-ion/Li-Polymer batteries, it can prevent the over-charging which can lead
to an explosion if improperly used. Every program in the unit is controlled with mutual links and communication
for possible errors so it introduces maximum safety which can be set by the user.
Individual Voltage Balancer for Li-ion/Li-Polymer Batteries
TB6B has an individual-cell-voltage balancer inside, so it does not need a separate balancer when charging
Li-ion/Li-Polymer batteries (LiIo/LiPo/LiFe).
Balance Individual Cells on Discharge
TB6B can also monitor and balance individual cells of the battery pack during the discharge process. If the
voltage of any one cell varies abnormally, the process will be stopped and an error message will appear.
Accepts Various Battery Types
TB6B can accept three types of batteries - LiIo, LiPo, LiFe, NiCd, NiMH, and Pb. Please select the correct one
before starting the process.
5
Data Store/Load
For your convenience, the device can store data for up to 5 different types of batteries. You can set the data to
charge or discharge continually. This data can be selected at any time and the process can be executed without
Cyclic Charging/Discharging
Continually perform 1 to 5 cycles of charge discharge for battery refreshing and balancing.
Robust Outer Aluminum Case

6
Operating Instructions
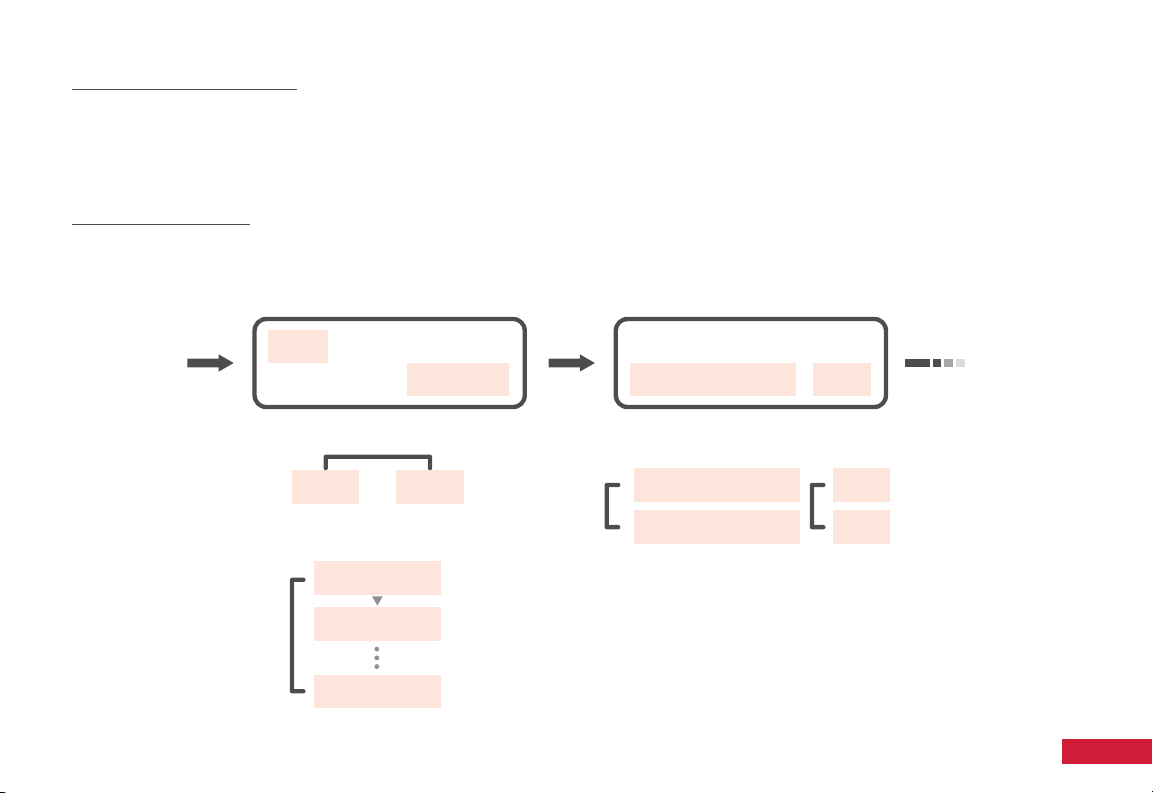
Main Menu
When charger TB6B rst powers up, the LCD screen will display the name of the charger for 2 seconds.
To select the desired program, press the “Mode/Esc” button, and cycle through the options.
TENERGY
TB6B
PROGRAM SELECT
LiPo BATT
NiMH BATT
NiCD BATT
Pb BATT
SAVE DATA
LOAD DATA
LiPo BATT
Press MODE/Esc
For More Options

7
LiPo
V.TYPE 3.7V
LiIo
LiPo
LiFe
3.6V
3.7V
3.3V
LiPo/LiIo/LiFe
CHK TIME 10min
USER SET
PROGRAM ->
Press Enter then Dec/Inc
For More Options
Press Enter to Start Press Enter then Dec/Inc
For More Options
5min 60min
Initial Parameter Setup
Once the desired program is selected, hit the “Enter/Start” button to enter the submenu.
Once in the submenu, you can then hit “Enter/Start” to make the parameter numbers blink, and cycle through
the options using the left (Dec.) and right (Inc.) “Status” keys.
***Please be sure to select the correct type of Lithium battery (refer to table A on Page 11).
Misuse can lead to a re or explosion***
LiPo/Li-ion/LiFe Check Time
Normally, the charger can determine the cell count of the battery at the beginning of the charge/discharge
process. However, when the battery is signicantly discharged, the device may not correctly determine the cell
count. When this happens, set the “check time” to 10 minutes, which should be enough for the device to then
correctly determine the cell count.
8
NiMH Sensitivity
D,Peak Default
Default
5mV/Cell
20mV/Cell
USB/Temp Select
Temp Cut-off 80C
Temp Cut-off 80C
20CUSB Enable
MiCd
NiMH
Press Dec/Inc Switch Between
Press Enter then Dec/Inc
For More Options
Press Enter then Dec/Inc
For More Options
NiMH/NiCd Sensitivity
Delta Peak shows the trigger voltage for automatic charge termination of NiMH and NiCd batteries.
D. Peak default setting is 12mV for NiCd and 7mV for NiMH. Please refer to the battery’s technical
specications for the ideal value.
USB/Temp Select
For the optional thermometer attachment, this setting lets you change the temperature cut off.

9
Waste Time
CHG>DCHG 10min
1min 60min
Press Enter then Dec/Inc
For More Options
Safety Timer
ON
ON
OFF
120min
1min
720min
Press Enter then Dec/Inc
For More Options
Waste Time
The cooling period between cycle charging and discharging.
Set more than 10 minutes to allow your battery time to cool-down between cycles.
Safety Timer
The back up alarm to ensure you don’t overcharge your batteries.
You can turn this feature off or extend the timer.
10
ON OFF
Key Beep
Buzzer ON
ON
Press Enter then Dec/Inc
For More Options
Input Power Low
Cut-off 10.5V
11.0V
10.0V
Press Enter then Dec/Inc
For More Options
Capacity Cut-off
ON
ON
OFF
500mAh
10mAh
20000mAh
Press Enter then Dec/Inc
For More Options
Capacity Cut-Off
An additional safety feature to prevent overcharging.
Set the max amount the charger can charge before shutting down.
Key Beep & Buzzer
Key Beep - Enable or Disable sound when pressing the buttons.
Buzzer - Enable or Disable alarm.
Input Power Low
The charger stops charging if the input voltage goes below this value.

11
Li-PoBattery Types
Standard Voltage (V/cell)
Max. Charge Voltage (V/cell)
Maximum Charge Current
Min. Discharge Voltage (V/cell)
Li-ion Li-Fe NiMH NiCd Pd
3.70 3.60 3.30 1.20 1.20 2.00
4.20 4.10 3.60 1.60 1.60 2.45
1C 1C 1C 1C 1C 0.2C
3.00 3.00 2.00 1.00 0.85 1.75
Table A
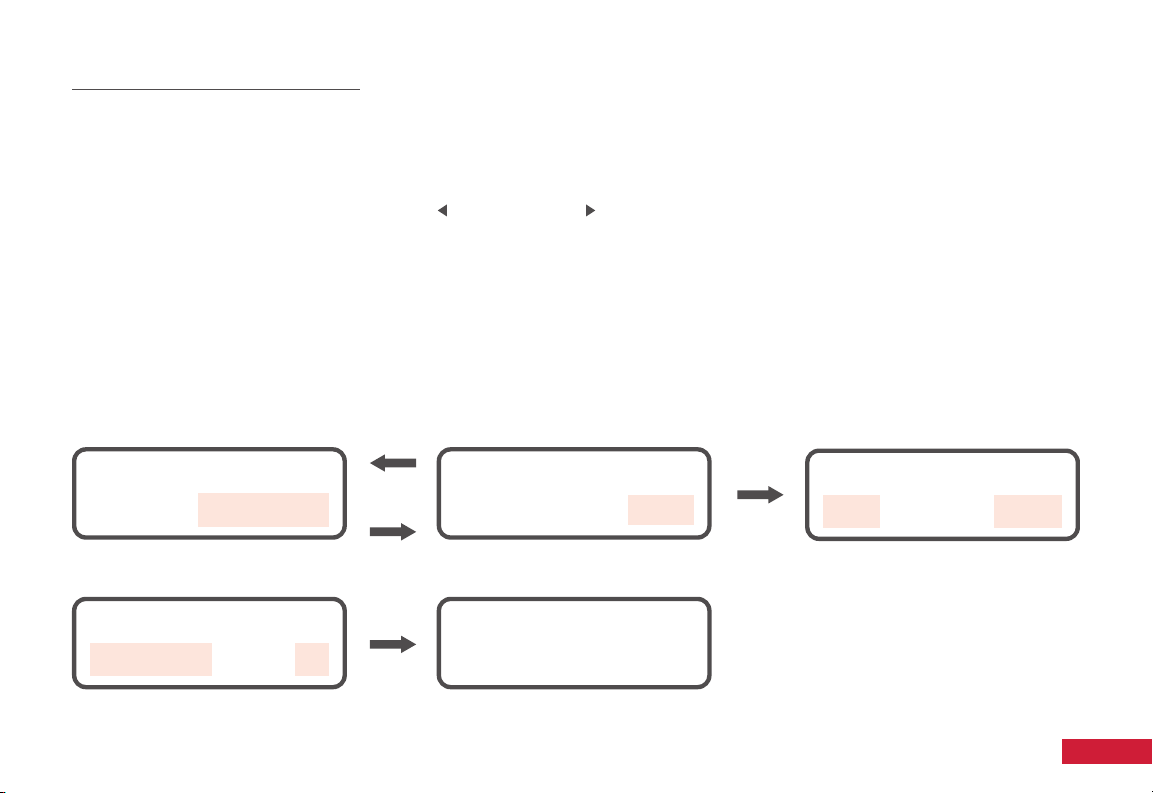
How to connect the wires
Auto charging mode Balance charging / storage
/ discharge mode
Individual cell
connection diagram
Li-Po/Li-ion/Li-Fe battery
without PCB and/or
requires balance charging
must use Balance Charge
Mode with JST XH
balancing connector.
Always follow both the
battery and charger
instructions. Failure to do
so may result in FIRE.
WARNING:
12
CHARGE – This is for individual batteries and some
special battery packs that do not have a balance port
or cell count. The left side of the screen shows you
the battery and the current you selected. The right
side shows the mode and the cell count of the battery
selected.
BALANCE – This is for 2-6 cell Lithium batteries with
a balance port. The battery’s individual cell balance
connector should be inserted into the balance board
connected to the right side of the charger.
FAST CHARGE – This is for rapid charging of your
batteries. The nal charge capacity will be slightly
reduced, but the charging time will also be shortened.
STORAGE – This is for charging/discharging
a battery which will not be used for some time.
This will keep the battery at 40% of its normal
capacity so as not to waste a full charge over time.
DISCHARGE – Although Lithium batteries do not
need to be discharged, this function allows for a
discharge of over 90%.
Lithium Batteries (Li-Ion/LiPo/LiFe)
Please follow the main instructions to select the correct type of battery and parameter value for your
desired application.
PROGRAM SELECT
Li** BATT
LiPo CHARGE
2.0A 11.1V(3S)
LiPo BALLANCE
2.0A 11.1V(3S)
LiPo FAST CHG
2.0A 11.1V(3S)
LiPo STORAGE
1.0A 11.1V(3S)
LiPo DISCHARGE
1.0A 11.1V(3S)

13
Selecting the Correct Cell Count
Once the type of battery and cell count is selected, press and hold the “Enter/Start” button for 2 sec. This will
take you to a screen to double check the cell count. “R” shows the number or cells found by the charger and “S”
shows the number of cells the user selected. If they match, please continue by pressing the “Enter” button.
If not, press “Mode” return to the previous screen, double check the battery’s specications, and repeat the step.
Checking the Individual Voltage and Capacity
You will need to connect the balance plug. By using the “Status” buttons, you can check the safety capacity
cut-off, safety timer, safety temperature, and the present voltage. You can also check the individual voltages of
each battery while it is charging.
R:3SER S:3SER
CONFIRM(ENTER)
LI3S 2.0A 12.59V
00682CHG 022:43
LiPo CHARGE
1.0A 11.1V(3S)
Press Enter
> 2 sec
Press Enter
Press Mode
End Voltage
AUTO CHK
4.20 4.20 4.20
0.00 0.00 0.00
USB/Temp Select
Temp Cut-off 80C
Safety Timer
ON 120min
IN Power VOLTAGE
12.60V
Capacity Cut-off
ON 5000mAh
EXT. Temp 0C
14
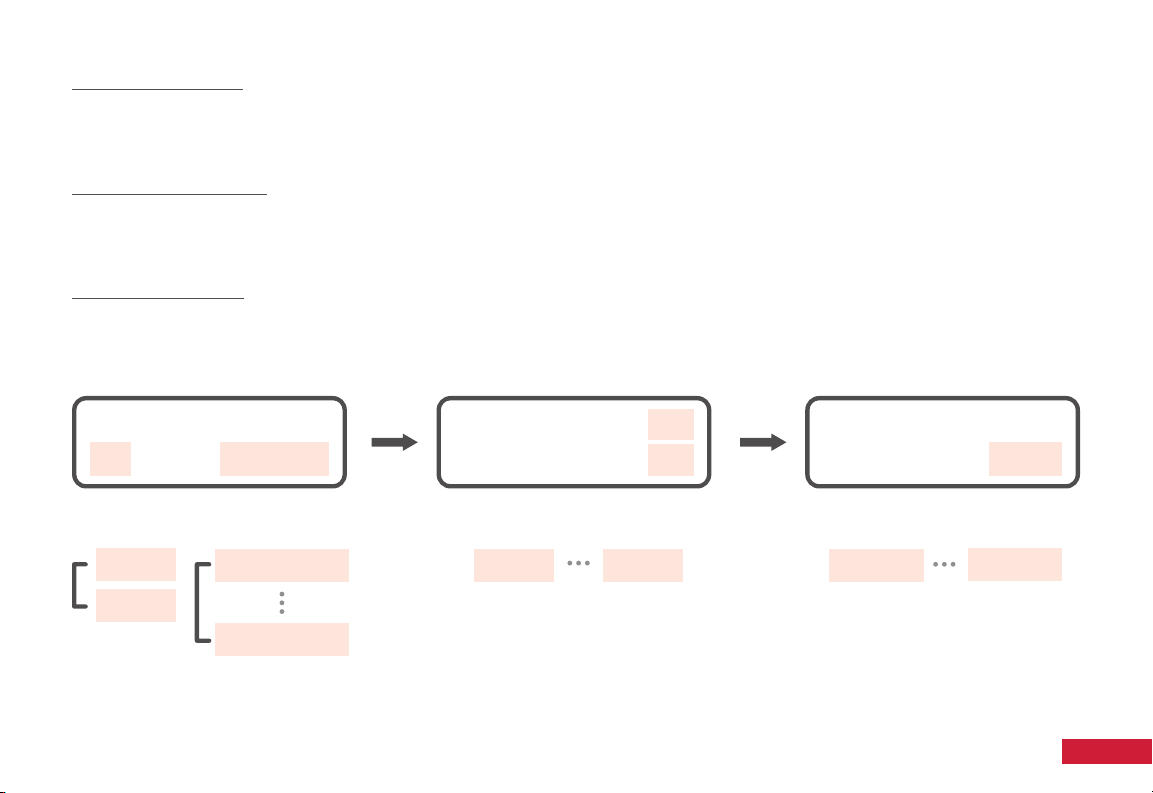
NiMH/NiCd Battery Program
Just as in the main screen, use the “Mode” and “Status” buttons to cycle through the options.
Charge mode – The default is “AUT” In this mode, the user needs to select the upper limit of the charge current
to avoid issues. In “MAN” mode, the device will charge the battery at the current you previously set. To switch
between AUT and MAN mode, press the (left arrow) and (right arrow) buttons on the charger simultaneously
at the NiMH Charge Current setting screen.
Discharge mode – The recommended voltage of NiMH batteries is 1.0V/cell and NiCd is 0.85V/cell. Otherwise,
please refer to the manufacturer’s recommendation for your battery.
Cycle mode – This mode will perform 1-5 cycles of Discharging/Charging the battery. Please use this mode for
new NI batteries or long-term placement NI batteries. Only use this option if you are sure your battery needs it.
Once all of the steps above have been completed and veried, please press “Enter/Start” to begin the process.
PROGRAM SELECT
NiMH BATT
NiMH CHARGE
CUR LIMIT 5.0A
Aut NiMH DISCHARGE
11.5V
1.0A
NiMH CYCLE
DCHG>CHG 3
NiMH 2.0A 7.42V
00890CHG 022:45
Press Enter
> 2 sec
Press Enter
Press Mode

15
Pb Battery Program
Use this program for Pb batteries with voltages between 2 and 20V.
Please do not use rapid charging for Pb batteries.
Charging a Pb Battery
The left side of the screen will show the Amp of the
battery, while the right side will show the voltage of
the battery. After verifying that the voltage on the
screen matches the voltage required by your batteries
manufacturer, press and hold the “Enter” button for 2
seconds, and the process will start.
The charge can be stopped at any time by pressing
the “Mode/Esc” button once.
Discharging a Pb Battery
Set the discharge current on the left side of the screen
and nal voltage desired on the right side. Then press
and hold “Enter” to begin the process.
The charge can be stopped at any time by pressing
the “Mode/Esc” button once.
Pb-6 0.4A 12.59V
00682CHG 022:43
Pb
4.0A 12.0V(6P)
CHARGE
Press Enter
> 2 sec
Press Mode
Pb-6 0.4A 12.59V
00682DSC 022:43
Pb
4.0A 12.0V(6P)
DISCHARGE
Press Enter
> 2 sec
Press Mode

16
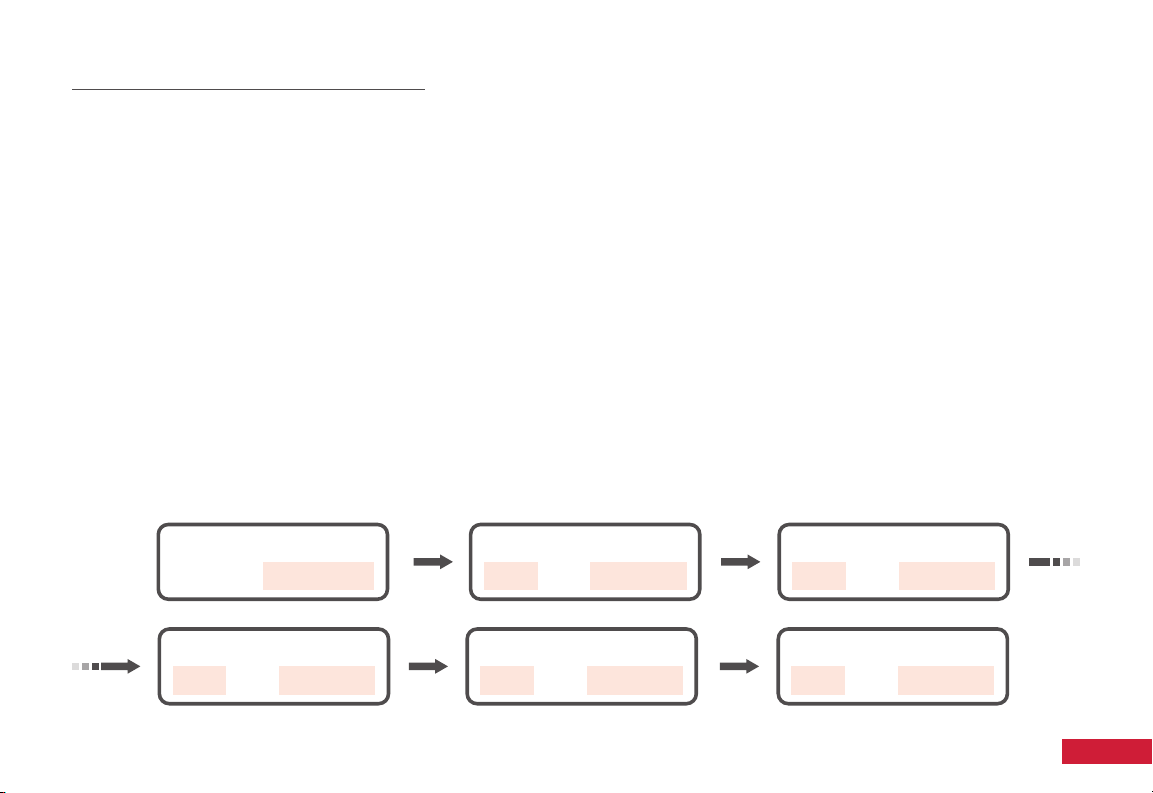
Save and Load Data Program
The charger can store data for up to 5 batteries.
Once set, you can automatically start the process without having to set it up every time.
Save Data
Press the “Mode” button until Save Data is selected on the screen, then press “Enter” to enter into the sub-
menu. The blinking number shows you which data slot the saved prole will be in. This can be changed by
pressing the left and right arrows, and selecting it by pressing “Enter” again.
Continue by selecting the type of battery, voltage, capacity, etc. and set the data by pressing the “Enter” button
each time. Once completed, press and hold the “Enter” button to save the data.
Load Data
Using the same process as the main menu, select the Load Data screen from the main menu. Then use the left
and right arrow buttons to select the data you want to load.
Once selected, press and hold the “Enter” button for 2sec.
PROGRAM SELECT
SAVE DATA
Press Enter
> 2 sec
Press Enter
> 2 sec
Press Enter
SAVE...NiMH CHARGE Mn*
CURRENT 0.1A
SAVE (01)
14.4V 3000mAh
NiMH
PROGRAM SELECT
LOAD DATA
Press Enter
> 2 sec
Press Enter
LOAD...
LOAD (01)
14.4V 3000mAh
NiMH

17
The output cable is connected to a battery with incorrect polarity.
Displayed when detecting an interruption in the connection between the battery and the output,
or when voluntarily disconnecting the charge lead during operation.
A short-circuit occurred, please check the charging leads.
The input voltage dropped below the limit.
The voltage of the battery pack was selected incorrectly. Please verify and restart the process.
A malfunction of the charger circuit has occurred.
The device detects a lower voltage than which was set.
Please verify the cell count and restart the process.
The device detects a high voltage then was set.
Please verify the cell count and restart the process.
The voltage of one of the cells in the battery pack is too low.
Please verify and restart the process.
The voltage of one of the cells in the battery pack is too high.
Please verify and restart the process.
There is a bad connection. Please check the connector cables.
The internal temperature is too high. Please allow it some time to cool down.
The unit needs to be repaired.
REVERSE POLARITY
CONNECTION BREAK
SHORT ERR
INPUT VOL ERR
VOL SELECT ERR
BREAK DOWN
BATTERY CHECK
LOW VOLTAGE
BATTERY CHECK
HIGH VOLTAGE
BATTERY VOLTAGE
CELL LOW VOL
BATTERY VOLTAGE
CELL HIGH VOL
BATTERY VOL ERR
CELL CONNECT
TEMP OVER ERR
CONTROL FAILURE
Warning and Error Messages

18
Prolong the life of the charger and keep it working properly, by following these safety tips.
• When the charger is running, please keep the device uncovered and in a well-ventilated area so it does not get too warm.
• Li-Po/Li-ion/LiFe battery without PCB and/or requires balance charging must use Balance Charge Mode with JST XH
balancing connector. Always follow both the battery and charger instructions. Failure to do so may result in FIRE.
This is especially true if you’re discharging a battery.
• Do not store or use in an environment colder than 41°F (5°C) or hotter than 122°F (50°C).
• Do not store or use in a wet or corrosive environment.
•
• Take care of the charger by not letting it fall or get shaken.
• Do not attempt to use voltage higher than recommended by the battery manufacturer.
• Ensure that the type and voltage of the battery is properly selected. Do not charge different batteries at the same time.
• This device is made for charging one battery pack. Please purchase separate accessories for multiple battery packs.
• Do not attempt to use this device on a non-rechargeable or damaged battery.
• Keep the charger away from pets and children at all times. Never leave this device unsupervised when connected to
a power supply.
Safety Message

Tenergy Corporation
The warranty period is 12 months. The warranty period is measured starting on the date of purchase by the
original consumer purchaser. The sales receipt from the rst consumer purchase is required in order to establish
the start date of the warranty period. For any repair or replacement service, please rst contact the reseller you
purchased the product from. If the product was purchased directly from Tenergy, please contact us at
[email protected]. This warranty is not valid for any damages or subsequent damage arising from misuse,
modication, or as a result of failure to observe the procedures outlined in this manual.
Warranty
Other manuals for TB6B
1
Table of contents
Other Tenergy Batteries Charger manuals

Tenergy
Tenergy TB6B User manual

Tenergy
Tenergy 01025 User manual

Tenergy
Tenergy T4s User manual

Tenergy
Tenergy TN456 User manual

Tenergy
Tenergy TB6AC+80W User manual

Tenergy
Tenergy E6AC User manual

Tenergy
Tenergy TN455 User manual

Tenergy
Tenergy TN299 User manual

Tenergy
Tenergy 01027 User manual

Tenergy
Tenergy T-3150 User manual


Popular Batteries Charger manuals by other brands

Dometic
Dometic MCA1225 Installation and operating manual

EVIE
EVIE EVIECSP732SHA installation manual

Holaday Industries
Holaday Industries 491198-48 Series user manual

Chicago Electric
Chicago Electric 42292 operating instructions

efacec
efacec EFAPOWER EV-QC24S Installation and user manual

XD COLLECTION
XD COLLECTION P308.52 Series manual


