Teradek Bolt 6 LT User manual

1.
WHAT'S
INCLUDED
2.
PHYSICAL PROPERTIES
3.
POWER AND CONNECT
4.
PAIRING
5.
POWER CABLES
6.
MOUNTING
7.
TX/RX CONFIGURATION MENUS
◦
Wireless Settings
◦
Video Settings
◦
Tools
Ter ad ek U se r Gu id e
/
Bolt 6
/
Quick Start Guides
Bolt 6 LT Quick Start Guide
Updated on
Oct 06, 2022
The Bolt 6 LT Set is a real-time wireless video transmission system that
supports 4K video with Teradek’s patented Zero-Delay technology, now with
less interference using the newly opened 6GHz wireless frequency. Bolt 6 LT
can send and receive color-accurate, True-HDR videos in under 0.001
seconds using the set’s included Bolt 6 LT video Transmitter and Receiver.
Bolt 6 LT is cross-compatible with the entire Bolt 4K Series – including Bolt
4K, Bolt 4K LT, and the Bolt 4K Monitor Modules – giving you the option to
expand your workflow requirements. Link up to 6 receivers to one transmitter,
or unlimited receivers when used in Broadcast Mode (available on MAX
models).
Table of Contents
Teradek User Guide
Bolt 6 LT Quick Start Guide | Bolt 6 | Teradek User Guide
https://guide.teradek.com/a/1604143-bolt-6-lt-quick-start-guide
1 von 14
22.02.23, 21:26

◦
Advanced/System Settings
◦
Additional Information
8.
BOLT APP
9.
OTHER RESOURCES
•
Bolt 6 LT Transmitter and Receiver
•
Hot Shoe Adaptor
•
Lightstand Adapter 1/4-20in
•
(Bit 118) 2pin Conn. to PowerTap - 18in Cable
•
(Bit 718) 2pin Conn. to 2pin Conn. (Alexa) 18in Cable
•
SDI - BNC to BNC Cable, 10in
•
USB Male Type A (Full) - USB Male Type B (Micro) -3ft Cable
•
Ultra Thin HDMI Male Type A (Full) - HDMI Male Type A (Full) 18in Cable
•
PSU 2pin Conn. to 18W AC Adapter (Int) - 6ft Cable
What's Included
Physical Properties
Bolt 6 LT Quick Start Guide | Bolt 6 | Teradek User Guide
https://guide.teradek.com/a/1604143-bolt-6-lt-quick-start-guide
2 von 14
22.02.23, 21:26

1.
Connect your power source to the transmitter and receiver using the included
A/C adapter. If both devices are equipped with battery plate accessories, attach a
compatible battery (
Gold
or
V mount
).
2.
Connect the output from your video source to either the SDI or HDMI input (
C
or
E
) on the Bolt transmitter.
3.
Connect either the SDI or HDMI output (
D
or
J
) from the Bolt receiver to the
video input on your monitor.
4.
Turn the units on by moving the power switches on both the transmitter and
receiver
(J)
to the ON position.
Bolt devices purchased as a set (TX and RX), are paired by default, requiring no
additional configuration. Bolt devices purchased separately need to be paired using the
device's front panel (OLED) menu,
Bolt Manager
, or the
Bolt App
. To pair your
transmitter with multiple receivers, you will need to use either Bolt Manager or the Bolt
App.
NOTE: Before starting either pairing process, ensure that both the
transmitter and receiver have the same firmware version and have Bluetooth
Power and Connect
Pairing/Unpairing
Bolt 6 LT Quick Start Guide | Bolt 6 | Teradek User Guide
https://guide.teradek.com/a/1604143-bolt-6-lt-quick-start-guide
3 von 14
22.02.23, 21:26

enabled.
PAIRING/UNPAIRING VIA FRONT PANEL
Pair:
1.
Using the Menu Joystick, navigate to the
Pair
menu on both the transmitter and
the receiver front panel.
2.
Select
Pair
to begin the pairing process. The transmitter will begin scanning for a
receiver within range and automatically pair to the receiver.
3.
Once paired, the front panel will indicate whether or not Pairing is successful.
To Unpair:
1.
Navigate to the
Unpair
menu on either the transmitter and the receiver.
2.
Select the transmitter/receiver you want to unpair. If you have multiple devices
paired, you can select
Unpair All
.
PAIRING VIA BOLT APP
Pair:
1.
Open the Bolt App from your iOS or Android device, then tap the
Pairing
button.
2.
Select the transmitter you wish to pair, then tap the
Next
button.
3.
Select the receiver(s) you wish to pair with the transmitter, then tap the
Pair!
button. The Bolt App will indicate when the pairing process is complete.
To Unpair:
1.
Open the Bolt App from your iOS or Android device, then tap the TX settings
button (3 dots) on the top right corner of the screen.
2.
Enter the
Pairing
menu, select the receiver(s) you wish to unpair, then tap the
Unpair
button.
PAIRING TIPS
If you’re having trouble getting units to pair, we recommend keeping the
transmitter and receiver six feet apart when pairing. Keep all other RF
devices nearby turned off or out of range to ensure the transmitter and
receiver are only detecting each other. To eliminate any chance of
interference, perform the Wired Pairing process via Bolt Manager.
!
Bolt 6 LT Quick Start Guide | Bolt 6 | Teradek User Guide
https://guide.teradek.com/a/1604143-bolt-6-lt-quick-start-guide
4 von 14
22.02.23, 21:26

WIRED PAIRING VIA BOLT MANAGER
To Pair:
1.
Connect both the transmitter and receiver(s) to your computer (Windows/Mac) via
USB.
2.
Open Bolt Manager, select the
Pairing
tab, then tap the
Wired Pairing
button.
3.
Select the devices you want to pair, then click the
Pair Devices
button. Bolt
Manager will indicate whether or not Pairing is successful.
To Unpair:
1.
Connect the transmitter to your computer (Windows/Mac) via USB.
2.
Open Bolt Manager, select the
Pairing
tab, then tap the
Unpair All
button.
2-Pin Power Connector
Bolt devices use a locking 2-pin power connector similar to the 0B 302 series LEMO
connector.
* Pin 1 is closest to the red dot on the connector.
Power Cables
Bolt 6 LT Quick Start Guide | Bolt 6 | Teradek User Guide
https://guide.teradek.com/a/1604143-bolt-6-lt-quick-start-guide
5 von 14
22.02.23, 21:26
Input Voltage:
6-28V DC
Max Power Consumption:
20W (TX) and 18W (RX)
Custom/3rd Party Cables
•
Test the power cable polarity with
ONLY
the power cable connected to Bolt. Do
not connect video cables.
•
Check the power cable for shorts and proper grounding.
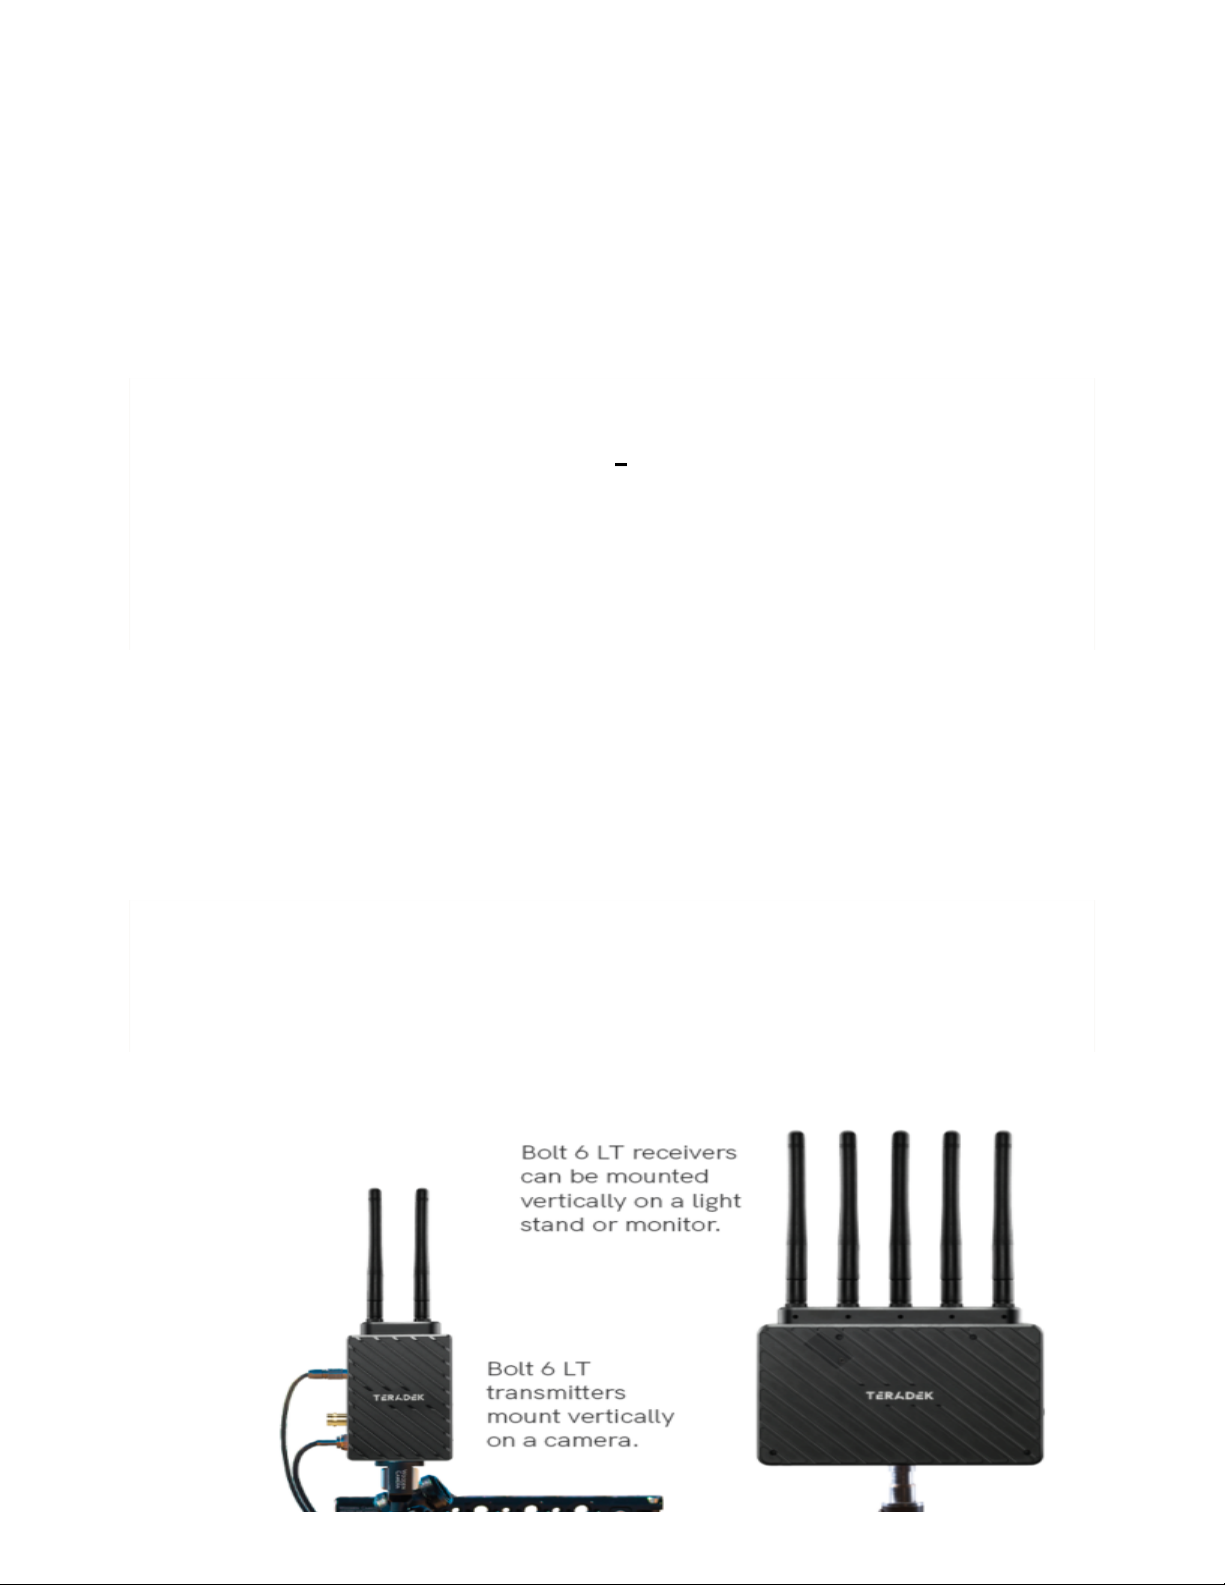
WITHOUT DUAL MOUNT
Bolt 6 LT devices have a 1/4”-20 threaded hole and two M3 threaded holes on the
bottom for mounting the included light stand adapter or any other mounting accessory.
CAUTION:
Using a reverse polarity or improperly
−
constructed power cable can
damage the product and is not covered under warranty. To prevent the
inputs from being damaged, best practice is to plug in the power cable
first, THEN connect the video cable from the camera before powering on
the TX unit.
"
Mounting
CAUTION: DO NOT OVERTIGHTEN SCREWS INSERTED INTO THE
THREADED HOLES
. Doing so can damage the device's chassis and
internal components, voiding the warranty.
"
Bolt 6 LT Quick Start Guide | Bolt 6 | Teradek User Guide
https://guide.teradek.com/a/1604143-bolt-6-lt-quick-start-guide
6 von 14
22.02.23, 21:26

Switch TX
(RX Only)
- Bolt 6 receivers can pair with up to four transmitters at a time.
Switch TX allows you to quickly switch from one paired transmitter's camera feed to
another paired transmitter. This feature is especially useful in multi-camera situations
when you need to switch to a different camera's view mid-shoot, without having to
perform the pairing process every time.
NOTE: The transmitter(s) need to first be
paired with the receiver
.
Band -
Select either the
5GHz
or
6GHz
wireless frequency. The 5GHz frequency
provides more channels but is utilized by more devices, resulting in frequent
interferences and video dropouts. The 6GHz frequency is less crowded than the 5GHz
frequency, resulting in faster connections and less interference.
Enable Broadcast Mode
(Bolt 6 LT MAX transmitters only)
-
Broadcast Mode
allows you to transmit to multiple receivers simultaneously (non-DFS frequencies only),
while also extending your Bolt 6's transmission range.
◦
Broadcast Mode Disabled (
Standard Multicast Mode
)
- Transmitter and
connected receiver(s) coordinate and maintain two-way communication with each
other to optimize frequency usage and video transmission.
◦
Broadcast Mode Enabled
- Data uplink channel is disabled, allowing the
transmitter to connect to an unlimited number of receivers, as long as they have
already been paired. To achieve even better range performance, attach the
receiver to your Bolt Panel Antenna while in Broadcast Mode.
NOTE:
Bolt 6 LT
750 and 1500 receivers will not link to a Bolt 6 LT MAX transmitter in Broadcast
TX/RX Configuration Menus
Wireless Configuration
Bolt 6 LT Quick Start Guide | Bolt 6 | Teradek User Guide
https://guide.teradek.com/a/1604143-bolt-6-lt-quick-start-guide
7 von 14
22.02.23, 21:26

Mode, even if they were previously paired. You must use a Bolt 6 LT MAX
receiver. Otherwise, the transmitter's OLED will display
Broadcast Not
Supported.
Enable Fixed Frequency
- Fixed Frequency Mode allows your transmitter to
designate a specific non-DFS channel within the selected wireless region for use,
providing a stronger connection in difficult environments.
NOTE: By default, Bolt 6 LT
will select the lowest available frequency from the Frequencies list if one has not
been selected beforehand.
Bandwidth
- Choose between 20MHz and 40MHz bandwidth options
Frequencies
- Select which frequency to use (determined by
Fixed Frequency Mode
selection).
Video Quality -
The Video Quality menu lets you adjust the balance between your
signal’s maximum range and quality according to the number of antennas used to
transmit fine information. Bolt 6 LT has three picture quality levels that vary based on
the lowest quality link or the furthest receiver.
◦
Auto Mode
- (
Default
) Transmitter automatically determines how many fine
antennas are needed based on the range and signal quality.
◦
Longer Distance Mode
- (
One fine antenna
) Maintains the maximum range in
situations where other sources of interference might be present, but will slightly
reduce your video signal’s maximum quality.
◦
Better Quality Mode
- (
Two fine antennas
) Maintains higher signal quality but
reduces the maximum range.
3D LUT Settings
(RX Only)
- The 3D LUT settings menu contains specific looks that
can be applied to your video output that either match or simulate how the video will
appear after editing, along with options for how they are overlayed on your video
output (
Full
or
Split-screen
).
◦
3D LUT Presets
- Select a specific look from the list of 3D LUT presets.
◦
3D LUT Mode
- Select whether the look is applied to the entire video output
(
Full Screen
) or
half (
Split Screen
).
Video Settings
Bolt 6 LT Quick Start Guide | Bolt 6 | Teradek User Guide
https://guide.teradek.com/a/1604143-bolt-6-lt-quick-start-guide
8 von 14
22.02.23, 21:26

Video OSD Settings (RX Only)
- Choose when to display the OSD.
◦
Never show
◦
Show when operating
◦
Show when no video
◦
Always show
Display Settings
- Use the Display Settings to control the OLED display operation. By
default, the OLED display will invert every 30 minutes.
Signal Quality Graph (RX Only) -
The Signal Quality Graph indicates the quality and
reliability of the signal being received according to the amount of interference that is
present between the RX and TX. Signal Quality is represented in percentages:
◦
Figures below 30% indicate
poor
signal quality
◦
Figures between 30% and 45% indicate
fair
signal quality
◦
Figures above 45% indicate
good
signal quality
Spectrum Analyzer (RX Only)
- The built-in Spectrum Analyzer provides a visual
indication of channel noise and saturation across the entire available frequency range.
Move the Menu joystick left and right to select a frequency. Frequencies are
represented by bars; the higher the bar, the more congested that frequency is.
Test Pattern (RX Only)
- This menu allows you to select a video resolution format to
output a test pattern over HDMI or SDI. Select a specific output resolution from the
resolutions list.
Lock Keypad -
The Lock Keypad feature prevents the menu joystick from being used
to avoid any accidental or unauthorized configurations. There are two ways to lock the
keypad:
•
Navigate to
Advanced Setting
s
via the front panel and select
Lock Keypad
.
Tools
Advanced/System Settings
Bolt 6 LT Quick Start Guide | Bolt 6 | Teradek User Guide
https://guide.teradek.com/a/1604143-bolt-6-lt-quick-start-guide
9 von 14
22.02.23, 21:26

•
Press and hold the menu joystick upward for 5 seconds.
To unlock, press and hold the menu joystick upwards for five seconds or until the
display reads "
KEYPAD UNLOCKED
."
HDMI (RX only) -
Bolt 6 supports all HDMI output modes. You can select from one of
the following options:
◦
Auto
◦
RGB 8bit
◦
RGB 10bit
◦
YCbCR 4:4:4 8bit
◦
YCbCR 4:4:4 10bit
◦
YCbCR 4:2:2 10bit
◦
YCbCR 4:2:0 8bit
◦
YCbCR 4:2:0 10bit
Audio (RX only) -
Configure Bolt’s Audio settings. If
Beep on REC
is activated, you
will hear a short tone whenever the camera begins or stops recording. The
Mute
Settings
allow you to completely mute audio or only mute audio while recording.
Bluetooth -
Use the Bluetooth menu to enable or disable Bluetooth communication.
NOTE: Bluetooth is enabled by default.
◦
Enable Bluetooth
- Allows transmitter and receiver to be paired and
communicate with the Bolt App.
◦
Use Bluetooth PIN
- Enables the use of a PIN for authentication when using the
Bolt App.
◦
Change PIN
- Press the Menu joystick towards the right to change the Bluetooth
PIN
Background Color (RX only)-
The Background Color feature allows you to select a
screen color to be displayed on the monitor when there is no video being received
from the transmitter. This is a useful tool that indicates to the crew that a signal has
been dropped and the TX and RX need to be synced again.
Reset All Settings
- Reset all configurable options to their factory settings.
Bolt 6 LT Quick Start Guide | Bolt 6 | Teradek User Guide
https://guide.teradek.com/a/1604143-bolt-6-lt-quick-start-guide
10 von 14
22.02.23, 21:26

Device Info
-
Displays the model and serial number of the device
Firmware Versions
-
Displays the current firmware versions for all device
components.
Regulatory -
Displays all compliance certifications and certification markings related to
radio frequencies used by the TX and RX to communicate. For complete regulatory
information and declarations of conformity, please visit the
Regulatory Information
section.
Use the Bolt App to remotely manage and monitor every parameter of Bolt 6 including
pairing, frequency selection, and 3D LUTs.
CONNECT VIA BLUETOOTH
1.
Download the Bolt App.
2.
Enable Bluetooth on your iOS or Android device.
3.
Navigate to the Bluetooth menu on both the transmitter and receiver, then select
Enable
.
4.
Open the Bolt App from your iOS or Android device, then tap the
Bolt Devices
button.
5.
Select the device(s) you want to pair or monitor.
Additional Information
Bolt App
Transmitter Status Display
Bolt 6 LT Quick Start Guide | Bolt 6 | Teradek User Guide
https://guide.teradek.com/a/1604143-bolt-6-lt-quick-start-guide
11 von 14
22.02.23, 21:26

•
Settings
(Descriptions listed in
Transmitter Menu
section)
- Tap the settings
button on the top right corner of the screen to customize the transmitter’s various
settings.
•
Status -
Displays the current status of:
◦
Video Input
◦
Network Status
◦
Connected Receivers
◦
Current Frequency
◦
Quality
◦
Temperature
◦
Camera Recording
◦
Region
◦
Bandwidth
◦
OSD name
Receiver Status Display
Bolt 6 LT Quick Start Guide | Bolt 6 | Teradek User Guide
https://guide.teradek.com/a/1604143-bolt-6-lt-quick-start-guide
12 von 14
22.02.23, 21:26

•
Settings
(Descriptions listed in
Receiver Menu
section)
- Tap the settings button
on the top-right corner of the display to customize the receiver’s various settings
such as the output format, audio, display, and OSD.
•
Signal Quality
- Determine the quality and reliability of the signal being received.
•
SNR (Signal to Noise Ratio) -
Compare the signal power level to the noise
power level from the antennas.
•
Range Analyzer -
Displays the transmission distance between the transmitter
and receiver.
•
Status
- Displays the current status of:
◦
TX Name
◦
Network Status
◦
Link
◦
Video Input
◦
Current Frequency
◦
Range
◦
Quality
Bolt 6
Bolt 6 LT Quick Start Guide | Bolt 6 | Teradek User Guide
https://guide.teradek.com/a/1604143-bolt-6-lt-quick-start-guide
13 von 14
22.02.23, 21:26

◦
Temperature
◦
Camera Recording
◦
Bandwidth
◦
Region
◦
OSD name
•
USER MANUAL:
https://guide.teradek.com/m/112641
•
FIRMWARE UPGRADE
:
https://teradek.com/pages/downloads#bolt6
Bolt 6 XT Quick Start Guide
Bolt 6 LT Quick Start Guide
Bolt 6 LT-HDMI Quick Start Guide
Bolt 6 Monitor Module Quick Start Guide
Other Resources
Spark 4K
Bolt 4K
Ranger 4K
Wave
Prism
Vidiu X
Serv
ART 2U Reference Guide
Node Modems
Ter ad ek RT
Airmix Remote - Airmix Mobile Device Camera
Airmix - Live Streaming Switching App
General Live Streaming Tutorials and Tips
Core
Discontinued Products
Other Resources
Quick Start Guides
4
Physical Properties
4
Getting Started
3
Menu Map
2
Configuration
8
Bolt App
1
Mounting
2
Additional Information
3
Technical Specifications
5
Bolt 6 LT Quick Start Guide | Bolt 6 | Teradek User Guide
https://guide.teradek.com/a/1604143-bolt-6-lt-quick-start-guide
14 von 14
22.02.23, 21:26
Table of contents
Other Teradek Extender manuals

Popular Extender manuals by other brands

Aegis
Aegis EXP-HDMI-7201 user manual

Gefen
Gefen EXT-DVI-FM-1000 user manual

Transition Networks
Transition Networks EO2Pxx4052-111 user guide

ZyXEL Communications
ZyXEL Communications WHD6215 quick start guide

NETGEAR
NETGEAR EX7320 user manual

Wilson Electronics
Wilson Electronics weBoost Drive Reach RV Installation overview

LevelOne
LevelOne WAP-3000 Technical specifications

Lindy
Lindy 38181 user manual

weBoost
weBoost smartech III 472005 installation instructions

Rose electronics
Rose electronics CrystalView EX5 Installation and operation manual

Aus Electronics Direct
Aus Electronics Direct HDV-E5100 user manual

NETGEAR
NETGEAR XAUB2511 installation guide


