TerraKing 45-0584 User manual

PRINTED IN USA FORM NO. 3-162 (03/29/22)
45-0584
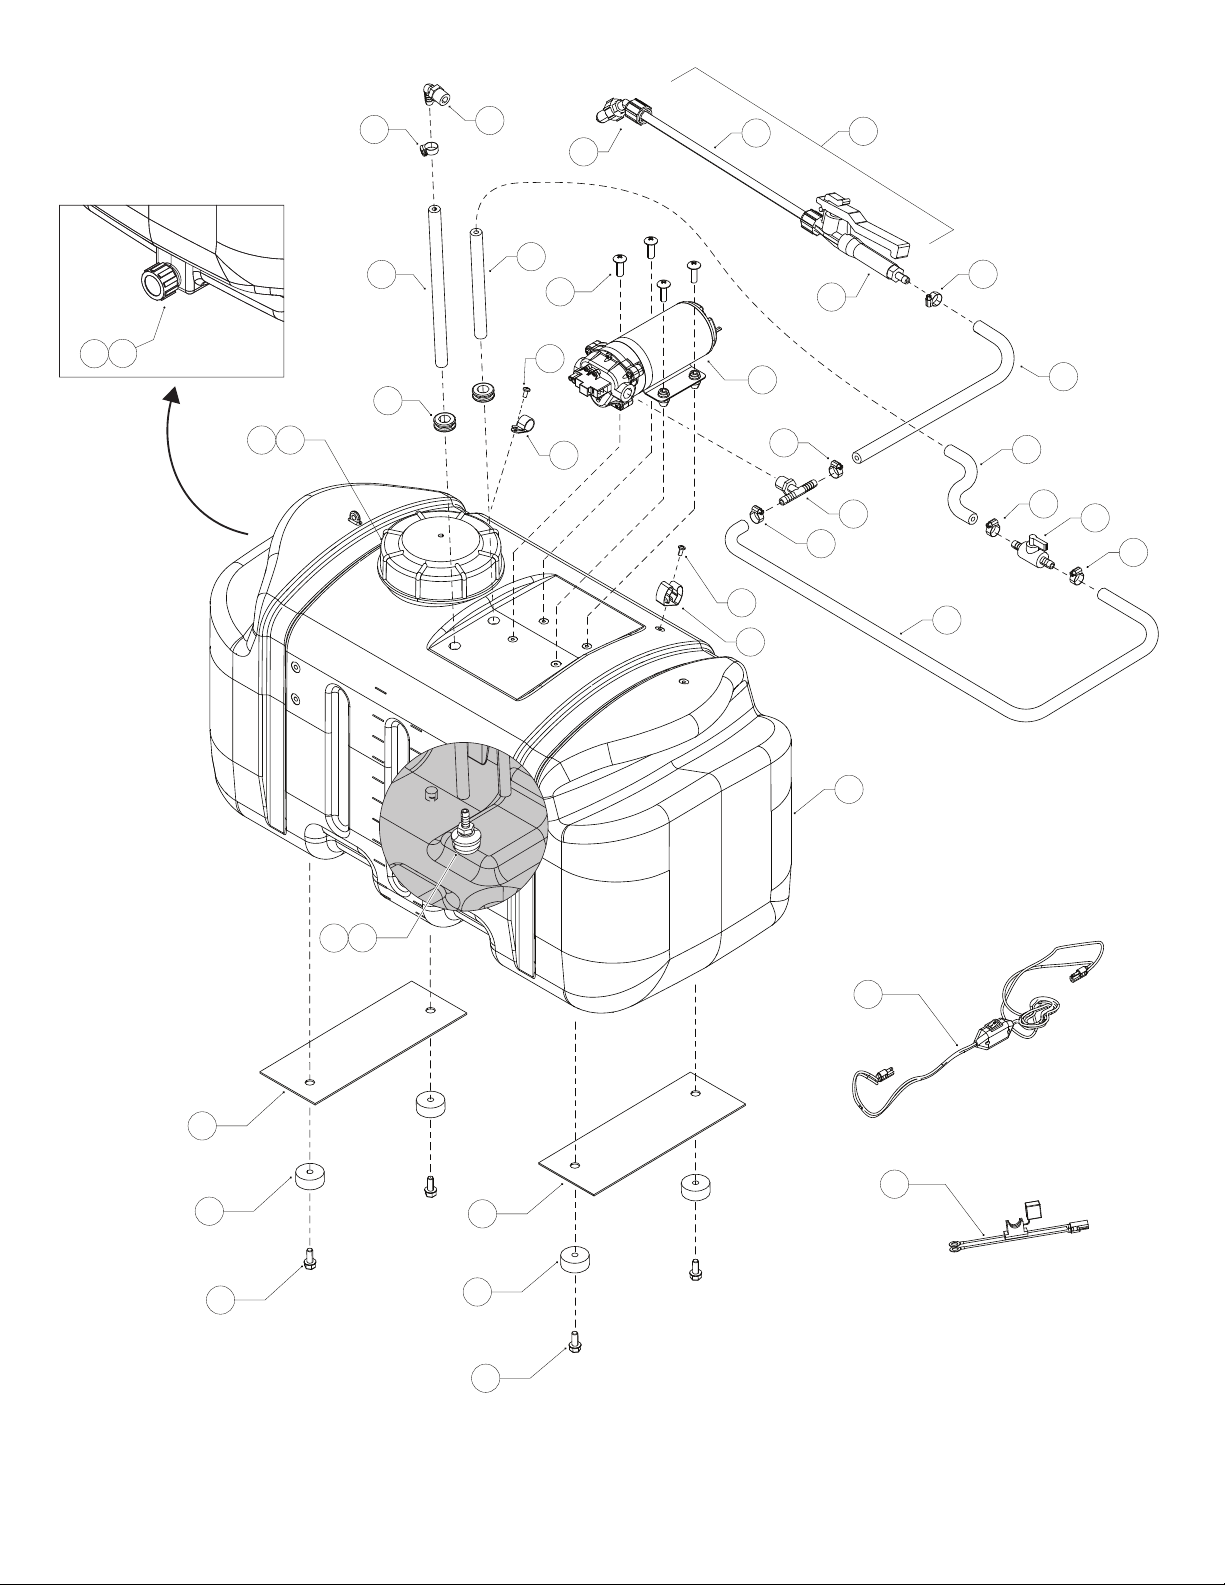
25 GALLON SPOT SPRAYER
TM
2
6
1
11 20
27
23
9
29
19
7
19
13
16
18
25
126
1
18
4
21
4
21
14
1
24
22
23
1
12
24
30
28
1
8
15
17
10 5

3
1 ST43652* 06 HOSE CLAMP 3/8" - 1/2"
2 ST43175 01 TANK FILL CAP
3 ST44017 01 LANYARD FOR TANK FILL CAP
4 ST43176 04 RUBBER BUMPER
5 ST43182 01 SUMP FITTING 3/8" BARB
6 ST43183 01 ELBOW 3/8" MP - 3/8" BARB
7 ST43191 01 HOSE HOLDER 3/8"
8 ST43235 01 TEE 3/8" BARB - 3/8" BARB - 3/8" MP
9 ST43673 01 SPRAY WAND WITH BRASS TIP
10 ST43258 01 SUMP STRAINER 3/8"
11 2-334 01 HOSE, 3/8" X 19.5"
12 2-345 01 HOSE, 3/8" X 228"
13 ST43287 01 SPRAY WAND HOLDER, LARGE
14 ST43918 01 PUMP 12V, 100PSI, 2.2GPM
15 ST43516 01 DRAIN CAP
16 2-467 01 25 GALLON TANK, WHITE
17 ST43684 01 WASHER FOR DRAIN CAP
18 ST62009 02 BOTTOM BRACE
19 ST65000 02 SCREW, 10-24 X 3/8" TRUSS HEAD
20 ST65001 04 SCREW, 10-24 X 1" TRUSS HEAD
21 ST65007 04 BOLT, FLANGE 5/16-18 X 3/4 GR5
22 ST43472 01 WIRE HARNESS, SWITCH
23 ST43483 01 WIRE HARNESS, BATTERY
24 2-318 01 HOSE, 3/8" X 12"
25 2-321 01 HOSE, 3/8" X 6.5"
26 ST43014 01 INLINE VALVE 3/8" BARB
27 ST43844 02 GROMMET 5/8 ID, 1-1/8 OD
28 ST43124* 01 SPRAY WAND VALVE
29 ST43515* 01 SPRAY WAND EXTENSION
30 ST43514* 01 SPRAY WAND BRASS TIP
ST43921* 01 PUMP HEAD (NOT SHOWN)
ST44031* 01 PUMP PRESSURE SWITCH (NOT SHOWN)
ST50749* 01 15A ATO / ATC Fuse (NOT SHOWN)
3-70 01 LABEL, TERRA-KING (NOT SHOWN)
ST43490 01 LABEL, 25 (NOT SHOWN)
ST43488 01 LABEL, WARNING - CHEMICAL HAZARDS (NOT SHOWN)
*Service parts
DESCRIPTIONQTY.PART NO.
REF.
NO.

4
ENGLISH
SAFETY
1. Read this owners manual and the vehicle owners manual before
using this sprayer.
2. Never allow children to operate this sprayer.
3. Do not allow anyone to ride on or sit on this sprayer.
4. Keep the area clear of all persons, especially small children.
5. Read the chemical label before handling or mixing chemicals.
6. Wear eye and hand protection and protective clothing when
handling and applying lawn chemicals.
7. Do not spray on windy days.
8. Be aware of your vehicle's capabilities. Attaching this sprayer may
aect your vehicle's braking and stability.
9. STAY OFF STEEP SLOPES. Refer to the vehicle owner's manual
concerning safe operation on slopes.
10. Operate at reduced speed on rough terrain, along ditches and on
hillsides to prevent loss of control.
INSTALLATION
1. Install sprayer on vehicle and secure to vehicle.
2. Connect ring terminals on battery harness to vehicle 12V battery.
3. Connect switch harness to the battery harness and route to sprayer
4. Connect switch harness to the pump.
OPERATION
CAUTION: Connect to a 12 V battery only.
PUMP PRESSURE SWITCH
The pump pressure switch turns o the pump when it reaches
its maximum pressure setting. Very low ow demand may cause
the switch to rapidly cycle the pump on and o. Rapid on and o
cycling must be limited to no more than 6 times per minute. Cycling
could cause the motor to heat beyond the recommended maximum
temperature and reduce the operational life of the pump and pressure
switch.
USING THE SPRAYER
1. Turn inline switch to 'on' position.
2. Squeeze handle on spray wand.
3. Turn inline switch to 'o' position when nished.
ADJUSTABLE SPRAY WAND NOZZLE
Twisting the nozzle will adjust the spray pattern from a cone shaped
mist to a solid stream.
SPRAYER RECIRCULATION
1. The sprayer is equipped with a recirculation valve to aid in material
agitation and pressure control.
2. This valve is in the “open” position when the valve handle is in line
with the hose, “closed” when perpendicular to the hose.
3. Adjusting the recirculation valve between the open/closed positions
will aect the pressure coming through the spray wand.
4. Closed position is full pressure through spray wand.
5. It may be helpful to adjust the pressure when spraying with the
spray wand to avoid damage to plants from excess pressure.
MAINTENANCE
AFTER EACH USE
1. Fill the sprayer part way with water and pump the water out through
the spray wand. Use the spray wand to wash the inside of the tank.
2. Rell the tank about half full with water and a chemical neutralizer
solution and repeat the cleaning instructions above. Follow the
manufacturers instructions for disposal of all chemicals.
AS NEEDED
1. Periodically clean the tank strainer on the end of the intake hose.
Remove the nylon swivel nut from the hose, pull out the screen and
ush it with water.
WINTER STORAGE
1. Drain all water out of the sprayer, especially the pump and
spray wand. These items are prone to damage from freezing
temperatures.
2. Winterize the sprayer by pumping a 50-50 solution of water and
R. V. antifreeze through the spray wand.

5
INSTALLATION
Installer le pulvérisateur sur le véhicule et le xer au véhicule.
Connecter les cosses à œillet du faisceau de batterie à la batterie
12 V du véhicule.
Connecter le faisceau de commutateur au faisceau de batterie et
l’acheminer vers le pulvérisateur.
Connecter le faisceau de commutateur à la pompe.
ENTRETIEN
APRÈS CHAQUE UTILISATION
1. Remplir partiellement le pulvérisateur d’eau et faire fonctionner la
pompe pour que l’eau circule dans les rampes et le pulvérisateur à
main. Rincer l’intérieur du réservoir à l’aide du pulvérisateur à main.
2. Remplir le réservoir environ à moitié avec de l'eau et une solution
de neutralisation chimique, et répéter les instructions de nettoyage
ci-dessus. Rebuter les produits chimiques conformément aux
instructions de leur fabricant.
LE CAS ÉCHÉANT
3. Nettoyer périodiquement la crépine du réservoir, à l’extrémité
du tube d’aspiration. Retirer l’écrou en nylon du tube, extraire la
crépine et la rincer à l’eau.
STOCKAGE HIVERNAL
4. Vidanger toute l’eau du pulvérisateur, en particulier celle se
trouvant dans la pompe et dans le pulvérisateur à main. Ceux-ci
risquant d’être endommagés par le gel.
5. Préparer le pulvérisateur pour l’hiver en faisant circuler une solution
à parts égales d’eau et d’antigel dans les rampes et dans le
pulvérisateur à main.
FRANÇAIS
SÉCURITÉ
1. Lire entièrement le présent manuel et le manuel du véhicule avant
d’utiliser ce pulvérisateur.
2. Ne jamais laisser d’enfants faire fonctionner ce pulvérisateur.
3. Ne laisser personne monter sur ce pulvérisateur pendant son
fonctionnement, ni s’asseoir dessus.
4. S’assurer qu’il n’y a personne dans la zone, en particulier de
jeunes enfants.
5. Lire les étiquettes des produits chimiques avant toute manipulation
ou mélange de ceux-ci.
6. Porter des lunettes protectrices et des gants pendant la
manipulation et l’épandage de produits chimiques pour pelouse.
7. Ne pas pulvériser quand il y a du vent.
8. Faire attention aux capacités de votre tracteur. Le remorquage de
ce pulvérisateur risque de réduire les capacités de freinage et la
stabilité de votre tracteur.
9. ÉVITER LES FORTES PENTES. Consulter les instructions
relatives à la sécurité de fonctionnement sur les pentes qui gurent
dans le manuel d’utilisation du tracteur.
10. Rouler à vitesse réduite en terrain dicile, le long de fossés et sur
les pentes, pour éviter toute perte de contrôle.
ATTENTION : Ne brancher le pulvérisateur qu’à une
batterie 12 V.
RECIRCULATION DU PULVÉRISATEUR
1. Le pulvérisateur est équipé d’une vanne de recirculation
pour faciliter l’agitation du produit et le contrôle de la
pression.
2. Cette vanne est en position « ouverte » lorsque la poignée
de la vanne est alignée avec le tuyau et fermée
lorsqu’elle est perpendiculaire au tuyau.
3. Le réglage de la vanne de recirculation entre les positions
ouverte/fermée aectera uniquement la pression passant
par la lance de pulvérisation.
4. La position fermée est la pleine pression à travers la lance
ou la rampe de pulvérisation.
5. Il peut être utile d’ajuster la pression lors de la
pulvérisation avec la lance de pulvérisation pour éviter
d’endommager les équipements en raison d’une pression
excessive.
FONCTIONNEMENT
MANO-CONTACT DE LA POMPE
Le mano-contact de la pompe arrête celle-ci une fois la valeur
maximale de pression atteinte. Un débit très bas risque de faire arrêter
et redémarrer la pompe rapidement par le mano-contact. Éviter les
périodes prolongées de redémarrage/arrêt de la pompe rapides.
La vanne de recirculation ajuste la pression de lalance de pulvérisation
et la recirculation du produit de pulvérisation vers le réservoir.
UTILISATION DU PULVERISATEUR
Tourner le commutateur en ligne sur la position « On ».
Presser la poignée sur la lance de pulvérisation.
Tourner le commutateur en ligne sur la position « O » une fois le
travail terminé.
BUSE DE PULVÉRISATION RÉGLABLE
Tourner la buse pour régler le jet de pulvérisation d’un brouillard en
forme de cône à un jet solide.

6
FUNCIONAMIENTO
INTERRUPTOR DE LA PRESIÓN DE LA BOMBA
El interruptor de la presión de la bomba enciende la bomba cuando
alcanza el máximo grado de presión Una demanda muy baja de
ujo puede hacer que el interruptor haga que la bomba rápidamente
se encienda y se apague. Evite los períodos prolongados de
funcionamiento continuo, a gran velocidad.
USO DEL PULVERIZADOR
Ponga el interruptor en línea en la posición de 'encendido'.
Apriete el pestillo del pulverizador.
Gireelinterruptor en líneaala posiciónde'apagado' cuandohayaterminado.
BOQUILLA AJUSTABLE DE LA VARILLA DE
PULVERIZACIÓN
Al girar la boquilla ajustará el patrón de pulverización de una niebla en
forma de cono a un chorro sólido.
MANTENIMIENTO
DESPUÉS DE CADA USO
1. Llene el rociador parcialmente con agua y bombéela a través del
arco y la pistola manual. Utilice la pistola manual para lavar el
interior del tanque
2. Vuelva a llenar el tanque hasta la mitad con agua y una solución
neutralizadora del producto químico y repita el paso anterior. Siga
las instrucciones del fabricante para la eliminación de todos los
productos químicos.
SEGÚN SEA NECESARIO
3. En forma periódica, limpie el ltro del tanque que se encuentra en el
extremo de la manguera de admisión. Quite la tuerca móvil de nylon
de la manguera, tire del ltro y lávelo con agua.
ALMACENAMIENTO DURANTE EL INVIERNO
4. Drene toda el agua del rociador, en especial, de la bomba y de la
pistola manual. Estos elementos tienen tendencia a dañarse debido
a las temperaturas frías.
5. Prepare el rociador para el invierno, bombeando una solución al
50% de agua con anticongelante para vehículos recreativos a través
del conjunto del arco rociador y de la pistola manual.
ESPAÑOL
SEGURIDAD
1. Lea el manual del usuario y el manual del propietario del vehículo
antes de utilizar el rociador.
2. Nunca permita que los niños operen el rociador.
3. No permita que nadie se monte ni se siente sobre el rociador.
4. Evite la presencia de personas en el área, particularmente de niños
pequeños.
5. Lea la etiqueta del producto químico antes de usarlo o de mezclarlo.
6. Use protección para sus ojos y sus manos y ropa protectora cuando
maneje y aplique productos químicos para el césped.
7. No realice la tarea de rociado en días ventosos.
8. Tenga en cuenta la capacidad de su tractor. Conectar este rociador
puede afectar la estabilidad y el frenado de su tractor.
9. MANTÉNGASE ALEJADO DE PENDIENTES DE GRAN
INCLINACIÓN. Consulte el manual de usuario del vehículo en relación
a la operación segura en pendientes.
10. En terreno quebrado, cerca de zanjas o en colinas, opere a baja
velocidad para prevenir la pérdida de control.
PRECAUCIÓN: Conecte sólo a una batería de 12
voltios.
RECIRCULACIÓN DEL PULVERIZADOR
1. El pulverizador está equipado con una válvula de recirculación
para ayudar a la agitación del material y al control de la presión.
2. Esta válvula está en posición "abierta" cuando el pestillo de la
válvula está en línea con la manguera (foto), "cerrada" cuando
está perpendicular a la manguera.
3. 3. El ajuste de la válvula de recirculación entre las posiciones
de apertura/cierre afectará solo a la presión que sale de la varilla
de pulverización.
4. 4. La posición cerrada permite la máxima presión a través de la
varilla de pulverización o de la pluma.
5. 5. Puede ser útil ajustar la presión cuando se pulveriza con
la varilla de pulverización para evitar daños en las plantas por
exceso de presión.
INSTALACIÓN
Instale el pulverizador en el vehículo y fíjelo al mismo.
Conecte los terminales de anillo del mazo de la batería a la batería
de 12 V del vehículo.
Conecte el mazo de cables del interruptor al mazo de cables de la
batería y diríjalo al pulverizador
Conecte el mazo de cables del interruptor a la bomba.

7

the fastest way to purchase parts
www.speedepart.com
© 2021 Agri-Fab, Inc.
REPAIR PARTS
Agri-Fab, Inc.
809 South Hamilton
Sullivan, IL. 61951
800-448-9282
www.agri-fab.com
This document (or manual) is protected under the U.S. Copyright Laws and the copyright laws of foreign countries, pursuant to the
Universal Copyright Convention and the Berne convention. No part of this document may be reproduced or transmitted in any form or
by any means, electronic or mechanical, including photocopying or recording, or by any information storage or retrieval system, without
the express written permission of Agri-Fab, Inc. Unauthorized uses and/or reproductions of this manual will subject such unauthorized
user to civil and criminal penalties as provided by the United States Copyright Laws.
Table of contents
Languages:
Other TerraKing Paint Sprayer manuals


