TerraTrike Rover User manual

www.TerraTrike.com - 800.945.9910
4525 Stauffer Ave SE, Suite A. Kentwood, MI
49508 USA
Assembly Guide
Pilot’s Handbook
Technical Illustration
&
Parts List

Table of Contents
Assembly Guide - Pg 1-8
Boom Install - Pg 1
Tie Rod Install - Pg 1
Alignment - Pg 2
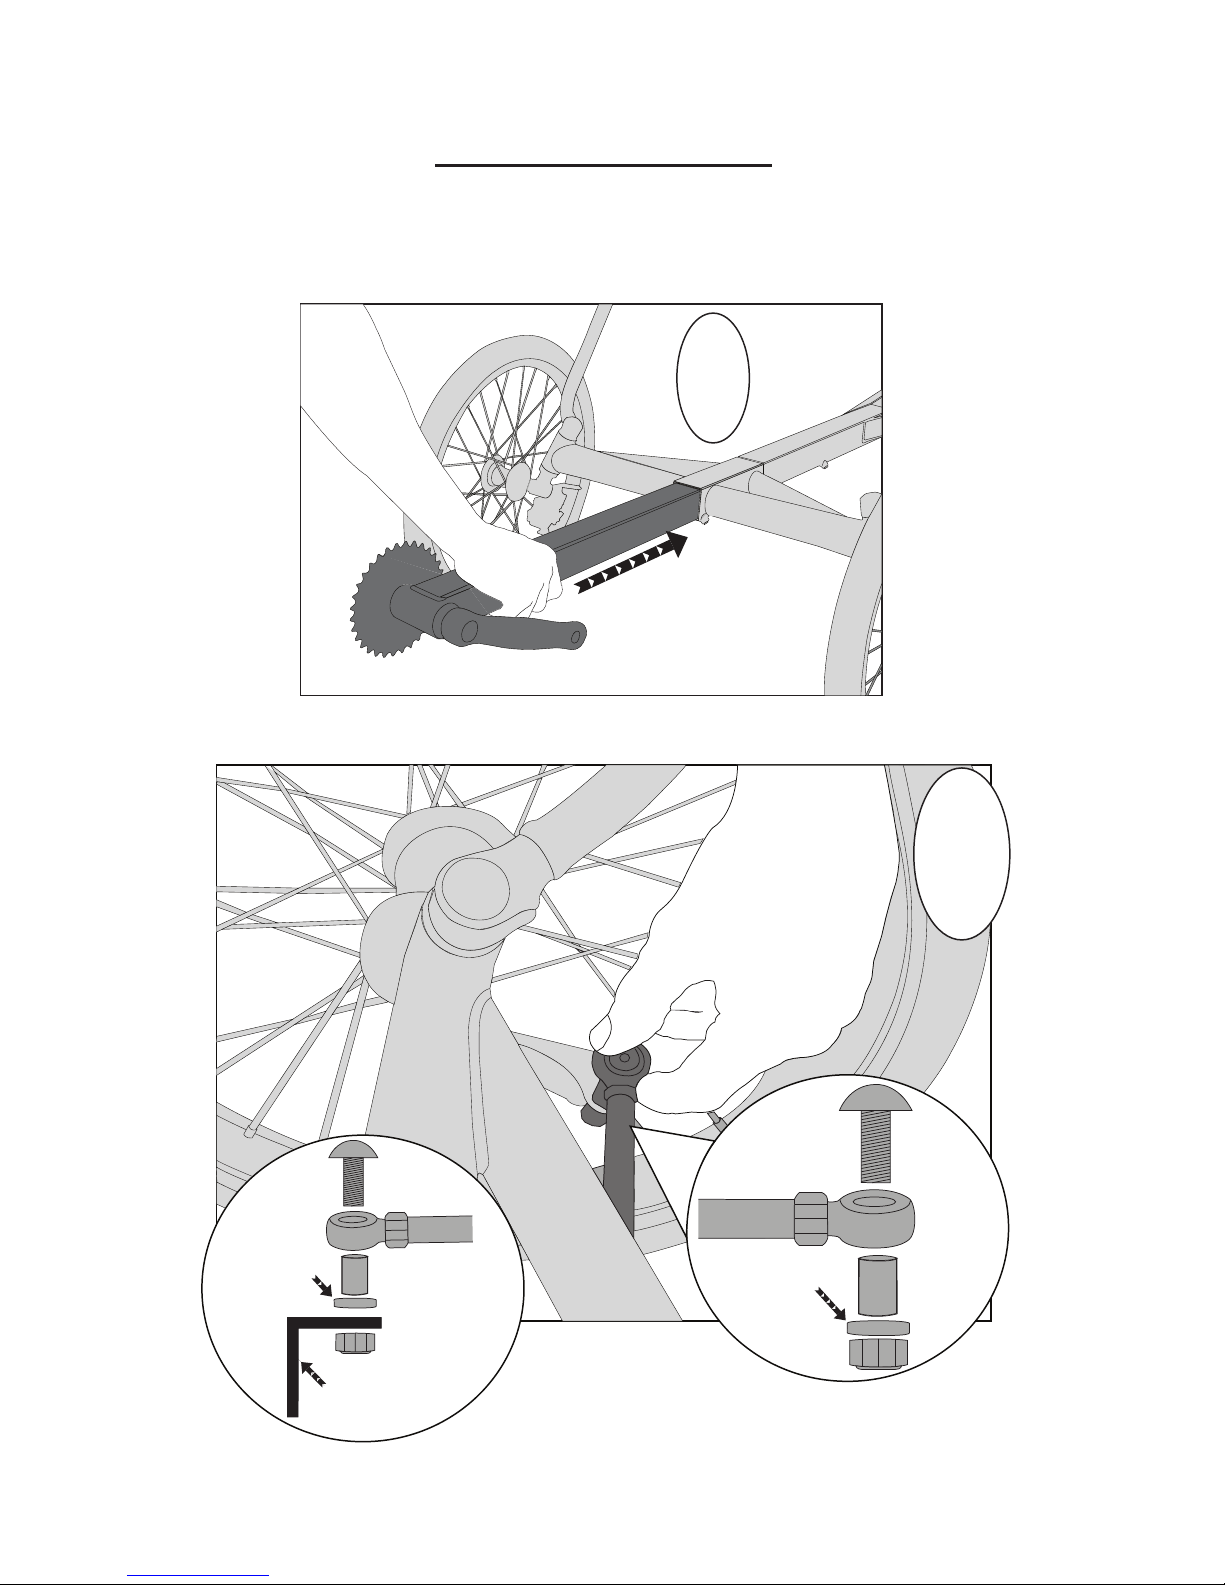
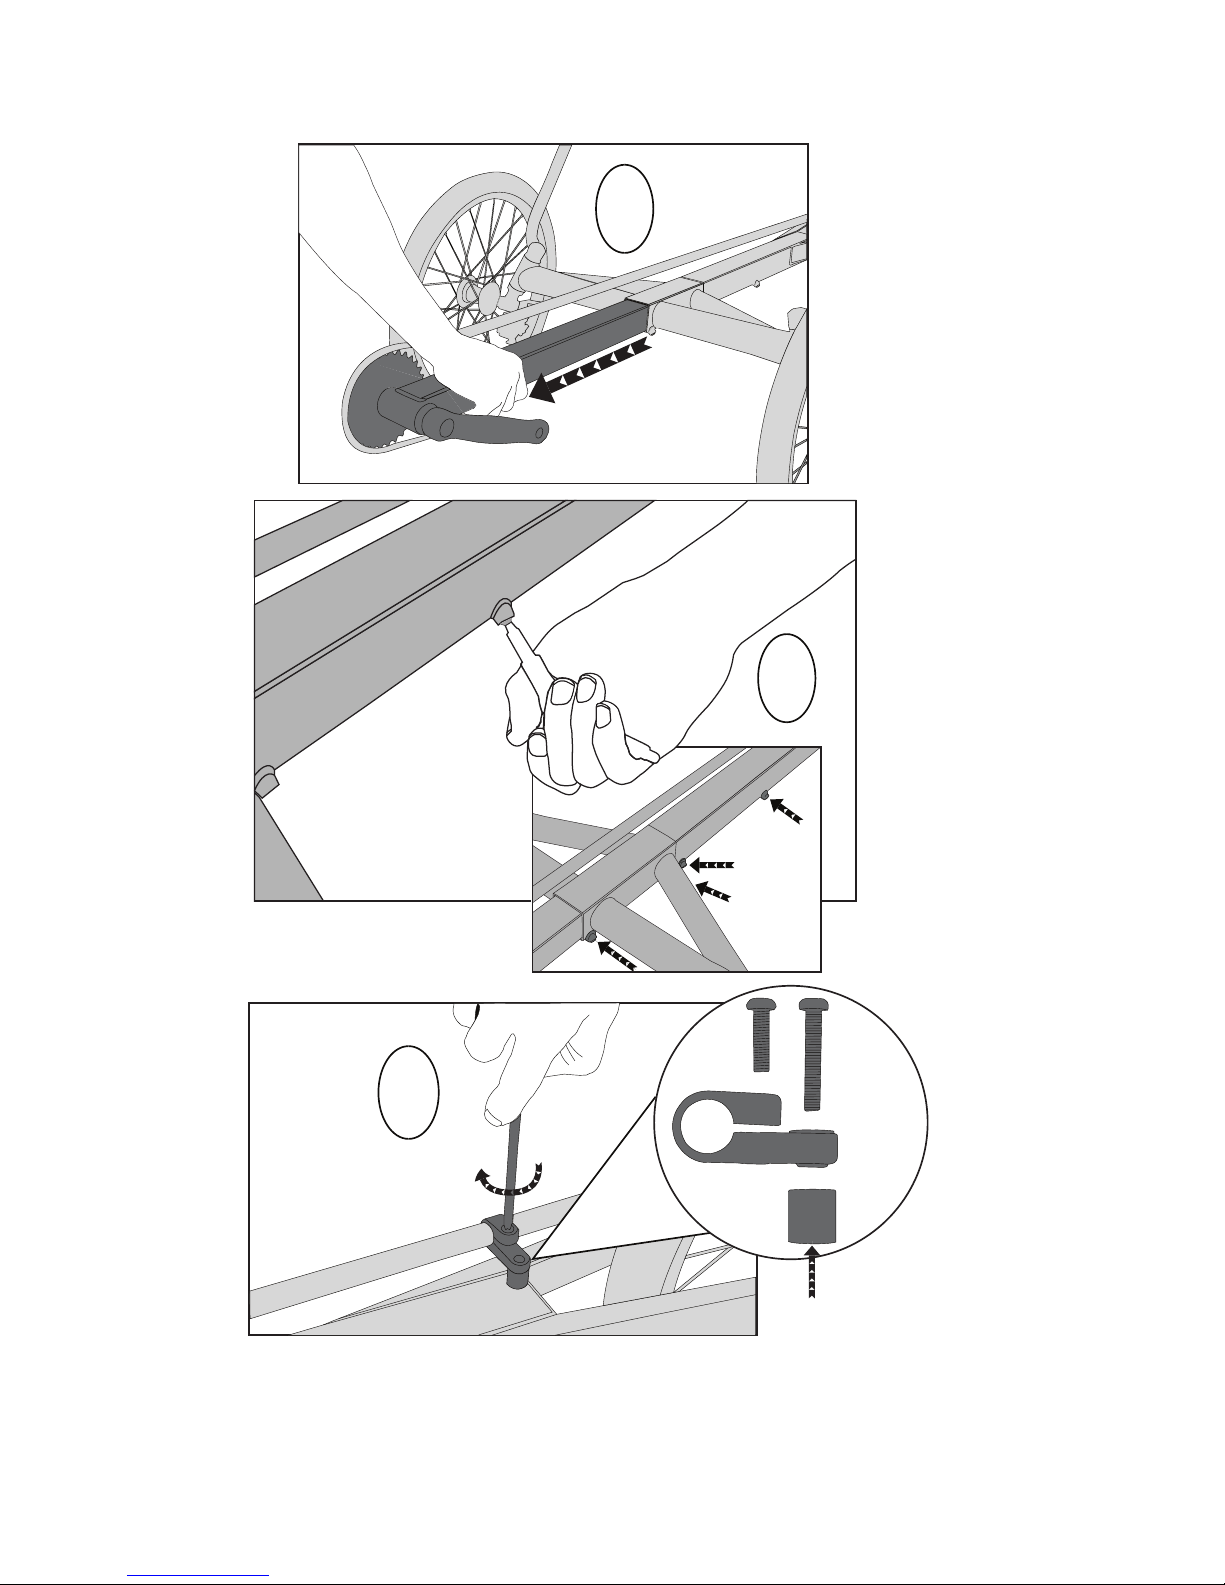
Chain Install - Pg 3
Tighten Set-Screw - Pg 4
Install Chain Tube Clamp - Pg 4
Install Seat - Pg 5
Install Pedals - Pg 6
Install Water Bottle/Accessory Mount Block - Pg 6
Install Reectors - Pg 7
Tuck Seat Straps - Pg 8
Zip Tie Cables - 8
Rover Sizing Chart - Pg 9
Pilot’s Handbook - Pg 10-14
General Information - Pg 10-12
-Unpackaging - Pg 10
-Cautions/Safety - Pg 10
-Riding Tips - Pg 10-11
-Special Tandem Consideration - Pg 11
-Survivals Tips - Pg 11
-Maintenance of your TerraTrike - Pg 11-12
-TerraTrike Lifetime Warranty - Pg 12
-Liability Waiver - Pg 12
Rover Information - Pg 13-14
-Disassembly - Pg 13
-Shiing - Pg 13
-Handle Bar Adjustment - Pg 13
-Seating Position Adjustment - Pg 14
-Tire Pressure - Pg 14
Technical Illustration - Pg 15
Parts List - Pg 16
Notes - Pg 17
Company Contact Information - Pg 18
Warranty Registration - Pg 18
1
RIGHT HAND
SIDE OF TRIKE
2
Hubmount
Hubmount
“L” Bracket (computer
sensor mount)
LEFT HAND
SIDE OF TRIKE
Assembly Guide
Dark Grey = Installation/Adjustment
1

29 13/16”
from center
of tires
3
Inate
Tires
First
13 15/16”
2

4
1” - 2”
3
5
7
-IMPORTANT-
Rover 3 and Rover 8
also have a chain tube
for return (bottom)
part of chain.
T
op
of
ma
i
n t
u
be
One located
under this
tube
Tighten to 8-10Nm
(70-85 in. lbs.)
6
Pull While tightening
Set Screws (Step 6)
Spacer(s) only used on
Rover 3, 8 & Tandem
4

A
9
B
Main
Tube
Seat frame Base
Chain
(drive
train)
side
of trike
8
Seat
stay
pins
5

11
10
6

13
12
7

15
14
Handle bar adjustment - SEE PG 13
16
8

ShortestBoom Length
MediumBoom Length
LongestBoom Length
(DoNot Pass this line)
(WillFit Most Riders)
(HeelWill Strike If Shorter)
Shortest Boom Length
Medium Boom Length
Longest Boom Length
(Do Not Pass This Line)
(Will Fit Most Riders)
Rover Boom
Assembly
(Boom Sizing sticker)
14.5”
Sticker Placement
14.5”
from
center of
bottom
bracket
11” from
center of
bottom
bracket
18” from
center of
bottom
bracket
(Heel Strike May Occur)
Chain Length Rover 1 Rover 3 Rover 8
Shortest 115” 116” 118”
Medium 122” 123” 125”
Longest 129” 130” 132”
**Chain measured WITH masterlink**
X-Seam Range Boom Position
29” - 39.5” Shortest - 11”
33” - 43.5” Medium - 14.5”
36.5” - 47” Longest - 18”
**Boom positions are from center of bottom brack-
et to edge of front frame section**
*For X-seam measurement illustration, refer to X-seam measurement
chart at: http://www.terratrike.com/sizing.php
9

Welcome to our growing Family!
First ings First...Please read the information below BEFORE you go riding. It discusses everything
from unpackaging your trike to trike maintenance to riding tips. We want our customers to be safe
and enjoy their trikes for years to come. ank you for supporting our company, dealers and families
by choosing TerraTrike.
Unpacking
When your TerraTrike arrives, carefully unpack the contents and inspect for any damage that may
have occurred during shipping. Notify your delivery person of ANY damage on the outside of the
box. If anything is amiss, contact the TerraTrike Sales Oce immediately at (616) 455-5988. Note:
e tires may have little or no air in them. is is our normal shipping procedure to avoid damage
from extreme altitude uctuations.
It’s a good idea to atten and save all boxes and packing materials. You may need them if you ever need
warranty service or want to ship your TerraTrike.
Cautions/Safety
Stop! Make sure to read and understand this manual completely before riding your TerraTrike. We
want to keep you riding safely for endless miles and years to come. So, always follow these safety
precautions for each ride:
•Inspect your TerraTrike before each ride. Check the tires for proper pressure and any damage. En-
sure that the brakes are functioning at their full capacity.
•Please remember a helmet is your most important piece of safety equipment. Wear one!
•If you ride at night make sure you have a white headlight visible from a distance of at least 500 feet,
and a red rear taillight.
•Look behind you! We strongly recommend the use of a rear view mirror. Also make sure to turn
your head and look before turning or changing lanes.
•Use caution when cornering. Learn to use safe speeds for negotiating corners and going down hills.
•Lean into turns when cornering at speed. Your TerraTrike can be “rolled” if turned too sharply for a
given speed. Rule of thumb: rubber side down. :)
•e disc brakes and rotors will get very hot aer braking. DO NOT touch them.
•Keep your feet securely on the pedals to prevent them from getting caught underneath your
TerraTrike. We recommend clipless pedals or Power Grip pedal straps.
•Brake evenly using both hands. Your TerraTrike is designed with front brakes only. You will experi-
ence brake-steer if you brake only one side.
•Although your TerraTrike is suitable for riding on dirt roads if equipped with more rugged tires, it is
not designed for all-terrain, o-road use, or canyoneering.
•e unique look of your TerraTrike will attract much attention, so you’re more likely to be seen.
•Be sure you are not obstructed from view by other vehicles. Use of a ag is highly recommended.
•Remember, your rst line of defense is always your own common sense. Ride as if you are invisible
to motorists.
•Your TerraTrike is strong enough for most riding conditions. at is not a license to ride in a
hazardous or abusive manner! Anyone can damage their TerraTrike if they try hard enough. Use
common sense.
•Take care of yourself. We like our customers, and we want to keep them around.
Riding Tips
Shiing: Simply twist the shier up or down to nd the desired gear. Sturmey Archer hubs should be
shied when you ARE NOT pedalling.
10

Riding Tips Cont.
•Turning: When turning, you will nd your TerraTrike does not lean into a corner the way a regular bicycle
does. It behaves more like an automobile. For this reason you will feel a tendency to be pulled to the out-
side of a turn. To counteract this force, lean into the center of the turn. Please read the cautions and safety
section carefully before taking high-speed turns.
•Stopping: To stop, squeeze the brake levers. Each brake lever will activate the corresponding brake on each
of the front hubs. To achieve a balanced braking eort, it is necessary to use both brake levers simultane-
ously. Brake evenly using both hands. You will experience brake steer if you brake only one side. Notice:
New brakes will grip tightly and stop you abruptly.
•Parking: To keep your TerraTrike from rolling away on inclines or in the wind, use the Velcro strap in-
cluded with your TerraTrike as a parking brake. Hold one of the brake handles down, wrap the strap around
the handlebar and the brake lever, and secure it.
•Riding over small obstacles: To successfully ride over obstacles, aim your TerraTrike so that the obstacle
goes right under one of your feet. is way the rear wheel will not hit the object.
Special Tandem Riding Considerations
•Remember you are riding a tandem. It’s not a sports car, so don’t expect it to handle like one. You are
moving twice the weight of a regular TerraTrike, and it will take longer to stop. Give yourself plenty of room
to slow down. You also have a very long wheelbase. You will need to consider this when turning. Also, be
considerate of, and communicate with your stoker (passenger).
Survival Tips
•Keep your upper body quiet (no movement) while riding to avoid unwanted biofeedback, or tadpoling. is
is especially crucial at speed.
•If you feel you are riding at high speeds regularly, you may want to consider a larger front chainring or
Speed Drive option to slow down your cadence. To help avoid tadpoling, you’ll want to ride with a slower
cadence than you would on an upright bike.
•If you’re taking your TerraTrike o-road, a knobby tire choice will give you more traction on dirt roads and
other non-paved surfaces. e TerraTrike is not recommended on quicksand...or loose sand for that matter.
•Try to avoid being hidden by trac while riding. A rear-view mirror and custom TerraTrike safety ag are
highly recommended.
•Take water with you to re-hydrate your body. Your body perspires as you ride and you may not notice how
much uid you are losing due to the cooling aects of evaporation. Drink before you’re thirsty.
•Desert riding range: as much water as you can carry.
•When riding your TerraTrike try to avoid extreme downhill mountain bike races, dare devil ramps, and
near-earth orbit.
•Don’t let your feet slip o the pedals. Your feet could get pulled under the outrigger tube resulting in an
injury.
Maintenance of Your TerraTrike
•Lubrication: Chain and cables need regular lubrication with a good quality bike lube, available through
TerraTrike or a local bike shop. All drive train parts will need periodic lubrication. With the exception of
the interanally geared hubs which are lubricated for life!
•Spokes: Break-in period. During the rst 100 miles, the spokes will experience a period of stretching to a
degree more than that of a two-wheeled bicycle. is is due to the higher lateral (or side) forces applied to
the wheels while turning. e spokes may require tightening, and the wheels truing. Have this performed
by a qualied bicycle technician unless you have the necessary wheel truing skills.
•Brakes: e brake cables will stretch in the early life of your TerraTrike. is is normal. To tighten the
brake cables, turn the adjustment barrels. Replace the cables at the rst indication of wear or fraying.
•Brake Balancing: If the braking action ever appears to be uneven (one side brakes harder than the other),
the brakes will need to be adjusted.
•Pads: Unless you are routinely making transcontinental jaunts, the brake pads should last many seasons. If
they do ever need replacing, contact your local bike shop.
•Shiers: e shi cables will also stretch when new. You may need to adjust them occasionally as they
break in.
11

•Steering: All of the steering parts tend to settle in aer the rst 100 miles or so. is may require some
tightening of nuts and bolts.
•Cleaning: Your TerraTrike will operate for years to come if you keep it regularly cleaned and lubed! Water
and soap won’t hurt your TerraTrike, provided you dry and lubricate right aer cleaning. If you need to
wash the seat mesh, remove it from the seat frame, wash it in the gentle cycle and let it air dry. If you ride
in inclement weather, immediately clean and lube your TerraTrike aer your ride. Road salt, over time, will
cause signicant damage to your TerraTrike. Clean it o immediately! Likewise, salty air will corrode your
TerraTrike. It’s a good idea to wax the frame occasionally with a good quality car wax. We do use stainless
steel nuts and bolts.
12

Rover Owners Information
Disassembly
To Break down your Rover, simply perform steps 9, 8, 7, 6, 5, 4, 2, 1 in the reverse order the images indicate.
**Rover Disassembly video available at http://rover.terratrike.com/assembly.php
Shiing
Your Rover 3 or 8 will arrive with an internally geared hub in the rear wheel. In order to shi, STOP PED-
ALLING (coast), shi, begin pedalling again. e trike doesn’t have to be stopped to shi into another gear.
However, it’s important that you DO NOT pedal when shiing. Pedalling while shiing can have a number
of consequenses. If the hub is damaged or malfunctions because of improper shiing technique, it WILL
NOT be covered under warranty.
Also, internally geared trikes can be shied to any gear at a stand-still. If you’re in a high gear when you
stop pedalling, shi into a lower gear to make acceleration easier.
Handlebar Adjustment
***HANDLEBAR ADJUSTMENT VIDEO AVAILABLE ONLINE - http://www.terratrike.com/manuals.php
Your Rover’s handlebars are adjustable in two dierent ways:
1) e stiness/ease of steering can be adjusted - you can make your Rover harder or easier to steer by
adjusting your “Top Cap Bolts” (number 22 in the technical illustration on pg 17).
2) ey can rotate out and away from the rider - this gains a slightly wider riding clearance for wider people.
is is also ideal for indiviuals with longer arms and/or broad shoulders.
If you decide to adjust your Rover’s handlebars, follow the below steps:
Top Cap Bolt Adjustment (Tighten or Loosen Steering “feel”):
1
2
1) Loosen the clamping bolt that secures your handlebar to the steering tube that runs through the frame.
2) Carefully loosen the cap screw bolt. is is what controls the stiness of the steering.
***DON’T LOOSEN THE CAP SCREW BOLT TOO MUCH. You DON’T want your handle bars to feel
wobbly!***
Retighten the clamping screw to secure your handle bar, and test the feel.
13
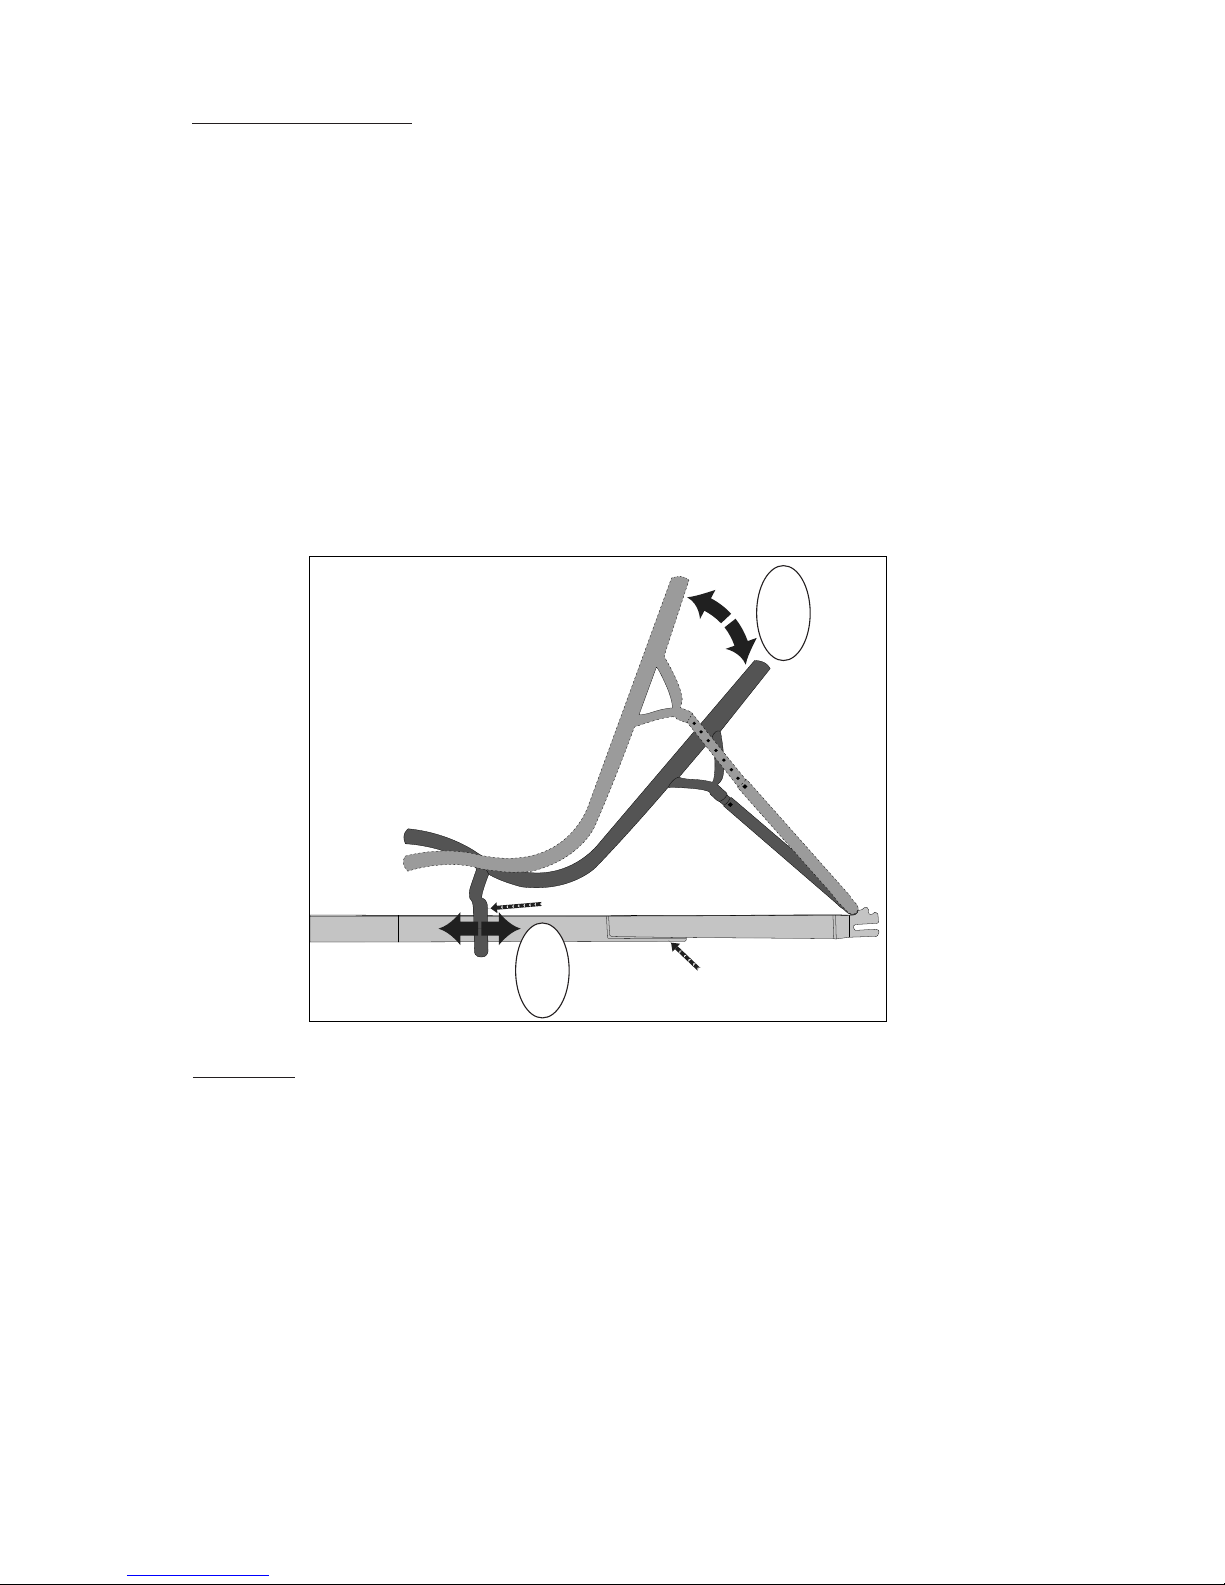
Seating Position Adjustment
Your Rover seat is adjustable on two dierent planes: incline/recline angle of the seat back and fore/a posi-
tions at the base.
Your Rover seating position can adjust anywhere from 15-80 degrees depending on where the “seat bracket”
(number 9 on the technical illustration) is located on the frame.
1) Fore/A Seat Position-
To move the base of your seat, ip the quick-release lever down, slide the seat bracket along the main tube,
ip quick-release lever to tighten the wedge setup. ***MAKE SURE THE WEDGES THAT REST AGAINST
THE UNDERSIDE OF THE MAIN TUBE ARE POSITIONED CORRECTLY - IN THE ASSEMBLY
MANUAL, STEP 7. ALSO, MAKE SURE THAT THE SEAT IS CLAMPED SECURELY***
2) Incline/Recline Position-
To adjust the incline/recline position (sitting up-right or laying back), pull the “seat stay pins” (number 29
in technical illustration) from the “seat stays” (number 11 in the technical illustration). You can now adjust
your angle of recline (seat back angle). When you have a seating position you feel comfortable with, align
the holes in the “seat stays” and reinstall your “seat stay pins” ***MAKE SURE THE HOLES IN THE SEAT
STAYS LINE-UP WHEN YOU REINSTALL YOUR SEAT STAY PINS***
Tire Pressure
Tire pressure is indicated on the side-wall of of each tire.
**TIRE PRESSURE SHOULD BE CHECKED BEFORE EACH RIDE.**
e Rover uses “Schrader” valves. ese valves are similar to car tires. A standard bicycle tire pump or air
compressor will work to inate these valves. ***BE SURE NOT TO OVER INFLATE.***
Seat Bracket
Rear frame section
1
2
15
24
27
28
29
30
31
32
33
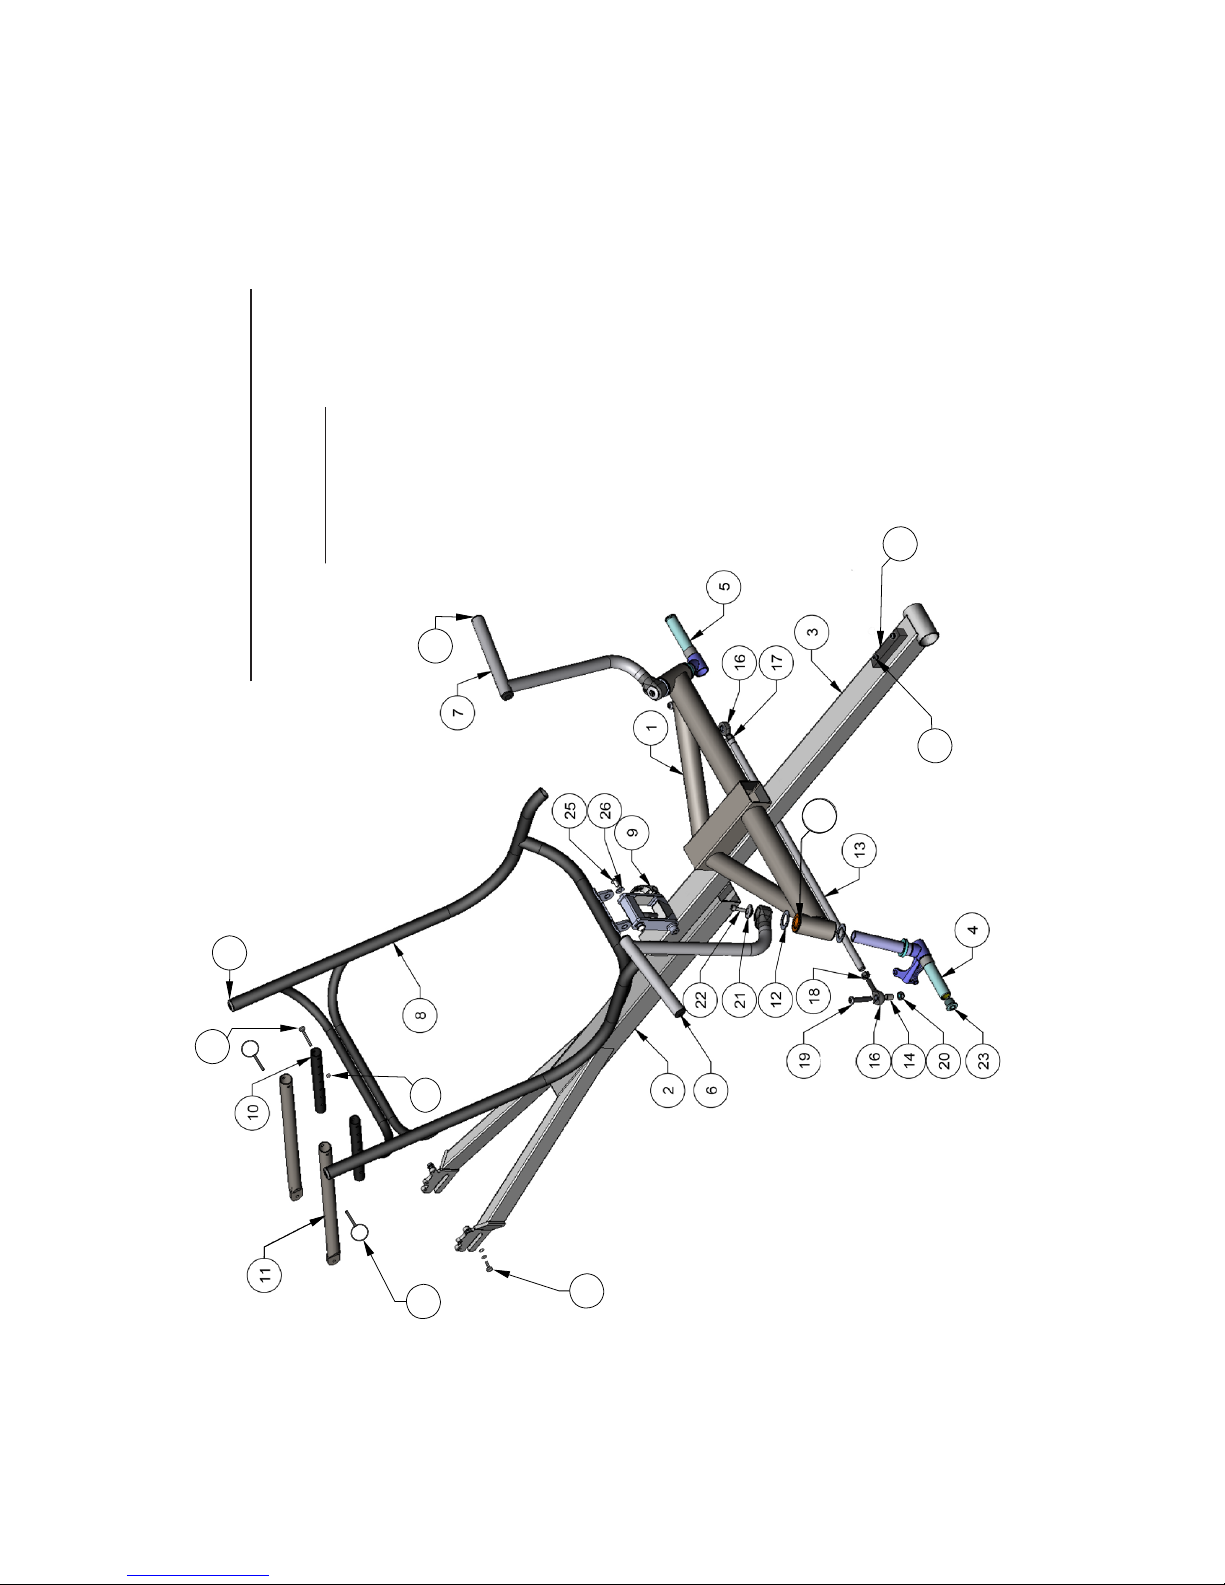
TECHNICAL ILLUSTRATION
&
PARTS LIST
**PARTS LIST LOCATED ON NEXT PAGE**
Image doesn’t Illustrate components, only proprietary parts
15

ROVER PARTS LIST
Item Descriptions Quantity
1 Front Frame Assembly 1
2Rear Assembly 1
3Boom Assembly 1
4 Hubmount (Right side) 1
5 Hubmount (Le side) 1
6 Handle bar (Right side) 1
7 Handle bar (Le side) 1
8 Seat Frame (Steel) 1
9Seat bracket w/ quick release 1
10 Seat Stay - upper 2
11 Seat Stay - lower 2
12 Steering washer 4
13 Tie Rod 1
14 Tie rod stand-o spacer (13mm) 2
15 Accessory/Bottle Cage Mount 1
16 Tie Rod 1
17 M8 Hex Nut - Le hand threads 1
18 M8 Hex Nut 1
19 M8x40mm Screw 2
20 M8 Lock Nut 2
21 Aluminum top cap for handle bars 2
22 M6x20mm (top cap bolt) 2
23 Axle Bolt (socket plug) 2
24 M5x30 Bolt (Button head) 2
25 M6x12 Bolt 2
26 M6 Flat Washer 2
27 Steering Bushing 4
28 M5 Lock Nut 2
29 Seat Stay Pin 2
30 1 M5x 12 Bolt & 2 M5 Flat Washer 2 (sets)
31 Seat Frame End Cap 2
32 M5x35mm Bolt 2
33 Handle Bar End Plug 2
16

NOTES
17

COMPANY INFORMATION:
TerraTrike (WizWheelz Inc.)
4525 Stauer Ave SE, Suite A.
Kentwood, MI 49508
USA
Email:
tech@terratrike.com - for Technical Assistance
shipping@terratrike.com - for Shipping Inquiries
Phone:
1-800-945-9910 or 1-616-455-5988
Fax:
1-616-455-6058
RESOURCES:
∙TerraTrike Forum - http://www.terratrike.com/forum/
∙TerraTrike Blog - http://terratrike.com/blog/
∙TerraTrike Facebook Page - http://www.facebook.com/terratrike
∙TerraTrike Twitter Page - http://www.twitter.com/terratrike
∙TerraTrike Youtube Channel - http://www.youtube.com/wizwheelzterratrike
∙TerraTrike Owners Group -http://sports.groups.yahoo.com/group/wwog/
∙Bentrider Online (BROL) - http://www.bentrideronline.com/
∙Recumbent Journal - http://www.recumbentjournal.com/
*Remember to subscribe!
WARRANTY REGISTRATION:
Register your trike online at: http://www.terratrike.com/register.php
or
Call us to register your trike - 1-800-945-9910
18
Other manuals for Rover
3
This manual suits for next models
1
Table of contents
Other TerraTrike Exercise Bike manuals


