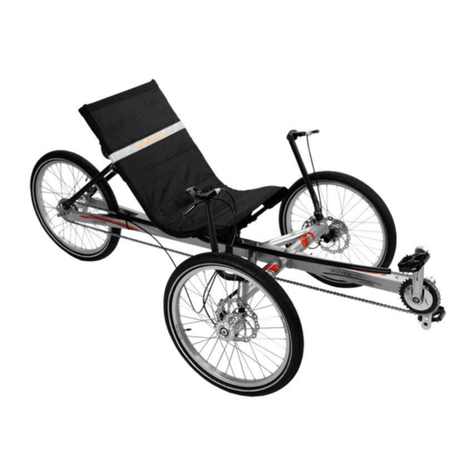
TerraTrike Rover User manual

TerraTrike Rover Assembly/Owners Manual 8/12/10
F G H D
E
C
B
A
Carefully unpack carton contents and remove protective
packing materials.
Parts List
A – Front Assembly
B – Rear Assembly
C – Boom Assembly
D – Seat Assembly
E – Chain Tube
F – Pedals
G – Frame Bolts and nuts
H – Chain with Master Link
PLEASE BE SURE TO GREASE ALL BOLTS
BEFORE ASSEMBLY.
1. Straighten the wheels until they are perpendicular to the
front assembly. Insert boom assembly into the “flat” side of
the front assembly as pictured (with the chainring on right
side of trike).
2. Slide rear assembly onto boom with rear cog on right side of trike. The
front and rear assemblies should butt up against each other. The holes in the
boom are used for sizing the trike to your leg length. The average height rider
will have one or two exposed holes in the boom in front of the front assembly
(see chart for recommendations).
3. After applying grease to the four M8x65mm button head
socket cap screws, install them with eight M8 flat washers
and four M8 Nyloc nuts, but do not tighten at this time. Be
sure that all four bolts engage into the through holes in the
boom. After you have determined the optimal seating/frame
position, tighten them securely (20 N-m/175 in-lbs.).
4. Loosen the handlebar fixing bolt on the side of the handlebar and rotate
each handlebar so that they extend over the front wheels. You should not
have to loosen the top cap bolt to rotate the handlebars.
5. Apply grease to the bolt and attach the tie rod to the
hubmount flange. The tie rod is mounted above the
hubmount flange using a 13mm spacer, an M8x40mm bolt
and an M8 Nyloc nut on the 8 speed and below the
hubmount flange on the 3 speed. NEVER allow the chain
to ride on the tie rod.
6. After aligning the front wheels so that they are parallel to each other
when pointing straight ahead (neutral toe), attach seat assembly to trike:
slide the upper seat stay tubes into the lower seat stay tubes and install ring
pins. Tighten upper and lower seat stay bolts securely. Attach shifter cable
to rear hub (see manual) and affix cable to main frame with a zip tie. Secure
shifter and brake cables halfway up each handlebar using zip ties.

7. Affix the lower seat clamp to the frame of the trike. Be
sure that the wedges are arranged correctly (as pictured
above). The center (large) wedge’s long side should be
facing toward the frame. The seat is adjustable fore and aft
as well as the angle of recline.
8. Position the seat so that you have about 15 degrees of bend at your knee
when the pedal is as far away from you as possible. You do not want your
leg to be 100% straight. Tighten the two (upper) bolts that secure the seat
clamp to the seat frame.
9. Pretension the quick-release with the lever perpendicular
to the frame. Tighten the knurled nut finger-tight and fold
the quick-release lever toward the frame until it is parallel to
the frame to lock it in place. Apply the decals as desired
prior to the following step.
10. Install the chain tube onto the right chainstay with the 35cm zip ties. Be
SURE to loop the zip ties all of the way around the chain tube once
before going around the chainstay. Make sure the zip ties are looped
properly and pulled very tight. Depending upon how you have set up the
trike for your leg length, you may have to cut the chain tube to a shorter
length. The chain tube should not contact the front chainring or the rear cog.
Size and tension the chain appropriately. Make sure the chain is not twisted
in the chain tube. THERE SHOULD BE NO SLACK IN THE CHAIN AT ALL!
11. Rotate the handlebars to a comfortable position and
tighten the handlebar fixing bolts securely. You should not
have to adjust the top bolt at all. Double check the tightness
of all nuts and bolts and put air in your tires.
TerraTrike ROVER Recommended Boom Positions
Short
Medium
Long
X-Long
Holes Exposed in Boom
0
1
2
3
Shoe Length (inches)
Up to
9"
Up to
11.75"
Up to
14.75"
Up to
18"
X-Seam Range-Full
33.5 –
45”
36 –
47”
38 –
49.5”
40.5 -
51.5”
X-Seam Range-Optimal
33.5 –
41”
41 –
43.5”
43.5 –
46”
46 –
51.5”
To determine the X-Seam measurement, please refer to our catalog or
http://www.terratrike.com/sizing.php. Ideally, we put the seat clamp just behind the
rear frame bolt to center the rider's weight. However, the seat can be moved forward
to make entry/exit easier.
Owner’s Information
1. Disassembly. To break down your Rover for transport, simply reverse the above steps. Begin by removing the seat and then
remove all four frame bolts. Disconnect the shift cable at the rear wheel. Take the chain off the front chainring. Then remove the boom
tube. Removing one tie rod bolt will allow you to collapse the front end. For more details on how the Rover comes apart, view our
Rover assembly video located at http://rover.terratrike.com/assembly.php.
2. Wear a helmet. We also recommend a safety flag, mirror and/or taillight for maximum visibility.
3. When slowing and stopping your Rover use uniform pressure on both brake levers at the same time. This will give you more control.
Also, look ahead and anticipate stops to avoid panic stops.
4. When cornering, the laws of physics apply: the faster you go the more you will need to lean into the corner. Failure to do so could
result in lifting the inside wheel and, in extreme cases, cause you to lose control and/or roll the trike onto its side. Your Rover is a very
stable machine in most instances, but be careful. We strongly recommend riding slowly until you are familiar with how your Rover
reacts to your riding and braking inputs.
5. You do not have to pedal your Rover when you are shifting gears. Actually, it is better not to pedal or “soft pedal” when you
shift gears. Due to our use of the internally geared hub, you can even shift gears when the trike is not moving.
6. Your tires have tubes with Schrader valves similar to a car’s tires. You can fill them with a hand pump or an air compressor. If you
are using an air compressor be careful. Many compressors deliver huge volumes of air in a short period of time. This can over inflate
your tube to failure. We recommend keeping your tires inflated to the inflation specification on the tire’s sidewall.
Other manuals for Rover
3
Table of contents
Other TerraTrike Exercise Bike manuals
