Tesla MODEL 3 2020 User manual

MODEL 3
OWNER'S MANUAL
Software version: 2020.12.5
Europe

SAFETY INFORMATION
The Model 3 Owner's Manual is available on the touchscreen. To view it, touch Controls >
Service > Owner's Manual.
For detailed information about your Model 3, go to www.tesla.com, and log on to your Tesla
Account, or sign up to get an account.
If you have any questions or concerns about your Model 3, call 1-877-79TESLA
(1-877-798-3752).
DOCUMENT APPLICABILITY
Features released in the most recent versions of software may not be described in this
document but are described in Release Notes. Display Release Notes on the touchscreen by
touching the Tesla T at the top center of the touchscreen, then touching the Release Notes link.
If information provided in this document conflicts with information in the Release Notes, the
Release Notes take precedence. ILLUSTRATIONS The illustrations provided in this document are
for demonstration purposes only. Depending on vehicle options, software version and market
region, the information displayed on the touchscreen in your vehicle may appear slightly
dierent.
PRODUCT SPECIFICATIONS
All specifications and descriptions contained in this document are verified to be accurate at the
time of printing. However, because continuous improvement is a goal at Tesla, we reserve the
right to make product modifications at any time. To communicate any inaccuracies or omissions
© 2012-2020 TESLA, INC.
All information in this document and all vehicle software is subject to copyright and other
intellectual property rights of Tesla, Inc. and its licensors. This material may not be modified,
reproduced or copied, in whole or in part, without the prior written permission of Tesla, Inc. and
its licensors. Additional information is available upon request. The following are trademarks or
registered trademarks of Tesla, Inc. in the United States and other countries:
TESLA, TESLA MOTORS, MODEL S, MODEL X, ROADSTER, MODEL 3, MODEL Y

Overview...................................................3
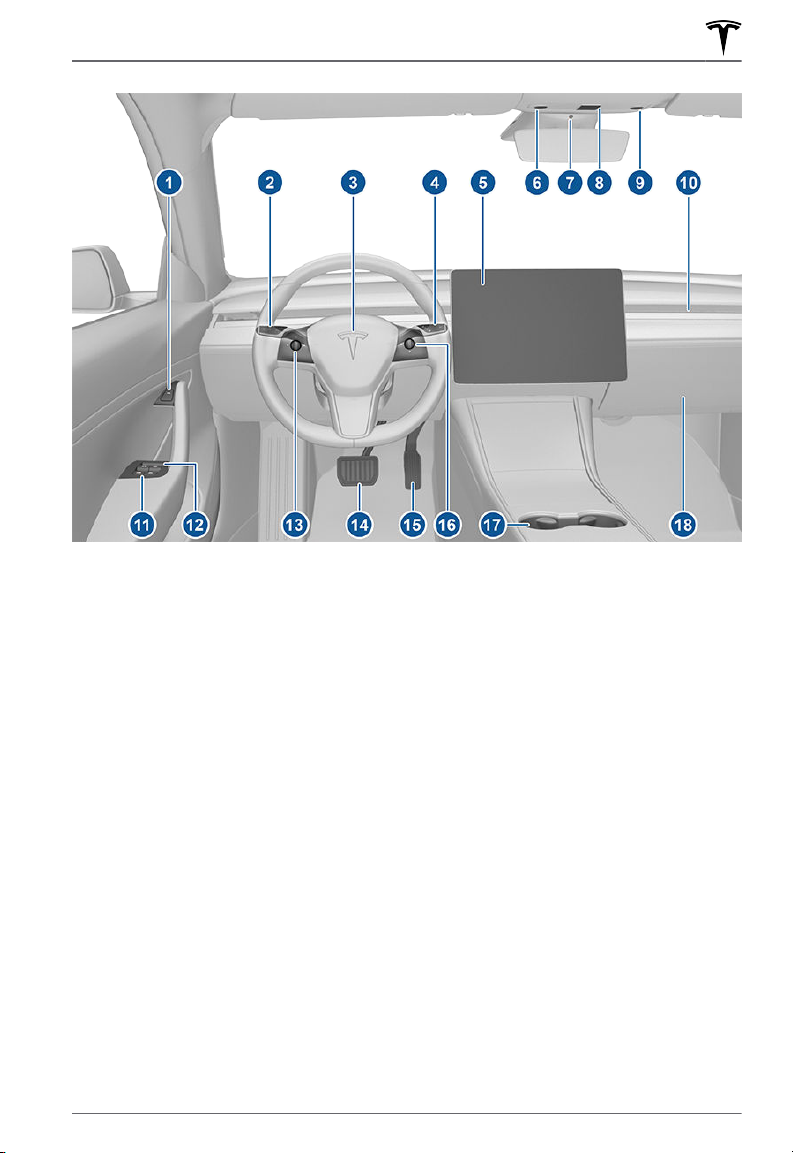
Interior Overview....................................................... 3
Exterior Overview...................................................... 5
Touchscreen Overview.............................................6
Opening and Closing...........................11
Keys.................................................................................11
Doors.............................................................................16
Windows...................................................................... 19
Rear Trunk..................................................................20
Front Trunk.................................................................22
Interior Storage and Electronics........................25
Seating and Safety Restraints....... 30
Front and Rear Seats.............................................30
Seat Belts................................................................... 34
Child Safety Seats................................................... 38
Airbags........................................................................ 52
Driving.....................................................57
Driver Profiles............................................................57
Steering Wheel........................................................ 60
Mirrors..........................................................................62
Starting and Powering O...................................64
Gears............................................................................ 66
Lights........................................................................... 68
Car Status................................................................... 72
Wipers and Washers.............................................. 76
Braking and Stopping............................................ 77
Traction Control....................................................... 82
Park Assist..................................................................83
Vehicle Hold...............................................................85
Track Mode................................................................ 86
Getting Maximum Range......................................89
Rear View Camera....................................................91
Dashcam..................................................................... 92
Towing and Accessories....................................... 95
Cold Weather Best Practices............................ 104
Autopilot.............................................. 108
About Autopilot.....................................................108
Trac-Aware Cruise Control............................... 111
Autosteer....................................................................118
Navigate on Autopilot..........................................123
Autopark....................................................................126
Summon.....................................................................128
Smart Summon....................................................... 132
Lane Assist............................................................... 136
Collision Avoidance Assist..................................139
Speed Assist............................................................ 143
Using the Touchscreen....................145
Controls..................................................................... 145
Climate Controls.....................................................154
Maps and Navigation........................................... 160
Media and Audio.................................................... 167
Phone...........................................................................171
Calendar.................................................................... 174
Using Voice Commands.......................................175
Security Settings....................................................176
HomeLink Universal Transceiver......................180
Connecting to Wi-Fi..............................................183
Software Updates..................................................184
Mobile App...............................................................186
Charging............................................... 189
Electric Vehicle Components............................ 189
Battery Information................................................191
Charging Instructions...........................................193
Maintenance........................................199
Maintenance Schedule.........................................199
Tire Care and Maintenance................................ 201
Cleaning................................................................... 209
Wiper Blades and Washer Jets.........................213
Fluid Reservoirs......................................................214
Jacking and Lifting................................................216
Parts and Accessories.......................................... 217
Specifications..................................... 218
Identification Labels..............................................218
Vehicle Loading...................................................... 219
Dimensions and Weights.....................................221
Subsystems..............................................................223
Wheels and Tires...................................................227
Roadside Assistance........................ 231
Contacting Tesla Roadside Assistance.......... 231
eCall........................................................................... 234
Instructions for Transporters............................ 235
Consumer Information................... 239
Easter Eggs............................................................. 239
About this Owner Information........................ 240
Disclaimers.............................................................. 242
Reporting Safety Defects..................................244
Contents

NOTE: On RHD (Right Hand Drive) vehicles, the controls illustrated above are arranged similarly,
but are mirrored on the right side of the vehicle.
1. Door open button (Opening Doors from the Interior on page 16)
2. High beams (High Beam Headlights on page 69), turn signals (Turn Signals on page 70),
and wipers and washers (Wipers and Washers on page 76)
3. Horn (Horn on page 61)
4. Gear selector (Shifting Gears on page 66) , Trac-Aware Cruise Control (Trac-Aware
Cruise Control on page 111), and Autosteer (Autosteer on page 118)
5. Touchscreen (Touchscreen Overview on page 6)
6. Driver dome light (Lights on page 68)
7. Cabin camera (Cabin Camera on page 29)
8. Hazard warning flashers (Hazard Warning Flashers on page 71) and SOS button (eCall on
page 234)
9. Passenger dome light (Lights on page 68)
10. Climate control vent (see Climate Controls on page 154)
11. Power window switches (Windows on page 19)
12. Manual door release (Opening Doors from the Interior on page 16)
13. Left scroll button (Scroll Buttons on page 60)
14. Brake pedal (Braking and Stopping on page 77)
15. Accelerator pedal (Regenerative Braking on page 78)
16. Right scroll button (Scroll Buttons on page 60)
Interior Overview
3Overview

1. Exterior lights (Lights on page 68)
2. Autopilot camera (About Autopilot on page 108)
3. Front door handle (Using Exterior Door Handles on page 16)
4. Key card sensor (Keys on page 11), Autopilot camera (About Autopilot on page 108)
5. Rear door handle (Using Exterior Door Handles on page 16)
6. Charge port (Charging Instructions on page 193)
7. Autopilot cameras (About Autopilot on page 108)
8. Exterior mirrors (Mirrors on page 62)
9. Radar sensor (hidden from view) (About Autopilot on page 108)
10. Hood/front trunk (Front Trunk on page 22)
11. Tow eye cover (Instructions for Transporters on page 235)
12. Wheels and tires (Wheels and Tires on page 227)
13. Rear view camera (Rear View Camera on page 91)
14. Rear trunk (Rear Trunk on page 20)
Exterior Overview
5Overview

The features and information you need to drive Model 3 are displayed on the touchscreen. When
driving, the touchscreen displays driving-related information such as driving speed, vehicle
range, warnings, etc. The touchscreen is used to control many features that, in traditional cars,
are controlled using physical buttons (for example, adjusting mirrors). You can also use the
touchscreen to customize Model 3 to suit your preferences.
WARNING: Always pay attention to road and trac conditions when driving. To
minimize driver distraction and ensure the safety of vehicle occupants as well as other
road users, avoid using the touchscreen to adjust settings while the vehicle is in motion.
NOTE: The image below is provided for demonstration purposes only. Depending on vehicle
options, software version and market region, your touchscreen may appear slightly dierent.
1. This area on the top of the touchscreen displays useful information and provides shortcuts
to various features. In addition to the time of day and the current outside temperature, this
area displays the following icons:
Touch to lock/unlock all doors and trunks.
Access information about your Model 3. See The Tesla "T" on page 10.
Touchscreen Overview
6 MODEL 3 OWNER'S MANUAL

Add, configure, or quickly switch driver profiles (including Valet Mode
and Easy Entry). See Driver Profiles on page 57.
Displays when a warning notification is in eect. Touch to display
information about the warning.
Displays when a software update is available (see Software Updates on
page 184).
Displays when Dashcam is ready to be used (you have inserted a
supported flash drive into a front USB port). Touch to operate
Dashcam. When in Park, touch the Dashcam icon and select "Launch
Viewer" to watch your saved Dashcam and Sentry Mode clips (see
Dashcam on page 92).
Touch to enable or disable Sentry Mode to actively monitor the
vehicle's surroundings (see Sentry Mode on page 176).
Control or program HomeLink devices (if equipped) (see HomeLink
Universal Transceiver on page 180).
Connected to a Wi-Fi network.
Connected to cellular network. Touch to connect to Wi-Fi (see
Connecting to Wi-Fi on page 183).
Touchscreen Overview
7Overview

Connect to a Bluetooth device (see Pairing a Bluetooth Phone on page
171).
Displays the status of the front passenger airbag (applicable only in
regions where the airbag can be disabled, as described in Airbags on
page 52).
2. Car Status. This area dynamically displays the current status of Model 3 as you drive, park,
open doors, turn lights on, etc. Monitor this area when driving as it displays important
information such as driving speed and warning messages (see Car Status on page 72).
When the car is in Park, you can open the trunks or charge port door.
3. Cards. This area automatically updates to display information such as incoming calls, seat
belt reminders, current state of the wipers, etc. It also provides easy access to the rear view
camera (see Rear View Camera on page 91), charging status (see Charging Instructions on
page 193), voice commands (see Using Voice Commands on page 175), wiper controls (see
Wipers on page 76), and seat belt reminders (see Seat Belt Reminders on page 34). Swipe
to the right or left to access:
◦Trips. You can display distance driven, energy usage and energy eciency starting at any
time, or since Model 3 was last charged. You can also display this information for up to two
trips. Touch ... in the top right corner of a trip to rename or reset a trip.
◦Tire Pressures. Display tire pressures or view cautions or warnings related to pressures
that are not within acceptable limits (see Tire Care and Maintenance on page 201).
4. Controls. Touch to control features and customize Model 3 to suit your preferences (see
Controls on page 145).
5. Media Player (see Media and Audio on page 167).
6. Touch the app launcher then choose from the following apps:
Call. See Phone on page 171.
Calendar. See Calendar on page 174.
Camera. Display the area behind Model 3. This area also displays
automatically whenever you shift into Reverse. See Rear View Camera on
page 91.
Touchscreen Overview
8 MODEL 3 OWNER'S MANUAL

Energy. See Getting Maximum Range on page 89.
Charging. See Charging Instructions on page 193.
Web. Access the Internet using the web browser (if equipped with
premium connectivity).
Entertainment. Browse the full library of games and access video
streaming services, all from your vehicle's touchscreen. To launch, Model 3
must be in Park.
NOTE: Due to vehicle configuration or market region, Entertainment,
Arcade, and/or Theater may not be available on your vehicle.
Toybox. Display Easter Eggs (see Easter Eggs on page 239).
NOTE: Swiping up on the app launcher displays the most recently used app (provided an app
is not currently being displayed).
NOTE: Depending on the market region and vehicle options, your vehicle may not be
equipped with some features.
7. Climate Controls (see Climate Controls on page 154).
8. Volume Control (see Volume Control on page 167).
9. The map displays on the touchscreen at all times (see Maps and Navigation on page 160).
NOTE: When you touch Controls, choose an app, or expand Media Player, the window
displays on top of the map. To close the Controls window, touch Controls again or touch the
Xin the top corner of the window. To close an app, touch the Xin the top corner of the
window. To close Media Player, drag it all the way down to the bottom of the touchscreen or
touch the icon again.
Touchscreen Overview
9Overview

The Tesla "T"
Touch the Tesla "T" at the top center of the touchscreen as a one-touch shortcut to the Controls
> Software tab, which displays:
• Vehicle name (see Naming Your Vehicle on page 152).
• Vehicle configuration.
• Odometer.
• Vehicle Identification Number (VIN).
• Version of software currently installed on your Model 3.
• Access to release notes associated with the currently-installed software version.
• Access to this owner's manual.
• One-touch access to call Tesla Customer Support and Roadside Assistance (if available in
your market region).
Touchscreen Overview
10 MODEL 3 OWNER'S MANUAL

Three Types of Keys
Model 3 supports three types of keys:
• Authenticated phone - You can set up
your personal smartphone to communicate
with Model 3 using Bluetooth. Supports
automatic locking and unlocking as well as
several other functions using the Tesla
mobile app.
• Key card - Tesla provides a key card that
communicates with Model 3 using short
range radio-frequency identification (RFID)
signals. The key card is used to
"authenticate" your phone to work with
Model 3 and to add or remove other key
cards, phones, or key fobs. In situations
where your authenticated phone has a
dead battery, or is lost or stolen, use your
key card to unlock, drive, and lock Model 3.
• Key fob - The key fob allows you to press
buttons to open the front and rear trunks,
and unlock, lock, and drive Model 3. The
key fob also supports automatic locking
and unlocking, if available in your region
(see Passive Key Fob on page 13). This is
an accessory sold separately.
Model 3 supports a total of 19 keys, which can
include authenticated phones, key cards, and
up to four key fobs.
CAUTION: Remember to bring a key
with you when you drive. Although
you can drive Model 3 away from its
key, you will be unable to power it
back on after it powers o.
Authenticated Phone
Using your phone is a convenient way to
access your Model 3. As you approach, your
phone's Bluetooth signal is detected and
doors unlock when you press a door handle.
Likewise, when you exit and walk away with
the phone, doors automatically lock
(provided the Walk-Away Door Lock feature
is turned on, as described in Walk-Away Door
Lock on page 17).
Before you can use a phone to access Model
3, follow these steps to authenticate it:
1. Download the Tesla mobile app to your
phone.
2. Log into the Tesla mobile app using your
Tesla Account user name and password.
NOTE: You must remain logged in to your
Tesla Account to use your phone to access
Model 3.
3. Ensure that your phone's Bluetooth
settings are turned on.
You must have your phone's Bluetooth
setting turned on AND you must also
ensure that Bluetooth is turned on within
your phone's global settings for the Tesla
mobile app. For example, on your phone,
navigate to Settings, choose the Tesla
mobile app, and ensure the Bluetooth
setting is enabled.
NOTE: Model 3 communicates with your
phone using Bluetooth. To authenticate
your phone or use it as a key, the phone
must be powered on and Bluetooth must
be enabled. Keep in mind that your phone
must have enough battery power to run
Bluetooth and that many phones disable
Bluetooth when the battery is low.
4. Ensure that Allow Mobile Access
(Controls > Safety & Security > Allow
Mobile Access) is enabled.
5. In the Tesla mobile app, touch PHONE
KEY then touch START to search for your
Model 3.
When your Model 3 is detected, the mobile
app asks you to tap your key card.
6. Tap the key card against the Model 3
card reader on the door pillar or center
console (see Key Card on page 12).
When Model 3 detects your key card, the
mobile app confirms that your phone has
been successfully authenticated. Touch
DONE.
If the key card is not successfully scanned
within approximately two minutes, the mobile
app displays an error message. Touch PHONE
KEY on the app again to retry.
To view a list of keys that can currently access
Model 3, or to remove a phone, touch
Controls > Locks (see Managing Keys on
page 14).
Keys
11Opening and Closing

NOTE: Authenticating your phone allows you
to use it as a key to access Model 3. To use
the phone hands-free, access your phone's
contacts, play media from it, etc., you must
also pair and connect to it using the
Bluetooth settings (see Phone on page 171).
NOTE: Model 3 can connect to three phones
simultaneously. Therefore, if more than one
phone is detected and you want to use, or
authenticate, a dierent phone, move the
other connected phone(s) out of range or
turn o its Bluetooth setting.
NOTE: Unlike the mobile app, once a phone
has been authenticated, it no longer requires
an internet connection to communicate with
Model 3. Authenticated phones communicate
with Model 3 using Bluetooth.
NOTE: Although Bluetooth typically
communicates over distances of up to
approximately 9 meters, performance can
vary based on the phone you are using,
environmental interference, etc.
NOTE: If multiple vehicles are linked to the
Tesla Account, you must switch the mobile
app to the vehicle that you want to access
before you can use the phone as a key.
Key Card
Tesla provides you with two Model 3 key
cards, designed to fit in your wallet. Tap your
Model 3 key card on one of its card readers,
located on the driver's side door pillar and on
the center console.
To use a key card to unlock or lock Model 3,
position the card as shown and tap it against
the card reader located just below the
Autopilot camera on the driver's side door
pillar. When Model 3 detects the key card, the
exterior lights flash, the mirrors unfold or fold
(if Fold Mirrors is on), the horn sounds (if
Lock Sound Confirmation is on), and the
doors unlock or lock.
NOTE: You may need to physically touch the
center console or driver's side door pillar with
the key card, and you may need to hold it
against the transmitter for one or two
seconds.
Once inside, power up Model 3 by pressing
the brake pedal within two minute of
scanning the key card (see Starting and
Powering O on page 64). If you wait
longer than two minutes, you must re-
authenticate by placing the key card near the
card reader located behind the cup holders
on the center console. When your key card is
detected, your two minute authentication
period restarts.
NOTE: Walk-Away Door Lock operates only
when using an authenticated phone or
passive key fob. When you walk away from
Model 3 carrying your key card, Model 3 does
not automatically unlock/lock, even if this
feature is turned on (see Walk-Away Door
Lock on page 17).
CAUTION: Always carry your key card
with you in your purse or wallet to use
as a backup in case your
authenticated phone has a dead
battery, or is lost or stolen.
Keys
12 MODEL 3 OWNER'S MANUAL

Key fob
If you have purchased the key fob accessory
(available for purchase from Tesla stores or
online at http://www.tesla.com/shop), you
can quickly familiarize yourself with this key
by thinking of it as a miniature version of
Model 3, with the Tesla badge representing
the front. The key has three buttons that feel
like softer areas on the surface.
1. Front trunk - Double-click to open the
front trunk.
2. Lock/Unlock All - Single-click to lock
doors and trunks (all doors and trunks must
be closed). Double-click to unlock doors
and trunks.
3. Rear trunk - Double-click to open the
rear trunk. Hold down for one to two
seconds to open the charge port door.
Once inside, power up Model 3 by pressing
the brake pedal within two minutes of
pressing the unlock button on the key fob
(see Starting and Powering O on page 64).
If you wait longer than two minutes, you must
press the unlock button again, or place the
key fob near the card reader located behind
the cup holders on the center console. When
your key fob is detected, the two minute
authentication period restarts.
When approaching or leaving Model 3
carrying the key fob, you do not need to point
the key fob at Model 3 as you press a button,
but you must be within operating range.
Radio equipment on a similar frequency can
aect the key. If this happens, move the key
at least 30 cm away from other electronic
devices (phone, laptop, etc.).
If the key fob does not work (for example, its
battery is dead), you can touch its flat side
against the card reader on the driver's side
door pillar (like the key card). Instructions for
changing the battery are provided in
Replacing the Key Fob Battery on page 14.
NOTE: You can use the same key fob with
multiple Model 3 vehicles provided you
authenticate it (see Managing Keys on page
14). However, key fob works with only one
Model 3 at a time. Therefore, to use a key fob
for a dierent Model 3, touch its flat side
against the card reader on the driver's side
door pillar.
NOTE: Model 3 supports up to four dierent
key fobs.
CAUTION: Protect the key from
impact, high temperatures, and
damage from liquids. Avoid contact
with solvents, waxes and abrasive
cleaners.
Passive Key Fob
Due market region or vehicle configuration,
Passive Key Fob may not be available for your
vehicle.
Locking and unlocking Model 3 with your key
fob is conveniently hands-free. Although you
must be carrying a paired key fob, there is no
need to use it. Model 3 has sensors around
the vehicle that can recognize the presence of
a key fob within a range of approximately one
meter. Therefore, you can keep your key fob
in your pocket or purse and simply pull on the
door handle to unlock. When carrying your
key fob with you, you can also open the trunk
without having to use the key by pressing the
trunk's exterior door handle. If Walk-Away
Lock is on, your vehicle automatically locks
when you exit and senses that the key fob is
no longer in range (see Walk-Away Door Lock
on page 17). Passive key fob is
automatically enabled when you pair your key
fob to your vehicle.
The key fob can only be paired to one vehicle
at a time. If you want your key fob to
passively lock and unlock for a dierent
vehicle, touch the flat side of the key fob onto
the driver's side door pillar or center console
Keys
13Opening and Closing

card reader. You only need to do this once to
pair it to your desired vehicle. You must pair
your key fob every time you use it with a
dierent vehicle.
NOTE: Only key fobs with the TESLA logo
printed on the flat side have the passive
locking and unlocking functionality. Key fobs
with the MODEL 3 logo printed on the flat
side cannot passively lock and unlock your
vehicle.
NOTE: For increased security, your key fob
disables itself after five minutes of being
stationary while in range but the vehicle is not
in use. The vehicle will not lock or unlock
passively when this occurs. Shake or press a
button on your key fob to wake it up.
Replacing the Key Fob Battery
Under normal use, the accessory key fob
(available at https://shop.tesla.com) has a
battery that lasts for up to five years,
depending on key fob version and selected
vehicle settings. When the battery is low, a
message displays on the touchscreen.
To replace the key fob battery:
1. With the key fob placed button side
down on a soft surface, release the bottom
cover.
2. Remove the battery by lifting it away
from the retaining clips.
3. While avoiding touching the battery's flat
surfaces, insert the new battery (type
CR2032) with the ‘+’ side facing up.
NOTE: CR2032 batteries can be purchased
through online retailers, local supermarkets,
and drug stores.
4. Holding the bottom cover at an angle,
align the tabs on the cover with the
corresponding slots on the key fob, then
press the cover firmly onto the key fob until
it snaps into place.
5. Test that the key fob works by unlocking
and locking your vehicle.
Attaching a Lanyard
To attach a lanyard, release the bottom cover
as described above. Place the lanyard over
the pin located between the slots on the
widest side of the key fob. Re-align the cover
and snap into place.
Managing Keys
To display a list of all keys (phones, key cards,
and key fobs) that can access your Model 3,
touch Controls > Locks. An icon displays next
to each key to indicate whether the key is a
phone, key card, or key fob. Use this list to
manage keys that have access to your vehicle.
To add or delete keys, see Adding and
Removing Keys on page 15.
Keys
14 MODEL 3 OWNER'S MANUAL

NOTE: You can use the same key for more
than one Model 3. This prevents you from
having to deal with multiple keys when you
switch vehicles. If you customize the name of
an authenticated key card or key fob on one
Model 3 (by touching the pencil icon), any
other Model 3 to which the key card or key
fob is authenticated also displays the same
customized name.
NOTE: Model 3 supports up to 19 keys. When
you reach this limit, you must delete a key
before adding a new one.
Adding and Removing Keys
Adding a new key card or key fob:
NOTE: If adding a key fob, ensure the key fob
is at room temperature. Pairing may be
unsuccessful if the key fob is cold.
1. On the touchscreen, touch Controls >
Locks then touch +in the Keys section.
2. Scan your new key card or key fob on the
key reader behind the cup holders on the
top of the center console. After the new
key card or key fob is recognized, remove it
from the key reader.
3. Scan an already-authenticated (i.e.
already has access to the vehicle) key card
or key fob on the key reader behind the
cup holders on the top of the center
console.
4. When complete, the key list on the
touchscreen displays the newly-
authenticated key. You can customize its
name by touching the associated pencil
icon.
Adding a new phone key:
NOTE: To add a new phone key, Bluetooth
must be enabled and the phone must have
the Tesla mobile app installed and connected
to the vehicle’s Tesla account.
1. While sitting in the vehicle, open the Tesla
mobile app and select the appropriate
vehicle (if there are multiple vehicles
associated with the account), then touch
Phone Key > Start.
2. Scan an already-authenticated key card
or key fob on the key reader behind the
cup holders on the top of the center
console.
3. When the mobile app notifies you that
the pairing was successful, touch Done. The
key list on the touchscreen (Controls >
Locks) displays the new phone key. The
name of the phone key is determined by
the name used in the phone’s settings.
Removing a key:
When you no longer want a key to access
your vehicle (for example, you lost your
phone or key card, etc.), you can remove the
key.
1. On the touchscreen, touch Controls >
Locks.
2. Find the key that you would like to delete
in the key list, then touch the key’s
associated trash icon.
3. When prompted, scan an already-
authenticated key card or key fob on the
key reader behind the cup holders on the
top of the center console to confirm the
deletion. When complete, the key list no
longer includes the deleted key.
NOTE: Your vehicle requires at least one
authenticated key card or key fob at all times.
If only one key card is included on the key list,
this key cannot be deleted.
Keys
15Opening and Closing

Keyless Locking and
Unlocking
Locking and unlocking Model 3 is easy and
convenient. Just carry your authenticated
phone or paired key fob with you. Model 3
recognizes the presence of an authenticated
phone or paired key fob and automatically
unlocks when you press a door handle, and
locks when you leave (see Walk-Away Door
Lock on page 17).
NOTE: If you don't have your authenticated
phone or paired key fob with you (or if the
phone's battery is dead or its Bluetooth
setting is turned o), place the key card
against the driver's side door pillar to
manually unlock or lock Model 3 (see Keys on
page 11).
NOTE: Due to market region or vehicle
configuration, an authenticated phone or
Passive Key Fob may not be available for your
vehicle.
NOTE: Your key fob (https://shop.tesla.com)
also allows you to press buttons to lock and
unlock Model 3.
NOTE: Walk-Away Door Lock operates only
when using an authenticated phone or paired
key fob. When you walk away from Model 3
carrying a key card or unpaired key fob
accessory, Model 3 does not automatically
unlock/lock, even if this feature is turned on
(see Walk-Away Door Lock on page 17).
NOTE: Accessory key fobs manufactured
before approximately October, 2019 are not
equipped with passive functionality.
Using Exterior Door
Handles
Use your thumb to push the wide part of the
door handle. The handle pivots toward you,
and you can open the door by pulling the
handle or pulling the edge of the door.
The handle retracts automatically.
When a door or trunk is
open, the touchscreen
displays the Door Open
indicator light.
NOTE: See Cold Weather Best Practices on
page 104 to ensure the vehicle's door
handles function properly in cold weather.
Opening Doors from the
Interior
Model 3 doors are electrically powered. To
open a door while sitting inside, press the
button located at the top of the interior door
handle and push the door open.
Doors
16 MODEL 3 OWNER'S MANUAL

NOTE: To prevent children from opening the
rear doors, turn on child-protection locks (see
Child-Protection Lock on page 18).
In the unlikely situation that Model 3 has no
power, these electrically powered buttons at
the top of the door handles no longer work.
Instead, pull up the manual door release
located in front of the window switches on
the front doors.
NOTE: Only the front doors are equipped
with a manual door release.
CAUTION: Manual door releases are
designed to be used only in situations
when Model 3 has no power.
Whenever Model 3 has power, use the
button located at the top of the
interior door handle.
Interior Locking and
Unlocking
While sitting inside Model 3, you can lock and
unlock all doors and trunks by touching the
lock icon on the touchscreen.
The icon changes to
indicate whether doors
are locked or unlocked.
You can also unlock the doors by pressing the
Park button on the end of the gear selector a
second time. Pressing this button once
engages the Park gear and pressing it again
unlocks the doors.
Walk-Away Door Lock
Doors and trunks can automatically lock
whenever you walk away carrying your
authenticated phone or paired key fob (if
ordered after approximately October 1, 2019).
To turn this feature on or o, touch Controls >
Locks > Walk-Away Door Lock.
When the doors lock, the exterior lights flash
once and the mirrors fold (if Fold Mirrors is
on). To also hear a confirmation sound
whenever Model 3 locks, touch Controls >
Locks > Lock Confirmation Sound > ON.
Model 3 does not automatically lock if:
• An authenticated phone or paired key fob
is detected inside Model 3.
• You are not using an authenticated phone
or paired key fob as the key, and walk away
carrying the key card or unpaired key fob
(see Passive Key Fob on page 13). When
using the key card you must manually lock
Model 3 by tapping the key card against
the door pillar. When using an unpaired key
fob (sold as an accessory), you must
manually lock Model 3 by pressing the lock
button. See Keys on page 11.
• A door or trunk is not fully closed.
NOTE: If all doors are closed and Model 3 was
automatically unlocked by your authenticated
phone or paired key fob, walk-away locking is
temporarily suspended for one minute. If you
open a door within this minute, it will not re-
lock until all the doors are closed and you
have walked away with the authenticated
phone or paired key fob.
NOTE: If Model 3 detects an authenticated
key for five minutes after you exit the vehicle
and close all doors, Walk-Away Lock disables
and will not lock when you leave with the key.
You will need to manually lock your vehicle
until after your next drive.
Doors
17Opening and Closing

Drive Away Locking
Model 3 automatically locks all doors
(including the trunks) whenever your driving
speed exceeds 8 km/h.
Child-Protection Lock
Model 3 has child-protection locks on the rear
doors to prevent them from being opened
using the interior release buttons. On the
touchscreen, touch Controls > Locks > Child
Lock.
NOTE: It is recommended that you turn child-
protection locks on whenever children are
seated in the rear seats.
Unlock on Park
When you stop Model 3 and engage the Park
gear, you can choose to unlock all doors. To
turn this feature on or o, touch Controls >
Locks > Unlock on Park.
NOTE: If set to OFF, you can unlock all doors
by pressing the Park button a second time
after engaging the Park gear.
Doors
18 MODEL 3 OWNER'S MANUAL
Other manuals for MODEL 3 2020
1
Table of contents
Other Tesla Automobile manuals

Tesla
Tesla Roadster 2 User manual

Tesla
Tesla S 2012 User manual

Tesla
Tesla MODEL X 2015 User manual

Tesla
Tesla MODEL S User manual

Tesla
Tesla Feature 3 User manual

Tesla
Tesla MODEL S User manual

Tesla
Tesla MODEL 3 2012 User manual

Tesla
Tesla MODEL Y User manual

Tesla
Tesla MODEL S User manual

Tesla
Tesla MODEL S User manual

Tesla
Tesla MODEL S User manual

Tesla
Tesla MODEL S User manual

Tesla
Tesla Model 3 User manual

Tesla
Tesla MODEL Y 2022 User manual

Tesla
Tesla 3 2018 User manual

Tesla
Tesla MODEL S User manual

Tesla
Tesla MODEL S User manual

Tesla
Tesla MODEL S User manual

Tesla
Tesla 2012- 21013 S User manual

Tesla
Tesla MODEL S User manual