Tesland Powerlift User manual

1
Instructions for the Powerlift for the trunk for the Model 3
Thank you for purchasing our Powerlift for the trunk for Tesla Model 3. We hope that you are satisfied with
the product!
Please read these instructions before installing the product.
If you have any doubt doing this after reading these instructions, we recommend that you have the
Powerlift for the trunk for Tesla Model 3 installed by a local professional. If you need to contact us, please
use the information on our website, www.tesland.com
Precautions and general notes.
All rights reserved. No parts of this manual may be reproduced in any form without the express written
permission of Tesland.com.
Tesland.com makes no representations or warranties with respect to the contents hereof. In addition,
information contained herein are subject to change without notice. Every precaution has been taken in the
preparation of this manual. Nevertheless, Tesland.com assumes no responsibility for errors or omissions or
any damages resulting from the use of the information contained in this publication.
Tesland.com does not take any responsibilities if during the installations anything goes wrong. Sometimes
some clips may break, they can be easily purchased and replaced.
Tesland.com can never be held responsible for replacement of any parts which will break during the
installation, even when following these guidelines.
To use these instructions, we recommend that you will have a look online at www.tesland.com. There you
will find these instructions with many pictures and in the near future a video of the installation as well.
Please watch these thoroughly, this helps a lot when installing the Powerlift for the trunk for Tesla Model
3.
NOTE: Installation Precaution
1. It is recommended to have this product installed by a professional to avoid damage caused by improper
installation.
2. Do not attempt to disassemble or modify any components included within the kit. Unapproved
modifications or evidence of tampering will void any warranty included with the product.
3. Before installation, inspect the vehicle's controls and interior/exterior for any damage or malfunctioning
components. Report any damage or non-conformities to the customer prior to installing the product.
4. Inspect the factory liftgate for proper operation and function of lights before installing this product.
Improper opening or closing of the liftgate may interfere with the functionality of the Power Liftgate
System.
5. It is recommended to remove or cover any item of clothing (belt buckles, jeans rivets, buttons, etc.) prior
to installation of this accessory to prevent damage incurred to the vehicle during the installation.
6. Interior panels that have been removed should be set aside somewhere safe during the installation
process to avoid damage.

2
7. When routing and securing wiring harnesses, care should be exercised to avoid any hot, sharp, or
moving objects in the vehicle such as steering column, pedals, dash bracing, HVAC components, etc.
8. Do not deviate from methods of installation in this document. Any damage caused by improper wire
routing, incorrect connections, wiring, etc. is not covered under the warranty.
9. After installation, you must manually set the liftgate to the highest position and press the trunk button
for 5 seconds until you hear a beep sound to initialize the system
Operation of the buttons
Tesla App
Key Fob
(if purchased)
Trunk Button
Added Driver Seat Button
Touch Screen
Open
Yes
Yes
Not Applicable
Yes
Yes
Close
Yes
Yes
Yes
Yes
No (greyed out)
Height Setting
To set the height, set the tailgate manual to your desired height. Press and hold the new trunk button for
about 5 seconds, until you hear a beep (Make sure the buzzer is connected). This is now the new height to
which the tailgate will open
Adjust the opening and closing speed
When the liftgate is in open state, press and hold the added button. Keep on holding the button after you
hear the first beep sound. You will eventually hear two long beeps (speed 2), three long beeps (speed 3),
four long beeps (speed 4), up to six long beeps (speed 6). Release the button after you hear the speed you
want to set. The slowest speed is speed 2 and the highest speed is speed 6. The factory default is at speed
4.
3 Packing List
#
Part
Qty
1
Motorized catch hook
1
2
Replacement Strut (left)
1
3
Replacement Strut (right)
1
4
Drill bit for switch
1
5
3M tape
4
6
Tie wrap
10
7
Computer
1
8
CAN Wires
1
9
Power Cable
1
10
Liftgate wiring harness
1
11
Trunk Control Button (Driver Seat) harness
1
12
Latch harness
1
13
Liftgate Control Splitter
1

3
14
25A Fuse Power Plug
1
15
Buzzer
1
16
Trunk Open/Close Button (driver seat)
1
17
Trunk Close Button (trunk)
1
Included Parts
Wiring Details

4
Tools needed for the installation
Removal of necessary trim pieces
Open the tailgate and remove the tailgate trim panel. It is sufficient to just open the right side, but
removing the whole trim panel will make work easier. If any clips break, get some new ones.
Here you see the removed trim piece with all the clips reinstalled.

5
Remove the trim pieces on the top and lower part of the inside of the trunk. For the top piece you first
need to remove 2 clips. To remove these clips, you need to pop the inner part with a screwdriver, then you
can remove them by hand.
The lower part can just be pulled up. Than pull the carpet on the left and right sides inboard, and remove
the cable from the trunk flood lights.

6
Open the rubber tube which is going from the right side of the trunk, to the liftgate on the bottom and
top.
Also open the tie wraps which is holding the rubber tube in place. You can open these tie wraps with a
very small screwdriver. In this way they can be used again. If they break just cut them off and install
new tie wraps after the installation of the power lift.

7
Open the frunk and remove the cover. Also remove the air inlet. This one is hold in place by 4 plastic
clips.
Remove the left doorsill. To do this you first must remove the cover which is on the left side of the
dashboard, then the cover which is between the doorsill and A-pillar. (in this piece of plastic you can
install the extra switch)

8
After you removed these panels you can see a clip, from which you need to pop the center first. Than
you can pull the doorsill out.
Remove the 2 taillights. On the inside release the connector from the taillight. Release the plastic screw
on top of the taillight and two 8mm nuts on the inside. The outside of the taillight has 2 clips, so you
need to pull the taillight aft to release those.

9
Installation and running the wiring harnesses.
The computer (part 7) will be placed in the right part of the trunk behind the carpet and below the
woofer (if installed). So, all the wiring must go to this area.
Power cable.
Open the 10 mm screw on the + of the battery. Be careful not to touch any metal parts with the tools,
since this will give a shortcut. Insert here the fuse holder (part 14) and fasten the screw again. It is
recommended to remove the fuse from the holder and replace it until the full installation is complete.
From the right foot well pull the carpet down. There you will see a rubber grommet with 2 orange (high
voltage) cables.
In this grommet, with a sharp small knife, make an incision. BE VERY CAREFULL NOT TO TOUCH THE
HIGH VOLTAGE WIRING.
Use a piece of sturdy electrical wire to pull the + of the power cable (part 9) through this hole, so it
enters the frunk area. Use this wire to pull the + connector of the power cable through. Connect the
connector in the plug of the fuse holder.

10
From the right foot well, hide the cable behind the trim panels, in order to reach the right side of the
trunk. A good place to hide the cable is tugging it under the right door sills.
From the back seat remove the side pillow. It can be pulled forward and up to remove it. From here
you can see more wiring going to the trunk area. Bring the purple connector of the power cable to the
right-aft side of the trunk.
On this power cable there is a ground connection. Connect this to the 10 mm bolt behind the right tail
light.
Can bus wiring.
From the left footwell, find the most forward plug and search for the blue and purple wire, which are
above each other. (check if this is still valid for your car, because Tesla tends to update there wiring)

11
Take the can bus wire (part 8), with the 2 wiretaps already installed, and connect them. The red-white
(H) wire must be connected to the blue wire. And the red-yellow (L) wire must be connected to the
purple wire.
Now route this cable under the left doorsills to the rear. In this wire there is a yellow wire sticking out.
This one is not used. It is easy to remove the left pillow of the backseat to reach the trunk area. Then
also route this cable to the right side of the trunk area.
If you want to install the extra button to close the trunk from the driver area, run the wire (part 11)
along the same routing to the trunk area.
Installations of the liftgate harness.
Now the fun begins. We need to run cables from the trunk area, via the rubber tube to the liftgate.
The best way is to use your sturdy electrical wire and bent it . The bent must be pushed from the top all
the way through the rubber tube to the trunk. Use soapy water to help guiding the wire.

12
When you managed to get the wire in the trunk area, get these 2 cables from the liftgate wiring
harness (part 10)
Tape all wires well together so the package is as thin as possible. In this case there is less chance of
damaging wires and connectors. Now pull, with the electrical wire, the harness through the tube, to
the liftgate. Use soapy water and someone to help you guide the cable. Be careful that the harness
does not grab any wires in the tubing, since this will damage the existing wiring of the car. Once you
succeeded to get the harness in the liftgate, you did the most challenging part. Congratulations!
In the liftgate reinstall the wires from the harness in the plugs again.
Use this picture as a reference for the colors. It is important not to mix up the colors. Once the wire
connectors clicked in place, reinstall the yellow and white locking pieces on the plugs.

13
Disconnect the existing connector from the liftgate latch and connect the Y-connectors to the lock
control. Connect the Y-Connectors to the new harness.
The purple lead from the new harness will be connected with a wiretap to the green wire of the
existing switch to open the trunk.
or
The lower side of the liftgate wiring harness must also be led to the right trunk area.

14
Installation of the new electric struts
To install the new struts, it is best to do it with 2 people, one for holding the liftgate and another to
remove the old and reinstall the new struts. It is also good to remove both the old struts before
installing new struts, since the length is a little difference. To remove the struts, use a screwdriver to
release the clips. Than the struts cab be removed from the ball joints.
The news struts can be clicked in place easily, without releasing the clips. Be careful to mount the struts
with the cables on the bottom, and the strut with the long cable left, and with the short cable on the
right.
To route the cables into the car, it is best to drill holes behind the taillights. The hole should be 18 to 20
millimeters. The best position is on the inside of the hole for the connector of the taillight and in
between the 2 screws. After drilling the hole, use some paint or other rust protection material to
protect the cut edge of the metal to prevent rusting. Use the rubber grommet to make the hole
watertight.
Then lead these wires to the right trunk area.

15
Replacing the catch hook to the electric catch hook
With a torx 45 bit release the existing hook and replace it by the motorized version (part 1). Put the new
hook in the middle position, it must be adjusted later.
In the bracket where you installed the ground wire, drill a 3 mm hole. This is a good place to install the
motor of the motorized catching hook with 1 screw.

16
The cable between the motor and catching hook must be put behind the carpet. Release 2 clips to do so.
Installation of buttons
Drill a hole in the indicated spot (marked in red) to install the trunk close button. Use the drill bit. Connect
the button and reinstall the trim panel.
If you use the extra button near the driver, we recommend this position

17
Now all the wires can be plugged in the computer. Also, the buzzer must be plugged in. After this is done
be sure there is nothing which can obstruct the closing of the trunk. Also plug in the closing button in the
liftgate and the one in the driver area (if used). Just put the computer in the trunk with all wiring away
so it can become stucked.
Now install the fuse in the frunk. You should hear a beep, and on the computer, there will be a red
flashing led. This is normal. Press the close button, the trunk should close. Open the trunk again. Adjust
the catching hook if needed. Try all functions, display, app, buttons and key fob (if you have this). When
everything works fine, it is time to clean things up; take care that all wiring is tucked away neatly, in such
a way that it can’t get damaged over time. Take car of sharp edges. The computer can be placed using
the pieces of 3M tape behind the righthand taillight on the bottom. Be careful it doesn’t rattle. Use tie
wraps to clean things up. Reinstall all the parts from the car which you removed.

18
Installation of foot sensor:
To install the footsensor the bumper needs to be removed.
To do this behind the rear wheels on both sides removed 3 clips.
Than under the car remove ten 10mm bolts (2 behind flaps). Here are pictured the 5 on 1 side.
Two 10mm bolts which are located under the tail lights they need to be removed. Also on the forward
side on the inside of the bumper there is a small torx screw hidden behind the trim. Remove these two
as well. Then remove the bumper with 2 people. Start with pulling the forward sides outward.

19
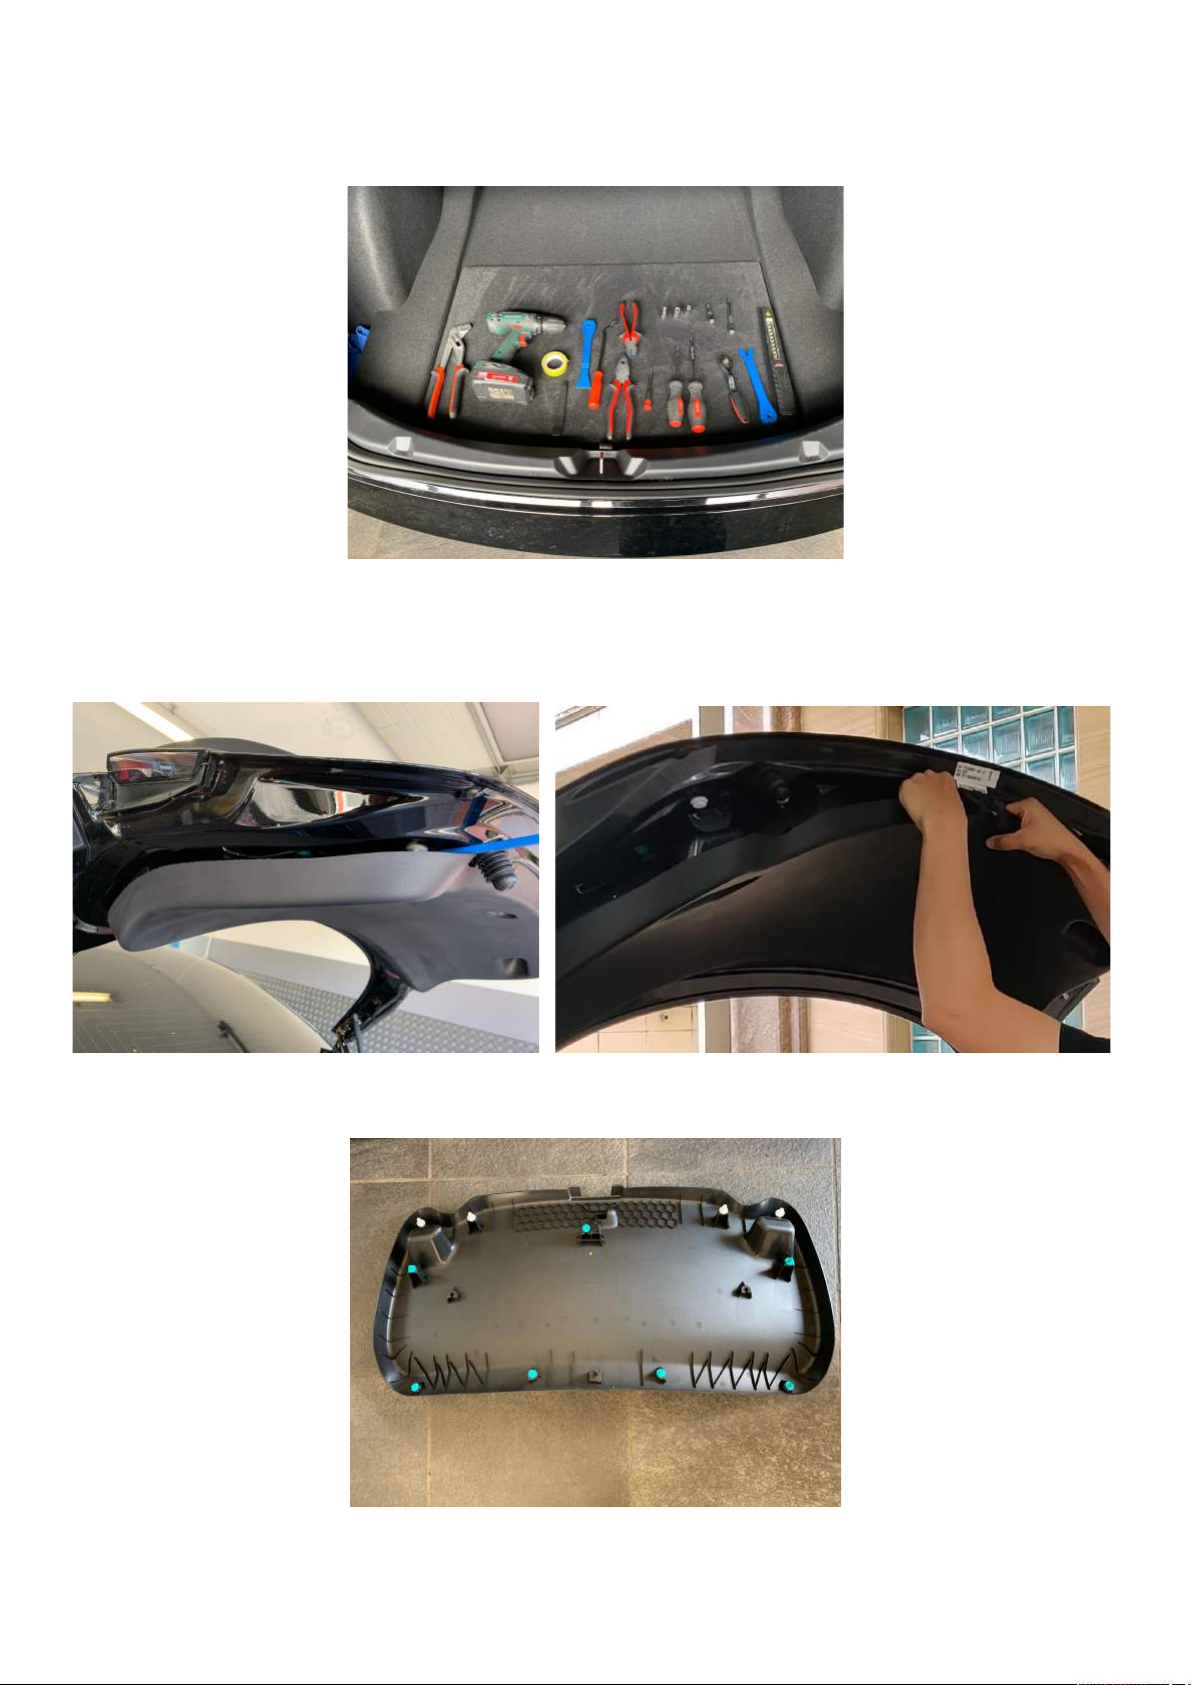
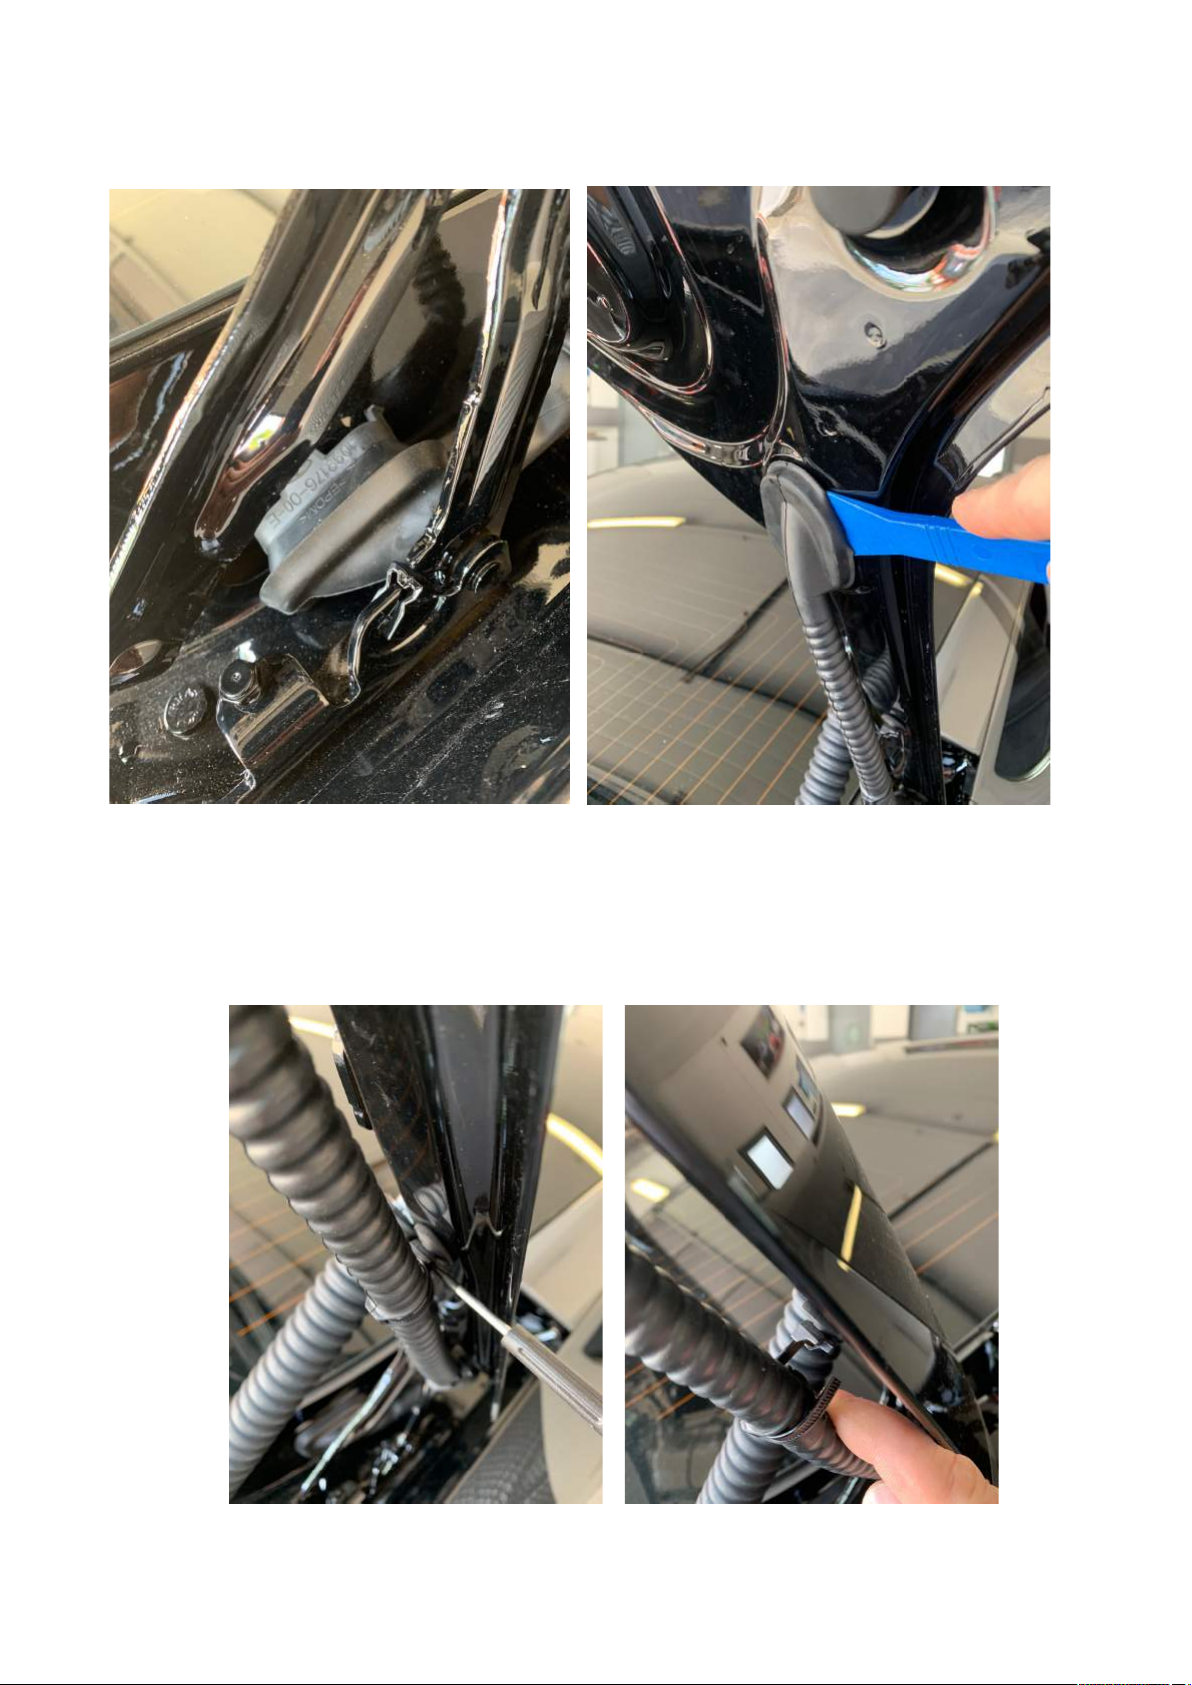
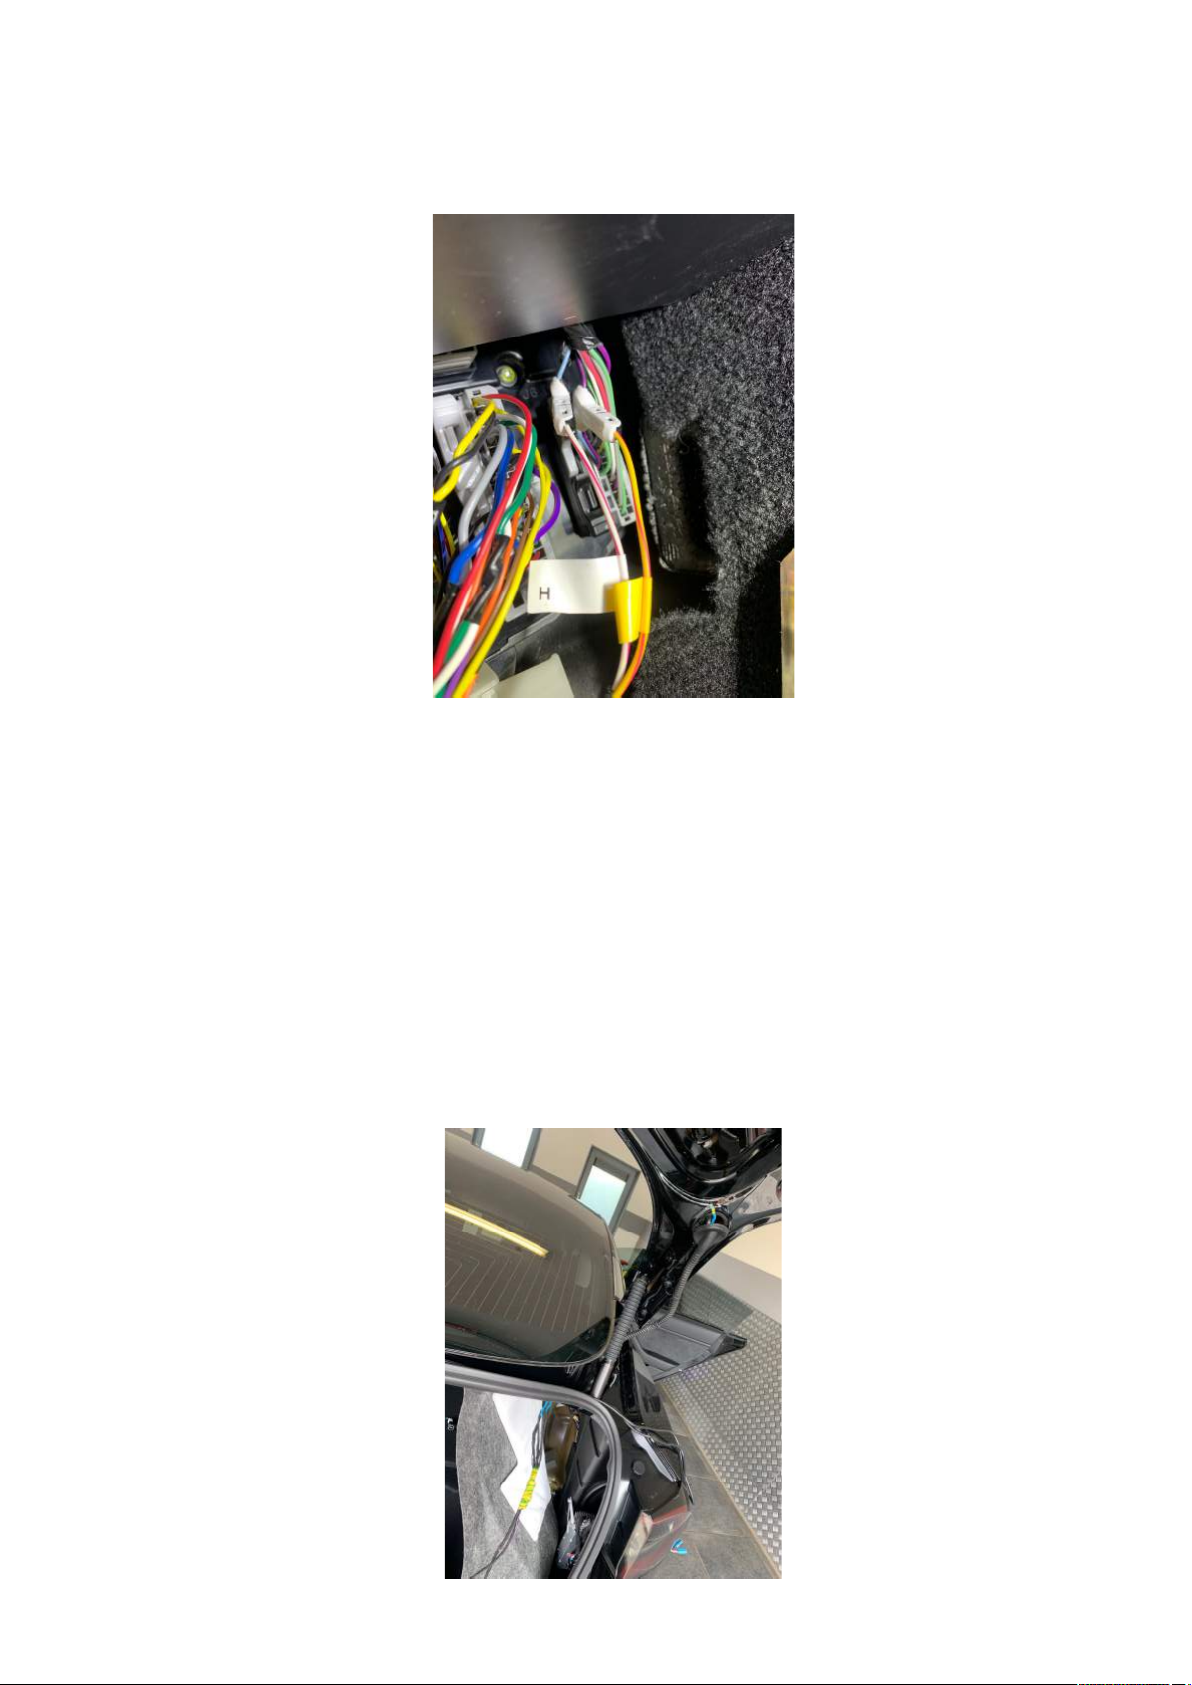
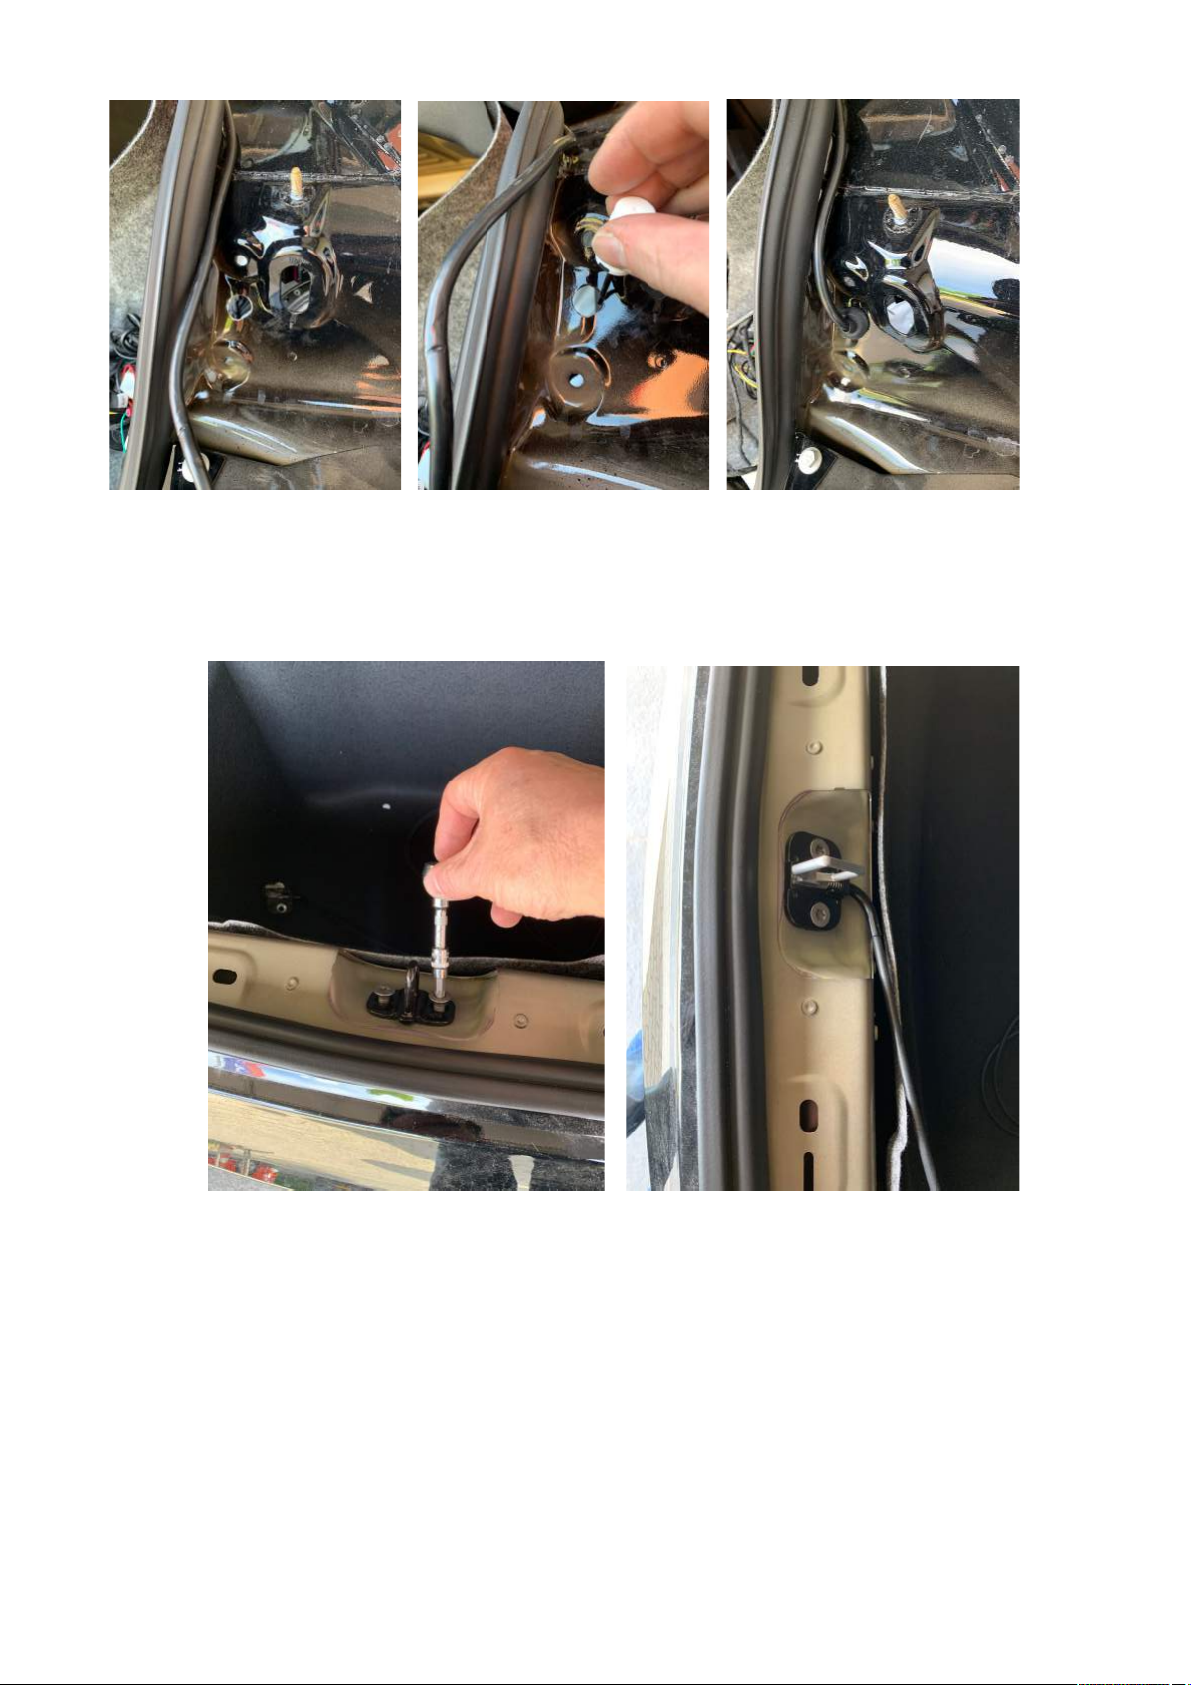
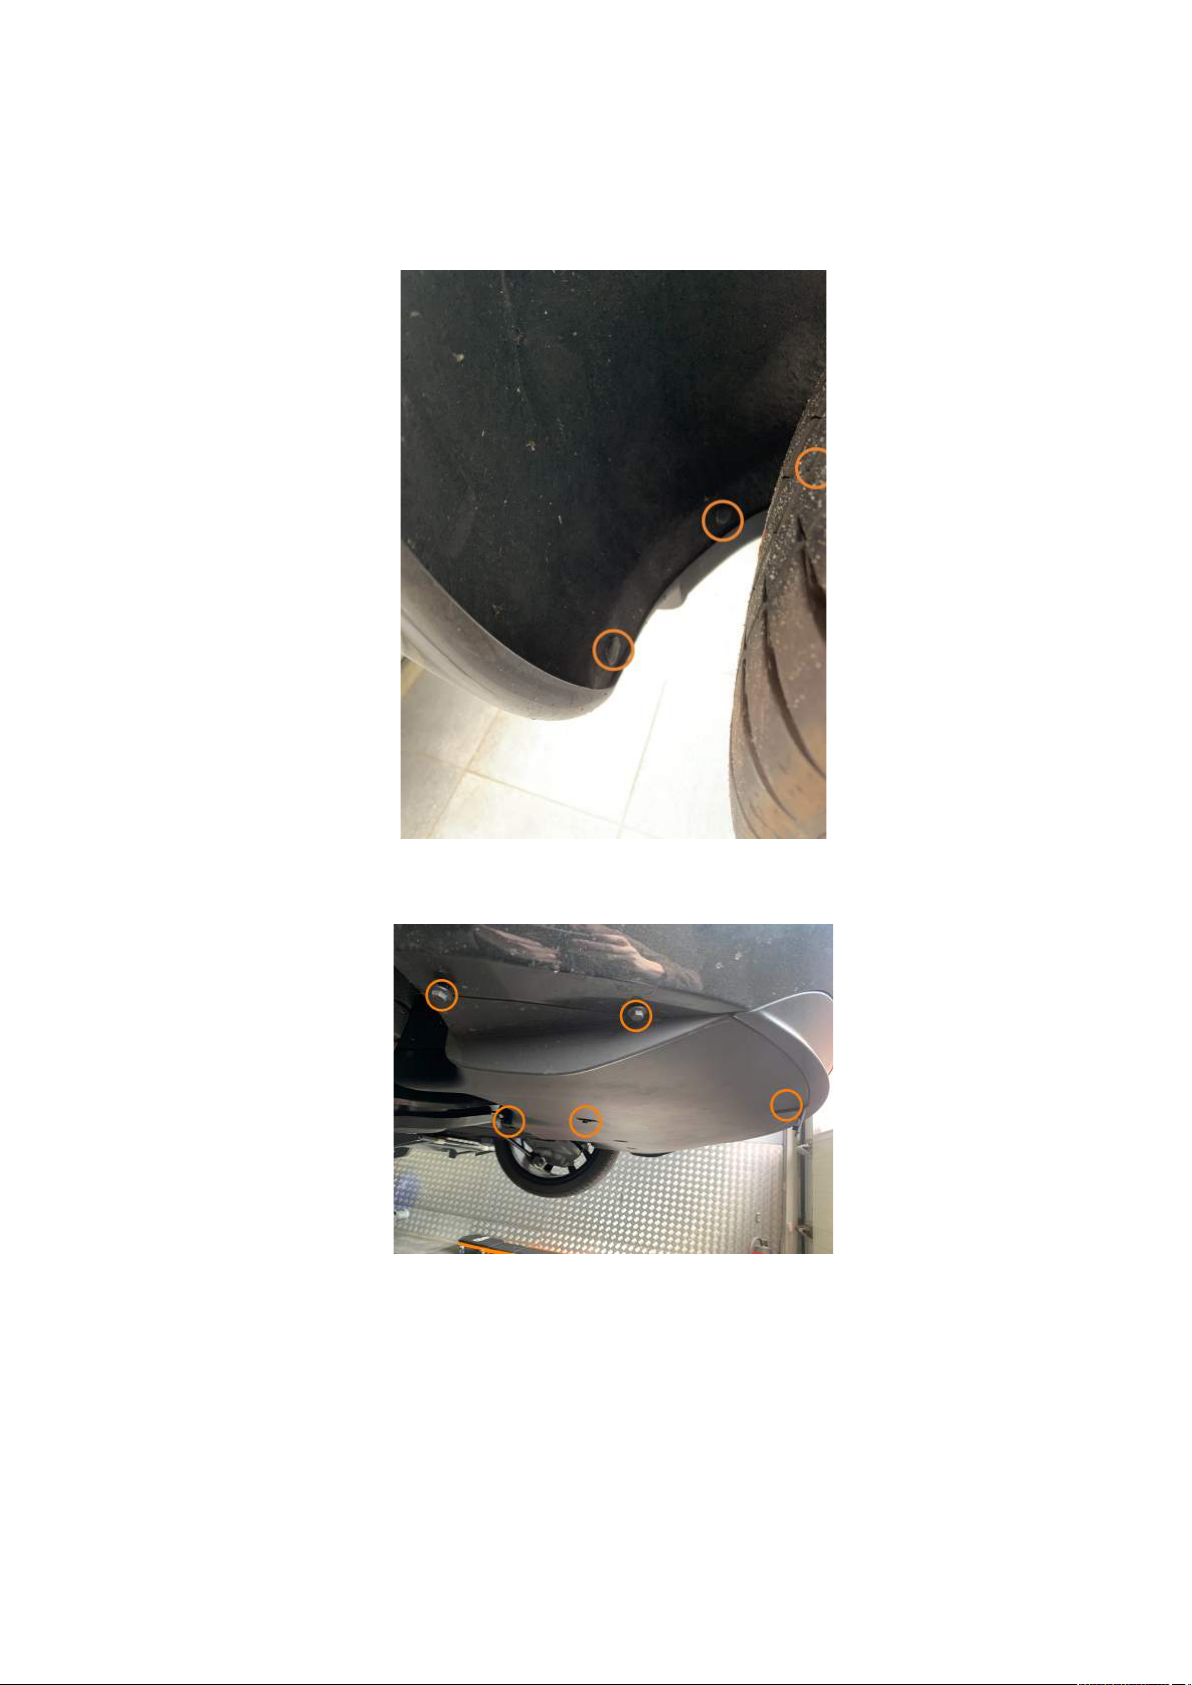
The bumper is hold in position with clips. When lowering the bumper you will see a plug for the bumper
sensor. If you will not pull the bumper away from the car, leave this one in.
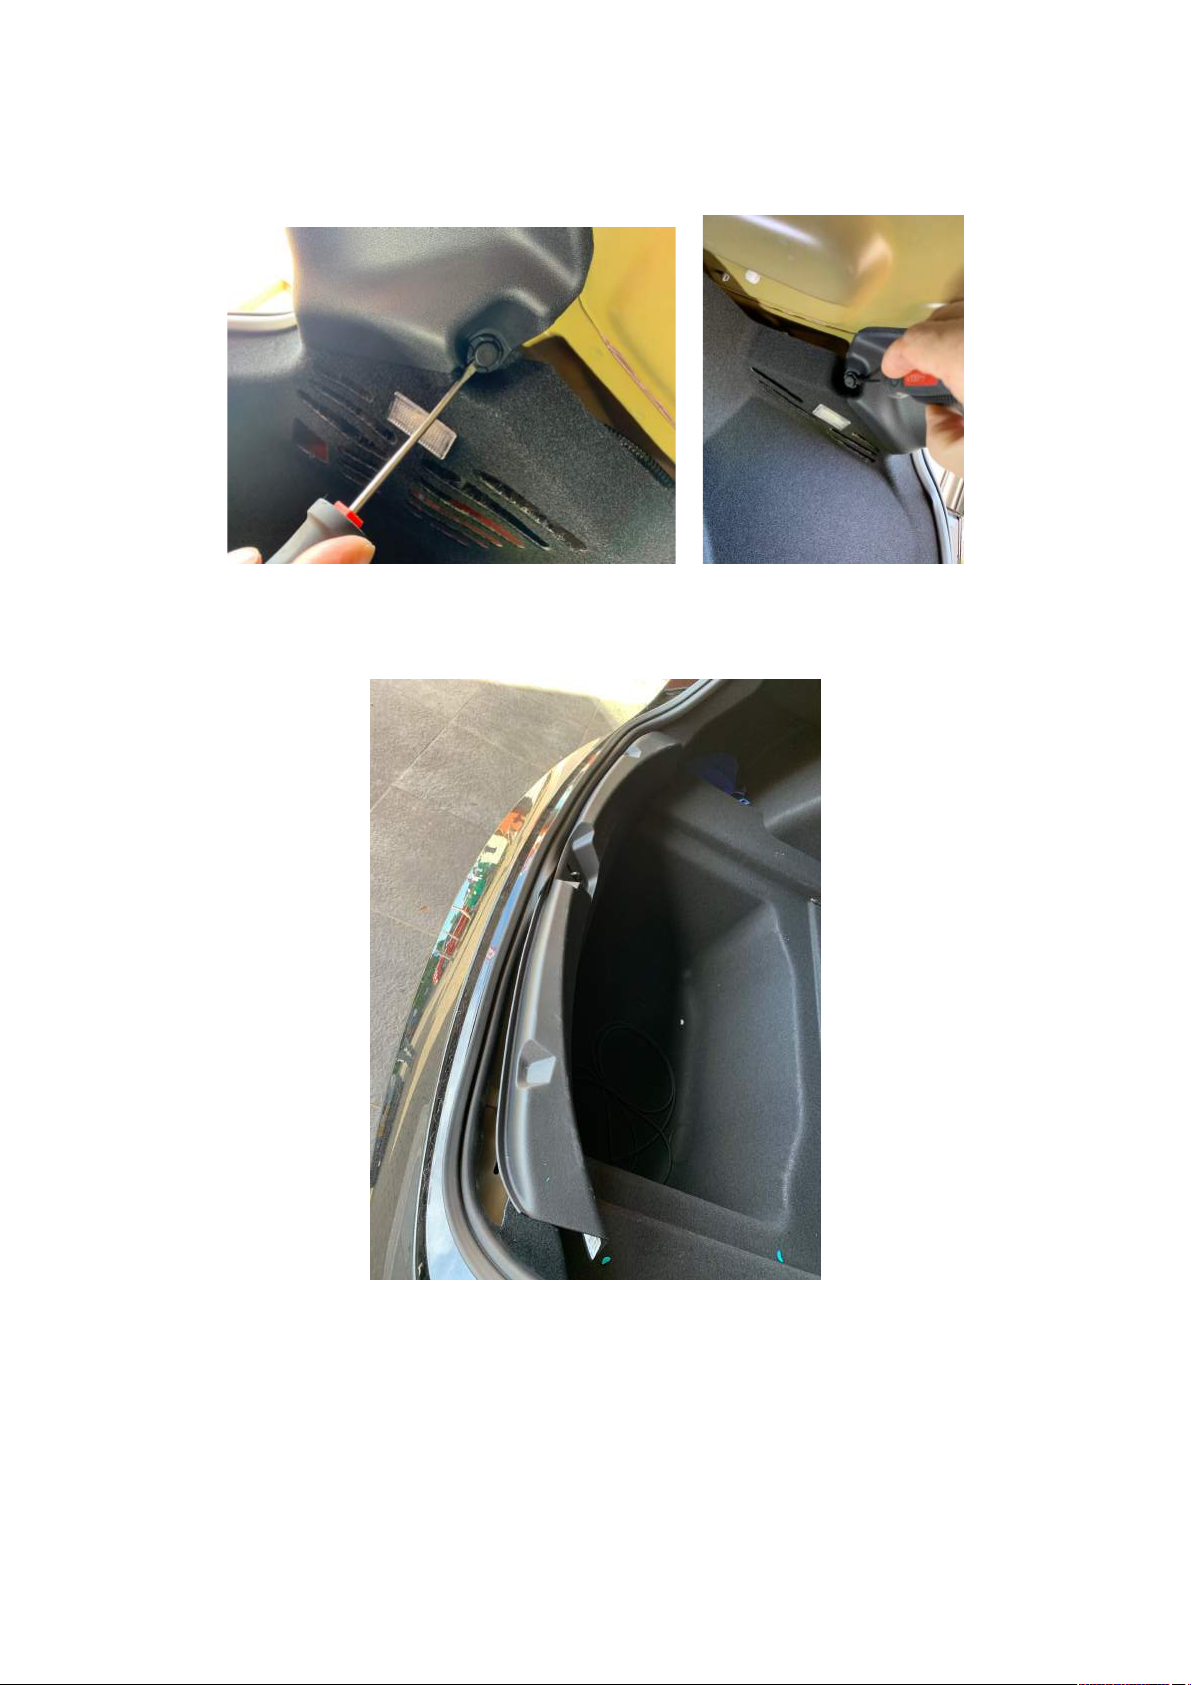
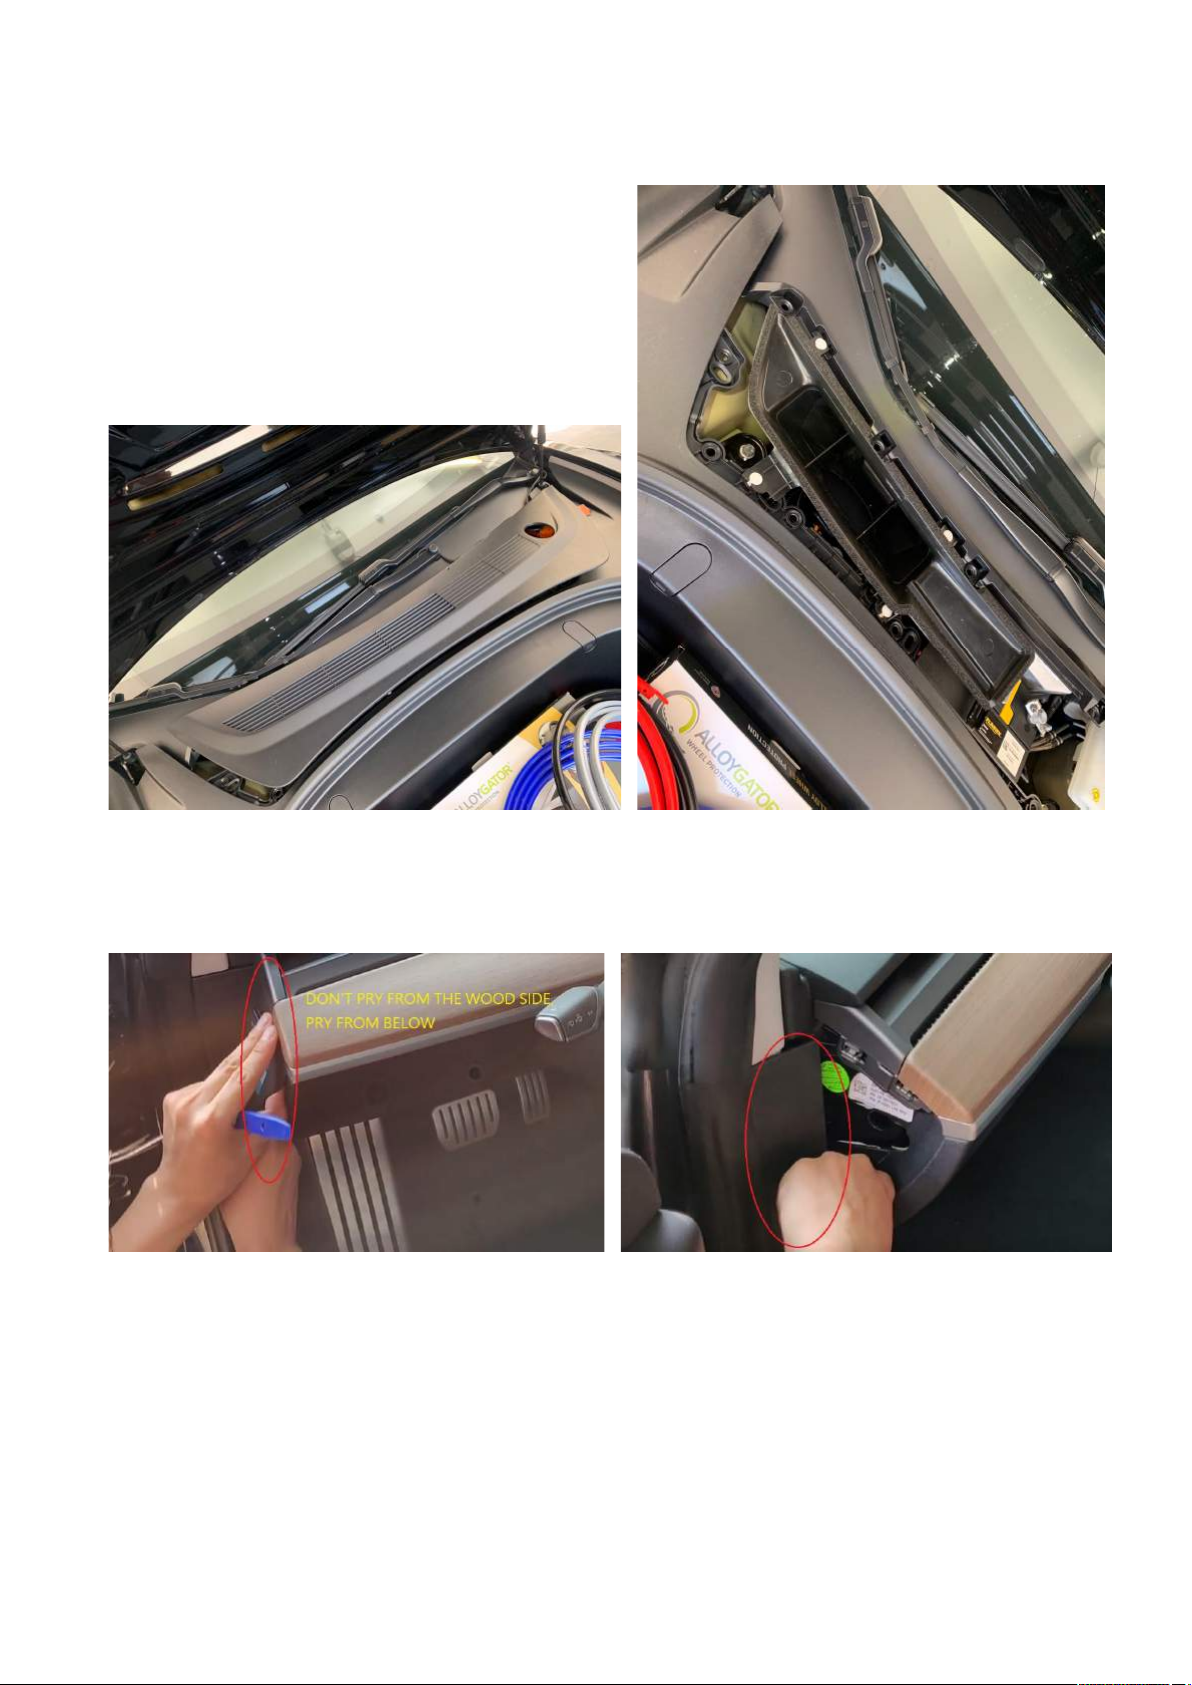
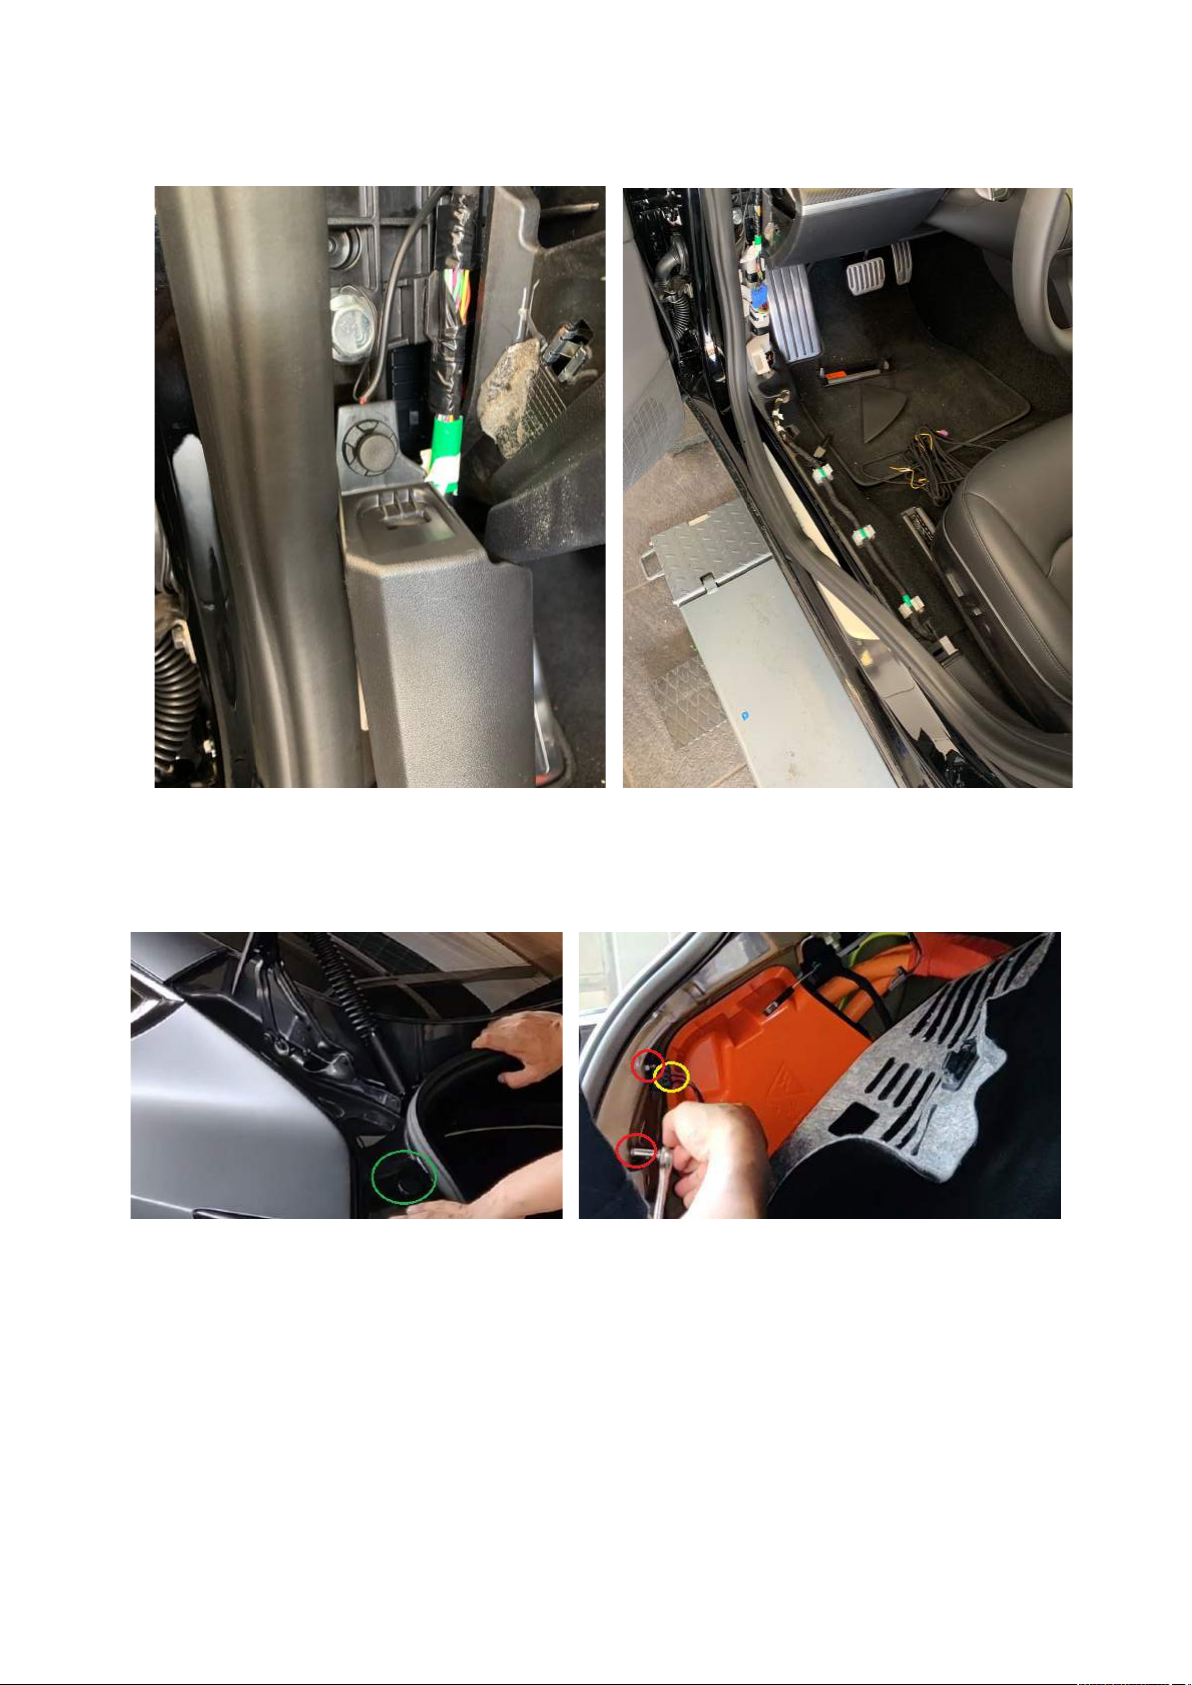
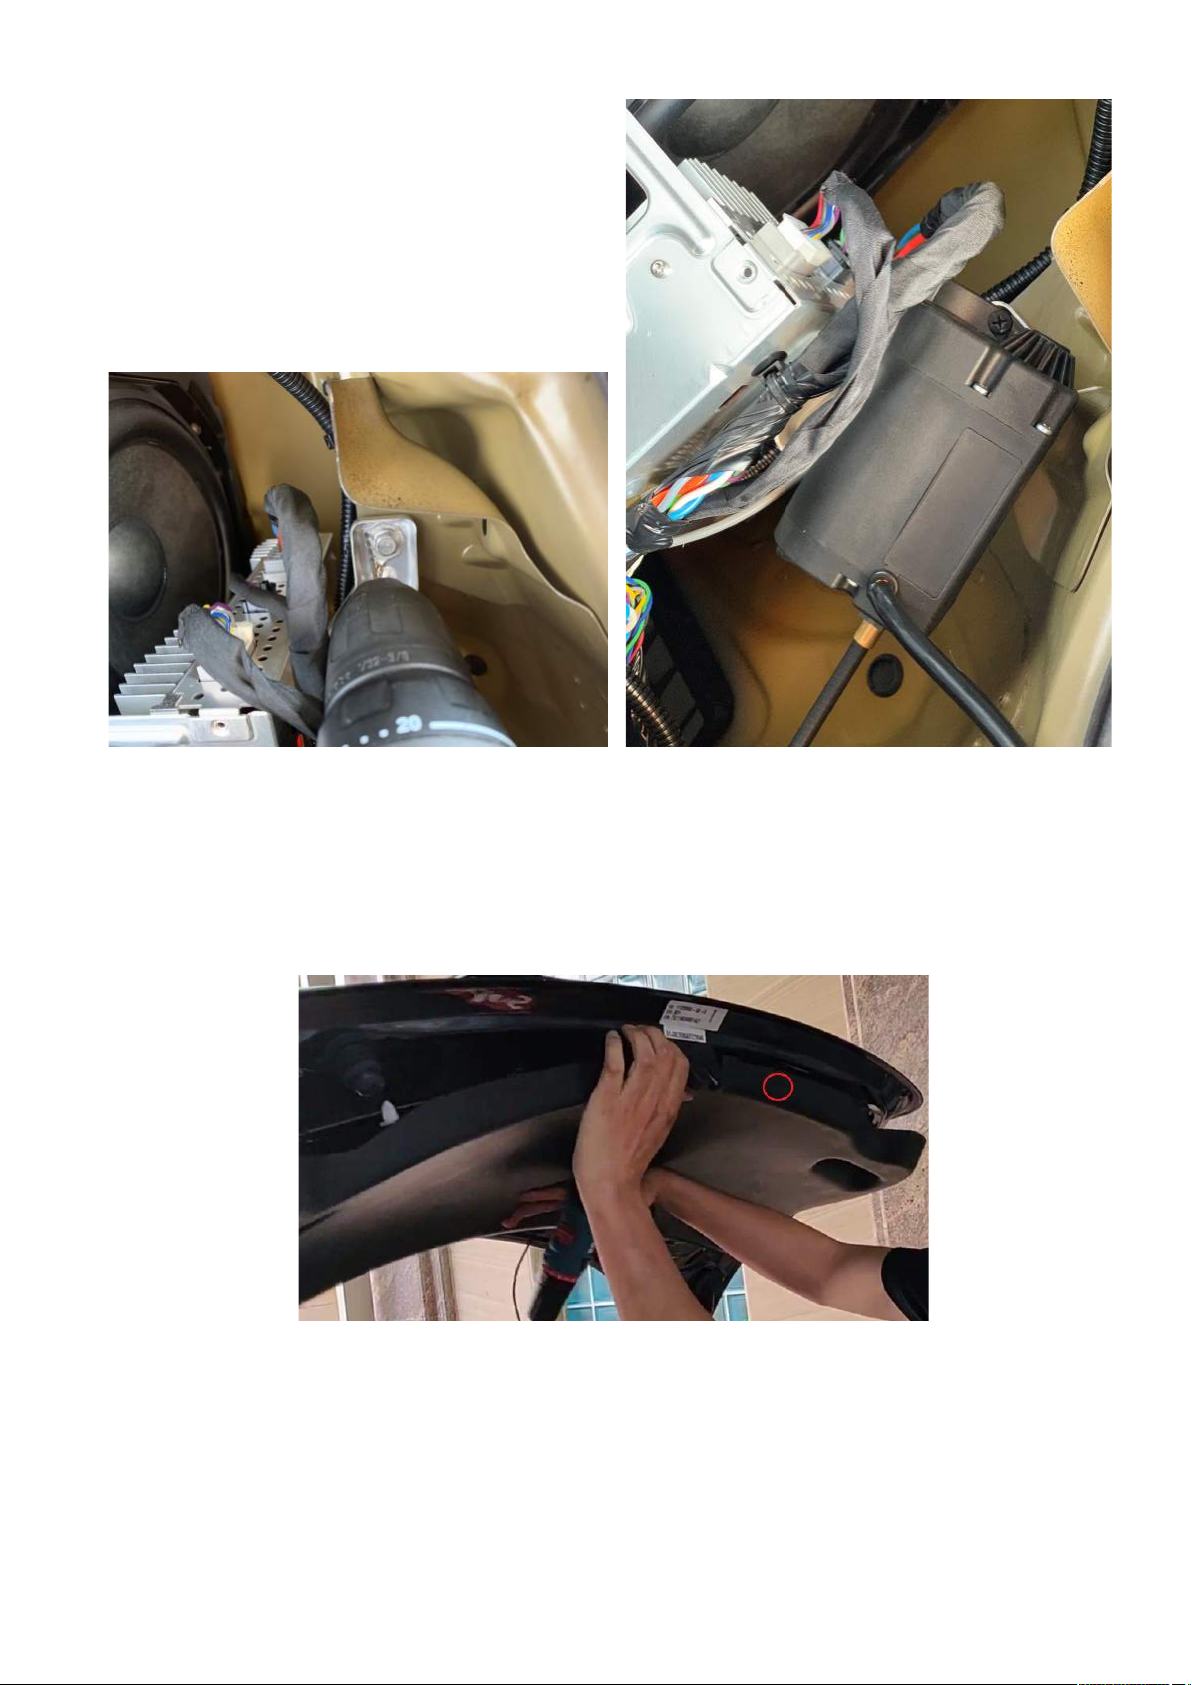
Install the kicksensor on the inside of the bumper. Clean the area where the sensor will be placed, and
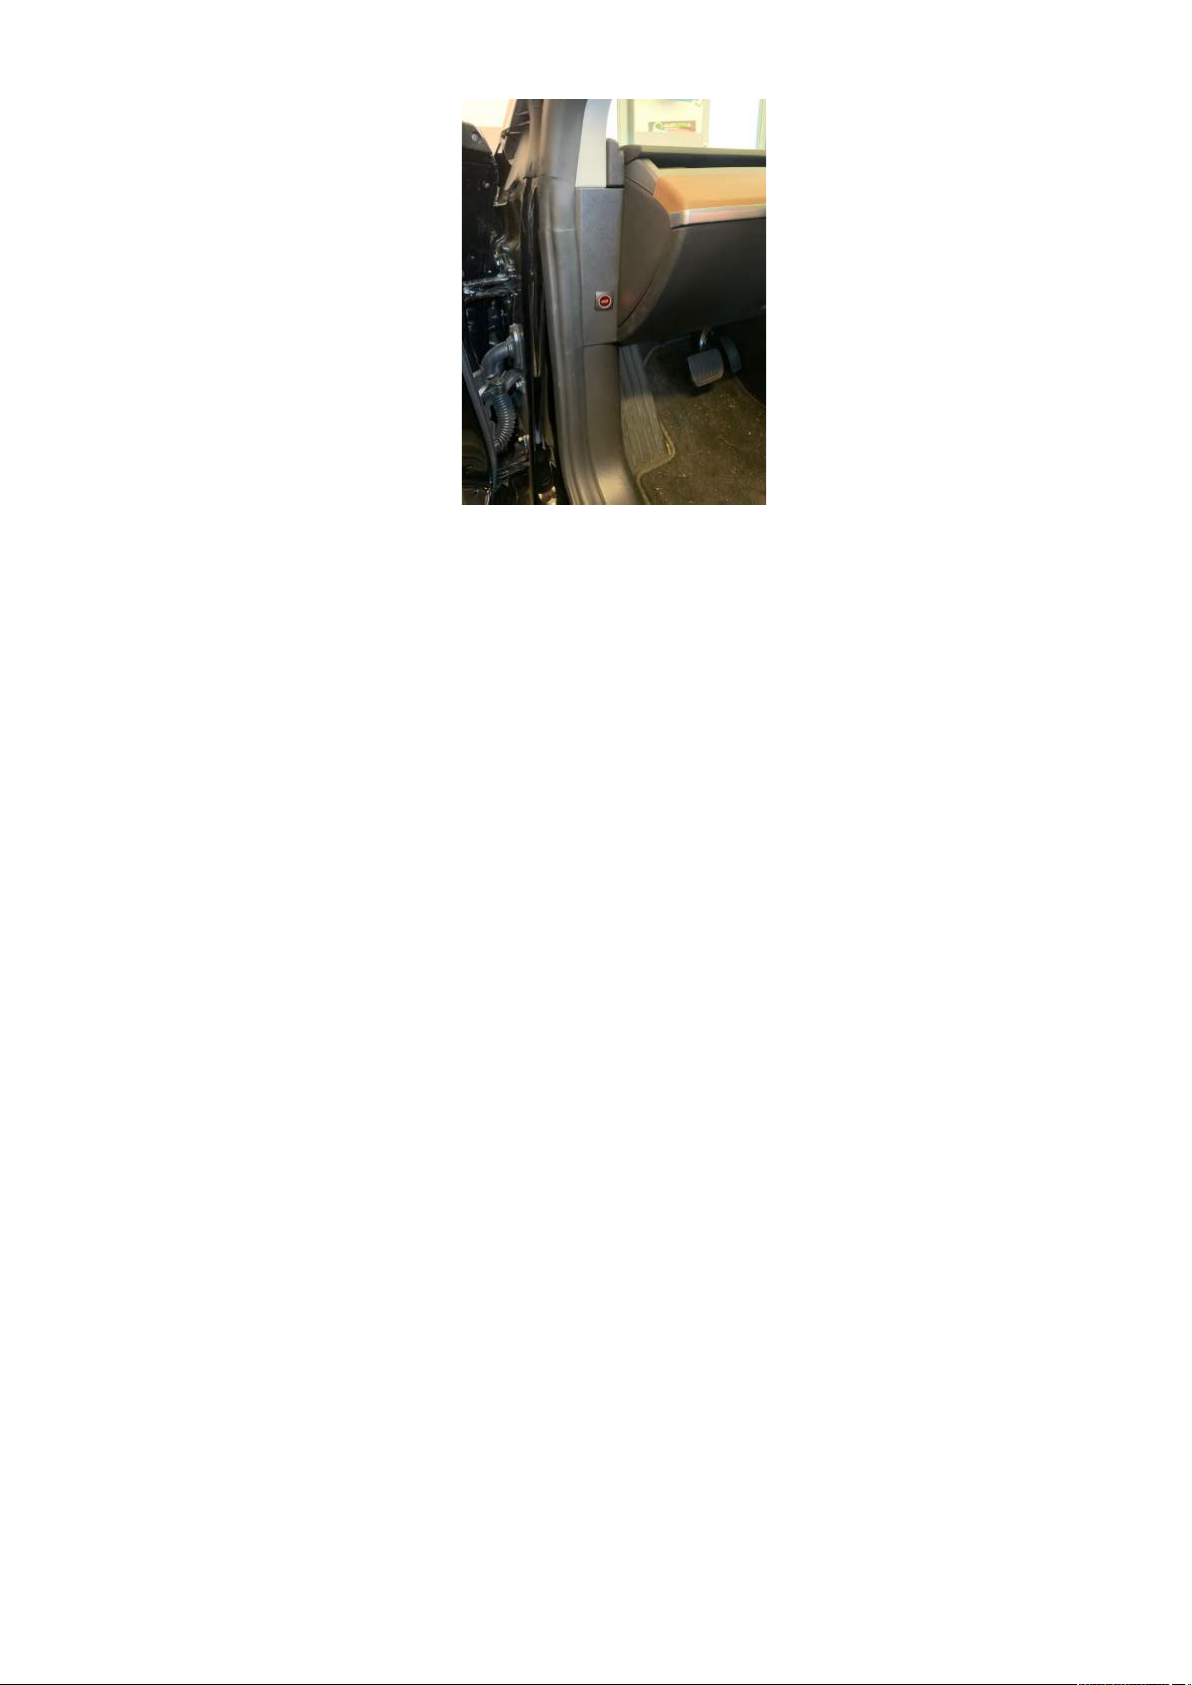
stick it with double sided tape to the bottom of the bumper. Route the cable to the inside of the car via
the right ventilation opening.
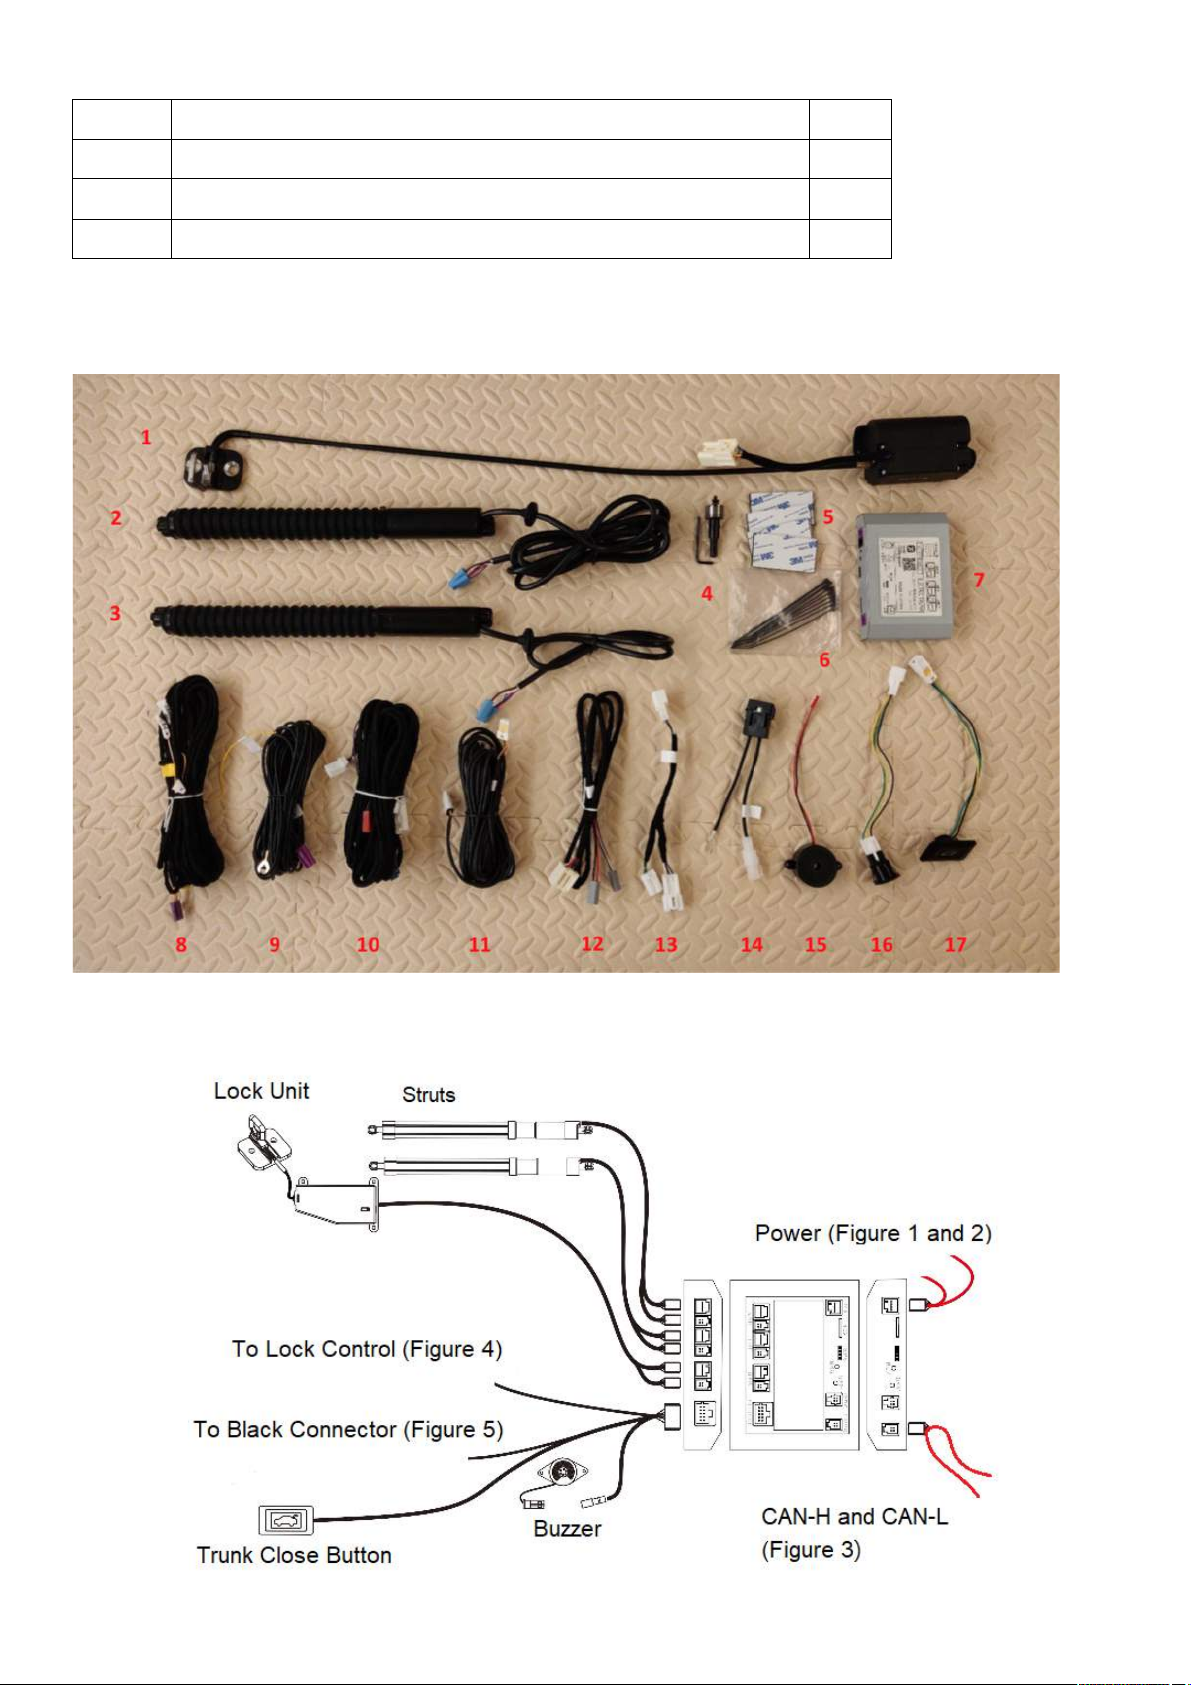
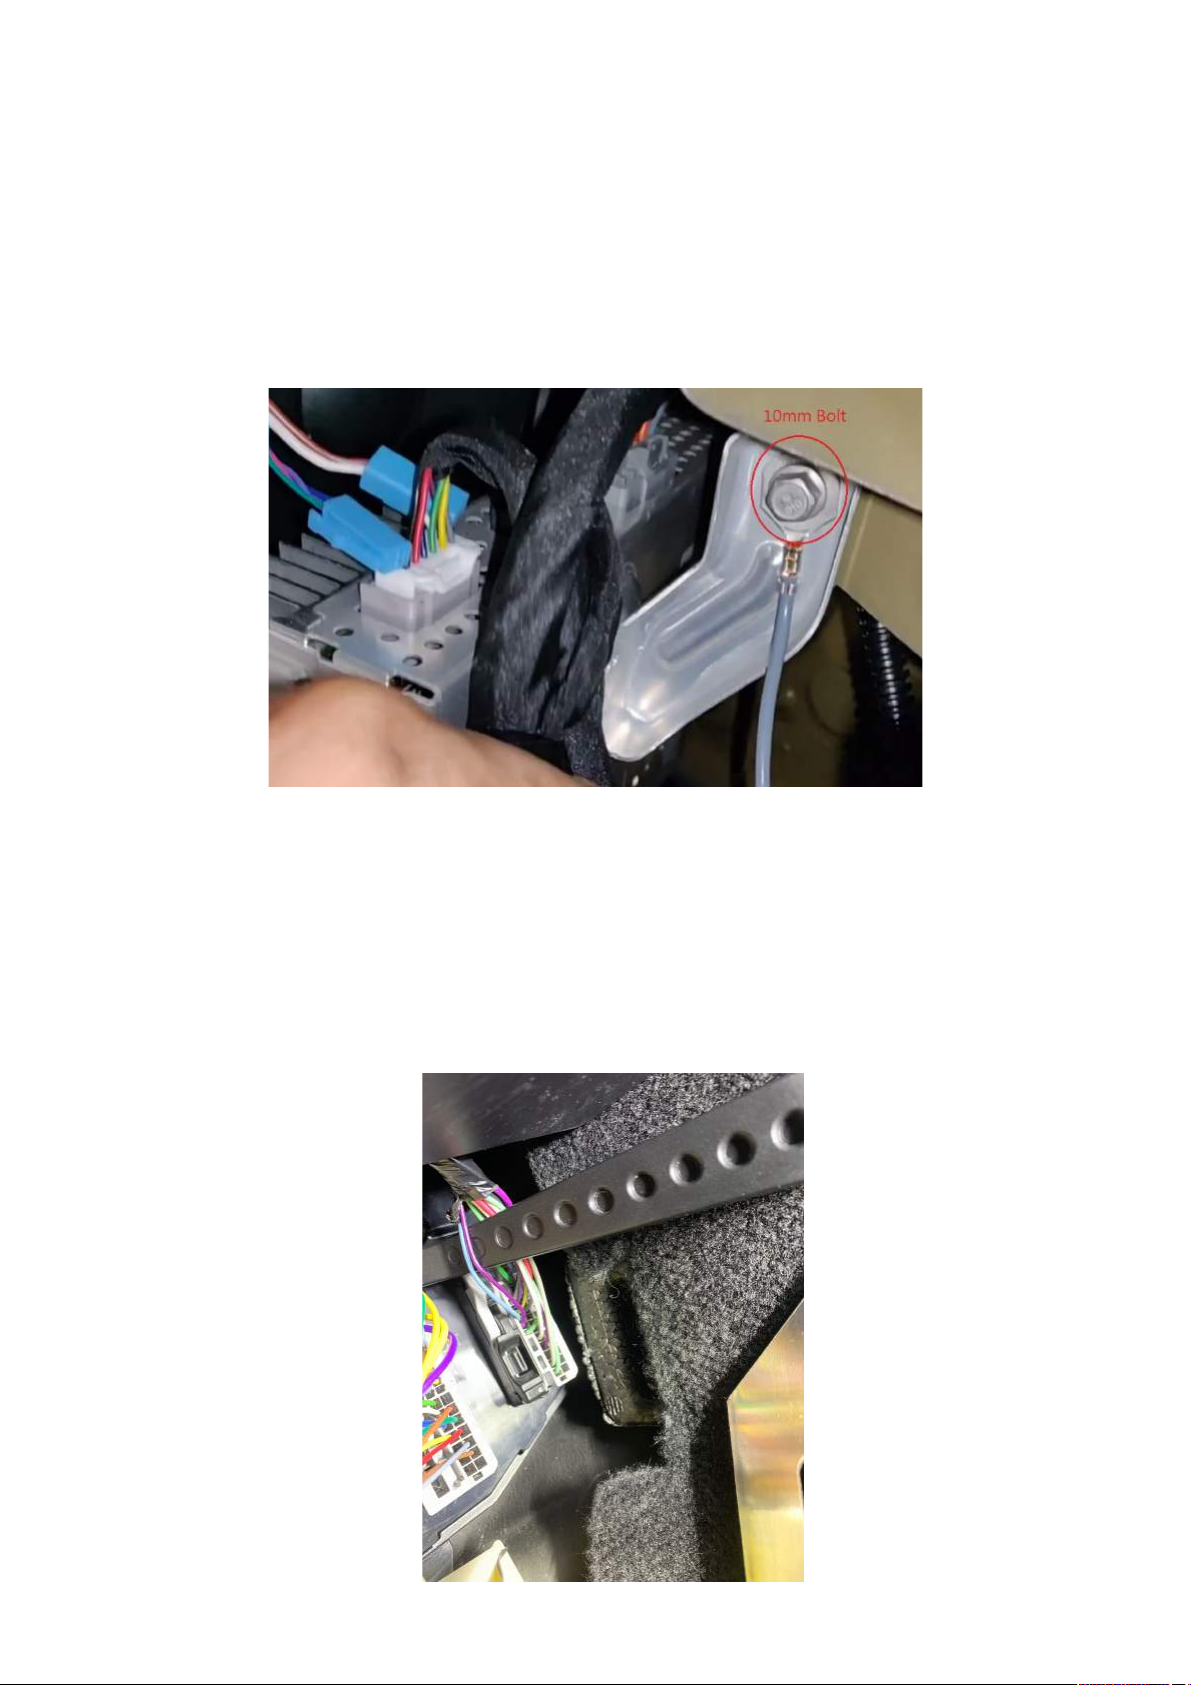
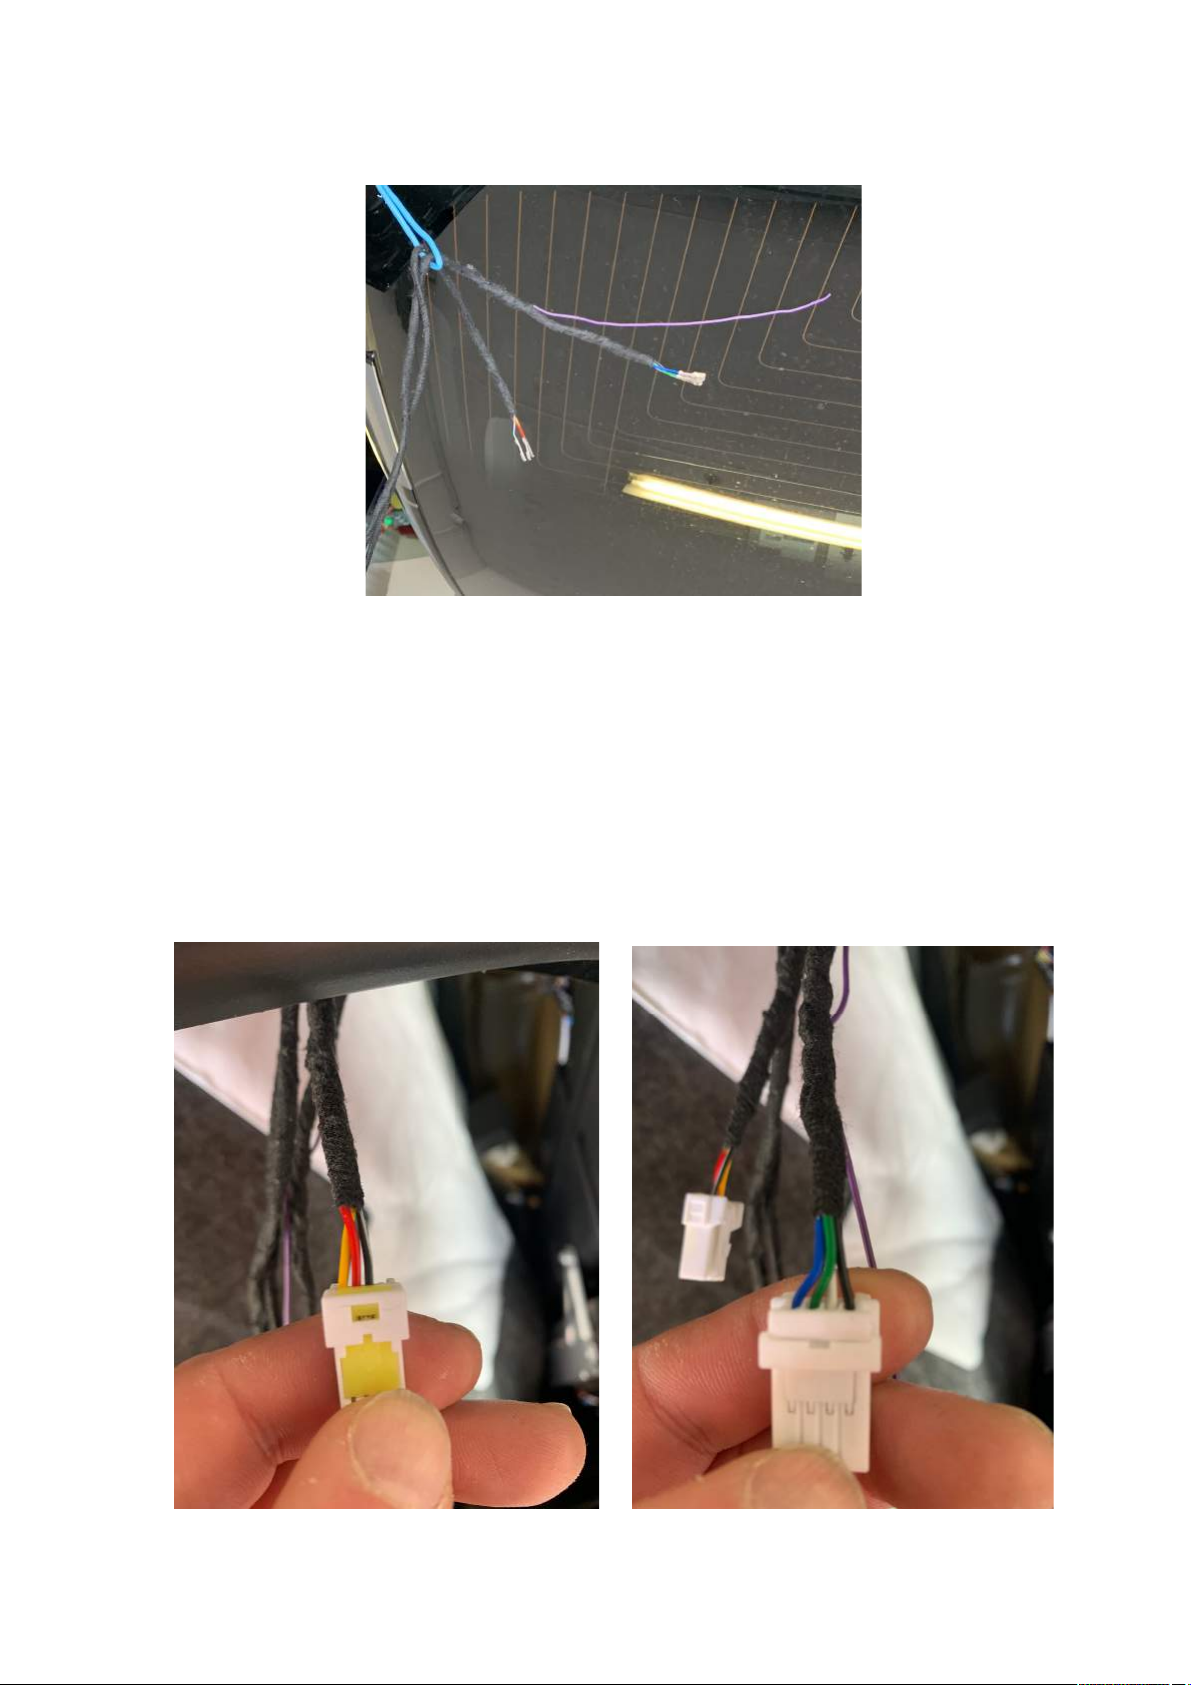
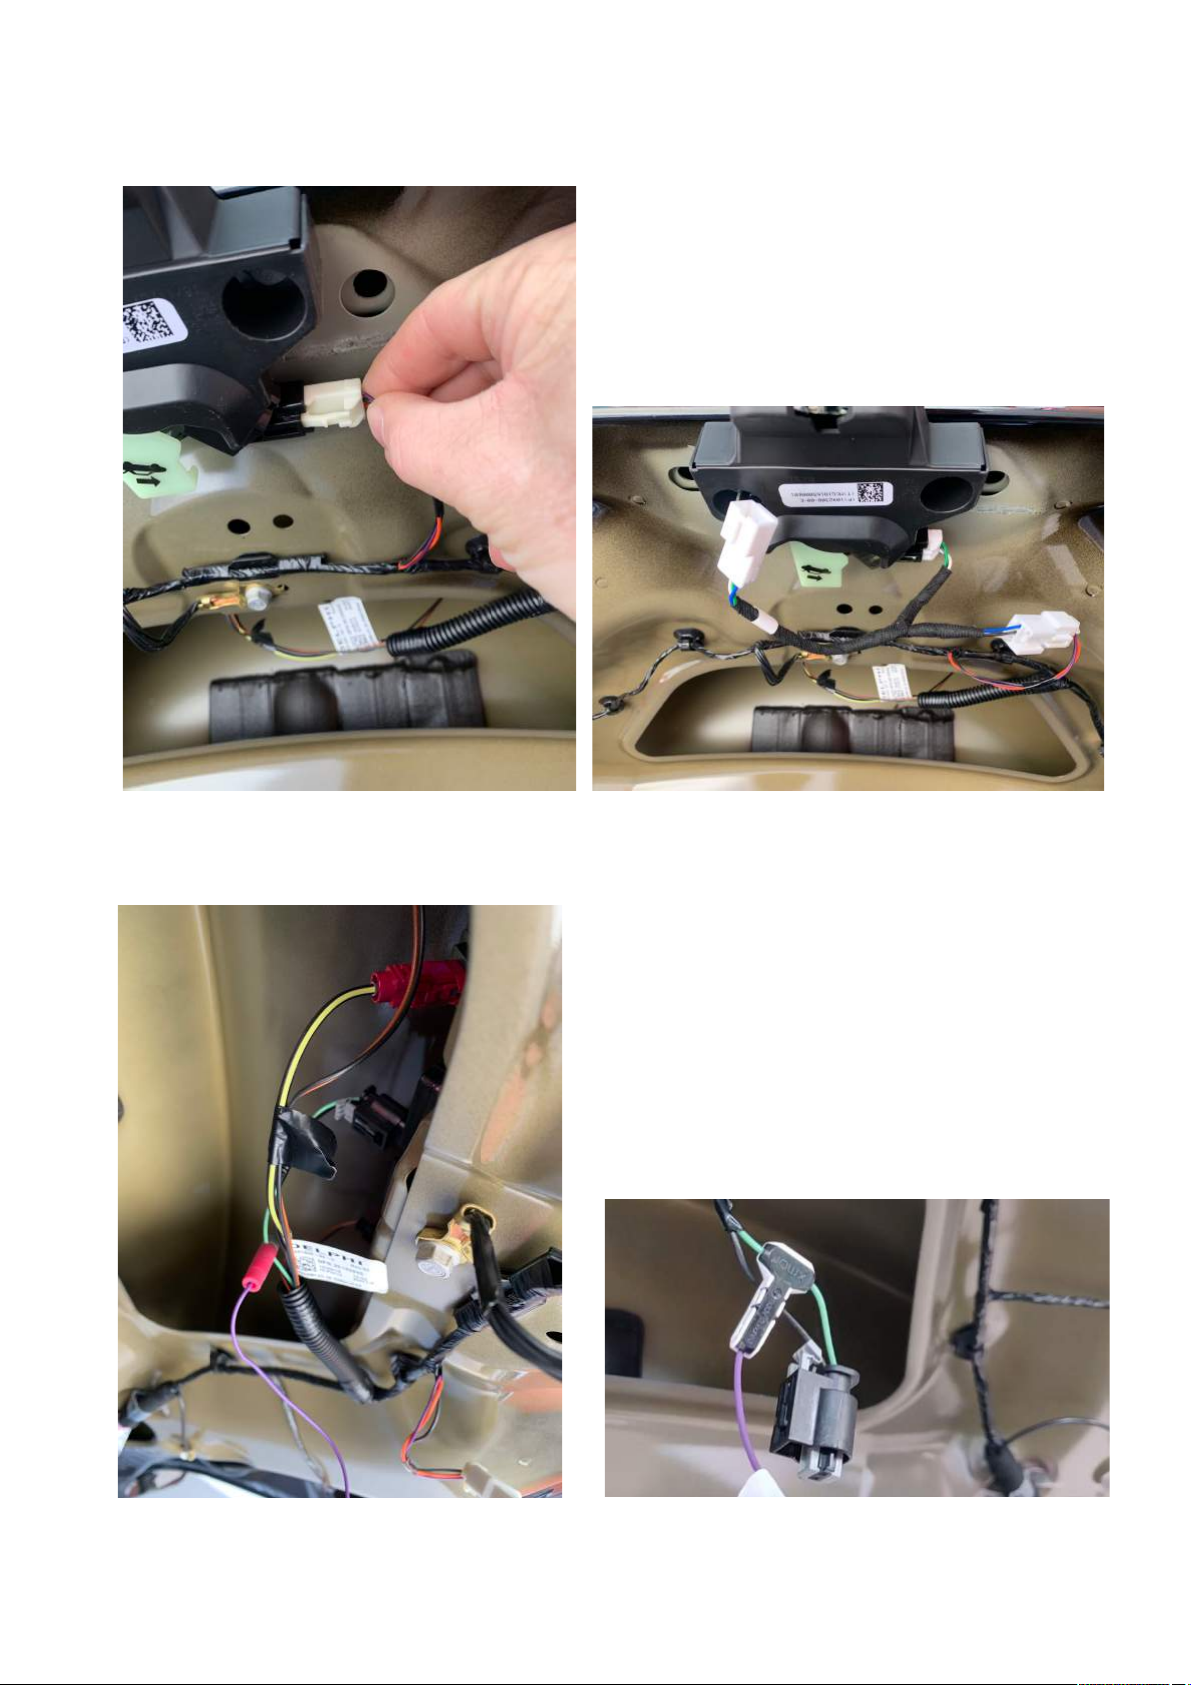
Now connect the ground to the same position of the powerlift. Connect the yellow + cable with the
fuse to the power cable of the powerlift. Install the green sensor cable to the purple cable of lift gate
harness.
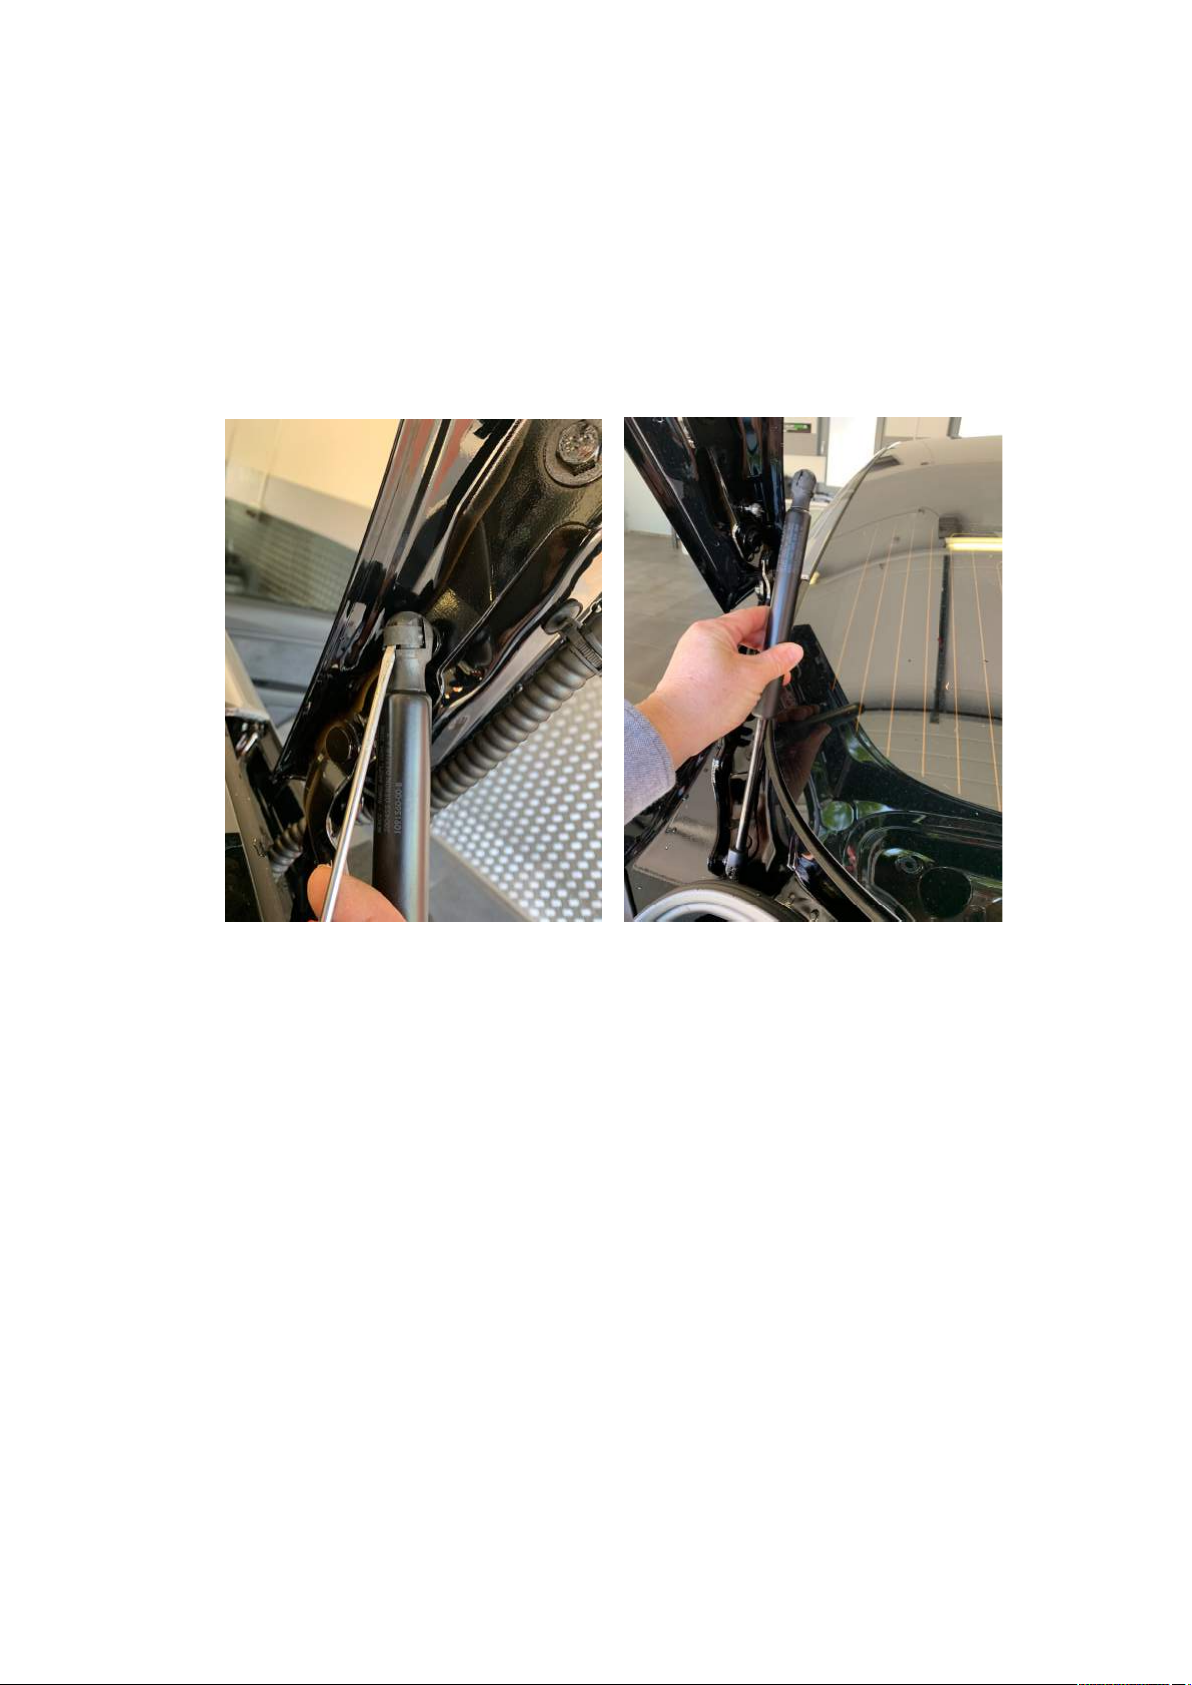
Install everything back together.
GRANT OF LICENSE
Tesland.com grants to you a non-transferable, non-exclusive license to use the product and the related documentation solely for your own
personal use or for internal use by your business, only on such Tesland.coa products. You shall not copy, reverse engineer, translate, port,
modify or make derivative works in the product. You may transfer all of your license rights in the product, the related documentation and a
copy of this License Agreement and Warranty to another party, provided that the party reads and agrees to accept the terms and conditions of
this License Agreement and Warranty.
OPERATIONAL WARNING AND SAFETY INSTRUCTIONS
(A) EXCEPT AS OTHERWISE CONTAINED HEREIN, the PRODUCTS and related documentation are provided to you, “AS IS”. IN NO EVENT SHALL
TESLAND.COM BE LIABLE FOR ANY DAMAGES, CLAIM OR LOSS INCURRED BY YOU (INCLUDING WITHOUT LIMITATION, COMPENSATORY,
INCIDENTAL, INDIRECT, SPECIAL, CONSEQUENTIAL, OR EXEMPLARY DAMAGES, LOST PROFITS, LOST SALES OR BUSINESS EXPENDITURES,
INVESTMENTS, OR COMMITMENTS IN CONNECTION WITH ANY BUSINESS, LOSS OF ANY GOODWILL, OR DAMAGES. THE TERM ‘INCIDENTAL
DAMAGES’ REFERS TO THE EXPENSES OF TRANSPORTING THE PRODUCTS TO TESLAND.COM, LOSS OF THE END-USERS [ORIGINAL
PURCHASER’S] TIME, LOSS OF THE USE OF THE PRODUCT, BUS FARES, CAR RENTALS OR OTHER COSTS RELATED TO THE CARE AND CUSTODY
OF THE PRODUCT. THE TERM ‘CONSEQUENTIAL DAMAGES’ REFERS TO THE COST OF REPAIRING OR REPLACING OTHER PROPERTY, WHICH IS
DAMAGED WHEN THIS PRODUCT DOES NOT WORK PROPERLY, RESULTING FROM THE USE OR INABILITY TO USE THE PRODUCTS, INCLUDING
ANY DAMAGES INCURRED DUE TO THE NEGLIGENT OPERATION OF A MOTOR VEHICLE, IN CONJUNCTION WITH THE USE OF SAID PRODUCTS.
THE END-USER ACKNOWLEDGES ITS RESPONSIBILITY FOR THE USE OF THE PRODUCT. THE ADDITION OF TESLAND.COM PRODUCTS AND ANY
AFTER-MARKET EQUIPMENT MAY ENHANCE THE VALUE OF A VEHICLE OR CAUSE A THIRD-PARTY TO ILLEGALLY ATTEMPT TO REMOVE THE

20
PRODUCTS AND AFTER-MARKET EQUIPMENT. TESLAND.COM DISCLAIMS ANY LIABILITY RELATED TO SUCH THEFT AND POTENTIAL DAMAGE TO
PROPERTY. IT IS THE END-USERS RESPONSIBILITY TO PROTECT ITS OWN PROPERTY. THE END-USER FURTHER ACKNOWLEDGES THAT THE
OPERATION OF A MOTOR VEHICLE IS AN INHERENTLY DANGEROUS ACTIVITY, AND BY ITS USE OF TESLAND.COM’S PRODUCTS,
ACKNOWLEDGES THAT THE PRODUCTS ARE REMOTELY RELATED TO SAID MOTOR VEHICLE OPERATION, AND THUS ANY DAMAGES CAUSED TO
THE DRIVER OF THE VEHICLE, THE VEHICLE ITSELF OR ANY THIRD PARTY AND ITS PROPERTY IS NOT THE RESPONSIBILITY OF TESLAND.COM, ITS
AGENTS OR ITS PRINCIPALS AND IS THE SOLE RESPONSIBILITY OF THE DRIVER OF SAID VEHICLE.YOU, THE END-USER, OR ANY OTHER DRIVER
OF THE VEHICLE, IS SOLELY RESPONSIBLE FOR THE SAFE OPERATION OF THE VEHICLE AND THE SAFETY OF BOTH YOU AND THE PASSENGERS.
FOR SAFETY PURPOSES, THE PRODUCT SHOULD NOT BE USED FOR THE DRIVER’S ENTERTAINMENT, WHILE THE VEHICLE IS BEING DRIVEN.
SUCH USE COULD BE A DISTRACTION TO THE DRIVER, WHICH COULD CAUSE AN ACCIDENT LEADING TO SERIOUS INJURY OR DEATH. IF YOU,
THE END-USER ALLOW ANOTHER PERSON TO USE THE VEHICLE, IT IS YOUR RESPONSIBILITY TO THOROUGHLY BRIEF THAT OTHER USER, ON
THE SAFETY REQUIREMENTS FOR OPERATING THE VEHICLE AND THE PRODUCTS INSTALLED THEREIN.(B) SAID DISCLAIMERS SHALL APPLY TO
THE USE OF SAID PRODUCTS, EVEN IF TESLAND.COM HAS BEEN INFORMED OF, KNEW OF, OR SHOULD HAVE KNOWN OF THE LIKELIHOOD OF
SUCH DAMAGES. THIS LIMITATION APPLIES TO ALL CAUSES OF ACTION IN THE AGGREGATE, INCLUDING WITHOUT LIMITATION: BREACH OF
CONTRACT, BREACH OF WARRANTY, NEGLIGENCE, STRICT LIABILITY, MISREPRESENTATION AND OTHER TORTS. IF TESLAND.COM’S WARRANTY
DISCLAIMER OR LIMITATION OF LIABILITY SET FORTH IN THIS AGREEMENT SHALL, OR FOR ANY REASON WHATSOEVER, BE HELD
UNENFORCEABLE OR INAPPLICABLE, YOU AND ANY OTHER END USER AGREE THAT TESLAND.COM’S LIABILITY SHALL NOT EXCEED (70%) OF
THE PRICE PAID FOR THE ENCLOSED TESLAND.COM PRODUCT.
Some states do not allow the exclusion or limitation of incidental or consequential damages, so the above limitation or exclusion may not
apply to you. This Warranty Disclaimer and Limitation of Liability shall not be applicable to the extent that any federal, state, or local law,
which cannot be pre-empted, prohibits any provision of this Warranty.Any use of the products where it is illegal to do so, may be used
against you as evidence of negligence in the event of an auto accident or other traffic infraction.
OTHER PROVISIONS
A. INDEMNIFICATION OF TESLAND.COM, ITS AGENTS AND EMPLOYEES.
By Purchasing, Installing and Using the Products, You, the End- User, agree to indemnify, defend and hold harmless, Tesland.com, and it’s
Affiliates, Directors, Officers, Agents and Employees from any Liabilities, Damage, Loss, Claim and Expense (including reasonable Attorney’s
Fees) arising out of the installation and use of the Products.
B. GOVERNING LAW.
This agreement and all Purchases hereunder shall be governed by, and construed under the laws of the Netherlands, without regard to
conflicts of law rules.
You agree that the Dutch Courts shall have exclusive jurisdiction over the Parties, for all disputes.
C. FORCE MAJEURE.
Tesland.com shall not be liable for any delay or failure in performance caused by or resulting from acts of God, fire, flood, storms, earthquakes,
tornado, other acts of nature, any accidents, riots, wars, government intervention, embargoes, strikes, labor difficulties, equipment failures, or
any other causes beyond the control of Tesland.com. Quantities are subject to availability.
D. ENTIRE AGREEMENT.
These terms and conditions constitute the entire and exclusive agreement between you, the End-User and Tesland.com, concerning the
Products, and your purchase hereunder, and supersede all statements or other agreements, whether oral or written, between you and
Tesland.com. No change in this Agreement shall be effective, unless agreed to in writing by both, you, the end-user and Tesland.com.
Table of contents
Popular Automobile Accessories manuals by other brands

ACV
ACV Inbay 241114-50-3 installation instructions

Audi
Audi Genuine Accessories 80A.071.128 installation instructions

Dakota Digital
Dakota Digital HDX-64P-GTO Instrument Installation

pewag
pewag bluetrack duo perfekt Welding Instruction

Over Armour Offroad
Over Armour Offroad AC-TRAIL-FC04 Instructions for Installation and Care

Motorola
Motorola HF800 - Bluetooth hands-free Speakerphone manual

Thule
Thule 1682 instructions

Thermo King
Thermo King Spectrum TS operating guide

Whelen Engineering Company
Whelen Engineering Company Century ECE Class 1 installation guide

LaserLine
LaserLine 921K operating instructions

Connects2
Connects2 CT23VW21 installation manual

iArmor
iArmor IA-N001 quick start guide