TEUCER WP-4RGBCCT User manual

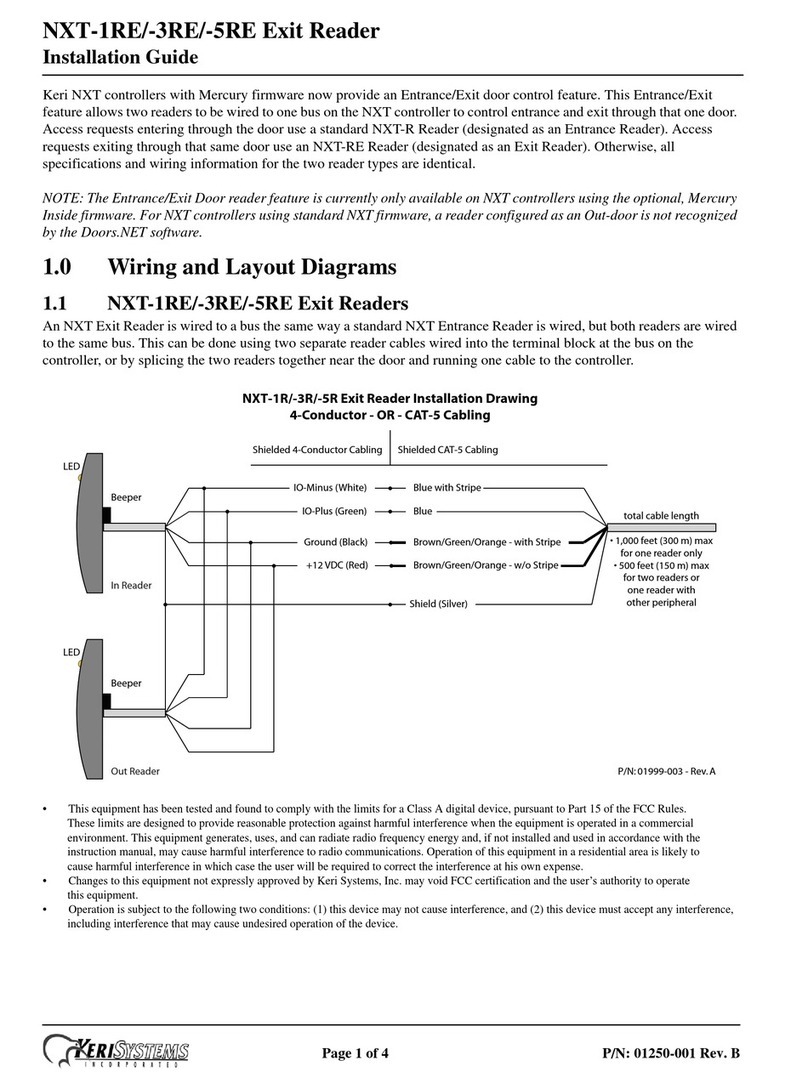
4 Zone DMX and RF wall panel
for Single Colour, Tunable White, RGB, RGBW
and RGBCCT LED strip
www.teucerled.co.uk
V002-11-2019
WP-4RGBCCT
The WP-4RGBCCT wall panel enables control of up to 4 zones of Single Colour, Tunable White, RGB,
RGBW and RGBCCT LED strip, featuring simple to use back-lit touch controls for easy brightness
adjustment.
Product Description
• Easy control of Single Colour, Tunable White,
RGB, RGBW and RGBCCT LED strips for up to
4 zones independently or simultaneously
• Touch sensitive glass and smooth dimming
• Backlit buttons for night time use
• Designed to fit into your existing switch back
box
• Built-in dynamic play modes with receiver
auto-synchronization
• Receiver Auto-Transmitting function to
achieve greater distances between receivers
and the remote
• Each zone can have different LED strip type
Features
Wall panel Technical Specification
Controller WP-4RGBCCT
Type RF and DMX wall panel
Input Voltage 85-265V AC
Dimension (WxLxH) 86 x 86 x 35mm
DMX Otuput Signal DMX512
Operation Frequency 2.4GHz
IP rating IP20
Compatible RGB receivers and DMX decoders
Technical Specification
Order code R3C R4C R5C DIM-DMX1CH(N) DIM-DMX5CH
Channels 3 (RGB) 4 (RGBW) 5 (RGBCCT) 4 (RGBW) 5 (RGBCCT)
Type RF receiver RF receiver RF receiver DMX decoder DMX decoder
Input Voltage 12-24V DC 12-36V DC 12-24V DC 12-24V DC 12-24V DC
Current 3x4A 4x5A 5x3A 4x5A 5x6A
Output 3X(48-96W) 4X(60-180W) 5X(36-72W) 4x(60-120)W 5x(72-140)W
Note Constant
voltage
Constant
voltage
Constant
voltage Constant voltage Constant
voltage
Dimension 33x97x18mm
(WxLxH)
45x175x27mm
(WxLxH)
38x114x20mm
(WxLxH)
50x170x23mm
(WxLxH)
170x86x39.5mm
(WxLxH)
R3C R4C R5C DIM-DMX1CH(N) DIM-DMX5CH

4 Zone DMX and RF wall panel
for Single Colour, Tunable White, RGB, RGBW
and RGBCCT LED strip
www.teucerled.co.uk
V002-11-2019
SCENE
S
ZONE ZO NE ZO NE Z ONE
1234
SPEED BR IGH TMODE
M
CCT
RGB
FRONT BACK
CCT mode /
CCT step
adjustment
RGB mode /
RGB step
adjustment
ON/OFF
AC INPUT L
AC INPUT N
WP-4RGBCT
DMX OUTPUT D+
DMX OUTPUT D-
DMX OUTPUT GND
Zones
Brightness
adjustment
Dynamic
play
mode
Scene
Dynamic mode speed /
Static RGB mode saturation
LNGNDD+ D-
DMX OUTPU T
INPUT
85-265VAC
86mm
86mm
45.5mm
59mm
35mm
62mm
11.5mm
Compatible
Back box types:
European style 86 size
Back box mounting
Wall panel Bracket Back box
Bracket removal
Controller layout
Installation diagram

4 Zone DMX and RF wall panel
for Single Colour, Tunable White, RGB, RGBW
and RGBCCT LED strip
www.teucerled.co.uk
V002-11-2019
RGB Receiver wiring diagram
RGBW Receiver wiring diagram
R3C
RGB LED strip
Power supply
+
R4C
RGBW LED strip
Power supply
+
R
G
B
W
Single colour receiver wiring diagram
+
+
+
R3C
Single colour LED strip
Power supply
+
+
+
R3C
Single colour LED strip
Power supply
Tunable White receiver wiring diagram
R3C
Tunable white LED strip
Power supply
V+
WW
NW
R3C
Tunable white LED strip
Power supply
V+
WW
NW

4 Zone DMX and RF wall panel
for Single Colour, Tunable White, RGB, RGBW
and RGBCCT LED strip
www.teucerled.co.uk
V002-11-2019
L
N
Power input
AC85-265V
Ppwer Supply
5-24VDC
LN
AC110-230V
Uin=12-36VDC
Iin=20.5A
Uout=4×(12-36)VDC
Iout=4×5A
Pout=4×(60-180)W
Temp Range:
-30℃~+55℃
DMX512 & RDM De coder
DMX IN /OUT
D+ D- D+ D-
Ppwer Supply
5-24VDC
LN
AC110-230V
Uin=12-36VDC
Iin=20.5A
Uout=4×(12-36)VDC
Iout=4×5A
Pout=4×(60-180)W
Temp Range:
-30℃~+55℃
DMX512 & RDM De coder
DMX IN /OUT
D+ D- D+ D-
DMX Signal
DMX Signal
LN
INPUT
85-265VAC
GNDD+ D-
DMX OUTPUT
WP-4RGBCCT
W
W
RGBW LED stripRGBW LED strip
DIM-DMX1CH(N)
DIM-DMX1CH(N)
DMX Decoder wiring diagram (RGBW)
RGBCCT Receiver wiring diagram
RGB+CCT LED strip
Power Supply
24V
R5C
DC
Constant Voltage AC110-230V
WW
+
-
+
INPUT
12-24VDC
Uin=12-24VDC
Iin=15.5A
RGB+CCT 5CH LED Con troller
Uout=5×(12-24)VDC
Iout=5×3A
Pout=5×(36-72)W
Temp Range: -20℃~+55℃
Made in China
OUTPUT
W4 +
+
2.4G wireless control RoHS
W5
W
0.5-1.5mm2
6-8mm

4 Zone DMX and RF wall panel
for Single Colour, Tunable White, RGB, RGBW
and RGBCCT LED strip
www.teucerled.co.uk
V002-11-2019
L
N
Power input
AC85-265V
Power Supply
5-24VDC
LN
AC110-230V
Power Supply
5-24VDC
LN
AC110-230V
DMX Signal
LN
INPUT
85-265VAC
GNDD+ D-
DMX OUTPUT
WP-4RGBCCT
Uout=12-24VDC
Iout=5CH×6A
Pout=5×(72-144)W
Uin=12-24VDC
Iin=Max 30A
INPUT
12-24VDC
M
<
DMX IN/OUT
DMX decoder mode: 1-5CH, 8bit / 16bit
DMXsignal amplify
Output PWM frequency: 250Hz, 500Hz, 2KHz, 8KHz
Output dimming curve: Gamma 0.1-9.9
Protection: Short circuit, Over current, Over heat
5CH DMX512 & RDM Decoder / Master
1 2 3
4
5
R G B W1 W2
<
Temp Range:
-30℃- +55℃
Quick sel f-tes ting:
Long pres s M&> key f or 3s
DMX Decoder
Addrs:001 5CH
PwmHz:Std 8bit
Curve:Standard
Uout=12-24VDC
Iout=5CH×6A
Pout=5×(72-144)W
Uin=12-24VDC
Iin=Max 30A
INPUT
12-24VDC
M
<
DMX IN/OUT
DMX decoder mode: 1-5CH, 8bit / 16bit
DMX master mode: 5CH Dimmer / RGB controller
DMXsignal amplify
Output PWM frequency: 250Hz, 500Hz, 2KHz, 8KHz
Output dimming curve: Gamma 0.1-9.9
Protection: Short circuit, Over current, Over heat
5CH DMX512 & RDM Decoder / Master
1 2 3
4
5
R G B W1 W2
<
Temp Range:
-30℃- +55℃
Quick sel f-tes ting:
Long pres s M&> key f or 3s
DMX Decoder
Addrs:001 5CH
PwmHz:Std 8bit
Curve:Standard
DIM-DMX5CH
DIM-DMX5CH
WW
W
WW
W
RGBCCT LED strip
RGBCCT LED strip
DMX Signal
DMX Decoder wiring diagram (RGBCCT)

4 Zone DMX and RF wall panel
for Single Colour, Tunable White, RGB, RGBW
and RGBCCT LED strip
www.teucerled.co.uk
V002-11-2019
Synchronising the wall panel to the receiver
1) Ensure the receiver has power. Press the match button on the receiver. LED Indicator will start flashing
slowly.
2) Choose the zone you wish to allocate on the panel within 5 seconds after pressing the match button.
The LED indicator on the receiver will flash rapidly 5 times and then stop flashing. The controller is now
synchronised with the receiver.
Match button
LED Indicator
R3C
Press the zone
you wish to allocate
SCE NE
S
ZON E ZON E ZON E ZO NE
1234
SPE ED BR IGH TMOD E
M
CCT
RGB
3) Repeat the process to allocate zones for all
receivers.
Note! RF technology allows for greater flexibility when it comes to controlling simple or complex lighting installations
without the need of additional cabling. There are some limitations where installations have the receivers enclosed in
electrical boxes or hidden away in a ceiling , reducing the RF signal strength and therefore the communication range.
In order to overcome these RF Signal restrictions we suggest the following when synchronising our RF controllers and
receivers:
• Keep the distance within 10 meters from the controller to the receiver. The remote can operate up to 30 meters if
signal is uninterrupted by obstacles.
• When expanding your lighting, always try and use a signal repeater (PR-RGB(N)), where possible.
Match button
LED indicator
Push -Dim
GND
R4C
Match button
LED indicator
R5C
+
-
+
I NPU T
12-24VDC
Uin=12-24VDC
Iin=15.5A
RGB+CCT 5 CH LED Co ntrol ler
Uout=5×(12-24)VDC
Iout=5×3A
Pout=5×(36-72)W
Temp Range: -20℃~+55℃
Mad e in China
OU TPUT
W4 +
+
2.4G wire less co ntrol RoHS
W5
0.5-1.5mm2
6-8mm
Synchronising the wall panel to the DMX decoder
Address Setting in Various modes when using a single decoder:
LED strip type
mode
Channel Zone 1 DMX
address
Zone 1 DMX
address
Zone 1 DMX
address
Zone 1 DMX
address
Single Colour W W W W W 1-5 6-10 11-15 16-20
Tunable White WW CW WW CW - 1-5 6-10 11-15 16-20
RGB R G B - - 1-5 6-10 11-15 16-20
RGBW R G B W W 1-5 6-10 11-15 16-20
RGBCCT R G B WW CW 1-5 6-10 11-15 16-20
Note! We recommend using the controller when controlling all lighting as a single zone.
Please note that with the DIM-DMX1CH(N) and DIM-DMX5CH one can use the manual button to switch ON the con-
nected LED strips and check the operation by cycling through the various modes.
• When expanding your lighting always try and use a signal repeater (PR-RGB) where possible.
• If using DMX over 55mtrs it is recommended to use a DMX amplifier for longer distances.
• If the recoil effect occurs because of the long DMX signal line or bad DMX line quality, please try to connect a 0.25W
90-120Ω terminal resistor at the end of the DMX signal line.
4) To restore the receiver to the factory default settings
and delete the allocated controller, press and hold the
match button on the receiver longer than 5 seconds
until the LED indicator flashes quickly 5 times.

4 Zone DMX and RF wall panel
for Single Colour, Tunable White, RGB, RGBW
and RGBCCT LED strip
www.teucerled.co.uk
V002-11-2019
Controlling the LED strip
Sound ON/OFF: When OFF more than 10
sec press and hold the Power button for
more than 5 seconds until you hear the
chime. Sound is now turned off. Repeat the
procedure to turn the sound back on.
• ON/OFF: Turn ON/OFF LED strips on the last setting.
• Zones: When ON choose the Zones you wish to control.
When OFF short press Zone to turn ON current Zone,
long press for 2s to turn OFF the desired Zone.
• RGB mode: To adjust the colour, press the RGB mode
button, then touch the colour wheel.
• CCT (Tunable White or RGBCCT type): Short press to
change CCT in 11 steps, long press to switch between
WW/CW
• CCT (RGB): Short press to change CCT by mixing RGB
channels in 11 steps, long press to switch between
WW/CW
• CCT (RGBW): Short press to change W channel in 11
steps, long press to switch between 0%/100%
• Dynamic play mode: Short press to run next mode,
long press 2s to run mode-cycle
• Speed: (static mode) Short press to change RGB
saturation in 11 steps, long press to change RGB
saturation in 256 levels
• Speed: (dynamic play mode) Short press to adjust
speed in 10 levels, long press 2s to set default speed.
Speed button syncs the receivers play mode if out of
sync
• Brightness: To adjust the brightness for the selected
Zones press the Brightness button. Press and hold for
continuous fine adjustment.
• Scene: Long press 2s to save current settings to Scene,
short press to retrieve saved scene.
SCENE
S
ZON E ZO NE ZON E ZONE
1
23
4
SPE ED BR IGH TMOD E
M
CCT
RGB
FRONT BACK
CCT mode /
CCT step
adjustment
RGB mode /
RGB step
adjustment
ON/OFF
AC INPUT L
AC INPUT N
WP-4RGBCT
DMX OUTPUT D+
DMX OUTPUT D-
DMX OUTPUT GND
Zones
Brightness
adjustment
Dynamic
play
mode
Scene
Dynamic mode speed /
Static RGB mode saturation
LNGNDD+ D-
DMX OUTPU T
INP UT
85-265VAC
86mm
86mm
45.5mm
59mm
35mm
62mm
11.5mm
Compatible
Back box types:
European style 86 size
Back box mounting
Wall panel Bracket Back box
Bracket removal
SCENE
S
ZONE ZO NE ZONE ZONE
1234
SPEED B RIGHTMODE
M
CCT
RGB
Tunable White
LED strip type
RGB
LED strip type
ON/OFF
Zones
Single Colour
LED strip type
RGBW
LED strip type
RGBCCT
LED strip type
Tunable White
CCT
RGB
RGB
RGBCCT
MODE
M
RGBW
SPEED
Single Colour
BRIGHT
LED strip type
Setting the LED strip type
1) Press ON/OFF to turn ON.
2) Press ON/OFF again to turn OFF. Immediately after press and hold ON/OFF for more than 6 sec. You
have now entered into LED strip type mode.
3) Press and hold desired Zone button for more than 3 sec until you hear the chime, then press and hold
the corresponding LED strip type button for more than 3sec.
4) Press ON/OFF to save settings and turn ON.

4 Zone DMX and RF wall panel
for Single Colour, Tunable White, RGB, RGBW
and RGBCCT LED strip
www.teucerled.co.uk
V002-11-2019
Problem Cause Corrective
No light
• No power.
• Wrong connection or unsecure
connection.
• Check the power.
• Check the connection.
Wrong Colour • Wrong connection of RGB/W wires. • Retrace and reconnect RGB/W
wires.
Uneven intensity
between front and
rear of the strip, with
voltage drop
• Output cable is too long.
• Cable diameter is too small.
• Overload beyond driver capability.
• Overload beyond receiver capability.
• Reduce cable or loop supply.
• Change to a thicker cable.
• Replace with a suitable higher
power driver.
• Add a power repeater.
No response
from the remote
• The wall panel has no power.
• Beyond controllable distance.
• The controller isn’t synchronised
with the remote.
• Check the incoming supply to the
wall panel.
• Reduce remote to receiver
distance.
• Re-sync the remote.
Troubleshoot
• Products must be installed and serviced by qualified electrician.
• Please ensure the receiver is mounted in a water proof enclosure if installed in an outdoor environment,
avoiding metallic enclosures.
• Always ensure products are mounted in areas with adequate ventilation to avoid overheating.
• Please ensure outputs of any power suppliers used in conjunction with this product comply with its
working voltage.
• Never install product whilst connected to power and double check connections before switching on to
avoid short circuits.
Safety
Warranty
Should this product fail during the 5 year warranty period it will be
replacedfreeofcharge,subjecttothecorrectinstallationoftheoriginal
product in accordance with applicable and appropriate electrical
codes and instructions provided by Teucer, as well as subsequent
return of the faulty unit. Teucer does not accept responsibility for any
installation costs associated with the replacement of this product
and Teucer reserves the right to alter specifications without prior
notice. For further information, please see our Terms and Conditions.
www.teucerled.co.uk/terms-and-conditions/
Teucer (UK) Ltd
Bedford House, Fulham Green
69-79 Fulham High Street
London, SW6 3JW, UK
Tel: +44 (0)20 7350 4429
Fax: +44(0)20 7228 4647
www.teucerled.co.uk
sales@teucer.eu
No. Name No. Name
1 RGB jump 6 RGB fade in and out
2 RGB smooth 7 Red fade in and out
3 6 color jump 8 Green fade in and out
4 6 color smooth 9 Blue fade in and out
5 Color temperature smooth 10 White fade in and out
Dynamic play mode presets
Table of contents
Other TEUCER Controllers manuals
