Tevion ALCD3270 User manual

32" LCD HD Television
instruction manual
After Sales Support TEL: 1300 366 144 WEB:
With integrated digital tuner
Model Number ALCD3270

This page has been left blank intentionally.
1

Dear customer,
Thank you for choosing this digital LCD colour TV. We expect our product and service will
deliver many years of visual enjoyment. This manual is to guide you to set up and operate your
TV as quickly as possible. Please read all the safety and operation instructions carefully before
you begin, then follow the instructions carefully.
This is an IEC safety class I and must be grounded for safety.
WELCOME TO THE WORLD OF DIGITAL LCD COLOUR TV
SAFETY
Important safeguard..............................................3
Preparation for using your new TV...........................4
Selecting a location for the TV......................4
Learning about your TV............................4,5
Connecting Your TV.............................6,7,8
Using the remote control...................................9,10
Preparing the remote control for use..............9
Learning about the remote control...............10
Using the TV .......................................................11
Basic operations....................................11,12
Menu system............................................13
Installing in television channels.............14,15
Adjusting the picture.................................................16
Controlling the audio settings...........................16
Controlling the system settings........................17
Lock Settings..................................................18
Screen Settings..............................................19
Appendix...............................................................20
Cleaning and care..........................................20
Troubleshooting.............................................20
Specifications................................................21
Features:
<Digital TV and Analog TV Display
This TV can receive both digital and analog signals.
<Multimedia functions
With a D-sub15 pin VGA interface, the TV can be used as a high performance LCD display for your
PC/Notebook.
<High quality LCD display
High brightness, high contrast ,wide viewing angle, the line by line scan digital display, real-come back perfect
picture.
<Memorizing system for Auto Search
With an automatic search function, it can install and memorize channels automatically; it adopts a HF Digital
Frequency Synthesizer.
<Multi-Mode wide screen display
16:9, 4:3 ,Zoom 1, Zoom 2 modes for your selection.
<Type D amplifier, outputting better sound in a larger dynamic range, energy saving and high efficiency.
<Electricity saving mode
If there is no signal input, after 15 minutes, the TV will
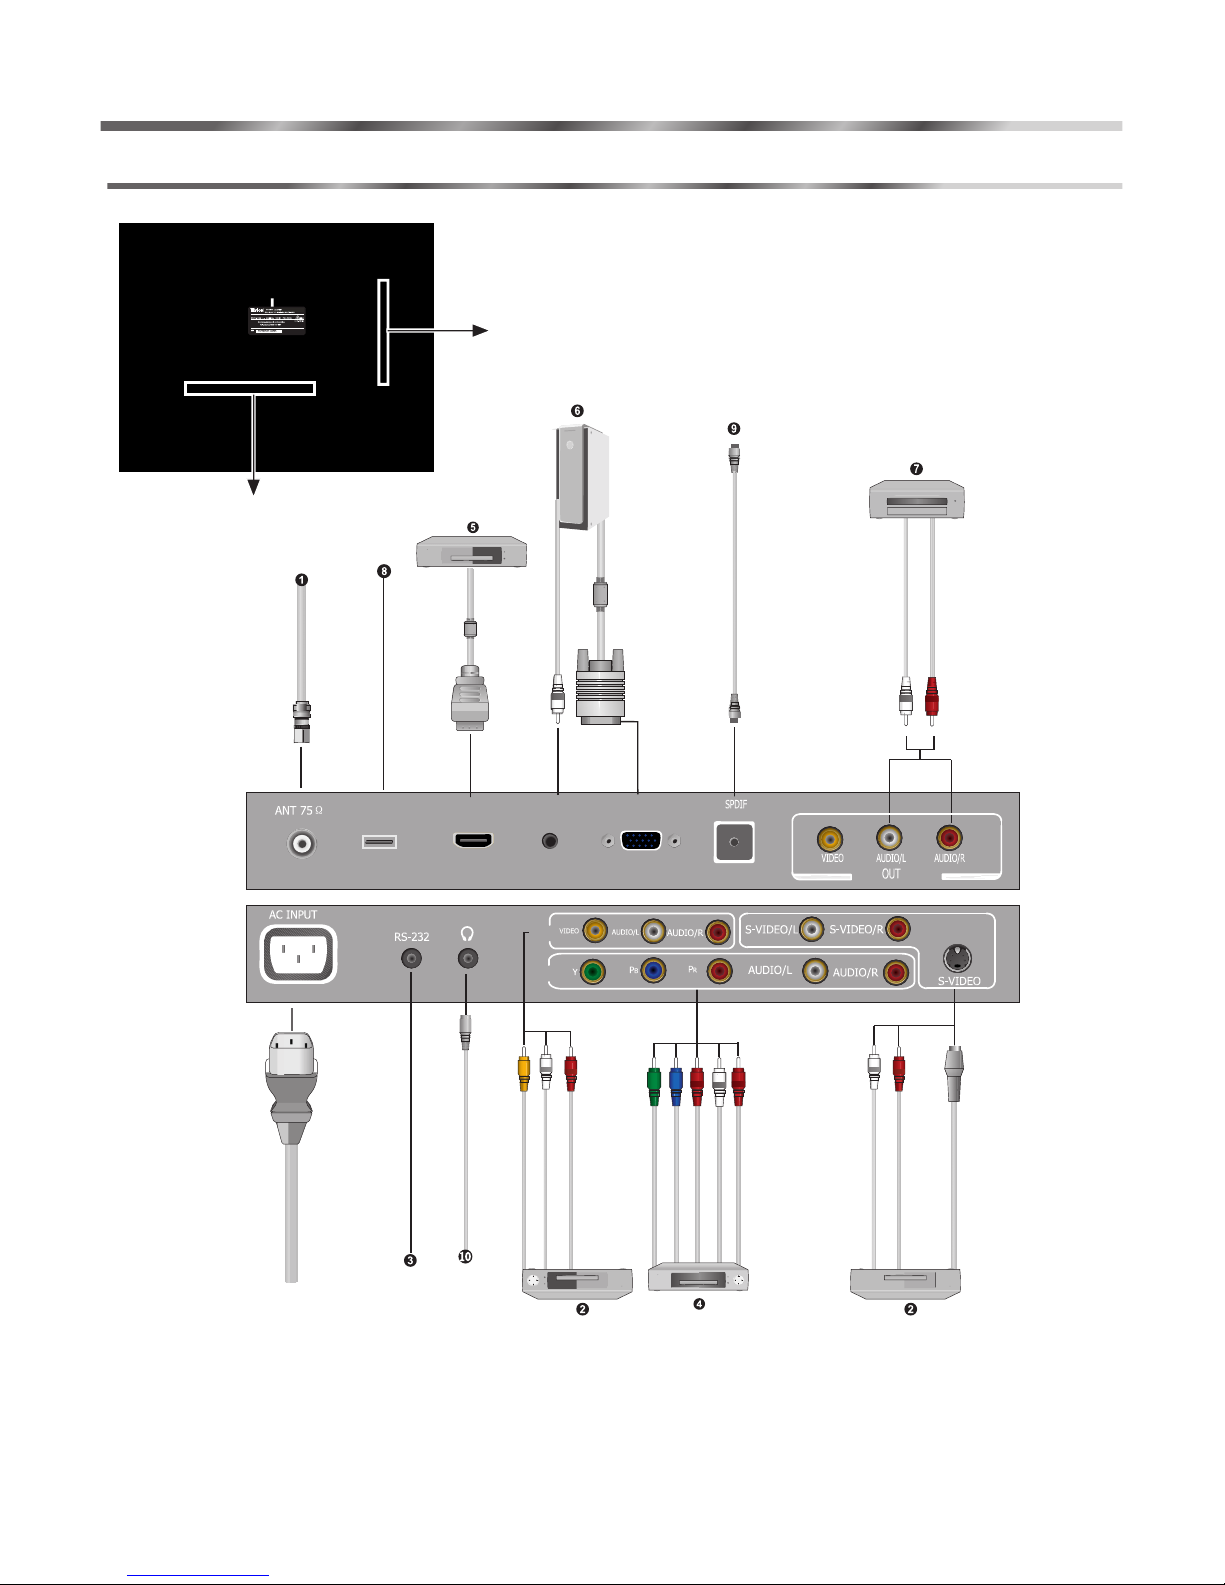
<Multimedia interface
1 D-sub15 pin VGA input, 1 HDMI input, 1 Video input, 1 S-Video input, 1 component input, 1Video output,
2 Audio inputs, 1 Audio output.
go into a low energy/consuming sleep/standby mode,
prolonging the life of the TV and reducing electricity consumption.
2

IMPORTANT SAFEGUARD
FIRE AND SHOCK PRECAUTIONS
the unit free from foreign objects, such as hairpins, nails, paper, etc. Do not put the set into a
bookcase or other enclosures in which it would be poorly ventilated. Do not place it on carpet or a
bed as low ventilation holes could become obstructed.
Do not set liquids, including flower vases and vessels filled with chemicals or water etc, on top of
the unit as liquid could get inside the unit. If a hazardous object falls inside the TV set, unplug
immediately and call 1300 366 144 for further instruction. When placing or moving the TV set, take
care to insure that the power cord is disconnected.
To avoid damage to the power cord, never allow heavy objects such as the TV set itself to be
placed on the power cord. Keep cord away from radiating appliances. Do not allow cord to become
knotted or tangled. Do not lengthen the cord. When removing the power plug from the socket,
always hold onto the plug, never pull by the cord.
This TV set must be connected to a mains power outlet with a protective earth connection.
The mains power outlet should remain readily accessible after installation.
Naked flamed sources, such as lighted candles are never to be placed on or around the TV.
A minimum distance around the TV for sufficient ventilation. (150mm recommended minimum)
WARNING
Do not remove the back cover of the TV set. Accidental contact with high voltage components
could result in electric shock.
If your set emits smoke or produces a strange sound or smell, immediately turn off your TV.
During vacation or other occasions when you will not be using the set for an extended period,
remove the power plug from the socket.
IMPORTANT INFORMATION
If a television is not positioned in a sufficiently stable location, it can be potentially hazardous due to
falling.
Many injuries, particularly to children, can be avoided by taking simple precautions such as:
Only using furniture that can safely support the television.
Ensuring the television is not overhanging the edge of the supporting furniture.
Not placing the television on tall furniture (for example, cupboards or bookcases) without
anchoring both the furniture and the television to a suitable support.
Not standing the televisions on cloth or other materials placed between the television and
supporting furniture.
Educating children about the dangers of climbing on furniture to reach the television or its controls.
Adequate ventilation must be provided to prevent heat build up inside the unit. Keep the inside of
3

You can operate your TV by using the buttons on the front panel or on the remote control. The terminals on the
backside provide all the connections you will need to connect other equipment to your TV.
1. Place the TV on a sturdy platform (away from direct sunlight for optimal viewing).
2. Place the TV far enough from the walls to allow proper ventilation. Inadequate ventilation may cause overheating
which may damage the TV.(150mm minimum recommended distance around a covered enclosure)
Note:
Please contact the retail dealer for wall mounting.
Selecting a location for the TV
Preparation for using your new TV
Learning about your TV
Front Controls
4
NO. Component Component Description
1 POWER Switch Press to turn the main power ON or OFF.
2 Remote sensor Receives signals from the remote control. Do not block.
3 (power standby ) button Press to turn your TV on or off (standby mode).
4 CH button Press to change the channel up.
5 CH button Press to change the channel down.
6 VOL button Press to decrease the volume.
7 VOL button Press to increase the volume.
8 SOURCE button Press to select the signal source for your TV.
9 MENU button Press to activate the on-screen display (OSD).
(NOTE: POWER Button switch location on bottom of front cabinet.)

US B HDMI PC/DVI AUDIO IN VGA
Back Connections
NOTE:
The above picture is for reference only, please refer to the actual TV to determine their appearance.
NO. Connector Description
1 AC INPUT Connect the power cord to this connector.
2 RS-232 For service purposes ONLY (will not support consumer products)
Plug headphone into this jack. When headphones are plugged in, no sound
3 Headphone jack
comes from the headphones.
4 Component Video Connect Component video devices, such as a DVD player / PVR / HDDVD
input (1) /BluRay to these jacks. (Recommended for superior picture quality)
Connect standard video/audio cables to these jacks. The row of jacks under
5 A/V input(1)/output(1)
the unit are inputs (Video/Audio In)The row of jacks on the side of TV are
output jacks (Video/Audio Out)
6 S-Video (1) Connect an S-Video device to this jack, inserting the left and right audio leads
into S-VIDEO/L and S-VIDEO/R
7 Antenna input Connection for the Aerial/Antenna.
8 USB Connector For service purposes ONLY. (Will not support consumer products)
9 HDMI(1) Connect an HDMI device to this jack.
10 PC/DVI AUDIO input Connect a audio from a computer to this jack.
11 VGA video input Connect the video from a computer to this jack.
12 Optical audio output Connect an optical audio device to this jack.(only available in Digital TV or HDMI modes)
13 Rating Label Model number and serial number found here
Preparation for using your new TV
5
Commponent IN
AV IN

Connecting your TV
Preparation for using your new TV
6
White
Yellow
Red
White
Red
Green
Blue
Red
White
White
Red
Red
Part: 1
Part: 2
NOTE: colors for inputs and cables must correspond on both devices.
USB HDMI PC/DVI AUDIO IN VGA
AV IN
Commponent IN
Whenever you connect an audio system to your set ensure that all elements are switched off.
When connecting an external device, match the color of the connection terminal to the cable.
NOTE: colors for inputs and cables must correspond on both devices.

Connecting an Aerial
To view television channels correctly, a signal must be received by the set from the
following source:
-An outdoor VHF/UHF antenna
-After connecting the antenna, power and all sources required below, switch the LCD
on then follow the on screen menu to start automatic tuning.
Connecting External A/V Devices
-Connect a Video RCA or S-VIDEO cable to an appropriate external A/V device such as
VCR, DVD or Camcorder.
- Connect RCA audio cables to “R -AUDIO - L” on the rear of your set and the other
ends to corresponding audio out connectors on the A/V device.
RS232
-Connector for service ONLY (do not connect any equipment here.)
Connecting Component Devices (DVD/PVR)
-Connect Component video and audio cables to Component inputs (“PR/CR”, “PB/CB”,
“Y”) on the rear of your set and the other ends to corresponding component video out
connectors on the PVR or DVD.
-The Y, PB/CB and PR/CR” connectors on your component devices (PVR or DVD) are
sometimes labeled Y, B-Y and R-Y or Y, CB and CR. (Colors for inputs and cables must
correspond to both devices.
NOTE:Some devices such as PVR or DVD players require “Component/YPBPR” signals
to be set to output in the devices settings - please consult your device user
manual for instructions.
Connecting HDMI
-Supports digital connections between HDMI - enabled AV devices such as (PVRs,
DVD, BluRay, HDDVD, AV receivers and digital devices.). -No sound connection is
needed for an HDMI to HDMI connection.
NOTE: Some devices such as PVR or DVD players require HDMI to be set to output in
the device's settings - please consult your device user manual for instructions.
Preparation for using your new TV
7

Connecting Computer
-Connect the D- Sub cable to “PC/VGA (PC IN)” on the rear of your set and the other end
to the Video Card of your computer.
-Connect the stereo audio cable to “AUDIO (PC IN)” on the rear of your set and the other
end to “Audio Out” of the sound card on your computer.
-This device may not be compatible with all PC video/graphic cards.
Connecting AUDIO
-Connect RCA audio cables to “R -AUDIO - L” on the rear of your set and the other ends
to corresponding audio in connectors on the Amplifier or DVD Home Theater.
Connecting USB Connector Devices
For service only.
Optical Audio
Connect an optical audio device to this jack (Toslink optical cable is needed).(Digital TV
mode or HDMI only)
Headphone
Headphones can be connected to the headphone output ( ) on the under side of your
set. (While the headphone is connected, the sound from the built-in speakers will be
disabled)
Preparation for using your new TV
8

Using the remote control
Preparing the remote control for use
Installing the remote control
1. Open the battery cover on the back of the remote control.
Remote control range
the following graphic shows the range of the remote control.
2. Install two AAA size(1.5V) batteries. Match the “+” and “-” signs on the batteries to the signs on the battery compartment.
3. Close the battery cover.
Note:
1.Dispose of your batteries in a designated disposal area. Do not throw the batteries into fire.
2.Do not mix battery types or combine used batteries with new ones.
3.Remove depleted batteries immediately to prevent battery acid from leaking into the battery compartment.
4.If you do not intend to use the remote control for a long time, remove the batteries.
5.The effective range of remote control is suggested in the figure.
9

Using the remote control
Learning about the remote control
10
4
23
56
789
0
1
Picture
Sound
Zoom
D/A
Inform
Recall
OK
Menu
Fav
Mute Still
Source
PC
HDMI
YPBPR
AV
Exit
Sleep
Ⅰ/Ⅱ
Epg
CH
V
V
VOL
V
V
CH
VOL
ALCD100
On/Off(Standby)
Set the sleep time
EXIT all menu display
Volume decrease/Left button
Digital/Analog TV Switch
Display the digital TV information
Enter button/Display channel list
Zoom image button
Mute the sound
Remote sensing Window
Power Indicator
Available source selection
To return to the last viewed program
Fast access to your saved favorite programs
Display the main menu/Back menu display
Display the current channel information
Volume increase/Right button
Sound mode
Previous channel/down button
Next channel/up button
Picture mode
Numeric numbers
Select PC source the
Select sound input
Select Component the source
Select Video/S-Video the source Select the HDMI source
Freeze picture

Main Source
: Move OK : Select
1. Analog TV
2. Digital TV
3. VIDEO
4. S-VIDEO
5. Component
6. PC
7. HDMI
Power ON/OFF
ØTurning on: Connect the TV to an AC power outlet and turn on the power switch located below the front right
hand side of unit. The power indicator will initial be red and then will change to blue. A few seconds later an
image will appear on the screen.
ØTurning off to standby mode: Press the [ ]button on the front panel or on the remote control to switch to
standby mode. You can activate the unit again by pressing the [ ] button.
ØPower indicator:
Red indicates standby mode.
Blue shows that the unit is on.
There will be no light when the power switch is in the off position.
Notes:
Turn the power switch off when you do not intend to use the TV for long periods, for example overnight. Remove
the connection from the wall power outlet if you do not intend to use the unit for longer periods, for example if you
plan to be away a few days.
Wait at least 5 seconds after turning off if you want to re-start the TV.
Signal source selection
<
[SOURCE] button(on the remote ): Press the [SOURCE] button and press the [CH /CH
<
]button to select the
signal input, press [OK] to confirm selection.
[SOURCE] button(on the front right side of panel ): Press the [SOURCE] button and
press the [CH / ] button to select the signal input, press the [SOURCE] to confirm selection.
[HDMI] button: press the [HDMI] button to select the HDMI signal input.
[YPBPR] button: press the [YPBPR] button to select the Component signal input.
[D/A] button: press the [D/A] button to switch between the Digital/Analog signal input.
Select channels
<
You can select channels by pressing the [CH /CH
<
] buttons on the remote or press
[CH / ] on the front right side of the front panel.
Select channels by numbers
Input channel numbers sequentially to select channels by program numbers.
For example, to select channel 120, press the button 1, and 1will be displayed on the top right corner of the
screen, then press the button 2, 12 will be displayed, press the button 0, channel 120 will now appear on screen.
<
[VOL ] or [VOL ] VOL /VOL
<
Adjust Volume
Press on the front panel of the TV or press [ ] on the remote to adjust volume.
Use the [Recall] button
Press the [Recall ] button repeatedly to alternate between the present program and the previous program.
Using the TV
Basic operations
11

Display channel information
Press the [INFO] button to view current channel information in TV source.
Press the [EPG] button to view channel information in digital signal source.
Selecting picture modes
Select sound modes
Still function
Press the [ STILL] button repeatedly to turn “on” or “off” picture still mode.
Zoom function
Press the [ZOOM ] button repeatedly to select the screen aspect ratio among 16:9, 4:3, Zoom1
and Zoom2.
Mute function
Pressing the [ MUTE ] button will allow you to mute the sound temporarily, press again to resume sound.
Sleep function
Pressing the [ SLEEP ] button repeatedly will allow you to change the sleep timer
mode:
Audio function
Pressing the[ I/II ] button will display the analogue/digital audio options. Select your desired
sound output by pressing the [I/II] button repeatedly.
FAV function
Press the [ FAV ] button to display your have saved favorite channels,
press the [Red/Green] buttons to page up/down, press [ button to
select your favorite channel, and press [OK] button to confirm,
press [EXIT] to exit.
Press the [PICTURE] button to select between 4 different pre-adjusted picture modes: Vivid, Standard, Movie and
User (configurable mode). The User mode automatically preserves your personal settings after adjusting
brightness, color and contrast etc.
Press the [SOUND] button to select between 4 different pre-adjusted sound modes:
User (configurable mode), Music (fixed modes) , Standard, Voice. The User mode
preserves your preferred sound settings after using the Equalizer available
under the SOUND submenu.
5Mins,10Mins,15Mins,30Mins,45Mins,60Mins,90Mins,120Mins,180Mins,240Min and Off.
<
CH /CH
<
]
Picture Mode
Audio Mode
: Move
: Move
OK : Select
OK : Select
Vivid
Standard
Movie
User
Voice
Music
Standard
User
Off
Sleep Timer
SLEEP: Change mode
I/II: Change mode
MONO
Analog Audio
Favorite Channel
1 C0
3 C2
5 C3
6 C5
7 C7
9 C9
C0 Page: 1/1
Pre/Next Page Move OK: Select EXIT:Cancel
Using the TV
ZOOM: Change mode
Aspect Ratio
16:9
STILL: Change mode
Still
on
12

You can conveniently control all functions of your television using an advanced menu system which is visible on the
screen via the On Screen Display (OSD) .
Press the [ Menu] button to access the menu system. Six submenus will be immediately available: Picture, Audio,
<
Screen, Channel, Lock Settings, System. Press the [CH /CH
<
] button to select your desired submenu, press
<
[OK/VOL ] button to enter. Then based on the OSD submenu adjust the value of your option.
Here is an example of how to adjust the brightness of the image. All other
sound and image attributes can be adjusted in a similar manner. The way you
'navigate' menus is identical for all functions and features.
Example:
<
1. Press the [MENU] button and select the Picture submenu by using [CH /CH
<
] button.
<
2. Press [OK/VOL ] to enter the Picture submenu.
<
3. Press [CH /CH
<
] to select the Brightness option.
<
4. Press [VOL /VOL
<
] increase or decrease the brightness.
5. When you are satisfied with the results, press [MENU] to adjust other menu options,
or press [EXIT] to exit all menus, the MENU will also exit automatically if it is left idle for a few seconds.
The menu system can be intuitively controlled by pressing just a few buttons:
Button Function in menu system
Enter the next submenu
Display the main menu
MENU
OK
<
VOL
<
CH /CH
<
<
VOL /VOL
<
Select submenu options
Adjust the value of a menu option
Enter the next submenu
MENU: back to previous submenu
EXIT: exit the menu system
EXIT
The menu system will memorize the last changes made, if any, and exit automatically
when no buttons are pressed in a period which is set in.
NO button
Menu System
IMPORTANT
The name of the function or control is highlighted in bold type
The path within the menu system is indicated in Italics within brackets.
As follows:
Function [Menu, Submenu1, Submenu2, Function, Option]
For example:
[Menu, Audio, Headphone Configure, Balance ]
Picture
Brightness 50
50
50
50
0
Contrast
Hue
Saturation
Enhanced Settings
: Move : Change MENU: Back : Exit allEXIT
Sharpness
Color Temp. Cold
Using the TV
13

Installing/Tuning in television channels
Your television has been pre-adjusted to receive the five major TV networks available(only available in analogue TV
mode) in capital cities of Australia; however you can add or delete channels at any time using the functions under the
Channel submenu.
[Menu, Channel, Auto Install]
-both the Analog and Digital signal source
1.Press [Menu] button to display the main OSD options.
<
<
2.Select the Channel option by using [CH /CH
<
] press the [OK/VOL ]
button to enter the Channel OSD.
<
3.Press the [CH /CH
<
] button to select Auto Install.
<
4.Press the [OK/VOL ] button to automatic search and this will memorize all the
available channels. Auto Install will take a few minutes; please wait until it has finished.
Manual Install [Menu, Channel, Manual Install]
-in Analog signal source
Manual Install is only needed when analogue channels are not found under an automatic tune.
1.Press [Menu] display the main OSD.
<
<
2.Press [CH /CH
<
] to select the Channel option, and press the [OK/VOL ]
button to enter the Channel OSD.
<
<
3.Press the [CH /CH
<
] button to select Manual Install, and press the [OK/VOL ]
button to enter the Manual Install menu.
<
<
4.Press the [CH /CH
<
] button to select Channel No., and use [VOL /VOL
<
] to
set the Manual Install Channel No..
<
<
5.Press the [CH /CH
<
] button to select Channel No. Use the [VOL /VOL
<
]
button to set the Manual Install initial Channel No./Direction, then press [OK]
to install channels from the initial channel No. along this initial direction.
<
6.If you would like to edit your installed analogue channel name, press [CH /CH
<
]
to select Channel Name, and then select a number (0_9) or press repeatedly to select a letter.
e.g. 1 (A,B,C)
2 (D,E,F)
<
pressing '1' 3 times will display the letter C. press [VOL ] to move to the next letter space and repeat until the desired
channel name is displayed.
<
7.Press [CH /CH
<
] to select Save and press [OK] to confirm. Press [EXIT] button to exit all menus.
Manual Install [Menu, Channel Manual Install]
-in Digital signal source
1.Press [Menu] to display the main OSD options.
<
<
2.Press [CH /CH
<
] to select the Channel option, press the [OK/VOL ] button to enter the Channel OSD. .
<
<
3.Press the [CH /CH
<
] button to select Manual Install, press the [OK/VOL ] button to enter the Manual Install menu.
<
<
4.Press the [CH /CH
<
]button to select Channel No., use [VOL /VOL
<
] to set the Manual Install initial Channel No..
<
then press [CH /CH
<
] to select scan item, press the [OK] button to begin scan from the initial Channel No..
Auto Install
This is the easiest and most effective way to install all channels available in your area
automatically.
Auto install in progress
EXIT: Cancel Auto Install
Channel
Manual Install
Auto Install
Fine Tune
Program Edit
: Move OK/ : Enter EXIT/MENU: Exit
Auto Install
Analog Channels: Se arching channel frequency: 487.288
Total channels fou nd: 4
Channel
: : Back : Exi t AllMove : Change MENU EXIT
Analog Channel Manual Install
Channel No.
Direction
Channel Name
Band Air
2
UP
Save
Channel
: : Back : Exit AllMove : Change MENU EXIT
Digital Channel Manual Install
Channel No.
12
Scan
Using the TV
14

Fine tuning [Menu, Channel , Fine Tune]
Under poor reception conditions, or when receiving analogue signals from distant
TV stations, the picture quality might be improved by using the Fine Tune option in
the Channel submenu. Select Fine Tune and adjust to display the best effect image
<
using the [VOL /VOL
<
] buttons. (Applicable for Analogue transmission only)
Editing Program Settings [Menu, Channel , Edit]
You can LOCK, Skip, add to Favorite or Rename your programs which are installed and stored. (Renaming of
channels is available in Analogue only, digital channels cannot be re-named)
1. Press [Menu] to display the main OSD options.
<
<
2. Press [CH /CH
<
] to select Channel item, and press the [OK/VOL ] button to enter.
<
<
3. Press the [CH /CH
<
] button to select the Program Edit, and press the [OK/VOL ] button to enter the Program
Edit submenu.
<
4. Press the [CH /CH
<
] button to select which Channel No. you want to edit,
use the Red button to set Lock programs,
use the Green button to set Skip programs,
use the Yellow button to set Favorite programs,
use the Blue button to set Rename programs. (Analogue ONLY)
If you would like to edit an analogue channel name, press the blue button. Either select a number (0_9) or press
repeatedly to select a letter.
e.g.
1 (A,B,C)
2 (D,E,F)
<
pressing '1' 3 times will display the letter C. press [VOL ] to move to the next letter space and repeat until the
desired channel name is displayed.
After your setting:
The channels which are set to 'Lock' cannot be watched without inputting a password, if the password protect is
activated most are locked except inputting if the password protect is activated most password.
<
The channels which are set to 'Skip' will not be displayed in normal browsing of channels [CH /CH
<
], but they still
can be selected by pressing the corresponding channel number.
The channels which are set to 'Favorite' can be selected via a special 'Favorite OSD' by pressing the [FAV] button
directly.
: Move : Switch Lock Skip Favorite Edit Name OK : Select
ChanName Lock Skip Favorite
No Name
No Name
No Name
No Name
My love
No Name
bb
No Name
No Name
No Name
No Name
No Name
NO
1
2
3
4
5
6
7
8
9
10
11
12
Channel
Channel Frequency: 503.236MHz
-1.5MHz +1.5MHz
Fine Tune
:Tu ne Down/Up EXIT:Exit Fine Tune
Using the TV
15

Adjusting the Picture [Menu, Picture, ...]
A wide variety of adjustments and optional advanced picture enhancement
features are available in the Picture submenu. Their purpose is described
below.
Picture
Brightness 50
50
50
50
0
Contrast
Hue
Saturation
Enhanced Settings
: Move : Change EXIT/MENU: Exit
Sharpness
Color Temp. Cold
Using the TV
The Audio [Menu, Audio,...] submenu contains all controls necessary to adjust audio to suit your needs and
preferences.
Balance
Adjust the volume from the left and right speakers.
AVC - 'Automatic Volume Control'
Lessens the gap in audio volume between the networks.
Digital Audio
With the Digital Audio (PCM, 5.1 CH Audio) effect, you can enjoy higher quality audio.
(Supported via Optical digital audio Out, only available in digital TV mode.
If DTV accompanying sound output format is MPEG2, Digital Audio switch to 5.1 CH
Audio, there will no sound output in SPDIF output.))
Headphone Configure
1. Mute the headphone sound or not.
2. Adjust the volume of the headphones.
3. Automatic Volume Control'
4. Adjust the volume from the left and right headphone speakers.
Controlling the Audio
16
The purpose and recommended use of these features is explained below.
Adjust luminance of the image from dark to light.
Accentuate both the black and white intensity simultaneously. (Higher
the setting the more vivid the blacks and whites appear)
Adjust colour saturation, saturation is the amount of gray in a particular colour, colour
with more gray is considered less saturated.
Increase or decreases image resolution. If you are viewing your TV at a close distance
lower the sharpness to soften the picture. Add more sharpness if you like a more defined
vivid picture.
Adjust the colour balance of the image. The average colour can be slightly biased
from Warm (red bias) to Cold (blue bias) with intermediate graduations. This can be
used to correct video sources in order to obtain a pure white display of your preference.
Adjust the Hue of the image. Note: PAL system does not require Hue compensation.
Adjustment is only for NTSC systems.
The fine tuning of Hue refers to the gradation of colour within the
picture. Minor errors in the NTSC system result in images with either
red or green tint, hue adjustment eliminates this effect.
Film mode settings : Film Mode detects the original frames of film within the video
stream and reconstructs an accurate image. This mode produces an image free of
motion artifacts and full vertical resolution.
Adjustment / Control
Brightness
Contrast
Saturation
Sharpness
Colour Temp.
Hue
Enhanced Settings
Audio
0
Equalizer Settings
Headphone configure
: Move OK/ : Enter EXIT/MENU: Exit
Balance
DigitalAudio PCM
AVC Off
Audio
50
0
Balance
Headphone configure
Volume
AVC Off
Mute Off
:Move : Change : Back : Exit AllMENU EXIT

Controlling the System
System
System
OSD Setting
Transparency
Low
1MinTimeout
Auto Turn-Off
Mode Daily
Setting of Auto Turn-Off Time:
12 : 00 PM
:Move : Cha nge : Back : Exit AllMENU EXIT
System
Auto Turn-On
Mode Off
System
Time:
Date/Time
Auto Turn-On
Auto Turn-Off
Time Zone WA
The System [Menu, System,...] submenu contains: Bluescreen, SetupWizard,
OSD Settings, Time and Factory reset. You can adjust them to your liking.
Bluescreen setting [Menu, System, Bluescreen]
If you prefer a Bluescreen, please set the Bluescreen option to 'On' in the
System OSD. Otherwise , please set the Bluescreen option to 'Off' in the
System OSD. [Fig. 1]
SetupWizard setting [Menu, System, SetupWizard ]
By selecting 'Setup Wizard' and changing to 'ON', at next start up of your TV you will be
given initial set-up options. You will be asked to select the Time Zone, Local time settings,
Auto Tune set-up for Digital and Analogue broadcasts. If the password option has been
set you will be asked to input a password.[Fig. 1]
OSD Settings [Menu, System, OSD Settings ]
You can also adjust the OSD display time, time for which the menu will remain visible
and active for your adjustment.
available times are; 1 minute, 30 seconds and 10 seconds. Adjust to your preference.[Fig.2]
You can also adjust the OSD transparency options: Low ,Medium, and High .
Time Settings [Menu, System, Time ]
There are four items in the Time settings:
1, [Fig. 3]
[Fig. 4]
[Fig. 5]
: [Fig. 6]
Factory reset [Menu, System, Factory reset ]
When you wish to reset the TV back to it's 'factory setting' you can do so by setting the
'Factory Reset' mode to YES. [Fig. 7]
This function is used to restore all parameter settings back to the factory or original
levels. A function which you might use if children have adjusted settings where you
cannot return to your normal preference.
Time Zone: First, set the Time Zone based on your local area.
2, Date/Time: Please set current time and date.
3, Auto Turn-On: auto turn on the TV in your set time.
4, Auto Turn-Off auto turn off the TV in your set time.
[Fig. 5]
[Fig. 3]
[Fig. 6]
[Fig. 2]
:Move : Cha nge : Back : Exit AllMENU EXIT
System
:Move OK : Se lect MENU: Back EX IT: Exit All
Factory
Reset
If YES is selected , all parameters will be reset.
No
YES
[Fig. 7]
System
Date Time Settings:
Mode Manual
Input Date/Time:
2005 / 01 / 01
08 09 AM
[Fig. 4]
:Move : Cha nge : Back : Exit AllMENU EXIT
System
:Move : Cha nge : Back : Exit AllMENU EX IT
Bluescreen On
OffSetupWizard
OSD Settings
Time
Factory Reset
[Fig. 1]
Using the TV
17

LockSettings
LockSettings
Save
:Move : Cha nge MENU: B ack EXIT: Exi t All
:Move& Select : Back : E xit AllMENU E XIT
G
PG
M
MA
AV
R
Block Al l
Lock Settings
The Lock Settings [Menu, Lock Settings,...] submenu contains
ou can adjust them for your
requirements.
Change Password [Menu, System, Change Password]
-Set and change your password to protect your TV settings.
Setting your password:
1. Input your password“____”(The factory initial password is “1111”).
2. Repeat input your password“____” to confirm.
3. Select the “Save” option and press [OK] button to confirm.
Parental Guidance [Menu, Lock Settings, Parental Guidance]
- in Digital signal source
<
Select rating Lock by pressing the [CH ] up to your desired rating block. Or select 'Block
All' by selecting and pressing 'OK' . To select rating blocks scroll up to G by pressing
<
[CH ] then press [CH
<
] to de-select in descending order.
If you set a kind of restricted Parental Guidance, the password protection is being
activated, Most of function operations are locked except inputting password.
Note: Not all channels display ratings.
Parental Guidance is a good tool to protect your children from watching unsuitable
television programs.
Parental Guidance,
Factory Reset Lock, Child Lock, Change Password, y
Password
Input Password
Confirm Password
LockSettings
:Move OK/ : Enter MENU /EXIT: Exit
Please input pa ssword:
(You hav e 3 times to try)
Password
0-9:Input OK : Co nfirm EXIT: Cancel
Parental guide code
Block G
and above
(optional)
Receiver menu set-up and Suggested OSD for setting blocked programs
(Restriction of access)
Block
All
Ticks reflect blocked programs when desired locks are engaged.
Block PG
and above
Block M
and above
Block MA
and above
Block AV
and above
Block R
and above
NO Block
X
X
X
X X
X
X
X X
X
X
X
X X
X X X
X X X
X
X
X X
X
X
X
X
X X
X X
XX
X
G General G
PG Parental
guidance PG
recommenced
M Mature
audience 15+ M
MA Mature
audience 15+ MA
AV Adult
audience, strong AV
violent 15+
R Restricted 18+ R
Block All Block All
Using the TV
Parental Guidance
Child Lock
Change Password
Block None
Off
18

Screen
0
0
0
0
Image Position
H Size
V Size
Phase
Clock
Auto Sync
: Move OK/ : Enter EXIT/MENU: Exit
Lock Settings
Screen Settings
If Child Lock is set to “on” , most of the remote and the panel buttons are invalid except [POWER],[VOL ] , [VOL ] ,
<
and the [MENU] buttons on the front side panel and [POWER],[VOL , [VOL
<
] , [OK] , [MENU] and [NUMBER]
buttons on the remote control. Press [MENU] to display the main menu, only Lock Settings can be selected and
adjusted by inputting your password, the [NUMBER] buttons are used for inputting a password.
NOTE:
The factory initial password is “1111”.
Child Lock [Menu, Lock Settings, Child Lock]
PC Setting
PC software setting: Set the PC Software properly
Supported VGA Mode:
VGA SVGA XGA SXGA
Please note: Your PC/Notebook may not be able to display some of these
resolutions.
Take Windows XP as an example, and the Windows system display setting as
illustrated:
1,Right click anywhere on your display, select 'Properties'.
2,Find the Settings tab on the dialogue box, set the screen Resolution.
3,See above details about the resolutions supported by this unit.
4,Click OK to exit.
PC Screen Setting
Image Position: Adjust the VGA image position single unit mode.
H Size: Adjust the horizontal size of the image.
V Size: Adjust the vertical size of the image.
Phase: Adjust the VGA phase to match he PC.
Clock: Adjust the VGA Clock to match he PC clock.
Auto Sync: Auto adjust the VGA image position.
Using the TV
19
Table of contents
Other Tevion LCD TV manuals