The Handy THGT User manual

07-02-2017
GARDEN TROLLEY
Model No: THGT -- Product No: 193854001
ASSEMBLY REQUIRED
SAVE THESE INSTRUCTIONS
SPARES & SUPPORT: 01793 333212
IMPORTANT
Please read & understand this manual, paying attention to the safety instructions, before use.
The manufacturer reserves the right to change the product specification and livery according to
continued product improvements.
Images used are for information purposes only and may differ from the actual product.
INSTRUCTION MANUAL


CONTENTS
SPECIFICATION
INTENDED USAGE
IMPORTANT INFORMATION
GENERAL SAFETY INSTRUCTIONS
SET UP & PREPARATION FOR OPERATION
MAINTENANCE & STORAGE
TROUBLE SHOOTING
PARTS DIAGRAM & LIST
WARRANTY
If you require any assistance with regards to the contents or operation of your machine, please
contact us:
Tel: 01793 333212 - Mon to Friday 8.00am to 5.30pm
(excl. Bank Holidays)
Email: customerservice@handydistribution.co.uk
ASSEMBLY IS REQUIRED –TWO PERSON
This product requires assembly before use. See the “Assembly” section for instructions.
Because of the weight and size of the Trolley, it is recommended that a minimum of TWO adults be
present to assist with the assembly.

INTENDED USAGE
The Large Garden Trolley is designed for use in private gardens and primarily used around
GRASS OR LAWN AREAS, but not in public facilities, parks or sports grounds and not for agricultural
or forestry use.
This is a garden trolley, therefore extended use over abrasive surfaces (e.g. concrete, tarmac etc.)
could cause premature wear on the trolley tyres. Commercial or industrial environments are not
recommended.
Compliance with this manual supplied by the manufacturer is a prerequisite for the proper usage of
the machine. The operating manual contains servicing and maintenance instructions as well as
directions for use.
SPECIFICATION
The manufacturer reserves the right to change the product specification and livery according to
continued product improvements.
Model
THLGT
Product No.
193854001
Load Capacity (kgs)
200
Overall Dimensions (cm)
109(L) 51(W) 60(H) (exc. draw bar handle)
Internal Bed Dimensions (cm)
94(L) 48(W) 25(H)
Tyre Size
10x4.10/3.50-4
Tyre
Puncture-less
IMPORTANT INFORMATION
WARNING
Read this instruction manual carefully before operating this machine. Make sure that you are familiar
with the controls and properly operate the machine. Following these instructions can reduce the risk
of personal injury.
IF NOT USED PROPERLY THIS MACHINE CAN BE DANGEROUS!
This machine can cause serious injury to the operator and others, the warning and safety instructions
must be followed to ensure reasonable safety and efficiency in using this product. The operator is
responsible for following the warning and safety instructions in this manual and on the machine.
Never use the product unless the components are correctly positioned and operational.
TRAINING
Read the instructions carefully: Be familiar with the controls and the proper use of the equipment.
Never allow children or people unfamiliar with these instructions to use the product.
Local regulations can restrict the age of the operator.
Keep in mind that the operator or user is responsible for accidents or hazards involving the machine
that occur to other people or their property.
GENERAL SAFETY INSTRUCTIONS
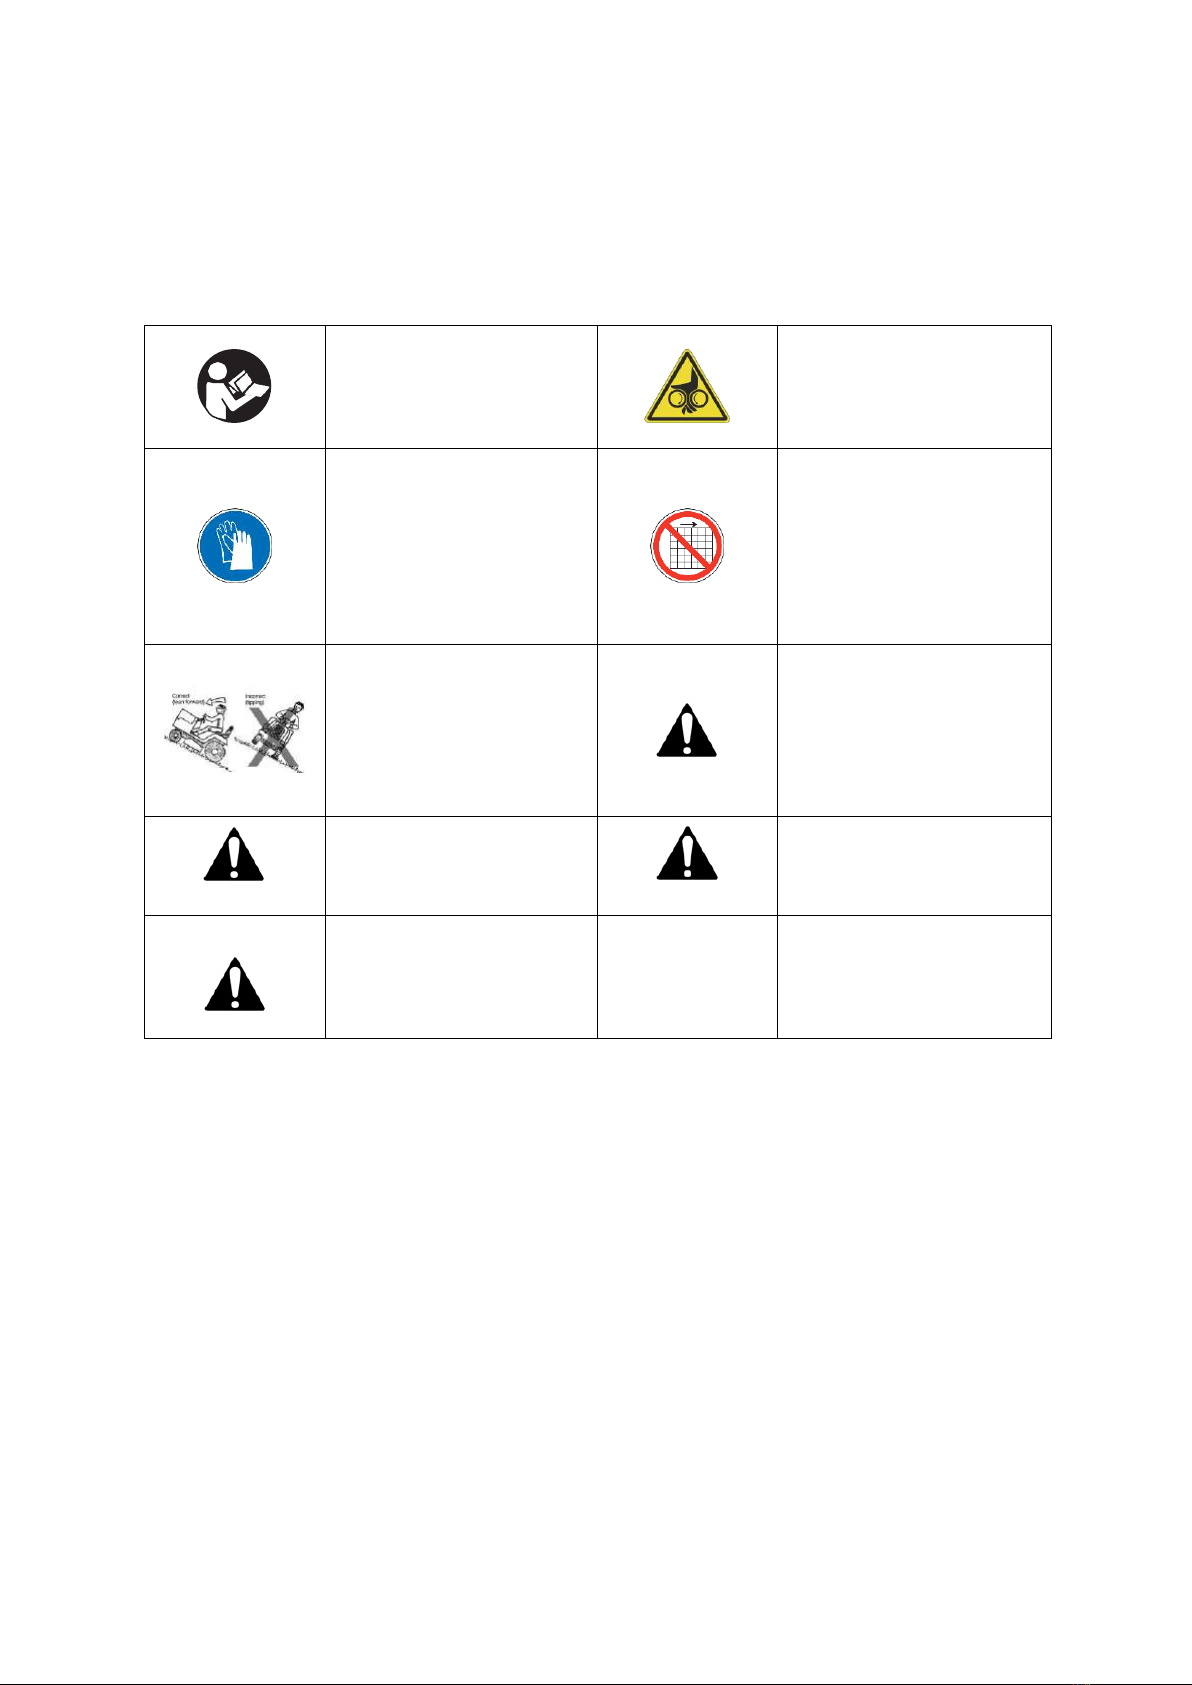
It is important that you read and understand the owner’s manual and labels affixed to the
machine. Learn its application and limitations as well as the specific potential hazards. Retain
these instructions for future reference. The operator is responsible for following the warnings &
instructions in this manual and on the product.
Read & understand operator’s
manual before using the
machine. Failure to follow
instructions could result in
death or serious injury.
DANGER
Pinch points can cause
personal injury.
Wear gloves to protect your
hands during assembly.
Check your machine before
using. Keep guards in place
and in working order.
Frequently check to see that
foreign objects are removed
before using. Replace
damaged, missing or failed
parts before using it.
Be careful when using on
slopes.
Do not operate on inclines
greater than 15°.
It is advised to manually or
with your tractor, pull up or
down the incline.
Safety alert symbol. Used to
alert you to potential personal
injury hazards. Obey all safety
messages that follow this
symbol to avoid possible
injury.
DANGER
Indicates an imminently
hazardous situation which, if
not avoided, will result in
serious injury.
WARNING
Indicates a potentially
hazardous situation which, if
not avoided, could result in
serious injury.
CAUTION
Indicates a potentially
hazardous situation which, if
not avoided, may result in
minor or moderate injury.
CAUTION
Used without the safety alert
symbol, indicates a potentially
hazardous situation which, if
not avoided, may result in
property damage.
STAY ALERT
Do not operate the machine while under the influence of drugs, alcohol, or any medication that
could affect your ability to use it properly. Do not use this machine when you are tired or distracted
from the job at hand. Be aware of what you are doing at all times. Use common sense.
AVOID DANGEROUS CONDITIONS
Make sure there is adequate surrounding workspace. Cluttered areas invite injuries.
Keep your work area clean with sufficient light. Keep the area around the machine clear of
obstructions, grease, oil, rubbish and other debris which could cause persons to fall onto moving
parts.
INSPECT YOUR MACHINE
Check all bolts, nuts, and screws for tightness before each use, especially those securing guards and
drive mechanisms. Vibration during use, may cause these to loosen.
Form a habit of checking to see that all other tools/equipment are removed from the working area
before turning it on.
Replace damaged, missing or failed parts before using it. Warning labels carry important
information. Replace any missing or damaged warning labels.

DRESS PROPERLY
Do not wear loose clothing, gloves, scarfs, neckties or jewellery (rings, wrist watches), which can be
caught in moving parts. Protective electrically non-conductive gloves and non-skid heavy duty
footwear are highly recommended when working. Wear a face or dust mask if the operation is dusty.
Always wear safety glasses/goggles and/or face shields. Everyday eyeglasses have only impact
resistant lenses; they are not safety glasses/goggles. Wear protective hair covering to contain long
hair, preventing it from getting caught in machinery.
KEEP BYSTANDERS AND CHILDREN AWAY
Keep unauthorised persons a minimum distance of 10 metres away from the machine. If
approached, stop the machine immediately. Do not allow children to handle, climb on or in the
machine. Do not at any time allow anyone to sit or stand on the Trolley. Do not allow children to
play on, stand upon or climb in the Trolley.
DO NOT OVERREACH
Keep proper footing and balance at all times when using the machine. Never stand on the
machine. Serious injury could occur if the machine is tipped or if the moving parts are
unintentionally contacted. Do not store anything above or near the machine, where anyone might
stand on the machine to reach them.
AVOID INJURY FROM UNEXPECTED ACCIDENT
Keep hands & feet out of the way of all moving parts. Do not place any part of your body or any
tool e.g. in the machine during operation.
DO NOT FORCE TOOL
Do not exceed the equipment maximum load capacity of 350kg
Always ensure that your load is evenly distributed over the front and rear axles & four wheels.
Do not try to carry loads that make the Trolley unstable.
NEVER LEAVE MACHINE RUNNING UNATTENDED
Do not leave your machine unattended until it has come to a complete stop.
MAINTAIN YOUR MACHINE WITH CARE
Clean the machine immediately after use. Keep the machine clean to ensure it operates to its full &
safest performance. When maintaining this machine, only the manufacturer’s original replacement
parts should be used. The use of non-original manufacturer parts may invalidate your warranty.
PROTECT THE ENVIRONMENT
Take left over materials to an authorised collection point or follow the stipulations in the country
where the machine is used. Do not discharge into drains, soil or water.
STORE IDLE EQUIPMENT
When not in use, the machine should be stored in a dry location. Keep the machine away from
children and others not qualified to use it.
TOWING
Do not exceed the equipment maximum load capacity of 2000kg.
Do not try to carry loads that make the Trolley unstable.
Avoid large holes and ditches when using the Trolley.
Be careful when operating on steep gradients (hills) the Trolley may tip over.
Only tow with recommended vehicles (Lawn/Garden Tractors and ATVs).
Always operate at a reduced speed in rough terrain, along creeks, ditches and on hillsides.
Do not operate close to creeks, ditches and public roads.
To avoid personal injury and/or equipment damage DO NOT EXCEED 10 MPH.
Always use caution when loading and unloading the Trolley.
Always secure and lock the Trolley to the vehicle hitch before operating
SET UP & PREPARATION
FOR OPERATION
Follow the operating instructions step-by-
step and use the pictures provided as a visual
guide to easily assemble the machine.
Please ensure that you have all the necessary
parts, before commencing with the
assembly. Parts lists are supplied towards
the back of this manual.
In the unlikely event that you are missing a
component, please do contact us Tel:
01793 333212, option 2 or Email:
customerservice@handydistribution.co.uk
for assistance.
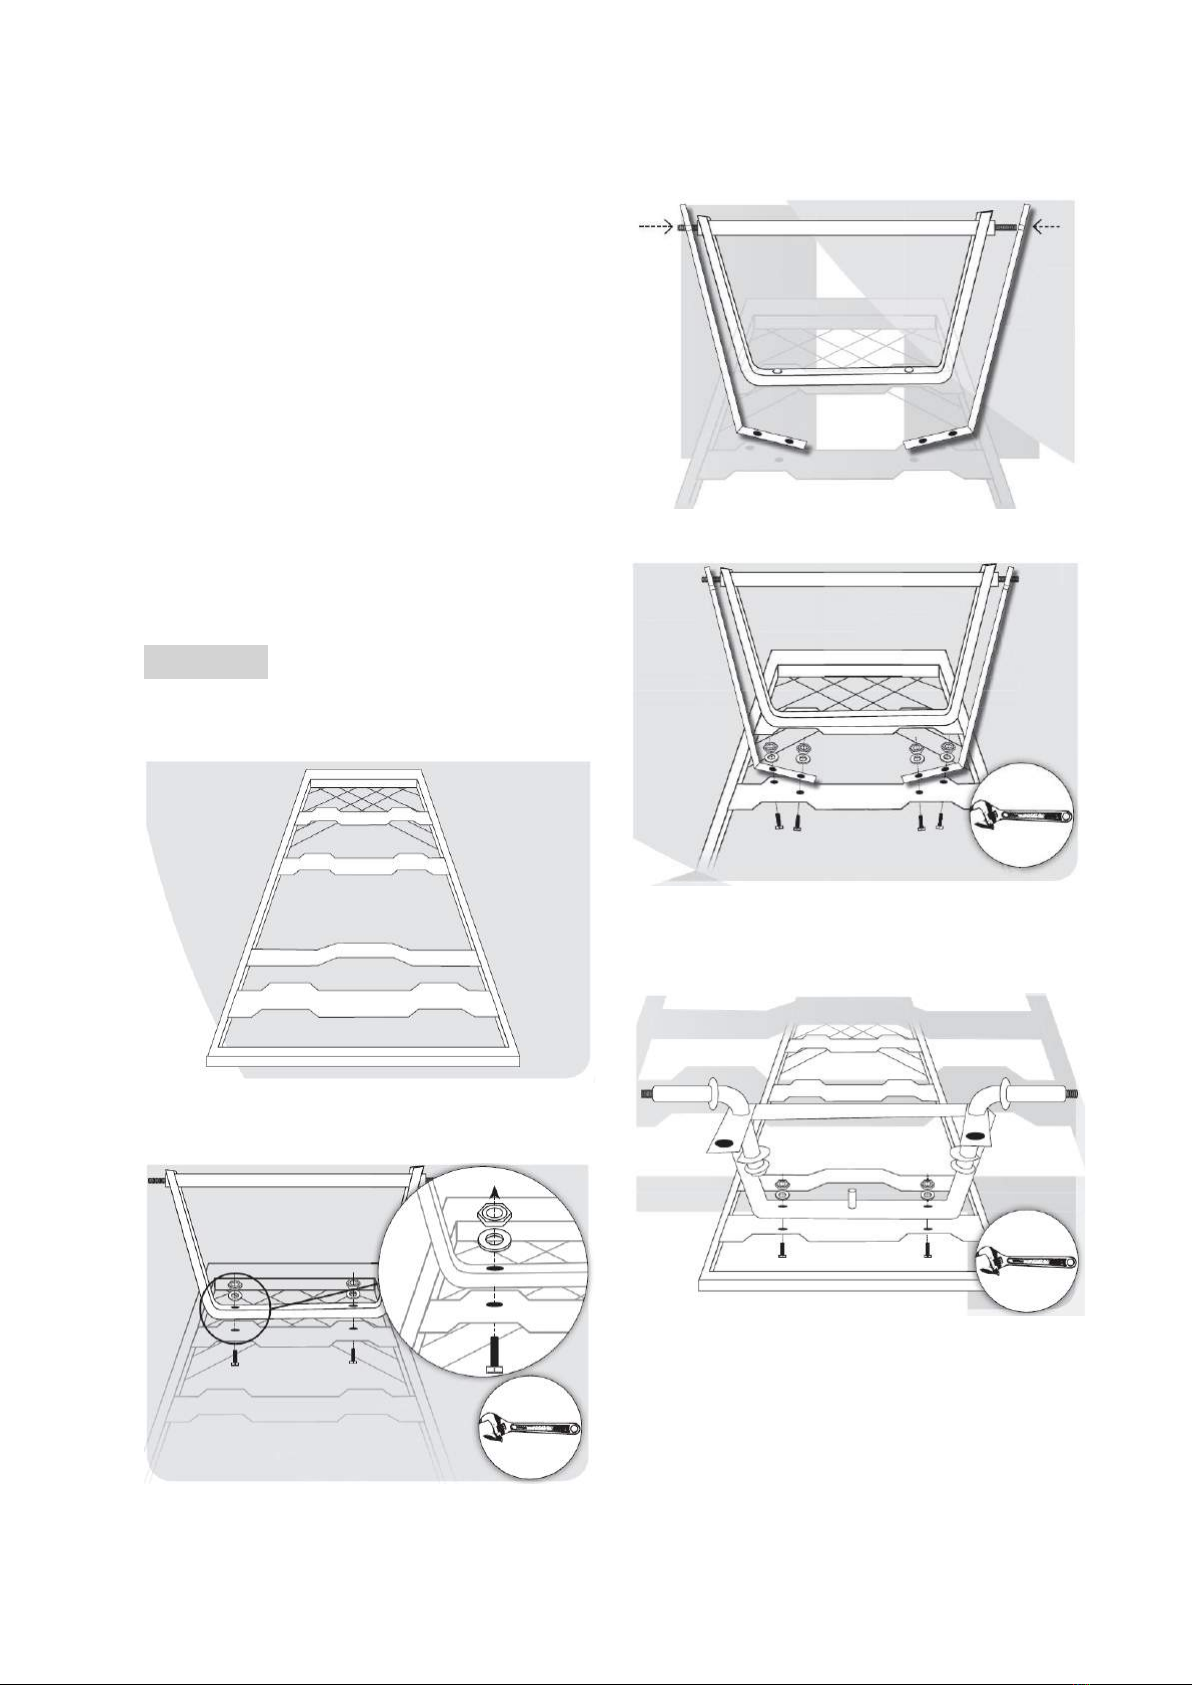
ASSEMBLY
STEP 1
Turn the trolley Bed upside down so that the
underside is facing up.
STEP 2
Attach the Rear Axle Support to the Bed using
two Carriage Support Bolts, Washers & Nuts.
Place the Right and Left Rear Axle Braces onto
the Rear Axle Support
Attach using Rear Axle Braces using four
Carriage Support Bolts, Washers & Nuts.
STEP 3
Attach the Front Axle Support to the Bed
using two Carriage Support Bolts, Washers &
Nuts.
STEP 4
Attach the Steering Link Connector to the
Front Axle Support arms, using Bolts, Washers
and Nuts. The connector should sit over the
axle as pictured.
STEP 5
Position the Central Front Axle Brace to the
Front Axle Support
Fix the Central Front Axle Brace to the Bed
using Carriage Bolt, Washer & Nut.
STEP 6
Slot the stepped arm of the Yoke onto the
protruding leg of the Front Axle Support (this
leg is stepped, so the Yoke will not go all the
way over the leg).
Position the straight arm of the Yoke between
the Centre Front Axle Brace & Front Axle
Support.
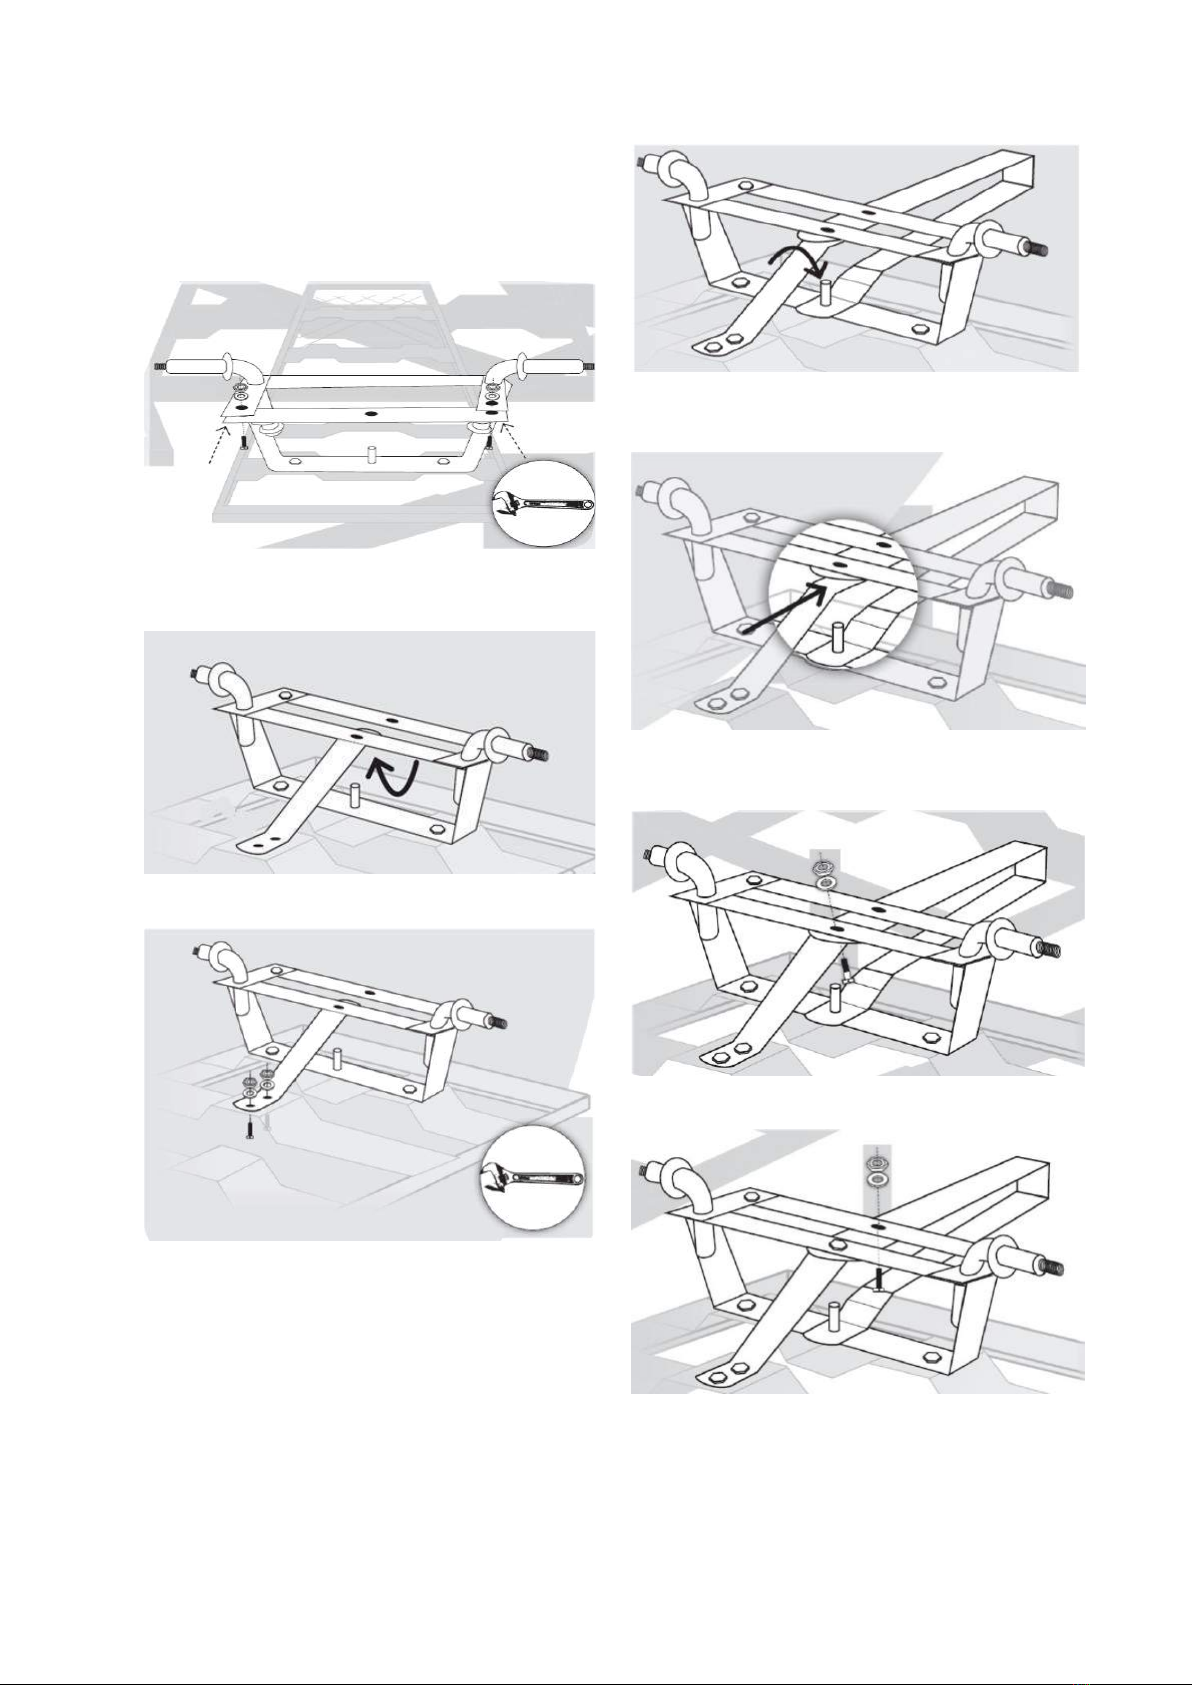
STEP 7
Fix the Yoke & Centre Front Axle Brace to the
Front Axle Support usng Bolt, Washer & Nut
Fix the Steering Link Connector to the Yoke
using Carriage Bolt, Washer & Nut.
Slide the Large Washer over the Front Axle
Support protruding leg (this is stepped) and
slide the Split Pin through the hole. Split open
the Pin legs to secure.
STEP 8
Attach the Pull Adapter (13) to the Yoke by
aligning the holes in the handle, handle
coupling and the Yoke.
Secure using the Pull Handle Bolt, Washer and
Nut (21).
If you wish to attach the trolley to a garden
tractor, remove the end of the Pull Handle by
undoing the R-Clip and removing the Pull Bolt,
and attach the tow hitch directly to the
tractor using the same R-Clip & Pull Bolt.
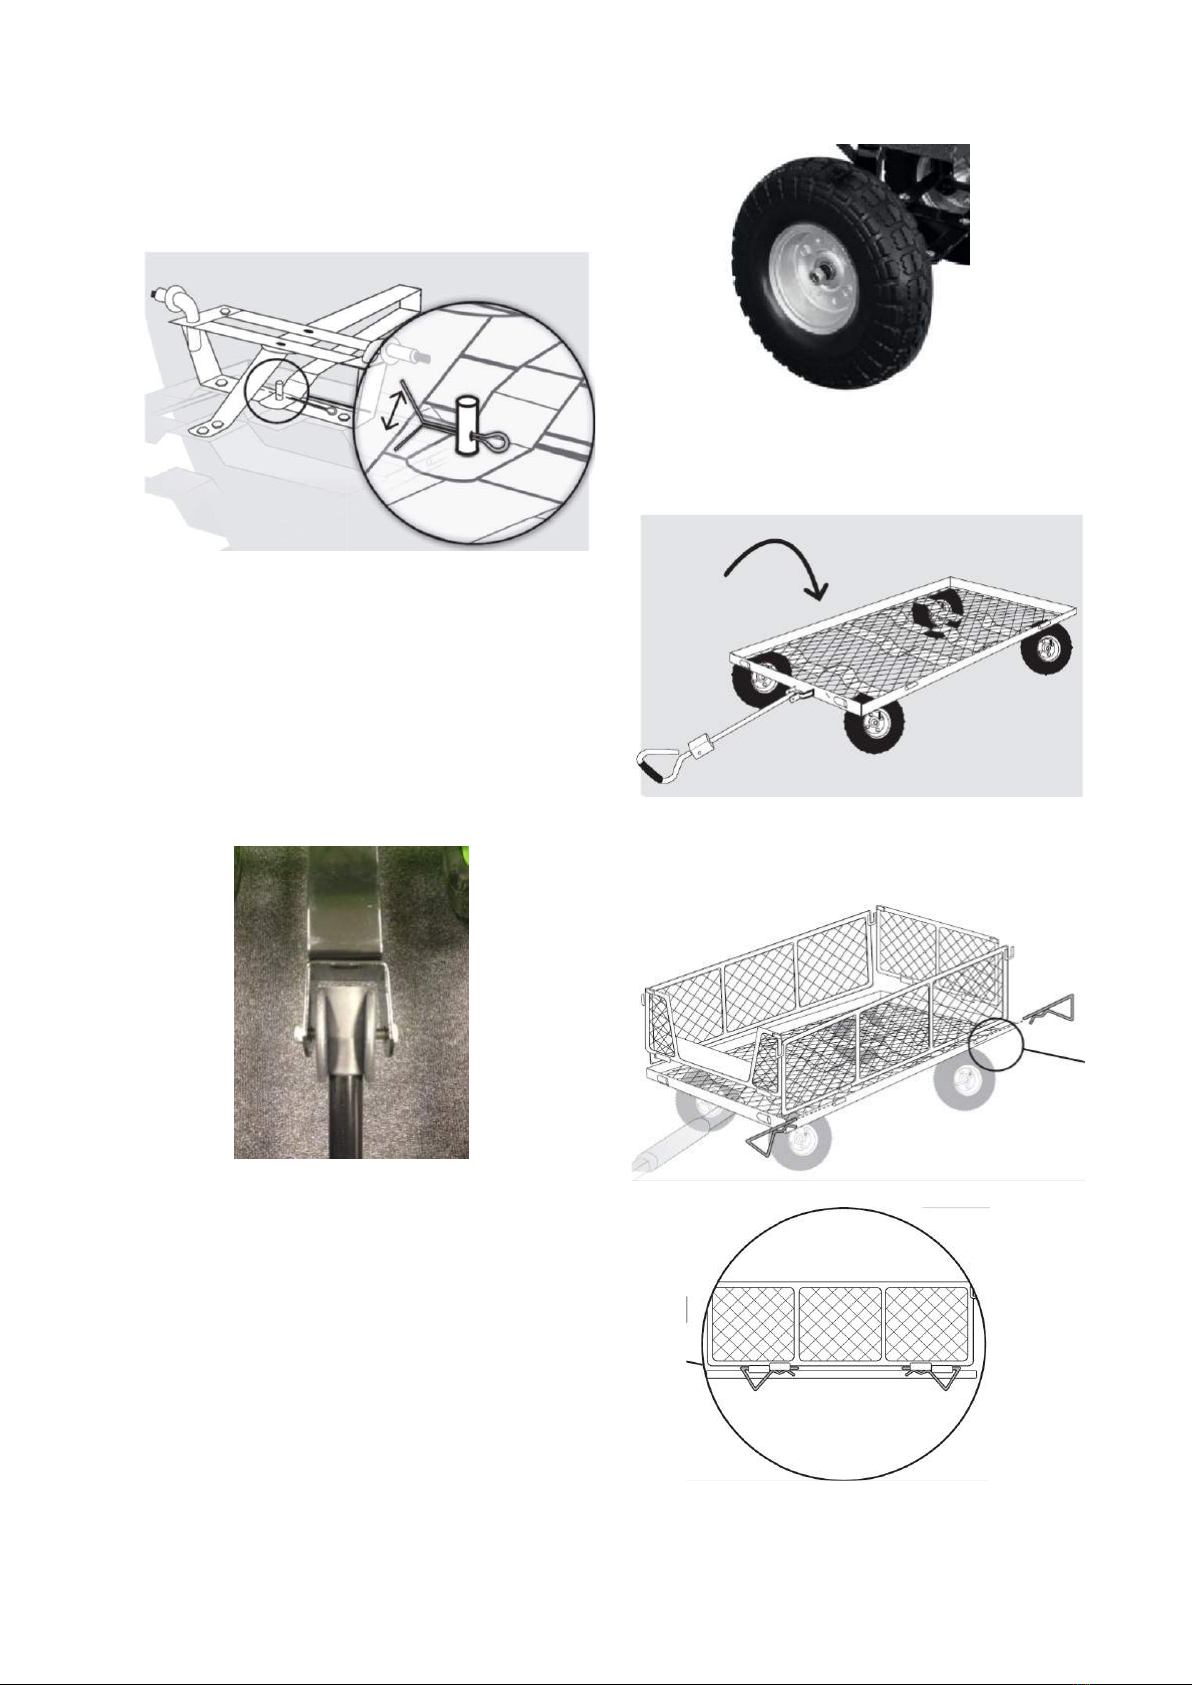
STEP 9
Slide the Wheel onto the axle.
Secure using a Wheel Washer and a Wheel
Nut on to the axle.
Do not over tighten; this may cause the wheel
to not rotate. Repeat with the remaining
wheels.
STEP 10
Turn the Trolley over onto it’s wheels (DO
NOT try and lift on your own, ask for
assistance!)
STEP 11
Attach the two Side, Front & Rear Panels to
the Bed, using the R-Clip (Two for each Panel).
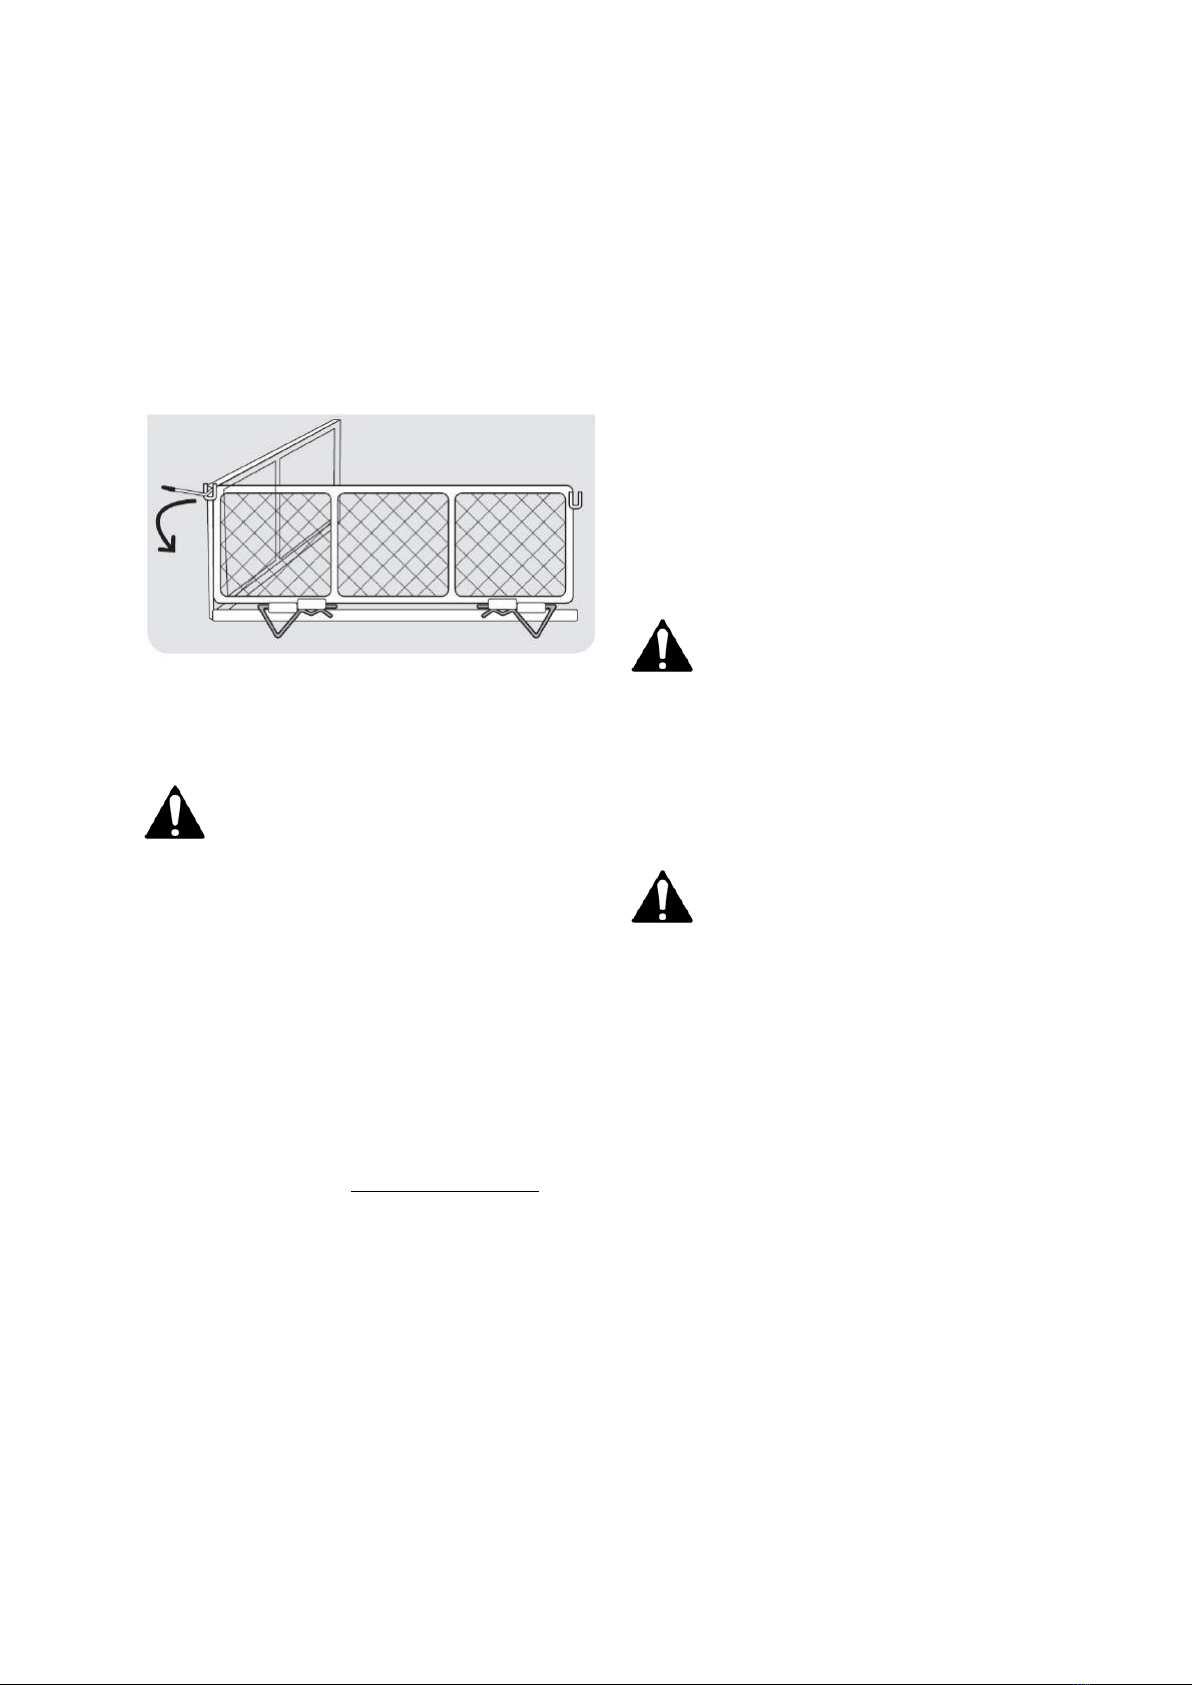
STEP 12
Position the Side Lock Handles through the
tabs on the top right and left of the front and
back Side Panels and secure using the nut
provided (do not overtighten). Ensure the
threaded end faces inwards towards each
other. Lift the Side Panels into position and
secure with the Side Lock Handle, by rotating.
Once in position, securely tighten all nuts
before use.
MAINTENANCE &
STORAGE
WARNING!
Repairs and maintenance work other than
those described within this instruction
manual may be performed only by an
authorised service agent.
REPAIRS & SERVICING
Users of this product should only undertake
actions described in this manual, unless
otherwise instructed by the manufacturer. All
other repairs and servicing should only be
undertaken by an approved service/repair
dealer. Your nearest approved service/repair
dealer can be found at www.thehandy.co.uk.
When repairing the product, always use
approved replacement Handy Parts or those
which are technically identical. Using high
quality replacement parts avoid the risk of
accidents, damage to the product and
invalidating the manufacturer’s warranty.
STORAGE
Never allow carried material to remain in the
Trolley for extended periods of time.
For years of trouble free service, make sure
the Trolley is clean and dry before storing.
Store in a dry protected area away from
sunlight, during severe weather and winter
months.
If storing for an extended period, grease the
axles and wheel bearings on the Trolley.
TROUBLESHOOTING
WARNING!
Only perform the steps described in these
instructions! All further inspection,
maintenance and repair work must be
performed by an authorised service
specialist! Contact your local authorised
service dealer if the problem cannot be
solved by yourself!
WARNING!
If the product does not perform properly,
makes unusual sounds, does not start or stop
as described, or any other irregularity or
malfunction occurs, do not attempt to repair
the product by yourself. Please contact
customer services or your local authorised
service dealer.
NEED ASSISTANCE
For Spares or Support of your Handy product,
please contact us:
Tel: 01793 333212 - Mon to Fri 8.30am to
5.30pm (excl. Bank Holidays)
Email:
customerservice@handydistribution.co.uk
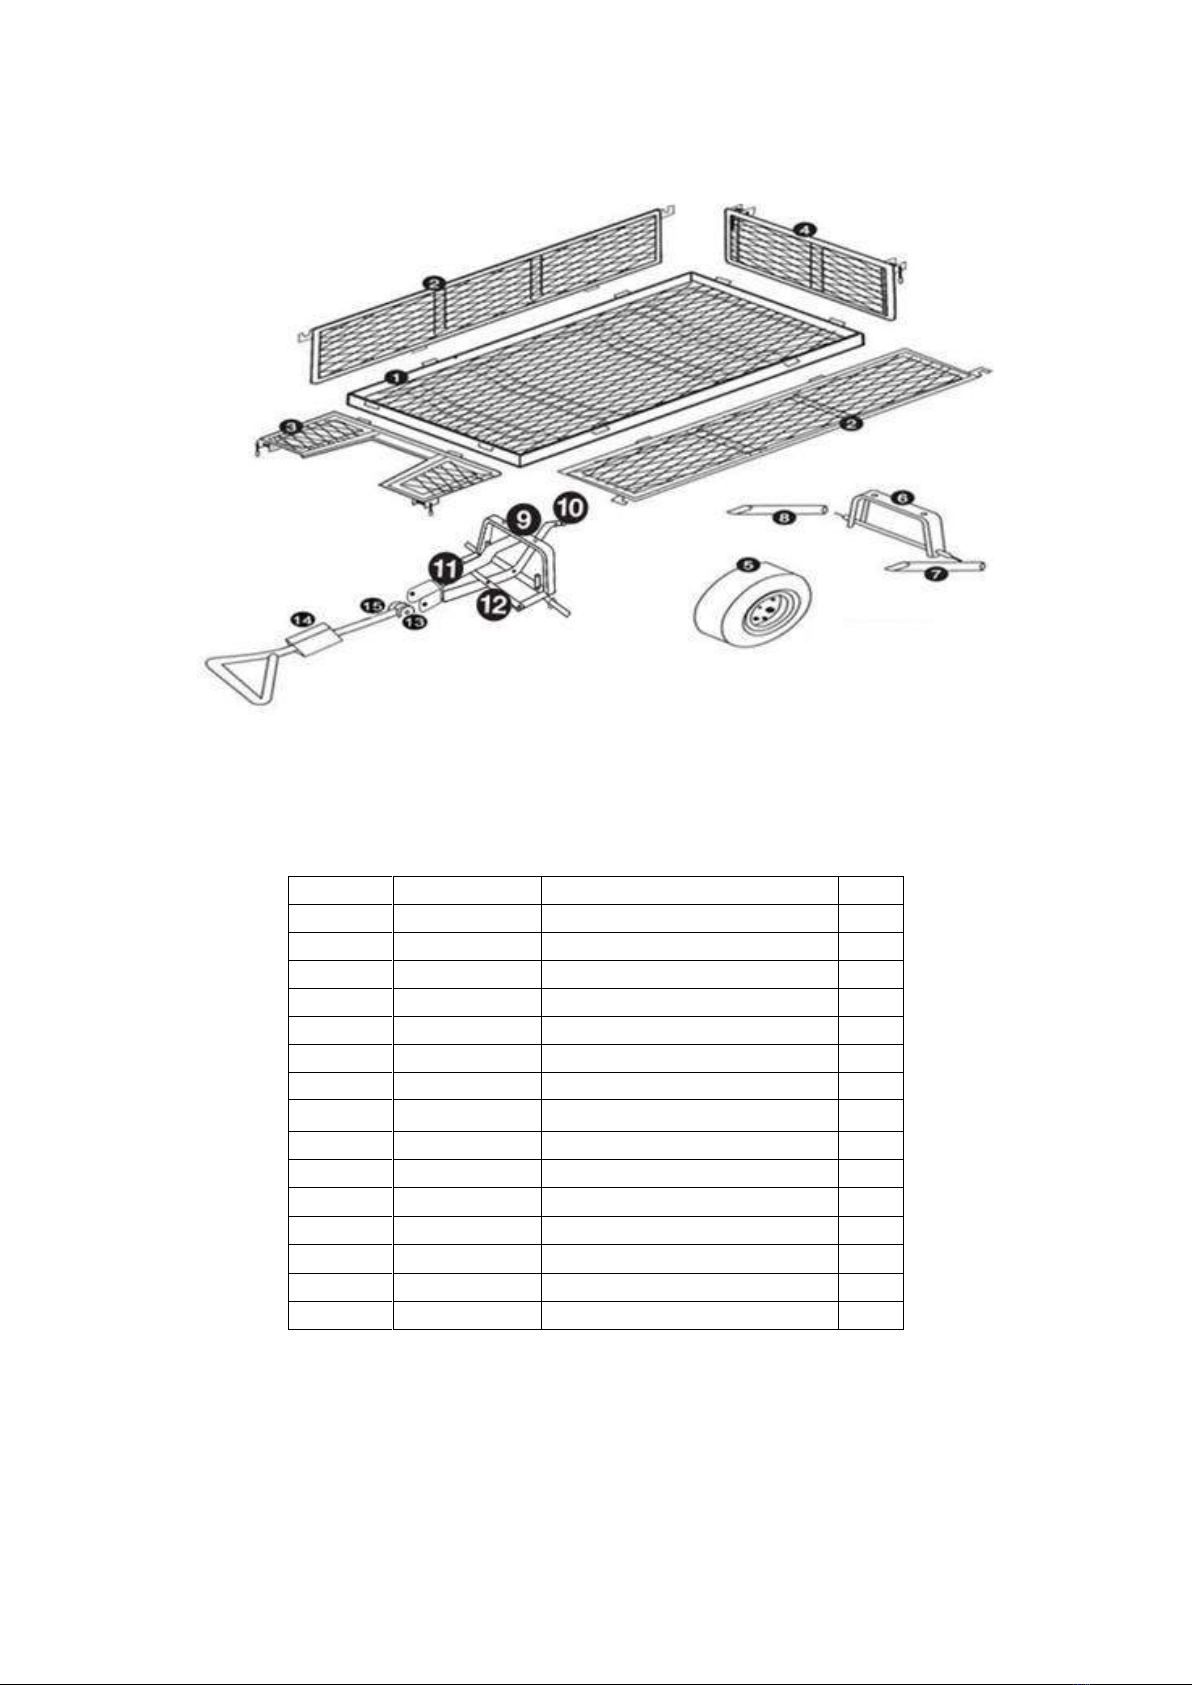
PARTS DIAGRAM
PARTS LIST
Item No
Part No.
Description
Qty
1
TH220-1-1
Bed
1
2
TH220-2-2
Side Panel
2
3
TH220-3-3
Front Panel
1
4
TH220-4-4
Rear Panel
1
5
TH219-1
Wheel Assembly
1
6
TH220-6-6
Rear Axle Support
1
7
TH220-7-7
Right Rear Axle Brace
1
8
TH220-8-8
Left Rear Axle Brace
1
9
TH220-9-9
Front Axle Support with Axles
1
10
TH220-10-10
Central Front Axle Brace
1
11
TH220-11-11
Yoke
1
12
TH220-12-12
Steering Link Connector
1
13
TH215-E2-13
Pull Adaptor
1
14
TH215-14-14
Pull Handle
1
15
TH215-15-15
Lower Pull Handle
1
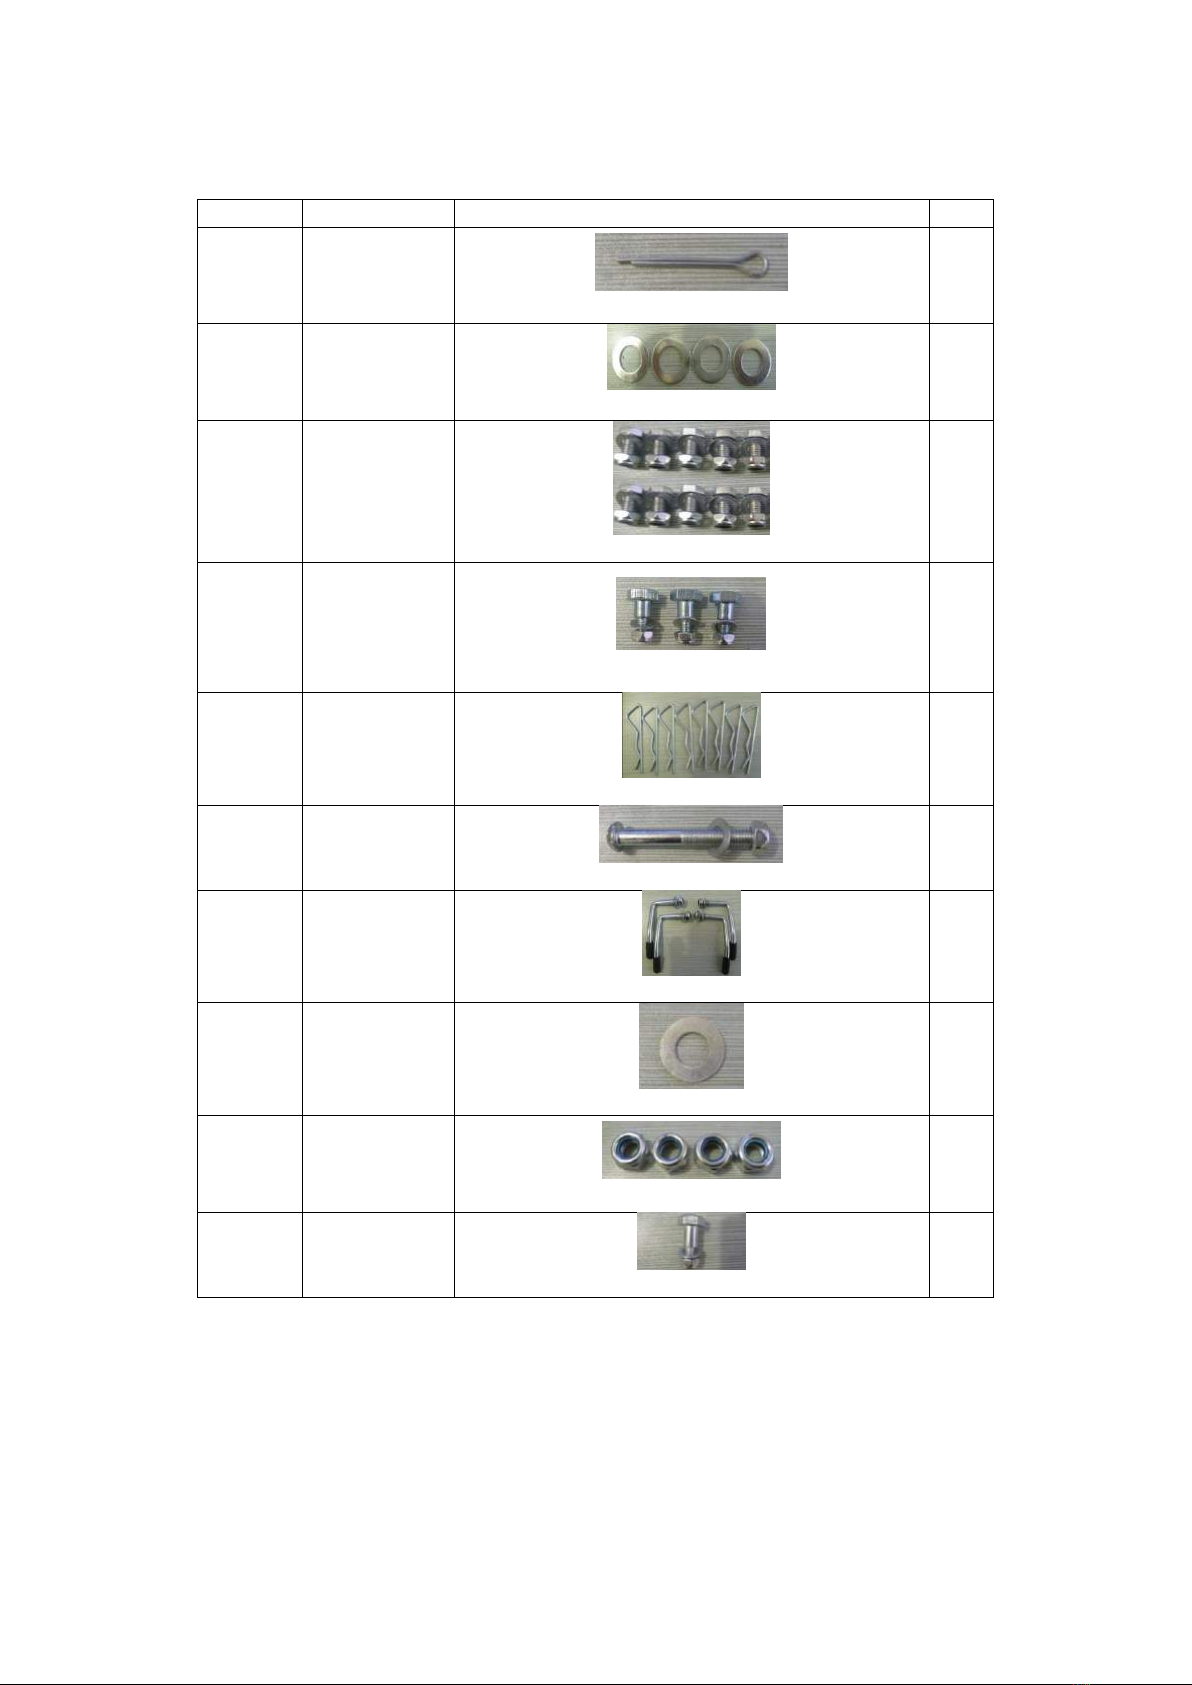
Item No
Part No
Description
Qty
16
TH215-A1-16
Split Pin – 2.5x45
1
17
TH219-2
Wheel Washer 16mm
4
18
TH215-C-18
Carriage Support Bolt, Washer & Nut - M8x15mm
10
19
TH215-A4-19
Bolt, Washer & Nut - M6x16mm
3
20
TH215-D-20
R-Clip - 40x105
8
21
TH215-E1-21
Bolt, Washer & Nut for Pull Handle - M8x60
1
22
TH215-F-22
Panel Lever
4
23
TH215-A2-23
Large Washer 10mm
1
24
TH215-B2-24
M12 Wheel Lock Nut
4
25
TH215-A3-25
Bolt, Washer & Nut - M6x20mm
1

GJ HANDY & CO LTD USER WARRANTY POLICY
Users Statement of Warranty
Each new machine is warranted against defective material or assembly of material under normal
usage. The warranty applies to the original purchaser and covers faulty parts and the labour involved
in replacing and repairing those parts, which are of original manufacture.
Period of Warranty
All Webb & Webb Pro machines plus Sanli engines.
a) 2 years from the original date of sale to the first domestic user.
b) 90 days from the original date of sale to the professional/commercial user.
c) 90 days from the original date of sale when used for hire.
d) A reduced warranty period of 90 days applies to those items which are subject to normal wear
and tear (e.g. but not limited to wheels, tyres, cutter bars, cylinders, bottom blades, belts,
cables, grass bags, spark plugs).
e) Engines as per the manufacturer’s warranty statement which will be supplied with the machine.
f) 90 days from the original date of purchase for Replacement Spare Parts (unless normal wear &
tear component, which are covered for 30 days).
g) All machines’ must be serviced within the first 12 months from the original date of purchase to
comply with the warranty, failure to do so will invalidate the 2nd year of the warranty.
All Handy, Mowerland and Q-Garden products.
a) 1 year from the original date of sale to the first domestic user.
b) 90 days from the original date of sale to the professional/commercial user.
c) 90 days from the original date of sale when used for hire.
d) A reduced warranty period of 90 days applies to those items which are subject to normal wear
and tear (e.g. but not limited to wheels, tyres, cutter bars, cylinders, bottom blades, belts,
cables, collection bags, spark plugs).
e) Engines as per the manufacturer’s warranty statement which will be supplied with the machine.
f) 90 days from the original date of purchase for Replacement Spare Parts (unless normal wear &
tear component, which are covered for 30 days).
All warranty repairs must be undertaken by an authorised service dealer. These dealers have been
accredited by GJ Handy & Co Ltd and agree to only use genuine parts and follow our repair
procedures.
Version 04 (10-16)

GJ HANDY & CO LTD USER WARRANTY POLICY
Not covered by this warranty
a) The warranty policy does not cover any depreciation or damages caused by ordinary wear,
rusting or corrosion, lack of correct maintenance or operation, misuse, abuse, lack of
transportation or accident.
b) The warranty policy does not cover any costs necessary for the standard periodic maintenance
services instructed by the operator’s manual, or service parts replacement which would include
oil, filters, tyres, belts, brake linings, fuses, blades, seals and other service parts unless it can be
proven that the item has evidence of faulty manufacture.
c) The warranty policy will not cover failure or damage caused as a result of parts or accessories
being modified without the written approval of GJ Handy & Co Ltd.
d) The warranty policy will not cover the unit if non-genuine parts have been fitted and as a result
damage has occurred to the unit.
e) The warranty policy is non-transferable and is only applicable to the original purchaser.
Disclaimer
a) This warranty is only a remedy for defect of products. GJ Handy & Co Ltd will never warranty in
terms of the merchantability or the fitness for a particular purpose.
b) No person is authorised to make any warranties, representations or promises, expressed or
implied, on behalf of GJ Handy & Co Ltd, or to modify the terms conditions or limitation of this
warranty policy in any way.
c) Neither GJ Handy & Co Ltd nor any company affiliated with GJ Handy & Co Ltd shall be liable in
any event or manner whatsoever for incidental or consequential damages or injuries, including,
but not limited to, loss of crops, loss of profit, out of pocket expenses or profits, rental of
substitute equipment or other commercial losses.
General
a) Most warrantable failures show up within the first few weeks of use. These failures are usually
straightforward and warranty assessment is relatively easy.
b) Failures relating to cutter decks and belts need careful investigation, as the cause may not
always be straightforward. Look for damage to blades and pulleys especially when the cutter
belt or blade boss have snapped or cracked as this could be due to impact damage.
c) Customers should always refer to the operator/instruction manual when any disputed problem
arises, you will find most areas covered within the manual.
Version 04 (10-16)


For spares or support of your Handy product,
please contact us:
Tel: 01793 333212
Email: customerservice@handydistribution.co.uk
(Mon –Fri 8.00am to 5.30pm excl. Bank Holidays)
To see our range of garden machinery & equipment visit:
www.thehandy.co.uk
Making gardening easier & affordable since 1938
Distributed by Handy Distribution, Murdock Road, Dorcan, Swindon, SN3 5HY
Other manuals for THGT
1
This manual suits for next models
1
Table of contents
Other The Handy Outdoor Cart manuals


Popular Outdoor Cart manuals by other brands


Carts Vermont
Carts Vermont 20 manual

Westward
Westward 2CZY4 Operating instructions and parts manual

Numatic
Numatic EcoMatic EM-5 Assembly

Bosch
Bosch XL-Cart Operating/safety instructions

Tennsco
Tennsco Modular Cart Top Component Assembly Assembly Instructions/Parts Manual

Clam
Clam POLAR TRAILER HD MAX manual


