The Handy THSBENCH-G User manual

01-11-2018
2200W ELECTRIC
SAW BENCH WITH GUARD
MODEL NO: THSBENCH-G -- PRODUCT NO: 1938188001
EN - ORIGINAL INSTRUCTIONS
ASSEMBLY REQUIRED –TWO PERSON
SAVE THESE INSTRUCTIONS
SPARES & SUPPORT: 01793 333212
FOR YOUR SAFETY
Please read & understand this manual, payingattention to the safety instructions, before use.
Incorrect use of the product could put the operator or machine in danger.
Whilst every effort has been made to ensure the accuracy of information contained in this manual, our
policy of continuous improvement determines the right to make modifications without prior warning.
Images used are for illustration purposes only
INSTRUCTION MANUAL

Copyright Notice
Copyright © Handy Distribution
Permission is granted to reproduce this publication for personal & educational use only.
Commercial copying, redistribution, hiring or lending is prohibited.
No part of this publication may be stored in a retrieval system or transmitted in any other form or means without
written permission from Handy Distribution.
In all cases this copyright notice must remain intact.

CONTENTS
SPECIFICATIONS
IMPORTANT INFORMATION
GENERAL SAFETY INSTRUCTIONS
SET UP & PREPARATION FOR OPERATION
ASSEMBLY
KNOW YOUR MACHINE
OPERATION
MAINTENANCE
STORAGE
WIRING DIAGRAM
TROUBLE SHOOTING
PARTS DIAGRAM & LIST
EC DECLARATION OF CONFORMITY
WARRANTY
ASSEMBLY IS REQUIRED –TWO PERSON
This product requires assembly before use. See the “Assembly” section for instructions.
Please check that all parts required for the assembly of this spreader are included. If for any reason you
believe a part for the assembly is missing or damaged, please contact us.
If you require any assistance with regards to the contents or operation of
your machine, please contact us:
TEL: 01793 333212
(MON –FRI 8.00AM TO 5.30PM EXCL. BANK HOLIDAYS)
SPECIAL WARNINGS & INSTRUCTIONS
•Carefully read through this entire operator’s manual before using your new saw bench. Take special care
to heed the cautions and warnings.
•The cutting operation of the machine is designed to be activated by one person. While there is the
possibility that additional operators could be working with the machine (e.g. for loading and unloading),
only one operator should activate cutting operations;
•The machine shall not be used by children;
•Description of functional tests of the machine;

SPECIFICATIONS
The manufacturer reserves the right to change the product specification and livery according to continued
product improvements.
Model Number
THSBENCH-G
Product Number
1938188001
Motor*
(230VAC 50Hz) 2200W, S2 15min*
Short Circuit Rating
1 kA
Protection Category
IP 54
Blade Size
Ø 405 × Ø 30 mm
Number of Saw Teeth
32
Log Capacity Diameter (mm)
140
Log Capacity Length (mm)
Min 300 –1000 Max
Blade Speed
2800 / min
Weight (kg)
N.W 36.3
Sound emission level (LpA)
96 db(A) k=4 db(A)
Sound pressure level (LpA)
101 db(A) k=4 db(A)
Sound power level (LwA)
115 db(A) k=4 db(A)
Vibration
<2.5 m/s²
*S2 15 minutes, Short-time duty. After continuous operation of 15 minutes the drill stops until the device
temperature deviates by less than 2 K (2°C) from the room temperature.
IMPORTANT INFORMATION
ELECTRICAL REQUIREMENTS
Connect the main leads to a standard 230V±10% (50Hz±1Hz) electrical supply which has protection devices of under-
voltage, overvoltage, over-current as well as a residual current device (RCD) which maximum residual current rated at
0.03A.
EXTENSIONS CABLES/CORDS OR LEADS
Improper use of extension cords may cause inefficient operation of the log saw which can result in overheating. Be
sure the extension cord is no longer than 10 metres and its section is no less than 2.5mm² to allow sufficient current
flow to the motor. Avoid use of free and inadequately insulated connections. Connections must be made with
protected material suitable for outdoor use.
WORKING CONDITIONS
This saw bench is a domestic use model. It is designed for operating under ambient temperatures between +5°C and
40°C and for installation at altitudes no more than 1000m above M.S.L. The surrounding humidity should be less than
50% at 40°C. It can be stored or transported under ambient temperatures between -25°C and 55°C.
INSPECT YOUR LOG
Make sure there are no nails or foreign objects in logs to be split. The ends of the logs must be cut square.
Branches must be cut off entirely so that the trunk is relatively smooth.

GENERAL SAFETY INSTRUCTIONS
It is important that you read and understand the owner’s manual and labels affixed to the machine. Learn its
application and limitations as well as the specific potential hazards. Retain these instructions for future
reference. The operator is responsible for following the warnings & instructions in this manual and on the
product.
Read & understand
operator’s manual before
using the machine. Failure
to follow instructions could
result in death or serious
injury.
Wear protective gloves to
protect your hands
CAUTION!
Wear ear-muffs. The impact
of noise can cause damage
to hearing. Wear safety
goggles. Sparks generated
during working or splinters,
chips & dust emitted by the
device can cause loss of
sight.
CAUTION!
Wear a breathing mask.
Dust which is injurious to
health can be generated when
working on wood and other
materials. Never use the device
to work on any materials
containing asbestos!
Wear protective clothing
Wear safety protective
footwear
It is forbidden to remove or
tamper with the protection
devices and safety devices.
CAUTION! RISK OF INJURY!
Failure to keep your hands
away from the blade will result
in serious personal injury.
Do not use in the rain.
Disconnect the mains plug
prior
to the repair, cleaning, and
maintenance of the machine!
Keep your work space tidy!
Untidiness may result in
accidents.
Keep all bystanders & animals
at least 10 metres away from
the machine during operation.
If approached, stop the
machine immediately.
Safety alert symbol. Used to
alert you to potential
personal injury hazards.
Obey all safety messages
that follow this symbol to
avoid possible injury.
DANGER
Indicates an imminently
hazardous situation which, if
not avoided, will result in
serious injury.
WARNING
Indicates a potentially
hazardous situation which,
if not avoided, could result
in serious injury
CAUTION
Indicates a potentially
hazardous situation which, if
not avoided, may result in
minor or moderate injury.
CAUTION
Used without the safety
alert symbol indicates a
potentially hazardous
situation which, if not
avoided, may result in
property damage.
Recycle unwanted materials
instead of disposing of them as
waste. All tools, hoses and
packaging should
be resorted, taken to the local
recycling centre and disposed
of in an environmentally safe
way.

UNDERSTAND YOUR SAW BENCH
Read and understand the owner’s manual and labels affixed to the log saw. Learn its application and
limitations as well as the specific potential hazards peculiar to it.
STAY ALERT
Do not operate the machine while under the influence of drugs, alcohol, or any medication that could affect
your ability to use it properly. Do not use this machine when you are tired or distracted from the job at hand.
Be aware of what you are doing at all times. Use common sense.
AVOID DANGEROUS CONDITIONS
Always operate your saw bench on dry, solid, level ground. Never operate your saw bench on slippery, wet,
muddy, or icy surfaces. The location you choose should be free from any tall grass, brush, or other
interferences. There should be plenty of room for handling, and help the operator stay alert. Keep your
work area clean and well lighted. Cluttered areas invite injuries. To avoid tripping, do not leave tools, logs, or
other components laying around the work area. Do not use the saw bench in wet or damp areas or expose it to
rain. Do not use it in areas where fumes from paint, solvents or flammable liquids pose a potential hazard.
INSPECT YOUR MACHINE
Check your log saw before turning it on. Keep guards in place and in working order. Use correctly sharpened
saw blades. Make sure only saw blades made in conformity to EN847-1:2005 shall be used on the machine.
Form a habit of checking to see that keys and adjusting wrenches are removed from tool area before turning it
on. Replaced damaged, missing or failed parts before using it. Make sure all nuts, bolts, screws, etc. are
securely tightened. Never operate your log saw when it is in need of repair or is in poor mechanical condition.
DRESS PROPERLY
Do not wear loose clothing, gloves, neckties or jewellery (rings, wrist watches). They can be caught in moving
parts. Protective electrically non-conductive gloves and non-skid footwear are recommended when working.
Wear protective hair covering to contain long hair, preventing it from getting caught in machinery.
PROTECT EYES & FACE
Any saw bench may throw foreign objects into the eyes. This can cause permanent eye damage. Always wear
safety goggles. Every day eyeglasses have only impact resistant lenses. They are not safety glasses. Also use
face or dust mask if cutting operation is dusty.
EXTENSIONS CABLES/CORDS OR LEADS
Improper use of extension cords may cause inefficient operation of the log saw which can result in overheating. Be
sure the extension cord is no longer than 10 metres and its section is no less than 2.5mm² to allow sufficient current
flow to the motor. Avoid use of free and inadequately insulated connections. Connections must be made with
protected material suitable for outdoor use.
AVOID DIRECT AND INDIRECT ELECTRICAL SHOCK
Check that the electric circuit is adequately protected and that it corresponds with the power, voltage and
frequency of the motor. Check that there is a ground connection, and a regulation differential switch
upstream. Ground the log saw. Prevent body contact with grounded surfaces: pipes, radiators, ranges, and
refrigerator enclosures. Never open the switch / plug box. Should this be necessary, contact a qualified
electrician. Make sure your fingers do not touch the plug’s metal prongs when plugging or unplugging
the saw bench.
KEEP BYSTANDERS AND CHILDREN AWAY
Allow only one person to load and operate the log saw. Always keep bystanders, including visitors, children
and pets away from the work area, especially when the saw bench is under operations. Only the operator
should stand near the machine and only within the safe operating area prescribed in this manual. Never use
another people to help you with freeing jammed log. No one under the age of 16 should be allowed to operate
the saw bench. Any individual under the age of 18 should have the necessary training, skills to perform the
functions properly and safely and should always be under the supervision of adult.
INSPECT YOUR LOG
Never attempt to cut logs containing nails, wire or debris. Branches must be cut of flush with the trunk.
DO NOT OVERREACH
Keep proper footing and balance at all times. Never stand on the saw bench. Serious injury could occur if the
tool is tipped or if the cutting tools is unintentionally contacted. Do not store anything above or near the saw
bench where anyone might stand on the tool to reach them
LIFTING
Due to the weight of the saw bench, we recommend it is lifted by a minimum of two people.

AVOID INJURY FROM UNEXPECTED ACCIDENT
Do not attempt to load or unload logs until the saw bench has stopped. To refrain from removing any off-cut
or other part of the workpiece from the cutting area whilst the machine is running except by using a push stick.
Keep hands out of the way of all moving parts. Never use a damaged saw blade or if has been dropped.
Do not reach around the saw blade with either hand while the cutter is running. Do not stand or have any part
of your body in line with the path of the sawblade. Avoid awkward cutting operations and hand positions here
a sudden slip could cause your hand to move into the saw blade. Never plie logs to be split in a manner that
will cause you to reach across the saw bench. Only use your hands to operate the control handle. Never use
your foot, knee, or any other extension device. Never attempt to free a stalled saw blade without first turning
the log saw off.
DO NOT FORCE TOOL
It will do a better and safer job at its design rate. Don’t use saw bench for a purpose for which it was not
intended. Do not, under any circumstances, alter your log saw. This equipment was designed and engineered
to be used in accordance with the operating instructions. Altering the equipment or using the equipment in
such a way as to circumvent its design capabilities and capacities, could result in serious or fatal injury and will
void the warranty. Never try to cut logs larger than those indicated in the specifications table. This could be
dangerous and may damage the machine.
NEVER LEAVE MACHINE RUNNING UNATTENDED
Do not leave the machine unattended, until it has come to a complete stop and the power removed from the
electrical source.
DISCONNECT POWER
Unplug when not in use, before making adjustments, changing parts, cleaning, or working on the saw bench.
All servicing and repairs are recommended to be undertaken by an approved service dealer.
MAINTAIN YOUR MACHINE WITH CARE
Always clean the unit after each use. Keep the saw bench clean for best and safest performance. Follow
instructions for lubricating. Control handles and power switches must be kept clean, dry and free from oil and
grease at all times. The use of non-original manufacturer parts or modifications may invalidate your warranty.
STORE IDLE EQUIPMENT
When not in use, Lock the area where machine stored. Store the saw bench away from children and others not
qualified to use it.the machine should be stored in a dry location, away from direct sunlight. Keep the machine
away from children and others not qualified to use it.
This symbol on the product or on its packaging indicates that this product may not be
treated as household waste. Instead it shall be handed over to the applicable collection
point for the recycling of electrical and electronic equipment.
For more detailed information about recycling of this product, please contact your local
council office, your household waste disposal service or shop where you purchased the
product.

SET UP & PREPARATION FOR OPERATION
The saw bench comes partially assembled. After all the parts have been removed from the carton, you should
have the below components. If you believe you are missing any components, please contact us:
1. Motor
2. Base Frame
3. Log Carriage Extension
4. Pivoting Log Carriage
5. Inner Saw Blade Cover
6. Saw Blade Guard 2
7. Outer Saw Blade Cover
8. Saw Blade Guard 1
9. Front Clamping Flange
10. Rear Saw Blade Flange
11. Saw Blade
12. Limit Plate
13. Handle
14. Top Guard
15. Back Plate 1
16. Back Plate 2
17. Guide Pipe with Return Spring
18. Cross Brace (x2)
19. Wrenches
20. Operators Manual
21. Hardware Bag including:
ASSEMBLY
This log saw was partially assembled at the factory. To assemble your machine follow the below instructions.
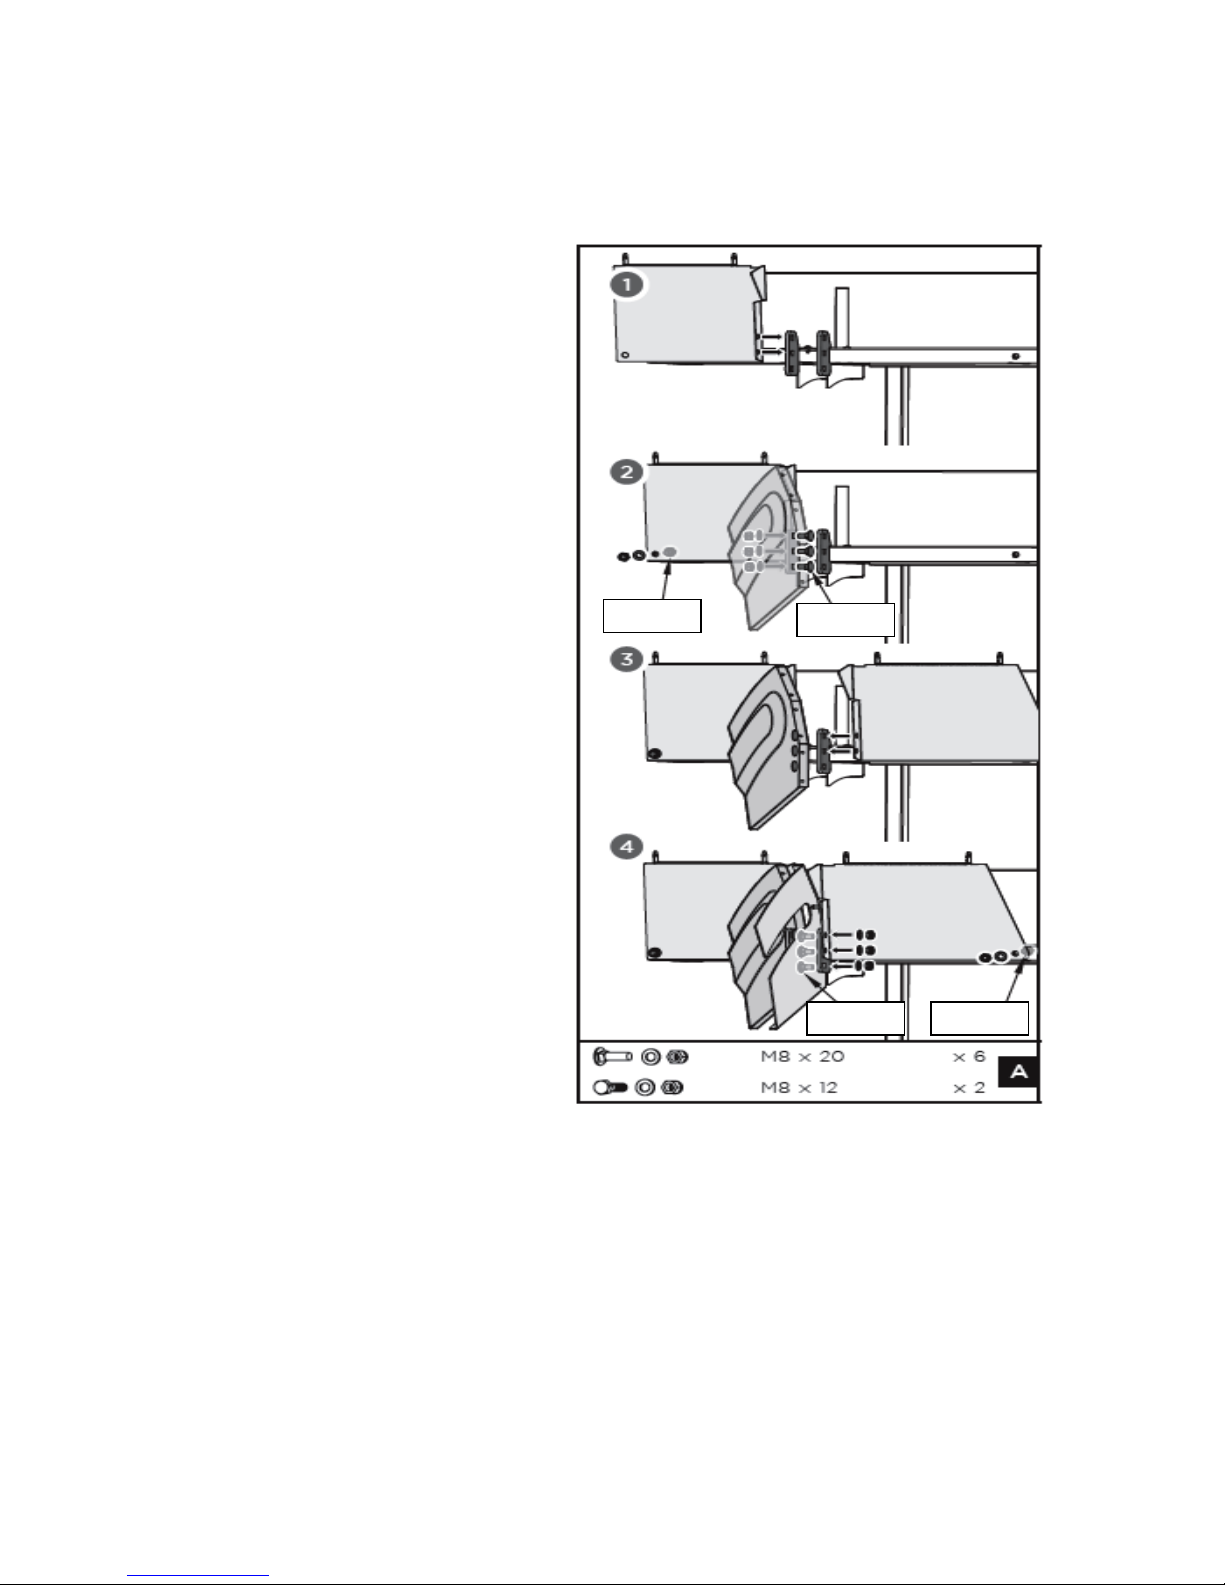
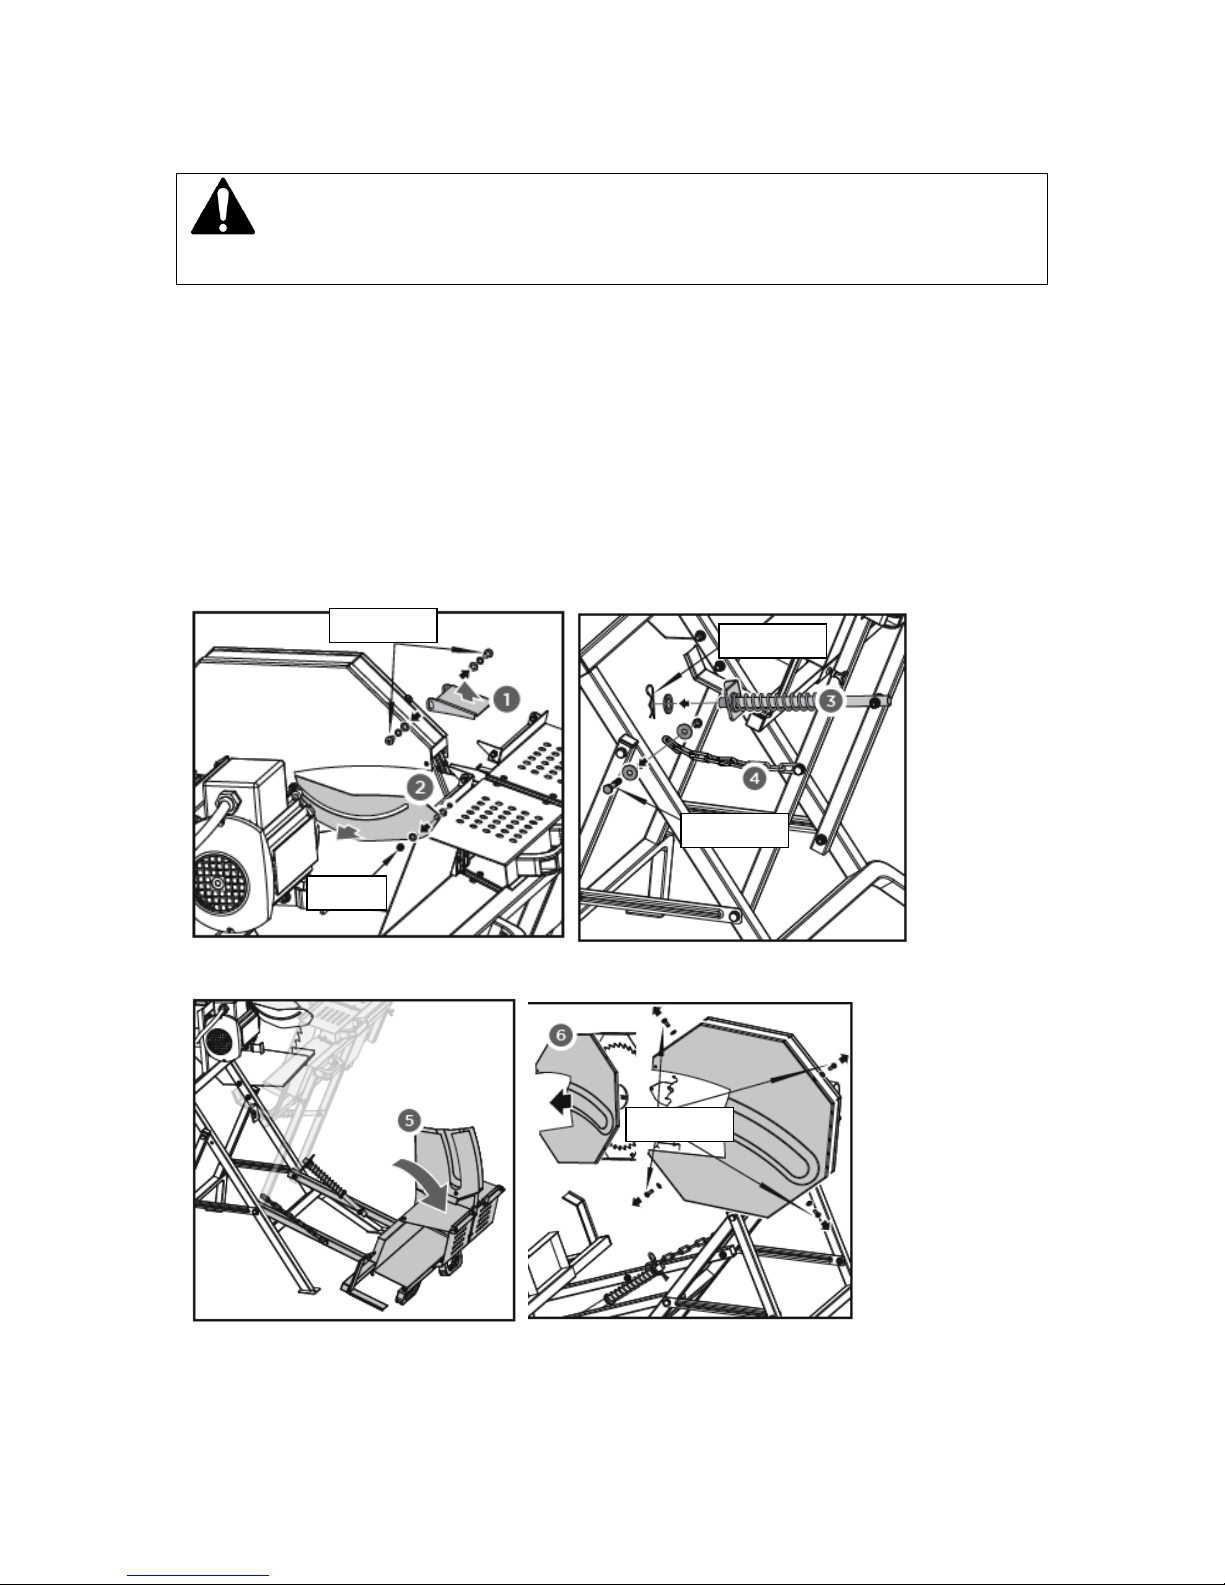
SAW BLADE GUARDS
Fig. A, illustration 1.
Place back plate 1 against outside of the
connecting part at the log carriage and align
its two holes with the upper two holes of the
connecting part.
Fig. A, illustration 2
Fix back plate 1 to the table with one M8×12
bolt, flat washer and nut.
Fig. A, illustration 3 & 4.
Put the saw blade guard 1 against inner side
of the same connecting part, align the holes
and bolt the saw blade guard 1, connecting
part and back plate 1 together with three
M8×20 bolts, washers and nuts.
Repeat the same assembly steps on the other
side for back plate 2 and saw blade guard 2.
M8x12 (x1)
M8x20 (x3)
M8x20 (x3)
M8x12 (x1)

HANDLE
Attach the handle to the back of the log
carriage. Secure it with two M8×25 bolts and
lock nuts (Fig. B). Screw the wing bolt M5×20
into the hole at the upper right corner.
ON/OFF SWITCH
Fix the switch to the motor plate with M4×58
bolts and nuts (Fig. C).
RETURN SPRING
Fix one end of the guide pipe with return
spring on the left leg with M8×55 bolts,
washers and lock nut (Fig. D).
M5x20 (x1)
M8x25 (x2)
M4x58 (x2)
M8x55 (x1)
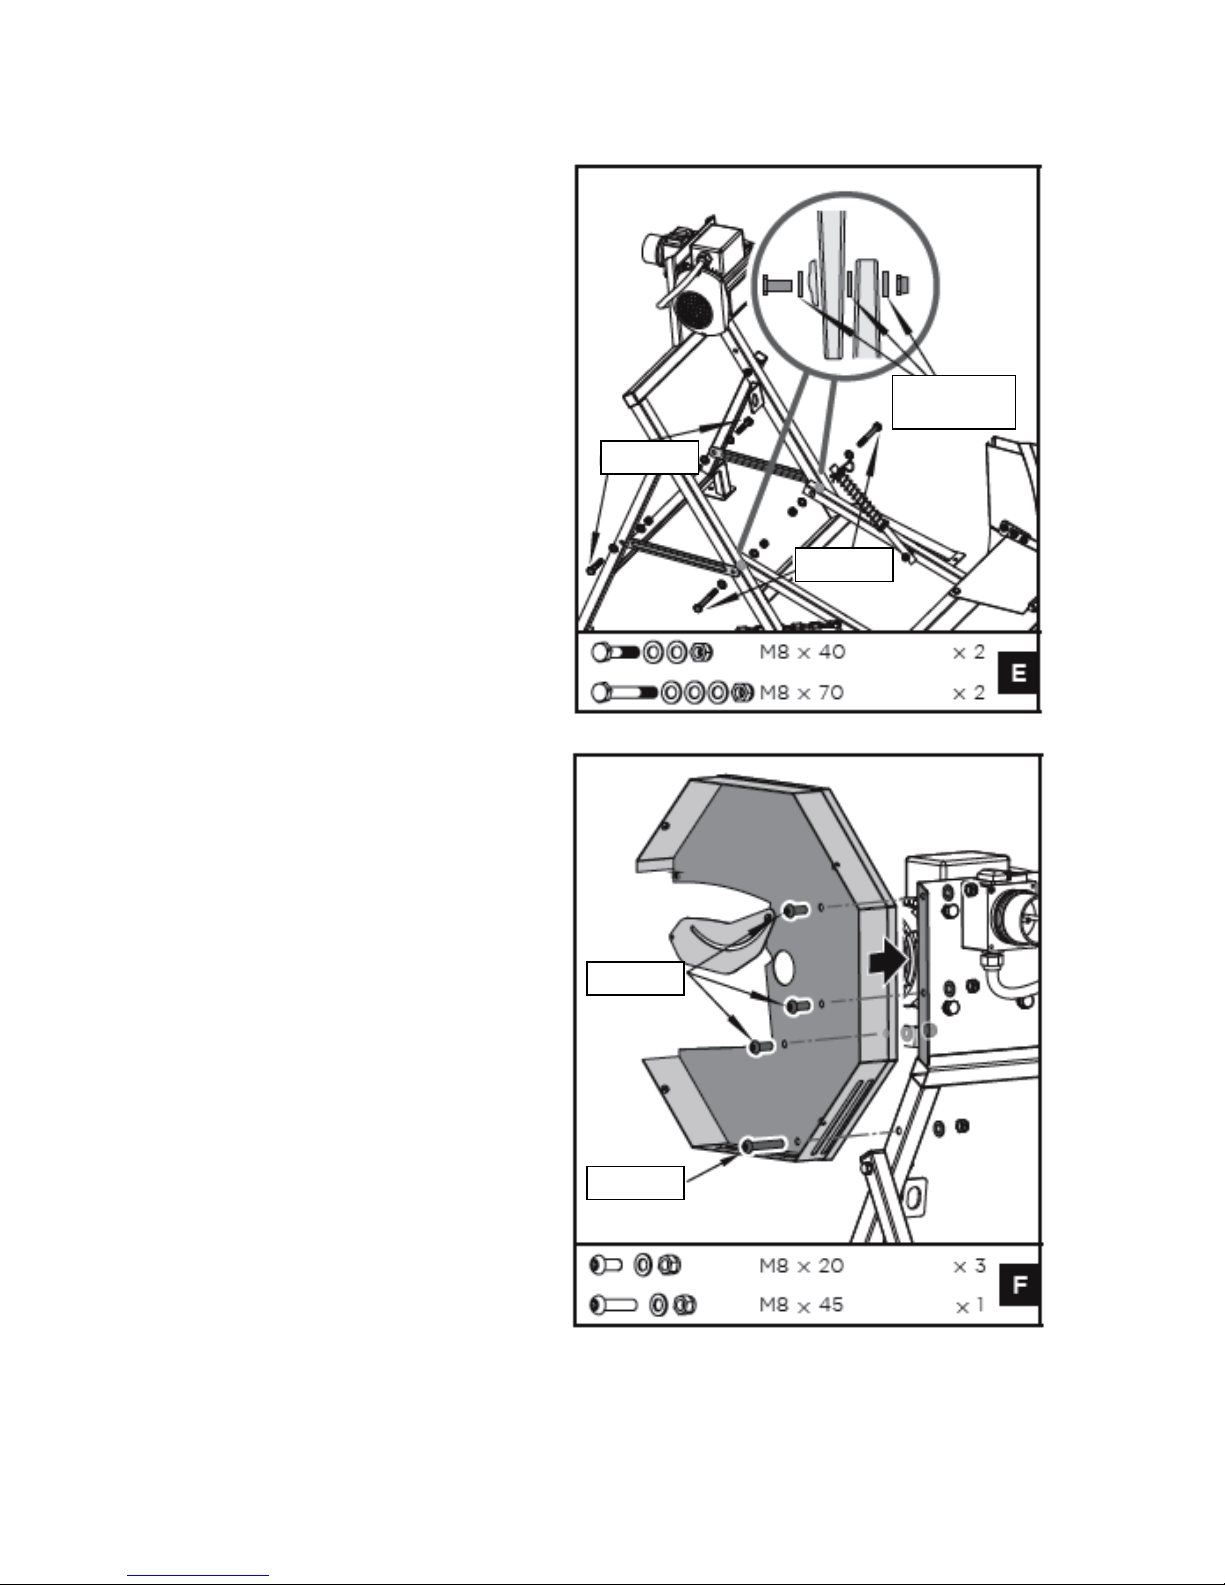
CONNECTING PIVOTING LOG CARRIAGE AND BASE FRAME
Lay the pivoting log carriage on the ground
with legs inside the base frame, and put one
end of the cross brace outside (Fig. E).
Fasten them together with M8×40 bolts,
washers and lock nuts on both sides.
Fix the other end of the cross brace from the
inner side of the base frame with M8×70
bolts, washers and lock nuts on both sides.
INNER SAW BLADE COVER
Slide the shaft through the centre hole of the
inner saw blade cover and align its other
holes with those on the motor plate (Fig. F).
Secure it with three M8×20 bolts, washers
and lock nuts on the upper side and one
M8×45 bolt, washer and lock nut on the
lower.
M8x40 (x2)
M8x70 (x2)
FLAT WASHER
(x3)
M8x20 (x3)
M8x45 (x1)

SAW BLADE
Fig. G, illustration 1
Slide the rear saw blade flange onto the
motor shaft. Place the saw blade together
with the front clamping flange onto the rear
flange and secure it with nut M20×1.5.
ATTENTION
The arrow on the saw blade has to point in
the direction of the operating side!
Fig. G, illustration 2 & 3.
Tighten the nut with the saw blade wrench by
holding the front clamping flange with the
face wrench in order to stop back.
Keep all wrenches provided in a safe place
for later use.
OUTER SAW BLADE COVER
Tighten the outer saw blade cover to the
inner cover with four M5×10 cross head
screws and flat washers (Fig. H).
M20x1.5
(x1)
SHAFT
M5x10 (x4)

FIXING RETURN SPRING AND CHAIN
Fig. I, step 1.
Take the cotter pin and washer from the
guiding pipe with spring.
Fig. I, step 2.
Push the log carriage to the base frame until
the open end of the guiding pipe is inserted
into the angle part at the base frame.
Fig. I, step 3
Secure the pipe with the washer and cotter
pin.
Fig. I, step 4.
Fix the open end of the chain to the base
frame at the left side with bolt M8×50, two
washers and a nut.
GUARD PLATE OF INNER SAW BLADE COVER
Fig. I, step 5
Install the guard plate of the inner saw blade
cover on the saw blade guard with a M5 nut
and two flat washers.
FLAT WASHER
(x2)
M8x50 (x1)
FLAT WASHER
(x2)
M5 (x1)
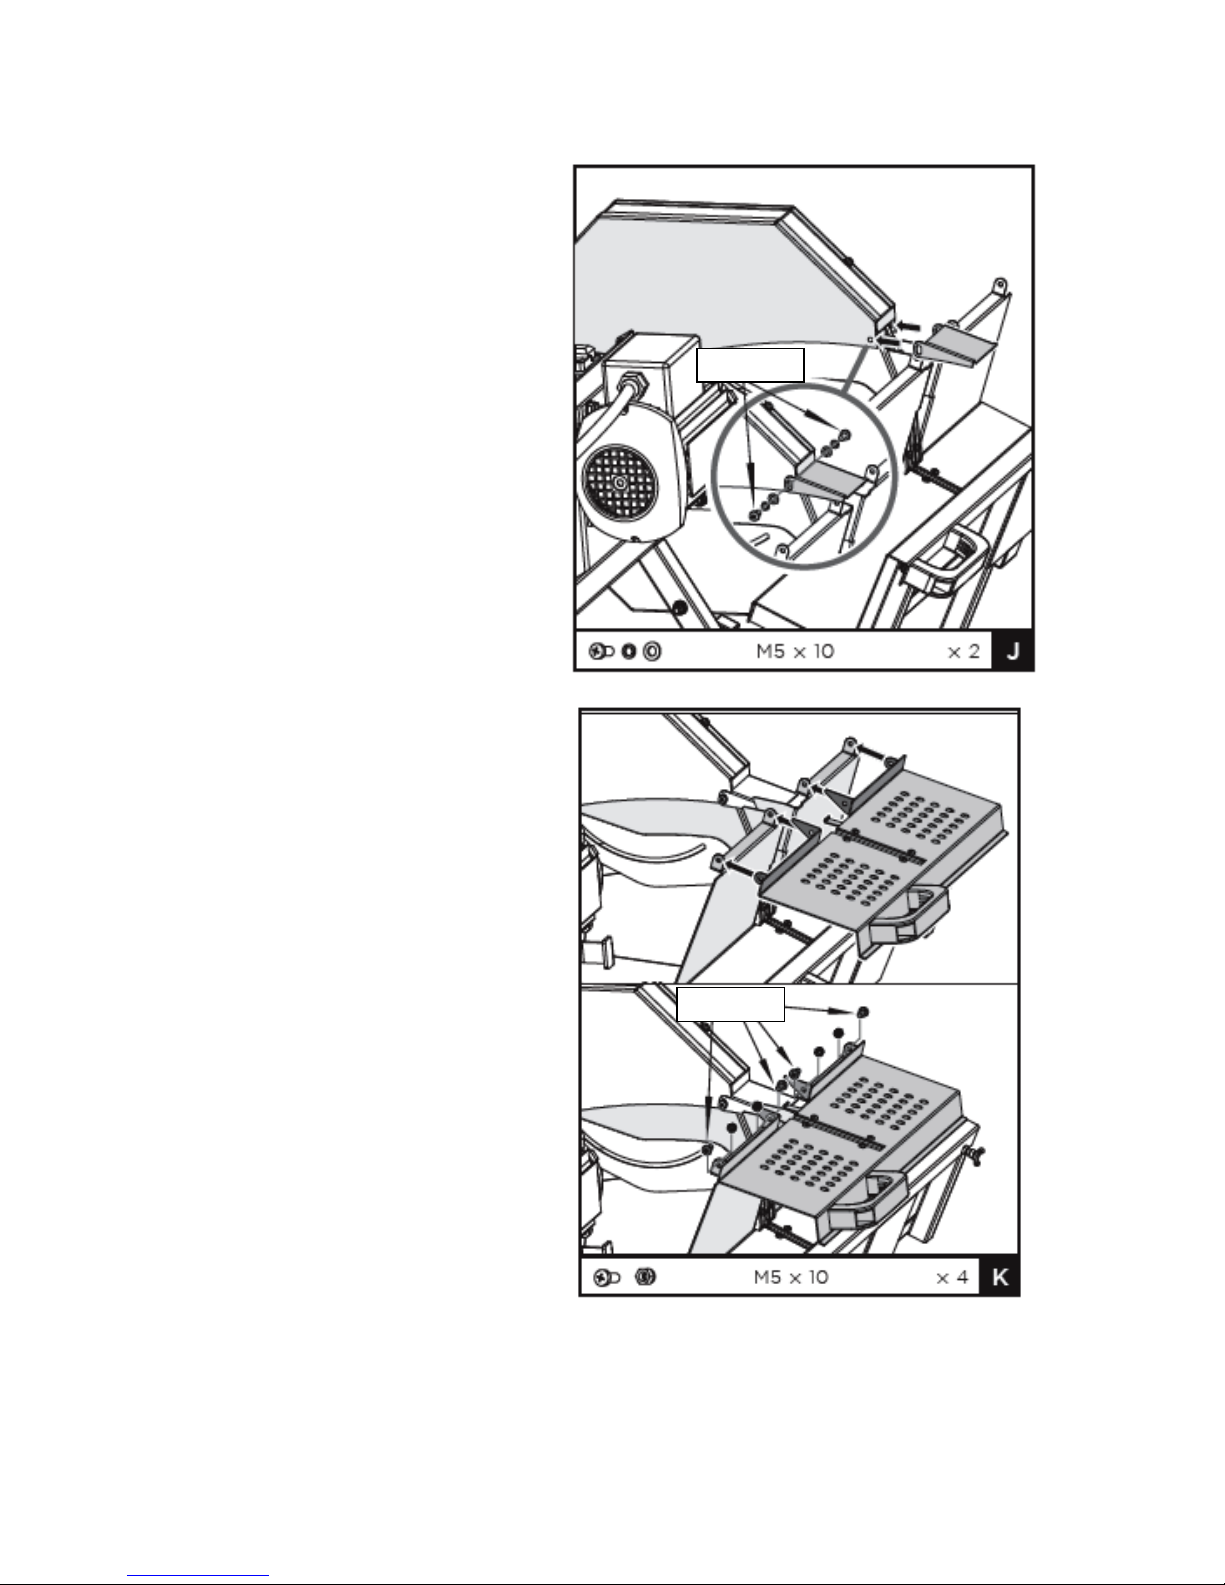
LIMIT PLATE
Mount the limit plate and fasten with two
M5×10 screws and washers (Fig. J).
TOP GUARD
Mount the top guard with four M5×10 bolts
and lock nuts (Fig. K).
M5x10 (x2)
M5x10 (x4)

LOG CARRIAGE EXTENSION
Loosen the wing bolt M5×20 on the back side
of the log carriage until the log carriage
extension can be inserted into the opening.
Slide the log carriage extension into the
channel and align it correctly. Then tighten it
with the wing bolt.
KNOW YOUR MACHINE
Make yourself aware of the compnents and operational levers of the machine, prior to attempting any work.
M5x20 (x1)
SAW BLADE COVER
GUARD PLATE
ON/OFF SWITCH
LIMIT PLACE
PLUG
HANDLE (RIGHT)
MOTOR
TOP GUARD
LOG CARRIAGE
EXTENSION
HANDLE (LEFT)
RETURN SPRING
LOG CARRIAGE
LOG RULER
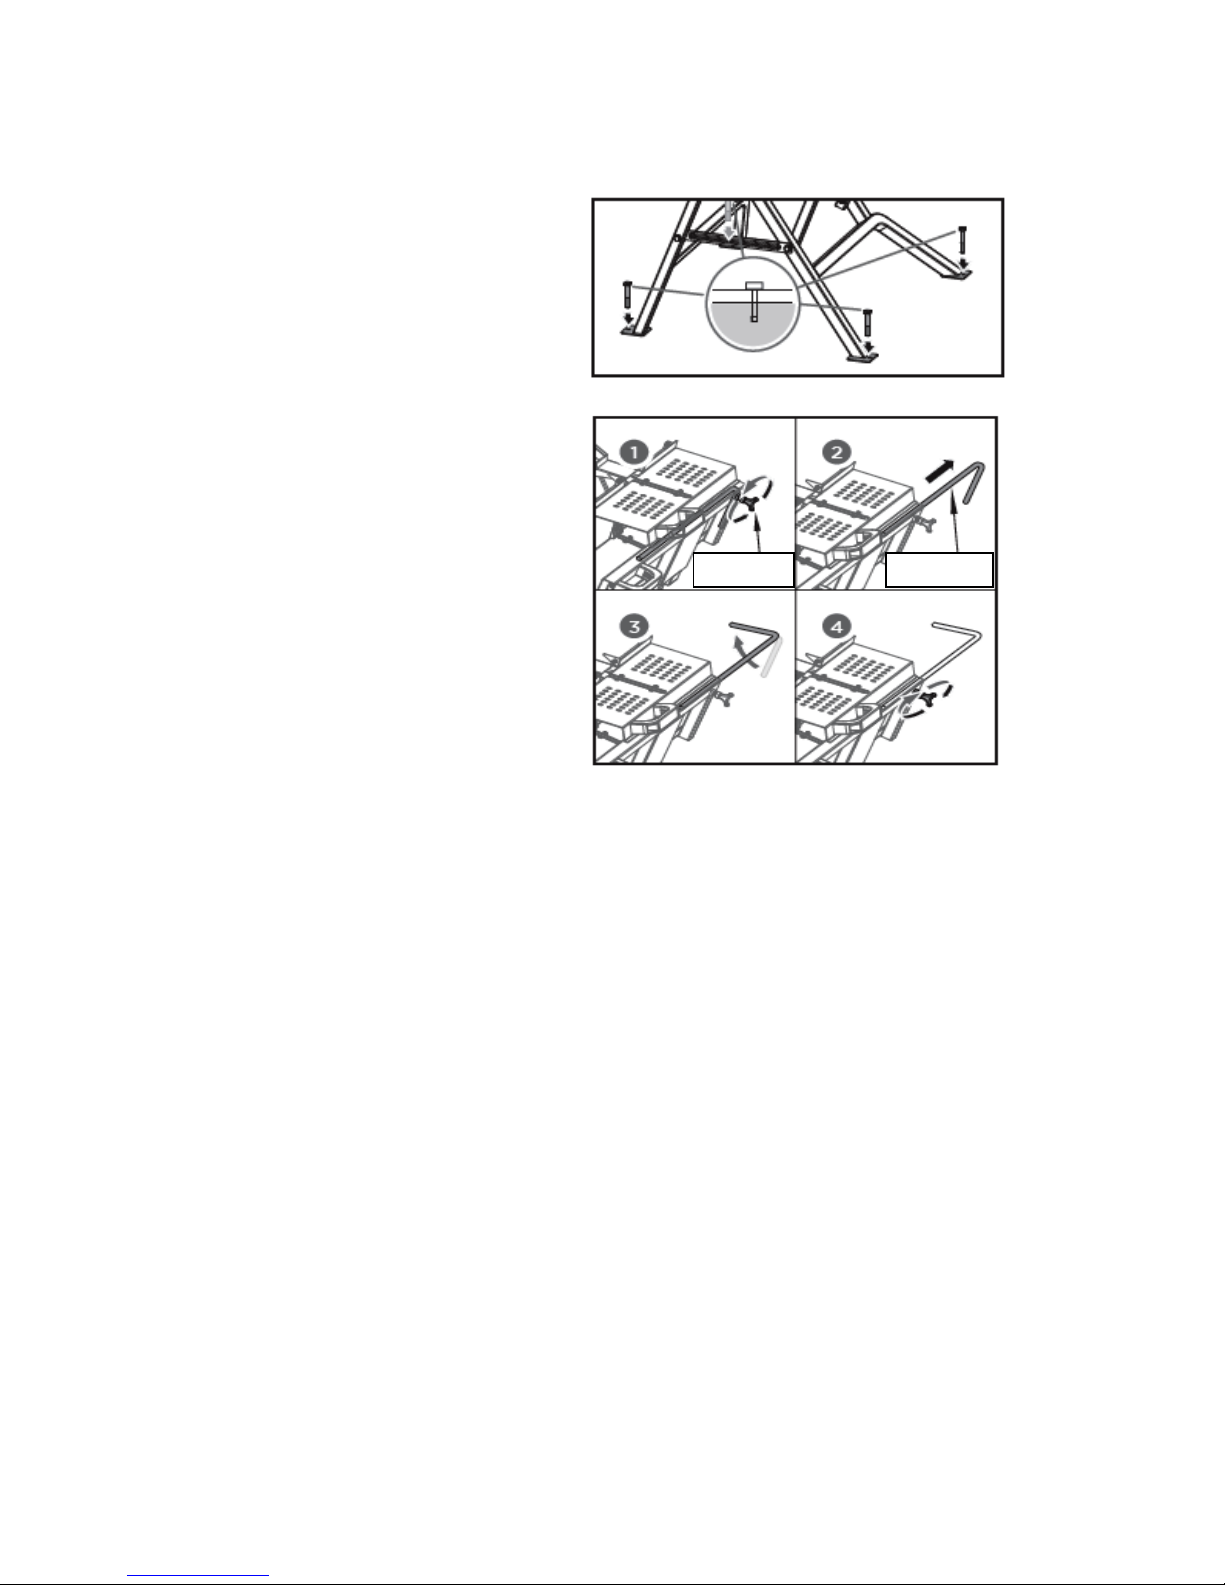
OPERATION
STAKE ON LEVEL GROUND
To secure your saw bench, use four bolts or
stakes on level ground. Due to varying ground
surfaces, these are not included.
Choose the right type of bolt or stake for your
surface type.
SET THE LOG RULER
Loosen the wing bolt M5×20 to allow the log
ruler to be pulled out freely. Set the desired
length on the scale.
Turn it clockwise as shown in illustration 3
and secure it by tightening the wing bolt.
POWER SUPPLY AND OPERATION
Put the plug in the socket and turn on the motor switch. Once motor switch is turned on, the cutting blade
starts rotation. Open the top guard, place the log to the cutting position on the log carriage and close the
guard. Grip the handle at the left side of log carriage and push it towards the saw blade cover. The movable
saw blade guard will open and show the saw blade. Keep pushing with even strength until the log on the log
carriage is cut. Stop pushing and log carriage will retract to its original position. Move the rest of log to the
cutting position and continue next cycle until the work is accomplished. To stop the machine, turn the motor
switch off until the cutting blade gradually comes to a complete standstill. Put the plug out of the socket and
clean the machine with cloth.
PREVENTIVE MAINTENANCE
Inspect the general condition of the log saw. Check for loose screws, misalignment or binding of moving parts,
cracked or broken parts, and any other condition that may affect its safe operation. Remove all debris from the
saw bench with a soft brush, vacuum or compressed air. Make maintenance a regular part of daily operation.
• Check nuts, bolts, and fittings –make sure all are tight and secure.
• Cutting blade conditions – sharpen or replace a dull or damaged blade.
FREE BLOCKED LOG
If a blockage is likely to occur. Switch off the device immediately.
• Wait until the saw comes to a stop.
• Pull out power plug.
• Remove the blocked log from the machine carefully.
SHARPENING THE SAW BLADE
The saw blade can be sharpened. This saw-blade can be sharpened several times without removing it from the
machine. Use a fine-cut square-blade file of 8-12" for sharpening. During manual sharpening, only file the front
rake of the tooth over a distance of about 5-7mm.
Always keep the original shape of the tooth. Do not make sharp notches at the root of the tooth with the file.
Always clean the blade-clamps carefully. Check the blade carefully to ensure you are never sawing with a
cracked blade.
M5x20
LOG RULER
MAINTENANCE
WARNING
Prior to any adjustment, maintenance or service work disconnect the mains power plug!
GENERAL MAINTENANCE MEASURES
Keep all safety devices, air vents and the motor housing free of dirt and dust as far as possible. Wipe the
equipment with a clean cloth or blow it with compressed air at low pressure.
We recommend that you clean the device immediately each time you have finished using it.
Clean the equipment regularly with a damp cloth and some soft soap. Do not use cleaning agents or solvents;
these could attack the plastic parts of the equipment.
Ensure that no water can seep into the device. The ingress of water into an electric tool increases the risk of an
electric shock.
In order to extend the service life of the tool, oil the rotary parts once monthly. Do not oil the motor.
SAW BLADE CHANGE
1. Disassemble the limit plate by loosening the M5×10 screws, spring washers and flat washers.
2. Remove the M5 nut and flat washers from the guard plate.
3. Pull the cotter pin and washer from the return guiding pipe.
4. Remove the M8×50 bolt, washers and nut fixing the chain.
5. Slowly lower the log carriage towards the ground.
6. Remove the four M5×10 screws & washers from the saw blade guard and also the outer saw blade cover.
M5x10 (x2)
M5 (x1)
M5x10 (x4)
M8x50 (x1)
COTTER PIN

7. Disassemble the nut M20×1.5 and the front clamping flange. Take down the old saw blade.
STORAGE
Store unused equipment in a dry, locked place out of the reach of children. Before a longer period of storage
carry out the following to extend the saw service life and ensure an easy operating.
• Thoroughly clean the device.
• Treat all movable parts with an environmentally friendly oil.
WIRING DIAGRAM
M20x1.5 (x1)
THERMAL
PROTECTOR
WHITE
22AWG
YELLOW-
GREEN
BLACK
BLACK
BLACK
BLACK 16AWG
BROWN
RED 16AWG
RED 16AWG
BLUE 16AWG
SWITCH
BLUE
CAPACITOR 30uF/450V
230V

TROUBLE SHOOTING
PROBLEM
PROBABLE CAUSE
REMEDY SUGGESTED
Saw blade gets loose after
turning off the motor
Fastening nut tightened
insufficiently
Tighten fastening nut right-hand
thread.
Motor does not start
1. Failure mains fuse
2. Extension cable defect
3. Connections of the motor or
switch defect
4. Motor or connections defect
1. Check mains fuse
2. Replace extension cable
3. Have it checked by an electrician
4. Have it checked by an electrician
Wrong direction of
motor rotation
Capacitor defect
Have it checked by an electrician
Motor unable to run the
fuse is tripped
1. Cross section of the extension
cable insufficient
2. Overload by dull saw blade
1. See “WIRING DIAGRAM” in the
operating manual
2. Exchange saw blade
Burns on the cutting
surface
1. Dull saw blade
2. Wrong saw blade
1. Insert a sharpened saw blade
2. Exchange saw blade

PARTS DIAGRAM –THSBENCH-G (1938188001)
Table of contents


