Theben QuickSet plus User manual

1103013405 © 05.2010 Theben HTS
Art. Nr. 907 0 532
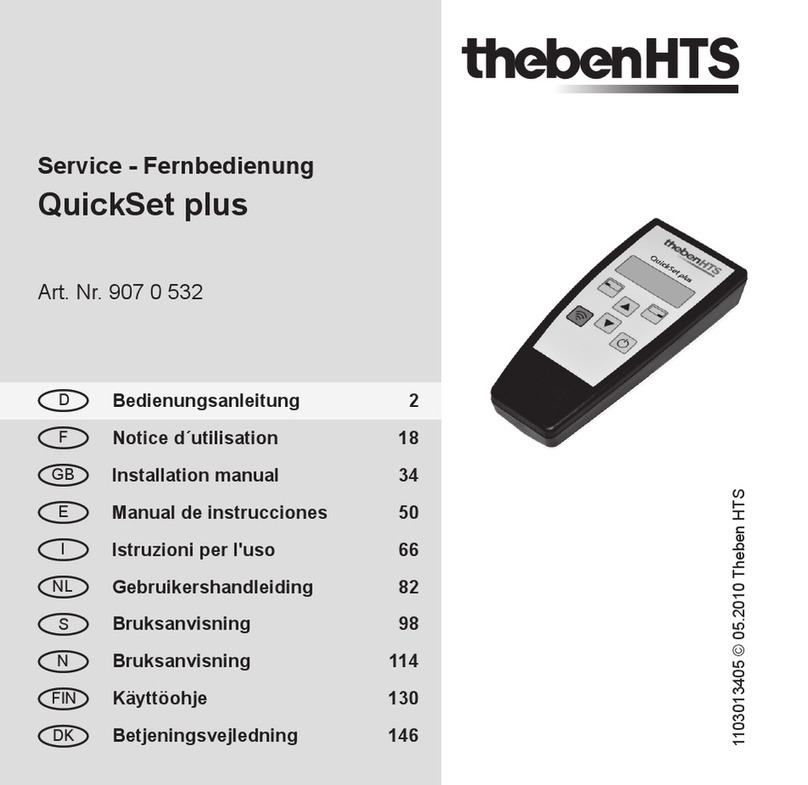
Service remote control
QuickSet plus
Bedienungsanleitung 2
Notice d´utilisation 18
Installation manual 34
Manual de instrucciones 50
Istruzioni per l'uso 66
Gebruikershandleiding 82
Bruksanvisning 98
Bruksanvisning 114
Käyttöohje 130
Betjeningsvejledning 146
DK
D
F
GB
E
I
NL
S
N
FIN

34
English Installation manual
Service remote control
QuickSet plus
Table of contents
1.Usage ..................................................35
2.Functionsandfeatures.....................................36
3.Operation................................................37
4.Behaviorofthedetector ....................................43
5.Update..................................................44
6.Technicaldata............................................ 45
7.Warrantydeclaration....................................... 46
8.Troubleshooting........................................... 47
9. Auxiliary table for settings with QuickSet plus . . . . . . . . . . . . . . . . 47, 162

35
GB
Thank you for purchasing a Theben HTS device and putting your trust in us.
1. Usage
Carefully read the installation manual and familiarize yourself with its func-
tions.
The remote control serves exclusively for the purpose contractually agreed
between the manufacturer and the user. Any other use is regarded as impro-
per. The manufacturer is not responsible for resulting damage.

36
2. Functions and features
●IR remote control for starting up Theben HTS presence detectors
●Quick adaptation to changing service condition without dismantling the
detector
●Transfer of individual settings or complete value packages to the detector
●Saving and calling up value packages
2.1 Control elements
Display
Selector key, left
Selector key, right
Page up/down through the menu,
change settings
Send settings to the detector
Remote control on/off
QuickSet plus

37
GB
3. Operation
While selecting the model, point QuickSet plus at the detector on the ceiling.
3.1 Selection of detector type
The remote control must be set to the right detector type.
model selection
compact ofce
send ¦ change
Go to the “Model selection“ menu. The currently
selected model is e.g. “compact ofce”.
Select a different model.
The current model selection is sent to the detector.
model selection
comp. off. DIM
OK ¦ back
The desired model is set using the arrow keys.
Reject changes, restore the originally selected model.
Select desired model.
The currently selected model ashes and can be
changed using the arrow keys.

38
The detector signals correct model selection by means of the LED which will
icker for 2 seconds. An incorrect choice of model will be indicated by a brief
one-time illumination of the LED.
3.2 Changing and adapting settings
Individual settings may be changed without altering the remaining detector settings.
I I I I I I I I I I I I
brightness 5.0
OK ¦ back
The desired value is set using the arrow keys.
Reject changes, restore the originally selected value.
Select new value; the value can now be sent.
The currently selected value ashes and can be
changed using the arrow keys.
I I I I I I I
brightness 4.0
send ¦ change
For example: Go to the “brightness” menu. A value of
4.0 is currently set.
Value 4.0 is too bright or too dark.
Select a different value.
The current value of 4.0 is sent to the detector.

39
GB
3.3 Send a value package
The current value memory of the remote control holds a complete value
package of settings.
S
e
n
d
i
n
d
i
v
i
d
u
a
l
v
a
l
u
e
S
e
n
d
v
a
l
u
e
p
a
c
k
a
g
e
S
t
o
r
e
v
a
l
u
e
p
a
c
k
a
g
e
L
o
a
d
v
a
l
u
e
p
a
c
k
a
g
e
L
o
a
d
v
a
l
u
e
p
a
c
k
a
g
e
8 free memory units predefined memory units
compact
office
Remote control
QuickSet plus
Current value
memory
send all
current values
send
All current values are sent to the detector.
Current settings: brightness, switch-off delay time,
switch-on delay time (dependent on detector).

40
3.4 Loading a predened value package
For the initial start-up we recommend using the predened value packages
(see pages 162 - 185). „ofce bright“ is for ofces where much light is required.
load values
ofce
OK ¦ change
The saved settings are to be loaded.
Other saved settings are to be loaded.
The pre-programmed factory settings “ofce” are to
be loaded.
load values
ofce bright
OK ¦ back
The desired value package is selected using the
arrow keys.
Reject changes, restore the originally selected
values.
Load new settings, settings for “ofce bright” can now
be sent.
The current setting ashes and can be changed
using the arrow keys.

41
GB
3.5 Storing an user-dened value package
The current value memory can be stored in the remote control as value pa-
ckage. 8 free storage locations are available for each model.
save values
room 1
OK ¦ change
Current settings are to be saved permanently in the
QuickSet plus.
The settings are saved under the name “room 1”.
The current settings are to be saved under a different
name.
save values
room 2
OK ¦ back
The desired storage location is selected using the
arrow keys.
Reject changes, restore the originally selected
storage location.
The settings are saved under the name “room 2”.
The current storage location ashes and can be
changed using the arrow keys.

42
3.6 Options
The „Reset“ command
The detector is restarted. The current settings are retained.
Test mode on/off
The presence detector is set to test mode. To exit test mode, resend “Test
on/off”. The detector performs a reset. Test mode ceases automatically
after 10 minutes. For detailed information, please refer to the installation
manual of the presence detector.
Switching the light
The switched output for light can be switched on or off.
Background lighting
To improve legibility, the display’s background lighting can be switched on.
Note: this will reduce battery life!
Language selection
The available languages are German, French, English, Spanish, Italian, Dutch,
Swedish, Norvegian, Finnish and Danish.
Version
Shows the software version of QuickSet plus. The software version ist also visi-
ble during start-up of the remote control during 2 seconds.

43
GB
4. Behavior of the detector
For detailed information, please refer to the installation manual of the
presence detector.
4.1 Reception of a value/command
The reception of a valid value or command is indicated by a ickering
(2 sec.) of the LED on the detector.
4.2 Reception of new setting values
●The contact „Light“ reacts immediately on brightness (to check the
brightness threshold).
● If the brightness is insufcient the light is switched on (LED on), if the
brightness is sufcient the light is switched off (LED off).
●The light is switched fully automatically (no semi-automatic operation).
4.3 Local setting of the potentiometers
4.4 Power failure
The current settings are retained no matter whether they have been set
using the remote control or locally on the device.
When changing a single potentiometer value on the
presence detector, all existing potentiometer settings
will be taken over. All programmed values will be lost.

44
4.5 Special case: KNX presence detectors
KNX presence detectors can only be parameterised using the ETS (Engi-
neering Tool Software). In the case of remotely controllable KNX presence
detectors, QuickSet plus has the following functions:
●Test, Reset
●Selecting the programming mode. The LED on the front side indicates
when the detector is in programming mode.
●As a tool for determining the brightness value; parameterisation is
carried out by means of ETS, the KNX commissioning software. This is
explained in the presence detector operating instructions.
● Checking to nd out whether a detector is a master.
A master responds by ashing its LED.
● Checking to nd out whether a detector is a slave.
A slave responds by ashing its LED.
5. Update
Please contact Theben HTS or the responsible Theben HTS representative.

45
GB
6. Technical data
Service remote control QuickSet plus
Voltage supply
Batteries
9V
1x Typ PP3 / 6F22
Transmission medium Infrared
Range approx. 4m (compact)
approx. 4m (PresenceLight)
approx. 8m (ECO-IR)
Transmission angle ± 15º
Dimensions 140x62x30mm
Temperature range 0º - 50º C
Colour Black
Article number 907 0 532
6.1 Compatibility (software version 3.04)
QuickSet plus suitable for the following Theben HTS presence detectors:
●PräsenzLight 180
●PräsenzLight 360
● compact ofce
● compact ofce DIM
● compact ofce 24V
● compact ofce 24V Lux
● compact ofce EIB
●compact passage
●compact passage 24V
●compact passage KNX
●compact passimo
●compact passimo KNX
●ECO-IR 360C NT
●ECO-IR DUAL-C NT

46
7. Warranty declaration
Theben HTS products are manufactured and quality-tested with the utmost care using
state-of-the-art technologies. Theben HTS therefore guarantees perfect function, provi-
ded the detectors are used as intended. However, should a defect occur, Theben HTS
offers the following warranty within the scope of its General Terms and Conditions of
Business:
Please bear in mind the following points:
●The warranty period is 24 months, commencing from the manufacturing date.
●The warranty becomes null and void if you or third parties undertake alterations to
the units.
We undertake to repair or replace as quickly as possible all supplied components which
have become defective or unusable as a result of demonstrably bad material, faulty
design or defective workmanship up to the expiry of the warranty period.
Returns
In the event of a warranty claim please send the unit together with the delivery note and
a brief description of the fault to the dealer concerned.
Industrial property rights
The concept including hardware and software of these units is protected by copyright.

47
GB
8. Troubleshooting
Subject to change without prior notice. Errors and omissions excepted.
9. Auxiliary table for settings with QuickSet plus
Note the settings used in the auxiliary table on pages 162 to 185.
Fault Cause
The remote control cannot be
switched on, or the display
disappears when sending
Replace the battery
The LED in the detector does
not react on sending
Point the remote control exactly to the detector
when sending; The distance to the detector is too
large; Check the model selected in the remote
control; Detector is not remote controllable
Background lighting is auto-
matically deactivated.
Insert new battery.
Note: keep a spare battery to hand when using
background lighting!
CE Declaration of Conformity
Product complies with the requirements of the directive 2004/108/EC.

48
Theben AG
Hohenbergstrasse 32, DE-72401 Haigerloch
Tel. +49 (0) 74 74 692 - 0
Fax +49 (0) 74 74 692 - 150
Hotline
Tel. +49 (0) 74 74 692 - 369
Fax +49 (0) 74 74 692 - 207
Switzerland
Theben HTS AG
Im Langhag 11, CH - 8307 Effretikon
Tel. +41 (0)52 355 17 00
Fax +41 (0)52 355 17 01
www.theben-hts.ch
Please nd the contact addresses for additional countries on www.theben.de

162
Meldertyp
Modèle
Type
compact ofce
compact ofce 24V
ECO-IR 360C NT
Modelo
Modello
Type melder
Objekt
Objet
Object
Objeto
Oggetto
Object
Inbetriebnahme
Installation
Installation
Instalación
Installazione
Inbedrijfstelling
Werte
Valeurs
Values
Valores
Valori
Waarden
vordeniert / prédénie / predended
Büro
Bureau
Ofce
4.0 15min. 15min. 0sec.
Ocina
Ufcio
Kantoor
predenido / predeniti / vooraf gedef.
Büro hell
Bureau clair
Ofce clear
5.0 15min. 15min. 0sec.
Ocina claro
Ufcio chiaro
Kantoor licht
Büro dunkel
Bureau sombre
Ofce dark
3.0 15min. 15min. 0sec.
Ocina loro
Ufcio scuro
Kant. donker
Korridor
Corridor
Passage
3.0 10min. 10min. 0sec.
Pasillo
Corridoio
Gang
WC
Toilette
Restroom on 10min. 10min. 1min.
WC
WC
WC
A B
LUX
t
off
t
on
t
off
D
F
GB
E
I
NL

163
Werte
Valeurs
Values
Valores
Valori
Waarden
Benutzer / Utilisateur / User
Raum 1
Pièce 1
Room 1
Sala 1
Stanza 1
Ruimte 1
Usuario / Utente / Gebruiker
Raum 2
Pièce 2
Room 2
Sala 2
Stanza 2
Ruimte 2
Raum 3
Pièce 3
Room 3
Sala 3
Stanza 3
Ruimte 3
Raum 4
Pièce 4
Room 4
Sala 4
Stanza 4
Ruimte 4
Raum 5
Pièce 5
Room 5
Sala 5
Stanza 5
Ruimte 5
Raum 6
Pièce 6
Room 6
Sala 6
Stanza 6
Ruimte 6
Raum 7
Pièce 7
Room 7
Sala 7
Stanza 7
Ruimte 7
Raum 8
Pièce 8
Room 8
Sala 8
Stanza 8
Ruimte 8
LUX
t
off
t
on
t
off

164
Detektortyp
Meldertype
compact ofce
compact ofce 24V
ECO-IR 360C NT
Tunnistintyyppi
Sensortype
Objekt
Objekt
Kohde
Objekt
Idrifttagning
Oppstart
Käyttöönotto
Opstart
Värden
Verdier
Arvot
Værdier
fördenierat / forhåndsdenert
Kontor
Kontor 4.0 15min. 15min. 0sec. Toimisto
Kontor
esimääritetty / vooraf gedefi
Kontor ljust
Kontor lyst 5.0 15min. 15min. 0sec.
Toimisto
valoisa
Kontor lyst
Mörkt kontor
Kontor
mørkt
3.0 15min. 15min. 0sec.
Toimisto
hämärä
Kontor mørkt
Korridor
Korridor 3.0 10min. 10min. 0sec. Käytävä
Korridor
WC
WC on 10min. 10min. 1min. WC
WC
A B
LUX
t
off
t
on
t
off
S
NO
FIN
DK

165
Detektortyp
Meldertype
compact ofce
compact ofce 24V
ECO-IR 360C NT
Tunnistintyyppi
Sensortype
Objekt
Objekt
Kohde
Objekt
Idrifttagning
Oppstart
Käyttöönotto
Opstart
Värden
Verdier
Arvot
Værdier
fördenierat / forhåndsdenert
Kontor
Kontor 4.0 15min. 15min. 0sec. Toimisto
Kontor
esimääritetty / vooraf gedefi
Kontor ljust
Kontor lyst 5.0 15min. 15min. 0sec.
Toimisto
valoisa
Kontor lyst
Mörkt kontor
Kontor
mørkt
3.0 15min. 15min. 0sec.
Toimisto
hämärä
Kontor mørkt
Korridor
Korridor 3.0 10min. 10min. 0sec. Käytävä
Korridor
WC
WC on 10min. 10min. 1min. WC
WC
Värden
Verdier
Arvot
Værdier
Användare / Bruker
Rum 1
Rom 1
Huone 1
Rum 1
Käyttäjä / Gebruiker
Rum 2
Rom 2
Huone 2
Rum 2
Rum 3
Rom 3
Huone 3
Rum 3
Rum 4
Rom 4
Huone 4
Rum 4
Rum 5
Rom 5
Huone 5
Rum 5
Rum 6
Rom 6
Huone 6
Rum 6
Rum 7
Rom 7
Huone 7
Rum 7
Rum 8
Rom 8
Huone 8
Rum 8
LUX
t
off
t
on
t
off
Other manuals for QuickSet plus
1
This manual suits for next models
1
Table of contents
Other Theben Remote Control manuals
Popular Remote Control manuals by other brands

LightwaveRF
LightwaveRF JSJS LW106 Operation manual
Universal Electronics
Universal Electronics Potenza ST user guide
Sony
Sony RM-BR300 - Remote Control Unit operating instructions
Topseed
Topseed TSEI-2404 user manual
Akerstroms
Akerstroms SESAM 800 CONFIGURABLE operating manual
YOODA
YOODA MELODY Series quick start guide
