Thenow HSN-JC3 User manual

User Manual
Thank you for purchasing this “Thenow”product;
Please read this manual carefully before attempting
to install,operate or service;
Please retain this booklet for future reference.
Wine Cellar Cooling System
Self-contained
Thenow Australia
PO Box 107
Park Orchards Vic 3114
Email:info@thenowair.com.au
www.thenowair.com.au
www.thenowair.com.au

To avoid the risk of electrical shock ,property damage ,personal
injure or death,please read the following instructions carefully
with safety or warning labels.
*
correct direction on the packing case.
* After transportation or moved, it needs to be allowed to
stand for more than 24 hours before it can be turned on.
* The power cord must be plugged into a 3-prong grounding-type
wall receptacle.
* Do not attempt to carry out any measurement, device
replacement or other maintenance work not covered in
this manual, otherwise it may lead to warranty failure,
endanger normal operation, extend equipment downtime
and increase additional maintenance costs.
During transportation or moving, please follow the
Disconnect electric power from the appliance before
performing any maintenance or repairs,failure to do so
could result in death or electrical shock.
Table of Contents
WARNING
1
2
3
6
14
15
20
21
24
Introduction
Working Principle
Main Technical Datas
Installation&Debugging
Wiring Schematic
Maintenance
Troubleshooting
After service
Introduction And Use of the Control Panel

Thenow wine cellar cooling self-contained unit best suited to the
wine room and wine cabinet.The device is suitable for wine cabinets
or wine storage rooms below 5m³. The purpose of this device is to
keep the room temperature in its range 10~16 degrees Celsius, the
humidity stays at the best level of 50% to 70%,and these temperature
and humidity are good for long term wine storage. Compact and easy
to install even without any duct work or piping, which also helps to
reduce overall installation costs.
We have different models for different occasions,widely used in
household,wine cabinet,underground wine cellar,wine wall and so on.
Features:
➢Condenser and evaporator combined inside one appliance, easy and
fast to install.
➢Intelligent control panel.
➢Suitable temperature between 10~16 C and humidity maintenance
within 50~70% RH.
➢Unique appearance design, little vibration,lower noise.
➢Commercial-grade, corrosion resistant components and spray
painting frame for long-term durability.
➢ Available with a heater and humidifier option (HSN-J15-Z).
1.Refrigeration
Using cycling vapor compression refrigeration system,when the
compressor work, indraft low temperature and pressure refrigerant
gas from evaporator, compressed by compressor into high
temperature and pressure gas, and then into the condenser to
condense into liquid, meantime release heat, after throttling under
the function of the thermal expansion valve, entering into the
evaporator and absorbed heat,then evaporate into gas, finally back to
the compressor through the suction tube and complete a refrigeration
cycle ; On the other hand,through changing of refrigerant flow
direction, total or partial condensing heat generated from
refrigeration can be exhausted to outside,to achieve the purpose of
adjusting the indoor temperature.
( )
2.Heating Principle Optional
a.Electric heating compensation
b.Heat pump heating : Using the working principle of the compressor
, through a four-way reversing valve, the condenser and evaporator
are interchangeable ,to absorb heat from the outside and transfer it to
the inside , so as to increase the room temperature.
3.Dehumidification Principle
When the wet air flows through the evaporator surface, the air
temperature will drop, when it falls below the dew point,the steam in
the air will condense out, gathering and drainage of water pipes in the
receiving plate, the controller automatically adjusts the compressor
start-up time according to the setting humidity , so as to achieve the
purpose of adjusting humidity.
4.Humidification Principle (Optional)
Using environmental protection wet curtain, water was spurted to the
room area under large air volume to achieve the purpose of
humidifying.
Introduction
1 2
Working Principle
www.thenowair.com.au www.thenowair.com.au
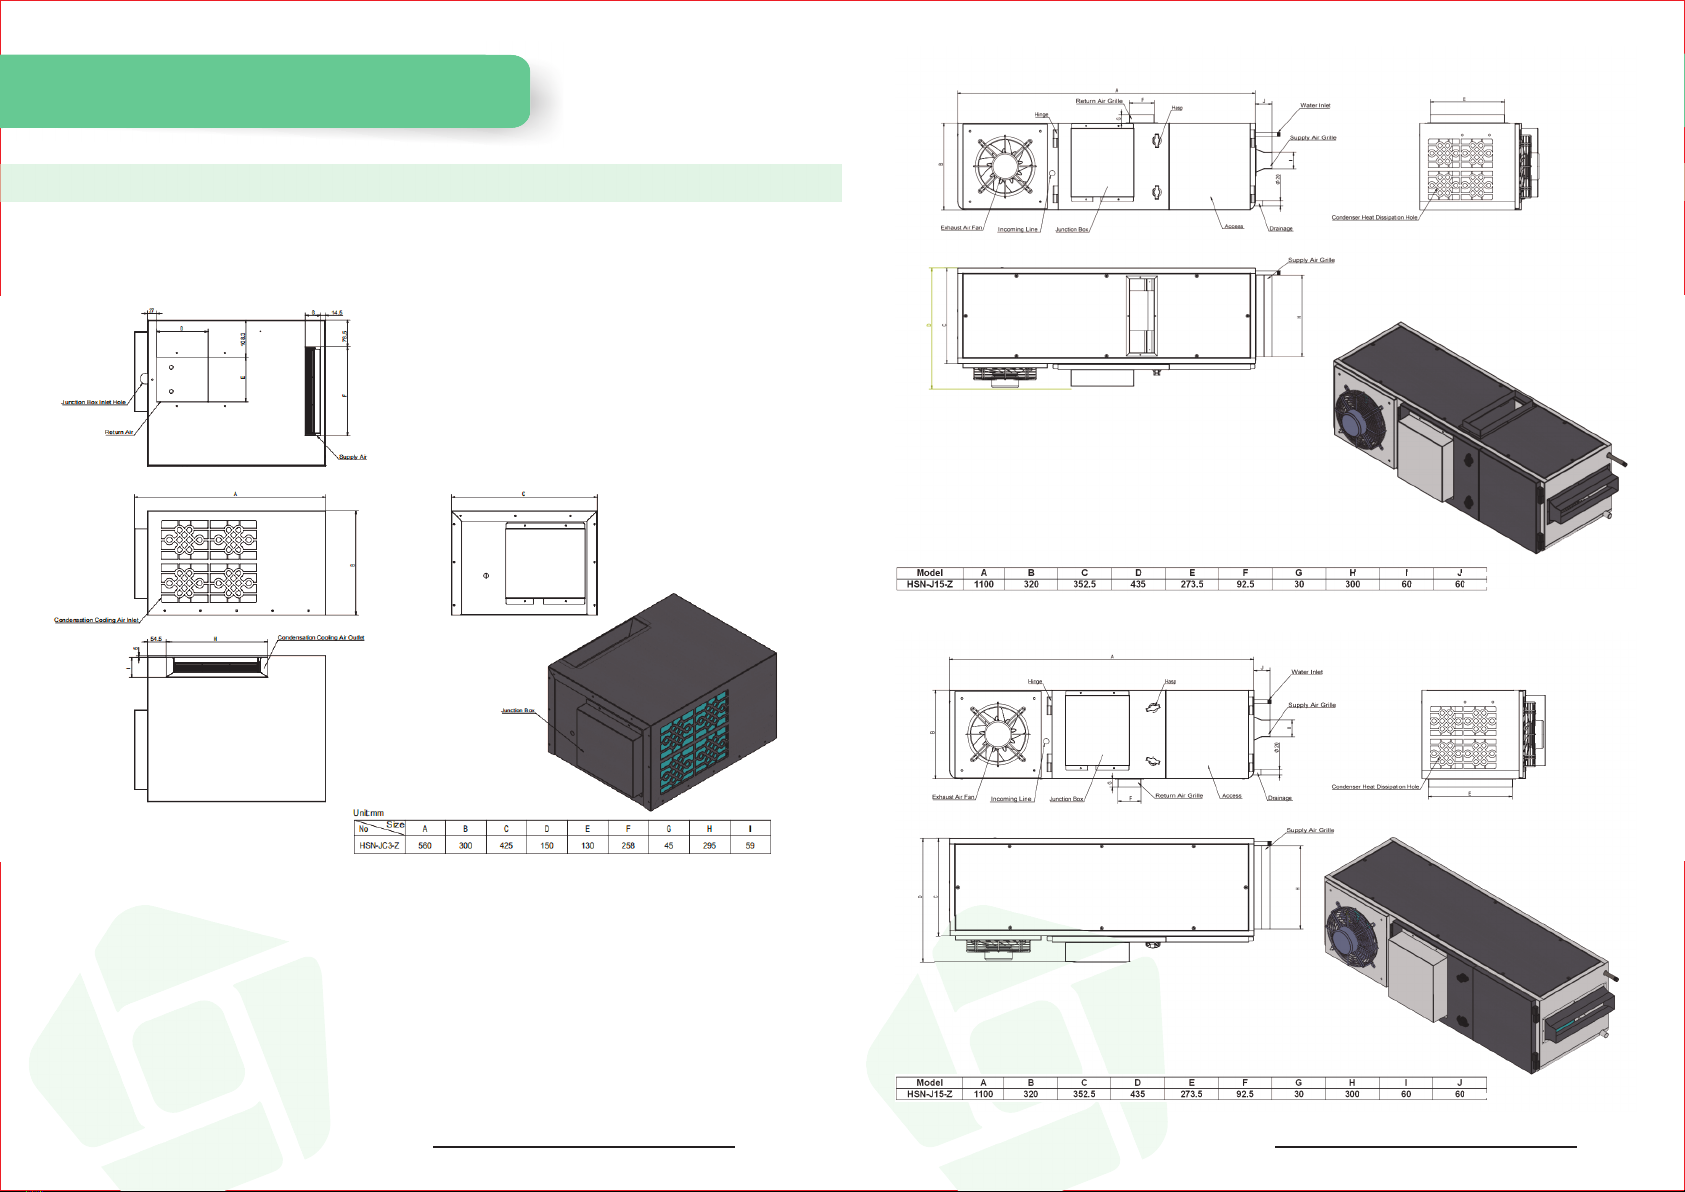
Dimensions HSN-JC3:
Main Technical Datas
3 4
Dimensions HSN-J15-Z(Side Supply Air/Top Return Air)
Unit:mm
Dimensions HSN-J15-Z(Side Supply Air/Bottom Return Air)
Unit:mm
Unit Dimension
www.thenowair.com.au www.thenowair.com.au

5 6
Installation & Debugging
Note:There are several factors such as glass,stone,concrete,insulation,
ambient temperature,ventilation etc. which will change the required amount
of Kw/BTU needed to properly cool your wine room or wine cabinet. We
strongly recommend you contact with us or our distributors beforehand to
help you to choose the model matched. We do not bear the losses caused
by the selection errors caused by the above reasons.
1. Pre-installation Inspection
(1) Check the outer packing for breakage.
(2) Machine model (nameplate), check whether it is consistent with
what you ordered.
(3) The appearance of the whole machine is intact
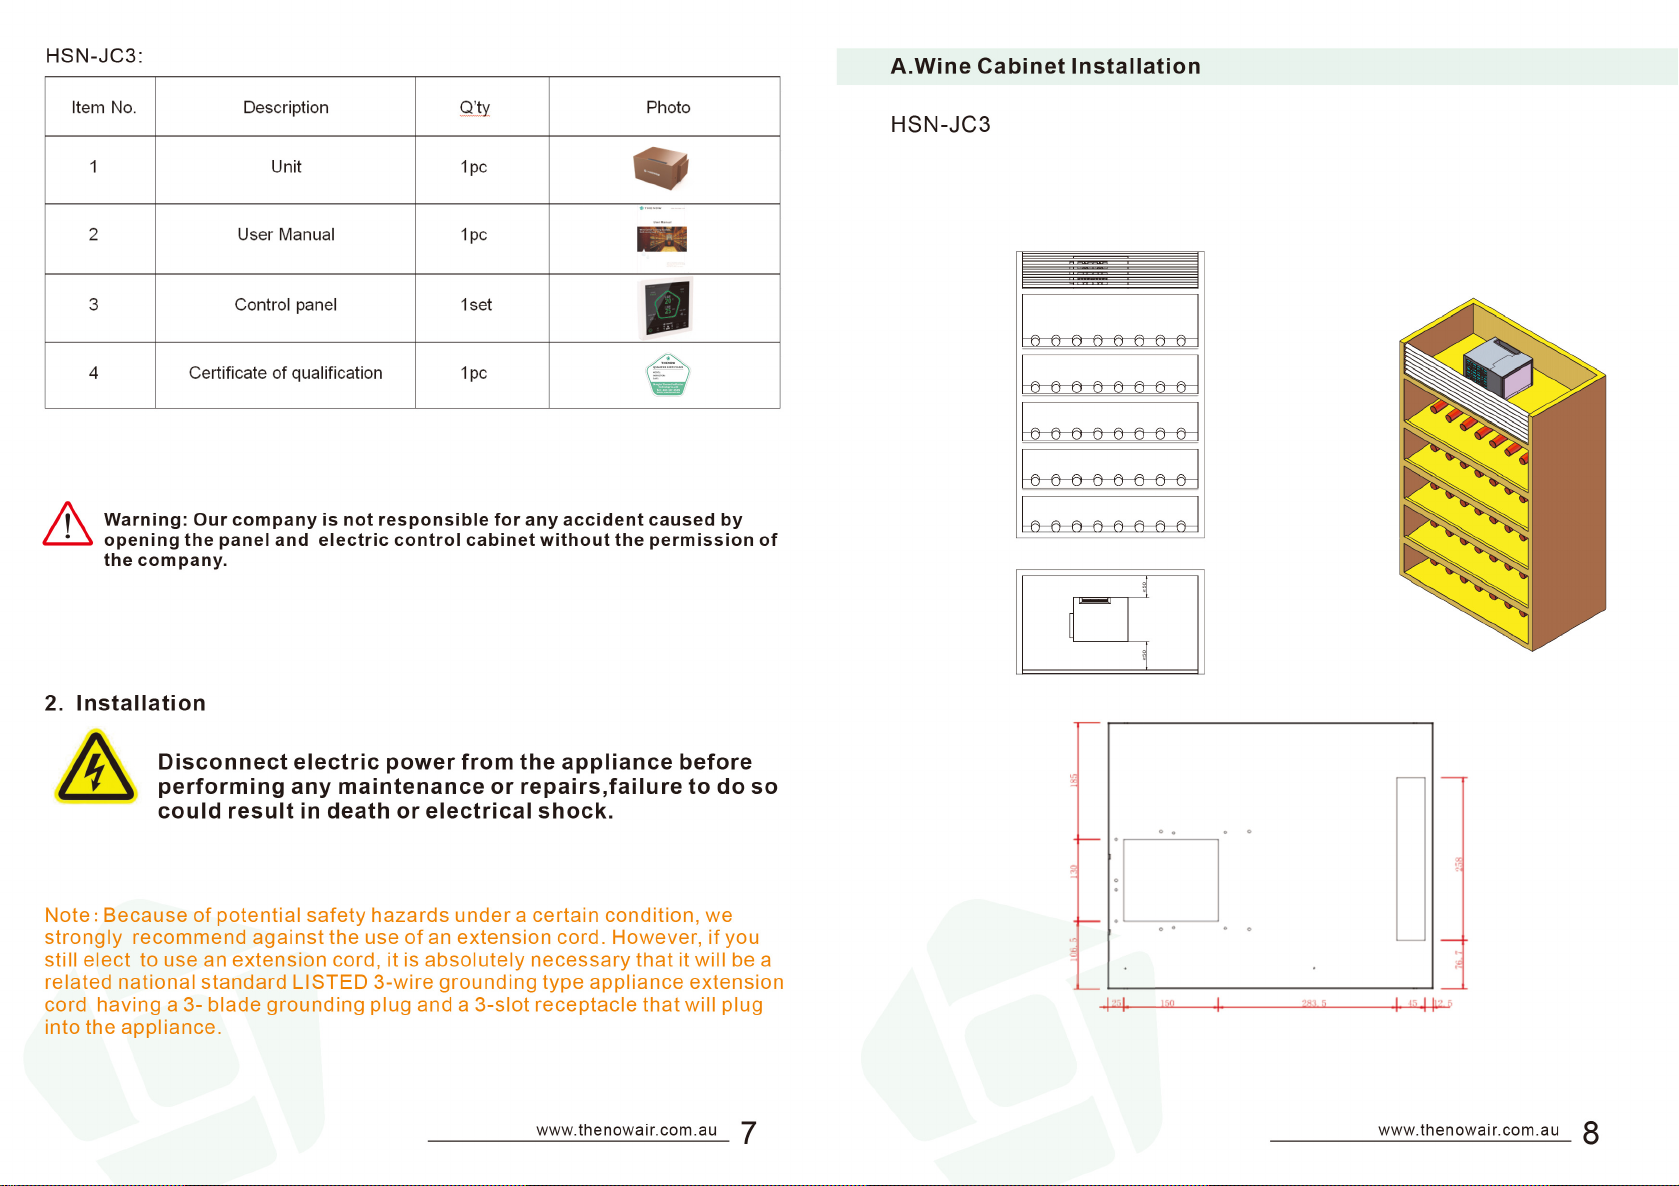
(4) Check attached accessories as follows
( )
Item No.Item Size Photo
1 Unit 1 Set See t he nameplate
2 User
manual 1 pc A5
3 Cont rol Panel 1 pc 90*90mm
4 Inlet Valve 1 pc /
5 Thread taper 1 pc 14
6 Drain-pipe 1 pc Leng t h-15cm
7 Hoop 1 pc
8 Inlet flange 1 pc 303.5*82.5m m
9 Screw 4pcs ST4.2*9.5
Q’ty
Installation: HSN-J15-Z
Technical Datas
Intelligent control panel
(Up to )
www.thenowair.com.au www.thenowair.com.au

9 10
Installation Conditions HSN-JC3
(1) Place the wine cabinet in a properly ventilation location.
Otherwise,heat exhausted by the cooling unit will build up and it
will not operate properly.
(2) Equipment should install on horizontal ground or platform, tilt
angle must not exceed one degrees, platform or ground should be
able to load-bearing unit weight.
(3) To keep good ventilation and easy maintenance,requires that the
wine cabinet grill can be flexibly disassembled.
(4) Never install the unit in danger areas,such as strong magnetic,
steam, dust,heating source,corrosion and combustible gases etc.
(5) Unobstructed airflow to and from the unit is critical to unit’s overall
performance and lifespan, make sure there is a minimum of 50mm
(100mm is better) of horizontal clearance in every direction around
the unit.
(6) Before install the unit, foam tape needs to be placed in the bottom
and side of the unit.
(7) Working environment: Temperature 5℃-35℃,Humidity RH<90%.
In order to avoid fire or electric shock hazard, please
do not expose the equipment to damp environment.
HSN-J15-Z
Side Supply Air/Top Return Air
Mode A B C D E F L W
HSN-J15-Z ≥50 60≥100 ≥375 ∅20320 300 60
Side Supply Air/Bottom Return Air
Mode A B C D E F L W
HSN-J15-Z ≥50 60≥100 ≥355 ∅20320 300 60
www.thenowair.com.au www.thenowair.com.au
11 12
Installation Conditions HSN-J15-Z
(1) Place the wine cabinet in a properly ventilation location.
Otherwise,heat exhausted by the cooling unit will build up and it
will not operate properly.
(2) Equipment should install on horizontal ground or platform, tilt
angle must not exceed one degrees, platform or ground should be
able to load-bearing unit weight;
(3) To keep good ventilation and easy maintenance,requires that
there must be more than ≥450*600mm maintenance space
around and at the top of the equipment.
(4) Never install the unit in danger areas,such as strong magnetic,
steam, dust,heating source,corrosion and combustible gases etc.
(5) Ensure that the distance between the condensing side of the
machine and the wine cabinet is at least 50mm ,the HSN--J15-Z
unit air outlet should be at least 100mm away from the wine
cabinet.
(6) The HSNJ15-Z unit height of machine installation space shall not
be lower than 360mm.
(7) To ensure better heat dissipation and ventilation of the machine,
the back of the wine cabinet must be reserved ventilation holes.
The heat dissipating end cover plate of the machine is a shutter
or a cover plate which is conducive to heat dissipation.
(8) The wine cabinet and the machine are reserved with fixed machine
support, add shock absorber at machine and bracket.
(9) Recommended materials for commonly used air duct:
A: Thermal insulation board, 15-20mm thickness.
B: Stainless steel air duct, 20mm insulation outside.
(10) Ambient temperature: 5 ℃ ~ 35 ℃, relative humidity is not more
than 90%
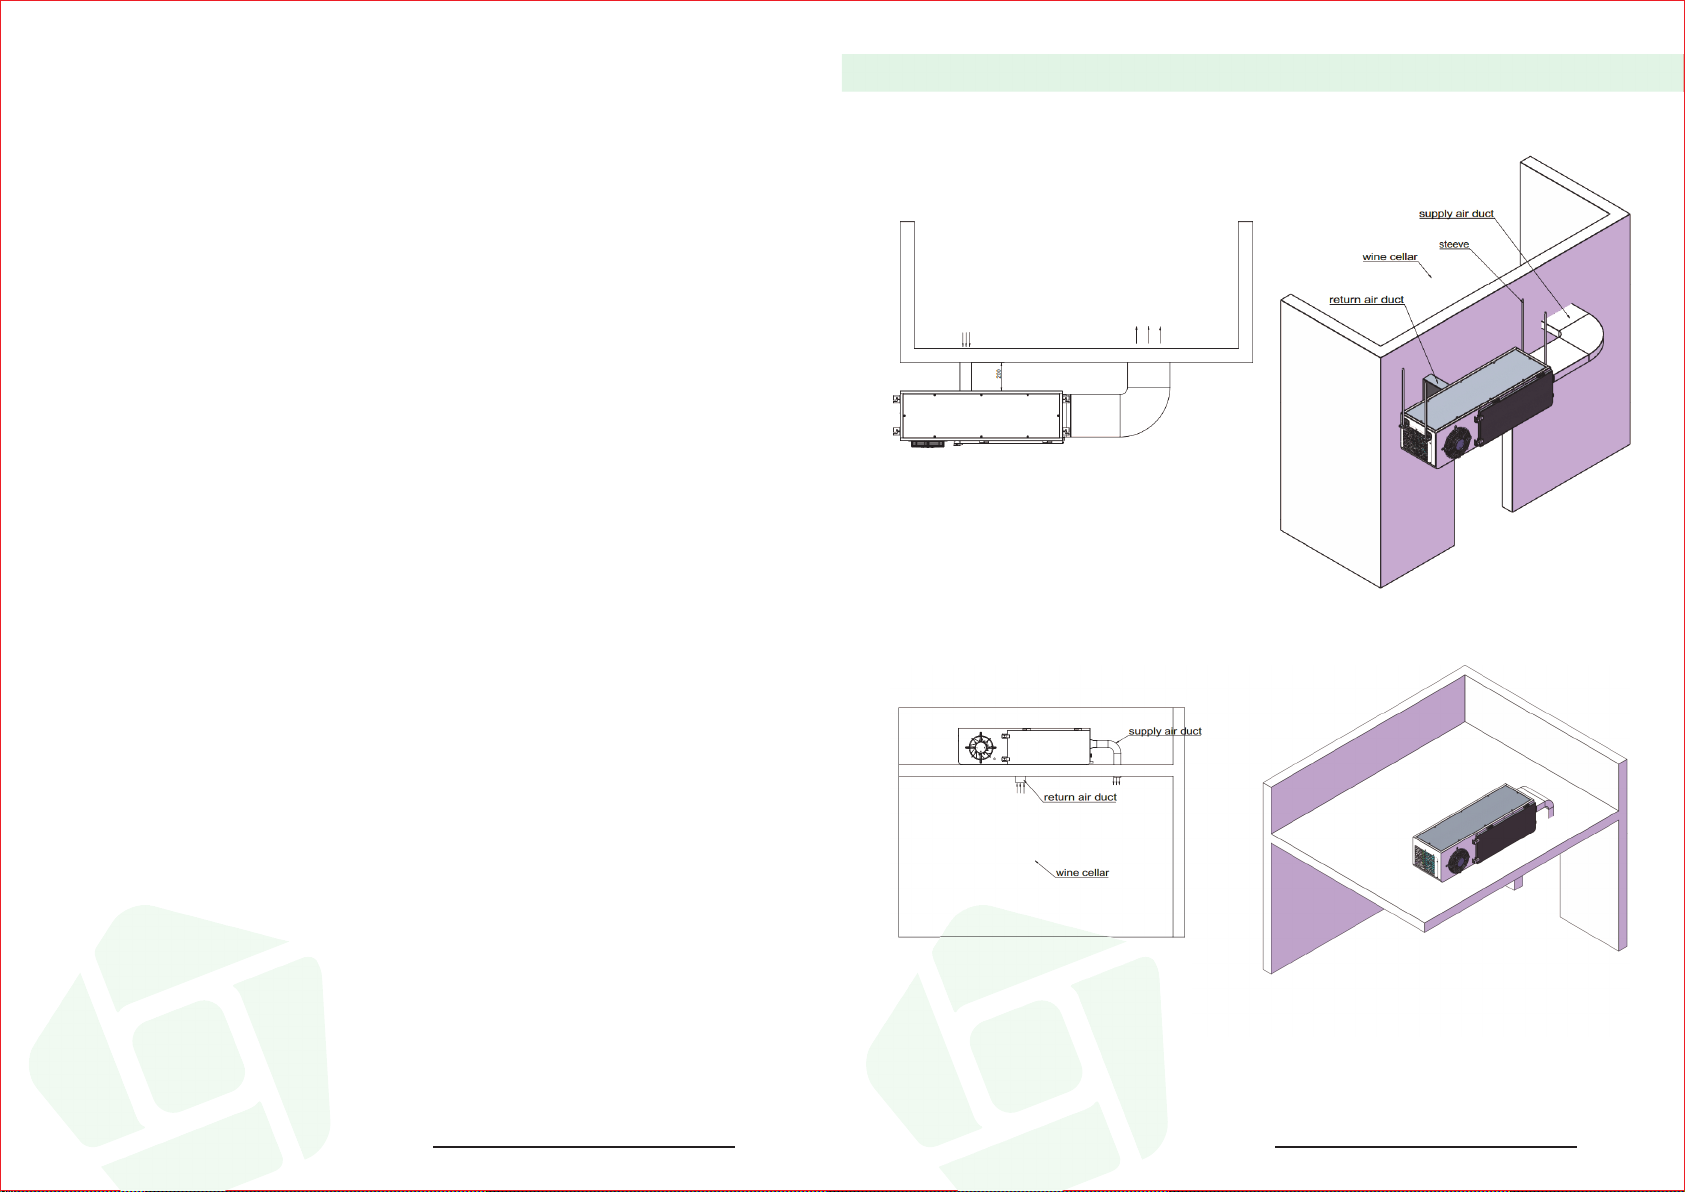
B. Wine Room Installation
Ambient temperature:5°~35°,
Humidity:≤90%RH.
HSN-J15-Z applicable wine cellar room volume: 1.5~3m³.
The unit must be installed in ventilated and dry
areas,and make sure it works at the right temperature.
Note:
Ambient temperature:5°~35°,
Humidity:≤90%RH.
HSN-J15-Z applicable wine cellar room volume: 1.5~3m³.
The unit must be installed in ventilated and dry
areas,and make sure it works at the right temperature.
Note:
www.thenowair.com.au www.thenowair.com.au

13 14
In order to avoid fire or electric shock hazard, please
do not expose the equipment to damp environment.
1. Online Debugging
Ambient temperature:5°~35°,
Humidity:≤90%RH.
HSN-J15-Z applicable wine cellar room volume: 1.5~3m³.
The unit must be installed in ventilated and dry
areas,and make sure it works at the right temperature.
Note:
After transportation or moved, it needs to be allowed to stand
for more than 24 hours before it can be turned on.
Note:
Wiring Schematic
HSN-JC3 & HSN-J15-Z PCB Wiring Schematic
Note:The bottom of the equipment must be fixed with an expansion
bolt, and ground connection has to be completely correctly. Confirm
that the power supply of the user's power distribution box is single-
phase 220V, the fluctuation range does not exceed 10%, and the
distribution box capacity meets the requirements for equipment use,
Refer to the internal electrical schematic of the unit . Check that the
embedded pipe conforms to the requirements of inlet and outlet air
and outlet water direction of the equipment, and the drain pipe should
be curved to ensure smooth drainage
1.Power the machine.
2.Set the operation mode at “Auto”, temperature at 12~16℃ and
humidity at 50%~60%(For setting methods, please check the operation
section of the controller in the user manual). Then cooling, heating or
humidification will be calling to work automatically according to the
setting value.
3.Keep the machine running at least 2 hours.
After the machine runs for 2 hours:
1.Check the alarm record. If all functions work well, no alarm record
will be generated.
2.Check the machine for leaks. In case of leakage, first check whether
the drainage is smooth. If so, reduce the opening of the ball valve to
reduce the inlet water pressure. Run the machine for half an hour
again and check whether the leakage problem is solved.
3.Check whether the temperature and humidity are at or near its
setting value.
4.If the cooling, heating and humidification of the equipment can
operate normally and there is no water leakage, the debugging work
is finished.
*The humidification part mentioned above is only valid for HSN-J15-Z
www.thenowair.com.au www.thenowair.com.au
15 16
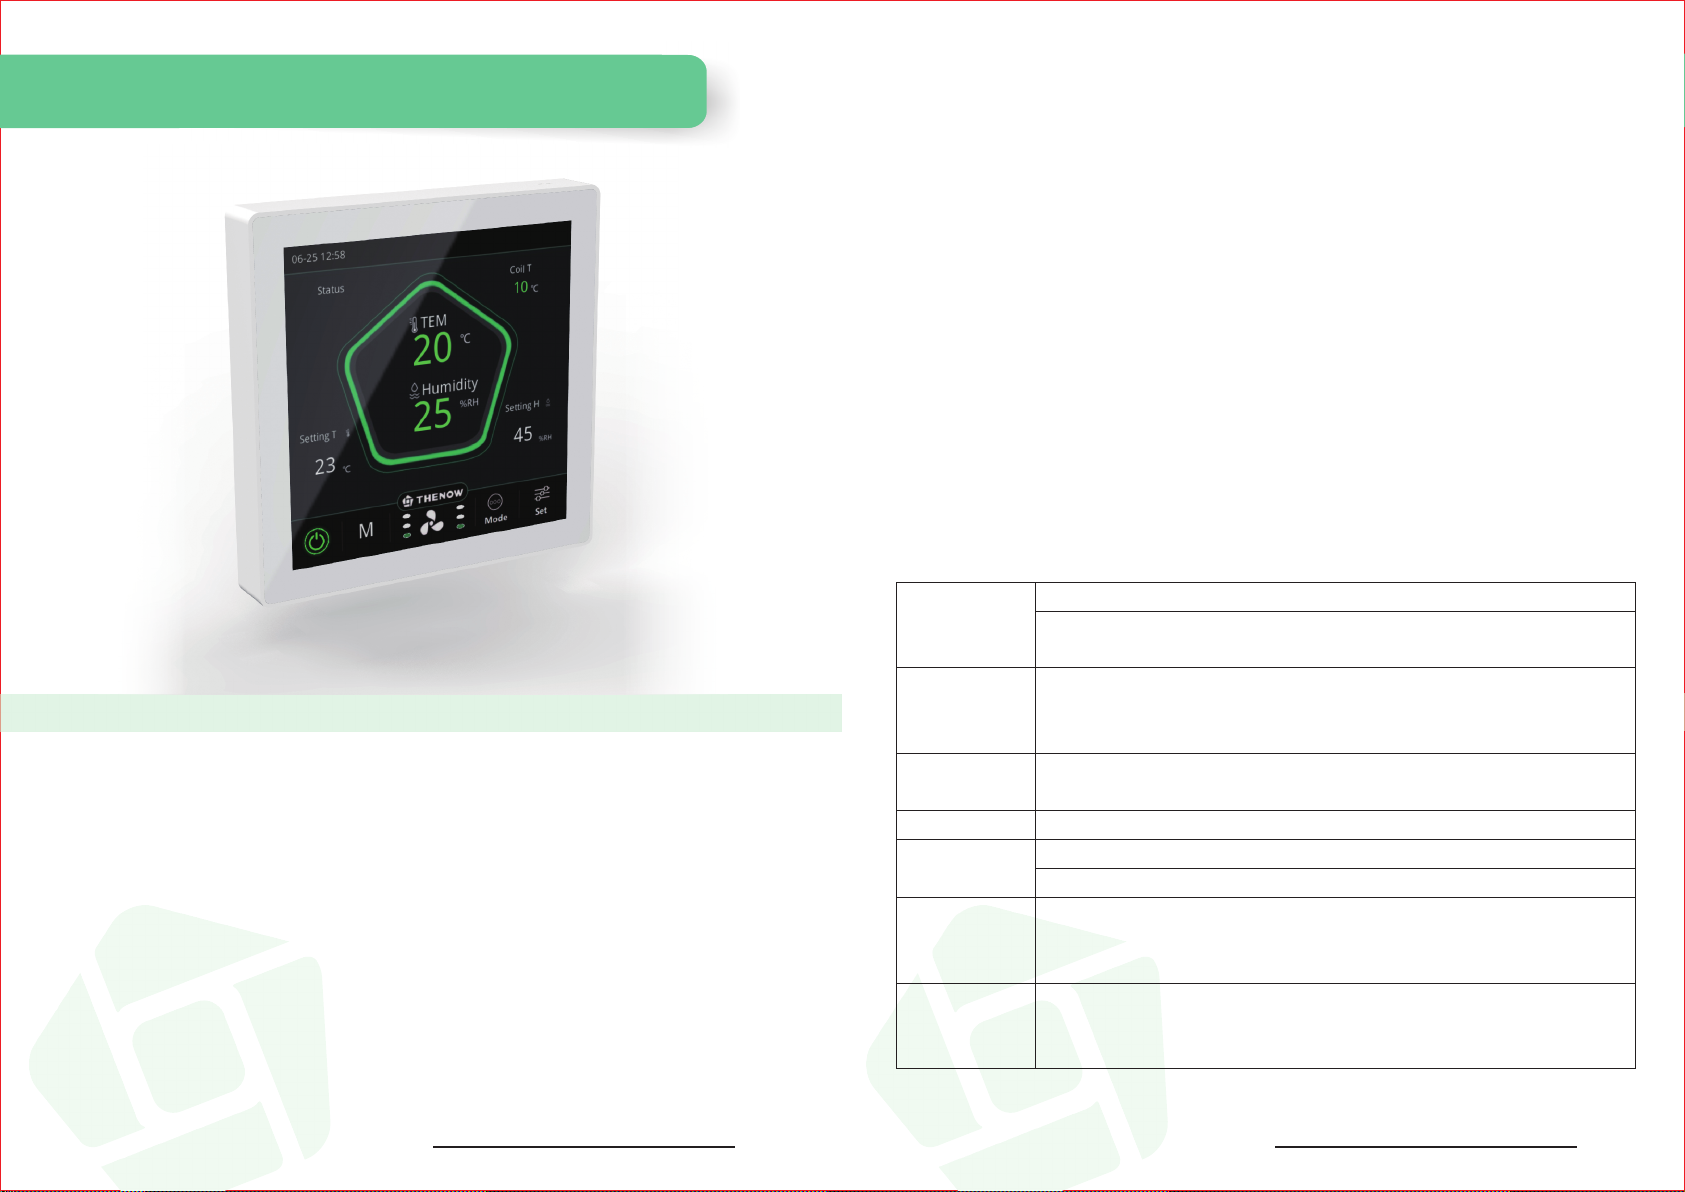
Introduction And Use of the Control Panel
Product introduction:
CK-4C-86 series controller is a new type of controller to realize
intelligent control of constant temperature and humidity for a wine
cellar and wine cabinet cooling units,which is widely used in precise
temperature control places with small volume.
The controller adopts 4-inch large -screen colorful display
technology,timing control,automatic/manual control of wind speed
,automatic operation of the appropriate wind speed ,comfortable
energy saving ,accurate and reliable.
Functional features:
1. With 4-inch capacitive full-touch screen to display clear texture.
2. Temperature and humidity ,clock real time display .
3. Can be controlled regularly.
4. Wind speed manual/automatic control selection.
5. Multiple operating mode options.
6. Built-in advanced parameter settings,manufacturers can freely set
according to different customer needs.
7. Standard 86 mounting bottom case for quick and easy installation.
8. Power off and restart function.
9. Alarm can be remembered.
Technical specifications:
Power supply
mode
PCB:AC220V±10% 50/60HZ
The control panel:DC12V
The shall
material
Flame retardant ABS+PC
Power
<12W
60mm
size
PCB:123mm×85mm
The control pan:91mm×90mm
Storage
environment
-10~~70℃
5%~~95%RH
Work
condition -10~~70℃5%~~95%RH
Pitch-row
www.thenowair.com.au www.thenowair.com.au

17 18
Schematic diagram of electrical connection:
Please connect in strict accordance with the product wiring diagram
,wiring must be disconnected from the power supply ,if any
abnormality occurs ,please cut off the power supply and contact the
manufacturer as soon as possible. Non-professionals should not
disassemble it in order to avoid danger.
Product installation:
1. Remove the plastic frame
and screw from the packaging
box,and then install and fix
the plastic frame to the 86
mounting box inside the wall
after the wire is threaded out
of the plastic frame.
2. Correct wiring according to
electrical connection diagram
and wiring marking.
3. Snap the product lower
point to the plastic frame,then
press and hold the upper part
of the product into the plastic
frame.
4. Confirm whether the shell
is fastened and the installation
is completed.
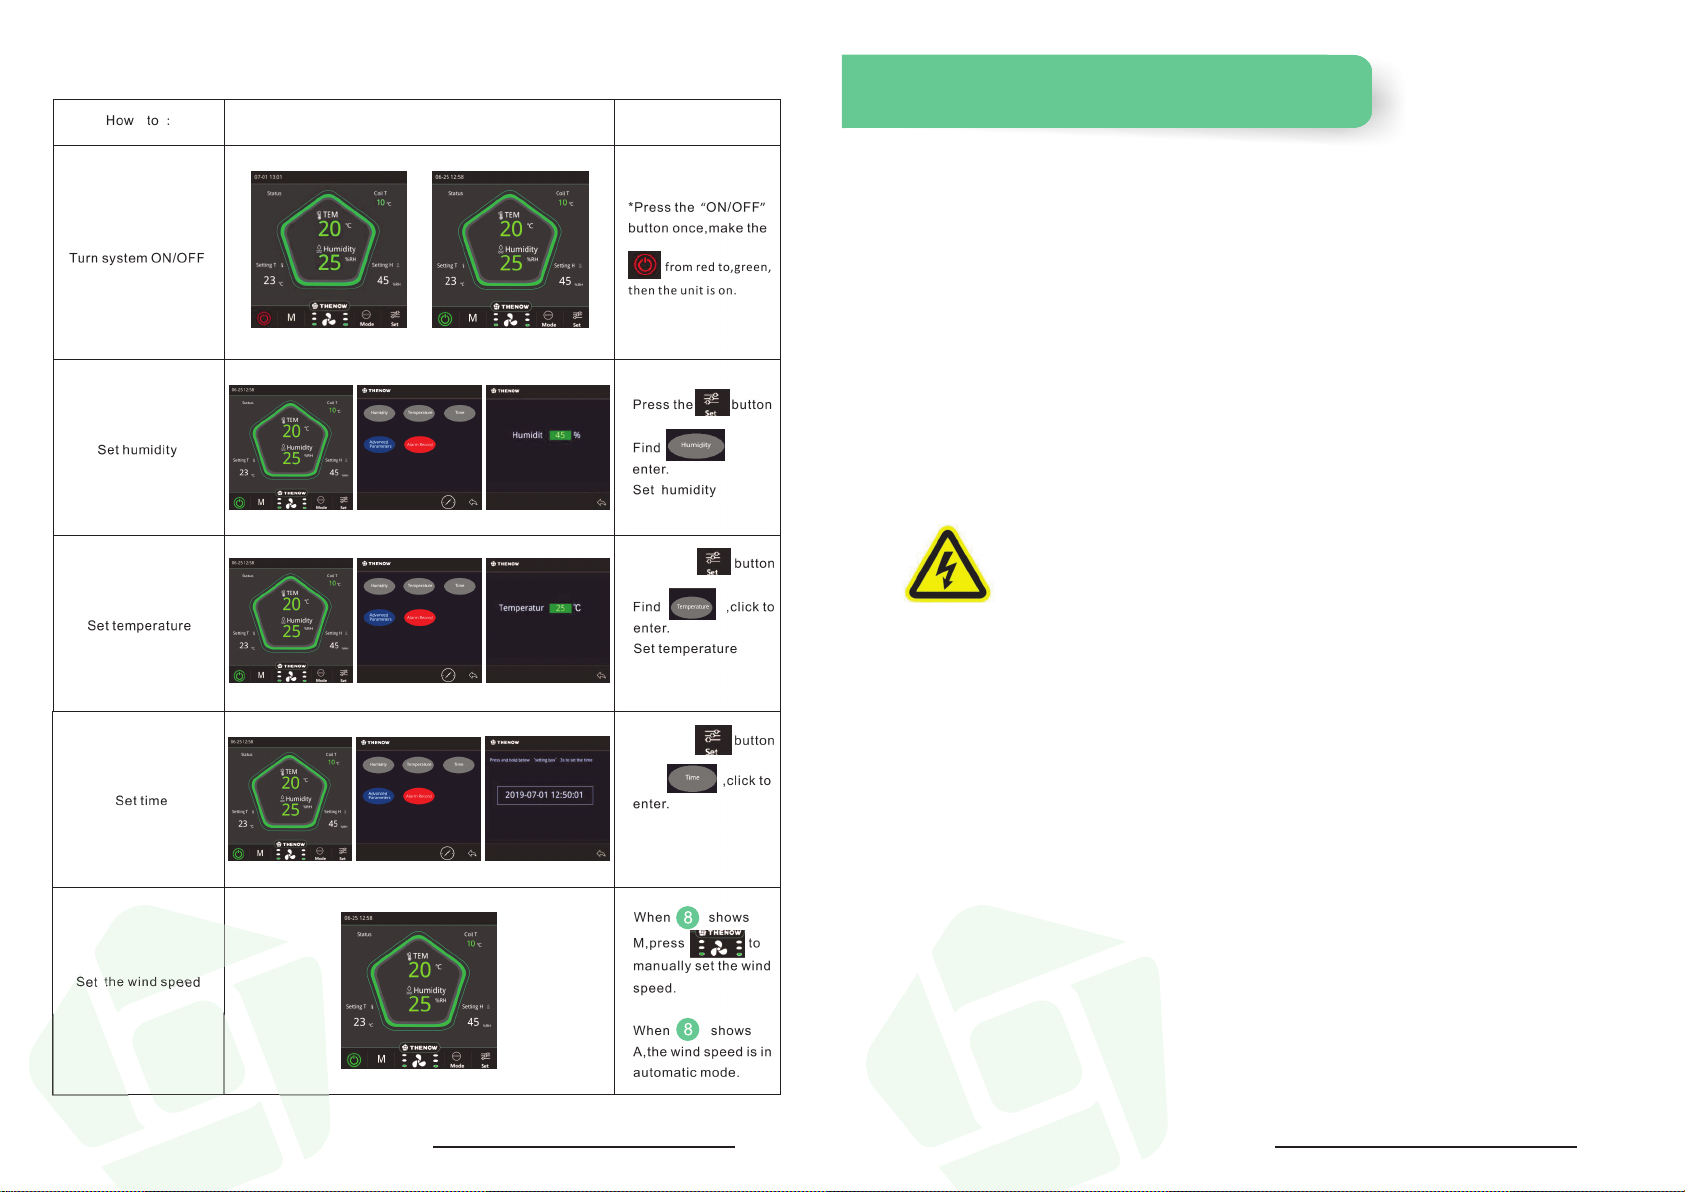
Use the steps Description:
(Showing the running mode of the unit)
(Setting running mode)
Air speed or set the air speed
A
www.thenowair.com.au www.thenowair.com.au
19 20
Schematic diagram of electrical connection
1.
2. ,click to
3.
1.Press the
2.
3.
1.Press the
2.Find
3.set time
1.
2.
Maintenance
1.Using Requirements
(1) Working conditions: Surrounding temperature at 5℃-35℃, relative
humidity lower than 90% ;
(2) Please make certain power supply is specified voltage, it's strictly
prohibited to operate equipment with phase missing or under
voltage;
(3) If the equipment has not been used for a long time ,please make
sure to turn off the power.
2.Cleaning
Disconnect electric power from the appliance before
any operation, otherwise there will be the risk of electric
shock.
(1) Because the temperature probe is a sensitive element,in dusty
place,please use low pressure water to clean regularly (for
example,with the dust ball blowing wash),when the accuracy
become poor ,please orrect or replace.
(2) When dust collects on the air filter,will affect the effect of the
equipment,or even breakdown, so must clean the filter regularly,
at least once per month; if the environment is dusty,it must be
cleaned weekly or daily, except for connecting with pipes.
(cleaning method: remove the filter from the side of the inlet of the
unit, knocking gently when cleaning or use cleaner to remove the
dust on the net, or put thefilter in warm water below 40 degrees
and add a small amount of neutral detergent washing,then rinse
with water and dry it in the air).
www.thenowair.com.au www.thenowair.com.au

21 22
Do not replace the filter while the machine is working
Troubleshooting
WARNING
Disconnect electric power from the appliance before performing
any maintenance or repairs,failure to do so could result in death
or electrical shock.
* If maintenance is needed, wait for 3 minutes after power failure (let
capacitor discharge on PCB), and then open the maintenance door.
* The surface temperature of the condenser may be very high. Do not
touch it to prevent burns.
* Even if the fan and compressor have stopped ,there is still
adangerous voltage at the terminals of the starting capacitor.
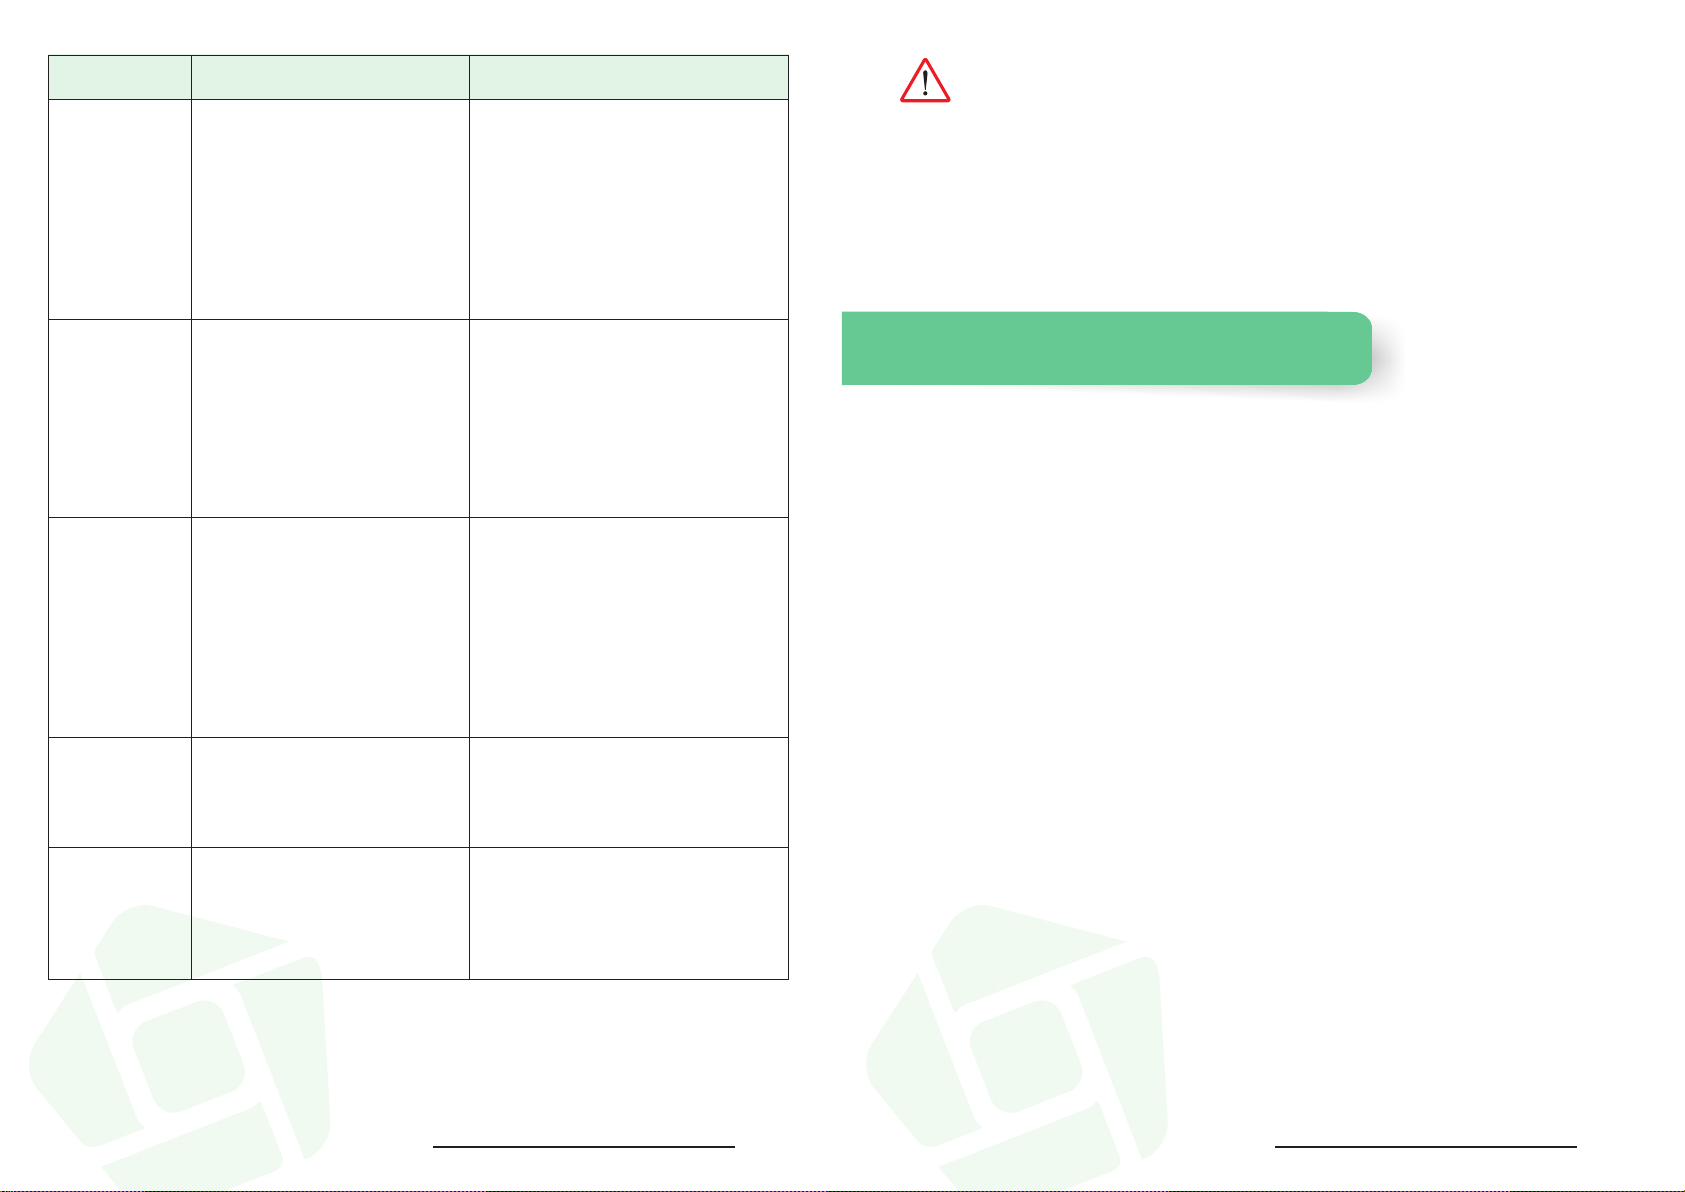
Troubleshooting
Status Reason Suggestion
Cooling unit not
running
1. No power.
2. power cord unplugged.
3.
low voltage
4. Incorrect or loose wirings.
5.
Ambient temperature above 35°C
or lower 5°C.
6. Setting higher than ambi ent
7.
Defrosting mode on .
1. Check power at receptacle &fuses.
2. Plug-in power cord plug.
3. Contact an authorized electrician.
4. Check all wirings and connections.
5. Ambient temperature not meet unit
working conditions.
6. lower temperature setting .
7. Wait 5-30minutes.
Cannot
dehumidification
1 I. nlet or outlet air grille is stuck.
1. Please check the air grille and clean it.
2.
Air filter is stuck.
3 . Refrigerant leakage.
4 . Compressor not working.
5 . Fan not working.
2 . Air filter is stuck.
3 . Add refrigerant.
4 Check whether the compressor is normal. .
5 Check the fan..
No air exhaust 1.
The air supply is blocked.
2.
Fan not working.
1.
Check and clean air outlet.
2.
Check the fan.
Louder noise
1. Loose parts.
2. Air filter is stuck.
3. The unit is not installed smoothly.
1 . Check parts.
2 Clean filter..
3 Install the machine smoothly..
temperature.
www.thenowair.com.au www.thenowair.com.au
23 24
Temperature too
high
1. Setting too high.
2. Improper cabinet seals.
3. Ambient temperature too high.
4. Cabinet/room too large.
5.
Fan fault.
6 . Refrigerant leakage.
1. lower setting.
2. Check gasket and door opening.
3. Check installation location.
4. Check for excessive size or the machine
model choice is improper.
5. Check both evaporator and condenser
fans.
6 . Add refrigerant.
Unit running too
long or continually
1. The machine model choice is
improper or improper room sealing.
2. Ambient temperature to high.
1. Check machine mode or check room
tightness.
2. Check installation location or increase
setting.
Evaporator icing
1. Evaporator airflow restricted.
2. Unit not stopping due to air leak,
high ambient temperature or
low setting.
3. Low ambient temperature
4. Bad thermostat or sensor
5. Refrigerant leaking
6. Expansion valve blockage
1. Check the fan.
2. Check fr seal,door
temperature and
3.
Defrost the unit.
4.
Check for thermostat and
5.
Check for sealed system
6.
Check for low side pressure.
The fan keeps
1. Fan protection procedure
2.
Wrong wiring harness connection
1 Wait 3 minutes..
2 Check harness links..
No cooling but
compressor
running
1. Refrigerant leakage.
2. Evaporator airflow restricted.
1 . Check of refrigerant.
2. Check for airflow through evaporator.
running
opening,ambient
setting.
sensor.
leakage.
Status Reason Suggestion
The above information is for reference only. If the machine fails to work
properly, please contact your local dealer or your local authorized repair
station.
All electrical installation and maintenance work in this manual must be
performed by a professional electrical engineer.,our company is not
responsible for opening the panel and electric control cabinet without
the permission of the company.
After service
NOTE:This table cannot replace the training required to train a professional
refrigeration maintenance technician, because it is not comprehensive enough.
1 year guarantee from installation is provided for the indoor &
outdoor unit.
2 years guarantee from installation is provided for the fan.
During the warranty period any defects due to the workmanship or
materials of the unit will be repaired and/or replaced free of charge.
ALL WARRANTIES WILL BE CEASED IF:
Installation IS NOT undertaken by a licenced & registered ARC
technician & electrician.
The installation is not to the instructions provided.
Dust, corrosive liquid or any other non-machine quality reasons for
damage.
ON-GOING MAINTENANCE:
Filter to be cleaned regularly every 6 months.
ON-GOING SERVICE:
Any service and/or repair needs that arise must be undertaken by
a licenced & registered ARC technician.
WARNING
www.thenowair.com.au www.thenowair.com.au
This manual suits for next models
1
Table of contents
Other Thenow Wine Cooler manuals


