manuals.online logo
Brands
  1. Home
  2. •
  3. Brands
  4. •
  5. Thermo Scientific
  6. •
  7. Microscope
  8. •
  9. Thermo Scientific DXR3xi User manual

Thermo Scientific DXR3xi User manual

Other Thermo Scientific Microscope manuals

Thermo Scientific Phenom XL G2 Desktop SEM User manual

Thermo Scientific

Thermo Scientific Phenom XL G2 Desktop SEM User manual

Thermo Scientific Nicolet RaptIR User manual

Thermo Scientific

Thermo Scientific Nicolet RaptIR User manual

Thermo Scientific Nicolet Continuum User manual

Thermo Scientific

Thermo Scientific Nicolet Continuum User manual

Thermo Scientific Nicolet iN10 Guide

Thermo Scientific

Thermo Scientific Nicolet iN10 Guide

Popular Microscope manuals by other brands

Brütsch Rüegger FUTURO instruction manual

Brütsch Rüegger

Brütsch Rüegger FUTURO instruction manual

Elenco Electronics EDU-41003 instructions

Elenco Electronics

Elenco Electronics EDU-41003 instructions

Nikon SMZ25 instruction manual

Nikon

Nikon SMZ25 instruction manual

National DC3-163 instructions

National

National DC3-163 instructions

KERN Optics OPE-1 User instructions

KERN Optics

KERN Optics OPE-1 User instructions

OPTIKA MICROSCOPES B-150D Operation manual

OPTIKA MICROSCOPES

OPTIKA MICROSCOPES B-150D Operation manual

Prior Lux POL operating instructions

Prior

Prior Lux POL operating instructions

Olympus SZ61 instructions

Olympus

Olympus SZ61 instructions

Opitec Smartscoop 115615 instructions

Opitec

Opitec Smartscoop 115615 instructions

KERN OPO-1 operating instructions

KERN

KERN OPO-1 operating instructions

Topcon SP-1P user manual

Topcon

Topcon SP-1P user manual

AO Cycloptic Reference manual

AO

AO Cycloptic Reference manual

Leica DVM5000 Setup manual

Leica

Leica DVM5000 Setup manual

MshOt MZ62 user manual

MshOt

MshOt MZ62 user manual

Celestron 44345 instruction manual

Celestron

Celestron 44345 instruction manual

KERN Optics OZR-5 User instructions

KERN Optics

KERN Optics OZR-5 User instructions

VWR VisiScope 384 Series instruction manual

VWR

VWR VisiScope 384 Series instruction manual

Leica DI C800 User's manual & installation instructions

Leica

Leica DI C800 User's manual & installation instructions

manuals.online logo
manuals.online logoBrands
  • About & Mission
  • Contact us
  • Privacy Policy
  • Terms and Conditions

Copyright 2025 Manuals.Online. All Rights Reserved.

DXR3xi Class 3B Conversion
Guide
WARNING
Avoid eye injury.
This system is configured as a Class 3B laser product when using the fiber optic
accessory or operating with the protective cover removed. Class 3B laser radiation is
hazardous, can be visible or invisible, can cause permanent eye damage, ignite
flammable materials, liquids, and gases, and can potentially cause other hazards if not
operated safely.
lMaking adjustments, using controls, or performing procedures that are not specified in the
documentation could result in exposure to hazardous laser radiation.
lSet up a laser control area in the location where a Class 3B system is being used.
lWhen using or working in the vicinity of any Class 3B laser product each person must wear laser safety
eyewear that exceeds the required optical safety density for the laser wavelength in use.
lNever look directly into the laser beam or at its reflection, even when wearing laser safety eyewear.
lEnsure that the protective eyewear is fitted properly when the user wears prescription glasses.
lProper storage and care of the goggles should be maintained. A scratch on the lens can expose the user
to the hazardous beam.
269-3512 00 Revision A
December 2021 Thermo Fisher Scientific
All rights reserved.
lDO NOT use magnets near the stage enclosure. Magnets can defeat the interlocks, causing emission of
visible and/or invisible laser radiation when the doors are open.
lExposure to laser radiation can result in serious injury and/or blindness. To avoid serious injury, wear
laser safety eyewear whenever operating a Class 3B laser product, entering a laser control area,
observing trained personnel servicing the product, or operating a product that has the safety interlocks
defeated.
Note For the complete laser safety information, refer to the DXR Raman Instruments Site and Safety
Guide. A PDF copy is included in the electronic documentation set and in the online software Help system
with the instrument.
For information about setting up the laser control area with external interlock, refer to the “Setting Up a Laser
Control Area” section in the Safety Guide.
For information about laser safety eyewear specifications, refer to the “Protective Eyewear” section in the
Safety Guide.
For information about individual lasers used in DXR3xi products, refer to the “Manufacturer’s Laser
Information” section in the Safety Guide.
2
DXR3xi Class 3B Conversion Guide
Preparing the Laser Control Area
The customer is responsible for complying with local laser safety regulations and set up a Class 3B Laser
Control Area for the instrument. Information can be found in the “Setting Up a Laser Control Area” section in
the DXR Raman Instruments Site and Safety Guide.
WARNING
Avoid hazard.
The Class 3B system must be connected to an external remote interlock system that
blocks the laser beam whenever a safety perimeter around the instrument is breached
(when an unauthorized person opens the door, for example).
lThis external remote interlock system must be connected when anyone is working in the vicinity of the
Class 3B laser system. Do not attempt to defeat the interlocks on the system.
lThe connectors and the laser safety circuit controlling access to the Laser Control Area must be
designed and built by personnel who have been trained in laser safety and in the operation of the
instrument.
lAppropriate area warning signs should be posted at the entryways and within the laser-controlled area.
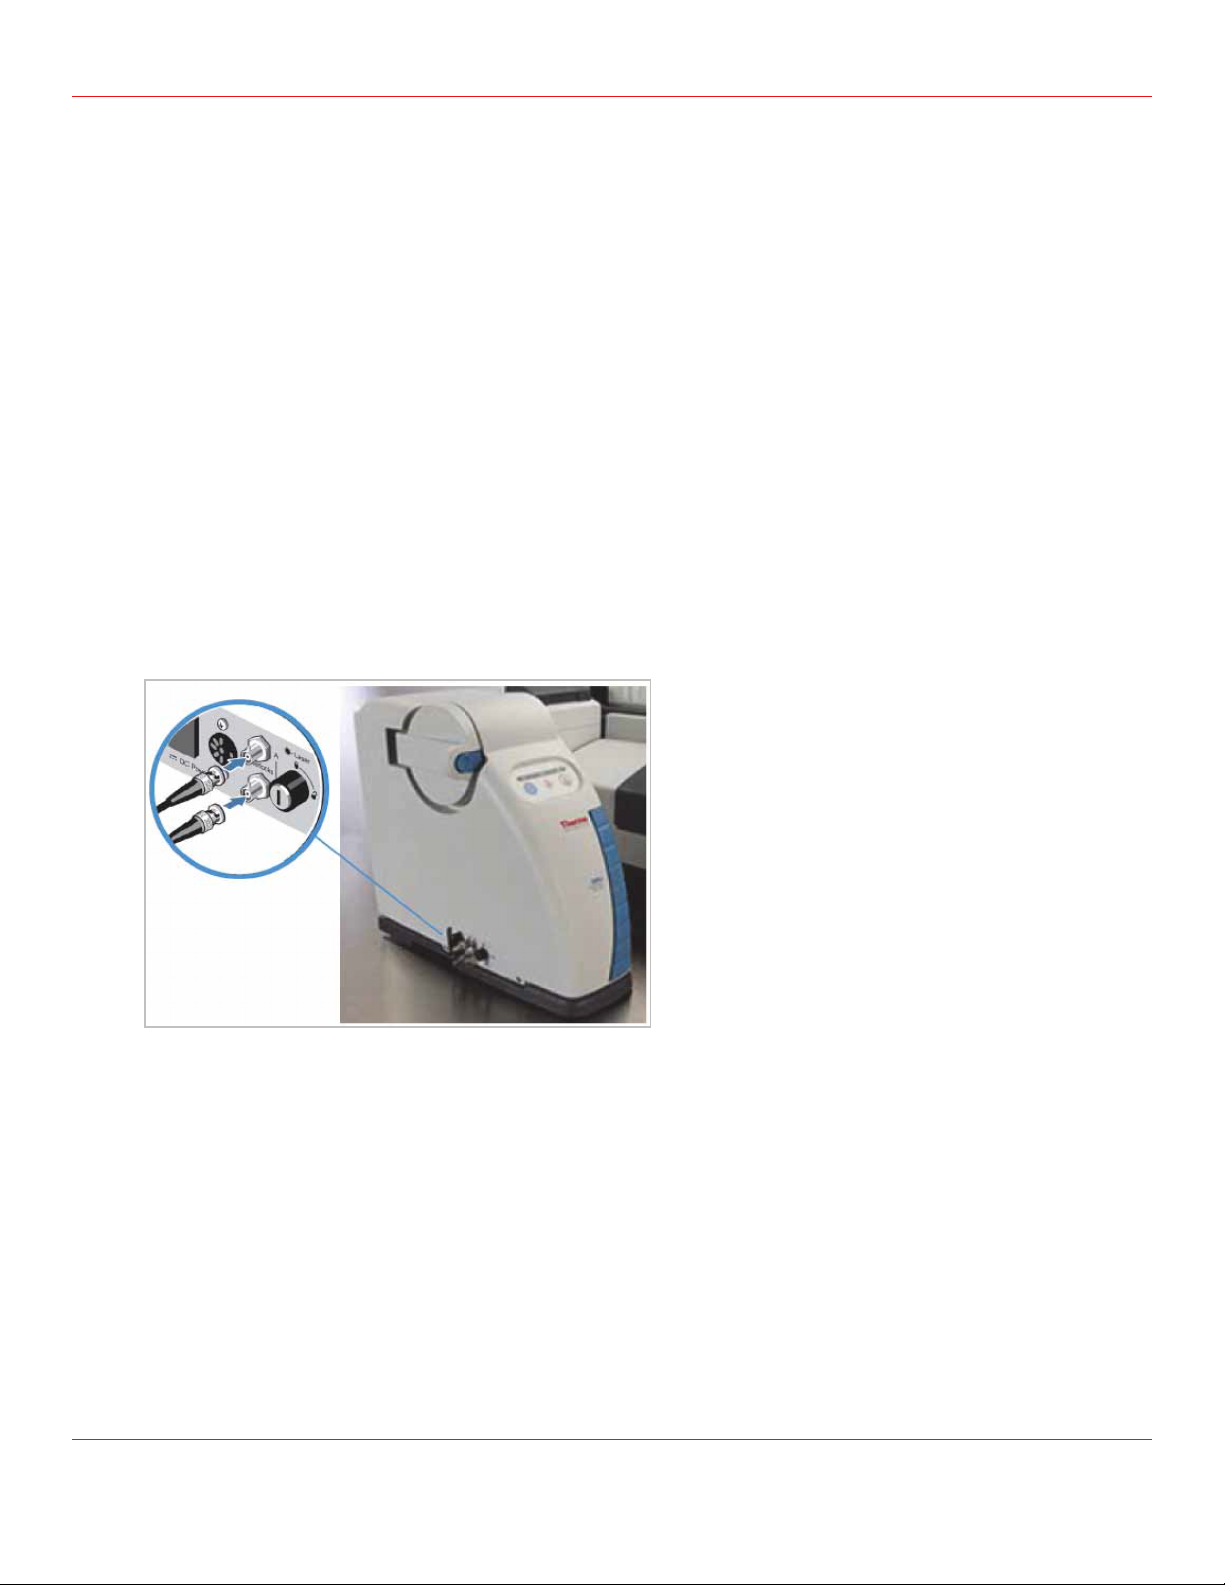
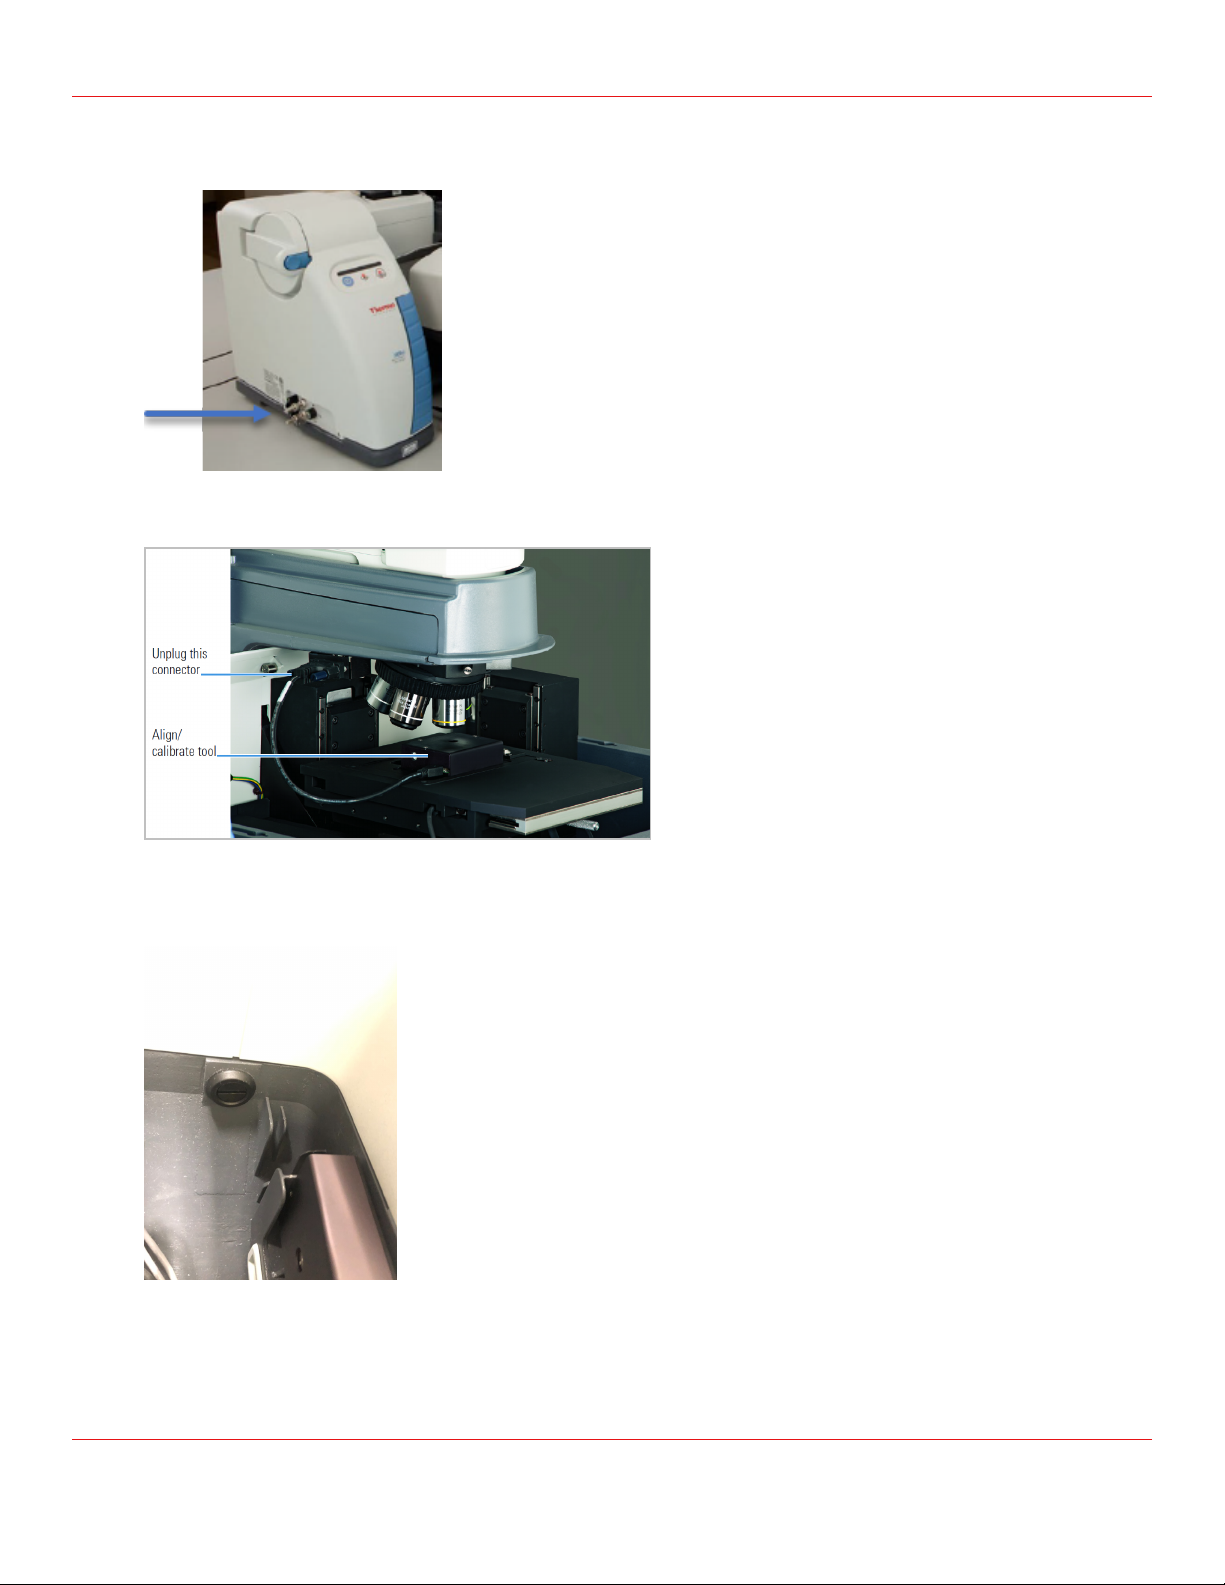
Below is a suggested method for installing the external remote interlock connectors:
1. Prepare 2 BNC cables and connect to the laser safety circuit within the Laser Control Area.
2. Install a switch across the pins of the connectors on each of the BNC cables. The switch must
accommodate +5 VDC at 10 mA when it is closed.
Note Opening the switch blocks the laser beam, and closing the switch unblocks the beam.
3. Connect the other end of the BNC cables to the interlock connectors on the instrument panel.
3
DXR3xi Class 3B Conversion Guide
Preparing the Laser Control Area
Converting DXR3xi from Class 1 to Class 3B
configuration
You must have a Class 3B Conversion Kit (840-2056xx) available to proceed.
❖ To convert a DXR3xi from the Class 1 to the Class 3B configuration
1. Make sure the stage is positioned all the way to the back. Turn OFF the laser and close OMNICxi
software.
2. Remove the BNC interlock jumpers from the Interlock connectors on the instrument panel. Properly store
the jumpers in a labeled bag. (They will be used when you want to convert the instrument to Class 1
configuration.)
3. Connect the external remote interlock BNC cables from your laser control area to the Interlock
connectors on the instrument panel.
4. Open the doors of the sample compartment.
4
DXR3xi Class 3B Conversion Guide
Converting DXR3xi from Class 1 to Class 3B configuration
5. Using a flat-blade screwdriver to unlock the two cover latches on the inside of front ledge of the sample
compartment, turn the cover latch 90-degrees until it is in a horizontal position.
6. Disconnect the align/calibrate tool and set it aside.
5
DXR3xi Class 3B Conversion Guide
Converting DXR3xi from Class 1 to Class 3B configuration
7. Close the covers. Hold both sides of the whole sample area cover and slide it toward you until it stops.
Gently lift the whole cover up and continue to pull forward. The whole cover can be fully pulled away from
instrument.
8. Take the laser interlock defeating dongle (085-0402xx CBL CLASS 3B OPERATION) from the Class 3B
Conversion Kit and install it to the interlock connector at the left side of sample area as shown below.
Note The instrument will not operate if the laser interlock defeating dongle is missing
6
DXR3xi Class 3B Conversion Guide
Converting DXR3xi from Class 1 to Class 3B configuration
9. Reconnect the align/calibrate tool onto the instrument.
10. Properly store the whole sample area cover in the lab.
11. The instrument is now converted to Class 3B configuration. Follow normal Align/Calibration procedure
and make sure all tests pass.
WARNING
Avoid eye injury.
Before turning on the laser, each person using or working in the vicinity of this
Class 3B system must wear laser safety eyewear that exceeds the required optical
safety density for the laser wavelength in use.
Two laser safety goggles are provided in the DXR Class 3B Conversion kit for 190-532 nm laser and 633-
1064 nm laser, respectively. If you need to order additional goggles please contact our local field
services or sales, or visit our web site at http://www.thermo.com/spectroscopy for assistance on ordering
the appropriate goggles.
7
DXR3xi Class 3B Conversion Guide
Converting DXR3xi from Class 1 to Class 3B configuration
12. If you have other accessory to be used with Class 3B configuration of this instrument, for example a fiber
optic accessory, please contact our local field services for assistance and refer to the Optional Class 3B
Laser Configuration section in the DXRxi Raman Instrument User Guide for installation and
align/calibration instructions.
WARNING
Avoid eye injury.
Never put anything except samples against the tip of the fiber optic probe. Never look
directly into the tip of a fiber optic probe or the fiber optic probe connectors, even if you
are wearing laser safety goggles.
8
DXR3xi Class 3B Conversion Guide
Converting DXR3xi from Class 1 to Class 3B configuration
Converting DXR3xi from Class 3B to Class 1
configuration
❖ To convert the DXR3xi from the Class 3B to the Class 1 configuration
1. Make sure the stage is positioned all the way to the back. Turn OFF the laser and the instrument. Close
OMNICxi software.
2. Carefully remove the Class 3B accessory from the instrument.
For example, to uninstall a fiber optic accessory:
a. Uninstall the fiber probe from the ports on the fiber optic launcher. Do not twist the probe into a tight
radius which can damage the fibers.
b. Place the cap onto the end of the probe and the caps onto the ports on the fiber optic launcher.
c. Remove the fiber optic launcher and replace with the proper wavelength edge filter into the
instrument.
3. Remove the interlock defeating dongle at the left side of sample area.
Properly store it in a labeled bag. (It will be used when you want to convert the instrument to Class 3B
configuration.)
9
DXR3xi Class 3B Conversion Guide
Converting DXR3xi from Class 3B to Class 1 configuration
4. Install the BNC interlock jumpers onto the Interlock connectors on the instrument panel. Remove the
external interlock BNC cables.
5. Disconnect the align/calibrate tool and set it aside.
6. Make sure the two cover latches on the inside of front ledge of the sample compartment are in a
horizontal position.
10
DXR3xi Class 3B Conversion Guide
Converting DXR3xi from Class 3B to Class 1 configuration