THERMODx Warm Blocks 360 User manual
MODEL: 360°
USER MANUAL
thermodx.com

Table of Contents:
WHAT’S PROVIDED................................................................................................................................... 1
PRODUCT SPECIFICATIONS ...................................................................................................................... 1
APPLICATION ............................................................................................................................................ 2
MAINTENANCE ......................................................................................................................................... 2
POWERING ON ......................................................................................................................................... 3
OPERATIONS............................................................................................................................................. 4
BLUETOOTH PAIRING ............................................................................................................................... 5
LIMITED PRODUCT WARRANTY ............................................................................................................... 7

1
WARNING:
1. Do not use on open wounds, bruises, varicose veins, swelling skin
2. Do not use while sleeping
3. Do not use on infants and children; supervision is required if consulted for use by a physician
4. Do not iron the pads
5. Do not wrap too tight to constrict blood flow
6. Do not use third party sources for initial heat (e.g. Microwave)
7. Keep the pads dry during operation
8. Do not use in conjunction with any ointments that produces heat to avoid skin burns
9. Do not use during pregnancy
10. Do not use if you have diabetes.
11. Do not use if you have any medical conditions, consult your physician for
their approval.
12. Do not use directly on your skin, it is recommended you use on top of an item of clothing.
13. Immediately stop the use of the product if discomfort or irritation develops during operation.
PLEASE KEEP THESE INSTRUCTIONS
Thoroughly read over the instructions prior to use.
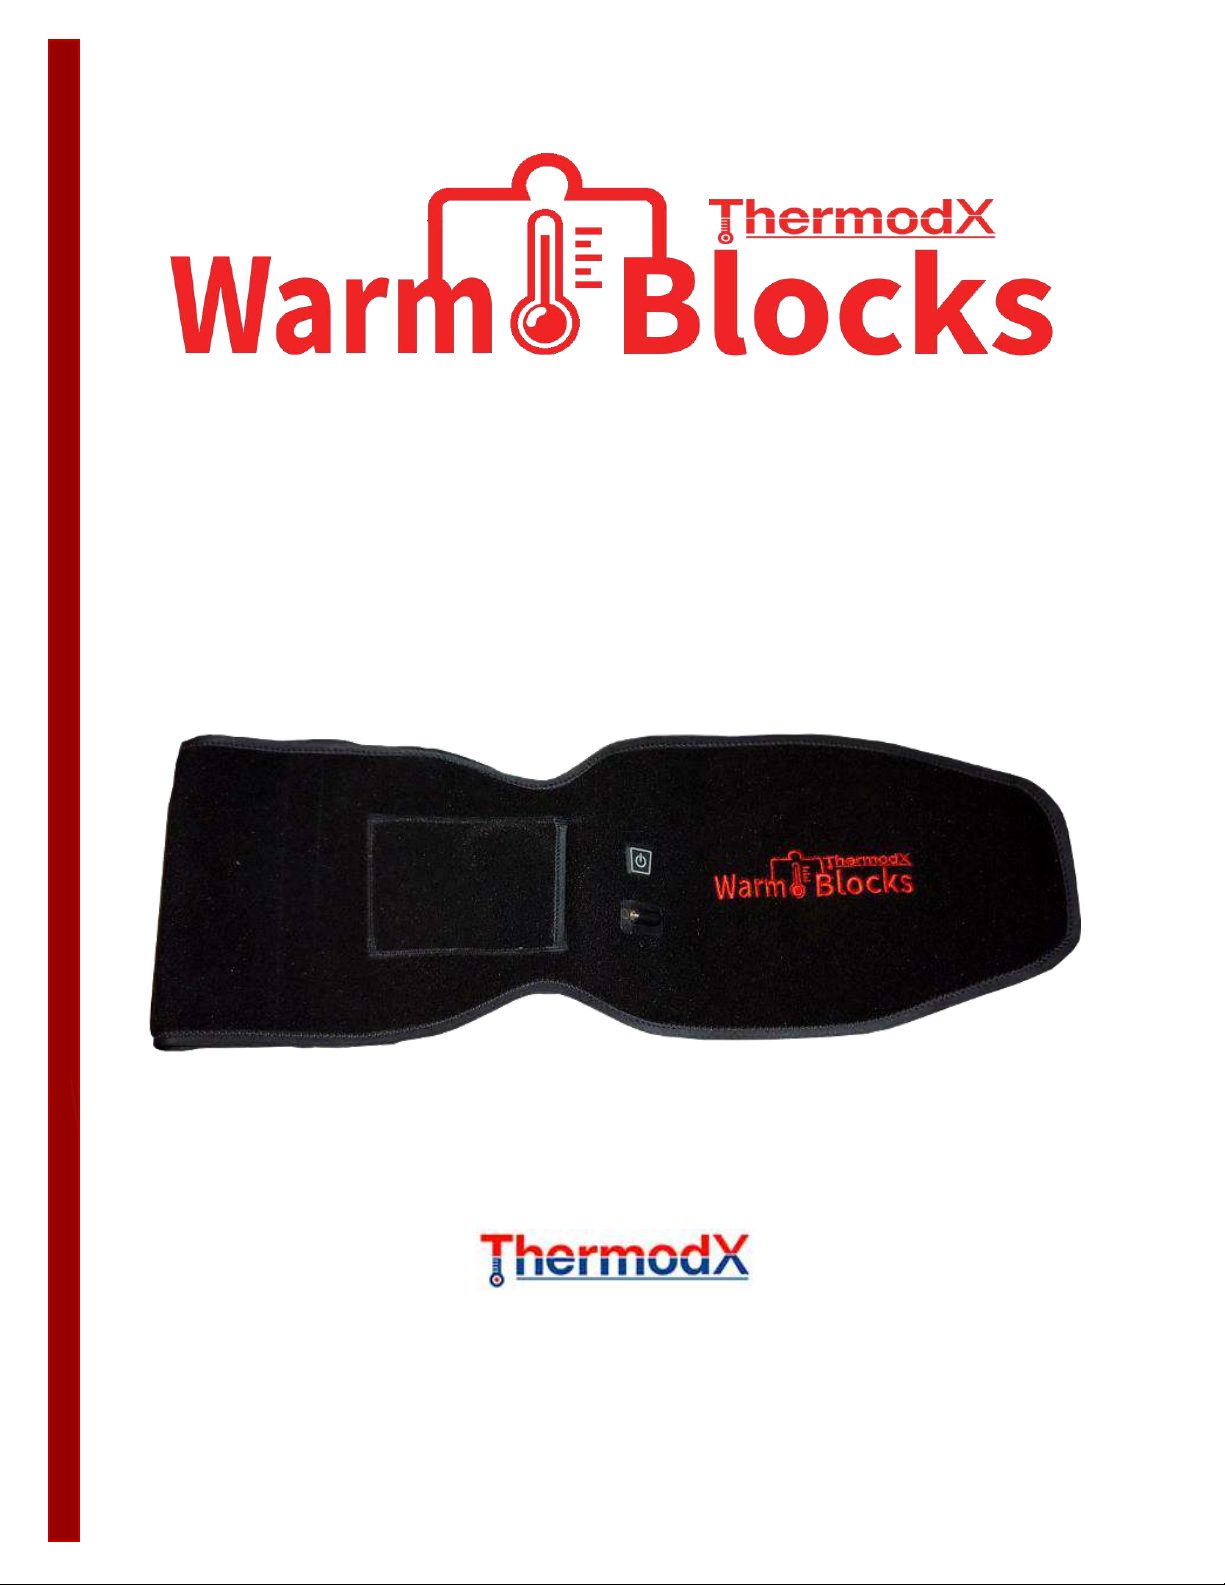
WHAT’S PROVIDED
Thermodx Warm Blocks 360°
With every purchase, Thermodx Warm Blocks 360°includes a genuine 360° warming wrap, 7.4v
rechargeable battery, certified UL 7.4v wall charger, and a manual. The wall charger is designed for
North America housing using (110/120V AC) outlets.
PRODUCT SPECIFICATIONS
Fabric Material: Polyester/Cotton
Voltage: 7.4V
Dimensions: Height –22cm/8.6 inches
Length - 135cm/53 inches

2
APPLICATION
Thermodx Warm Blocks 360°
Use it anywhere whenever you need some warmth for your body. Indoors or outdoors, it provides
additional heat for your body to stay warm for up to 4 hours.
Notably used for winter sports, hunting, hiking, labour work, emergencies.
MAINTENANCE
•Store away flat and disconnect the heating pad from any cables to prolong the longevity of the
product.
•Store in a cool dry place when not in use.
•Never leave the unit unattended when turned on.
•Do not use outside when exposed to wet, or damp environments.
•Thermodx Warm Blocks 360°are machine washable, or by hand wash. DO NOT BLEACH.
oPlease ensure the following when cleaning your Thermodx Warm Blocks 360°
▪Remove any cords attached to the heating pad.
▪Use low tumble, cold wash with mild detergent only.
▪Do not machine dry; hang dry only.
▪Do not dry clean.
▪Allow the heating pad to dry completely before use.
IMPORTANT: Each unit is limited to a few washes before deterioration of quality. We recommend only
washing when needed to remove odor and stains. It is not guaranteed that the product performs
optimally when exposed to water frequently due to electrical components.
3
POWERING ON
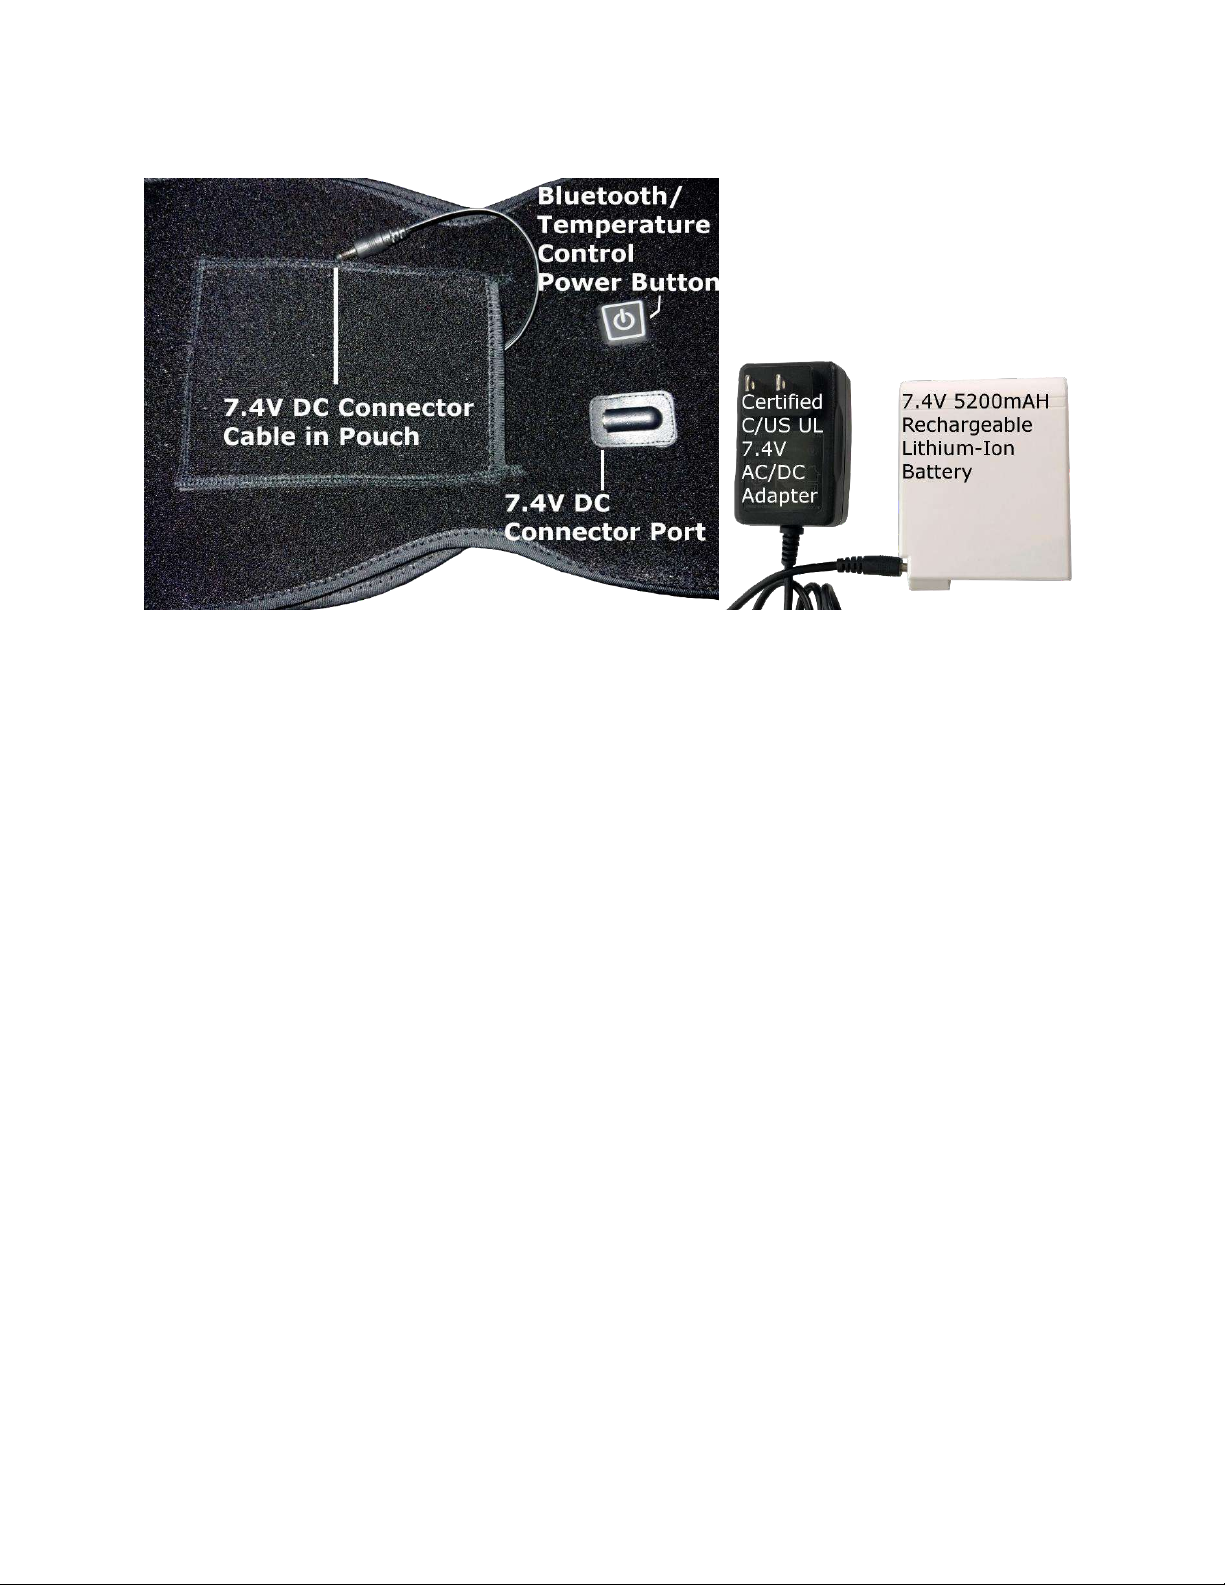
ACCESSORIES
•7.4V Lithium-Ion Battery
o5200mAH capacity
oPower: 20W Max
oInput: 8.4V 1A
oMaintenance: Charge the battery once a month to retain the maximum usage, roughly
500 charges
•7.4V AC/DC Adapter
oRequires 110/120V AC outlets, or use of converter
oOutput: 8.4V 1.5A
oRED light indicates the battery requires and/or is charging
oGREEN light indicates the battery is connected and/or fully charged
oCertified UL Listed: E361870
DISCLAIMER:
(BATTERIES AND AC/DC ADAPTERS)
Only use the genuine 7.4V battery provided to power on your Thermodx Warm Blocks 360°. The battery
must be recharged using the 7.4V DC charger. We strongly recommend only using genuine Thermodx
products as replacements for your own safety.
Be sure to fully charge your 7.4V battery before your first time of usage. We do not ship batteries at full
capacity due to safety regulations. It can take up to 6 hours to fully charge the battery from depletion.
4
We are not liable for the damage caused by using third-party products with any Thermodx products.
Contact support for any problems that may arise under our warranty claim period. (See warranty for
more details.)
When your 7.4V battery is fully charged, connect to the DC cable and place it inside the pouch.
OPERATIONS
The unit is powered on automatically when connected to the 7.4V battery properly. The Bluetooth signal
will be active immediately, indicated by the flashing BLUE light. The unit itself will turn off automatically
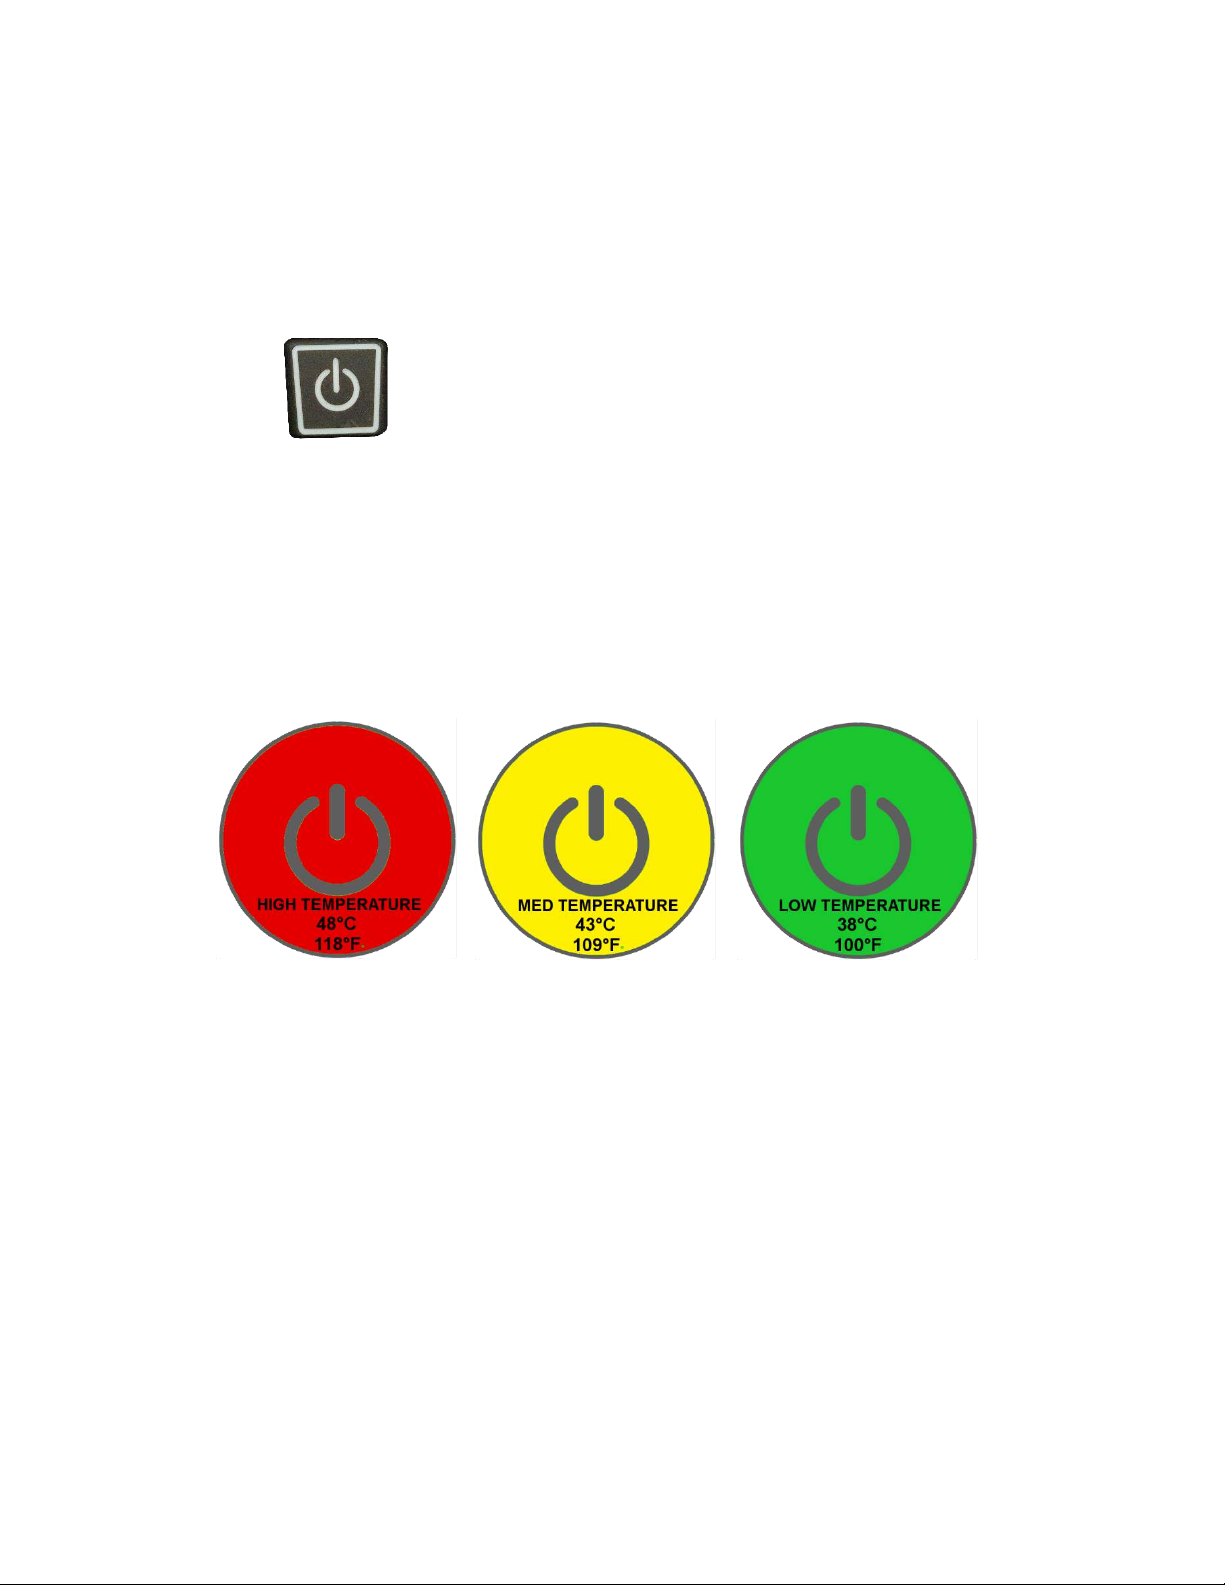
when it remains idle for more than 5 minutes when not actively heating. Press the power button once
when this happens.
To start heating, hold the power button down until the RED light is on. (See next section for details on
the Warm Blocks App.)
Under operations, the battery can last up to 2.5-4.5 hours based on the temperature setting used:
2.5 hours 3.5 hours 4.5 hours
By default, the unit will start at HIGH temperature (RED) mode. Within 5-10 minutes, the unit will reach
temperature desired.
To lower the heat, simply press the button again to cycle down to LOW temperature (GREEN) mode. The
light indicators for modes are as follows:
The temperature cycle is fixated to High-Low-Med on manual control. Please use the Warm Blocks App
adjust the temperature that best suits you the most.
NOTE: Your Thermodx Warm Blocks 360° may experience performance issues due to the following
reasons:

5
•Ambient temperature below room temperature can slow down heating and reduce the
maximum temperature the unit can reach (error range of 2°C/3-4°F). It may also shorten the run
time of your unit by requiring more power to maintain the heat.
We recommend heating up your unit indoors for at least 5 minutes for best results under
winter conditions.
•Battery life expectancy will slowly deteriorate overtime, reducing the run time of your unit per
charge.
•Additional layers of clothing underneath the unit will reduce the heat
sensation you will feel directly. It is best to wear insulating materials such as wool and fleece to
stay warmer by trapping heat. Be sure to have a water-resistant outer clothing to avoid getting
wet or damped.
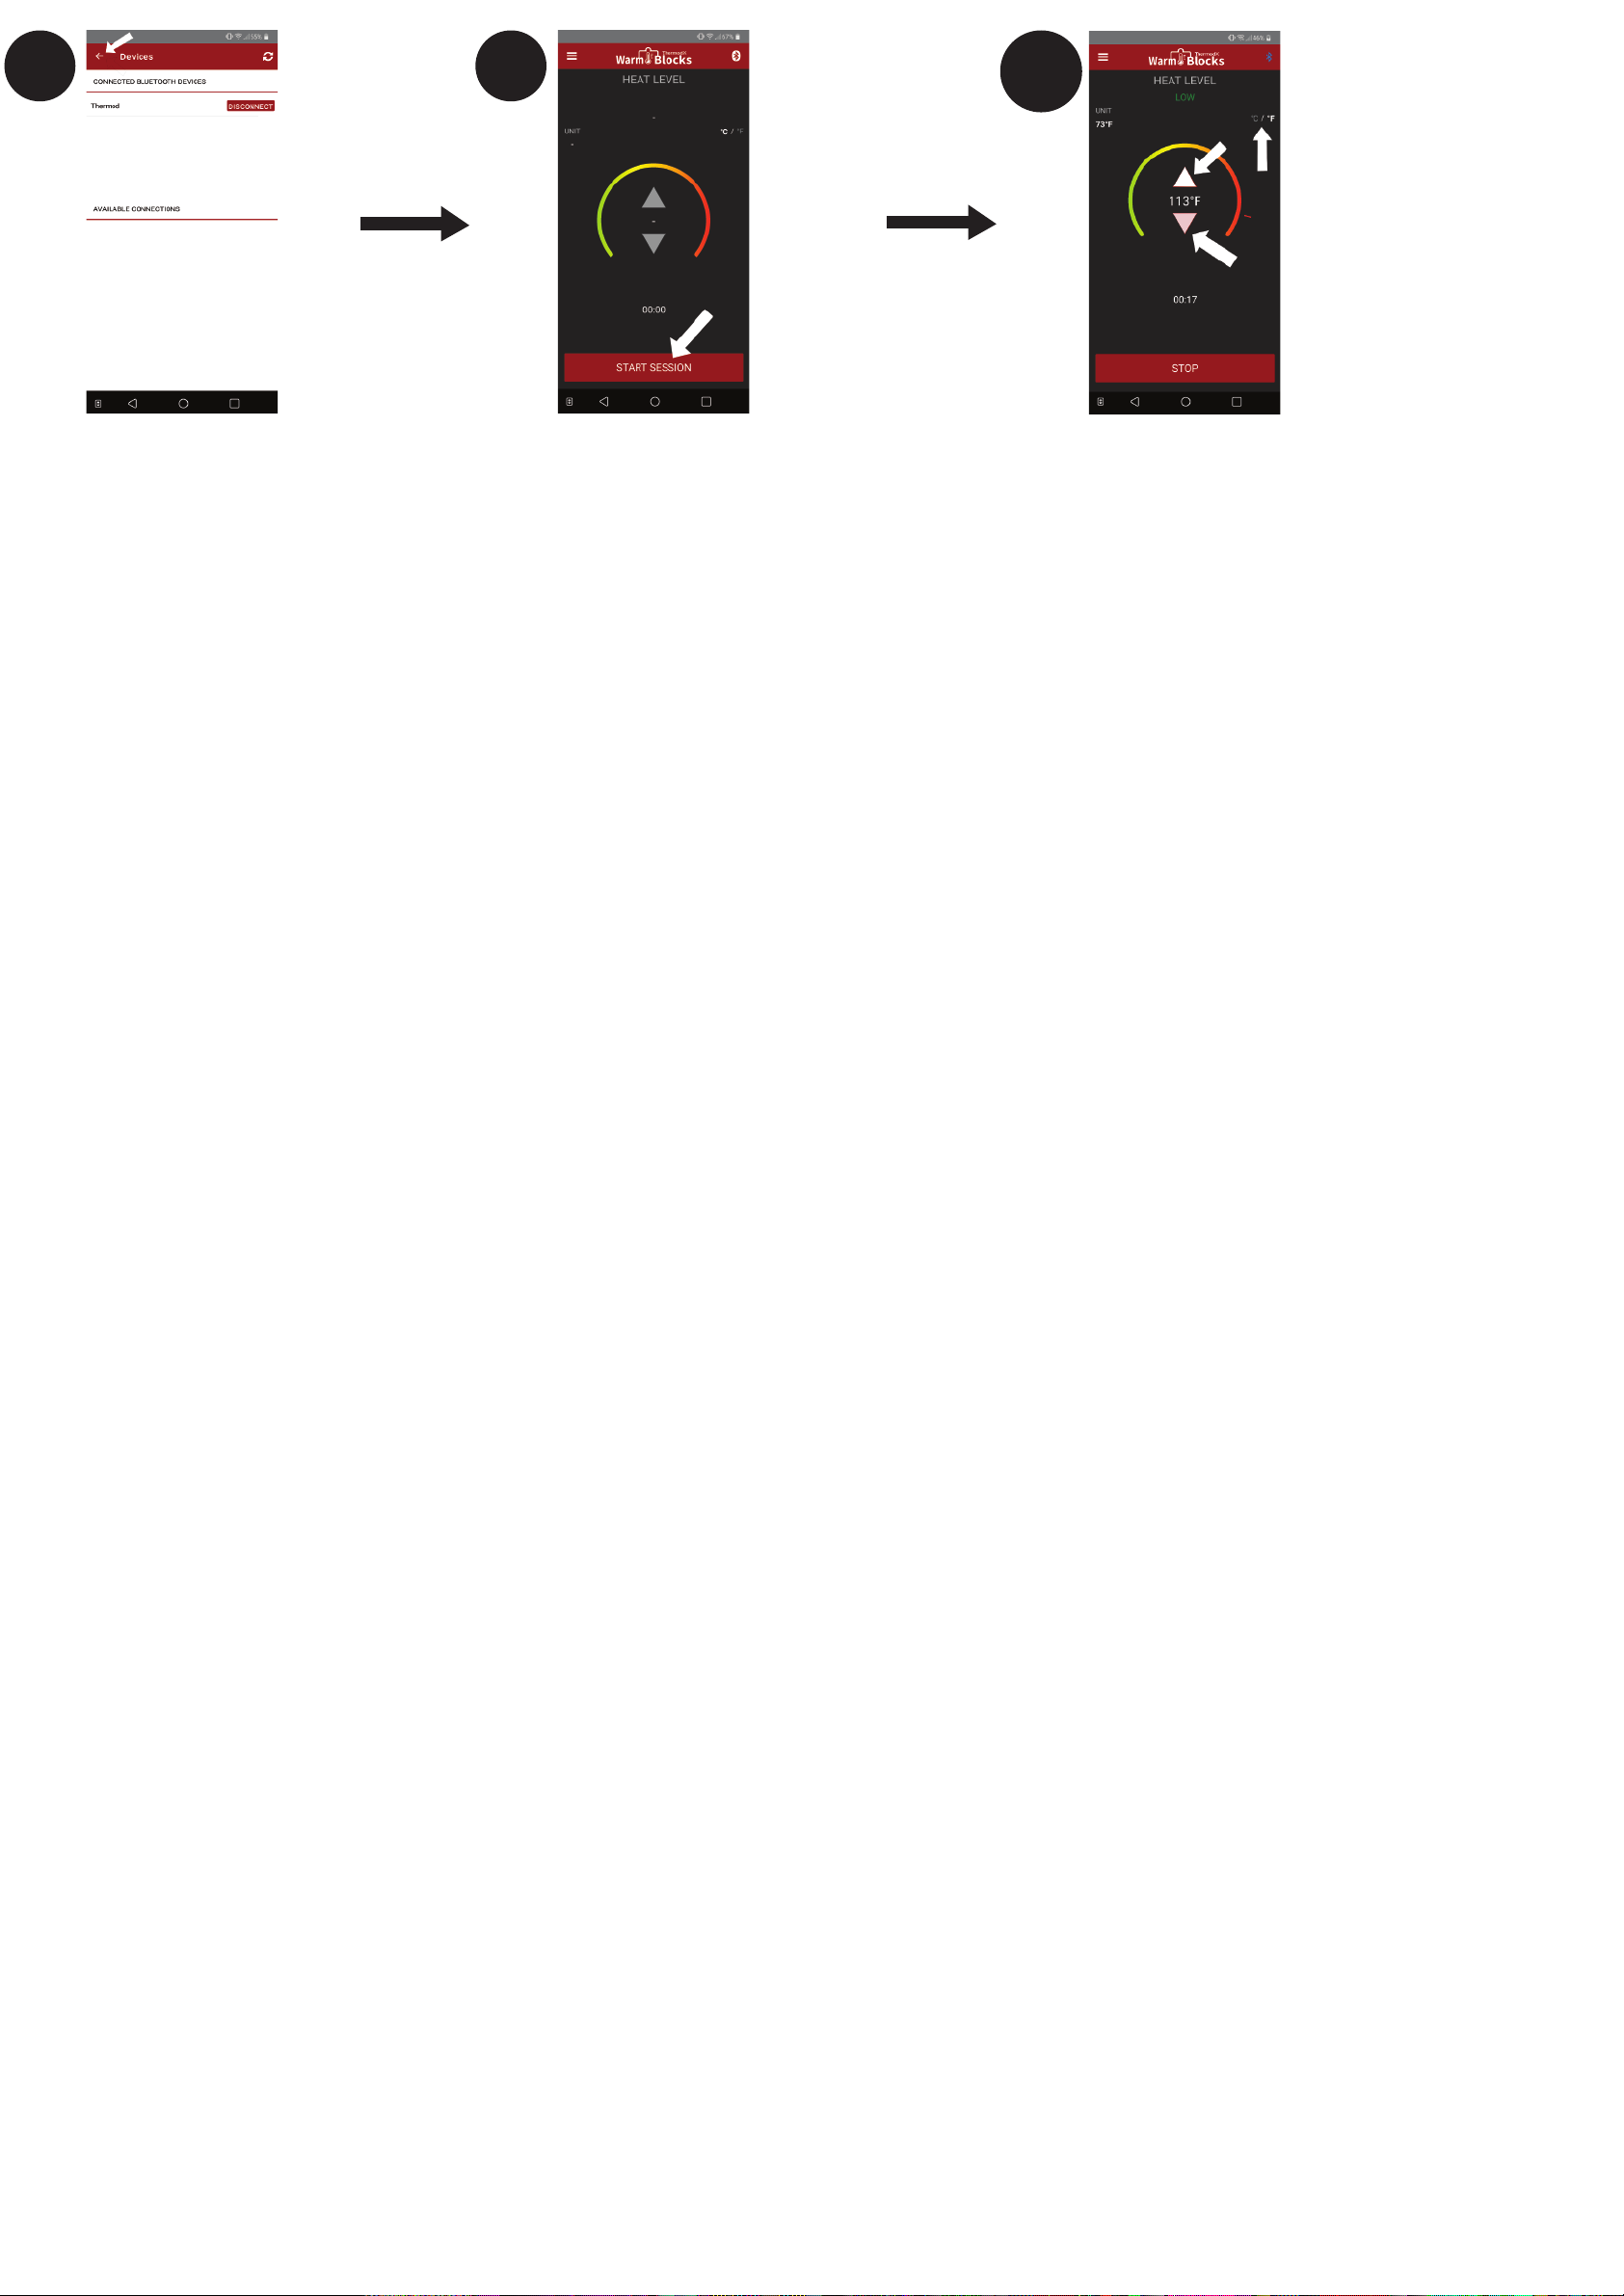
BLUETOOTH PAIRING
The Thermodx Warm Blocks app allows users with smartphones to have more precise temperature
control with real-time unit display during operation. If the Bluetooth signal is active, your smartphone
can have full control over your Thermodx Warm Blocks 360° once paired.
The Bluetooth signal is enabled by the flashing BLUE light indicator. If there is no light, make sure the
battery is charged and connected all the way, then press the power button once to enable.
To successfully pair, your smartphone must have Bluetooth enabled. Once done, download the app via
Google Play Store (Android), or App Store (iOS) at no extra cost to you.
Launch the app and press the Bluetooth icon to navigate towards the pairing screen. Your
device will be displayed on the bottom list; press the connect button beside the name. The device

6
should move up the upper list that indicates pairing was a success. Go back to the main interface, and
press strart to begin heating.

7
LIMITED PRODUCT WARRANTY
THERMODX products are warranted to be free from defects in materials or workmanship for one (1)
year from the date of purchase from an authorized dealer of Thermodx products. Within this period, we
will, at our sole discretion, repair or replace any components that fail in normal use. Such repairs or
replacement will be made at no charge to you for parts and/or labor, provided that you shall be
responsible for any transportation charges. Replacement products may be new or refurbished at our
discretion.
This warranty does not apply to: (i) cosmetic damage, such as scratches, nicks, stains and dents; (ii)
consumable parts, such as batteries, unless product damage has occurred due to a defect in materials or
workmanship; (iii) damage caused by accident, abuse, misuse, water (in excess of specifications), flood,
fire, or other acts of nature or external causes; (iv) damage caused by service performed by anyone who
is not an authorized service provider of THERMODX INC.; or (v) damage to a product that has been
modified or altered without the prior written permission of THERMODX INC.
After Warranty repair or replacement, your Warranty will remain in effect until either one (1) year after
your original purchase date, or ninety (90) days after repair or replacement, whichever is longer.
The Limited Product Warranty applies only to the original purchaser of the Product that was purchased
from an authorized reseller or sales channel and manufactured by or for Thermodx that can be
identified by an authorized “Thermodx” trademark, trade name, or logo affixed to it. Without limiting
the foregoing, the Limited Product Warranty does not apply to any (a) Thermodx products and services
other than the Products, (b) non-Thermodx products, even if included or sold with a Product, including,
without limitation, any counterfeit products, (c) products that are, or Thermodx reasonably believes to
be, stolen, (d) consumables (such as batteries), or (e) software, even if packaged or sold with the
Product or embedded in the Product. In addition, this Limited Product Warranty does not apply to
damage or defects caused by (a) use with non-Thermodx products; (b) accident, abuse, misuse,
mishandling, flood, fire, earthquake or other external causes; (c) normal wear and tear or aging of the
Product such as discoloration or stretching; or (d) operating the Product (i) outside the permitted or
intended uses described by Thermodx, (ii) not in accordance with instructions provided by Thermodx, or
(iii) with improper voltage or power supply.
No Thermodx reseller, distributor, agent or employee is authorized to make any modification, extension,
or addition to this Limited Product Warranty. If any term contained herein is held to be illegal or
unenforceable, the legality or enforceability of the remaining terms shall not be affected or impaired.
To start your claim and return, please contact support on our website (thermodx.com/support) by filling
out the return form completely. For further questions, you may e-mail us at info@thermodx.com, or
contact us at our business hours:
Mon-Fri 9AM - 5PM (Holiday Exceptions) Tel:1 (888) 596-2221

Quick Start Instructions
Model: 360°
1
Powering On
Connect the battery after fully
charging it to the DC cable in the
pouch. Place the battery inside
the pouch.
Turning On/Off
Press and hold down the power
button until the unit turns on. To
turn o, press and hold again until
the light goes o. It is done right
when there is a clicking sound
when pressing down on the
button. The RED light indicates it is
heating up and working properly.
Adjusting Temperature
To adjust temperature modes,
simply press the power button
once to cycle through. A clicking
sound indicates the button is
working properly.
The unit temperature mode order
is the following:
HIGH -> MED -> LOW
(RED) (YELLOW) (GREEN)
A) MANUAL
CONTROLS
GUIDE
B) APP STARTING GUIDE
Activating Bluetooth
After Step 1, the power button
should be ashing with a BLUE
light. This means Bluetooth is
active. If not present, press the
power button once to activate.
Enabling Bluetooth
On Smartphones
Make sure your smartphone has
Bluetooth enabled.
Normally done in Settings ->
Network -> Bluetooth.
Acquiring The Free App
Download the Thermodx Warm
Blocks app free in the Google
Play or Apple App Store for both
Android and iOS. Install it and
then open the app.
Navigating to
Bluetooth Pairing Screen
On the main interface screen,
press the Bluetooth icon to
nd your device and begin
pairing to your smartphone.
Searching For Your Device
Allow up to 10 seconds for
the app to search for your
device. Press the refresh
icon, or the Search again
button to retry.
How to Connect/Pair Your Device
With The App
Your device will appear on the
bottom list during the search. Press
the connect button to begin pairing
with your smartphone.
2a 3a
2b 3b 4b
5b 6b 7b
Connecting/Pairing Device
Success
Your device is now paired
with your smartphone. Press
the back button to return to
the main interface screen.
App Controls: Heating Up
The Bluetooth icon should now be
blue to indicate the connection
between the device and smart-
phone. Press the start button to
begin heating.
App Controls:
Temperature Adjustments/Displays
You may adjust the temperature using
the centered controls by either increas-
ing or decreasing.
Temperature is set at Celsius by default;
switch to Fahrenheit at any point of time.
8b 9b 10b
Table of contents
Popular Medical Equipment manuals by other brands

Edwards Lifesciences
Edwards Lifesciences 3000TFX PERIMOUNT Magna Aortic Instructions for use

DemeTECH
DemeTECH DemeMASK N95 quick start guide

Physio Control
Physio Control LUCAS 3 Instructions for use

MEND Technology
MEND Technology Wellness IS02LCD owner's manual

Sirona
Sirona teneo Installation requirements

Griffin Technology
Griffin Technology Trutone Emote instructions


titanox
titanox A3-216-400 instruction manual

IMP
IMP De Mayo D2 Knee Positioner Instructions for use

Bayer HealthCare
Bayer HealthCare Rapidlab 800 Operator's manual

Orliman
Orliman actius Instructions for use and care

Bio Compression Systems
Bio Compression Systems SC-3008-DL operating instructions

Masimo
Masimo Radical Operator's manual