ThermoProbe TL3-A User manual

11/2020, JK
ThermoProbe Models TL3A, TL3W and TL3R
English | Español | Français | Pусский |中文
TL3-A
TL3-W
TL3-R
U
SER
M
ANUAL

9/3/2020, JK
EU Declaration of Conformity according to directive 2014/34/EU (ATEX)
Thermoprobe, Inc. hereby declares the TL3-A, TL3-R and TL3-W products to be in accordance with the following
standards and directives:
Name and address of Manufacturer ThermoProbe, Inc.
112A Jetport Dr.
Pearl, MS 39208 USA
Description of Devices TL3-A, TL3-R and TL3-W
Portable Electronic Thermometers
Ex-Designation II 1 G Ex ia IIC T4 Ga
EC-Type Examination Certificate ITS19ATEX205407X
Notified Body Intertek Testing & Certification Limited
Intertek House
Cleeve Road
Leatherhead,
Surrey KT22 7SB, UK
Auditing body (QAN) Intertek Testing & Certification Limited
Intertek House
Cleeve Road
Leatherhead,
Surrey KT22 7SB, UK
Identification Number: 0359
Applied Harmonized Standards
EN 60079-0: 2018 Explosive atmospheres – Part 0: Equipment – General requirements
EN 60079-11: 2012 Explosive Atmospheres – Part 11: Equipment Protection by Intrinsic
Safety ‘i’
Applied European Directives
2014/34/EU - Equipment and protective systems intended for use in potentially explosive atmospheres
ThermoProbe, Inc.
Luke Bartkiewicz
President

11/2020, JK
USER INSTRUCTIONS – TL3-A, TL3-W & TL3-R
INTRODUCTION
This manual describes the basic function, use and safety instructions for the model TL3-A, TL3-W and TL3-R portable
digital reference thermometer instruments.
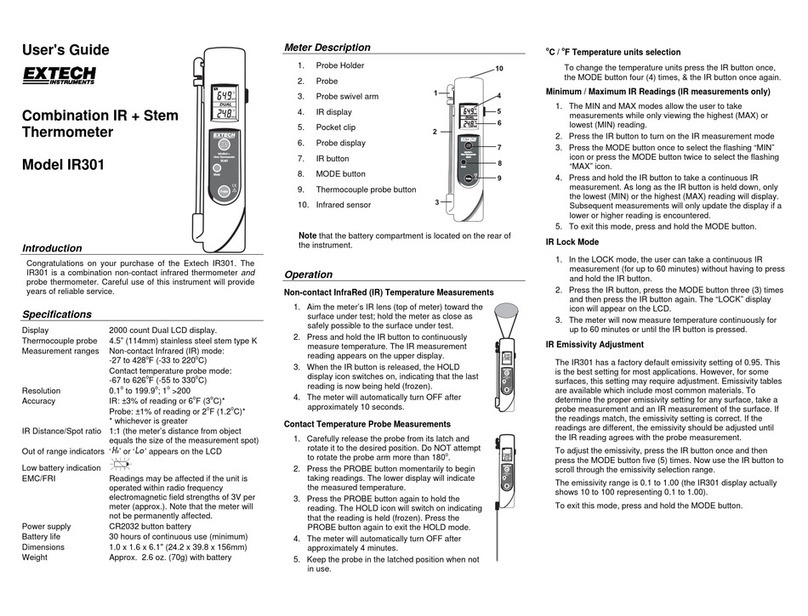
REPLACING BATTERY
When the battery voltage is low, the display will show ‘Lo bAtt’.
Replace the battery as soon as possible in a safe location after the low battery is noticed. This will avoid possible
malfunctioning. Do not attempt to calibrate the instrument if the low battery indicator is displayed.
WARNING:
Batteries must be changed in Non-hazardous area.
Batteries must be of correct approved type.
Batteries must be installed with correct polarity making sure the (+) end of the battery is aligned with (+)
symbol embossed in the battery case.
Batteries must not be installed with polarity reversed where one cell could charge another cell.
a) Ensure the instrument is in a non-hazardous area & powered off.
b) Use a #2 Phillips drive to remove the 1 screw holding the back cover on the TL3.
c) Replace each new battery making sure the (+) end of the battery is aligned with (+) symbol embossed in the
battery case.
d) Reinstall the cover. Make sure the rubber gasket is seated in its groove around the case opening (TL3-W, TL3-R).
CERTIFIED Batteries for the TL3-A, TL3-W and TL3-R are as follows:
Model Type Duracell Panasonic
TL3-A (1) CR2032 LiMnO
2
DL2032 CR2032
TL3-W, TL3-R (2) AAA (LR03) Alkaline MN2400 LR03XWA
AUTHORIZED REPAIR
It is recommended that service beyond the scope of this manual be performed by ThermoProbe, Inc. or one of its
authorized distributors.
See www.thermoprobe.net for video on proper use of this instrument.

11/2020, JK
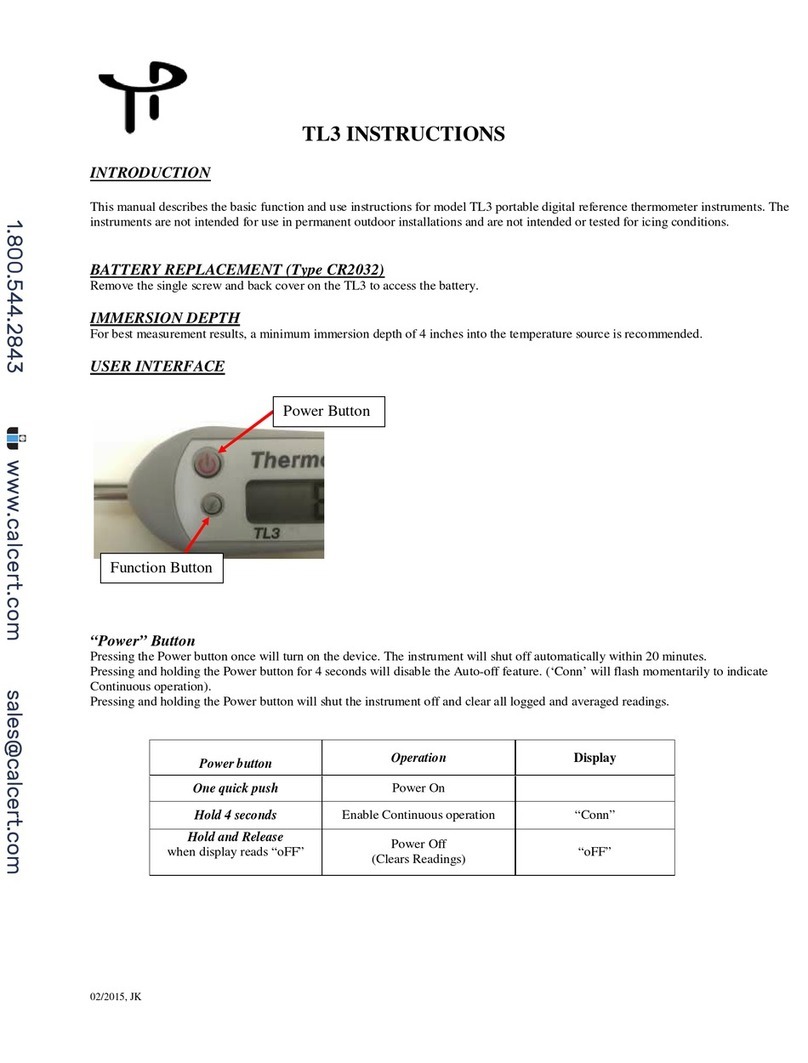
USER INTERFACE
Power/Select Button
:
Pressing the Power button once will turn on the device. (Note: The instrument will automatically power off 20 minutes
after the last button push.) Pressing and holding the “Power” button until it displays ‘OFF’ will turn off the instrument.
Selection MENU
:
Use the Advance (down arrow) button for the following selections:
C-F: Select Celsius or Fahrenheit temperature display
DEC: Select 0.1 or 0.01 display resolution (0.01/0.001 for TL3-R)
LAH – Displays Lowest reading (LO),
Average reading (AVG) and Highest reading (HI)
CON: Switches between auto off or continuous operation
STRT BT / STOP BT: Start or Stop Bluetooth (TL3-W or TL3-R)
ZERO: Allows user to view or adjust the zero correction
(* TL3-R model only - See Zero Correction section)
Advance Button
Power/Select Button
Temperature
trend arrows

11/2020, JK
Lowest, Highest & Average readings
The lowest, highest and average temperatures recorded while the TL3 is powered on can be accessed from the menu.
These are indicated by LO, AVG or HI indicators shown on the display immediately before the corresponding reading
is displayed. These readings are deleted after the unit is powered off.
Bluetooth
®
Wireless (TL3-W or TL3-R models only)
Bluetooth can be enabled from the menu to transmit temperature data to supported Bluetooth devices. Please go to
www.thermoprobe.net for additional information and drivers.
Display Codes
OPEN Ct - Indicates the sensor is operating above its temperature limit, or the sensor is damaged.
Shrt Ct - Indicates the sensor is operating below its temperature limit or the sensor is damaged.
Lo bAtt - Indicates the battery voltage is low.
Zero Correction (TL3-R model only)
Note: A password (‘247’) is required to enter Zero Correction mode.
Corrections made will offset temperature over the entire range of the device.
Zero correction should only be performed by qualified personnel with proper
reference instrumentation.
Zero Correction is intended to be performed at water freezing point 0°C (32°F).
The Zero Correction can be accessed by selecting ZERO from the menu.
From the Zero Correction menu, selecting Corr will display the current zero correction.
Selecting AdJ will display a password field of 3 digits. Enter the password (247) one digit at a time using the
ADVANCE button to increment each display digit. Then use the SELECT button to go to the next digit. Pressing
SELECT for the 3
rd
digit will take you to a temperature display where you can adjust the displayed temperature. The
arrow indicator shows the direction you are changing the temperature. Press and hold the ADVANCE button to
increment the value by 0.001 degrees until it reaches 10 and then it will increment at a rate of 0.01 degree per
second. Use the SELECT button to go from adjust UP, adjust DOWN, Save correction, and Cancel (don’t save). Once
you have saved the adjustment you can view the zero adjustment being applied from the Zero→Corr→’Displays
current correction’ menu selection.
ThermoProbe, Inc.
112A JETPORT DR.
PEARL, MS 39208
Tel: +1 601.939.1831
Fax: +1 601.355.1831
sales@thermoprobe.net
www.thermoprobe.net

11/2020, JK
SAFETY INSTRUCTIONS – TL3-A, TL3-W & TL3-R REV 042020
These ThermoProbe instruments are intended for use in both hazardous (potentially flammable or explosive) and non-
hazardous areas under dry conditions at ambient temperatures between -20°C to 40°C.
The instruments are not intended for use in permanent outdoor installations and are not intended or tested for icing
conditions. Additional means of protection should be used where the equipment may be exposed to excessive external
stresses (e.g. vibration, heat, impact, etc.). The user must have a working knowledge of appropriate safety
requirements. Be aware of aggressive substances and that extra protection may be needed. Exposure to excessive heat
can melt the plastic components of the instrument.
a) The user must have a thorough knowledge of the products to be measured and must know of the safety precautions
to be taken when working with the material to be measured.
b) The instrument shall be checked concerning severe defects; check that instrument is complete, has good batteries,
etc. If necessary, check measurement accuracy. If any defects are found, the instrument should not be used until
repairs have been made.
c) The instrument should be clean for safety and ease of use.
d) The physical measurement location should be evaluated for primary and secondary risks.
e) Power source must be removed before performing any maintenance.
f) Exchange of components other than the batteries may compromise ATEX/IECEx or other certifications and shall
only be undertaken by ThermoProbe or one of its qualified service providers. See also “Authorized Repair” section.
CAUTION:
The following metal parts have a capacitance in excess of 3pF, are isolated from ground and may pose a potential
electrostatic charging hazard: (Metal probe - 19.5pF)
In the event that any part of the instrument should become electrostatically charged in a potentially
hazardous location, follow company policies for testing and clearing the area of any hazardous gases before
attempting to use the instrument in that location. If this is not possible allow sufficient time for the instrument to
naturally dissipate any charges. Given the atmosphere, this could take several hours.
SAFETY APPROVALS FOR TL3-A, TL3-W AND TL3-R:
Ex ia IIC T4 Ga
Applicable Standards are: Agency or Safety Designation
IEC 60079-0:Ed 7, IEC 60079-11:Ed 6 IECEx: Internationally Recognized Body
EN 60079-0:2018, EN60079-11:2012 ATEX: Europe

11/2020, JK
INTRINSIC SAFETY
Intrinsically safe equipment is defined as "equipment and wiring which is incapable of releasing sufficient electrical
or thermal energy under normal or abnormal conditions to cause ignition of a specific hazardous atmospheric mixture
in its most easily ignited concentration." (ISA-RP12.6) This is achieved by limiting the amount of power available to
the electrical equipment in the hazardous area to a level below that which will ignite the gases.
In order to have a fire or explosion, fuel, oxygen and a source of ignition must be present. An intrinsically safe system
assumes the fuel and oxygen are present in the atmosphere, but the system is designed so the electrical energy or
thermal energy of a particular instrument loop can never be great enough to cause ignition.
BATTERIES
Batteries must be changed in Non-hazardous area.
Batteries must be of correct approved type.
Batteries must not be mixed with batteries of other models or manufacturers.
Batteries must be installed with correct polarity making sure the (+) end of the battery is aligned with (+)
symbol embossed in the battery case.
CERTIFIED Batteries for the TL3-A, TL3-R and TL3-W are as follows:
Model Type Duracell Panasonic
TL3-A CR2032 LiMnO
2
DL2032 CR2032
TL3-W, TL3-R AAA (LR03) Alkaline MN2400 LR03XWA

11/2020, JK
INSTRUCCIONES PARA EL USUARIO –TL3-A,
TL3-W Y TL3-R
INTRODUCCIÓN
Este manual describe el funcionamiento básico, el uso y las instrucciones de seguridad para los instrumentos
de termómetro de referencia digital portátil TL3-A, TL3-W y TL3-R.
REEMPLAZO DE LA BATERÍA
Cuando baja el voltaje de la batería, la pantalla muestra ‘LobAtt’.
Reemplace la batería lo antes posible en un lugar seguro al notar que la batería está baja. Esto evitará un posible
mal funcionamiento. No intente calibrar el instrumento si el indicador de batería baja está encendido.
ADVERTENCIA:
•Se deben cambiar las baterías en un área sin riesgos.
•Las baterías deben ser del tipo aprobado correcto.
•Las baterías deben instalarse con la polaridad correcta, asegurándose de que el lado (+) de la misma esté
alineado con el símbolo (+) que aparece en la caja de la batería.
•Las bateríasno deben instalarse con la polaridad invertida, donde una celda pudiera cargar la celda equivocada.
a) Asegúrese de que el instrumento esté en un área sin riesgos y que esté apagado.
b) Utilice un destornillador Phillips n.º 2 para retirar el tornillo que sostiene la tapa posterior del TL3.
c) Reemplace cada batería nueva asegurándose de que el extremo (+) de la batería esté alineado con el símbolo (+)
que aparece en la caja de la batería.
d) Vuelva a colocar la cubierta. Asegúrese de que la junta de hule esté asentada en su ranura alrededor de la abertura
de la caja (TL3-W, TL3-R).
Las baterías CERTIFICADAS para los TL3-A, TL3-W y TL3-R son las siguientes:
Modelo Tipo Duracell Panasonic
TL3-A (1) CR2032 LiMnO2DL2032 CR2032
TL3-W, TL3-R (2) AAA (LR03) Alcalina MN2400 LR03XWA
REPARACIÓN AUTORIZADA
Se recomienda que el mantenimiento que no esté incluido en el ámbito de este manual sea realizado
por ThermoProbe, Inc. o por uno de sus distribuidores autorizados.
Visite www.thermoprobe.net para encontrar un video sobre el uso adecuado de este instrumento.

11/2020, JK
INTERFAZ DEL USUARIO
Botón de Encendido/Selección:
Al presionar una vez el botón de Encendido el dispositivo comienza a funcionar. (Nota: El instrumento se apaga
automáticamente 20 minutos después de presionar el último botón.)El instrumento se apaga al presionar el botón
"Encendido” hasta que la pantalla muestre "APAGADO".
MENÚ de selección:
Utilice el botón Avanzar (flecha hacia abajo)
para las siguientes selecciones:
C-F: Selecciona grados Celsius o Fahrenheit
para la temperatura en pantalla.
DEC: Selecciona la resolución de visualización 0.1
o 0.01 (0.01/0.001 para el TL3-R)
LAH: muestra la lectura más baja (LO),
La lectura promedio (AVG) y la lectura más alta (HI)
CON: Cambia entre apagado automático
y funcionamiento continuo
STRT BT / STOP BT: Encender o apagar el Bluetooth
(TL3-W o TL3-R)
ZERO: Permite al usuario ver o ajustar la corrección de cero
(* Solo para el modelo TL3-R: consulte
la sección Corrección de cero)
Botón de avance
Botón de Encendido/Selección
Flechas de tendencia
de temperatura

11/2020, JK
Lecturas mínima, máxima y promedio
Mientras el TL3 esté encendido, desde el menú se puede acceder a las temperaturas registradas más baja, más alta
y promedio. Estos valores se muestran mediante los indicadores LO, AVG o HI que aparecen en la pantalla
inmediatamente antes de indicar la lectura correspondiente. Estas lecturas se borran al apagar la unidad.
Bluetooth®Inalámbrico (solo modelos TL3-W o TL3-R)
El Bluetooth puede activarse desde el menú para transmitir datos de temperatura a dispositivos Bluetooth
compatibles. Visite www.thermoprobe.net para obtener información y controladores adicionales.
Códigos de pantalla
OPEN Ct: indica que el sensor está funcionando por encima de su límite de temperatura o que el sensor está
dañado.
Shrt Ct: indica que el sensor está funcionando por debajo de su límite de temperatura o que el sensor está dañado.
Lo bAtt: indica que el voltaje de la batería es bajo.
Zero Correction (solo para el modelo TL3-R)
(Nota: Se requiere una contraseña ('247’) para ingresar al modo Zero Correction.
Las correcciones realizadas compensan la temperatura en el rango total del dispositivo.
La Zero Correction debe ser realizada únicamente por personal calificado y con la adecuada
instrumentación de referencia.
La Zero Correction debe realizarse en el punto de congelación de agua a 0°C (32 °F).
Se puede acceder a la Zero Correction seleccionando ZErO en el menú.
En el menú Zero Correction, al seleccionar Corr se muestra la corrección cero actual.
Al seleccionar AdJ se muestra un campo de contraseña de 3 dígitos. Introduzca la contraseña (247) un dígito
a la vez usando el botón AVANZAR para incrementar cada dígito en la pantalla. Utilice entonces el botón
SELECCIONAR para pasar al siguiente dígito. Al presionar SELECCIONAR en el 3er dígito se muestra una
pantalla de temperatura donde se puede ajustar la temperatura mostrada. El indicador de flecha muestra la dirección
en la que está cambiando la temperatura. Presione y mantenga presionado el botón de AVANZAR para aumentar el
valor en 0.001 grados hasta que alcance los 10 y luego aumentará a una velocidad de cambio a 0.01 grados por
segundo. Utilice el botón SELECCIONAR para pasar del ajuste HACIA ARRIBA, ajuste HACIA ABAJO, SAvE
(guardar) corrección y CAnCEL (no guardar). Una vez guardado el ajuste, puede ver el ajuste a cero que se aplica
desde la selección del menú ZErO→Corr→ 'Displays current correction’.
ThermoProbe, Inc.
112A JETPORT DR.
PEARL, MS 39208 USA
Tel.: +1 601.939.1831
Fax: +1 601.355.1831
www.thermoprobe.net

11/2020, JK
INSTRUCCIONES DE SEGURIDAD: TL3-A, TL3-W Y TL3-R REV 042020
Estos instrumentos ThermoProbe están destinados para su uso en áreas peligrosas (con sustancias potencialmente
inflamables o explosivas) y no peligrosas, en condiciones secas a temperatura ambiente entre -20 °C y 40 °C.
Los instrumentos no están diseñados para su uso en instalaciones permanentes al aire libre y no fueron diseñados
ni sometidos a pruebas en condiciones de congelación. Se deben utilizar medios de protección adicionales cuando
el equipo pueda estar expuesto a exigencias externas excesivas (p. ej., vibración, calor, impacto, etc.). El usuario
debe contar con un conocimiento práctico de los requisitos de seguridad apropiados. Se debe estar consciente de las
sustancias agresivas y de la posible necesidad de protección adicional. La exposición al calor excesivo puede fundir
los componentes plásticos del instrumento.
a) El usuario debe contar con un amplio conocimiento de los productos a medir y conocer las precauciones
de seguridad a observar cuando se trabaja con el material a medir.
b) Se debe revisar el instrumento para detectar defectos graves; verificar que el instrumento esté completo, que tenga
baterías en buenas condiciones, etc. Si fuera necesario, verifique la precisión de las mediciones. Si se encontrara
algún defecto, no se debe utilizar el instrumento hasta que se lleven a cabo las reparaciones.
c) El instrumento debe estar limpio por razones de seguridad y de facilidad de uso.
d) Se deben evaluar los riesgos primarios y secundarios de la ubicación física de la medición.
e) Se debe retirar la fuente de energía antes de realizar cualquier operación de mantenimiento.
f) El cambio de componentes que no sean las baterías puede comprometer las certificaciones ATEX/IECEx u otras y
debe llevarlo a cabo ThermoProbe o de uno de sus proveedores de servicio calificados. Consulte también la sección
“Reparación autorizada”.
PRECAUCIÓN:
Las siguientes piezas metálicas tienen una capacitancia superior a 3pF, están aisladas del suelo y pueden representar
un posible peligro de carga electrostática: (Sonda metálica - 19.5 pF)
En caso de que alguna parte del instrumento se cargue electrostáticamente en una ubicación posiblemente peligrosa,
siga las políticas de la empresa para probar y limpiar el área de cualquier gas peligroso antes de intentar el uso
del instrumento en esa ubicación. Si esto no es posible, deje tiempo suficiente para que el instrumento disipe
naturalmente cualquier carga. Según el tipo de atmósfera, esto puede tardar varias horas.
APROBACIONES DE SEGURIDAD PARA EL TL3-A, TL3-W Y TL3-R:
Ex ia IIC T4 Ga
Las normas pertinentes son: Agencia o designación de seguridad
IEC 60079-0:Ed 7, IEC 60079-11:Ed 6 IECEx: Organismo reconocido internacionalmente
EN 60079-0:2018, EN60079-11:2012 ATEX: Europa

11/2020, JK
SEGURIDAD INTRÍNSECA
Se define al equipo intrínsecamente seguro como "equipo y cableado que no pueden liberar suficiente energía
térmica o eléctrica, ya sea bajo condiciones normales o anormales, como para provocar la ignición de una mezcla
atmosférica específica peligrosa en su concentración de mayor ignición" (ISA-RP12.6). Esto se logra al limitar
la cantidad de energía disponible para el equipo eléctrico en el área peligrosa a un nivel inferior al necesario para
que se inflamen los gases.
Para que haya ignición o explosión, debe haber presencia de combustible, oxígeno y una fuente de ignición. Un
sistema intrínsecamente seguro asume que el combustible y el oxígeno están presentes en la atmósfera, pero el
sistema está diseñado para que la energía eléctrica o térmica de un bucle de instrumento en particular nunca pueda
ser lo suficientemente grande como para provocar la ignición.
BATERÍAS
•Se deben cambiar las baterías en un área sin riesgos.
•Las baterías deben ser del tipo aprobado correcto.
•No se deben mezclar las baterías de diferentes modelos o fabricantes.
•Las baterías deben instalarse con la polaridad correcta, asegurándose de que el lado (+) de la misma
esté alineado con el símbolo (+) que aparece en la caja de la batería.
Las bateríasCERTIFICADAS para los TL3-A, TL3-W y TL3-R son las siguientes:
Modelo Tipo Duracell Panasonic
TL3-A CR2032 LiMnO2DL2032 CR2032
TL3-W, TL3-R AAA (LR03) Alcalina MN2400 LR03XWA

11/2020, JK
` MODE D'EMPLOI –TL3-A, TL3-W et TL3-R
INTRODUCTION
Ce manuel décrit le fonctionnement de base, et les instructions d’utilisation et de sécurité du thermomètre numérique
portable de référence modèle TL3-A, TL3-W ou TL3-R.
REMPLACER LES PILES
Lorsque la tension des piles est faible, l'écran affiche « LobAtt ».
Dès que l'indication de piles faibles s'affiche, remplacez les piles au plus vite dans un endroit sûr. Cela évitera un
éventuel dysfonctionnement. N’essayez pas d’étalonner l’instrument si l’indicateur de pile faible s'affiche.
ATTENTION :
•Les piles doivent être remplacées dans une zone sans risques.
•Les piles doivent être du type requis.
•Les piles doivent être placées avec la bonne polarité : assurez-vous que l’extrémité (+) de la batterie est
placée face au symbole (+) inscrit en relief sur le boîtier de la pile.
•Les pilesne doivent pas être mises en place avec une polarité inversée souspeine de surcharge de l'une descellules.
a) Assurez-vous que l'instrument se trouve dans une zone sans risques et qu'il est hors tension.
b) Utilisez un tournevis Phillips n° 2 pour retirer la vis maintenant le cache piles à l'arrière du TL3.
c) Installez chaque nouvelle pile en veillant à ce que l’extrémité (+) de la pile soit placée face au symbole (+) inscrit
en relief sur le boîtier de la pile.
d) Remettez le cache piles en place. Assurez-vous que le joint en caoutchouc est bien inséré dans la rainure du
boîtier (TL3-W, TL3-R).
Les piles CERTIFIÉES pour les modèles TL3-A, TL3-W et TL3-R sont les suivantes :
Modèle Type Duracell Panasonic
TL3-A (1) CR2032 LiMnO2DL2032 CR2032
TL3-W, TL3-R (2) AAA (LR03) alcaline MN2400 LR03XWA
RÉPARATIONS AUTORISÉES
Il est recommandé de faire appel à ThermoProbe, Inc. ou à l’un de ses distributeurs autorisés pour toutes les
interventions dépassant le cadre de ce manuel.
Consultez www.thermoprobe.net pour voir la vidéo sur l’utilisation adéquate de cet instrument.

11/2020, JK
INTERFACE UTILISATEUR
Bouton de mise en marche/sélection :
Appuyez une fois sur le bouton de mise en marche pour allumer l'appareil. (Note : L'instrument s'éteindra
automatiquement au bout de 20 minutes d'inactivité.)Pour éteindre l'instrument, appuyez et maintenez enfoncé
le bouton de mise en marche jusqu’à ce que « OFF » s'affiche.
MENU de sélection :
Utilisez le bouton de défilement (flèche vers le bas)
pour effectuer les sélections suivantes :
C-F : Sélectionner l’affichage de la température en degrés
Celsius ou Fahrenheit
DEC : Sélectionner une résolution d’affichage de 0,1
ou 0,01 (0,01/0,001 pour TL3-R)
LAH : Afficher la mesure la plus basse (LO),
la mesure moyenne (AVG) et la mesure la plus élevée (HI)
CON : Basculer entre l'arrêt automatique
et le fonctionnement en continu
STRT BT / STOP BT : Activer ou désactiver le Bluetooth
(TL3-W ou TL3-R)
ZÉRO : Permettre à l'utilisateur de visualiser ou d'ajuster
la correction du point zéro
(*Modèle TL3-R uniquement - Voir la section Correction du point zéro)
Bouton de défilement
Bouton de mise en marche/sélection
Flèches d’indication
de température

11/2020, JK
Mesure la plus basse, la plus élevée et moyenne
La mesure la plus basse, la mesure la plus élevée et la mesure moyenne enregistrées lorsque le TL3 est sous tension
sont accessibles à partir du menu. Celles-ci sont indiquées par LO, AVG ou HI qui s'affichent à l'écran juste avant
l'affichage de la mesure correspondante. Ces mesures sont supprimées après la mise hors tension de l'appareil.
Bluetooth®sans fil (uniquement modèles TL3-W et TL3-R)
Le Bluetooth peut être activé à partir du menu pour transmettre les données de température aux appareils Bluetooth
connectés. Veuillez consulter www.thermoprobe.net pour obtenir plus d'informations et obtenir les pilotes.
Codes d’affichage
OPEN Ct - Indique que le capteur fonctionne au-delà de sa température limite ou que le capteur est endommagé.
Shrt Ct - Indique que le capteur fonctionne en dessous de sa température limite ou que le capteur est endommagé.
Lo bAtt - Indique que la tension des piles est faible.
Correction du point zéro (modèle TL3-R uniquement)
Remarque : Un mot de passe (« 247 ») est requis pour accéder au mode de correction du point zéro.
Les corrections apportées décaleront la température sur toute la plage de l'appareil.
La correction du point zéro ne doit être effectuée que par du personnel qualifié disposant d'un
équipement de référence adapté.
La correction du point zéro doit être effectuée au point de congélation de l'eau de 0°C (32 °F).
La correction du point zéro est accessible en sélectionnant ZErO dans le menu.
Dans le menu Correction du point zéro, en sélectionnant Corr, la valeur de correction actuelle du point zéro s'affichera.
En sélectionnant AdJ, un champ de mot de passe de 3 chiffres s'affichera. Entrez le mot de passe (247), un chiffre
à la fois, en utilisant le bouton de défilement pour incrémenter chaque chiffre affiché. Ensuite, utilisez le bouton
SELECT pour passer au chiffre suivant. En appuyant sur SELECT pour le 3echiffre, vous accéderez à un affichage de
la température où vous pourrez régler la température affichée. La flèche indique dans quel sens modifier la température.
Appuyez et maintenez enfoncé le bouton de défilement pour incrémenter la valeur de 0,001 degré jusqu'à ce qu'elle
atteigne 10, puis elle augmentera à une vitesse de 0,01 degré par seconde. Utilisez le bouton SELECT pour paramétrer
la température vers le haut (UP), vers le bas (DOWN), SAvE (enregistrer) la correction, et CAnCEL (annuler) (sans
enregistrer). Une fois que vous avez enregistré le réglage, vous pouvez afficher le paramétrage du point zéro appliqué
en sélectionnant dans le menu ZErO→Corr→« Afficher la valeur de correction actuelle ».
ThermoProbe, Inc.
112A JETPORT DR.
PEARL, MS 39208, États-Unis
Tél. : +1 601 939 1831
Fax : +1 601 355 1831
www.thermoprobe.net

11/2020, JK
CONSIGNES DE SÉCURITÉ –TL3-A, TL3-W& TL3-R REV 042020
Ces instruments ThermoProbe sont destinés à être utilisés à la fois dans des zones dangereuses (potentiellement
inflammables ou explosives) et sans risques, dans des conditions sèches et à des températures ambiantes comprises
entre -20 °C et +40 °C.
Les instruments ne sont pas conçus pour être utilisés dans des installations extérieures permanentes et ne sont pas
conçus ni testés pour des conditions de givrage. Des moyens de protection supplémentaires doivent être utilisés
lorsque l'équipement peut être exposé à des contraintes extérieures excessives (p. ex. vibrations, chaleur, chocs,
etc.). L'utilisateur doit disposer de connaissances pratiques des exigences de sécurité appropriées. Soyez conscient
des substances agressives et du fait qu'une protection supplémentaire peut être nécessaire. L'exposition à une chaleur
excessive peut faire fondre les composants en plastique de l'instrument.
a) L’utilisateur doit avoir une connaissance approfondie des produits à mesurer et doit connaître les précautions
de sécurité à adopter lors du travail avec les matériaux à mesurer.
b) Une vérification de l'instrument visant à déceler des défauts graves doit être effectuée : vérifier que l'instrument
est complet, que les piles sont en bon état, etc. Si nécessaire, vérifier la précision des mesures. Si des défauts sont
détectés, l'instrument ne doit pas être utilisé tant que les réparations n'ont pas été effectuées.
c) L'instrument doit être propre pour des raisons de sécurité et de facilité d'utilisation.
d) Les risques primaires et secondaires du lieu de mesure physique doivent être évalués.
e) La source d’alimentation doit être débranchée avant toute opération d'entretien.
f) Le remplacement de composants autres que les piles peut compromettre les certifications ATEX/IECEx ou
d'autres certifications et ne doit être effectué que par ThermoProbe ou l'un de ses prestataires de services qualifiés.
Voir également la section « Réparations autorisées ».
ATTENTION :
Les pièces métalliques suivantes ont une capacité supérieure à 3 pF, sont isolées de la terre et peuvent présenter
un risque potentiel de charge électrostatique : (Sonde métallique - 19,5 pF)
Dans le cas où une partie de l'instrument deviendrait chargée électrostatiquement dans un endroit potentiellement
dangereux, suivez les directives de l'entreprise pour tester la présence de gaz dangereux et dégager la zone avant
d'essayer d'y utiliser l'instrument. Si cela s'avère impossible, attendez suffisamment longtemps pour que l'instrument
dissipe naturellement les charges. Selon l'atmosphère, cela peut prendre plusieurs heures.
HOMOLOGATIONS DE SÉCURITÉ POUR LES MODÈLES TL3-A,
TL3-W ET TL3-R :
Ex ia IIC T4 Ga
Les normes applicables sont : Agence ou désignation de sécurité
IEC 60079-0:Ed 7, IEC 60079-11:Ed 6 IECEx : organisme internationalement reconnu
EN 60079-0:2018, EN60079-11:2012 ATEX : Europe

11/2020, JK
SÉCURITÉ INTRINSÈQUE
Un équipement à sécurité intrinsèque est défini comme « un équipement et un câblage incapables de libérer
suffisamment d’énergie électrique ou thermale dans des conditions normales ou anormales pour provoquer
l’inflammation d’un mélange atmosphérique dangereux dans sa concentration la plus facilement inflammable ».
(ISA-RP12.6) Ceci est réalisé en limitant la quantité d’énergie disponible pour l’équipement électrique
dans la zone dangereuse à un niveau inférieur à celui qui enflammera les gaz.
Pour qu’un incendie ou une explosion se produise, un carburant, de l’oxygène et une source d’inflammation doivent
être présents. Un système à sécurité intrinsèque suppose que le carburant et l'oxygène sont présents dans l'atmosphère,
mais le système est conçu de manière à ce que l'énergie électrique ou l'énergie thermique d'une boucle d'instrument
particulière ne puisse jamais être suffisante pour provoquer l'inflammation.
PILES
•Les piles doivent être remplacées dans une zone sans risques.
•Les piles doivent être du type requis.
•Les piles ne doivent pas être mélangées avec des piles d’autres modèles ou fabricants.
•Les piles doivent être placées avec la bonne polarité : assurez-vous que l’extrémité (+) de la batterie
est placée face au symbole (+) inscrit en relief sur le boîtier de la pile.
Les piles CERTIFIÉES pour les modèles TL3-A, TL3-R et TL3-W sont les suivantes :
Modèle Type Duracell Panasonic
TL3-A CR2032 LiMnO2DL2032 CR2032
TL3-W, TL3-R AAA (LR03) alcaline MN2400 LR03XWA

11/2020, JK
ИНСТРУКЦИЯ ПО ЭКСПЛУАТАЦИИ:
TL3-A, TL3-W и TL3-R
ВВЕДЕНИЕ
В этом руководстве описаны основные функции цифровых портативных термометров моделей TL3-A, TL3-W
и TL3-R, а также содержатся инструкции по их эксплуатации и технике безопасности при работе с ними.
ЗАМЕНА БАТАРЕЙ
При низком заряде батарей на дисплее отображается сообщение «LobAtt».
После появления сообщения о низком заряде необходимо как можно скорее заменить батареи в безопасном
месте. Это позволит избежать возможных неисправностей в работе прибора. Недопустимо выполнять
калибровку прибора, если на дисплее отображается индикатор низкого заряда.
ПРЕДУПРЕЖДЕНИЕ.
•Замену батарей следует выполнять в безопасном месте.
•Используйте батареи только разрешенного типа.
•При установке батарей необходимо соблюдать правильную полярность, то есть полюс батареи,
обозначенный символом «+», должен совпадать с символом «+» в батарейном отсеке.
•Не допускается устанавливать батареи так, чтобы их полярность друг относительно друга была
обратной; при такой схеме одна батарея заряжается от другой.
А. Прибор должен быть выключенным и находиться в безопасном месте.
Б. С помощью крестовой отвертки 2-го размера открутите 1 винт (модель TL3), удерживающий заднюю
крышку прибора.
В. Установите новые батареи. При этом полюс каждой батареи, обозначенный символом «+», должен
совпадать с символом «+» в батарейном отсеке.
Г. Установите крышку. Убедитесь, что резиновая прокладка вошла в паз вокруг отверстия корпуса
(на моделях TL3-W, TL3-R).
Ниже перечислены ОФИЦИАЛЬНО ОДОБРЕННЫЕ батареи для моделей TL3-A, TL3-W и TL3-R:
Модель Тип Duracell Panasonic
TL3-A (1) CR2032 LiMnO2DL2032 CR2032
TL3-W, TL3-R (2) AAA (LR03) Щелочная MN2400 LR03XWA
РЕМОНТ УПОЛНОМОЧЕННЫМИ ЛИЦАМИ
Все работы по обслуживанию, не описанные в этом руководстве, рекомендуется поручать специалистам
компании ThermoProbe, Inc. или уполномоченным дистрибьюторам.
На сайте www.thermoprobe.net размещено видео по правильному применению прибора.

11/2020, JK
ИНТЕРФЕЙС ПОЛЬЗОВАТЕЛЯ
Кнопка питания и выбора:
При однократном нажатии кнопки питания происходит включение прибора. (Примечание. Прибор
автоматически отключается через 20 минут после последнего нажатия этой кнопки.)При нажатии и
удержании кнопки питания на дисплее появится слово «OFF» (выкл.) и прибор выключится.
МЕНЮ выбора:
С помощью кнопки навигации (стрелка вниз)
можно выбрать следующие элементы:
C-F: выбор отображения температуры в градусах
по Цельсию или по Фаренгейту.
DEC: выбор количества разрядов отображаемого
значения: с десятыми (0,1) или с сотыми (0,01)
долями (0,01/0,001 в TL3-R).
LAH: отображение минимального (LO),
среднего (AVG) и максимального (HI)
значений температуры.
CON: переключение между автоматическим
выключением или непрерывной работой.
STRT BT / STOP BT: включение или выключение
Bluetooth (модели TL3-W или TL3-R).
ZERO: позволяет просматривать или настраивать коррекцию нуля
(*только в модели TL3-R —см. раздел «Коррекция нуля»).
Кнопка навигации
Кнопка питания и выбора
Стрелки повышения и
понижения температуры

11/2020, JK
Минимальное, среднее и максимальное значения температуры
Доступ к минимальному, среднему и максимальному значениям температуры, зарегистрированным при включенном
TL3, осуществляется из меню. Они обозначаются индикаторами LO, AVG или HI, которые отображаются на дисплее
прямо перед соответствующим значением. После выключения устройства эти показания удаляются.
Беспроводное подключение по Bluetooth®(только в моделях TL3-W или TL3-R)
Bluetooth можно включить из меню для передачи значений температуры на поддерживаемые устройства Bluetooth.
Чтобы получить более подробную информацию и загрузить драйверы, перейдите на сайт www.thermoprobe.net.
Коды, отображаемые на дисплее
OPEN Ct: указывает, что датчик работает при температуре выше допустимого предела или поврежден.
Shrt Ct: указывает, что датчик работает при температуре ниже допустимого предела или поврежден.
Lo bAtt: указывает на низкий заряд батарей.
Коррекция нуля (только в модели TL3-R)
Примечание. Чтобы перейти в режим коррекции нуля, необходимо ввести пароль («247»).
Внесение изменений приведет к смещению показаний температуры на всем диапазоне
работы устройства.
Коррекция нуля должна выполняться только квалифицированным персоналом
с применением
надлежащих контрольно-измерительных приборов.
Коррекция нуля должна выполняться при температуре замерзания воды 0°C (32 °F).
Чтобы перейти в режим коррекции нуля, выберите пункт ZErO в меню.
При выборе опции Corr в режиме коррекции нуля на дисплее отобразится текущая коррекция нуля.
При выборе опции AdJ на дисплее отобразится поле пароля из 3 цифр. Введите пароль (247) по одной цифре
за раз, используя кнопку НАВИГАЦИИ, увеличивая каждую отображаемую цифру. Затем нажмите кнопку
ВЫБОРА, чтобы перейти к следующей цифре. При нажатии кнопки ВЫБОРА 3-йцифры выполняется переход
к дисплею отображения температуры, где можно отрегулировать отображаемую температуру. Индикатор в виде
стрелки показывает направление изменения температуры. Нажмите и удерживайте кнопку НАВИГАЦИИ, чтобы
увеличить значение на 0,001 градуса, пока оно не достигнет 10, а затем оно будет увеличиваться с шагом 0,01
градуса в секунду. Используйте кнопку ВЫБОРА, чтобы выйти из режима ПОВЫШЕНИЯ или ПОНИЖЕНИЯ
значения, сохранить (SAvE) или не сохранять (CAnCEL) коррекцию. После сохранения настройки
действующую настройку нуля можно просмотреть в меню ZErO→Corr→«Отображение текущей коррекции».
ThermoProbe, Inc.
112A JETPORT DR.
PEARL, MS 39208 (ШТАТ МИССИСИПИ), США
Тел.: +1 601 939 1831
Факс: +1 601 355 1831
www.thermoprobe.net
This manual suits for next models
23
Table of contents
Languages:
Other ThermoProbe Thermometer manuals
