Thermrup HI616-BLU User manual

1
DE Elektrische Beheizbare Einlegesohle
Gebrauchsanweisung ----------------------------------3
GB Electric heated insole
Instruction Manual ------------------------------------ 9
Art.Nr. HI616-BLU

2
Bitte sorgfältig lesen!
Please read carefully!

3
Inhalt
1. Wichtige Anweisungen……………………………………………………….3
2. Funktion ................................................. …........................4
3. Lieferumfang………………………………………………………………………4
4. Anwendung………………………………………………………………….……4
5. Reinigung und Pflege…………………………………………….……….....7
6. Spezifikation …………………………………………….…………….......7
7. Hinweis zu Entsorgung……………………………………………………….7
8. Garantie …………………………………………………………………………….8
1. Wichtige Anweisungen
• Ein Nichtbeachten der nachfolgenden Hinweise kann Personen- oder
Sachschaden.
• Diese Beheizbare Einlegesohle ist nur zur Erwärmung des menschlichen
Körpers bestimmt.
• Setzen Sie das Gerät nicht bei Kindern, behinderten oder schlafenden
Personen sowie bei hitzeunempfindlichen Menschen ein, die nicht auf
eine Überwärmung reagieren können.
• Kinder dürfen nicht mit dem Gerät spielen.
• Diese Beheizbare Einlegesohle darf nur in Verbindung mit dem auf dem
Etikett angegebenen Akkus betrieben werden.
• Nicht an den Leitungen ziehen, drehen oder sie scharf knicken.
• Wenn die Beheizbare Einlegesohle über mehrere Stunden benutzt wird,
empfehlen wir die niedrigste Temperaturstufe am Akkus einzustellen, um
eine Überhitzung des erwärmten Körperteils zu vermeiden.
• Der Akku ist nicht wasserdicht. Bitte halten Sie den Akku bei der
Anwendung trocken.
Deutsch

4
2. Funktion
Elektrische Beheizbare Einlegsohle dient dazu, die Fußsohle beim kalten
Wetter warm und bequem sowie sicher zuhalten, um die Erfrierungen
der Füße zu vermeiden. Mit der „Thermrup Smart Heat Duo“ App können
Sie die Einlegesohle über Ihre Smartphone steuern.
Diese elektrische Beheizbare Einlegsohle ist sowohl für langen als auch für
kurzen Stiefel geeignet, ideal für den Wintersport.
3. Lieferumfang
- 2x Elektrische Beheizbare Einlegsohle
- 2x Gamasche mit Temperaturregler
- 2x Akku 3000mAh
- 1x Ladegerät
- 2x Gamasche Verlängerung
- 1x Betriebsanleitung
4. Anwendung
4.1 Aufladung des Akkus
Vor der ersten Benutzung oder nach längerer Nichtbenutzung muss
der Akku für mindestens 3 Stunden vollständig aufgeladen werden.
Zum Aufladen der Akkus verbinden Sie das Kabel des Ladegeräts
mit dem Akku. Während des Ladevorganges leuchtet die LED auf
dem Ladegerät rot. Ist der Akku vollständig geladen, leuchtet die
LED auf dem Ladegerät grün. Sie können dann das Ladegerät vom
Stromnetz und vom Akku trennen.
Wenn Sie die Einlegesohle lange Zeit nicht benutzen, laden Sie den
Akku alle 6 Monate ausreichend auf, um seine Funktionstüchtigkeit
sicherzustellen.

5
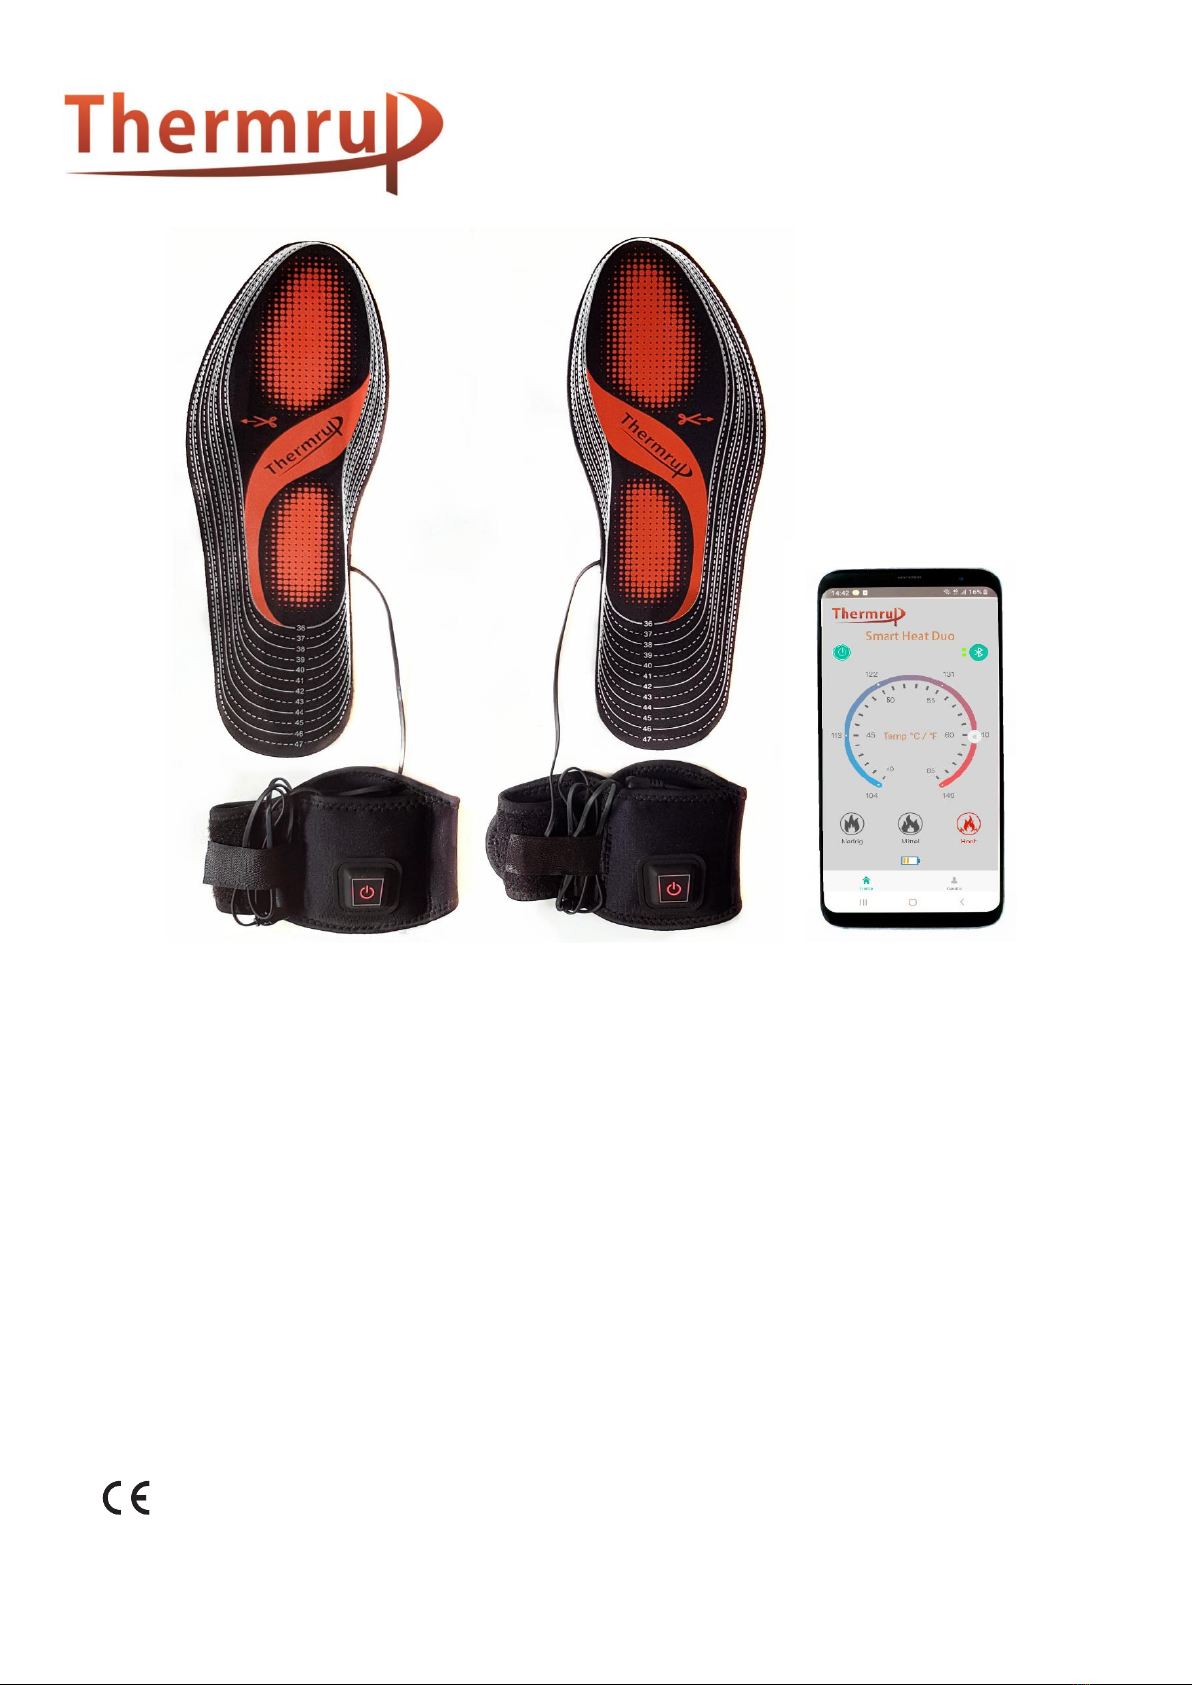
4.2 Betreiben der Einlegesohle
Schneiden Sie bitte vorsichtig entlang der Schnittlinie der
elektrischen Beheizbare Einlegsohle je nach Größe der Füße. Die
Schnittlinie auf der Einlegesohle deutet übersichtlich auf die
geeignete Größe hin, Das Gummi-Heizelement in der Einlegesohle
kann geschnitten werden, was die Wärme der Einlegesohle aber
nicht beeinflusst.
Stecken Sie den Stecker des Sohlenkabels in die Buchse aus dem
Akku-Beutel ein. Stecken Sie den Stecker aus dem Akku-Beutel in
die Buchse der Akkus. Stellen Sie den Akkus in den Akkus-Beutel.
Sie können das Kabel mit dem Klettverschluss binden.
Legen Sie die Einlegesohle in den Stiefel oder Schuhe. Befestigen Sie
die Gamasche um Ihrem Bein.
Drücken Sie die Power-Taste des Reglers ca. 1 Sekunden lange um
die Heizfunktion einzuschalten. Drücken Sie danach die Ein-/Aus-
Taste kurz(ggf. mehrfachen), um die gewünschte Temperaturstufe
(Stufe1-2-3, Grün - Blau -Rot) einzustellen.
Die 1. Stufe ist die niedrigste Stufe, die LED-Anzeige leuchtet grün.
Die 2. Stufe ist die mittele Stufe, die LED-Anzeige leuchtet blau.
Die 3. Stufe ist die wärmste Stufe, die LED-Anzeige leuchtet rot.
Drücken Sie die Ein-/Ausschalter ca. 1 Sekunden um die
Heizfunktion auszuschalten.
*** Bitte trennen Sie den Akku nach jedem Gebrauch von dem Regler,
um den Akku zu schonen. ***
Regler/Power-Taste

6
4.3 Betreiben mit APP
Suchen Sie die APP „ Thermrup Smart Heat Duo“ in
Google Play oder Apple App Store.
Vor der ersten Verwendung müssen Sie die beiden Regler der Sohlen
mit Ihrem Smartphone koppeln. Halten Sie die Power-Taste des
Reglers (im ausgeschalteten Zustand) für 8 Sekunden gedrückt, bis
der Regler blinkt. Gehen Sie ins Menü „ Gerät“. Tippen Sie das
„+“ Symbol um den Regler in der Geräteliste hinzufügen.
Wiederholen Sie den Prozess nochmal bis die beiden Reglern in der
Gerätliste stehen.
Tippen Sie das Bluetooth Symbol um die Bluetooth-
Verbindung herzustellen. Warten Sie bis die beiden
Punkten grün sind.
Tippen Sie das Power-Symbol um die Heizfunktion ein-
/auszuschalten.
Sie können mit dem Temperatur-Rad und den drei Stufe-Symbols die
Heizleistung einstellen.
Das Akku-Symbol zeigt den Akkustand des Akkus, der die
niedrigere Kapazität hat.

7
5. Reinigung und Pflege
• Die elektrische Heizeinlegesohle können im Wasser mit der Hand oder
in der Waschmaschine bis 45°C in einem Waschsack gewaschen werden.
• Die Gamasche mit dem Regler darf man nicht waschen. Vor jeder
Reinigung, trennen Sie die Einlegesohle von dem Regler.
• Verwenden Sie nie aggressive Reinigungsmittel oder starke Bürsten.
• Der Heizeinlegesohle darf nicht in einem Trockner getrocknet oder
gebügelt werden.
6. Spezifikation
- Leistung: max. 6 W
- Materialien
Die äußere Schicht ist EVA-Schaumstoff und Samt, die Innenschicht ist der
Gummi-Heizkörper.
7. Hinweise zur Entsorgung
Dieses Gerät darf nicht zusammen mit dem Hausmüll entsorgt werden. Jeder
Verbraucher ist verpflichtet, alle elektrischen oder elektronischen Geräte, egal,
ob sie Schadstoffe enthalten oder nicht, bei einer Sammelstelle seiner Stadt oder
im Handel abzugeben, damit sie einer umweltschonenden Entsorgung zugeführt
werden können. Wenden Sie sich hinsichtlich der Entsorgung an Ihre
Kommunalbehörde oder Ihren Händler.

8
8. Garantie
Wir leisten 2 Jahre Garantie ab Kaufdatum für Material- und
Fabrikationsfehler des Produktes.
Die Garantie gilt nicht:
• Im Falle von Schäden, die auf unsachgemäßer Bedienung beruhen.
• Für Verschleißteile.
• Bei Eigenverschulden des Kunden.
• Sobald das Gerät durch eine nicht autorisierte Werkstatt geöffnet wurde.
Für Geltendmachung eines Garantiefalles innerhalb der Garantiezeit ist
durch den Kunden der Nachweis des Kaufes zu führen.
Bitte wenden Sie sich im Falle von Reklamationen an unseren Service
unter folgendem Kontakt:
E-Mail: service@zewox.de
Zewox GmbH
Oststr.159
47057 Duisburg
Deutschland

9
GB Electric heated insole
Instruction Manual
Art.No. HI616-BLU
Please read carefully!

10
Contents
1. Important instructions……………………………………………………….10
2. Function................................................................................11
3. Package Contents …………………………………………………………..…11
4. Operating……………………………………………………………..…………..11
5. Cleaning and maintenance……………………………….…………......14
6. Specification ………………………………………………………….…….…..14
7. Deposal……………………………………………………….………….….…….14
8. Warranty………………………………………………….……………….………15
1. Important instructions
• Non-observance of the following notes may result in personal injury or
material damage.
• This heated insole is only designed to warm up the human body.
• Do not use the heated insole on children or persons who are disabled,
asleep or insensitive to heat (persons who cannot react on overheating).
• Children shall not play with the appliance.
• The heated insole may only be operated with the battery supplied.
• Do not pull, twist or make sharp bends in the cables.
• If the heating insole is being used over several hours, we recommend
that you set the lowest temperature setting on the battery to avoid
overheating the heated body part, which may lead to burns to the skin.
•The battery is not waterproof. Please keep the battery dry during use.
English

11
2. Function
Electric heated insole is used to keep the sole of the foot warm and
comfortable as well as safe in cold weather in order to avoid the
frostbite of the feet. With the "Thermrup Smart Heat Duo" app you
can control the insole via your smartphone.
This electric heated insole is suitable for both long and short boots.
3. Package Contents
- 2x Electric heated insole
-2x battery 3000mAh
-1x charger
-2x gaiter with controller
-2x gaiter extension
-1x Operating manual
4. Operating
4.1 Charging the battery
Before using for the first time or after a long period of non-use, the
battery must be fully charged for at least 3 hours.
To charge the batteries, connect the charger cable to the battery.
The LED on the charger lights up red during the charging process.
When the battery is fully charged, the LED on the charger lights up
green. You can then disconnect the charger from the mains and
from the battery.
If you do not use the insole for a long time, charge the battery
sufficiently every 6 months to ensure that it works properly.

12
4.2 Operating the heated insole
Please cut carefully along the cutting line of the electric heated
insole depending on the size of the feet. The cutting line on the
insole clearly indicates the suitable size. The rubber heating
element in the insole can be cut, but this does not affect the heat
of the insole.
Insert the plug of the sole cable into the socket from the battery
bag. Insert the plug from the battery bag into the battery socket.
Place the batteries in the battery bag. You can tie the cable with the
Velcro.
Place the insole in your boots or shoes. Attach the gaiter around
your leg.
Press the on / off switch for approx. 1 second to switch on the
heating function. Then briefly press the on / off button (several
times if necessary) to set the desired temperature level (level 1-2-3,
blue-green-red).
The 1st level is the lowest level, the LED indicator lights up green.
The 2nd stage is the middle stage, the LED display lights up blue.
The 3rd stage is the warmest stage, the LED display lights up red.
Press the on / off switch for approx. 1 second to switch off the
heating function.
*** Please disconnect the battery from the controller after each use to
save the battery. ***
On/Off Switch, Controller

13
4.3 Operation with APP
Search for the "Thermrup Smart Heat Duo" APP in
Google Play or the Apple App Store.
Before using the soles for the first time, you must pair them with
your smartphone. Hold the on/off switch (while switched off) for 8
seconds until the controller flashes. Go to the "Device" menu. Tap
the "+" symbol to add the controller to the device list. Repeat the
process again until the two controllers are in the device list.
Tap the Bluetooth icon to establish the Bluetooth connection.
Wait until the two dots are green.
Tap the power icon to switch the heating function on / off.
You can set the heating output with the temperature wheel and the
three level icons.
The battery icon shows the battery level of the battery with
the lower capacity.

14
5. Cleaning and Care
•The electric heating insole can be washed in the water by hand or
in the washing machine up to 45 °C in a washing bag.
•The gaiter with the controller must not be washed. Before each
cleaning, disconnect the insole from the gaiter. The gaiter cannot
be washed.
•Never use aggressive cleaning agents or strong brushes.
•Do not dry or iron the heating insole in a dryer.
6. Specification
- Power: max. 6W / DC 7.4V
- Materials
The outer layer is EVA Sponge and velvet, the inner layer is the rubber
heating element.
7. Disposal
This product must not be disposed together with the domestic waste.
All users are obliged to hand in all electrical or electronic devices,
regardless of whether or not they contain toxic substances, at a
municipal or commercial collection point so that they can be
disposed of in an environmentally acceptable manner. Consult your
municipal authority or your dealer for information about disposal.

15
8. Warranty
We provide a 2-year warranty from the date of purchase for material and
manufacturing defects of the product.
The warranty does not apply:
•In the case of damage caused by improper use.
•For wear parts.
•Customer's own fault.
•Once the unit has been opened by an unauthorized workshop.
For the assertion of a warranty within the guarantee period, the customer
must prove the purchase.
In case of complaints please contact our service under the following
contact:
E-Mail: service@zewox.de
Zewox GmbH
Oststr.159
47057 Duisburg
Germany

16
Other manuals for HI616-BLU
1
Table of contents
Languages:
Other Thermrup Motorcycle Accessories manuals