THM MANDIBULA SEATPOST User manual
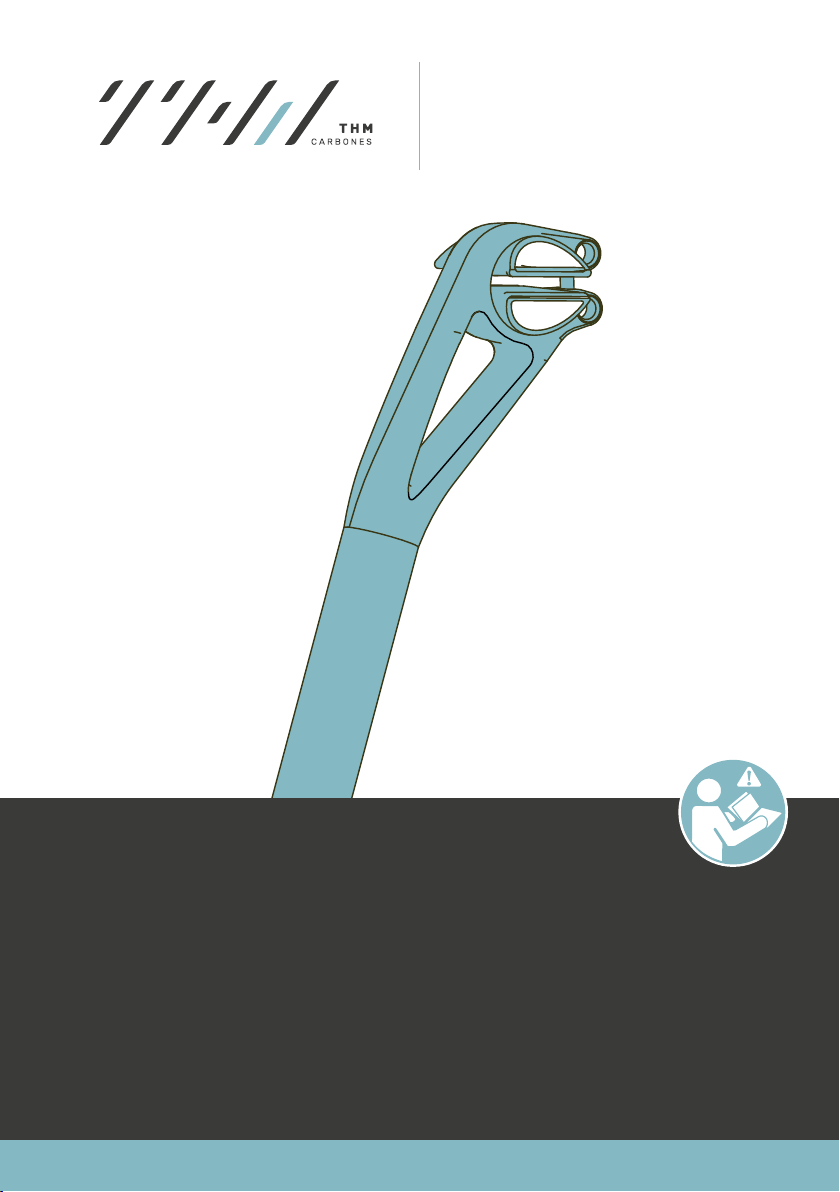
MANDIBULA SEATPOST
INSTRUCTION BOOK
THMMANDIBULA
thm.bike
8 7
A
B
23456 1
578 246 13
E
D
C
F F
D
B
A
E
C
0,150,10,050,05
over 30
to 120
over 6 to 30over 3 to 60,5 to 3
Tolerance class
ne
Dimensions are
in Millimeters
g
Drawing number:
Company:
THM GmbH
DRAWN
CHK'D
APPV'D
MFG
Q.A
ISO
2768-1f
2768-2H
Surface treatment:
Name
Signature
Date
Material:
DO NOT SCALE DRAWING
REVISION
Description:
Scale: 1:1
Page 1 of 1
A3
Weight:
18.04.2019
CHANGES
EDIT
01.01.2017

THMMANDIBULA 3
MANDIBULA SEATPOST
INSTRUCTION BOOK
WARNING
Please keep in mind that your THM component is a lightweight
construction manufactured from carbon – take this into account for
assembly/ maintenance work and when handling the product and
proceed with caution!
WARNING
Non-observance of the information contained in this manual could
result in an accident and death or serious injury.
INTRODUCTION
PREFACE
This manual is an integral part of your THM component and it provides
you with information regarding the safe operation of your THM-
Mandibula seatpost. Carefully read this manual prior to assembling your
THM components. Always read and observe all of the assembly and
maintenance instructions in this manual, as well as those provided in
the manuals of other manufacturers whose products are used on your
bicycle (Frames, seat clamp, saddles, etc.).
You will encounter the following symbols and references in this manual
The index nger instructs you to perform a particular action.
The arrow indicates the consequence of your action.
WARNING
This safety message indicates a hazardous situation which, if not
avoided, could result in death or serious injury.
CAUTION
This safety message indicates a hazardous situation which, if not
avoided, could result in minor or moderate injury.
NOTICE
This message warns of a risk of material damage.
INFO
This refers to additional information or tips.
Retain this manual for other users of your THM components. Make sure
that all users read, understand and observe this manual. If you ever sell
or give away your THM components, this manual should be transferred to
the new owner.
We hope you get a lot of joy from your THM components!
Your THM-Carbones Team
THMMANDIBULA 5
MANDIBULA SEATPOST
INSTRUCTION BOOK
SAFETY
INTENDED USE
WARNING
Any use diering from that intended could cause an accident and
result in death or serious injury.
The THM seatpost is approved for a total weight (bike+rider+luggage) up
to 110 kg (242 lbs.) and can be used on road, gravel, cyclocross and cross-
country MTB bikes. The seatpost must be used with seat tubes of 27,2 +0,2 mm
diameter or with a reducing sleeve (option).
The available lenghts of the THM seatpost are 350 mm and 400 mm.
RACKS & TRAILERS
The seatpost is not compatible with any kind of clamp-on rear racks or
trailers which attach to the seatpost. Installation of clampable rear racks
or trailers will void the warranty and may result in damage to the seatpost
and injury the rider.
WORK STAND
If you use a work stand that attaches onto your seatpost please only
clamp at the cylindric part of the seatpost. Use only very low clamping
force.
FUNDAMENTAL SAFETY PRECAUTIONS
Always remember that riding a bicycle involves potential danger for the
rider and other road users, as well as for the bicycle and its components.
For the time being we limit the service life of your THM seatpost to
100,000 km or 10 years. It is imperative you contact us before continuing
to use your THM Mandibula seatpost after one of these limits has expired!
You should therefore use your common sense and avoid any
unreasonable behavior!
ASSEMBLY & MAINTENENCE
WARNING
Risk of accident caused by assembly and maintenance work which
has not been conducted in a professional manner.
•Do not overestimate your technical ability. All assembly and
maintenance work should be performed by a specialist workshop
for bicycles. This is the only way to ensure the work is conducted in
a professional manner.
•Always observe all of the specifed tightening torques for the screw
connections.
•Only ever use original THM components which are available from
your specialist dealer or directly from THM.
•Never make any modifcations to your THM components.
•Check your THM components before each journey to ensure
the surfaces are completely undamaged. Send us your THM
components for inspection before further use if damage is visible
(cracks, fractures, deformations, deep scratches in the paintwork
which extend into the carbon structure, large abrasions, etc.) or if
you are in any doubt about their functionality.
•Always ensure your bicycle is maintained in a fawless condition.
Care and maintenance will prolong the service life of your bicycle
and its components and also improve your personal safety.

THMMANDIBULA 7
MANDIBULA SEATPOST
INSTRUCTION BOOK
ON THE ROAD
Risk ofaccident caused bywrong riding behaviour or improper equipment.
•Always ride with foresight, attention and a readiness to brake.
• Adjust your speed to the prevailing conditions (trac, weather, visibility, etc.).
• Do not use your THM-Mandibula seatpost at ambient temperatures
below -10°C (14 °F).
•Do not exceed the maximum riderweightforwhich yourTHM component
have been approved. See Dimensions with “INTENDED USE” on page 5.
• Do not perform jumps with your bicycle as this generates an enormous
amount of force.
• Always comply with the trac regulations that are in force in the
country where you are using your bicycle.
•When riding your bicycle you should always wear a high quality cycling
helmet (e.g. ANSI certied) that is in excellent condition. Your clothing
should be close-tting but not restrictive.
•Only ride your bicycle if you are in good physical condition and your
bicycle and all of its components are operating in a awless manner.
• If you are involved in a heavy fall you should not continue to ride your
bicycle. If such a case occurs, send us your THM components for
inspection, even if no external damage is visible. In your own interest
you should treat all of the components on your bicycle which have been
produced by other manufacturers in the same manner.
TRANSPORT AND STORAGE
WARNING
RISK OF ACCIDENT CAUSED BY DAMAGED BYCICLE COMPONENTS.
Always transport your bicycle in an appropriate and careful
manner.
•Do not store your THM components at an ambient temperature
below -15°C (5°F) or above 55°C (131°F).
RISK OF ACCIDENT.
•Do not allow children to play with your bicycle.

4
578 246 13
THMMANDIBULA 9
MANDIBULA SEATPOST
INSTRUCTION BOOK
TECHNICAL SPECIFICATIONS
The seatpost is available in two lengths and can be used with round and
oval saddle rails.
SCOPE OF DELIVERY
N°. DESCRIPTION SADDLE
RAILTYPE
1 Seatpost -
2 Lower half shell
with small slots
(green label)
All
3 Upper half shell
with medium
slots (red label)
Ø7 mm
round
4 Upper half shell
with deep slots
for oval rails
(red label)
7X 9 mm
oval
5 Upper M6
clamping bolt
-
6 Lower D6
clamping bolt
-
7 Washer -
8 Titanium M6
screw
-
9 Carbon paste -
DIMENSIONS
A [mm] Length*350 400
B [mm] Ø seatpost diameter*± 0,2 27,2
C [mm] Max. insert depth in the Frame*250 300
D [mm] Setback*25
E [mm] Min. insert depth in the Frame or adaptor** 100
[g] Weight*± 5 % 159 172
[kg] Total weight, max. =
rider + bicycle + luggage 110
* Technical specications, dimensions and weights are to be understood
with the corresponding tolerances and can dier slightly from your THM
components.
** Some frames require additional insert depth to ensure that the seat tube is
overlapped by the seatpost for a certain length. Often frame manufacturers
require that the base of the seatpost should be under the top tube. Please
check this before sitting on the saddle of your bike. If you use an adaptor it
should be 100 mm long.
(Figure 1)
(Figure 2)
(Table 1)
(Table 2)
A
C
E
BD
2
1
3
4
8
76
5

THMMANDIBULA 11
MANDIBULA SEATPOST
INSTRUCTION BOOK
ASSEMBLY
MANDIBULA ASSEMBLY
INSTALLATION OF THE SADDLE TO THE MANDIBULA
CAUTION
•When installing the saddle onto the seatpost it can come to a
crushing hazard for your ngers.
•do not use friction enhancer or carbon paste between the half
shells and the seatpost.
INFO
For easier installation install rst the saddle onto the seatpost and
then onto your bicycle.
TIGHTENING TORQUES
COMPONENT (N°.) MAX. TORQUE IN
N·M (LBF ·IN) SURFACE TREATMENT
Seatpost (1)/ frame*** 5 (45) Carbon paste
Titanium M6 screw (8) 8 (71) dry
Half-shells (2,3,4) 8 (71) dry
*** Recommended torques in this instruction book are specic for the THM
Mandibula seatpost. Please check the manual of the mating component
(frame, seat clamp) for the recommended torque. Always use the lower
torque recommendation!
WARNING
Risk of accident caused by a malfunctioning seatpost due to loosen
screw connections. Check the required tightening torque of all screw
connections after the rst 100 km Re-tighten the connections if
necessary. Repeat this check at least every 2500km!
(Table 3)

4
or
3
WORKBENCH
WORKBENCH
THMMANDIBULA 13
MANDIBULA SEATPOST
INSTRUCTION BOOK
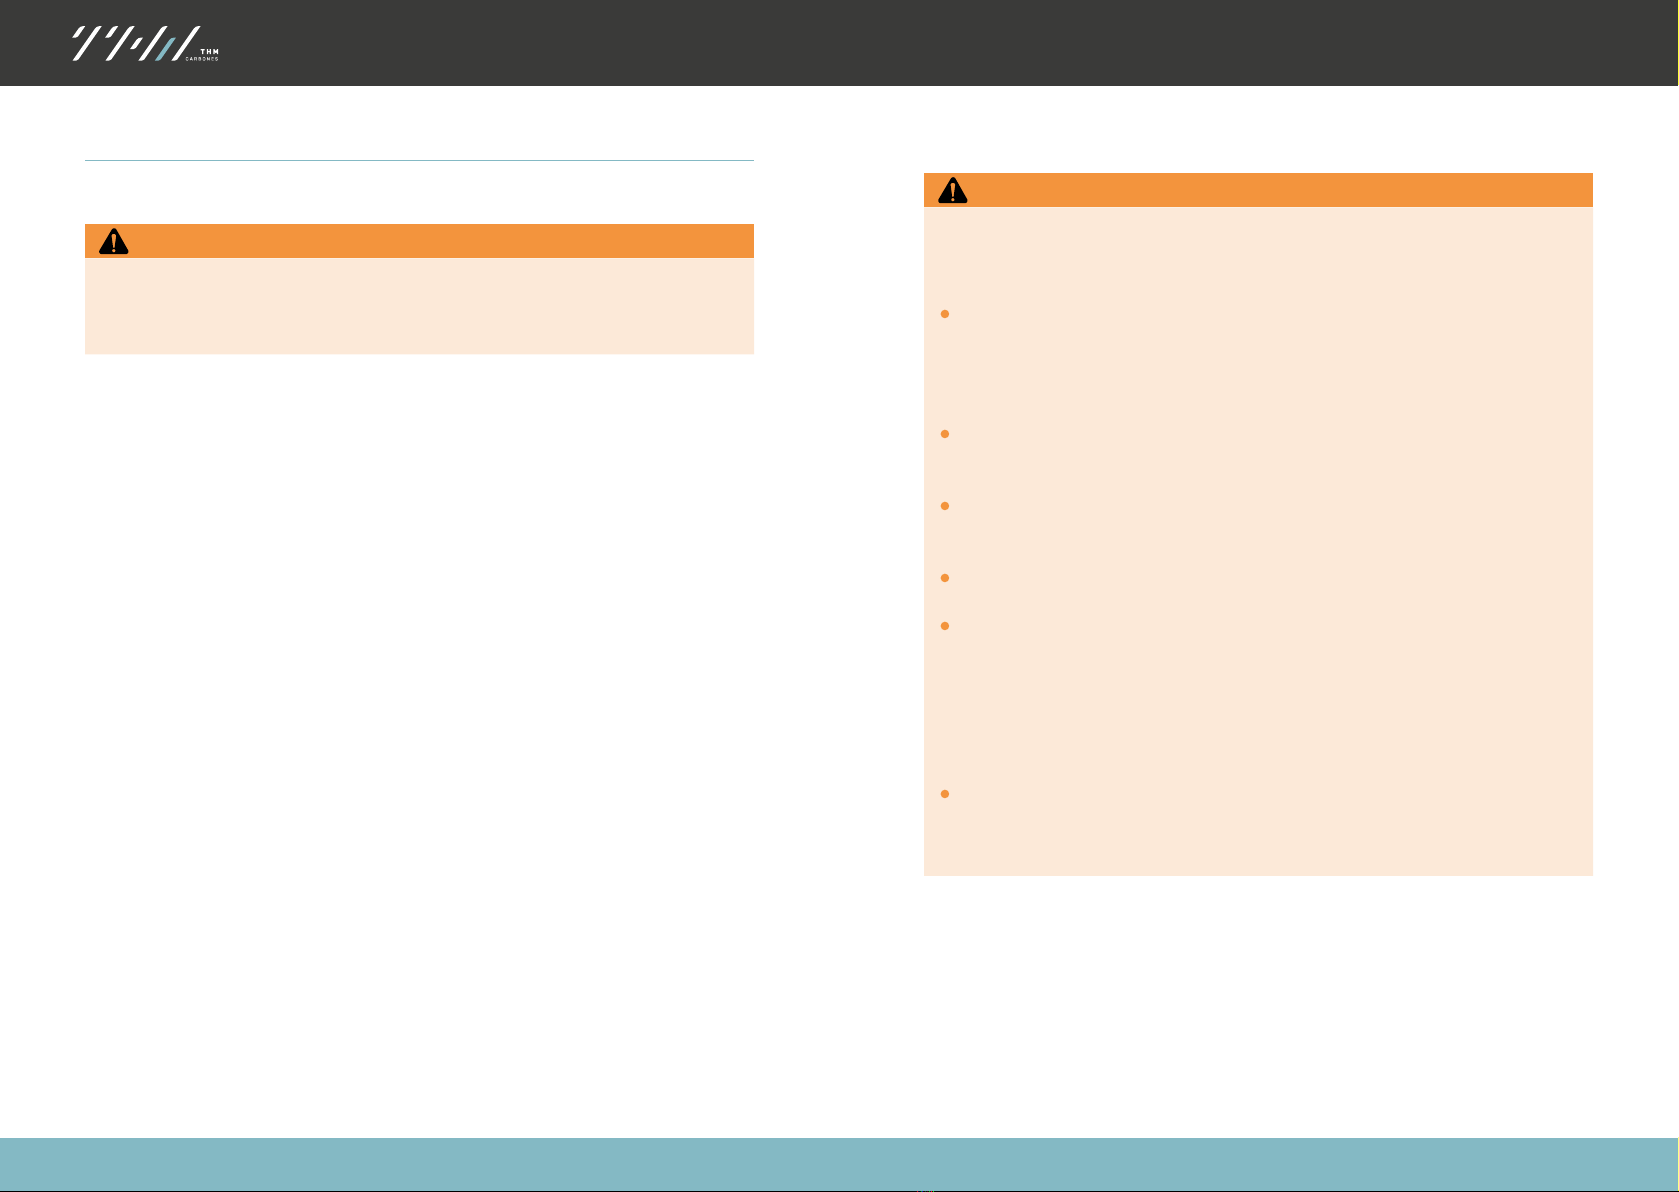
(Figure 3)
Turn the screw (8) contraclockwise with a T20 Torx Fig. 3 until
between the D6 clamping bolt (6) and the washer appears a gap of
5 mm.
Now ip the seatpost around so that the head is facing to the ground.
Insert the upper half shell (medium (3) or deep slotted (4) half shell
depends on the rail type of your saddle) and hold the seatpost
vertical with one of your hands in place.
(Figure 4)
Use your second hand to x the saddle on a surface (Workbench)
and insert one of the rails into the slot of the half shell. The second
rail is inserted by moving the seatpost into vertical position and
moving parallel the upper (slotted, 3 or 4) half shell axial. (it is often
helpful to start at the rear end of the saddle rails.).
(Figure 5) Mandibula rear view
Rotating the Mandibula to vertical
position
Axial movement of the slotted half shell
(3 or 4) between the saddle rails
(Figure 6) Mandibula rear view
2
1
1
2
4
or
3
4
or
34
8
5 mm

aa
THMMANDIBULA 15
MANDIBULA SEATPOST
INSTRUCTION BOOK
1 ONE HAND ACTION:
FOR EASIER INSTALLATION
• Hold the seatpost with one
hand and push the screw
head with your thumb to open
up the clamping
2
8
2
32WITH YOUR SECOND HAND
• Push axial the at half shell
between the saddle rails
3WITH YOUR SECOND HAND
•Pull the at half shell upwards
with your forenger
(Figure 7) Mandibula rear view
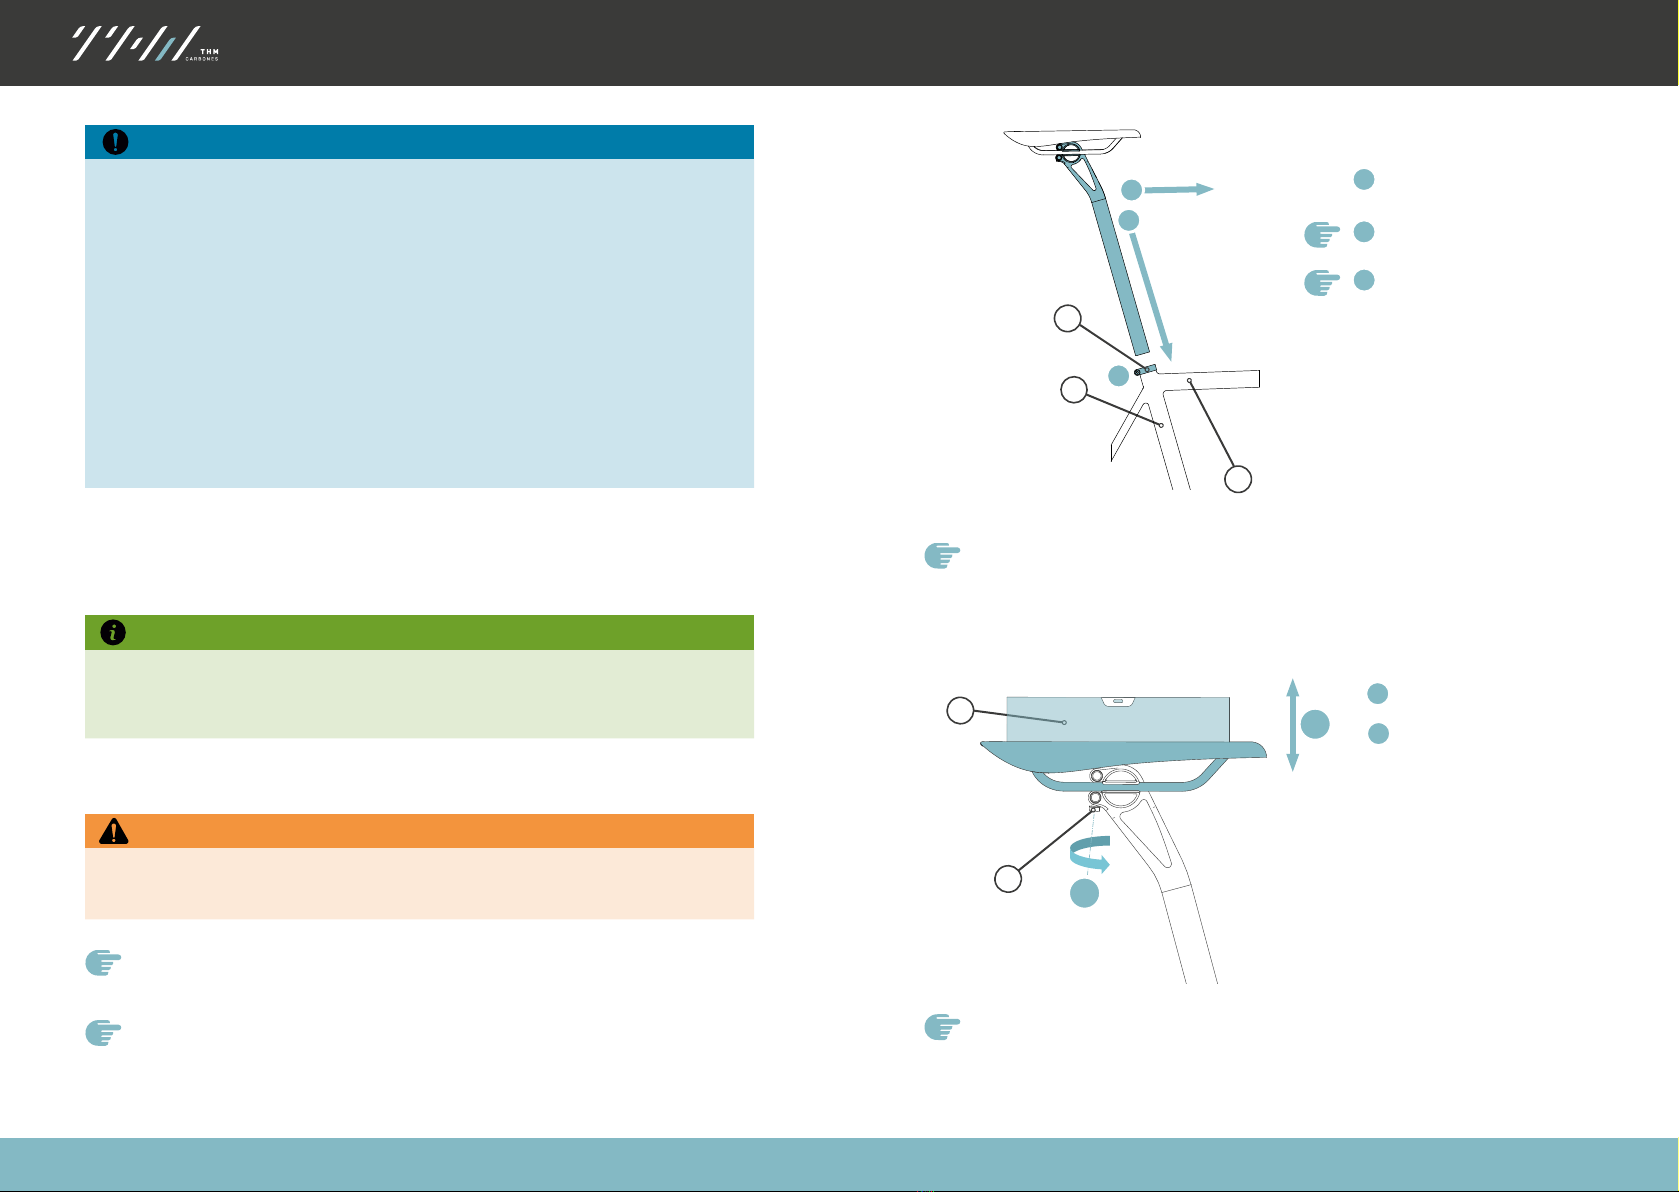
CENTREING THE SADDLE
After pushing in the at half shell your seatpost saddle groupe is
mounted. The next step is to center the half shells in the Mandibula
clamping. The half shells should sit symmetrically in the seatpost.
On both sides should be the same distance “a”.
If this is not the case you have to hold with one hand the saddle and
the half shells on the workbench.
With your second hand you can rotate the seatpost around the half
shells and push it axial to adjust the distance “a”.
INFO
If it is hard to rotate the seatpost around the half shells (2, 3 or 4) you
can press slightly with your thumb on the loosend screw (8) to open
the clamping therefore the axial movement is easier.
(Figure 8) Mandibula rear view
If the half shells are aligned go ahead and tighten the clamping screw
slightly (approx. 2 N•m or 18 Ibf•in).
INSTALLATION OF THE DI2 BATTERY
•In the case that you want to install a Di2 batterie into the seatpost THM
recommends to use a adaptor from PRO (part number: FAPRAC0094).
INSTALLATION INTO THE FRAME
CAUTION
•Sharp edges and burrs can damage the structure of the seatpost
and can result in a fail.
•Do not apply any kind of lubricants or grease to the seatpost
surfaces or the seat tube of your frame.
1
2
4
or
3
8
AXIAL MOVEMENT
OF THE SEATPOST
WORKBENCH
WORKBENCH
10
11
12
13
8
1
2
3
THMMANDIBULA 17
MANDIBULA SEATPOST
INSTRUCTION BOOK
NOTICE
Please do not cut or grind the seatpost at any time.
Make sure to remove all sharp edges and burrs over the whole insert
depth inside the seat tube or the reducing sleeve (optional). If you
have to rework the seat tube use a reamer.
The inner diameter of the seat tube should be around 0.05 – 0.1 mm
bigger than the seatpost diameter.
The seatpost should slide easily into the seat tube. When sliding in it
should not rattle around the seat tube. There should be a little bit of
resistance when sliding in the seatpost.
Please check the manual of the mating component (frame,
seatclamp) for the recommended torque. Always use the lower torque
recommendation!
PRE-WORK ON THE FRAME
Before assembling the seatpost into your frame degrease the seat tube.
(for example, with brake degreaser).
INFO
Apply carbon paste on the cylindric (Ø 27.2 mm) part of the seatpost
and into the seat tube of the frame.
INSERTING THE SEATPOST WITH SADDLE
Loosen the seat clamp (10) screw fully. Slide the assembled group
(seatpost and saddle) into the seat tube (11) at your roughly desired
height. The saddle should be lined up with the top tube (12).
Now tighten the seat-clamp at max. 5 N•m (45 Ibf •in).
Apply carbon paste and slide
in the seatpost with just some
resistance.
Tighten the seat clamp screw up
to max. 5 N•m (45 Ibf•in).
(Figure 9) side view
WARNING
The minimum insert depth is 100 mm for the THM Mandibula seatpost.
ADJUSTING THE SADDLE ANGLE
Loosen the saddle clamping screw (8) fully before adjusting the
saddle angle. THM recommends to use a bubble level (13) to check
if the saddle is horizontal. If you prefer another angle adjust it to
your preferences. Tighten the T20 Torx screw with max. 8 N•m (71
lbf•in).
(Figure 10) side view
After tightening the saddle clamp, you have to settle the half shells.
You can do it by pushing down (around 7 kg) on the saddle front until
it makes a click sound. Afterwards you have to retighten the saddle
clamp screw with max. 8 N•m (71 lbf•in).
8 N•m (71 Ibf•in)T
2
horizontal
1
2
1
Ride direction
1
2
3
8
10
Point of no-return
1
2
1
1
THMMANDIBULA 19
MANDIBULA SEATPOST
INSTRUCTION BOOK
(Figure 11) side view
INFO
When settling the half shells the saddle may rotates around 0.5 - 1
degrees.
CAUTION
•Check if the saddle is properly clamped before getting on your
bike. If you can rotate the saddle do note.
Ride and contact your dealer or THM.
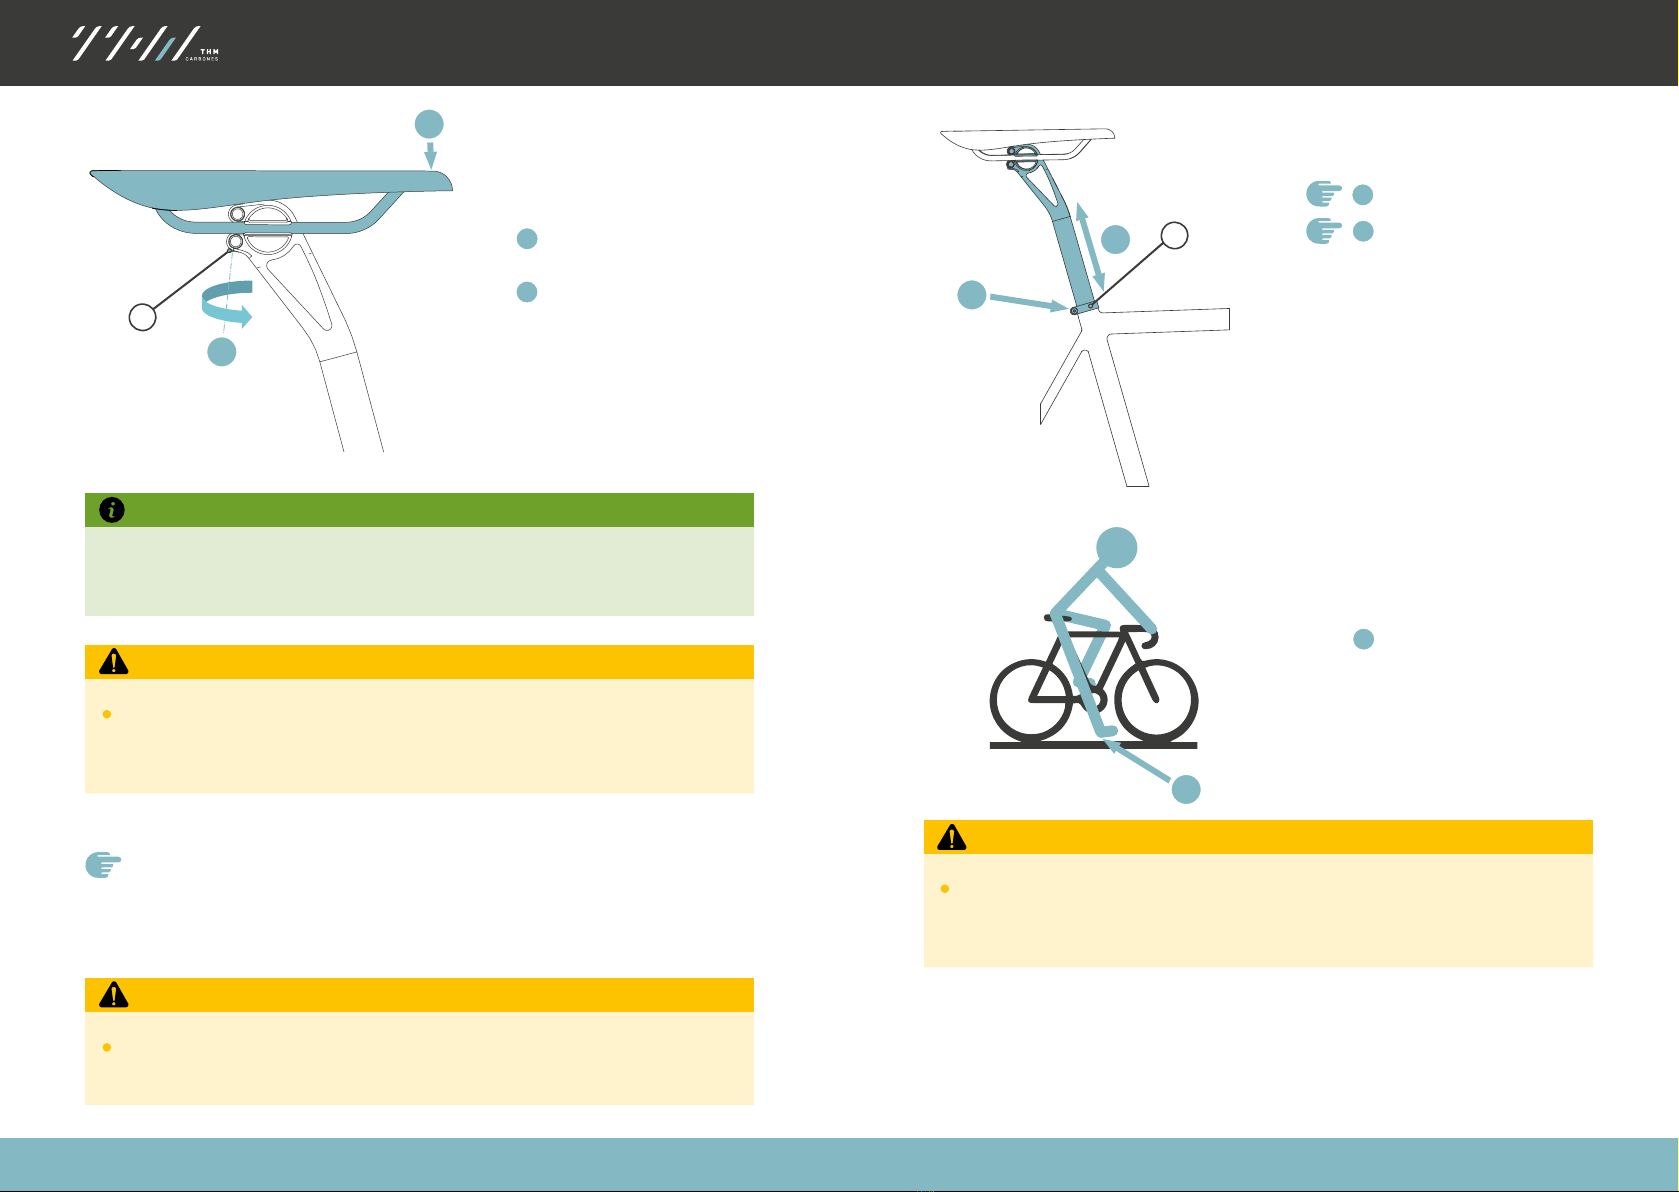
ADJUSTING THE SADDLE HEIGHT
To adjust your saddle height to your preference. THM recommends
to sit on the bike with your cycling shoes and bib shorts on. Now put
one of your heels on the pedal and turn the crankarm to the point
of no-return (this point varies between 5 and 6 o ‘clock). Your leg
should be slightly stretched in this position.
Adjust the saddle height.
Tighten nally the seat clamp (10)
screw up to max. 5 N•m(45 Ibf•in).
(Figure 12) side view
CAUTION
•The rider should lean against a wall or another person should hold
the bike. This prevents the rider from falling o the bike.
1
2
CAUTION
• After mounting and adjusting your THM Mandibula seatpost check
the seat clamp and the saddle clamping for the correct tightening
toques.
push down
8 N•m (71 Ibf•in)T
1
2
1
2

THMMANDIBULA 21
MANDIBULA SEATPOST
INSTRUCTION BOOK
MAINTENANCE
IMPORTANT MAINTENANCE INFORMATION
WARNING
If not properly performed, assembly and maintenance work could
cause accidents resulting in death or serious injury.
•Do not overestimate your technical ability. All assembly and
maintenance work should be performed by a specialist workshop
for bicycles. This is the only way to ensure the work is conducted in
a professional manner. bicycles. This is the only way to ensure the
work is conducted in a professional manner.
Improperly performed assembly and maintenance work could also
result in a loss of your warranty rights (liability for defects)! Risk of
accident caused by damaged components.
WARNING
•Never attempt to disassemble your THM-Mandibula seatpost - only
THM employees are authorised to do this.
•Always read and observe all of the assembly and maintenance
instructions in this manual, as well as those provided in the manuals
of other manufacturers whose products are used on your bicycle
(frame, saddle, seat clamp, etc.).
•Always observe the minimum and maximum values specied – see
Technical specications, from page 8 to 11.
•When conducting assembly steps that require a specic tightening
torque, always use an appropriate torque wrench that is designed
for the tightening torque specied.
•Only ever use original THM components which are available from
your specialist dealer or directly from THM.
Always ensure your bicycle is maintained in a awless condition. Care
and maintenance will prolong the service life of your bicycle and its
components and also improve your personal safety!
If you suspect that your bicycle is defective or is not functioning properly,
stop using it and contact a specialist bicycle workshop immediately!
NOTICE
Never use a high-pressure cleaner or steam cleaner to clean your
bicycle, as the seals of your bicycle components are not able to
withstand the pressure. If such cleaners are used, it would result in
corrosion and material damage.
Never use caustic solvents (such as paint thinners, acetone, nitro
compounds, etc.) as they can attack the surface of your THM
components.
Only use commercially available paint care products and water to
clean your THM components.
Spirit or petrol should be used carefully - when using such products
avoid excessive wiping and prolonged exposure times.

THMMANDIBULA 23
MANDIBULA SEATPOST
INSTRUCTION BOOK
DISPOSAL
If THM components are defective or no longer in use, you can dispose
them with your non-recyclable waste or domestic refuse, or ask a local
waste disposal company for other disposal methods (e.g. recycling).
Only if you are citizen of the EU please sent us the defective THM
component back and we will take care of the professional waste disposal.
BEFORE EVERY JOURNEY
WARNING
Risk of accident caused by material damage or improper assembly.
•Check to ensure the quick release elements and your wheels have
been rmly and correctly secured.
•Check your seatpost to make sure they are undamaged and
functioning properly every time you use your bike. Send us your
THM-Mandibula seatpost before further use if damage is visible
(cracks, fractures, deformations, etc.) or if you are in any doubt
about their functionality.
• Check your THM components before each journey to ensure the
surfaces are completelyundamaged. Send us yourTHM components
for inspection before further use if damage is visible
(deep scratches in the paintwork which extend into the carbon
structure, large abrasions, etc.) or if you are in any doubt about their
functionality.
•Do not exceed the max. total weight for which your THM components
have been approved – see Dimensions, page 9.
REGULAR MAINTENANCE
The maintenance intervals required for your bicycle depend on how often
and in which weather conditions it is used.
The following maintenance measures should be conducted more
frequently if the bicycle is used in extreme conditions (rain, dirt, long
distances, etc.).
When conducting regularmaintenance procedures make sureyourbicycle
is always clean and well protected by lubricants and cleaning agents. Ask
your specialist dealer about appropriate lubricants and cleaning agents
as well as information relating to their correct application.
WARNING
Risk of accident caused by a malfunctioning seatpost and saddle
system due to loose screw connections.
•Check the required tightening torque of all screw connections after
the rst 100 km.
•Retighten the connections if necessary. Repeat this check every
2500km!
Risk of accident caused by malfunctioning brakes.
•After conducting any cleaning, maintenance or repair work make
sure that the braking rims of you wheels are free from lubricants
(such as grease, oil, silicon, Tefon, wax or other similar).
THMMANDIBULA 25
MANDIBULA SEATPOST
INSTRUCTION BOOK
NOTICE
If you are using a hose, handle it with care - never aim the hose
directly at the bearing components (Figure A).
Clean your THM-components at regular intervals by using water and
a non-abrasive, environmentally friendly cleaning agent.
When cleaning your THM components always check for signs of
damage (dents, cracks, scratches, large abrasions, worn areas, etc.).
Periodically preserve the surface of your THM components using a
high quality protecting wax or other similar agent.
(Figure A)
WARRANTY
MATERIALS DEFECT LIABILTY
We provide a 24-month warranty for all THM products which covers
material and processing defects.
During this period all products accepted to be defective are replaced at
no cost to the user.
The liability period starts at the time the relevant THM product was
purchased. Liability does not extend to any kind of damage caused by
accidents, modifcations, negligence or improper handling and use.
Liability shall expire if repair work or any other work on the THM product
has been conducted by unauthorised persons.
The same shall also apply to any direct or indirect damage resulting from
an action described in the preceding sentence.
INFO
Please contact us before returning a defective THM product!
If products are returned without our previous agreement,
the shipping costs incurred will be charged to your account!
WARRANTY
Minor damage to your THM products will be repaired by our workshop free
of charge even after expiration of the 24-month liability period, provided
that the work required does not exceed 0.5 hrs.
The decision regarding whether or not a repair is to be carried out free of
charge rests solely with us.
If the damage has been self-incted, there is no entitlement to free
repair work!
In the event of self-incted damage please send us the product concerned
for inspection. We will then assess the level of work required and either
perform the repair free of charge or send you a
quotation. It is then up to you to decide whether or not to go ahead with
the repair work.

THMMANDIBULA 27
MANDIBULA SEATPOST
INSTRUCTION BOOK
When returning a damaged product to us please ensure adequate
postage costs are provided.
Any shipment which is not prepaid will be rejected and returned to the
sender! In the event of irreparable damage (e.g. caused by an accident)
we will apply our crash replacement policy, providing a discount for the
purchase of a THM component as replacement.
The relevant claim must be forwarded directly to THM Faserverbund-
Technologie GmbH.The irreparable product shall then remain our property.
The company THM Faserverbund-Technologie GmbH is constantly
striving to improve product designs as technical developments continue.
We therefore reserve the right to make alterations which must not
correspond to the text and illustration contained in this manual, and
without incurring obligation to alter any products previously delivered.
Technical specications, dimensions and weights are to be understood
with the corresponding allowances. Reproduction or translation of this
publication, in whole or in part, is not permitted without the written
consent of the company THM Faserverbund-Technologie GmbH. All
rights under the provisions of the copyright act are reserved.

THM Faserverbund-Technologie GmbH
Am Sportplatz 3
D-24791 Alt Duvenstedt
www.thm.bike
thm.bike
THM_MANDIBULA_1_EN_2019-05
MANDIBULA SEATPOST
INSTRUCTION BOOK
8 7
A
B
23456 1
578 246 13
E
D
C
F F
D
B
A
E
C
0,150,10,050,05
over 30
to 120
over 6 to 30over 3 to 60,5 to 3
Tolerance class
ne
Dimensions are
in Millimeters
g
Drawing number:
Company:
THM GmbH
DRAWN
CHK'D
APPV'D
MFG
Q.A
ISO
2768-1f
2768-2H
Surface treatment:
Name
Signature
Date
Material:
DO NOT SCALE DRAWING
REVISION
Description:
Scale: 1:1
Page 1 of 1
A3
Weight:
18.04.2019
CHANGES
EDIT
01.01.2017
Table of contents
Other THM Bicycle Accessories manuals


Popular Bicycle Accessories manuals by other brands


Specialized
Specialized Elite CylcoComputer user manual

Sigma
Sigma BC 16.16 manual

Playcore
Playcore Dero Setbacks installation instructions

VDO Cyclecomputing
VDO Cyclecomputing x3dw instruction manual

Cateye
Cateye RAPID X2 manual

buratti meccanica
buratti meccanica Clorofilla Trail Use and maintenance manual


