thomann Harley Benton CST-24 User manual

Electric Guitar Kit CST-24
Electric Guitar Kit
User Manual

Thomann GmbH
Hans-Thomann-Straße 1
96138 Burgebrach
Germany
Telephone: +49 (0) 9546 9223-0
Internet: www.thomann.de
01.09.2022, ID: 464643 (V2)

Table of contents
1 Safety instructions................................................................................................................. 5
2 Scope of delivery..................................................................................................................... 6
3 Assembly instructions.......................................................................................................... 7
3.1 Painting body and neck................................................................................................ 7
3.2 Mounting the machine head...................................................................................... 8
3.3 Mounting the guitar neck.......................................................................................... 10
3.4 Wiring pots, pick-ups and switch............................................................................ 11
3.5 Mounting tailpiece and strap pins.......................................................................... 20
3.6 Strings, neck relief and string action...................................................................... 21
4 Protecting the environment........................................................................................... 26
Table of contents
Electric Guitar Kit CST-24 3
Electric Guitar Kit

4Electric Guitar Kit CST-24
Electric Guitar Kit

1 Safety instructions
DANGER!
Danger for children
Ensure that plastic bags, packaging, etc. are properly disposed of and
are not in the reach of babies and young children. Choking hazard!
Ensure that children do not detach any small parts (e.g. knobs or the
like) from the product. They could swallow the pieces and choke!
Never let children play unattended with the product.
CAUTION!
Risk of injury to the hands
When assembling and screwing the individual parts, pay attention to
sharp edges on tools, screws and components.
Safety instructions
Electric Guitar Kit CST-24 5
Electric Guitar Kit

2 Scope of delivery
Thank you for buying this guitar assembly kit. All wooden parts, hardware and elec‐
trical components are contained in this package.
The picture below shows the individual items included in the delivery.
The assembly is described in detail in the following sections.
Scope of delivery
6Electric Guitar Kit CST-24
Electric Guitar Kit

3 Assembly instructions
Provide the following tools and materials for the assembly of the guitar:
nPhillips screwdriver
nRubber mallet
nRing wrench
nPliers / wire cutter
nVarnish and accessories
nSandpaper
Body and neck should by all means be painted before assembly.
When applying spray lacquer or paint, you must wear a dust mask.
3.1 Painting body and neck
The solid wood of the guitar body is sealed and prepared for various types of lacquer
coating. A wide variety of nishes can be procured from DIY, timber and automotive
outlets in aerosol cans making nishing straightforward without requiring specialist
skills.
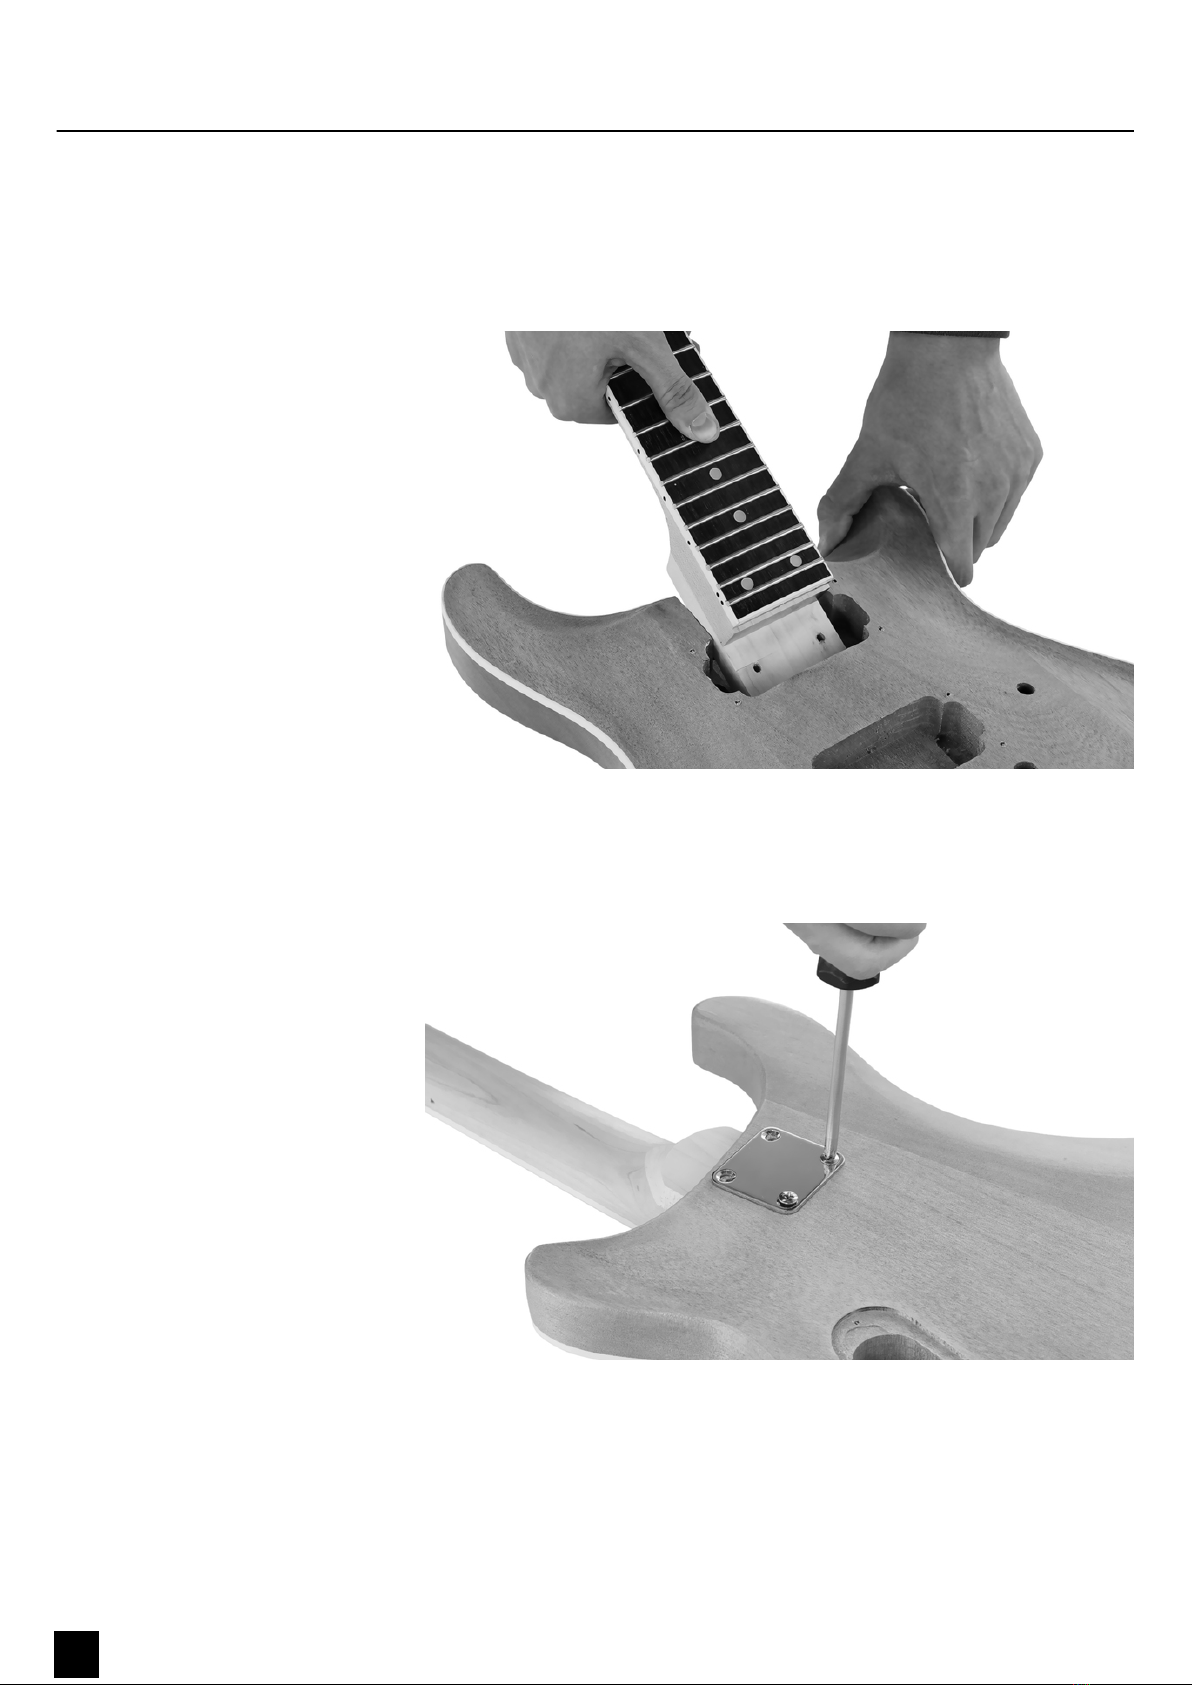
The rst step is to check the t of the body to the neck joint. These components are
machined from high-grade tonewoods to ensure optimum alignment. Since wood is
a natural material, however, its shape changes slightly over time. If the t is too tight,
you can adjust it using a sharp chisel or sandpaper. Please remember that the addi‐
tional lacquer coat will make the neck t a little more tightly into the cutout.
Before coating the body, ensure that all surfaces are clean and free of dirt and dust.
Carry out all painting operations in a well-ventilated, dust-free environment. Consid‐
ered and careful working is a key factor for a qualitatively satisfactory result. It is
highly recommended that you rst try out the colour and technique on another
piece of wood.
Paint the body edges rst and let them dry. If the edges are dry, go on with front and
back side. By layered, successive application you can achieve a uniform coating struc‐
ture. If you notice surface irregularities, wait until the paint has dried completely and
correct them with ne sandpaper (e.g. 800+) before proceeding to paint. For full cov‐
erage apply three or more layers.
Wait another two to three days to dry until the paint is fully cured. Polish or burnish
the body until it meets your expectations. Take care not to bu too vigorously as this
may remove the nish.
Useful tools and materials
Painting the body
Assembly instructions
Electric Guitar Kit CST-24 7
Electric Guitar Kit

The guitar neck is sealed with a thin layer of matt lacquer before delivery and is ready
to use. If you still want to treat the neck with coloured or clear lacquer, proceed as
follows.
Carefully mask o the ngerboard and all frets before painting. Make sure that all sur‐
faces are free of dust and dirt. Carry out all painting operations in a well-ventilated,
dust-free environment.
For the neck, use a clear or slightly tinted wood paint of good quality. Start on the
front and at the edges of the headstock. Apply a thin layer evenly, let it dry and
repeat the process two or three times. If you notice surface irregularities, wait until
the paint has dried completely and correct them with ne sandpaper (e.g. 800+)
before proceeding to paint.
Once the headstock has dried, place the neck on the ngerboard and paint the back
of the neck as described.
Wait another two to three days to dry until the paint is fully cured. Polish or burnish
the neck until it meets your expectations. Take care not to bu too vigorously as this
may remove the nish.
3.2 Mounting the machine head
Insert the four machine heads from the rear side of the headstock into the bores.
Align the machine heads so that the tuning pegs are perpendicular to the top of the
headstock.
Fix the machine heads as shown in the gure in this position hand-tight with the sup‐
plied screws.
Neck nish
Assembly instructions
8Electric Guitar Kit CST-24
Electric Guitar Kit

Turn the neck and fasten all the machine heads nger-tight to the front of the head‐
stock with the washers and nuts provided.
Tighten the nuts on the front with an appropriate spanner, then tighten the screws
on the back rmly to fasten the tuners.
Assembly instructions
Electric Guitar Kit CST-24 9
Electric Guitar Kit

3.3 Mounting the guitar neck
Place the body on a suitable working surface. Use a soft pad in order to avoid
damage to the surface. Insert the neck into the neck cutout. If necessary, use a sharp
chisel or sandpaper to adjust it. Be very careful when removing material. The neck
should be tight and never have too much clearance in the cutout!
Turn the guitar over, position the mounting plate over the four screw holes on the
back of the body and screw the two supplied long screws through the upper holes
and the two supplied short screws through the lower holes in the mounting plate
into the body and neck until the connection is rm.
Assembly instructions
10 Electric Guitar Kit CST-24
Electric Guitar Kit

3.4 Wiring pots, pick-ups and switch
The pickups, potentiometer and jack socket are wired using connectors.
Thread the cable for the string earthing (after stripping the insulation, and without
the connector) through the channel from the opening in the back into the hole to
fasten the tailpiece.
Pull the cable far enough out of the hole that there will be sucient contact with the
metallic surface when the tailpiece is installed. Earthing the strings reduces noise
(humming).
Assembly instructions
Electric Guitar Kit CST-24 11
Electric Guitar Kit

Using a rubber mallet, hammer the mounting bolts of the tailpiece into the body as
shown. Make sure there is sucient contact between the stripped end of the
grounding cable and the tailpiece bolt.
Assembly instructions
12 Electric Guitar Kit CST-24
Electric Guitar Kit

Screw the tailpiece mounting bolts into the bracket.
Lead the output socket from the back of the body through the hole provided on the
body edge.
Assembly instructions
Electric Guitar Kit CST-24 13
Electric Guitar Kit

Insert the switch into the recess provided at the back.
Insert the pots into the back slots as shown in the following illustrations.
Assembly instructions
14 Electric Guitar Kit CST-24
Electric Guitar Kit

Turn the guitar over and x the pots and switch with the supplied washers and nuts
on the front of the body.
Assembly instructions
Electric Guitar Kit CST-24 15
Electric Guitar Kit

Press the pot knobs on the pins of the two pots.
Insert the holder for the output socket and check the projection of the socket. This
must protrude so far over the bracket to the outside that it can be suciently tight‐
ened with the supplied nut and then only slightly protrudes. If necessary, correct the
protrusion by turning the counter nut inside accordingly.
Assembly instructions
16 Electric Guitar Kit CST-24
Electric Guitar Kit

Then screw the holder of the output socket to the body with the screws provided.
Lead the pick-up cables through the channels from the front recesses into the rear
slot. The neck pickup is somewhat atter and is inserted into the opening nearer the
neck of the guitar. Insert the somewhat taller bridge pickup into the opening closer
to the bridge.
Assembly instructions
Electric Guitar Kit CST-24 17
Electric Guitar Kit

Turn the guitar over and attach the pick-ups to the front recesses with the supplied
screws.
Turn the guitar over and connect the pick-up connectors to the pots.
Assembly instructions
18 Electric Guitar Kit CST-24
Electric Guitar Kit

Then screw the plastic plate to cover the recess for the pots and the switch with the
screws provided in the pre-drilled holes on the back of the body.
Assembly instructions
Electric Guitar Kit CST-24 19
Electric Guitar Kit

3.5 Mounting tailpiece and strap pins
Screw the strap pins into the pre-drilled holes in the body as shown using the sup‐
plied screws.
Assembly instructions
20 Electric Guitar Kit CST-24
Electric Guitar Kit
Other manuals for Harley Benton CST-24
1
Table of contents
Other thomann Accessories For Musical Instruments manuals
Popular Accessories For Musical Instruments manuals by other brands

Fishman
Fishman FLUENCE TIM HENSON SIGNATURE Series installation guide

Auralex Acoustics
Auralex Acoustics Max-Wall manual

LEWISMIDI
LEWISMIDI CZ Patch Library quick start

Hipshot
Hipshot Universal Mounting Plate quick start guide

James May Engineering
James May Engineering Ultra Tonic installation instructions

Solo Music Gear
Solo Music Gear JEK-10 Assembly manual