manuals.online logo
Brands
  1. Home
  2. •
  3. Brands
  4. •
  5. Thomashilfen
  6. •
  7. Stroller
  8. •
  9. Thomashilfen SWIFTY User manual

Thomashilfen SWIFTY User manual

Smanjivač sjedala
Uputa za montažu – Pribora
Wkładka redukcyjna
Instrukcja montażu – Osprzęt
Istuimen pienennys
Asennusohje – Lisätarvike
Sædeformindsker
Montage-vejledning – Tilbehør
Sitsförminskare
Monteringsanvisning – Tillbehör
Seteforminsker
Monteringsanvisning – Tilbehør
Stoelverkleining
Montage handleiding – Accessoires
Riduttore di seduta
Istruzioni di montaggio – Accessori
Redutor do assento
Instruções de montagem – Acessórios
Reductor de asiento
Instrucciones de montaje – Accesorios
Réducteur de siège
Notice de montage – Accessoires
Seat minimizer
Assembly instructions – Accessory
Sitzverkleinerer
Montageanleitung – Zubehör
Swifty
2
2
1
Sitzverkleinerer Art.-Nr.: 6834
Der Sitzverkleinerer besteht aus 4 Teilen: Kopfpolster, Thoraxunterstützung, Sitzpolster und
Fußstützenauflage. Es wird mit der Anbringung der Thoraxunterstützung begonnen.
Thoraxunterstützung: Die Thoraxunterstützung auf der Rückenlehne positionieren. Das
untere Polsterteil muss auf der Sitzfläche liegen. Nun die 2 Gurte rechts und links an den
Klemmschnallen an der unteren Rückseite der Rückenplatte festklemmen. (Abb. 1)
Kopfpolster: Zunächst die Gurte der Oberkörperbegurtung von oben durch die Schlaufen
des Kopfpolsters führen. Dann das Kopfpolster positionieren und am oberen Polsterteil der
Thoraxunterstützung festkletten. (Abb. 2)
Sitzpolster: Schutz vom Klettband (Haken) auf der Polsterunterseite entfernen. Das Sitzpolster
auf den Sitz legen und am unteren Polsterteil der Thoraxunterstützung festkletten. (Abb. 3) Das
Klettband (Haken) darf nicht auf dem Abstandsgewirk des Swifty-Polsters aufliegen, da dies
sonst beschädigt werden kann.
Fußstützenpolster: Das Fußstützenpolster auf die Fußstütze legen und die beiden Gurte unter
dem Fußstützenblech zusammenkletten. (Abb. 4)
Hinweis: Eine gleichzeitige Verwendung von Swifty-Zubehörteilen wie Thoraxpelotten,
Sitzhose, Sitzweste, Beckengurt und Fußriemen ist nicht bzw nur eingeschränkt möglich.
Achtung: Nehmen Sie VOR dem Falten des Buggys immer das Sitzpolster heraus.
4
3
3
Seat minimizer Item code: 6834
The seat minimizer comprises 4 pieces: Head pillow, lateral trunk support, seat cushion, and
footrest pad. First, the lateral trunk support is attached to the seat.
Trunk support: Position the trunk support on the backrest. The bottom part of the pad must rest
on the seat surface. Now, fasten both belts left and right at the cam buckles on bottom rear of
the backrest. (Fig. 1)
Head pillow: Guide the h-belt webbing through the loops of the head pillow threading from
the top to bottom. Position the head pillow and hook and loop-fasten it to the top pad of the
lateral trunk support. (Fig. 2)
Seat cushion: Remove the protective strap from the hook and loop (hooks) on the bottom side
of the cushion. Place the seat cushion on the seat and hook and loop-fasten it to the bottom of
the lateral trunk support. (Fig. 3) Make sure the hook and loop strap (hooks) does not rest on
the interlaced yarns of the Swifty cushion to avoid damages to the cushion.
Footrest pad: Place the footrest pad on the footrest. Hook and loop-fasten both webbing straps
underneath the footrest plate. (Fig. 4)
Note: A combined use of Swifty accessories, like lateral trunk supports, soft pelvic harness,
seat waistcoat, pelvic belt, or foot straps is not possible or to a limited extent only.
Caution: Remove the seat minimizer PRIOR TO folding the buggy.
Réducteur de siège N° d’art.: 6834
Le réducteur de siège se compose de 4 pièces : coussin appui-tête, support de thorax, coussin
d’assise et coussin de repose-pieds. Commencez par le montage du support de thorax.
Support de thorax: Placez le support de thorax sur le dossier. La partie inférieure doit reposer
sur l’assise. Fixez à présent les 2 bretelles à droite et à gauche aux boucles de serrage au bas
du dos du panneau du dossier. (fig. 1)
Coussin d’appuie-tête: Introduisez ensuite les sangles du thorax de par le haut à travers les
boucles du coussin d’appuie-tête. Positionnez ensuite le coussin d’appui-tête et fixez-le avec
le fixation auto-agrippante sur le dossier supérieur du support de thorax (fig. 2).
Coussin d’assise: Enlever la protection de la bande fixation auto-agrippante. Posez le coussin
d’assise sur le siège et fixez-la avec le fixation auto-agrippante sur la partie inférieure du
support de thorax. (fig. 3)
Coussin de repose-pieds: Posez le coussin du repose-pied sur le repose-pied et reliez les deux
bretelles avec le fixation auto-agrippante au-dessous de la tôle du repose-pied. (fig. 4)
Notez: Une utilisation combinée des accessoires Swifty tels que pelotes de thorax, pantalon
d’assise, gilet d’assise, sangle de bassin et pieds n’est pas possible ou uniquement dans
certaines limites.
Attention: Retirez toujours l‘assise AVANT de plier la poussette buggy
4
Reductor de asiento N° de Art.: 6834
El reductor de asiento se compone de 4 piezas: cojín reposa-cabezas, apoyo torácico, cojín de
asiento y cojín reposa-pies. Se empieza con la colocación del apoyo torácico.
Apoyo torácico: Posicione el apoyo torácico en el respaldo. La parte inferior del cojín debe
apoyarse en la superficie del asiento. Fije los 2 cinturones a la derecha y a la izquierda en las
hebillas de apriete en la cara posterior de la placa dorsal. (Fig. 1)
Cojín reposa-cabezas: En primer lugar, lleve las correas del cinturón torácico desde arriba a
través de los lazos del cojín reposa-cabezas. Después, posicione el cojín reposa-cabezas y
fíjelo mediante el cierre de gancho y bucle en la parte superior del cojín del apoyo torácico.
(Fig. 2)
Cojín del asiento: Quitar la protección de cierre de gancho y bucle. Coloque el cojín en el
asiento y fíjelo mediante el cierre de gancho y bucle en la parte inferior del cojín del apoyo
torácico. (Fig. 3)
Cojín reposa-pies: Coloque el cojín reposa-pies en el reposa-pies y una mediante el cierre de
gancho y bucle los dos cinturones por debajo de la chapa del reposa-pies. (Fig. 4).
Nota: No es posible el uso simultáneo de accesorios Swifty como la almohadilla torácica, el
pantalón arnés para asiento, el chaleco arnés para asiento, el cinturón pélvico y la correa del
pie, o solo es posible de forma limitada.
Atención: ANTES de plegar el carrito, desmonte siempre el cojín del asiento.
2
1
4
3
5
Redutor do assento Art.-N.º: 6834
O redutor do assento é composto por 4 peças: Almofada para a cabeça, apoio para o tórax,
almofada do assento e descanso para os pés. Começa-se com a montagem do apoio para o
tórax.
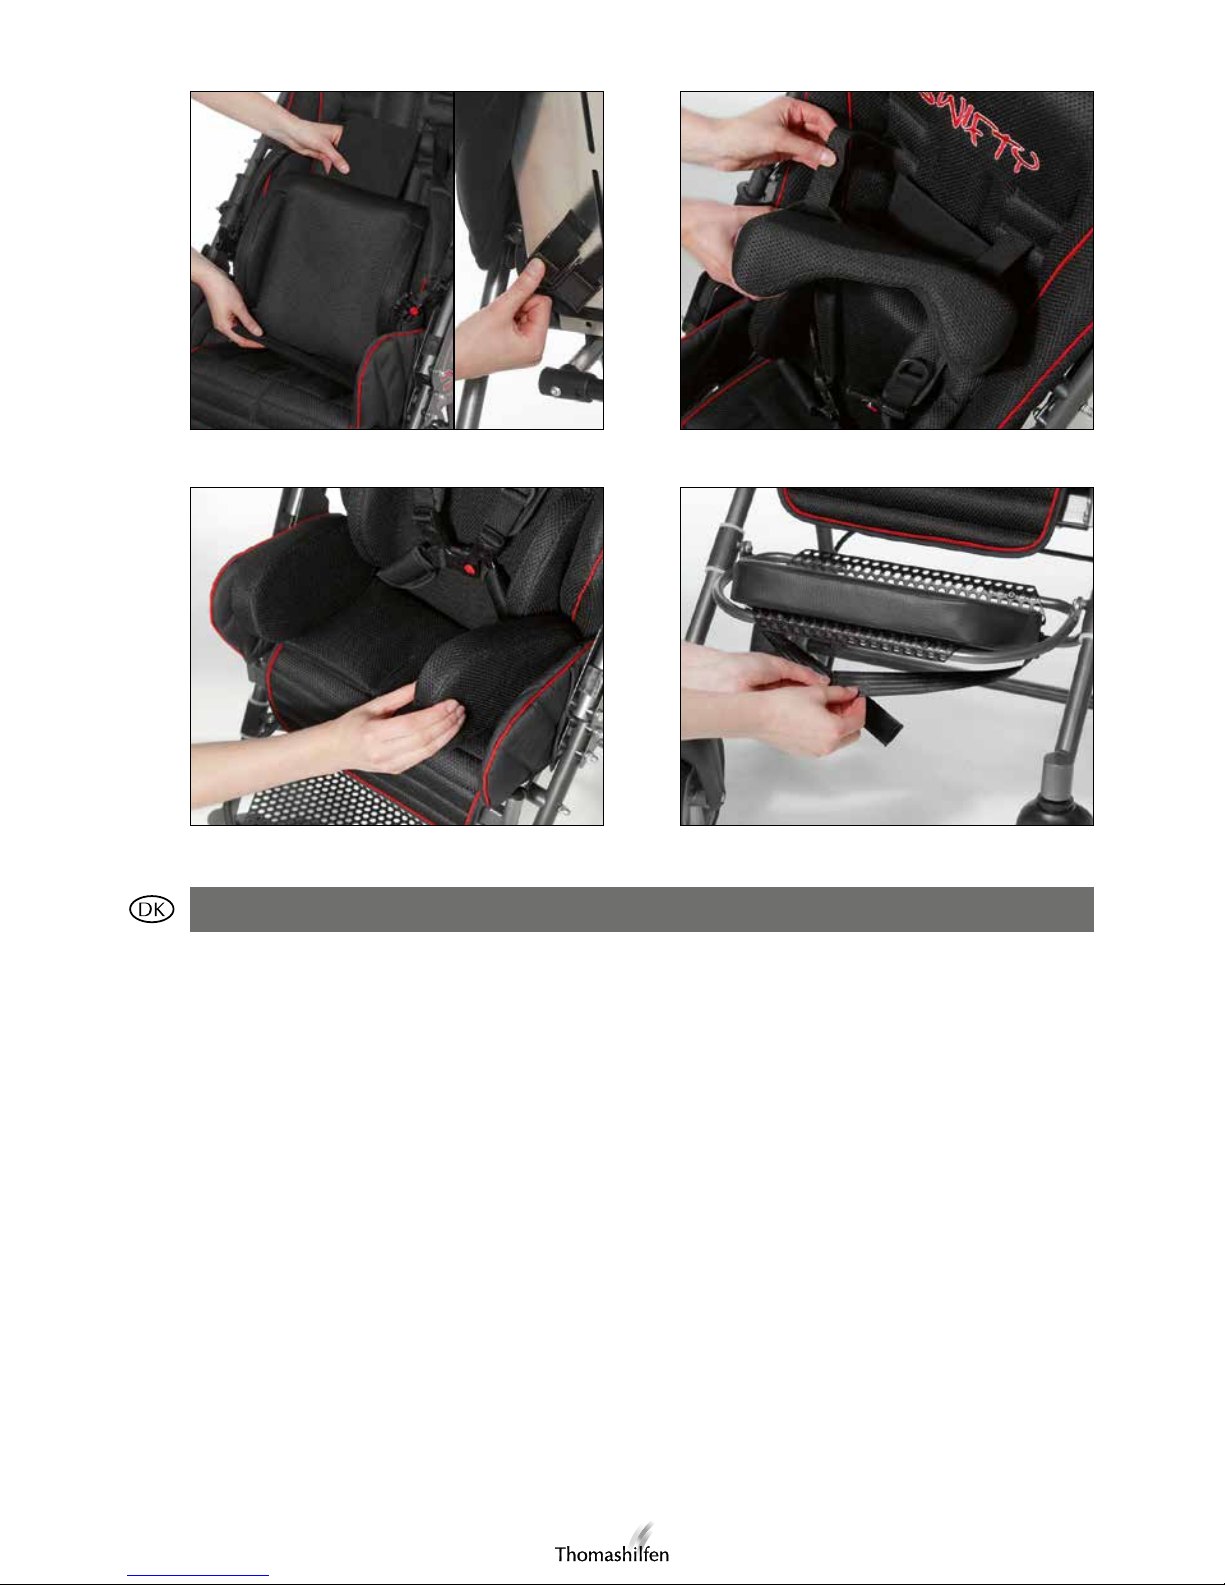
Apoio para o tórax: Posicionar o apoio para o tórax no encosto. A parte inferior do estofo deve
ficar sobre a superfície do assento. Prender depois os 2 cintos, da direita e da esquerda, nas
fivelas na parte inferior da traseira da placa dorsal. (fig. 1)
Almofada para a cabeça: Passar primeiro as correias do cinto torácico desde a parte de cima,
através das presilhas da almofada para a cabeça. Posicionar depois a almofada para a cabeça
e fixar a parte superior almofadada do apoio para o tórax com fecho aderente. (fig. 2)
Almofada para o assento: Retirar a proteção da fita de fecho aderente que se encontra no
lado inferior da almofada. Colocar a almofada do assento no sítio e fixar com a fita de fecho
aderente na parte inferior da almofada do apoio para o tórax. (fig. 3) A fita de fecho aderente
não deve ser aplicada na zona tecida da almofada Swifty a fim de não a danificar.
Almofada para os pés: Colocar a almofada para os pés no apoio para os pés e fixar ambos os
cintos sob a placa do apoio com a fita de fecho aderente. (fig. 4)
Nota: A utilização simultânea com os acessórios Swifty, como apoios para o tórax, calça arnês
de assento, colete arnês de assento, cinto pélvico e correias para os pés não é possível ou é
possível com limitações.
Atenção: Desmonte sempre a almofada do assento ANTES de dobrar a cadeira.
Riduttore di seduta Art. nr.: 6834
Il riduttore di seduta consiste di quattro parti: poggiatesta, supporto toracico, seduta imbottita
e rivestimento per poggiapiedi. Si inizia applicando il supporto toracico.
Supporto toracico: posizionare il supporto toracico sullo schienale. La parte imbottita inferiore
deve poggiare sulla superficie di seduta. Fissare ora le due cinghie destra e sinistra sulle fibbie
che si trovano sul lato posteriore inferiore della placca dorsale (Fig. 1).
Poggiatesta: far passare innanzitutto la cinghia dell’imbragatura del busto attraverso i passanti
del poggiatesta. Posizionare quindi il poggiatesta e fissarlo alla parte imbottita superiore del
supporto toracico (Fig. 2).
Seduta imbottita: rimuovere la protezione di chiusura a strappo. Poggiare la seduta imbottita
sulla seduta e fissarla alla parte imbottita inferiore del supporto toracico (Fig. 3).
Rivestimento per poggiapiedi: poggiare il rivestimento per poggiapiedi sul poggiapiedi stesso
e congiungere le due cinghie sotto la piastra del poggiapiedi (Fig. 4).
Indicazione: un utilizzo contemporaneo di accessori Swifty come pelotta toracica, imbragatura
inferiore, imbragatura superiore, cintura addominale e cinghia per i piedi non è possibile o lo
è soltanto in maniera limitata.
Attenzione: PRIMA di ripiegare il passeggino estrarre sempre la seduta imbottita.
6
2
1
4
3
Stoelverkleining Art.nr.: 6834
De stoelverkleining bestaat uit 4 delen: hoofdkussen, thoraxsteun, zitkussen en voetenkussen.
Begonnen wordt met het aanbrengen van de thoraxsteun.
Thoraxsteun: positioneer de thoraxsteun op de rugleuning. Het onderste kussengedeelte moet
op de zitting liggen. Klem nu de beide gordels links en rechts onder aan de achterzijde van de
rugplaat vast. (afb. 1).
Hoofdkussen: voer eerst de gordels voor de bescherming van het bovenlichaam van bovenaf
door de lussen van het hoofdkussen. Breng vervolgens het hoofdkussen in positie en klit het
vast aan het bovenste kussengedeelte van de thoraxsteun. (afb. 2).
Zitkussen: verwijder de bescherming van klittenband. Leg het zitkussen op de zitting en klit
het vast aan het onderste kussengedeelte van de thoraxsteun. (afb. 3).
Voetenkussen: leg het voetenkussen op de voetensteun en klit de beide gordels onder de
voetensteunplaat aan elkaar. (afb. 4).
Opmerking: een gelijktijdig gebruik van Swifty-accessoires zoals thoraxpelotten, zitbroek,
zitvest, heupgordel en voetenriemen is niet of slechts beperkt mogelijk.
Opgelet! Verwijder VÓÓR het dichtvouwen van de buggy altijd eerst het zitkussen.
7
Seteforminsker Art.-nr.: 6834
Seteforminskeren består av 4 deler, hodepute, brytstkassestøtte, sittepute og fotstøtte. Det
startes med plassering av brystkassestøtten.
Brystkassestøtte: Brystkassestøtten plasseres på ryggstøtten. Nedre del av puten skal ligge på
sitteflaten. Fest så de 2 stroppene på høyre og venstre side til festeklemmene nede på baksiden
av ryggplaten (fig. 1)
Hodepute: Før deretter stroppene for feste av overkroppen ovenfra gjennom sløyfene på
hodeputen. Posisjoner så hodeputen og fest brystkassestøtten med borrelås på øvre del av
puten (fig. 2)
Setepute: Fjern beskyttelse av borrelås. Seteputen legges på setet og festes med borrelås til
nedre del av puten på brystkassestøtten (fig. 3)
Fotstøttepute: Fotstøtteputen legges på fotstøttene, og de to stroppene festes med borrelås
under fotstøtteplaten (fig. 4) .
Anvisning: Samtidig bruk av Swifty-tilbehørsdeler som brystkasse-trykkplate, sitte-bukse, sitte-
vest, hoftebelte og fotreimer er ikke eller kun delvis mulig.
Forsiktig: Ta alltid ut seteputen FØR Buggyen foldes sammen.
Sitsförminskare Art.-nr: 6834
Sitsförminskaren består av 4 delar: huvuddyna, bålstöd, sittdyna och fotstöd. Du börjar med
att montera bålstödet.
Bålstöd: Positionera bålstödet på ryggstödet. Dynans undre del ska anligga mot sittytan. Fäst
sedan de 2 bältena till höger och vänster i spännena på underdelen av ryggplattans baksida.
(Fig. 1)
Huvuddyna: Dra först bältena för överkroppen uppifrån genom hällorna på huvuddynan.
Positionera sedan huvuddynan och fäst den med kardborreförslutningen på den övre delen av
dynan på bålstödet. (Fig. 2)
Sittdyna: Ta bort skydd av kardborreband. Lägg sittdynan på sittdelen och fäst den med
kardborreförslutningen på den undre delen av dynan på bålstödet. (Fig. 3)
Fotstödsdyna: Lägg fotstödsdynan på fotstödet och fäst ihop båda bälten med
kardborreförslutningen på fotstödesplåten. (Fig. 4) .
Obs: Det är inte eller endast i begränsad omfattning möjligt att använda Swifty-tillbehörsdelar,
som bålpelotter, sittbyxa, sittväst, höftbälte och fotremmar, samtidigt.
Se upp: Ta alltid ut sittdynan innan du viker ihop buggyvagnen.
8
2
1
4
3
Sædeformindsker Art.-Nr.: 6834
Sædeformindskeren består af 4 dele: Hovedpolstring, toraxstøtte, sædepolstring og
fodstøttepolstring. Start med at anbringe toraxstøtten.
Toraxstøtte: Positionér toraxstøtten på ryglænet. Polstringens nederste del skal ligge på
siddefladen. Klem nu de to seler i højre og venstre side af klemspænderne fast nede på
rygpladens bagside. (fig. 1)
Hovedpolstring: Før først selerne fra overkroppens seleanordningen oppefra ned gennem
hovedpolstringenssløjfer.Positionérsåhovedpolstringenogsætdenfastmedburrebåndbåndene
på toraxstøttens øverste polstring. (fig. 2)
Sædepolstring: Fjern beskyttelse af burrebåndbåndene. Læg sædepolstringen på sædet og sæt
den fast med burrebåndbåndene på toraxstøttens nederste polstring. (fig. 3) Burrebåndbåndene
bør ikke komme i berøring med Swifty særlige polster, da det derved kan beskades.
Fodstøttepolstring: Læg fodstøttepolstringen på fodstøtten og sæt de to burrebåndbånd
sammen under fodstøttens plade. (fig. 4).
Bemærk: Det er ikke eller kun i begrænset omfang muligt, at anvende Swifty-tilbehørsdele
som toraxpelotter, siddebukser, siddevest, bækkensele og fodrem samtidig.
OBS: Tag altid sædepolstringen ud INDEN du folder buggyen sammen.
9
Istuimen pienennys Tuotenro.: 6834
Pienennin koostuu 4 osasta: Päätyyny, rintakehätuki, istuintyyny ja jalkatuen päällys.
Pienentäminen aloitetaan rintakehätuesta.
Rintakehätuki: Asemoi rintakehätuki selkänojaan. Alemman tyynyosan täytyy olla istuimen
päällä. Kiinnitä nyt 2 vyötä selkälevyn takana alhaalle oikealla ja vasemmalla puolella oleviin
solkiin. (Kuva 1)
Päätyyny: Pujota ensin rintakehätuen vyöt ylhäältäpäin päätyynyn lenkkien läpi. Asemoi sen
jälkeen päätyyny ja kiinnitä tarroilla kiinni rintakehätuen ylempää tyynyosaan. (Kuva 2)
Istuintyyny: Poista tyynyn alapuolelta tarranauhan suojus. Aseta tyyny istuimelle ja kiinnitä
tarralla rintakehätuen tyynyosan alareunaan. (Kuva 3) Tarra (hakanen) ei saa olla swifty-tyynyn
neuleen päällä, koska se voi vahingoittua.
Jalkatuen tyyny: Jalkatuen tyyny asetetaan jalkatuelle ja kiinnitetään molemmilla vöillä
jalkatuen alla oleviin pisteisiin. (Kuva 4)
Huomautus: Swifty -lisätarvikeosien, kuten myös rintakehätuen, istuinhousujen, istuinliivin,
vyötärövyön ja jalkahihnojen samanaikainen käyttö on rajoitetusti mahdollista.
Huomio: Poista istuin aina ENNEN vaunujen kokoon taittoa.
Pomoc do podginania nr katalogowy: 6834
Wkładka redukcyjna składa się z 4 części: wyściełany zagłówek, podparcie piersiowego
odcinka kręgosłupa, wyściełane siedzisko i nakładka na podnóżek Na początku montowane
jest podparcie piersiowego odcinka kręgosłupa.
Podparcie piersiowego odcinka kręgosłupa: Podparcie należy umieścić na oparciu. Dolna
poduszka powinna leżeć na siedzisku. Następnie należy zacisnąć 2 pasy z prawej i lewej
strony w klamrach na dole z tyłu płyty oparcia. (rys. 1)
Wyściełany zagłówek: Najpierw należy przełożyć pasy przytrzymujące tułowie z góry przez
pętle zagłówka. Następnie należy umieścić zagłówek we właściwej pozycji i zapiąć na rzep
na górnej poduszce podparcia piersiowego odcinka kręgosłupa (rys. 2)
Wyściełane siedzisko: Usuń ochrony rzep. Następnie należy położyć poduszkę siedziska na
siedzeniu i zapiąć na dolnej poduszce podparcia piersiowego odcinka kręgosłupa. (rys. 3)
Wyściełana nakładka na podnóżek: Położyć poduszkę nakładki na podnóżek i spiąć ze sobą
oba pasy pod blachą podnóżka. (rys. 4)
Wskazówka: Równoczesne użytkowanie akcesoriów Swifty takich jak podparcia piersiowego
odcinka kręgosłupa, pas na krocze, kamizelka ochronna, pas biodrowy i paski mocujące
stopy nie jest możliwe lub jest możliwe w ograniczonym zakresie.
Uwaga: PRZED złożeniem wózka należy zawsze zdjąć poduszkę siedziska.
10
2
1
4
3
Smanjivač sjedala Kat. br.: 6834
Smanjivač sjedala ima 4 dijela: jastuk za glavu, potpora za grudni koš, jastuk za sjedenje i jastuk
nožnog oslonca. Najprije se stavlja potpora za grudni koš.
Potpora za grudni koš: Namjestite potporu za grudni koš na leđni naslon. Donji dio jastuka treba
biti polegnut na sjedalo. Pričvrstite 2 remena desno i lijevo na steznim kopčama donje strane
leđne ploče. (sl. 1)
Jastuk za glavu: Najprije provucite remenje gornjeg dijela tijela odozgo kroz omče jastuka za
glavu. Potom namjestite jastuk za glavu te ga pričvrstite na gornjem dijelu jastuka potpore za
grudni koš. (sl. 2)
Jastuk za sjedenje: Uklonite zaštitu s čičak trake (kuka) na donjoj strani jastuka. Jastuk za sjedenje
položite na sjedalo te ga pričvrstite na donjem dijelu jastuka potpore za grudni koš. (sl. 3) Čičak
traka (kuka) ne smije nalijegati na graničnu tkaninu jastuka Swifty, jer bi se mogla oštetiti.
Jastuk nožnog oslonca: Jastuk nožnog oslonca polegnite na nožni oslonac i spojite oba remena
ispod lima nožnog oslonca. (sl. 4)
Napomena: Istovremena uporaba dodatne opreme Swifty, uključujući jastučiće za grudni
koš, hlače za sjedenje, prsluk za sjedenje, zdjelični pojas i nožni remen, nije moguća ili je
ograničena.
Pozor: PRIJE sklapanja kolica, uvijek izvadite jastuk za sjedenje.
Thomas Hilfen für Körperbehinderte GmbH & Co. Medico KG · Walkmühlenstr. 1 · D - 27432 Bremervörde · Germany
Phone: +49 (0)4761 / 8860 · Fax: +49 (0)4761 / 886-19 · [email protected] · www.thomashilfen.com
Mitglied in der Internationalen
Fördergemeinschaft für Kinder-
und Jugendrehabilitation e.V.
Art.-Nr. / Item code: 95642, Stand / status: 07/2013, technische Änderungen vorbehalten / subject to technical alterations

Other manuals for SWIFTY

2

Other Thomashilfen Stroller manuals

Thomashilfen EASyS User manual

Thomashilfen

Thomashilfen EASyS User manual

Thomashilfen ThevoTherapy User manual

Thomashilfen

Thomashilfen ThevoTherapy User manual

Thomashilfen tRide User manual

Thomashilfen

Thomashilfen tRide User manual

Thomashilfen ThevoTwist User manual

Thomashilfen

Thomashilfen ThevoTwist User manual

Thomashilfen EASyS Advantage User manual

Thomashilfen

Thomashilfen EASyS Advantage User manual

Thomashilfen tRide User manual

Thomashilfen

Thomashilfen tRide User manual

Thomashilfen Swifty 2 User manual

Thomashilfen

Thomashilfen Swifty 2 User manual

Thomashilfen tRide User manual

Thomashilfen

Thomashilfen tRide User manual

Thomashilfen Swifty 2 User manual

Thomashilfen

Thomashilfen Swifty 2 User manual

Thomashilfen Tip Assist for A Chassis Supplement

Thomashilfen

Thomashilfen Tip Assist for A Chassis Supplement

Thomashilfen J/A User manual

Thomashilfen

Thomashilfen J/A User manual

Thomashilfen EASyS User manual

Thomashilfen

Thomashilfen EASyS User manual

Thomashilfen EASyS Advantage User manual

Thomashilfen

Thomashilfen EASyS Advantage User manual

Thomashilfen EASyS User manual

Thomashilfen

Thomashilfen EASyS User manual

Thomashilfen JAZZ EASyS User manual

Thomashilfen

Thomashilfen JAZZ EASyS User manual

Thomashilfen EASyS Advantage User manual

Thomashilfen

Thomashilfen EASyS Advantage User manual

Thomashilfen Swifty 2 User manual

Thomashilfen

Thomashilfen Swifty 2 User manual

Thomashilfen ThevoTwist User manual

Thomashilfen

Thomashilfen ThevoTwist User manual

Thomashilfen EASyS User manual

Thomashilfen

Thomashilfen EASyS User manual

Thomashilfen EASyS Advantage User manual

Thomashilfen

Thomashilfen EASyS Advantage User manual

Thomashilfen ThevoTwist User manual

Thomashilfen

Thomashilfen ThevoTwist User manual

Thomashilfen EASyS Advantage User manual

Thomashilfen

Thomashilfen EASyS Advantage User manual

Thomashilfen A User manual

Thomashilfen

Thomashilfen A User manual

Thomashilfen ThevoTwist User manual

Thomashilfen

Thomashilfen ThevoTwist User manual

Popular Stroller manuals by other brands

Baby Trend Snap-N-Go SG33 instruction manual

Baby Trend

Baby Trend Snap-N-Go SG33 instruction manual

MaxiCosi Dana For2 user manual

MaxiCosi

MaxiCosi Dana For2 user manual

icklebubba Stomp Instructions for use

icklebubba

icklebubba Stomp Instructions for use

Baby Jogger City Mini Zip Assembly instructions

Baby Jogger

Baby Jogger City Mini Zip Assembly instructions

Baby Trend SS66A instruction manual

Baby Trend

Baby Trend SS66A instruction manual

Baby Trend Expedition DLX Travel System TJ75 P Series instruction manual

Baby Trend

Baby Trend Expedition DLX Travel System TJ75 P Series instruction manual

tuctuc Plume Instruction booklet

tuctuc

tuctuc Plume Instruction booklet

Baby Love URBANLITE SH608 Series Instruction book

Baby Love

Baby Love URBANLITE SH608 Series Instruction book

Baby Trend Expedition LX instruction manual

Baby Trend

Baby Trend Expedition LX instruction manual

Mothers choice wilton instruction manual

Mothers choice

Mothers choice wilton instruction manual

icklebubba Discovery manual

icklebubba

icklebubba Discovery manual

Baby Trend Tango TC04 A Series instruction manual

Baby Trend

Baby Trend Tango TC04 A Series instruction manual

EasyGO optimo user manual

EasyGO

EasyGO optimo user manual

Akces-Med Aurora user manual

Akces-Med

Akces-Med Aurora user manual

Baby Trend 1981CT instruction manual

Baby Trend

Baby Trend 1981CT instruction manual

Baby Trend Rocket Stroller ST21 instruction manual

Baby Trend

Baby Trend Rocket Stroller ST21 instruction manual

MaxiCosi Leona user manual

MaxiCosi

MaxiCosi Leona user manual

EasyGO duo comfort user manual

EasyGO

EasyGO duo comfort user manual

manuals.online logo
manuals.online logoBrands
  • About & Mission
  • Contact us
  • Privacy Policy
  • Terms and Conditions

Copyright 2025 Manuals.Online. All Rights Reserved.