THOMSON TV Set User manual

thomsontv.eu
User manual
Guide d'utilisation
Bedienungsanleitung
Руководство пользователя
Посібник користувача
Manuale d’uso
Manual de usuario
Manual do Utilizador
Gebruikshandleiding
Εγχειριδιο χρηστη
Manual de utilizare
Uporabniški priročnik
Korisnički priručnik
Instrukcja użytkownika
Lietotāja rokasgrāmata
Vartotojo instrukcija
Kasutusjuhend
Felhasználói útmutató
Návod k použití
Návod na použitie
Käyttöohje
Användarhandbok
Kullanım elkitabı
Brukerveiledning
Brugsanvisning
Ръководство на потребителя

LCD-cov 16/10/03 10:44 Page 2

On screen display
Figure 1 Figure 2
Figure 3 Figure 4
Figure 5
List of languages
#
Abbr. Language # Abbr. Language # Abbr. Language # Abbr. Language
1
EN English 2 FR Français 3 DE Deutsch 4 RU Русский
5
UA Українська 6 IT Italiano 7 ES Español 8 PT Português
9
NL Nederlands 10 EL Ελληνικά 11 RO Română 12 SI Slovenščina
13
HR Hrvatski 14 PL Polski 15 LV Latviešu 16 LT Lietuvių
17
EE Eesti 18 HU Magyar 19 SK Slovensky 20 CZ Česky
21
FI Suomi 22 SE Svenska 23 TR Türkçe 24 NO Norsk
25
DA Dansk 26 BG Български
Picture
Sound
PAP
Options
Lock
Setup
Media
Smart TV
Back
Exit
Select
3D
3D Mode
L-R Switch
Depth of Field
3D-to-2D
Top-and-Bottom
Off
16
Off
Back
Exit
Select
Subtitle
Subtitle
Digital subtitle language
Digital subtitle language 2nd
Subtitle type
On
English
English
Normal
Channel install
Automatic search
Automatic update
Analog manual scan
Air manual installation
Clean channel list
Back
Exit
Select
Enter
Initial setup
Welcome to use the Wizard for Initial Setup !!
Please press [OK] to start the wizard.
Welcome

EN 1
Getting started
Chapter 1
Important information
Safety
Ensure that your domestic mains supply voltage
matches the voltage indicated on the identication
sticker located at the back of your set. Where the
mains plug or an appliance coupler is used as
disconnect device, the disconnect device shall remain
readily operable.
On certain models, the light indicator is located at the
side of the TV set. The absence of a light indication
at the front does not mean that the TV set is fully
disconnected from the mains. To disconnect the TV
set completely, the mains plug must be pulled out.
The TV set’s components are sensitive to heat. The
maximum ambient temperature should not exceed
35ºCelsius. Do not cover the vents at the back or
sides of the TV set. Leave sufcient space around
it to allow adequate ventilation. Install the appliance
away from any source of heat (replace, etc.) or
appliances creating strong magnetic or electric elds.
Moisture in rooms where the set is installed should
not exceed 85% humidity. Apparatus shall not be
exposed to dripping or splashing and no objects
lled with liquids, such as vases, shall be placed
on the apparatus. Moving the set from a cold place to
a warm one can cause condensation on the screen
(and on some components inside the TV set). Let the
condensation evaporate before switching the TV set
on again.
The or POWER/button on the TV set or the
button on the remote control can be used to switch it
on and put it into standby mode. If you are not going
to be watching the TV for a lengthy period of time,
switch it off completely by removing the plug from the
mains power socket.
During thunderstorms, we recommend that you
disconnect the TV set from the mains and aerial so
that it is not affected by electrical or electromagnetic
surges that could damage it. For this reason, keep
the mains and aerial sockets accessible so they can
be disconnected, if necessary.
Unplug the TV set immediately if you notice it giving
off a smell of burning or smoke. You must never,
under any circumstances, open the TV set yourself,
as you run the risk of an electric shock in doing so.
TV screen
The TV screen used in this product is made of glass.
Therefore, it can break when the product is dropped
or impacted upon by other objects.
The TV screen is a very high technology product,
giving you nely detailed pictures. Occasionally, a few
nonactive pixels may appear on the screen as a xed
point of blue, green or red. This does not affect the
performance of your product.
Care
Use a glass-cleaning product to clean the screen and
a soft cloth and mild detergent to clean the rest of the
set.
Important: Using strong detergents, alcohol-based
and abrasive products may damage the screen.
Dust the vents at the back and sides regularly. Using
solvents, abrasive or alcohol-based products could
damage the TV set. If an object or liquid enters the
appliance, unplug it immediately and have it checked
by an authorized engineer. Never open the appliance
yourself since this may put you at risk or damage the
appliance.
Hanging the TV set on the wall
Warning: This operation requires two people.
To ensure a safe installation, observe the following
safety notes:
Check that the wall can support the weight of the TV•set and wall mount assembly.
Follow the mounting instructions provided with the•wall mount. For certain models, make sure to screw
the hexagonal VESA wall mounting screw bosses
(and screws) provided with the set into the nuts for
the wall mount at the back of your set before your
wall mounting.
The TV set must be installed on a vertical wall.•Make sure to use only screws suitable for the•material of the wall.
Make sure that the TV set cables are placed so that•there is not danger of tripping over them.
All other safety instructions about our TV sets are
also applicable here.
Handling the TV set on the table
Before setting up your television set, make sure that
the surface you want to put the set on can support its
weight.
Do not place the set on an unstable surface (e.g.
moving shelf, very edge of a unit) and make sure that
the front of the television set does not overhang the
surface it is standing on.
This product is designed and manufactured
with high quality materials and components
which can be recycled and reused.
This symbol means that electrical and
electronic equipment, at their end-of-life,
should be disposed of separately from
your household waste.
Please, dispose of this equipment at your local community
waste collection/recycling centre. In the European Union
there are separate collection systems for used electrical
and electronic product. Please, help us to conserve the
environment we live in!
WARNING
To prevent the spread of re, keep candles or
other open ames away from this product at
all times.

EN 2
English
OU
T
Connect the power and antenna
To switch on TV after connecting power cord, press or
POWER/ .
Note: Position of power socket varies according to TV model.
On certain models, you have to turn on
the power switch rst.
DVD recorder, cable receiver
DVD player, home theatre system Blu-ray Disc player, headphones, HD game
console & HD camcorder
Game console, PC
OUT
IN
ANTENNA
IN
OUT
OUT
IN
ANTENNA
OUT
HD Camcorder
Notes:
- USB connectors are for data
input from USB storage
devices. Only USB 1 port
can be connected to your
USB dongle.
- Excessive sound pressure
from earphones and
headphones can cause
hearing loss.
- Number of HDMI may vary.
- ARC(Audio Return Channel)
function is only supported
on HDMI 4 (ARC) port.
TV
Blu-ray
Disc
player
HD game
console
Network
connection
TV
Getting started
TV
Cable
Note: Disconnect the
power cord before
connecting devices.
Cable
TV
DVD player/
Home theatre system
Note: Before connecting a
PC, set the PC monitor
refresh rate to 60Hz.
Or use an HDMI
connection.
DVD
recorder
Set-top
box
Game
console
Notes:
- The gures are for representation only.
- Not all connections available on all models.
- The location of the power socket on the TV may
vary according to TV model.
- The positions and names of the function buttons
and connectors on the TV may vary according to
TV model.
OUT

EN 3
Standby / quit standby.
3D To toggle among the 3D input format
options.
Alphanumeric
buttons To enter channel numbers; to enter a letter,
a digit or a symbol in some functions.
ECO To select desired power saving mode.
SOURCE To select connected devices.
V+/- To control the volume.
To switch the sound off and back on again.
INFO To display programme information, if
available.
P+/- To change channels.
or To go directly to the Smart TV menu or the
Yahoo homepage, depending on the model
of your TV.
Smart TV To bring up the Smart TV menu.
@To go directly to the homepage of your
browser or the Orange homepage, depending
on the model of your TV.
MENU To access the main menu; to return to the
previous menu; to access or exit the virtual
keyboard in Opera browser function.
OK To conrm an entry or selection; to freeze/
unfreeze the picture in digital TV mode.
To navigate through the menus; to select
menu options; to switch to the previous or
next photo, song or video in USB function.
/*ZOOM+/-
To navigate through the menus; to set
functions and change values. ► can
also be used to open the corresponding
submenu.
* To select the picture format.
Note: You are recommended to use the full
screen mode. Do not use the display mode
with black bars on both sides of the picture
(such as 4:3) for long time; otherwise the
TV screen may be damaged permanently.
Getting started
Important:
Batteries shall not be exposed to excessive heat such as sunshine, re or the like. If the batteries in your remote
control are run down you can use the buttons on your TV set. In TV mode, they have the same functions as the
corresponding buttons on the remote control. In the menus they have the following functions:
For models with OK button on the set: For models without OK button on the set:
PR+ or PR ▲▲ PR+ or PR ▲►
PR- or PR ▼ ▼ PR- or PR ▼ ◄ & OK
VOL+, + or VOL ►► VOL+, + or VOL ►▲
VOL-, - or VOL ◄◄ VOL-, - or VOL ◄▼
MENU or MENU MENU or MENU
OK OK
Remote control functions
Most of your television's functions are available via the menus that appear on the screen. The remote control
supplied with your set can be used to navigate through the menus and to congure all the general settings.
To return to the previous channel; to return
to the previous menu in USB function
EXIT To exit the menu structure or Teletext.
OPTION To display the function menu to perform
certain operations; to display the Teletext
page in different modes.
USB To bring up the Media center menu.
TV To access TV mode.
SLEEP To toggle among the sleep timer options.
GUIDE To toggle the Electronic Programme
Guide on or off (only available for digital
channels).
FAV To bring up the Channel list selection
menu.
LIST To display the channel list.
Colour
buttons
To select tasks or Teletext pages. The
red button can also be used for MHEG
function.
Lang To select a sound type available for
selected analogue TV programme; to
select an audio language available for
selected digital TV programme.
SUBTITLE To select a subtitle language available for
selected digital TV programme.
TEXT To toggle Teletext on or off.
Replay To select the previous photo, music or
video.
Next To select the next photo, music or video.
Rewind To start fast reverse.
Forward To start fast forward.
REC Recording button.
Play/Pause To start or pause playback.
Stop To stop playback.

EN 4
English
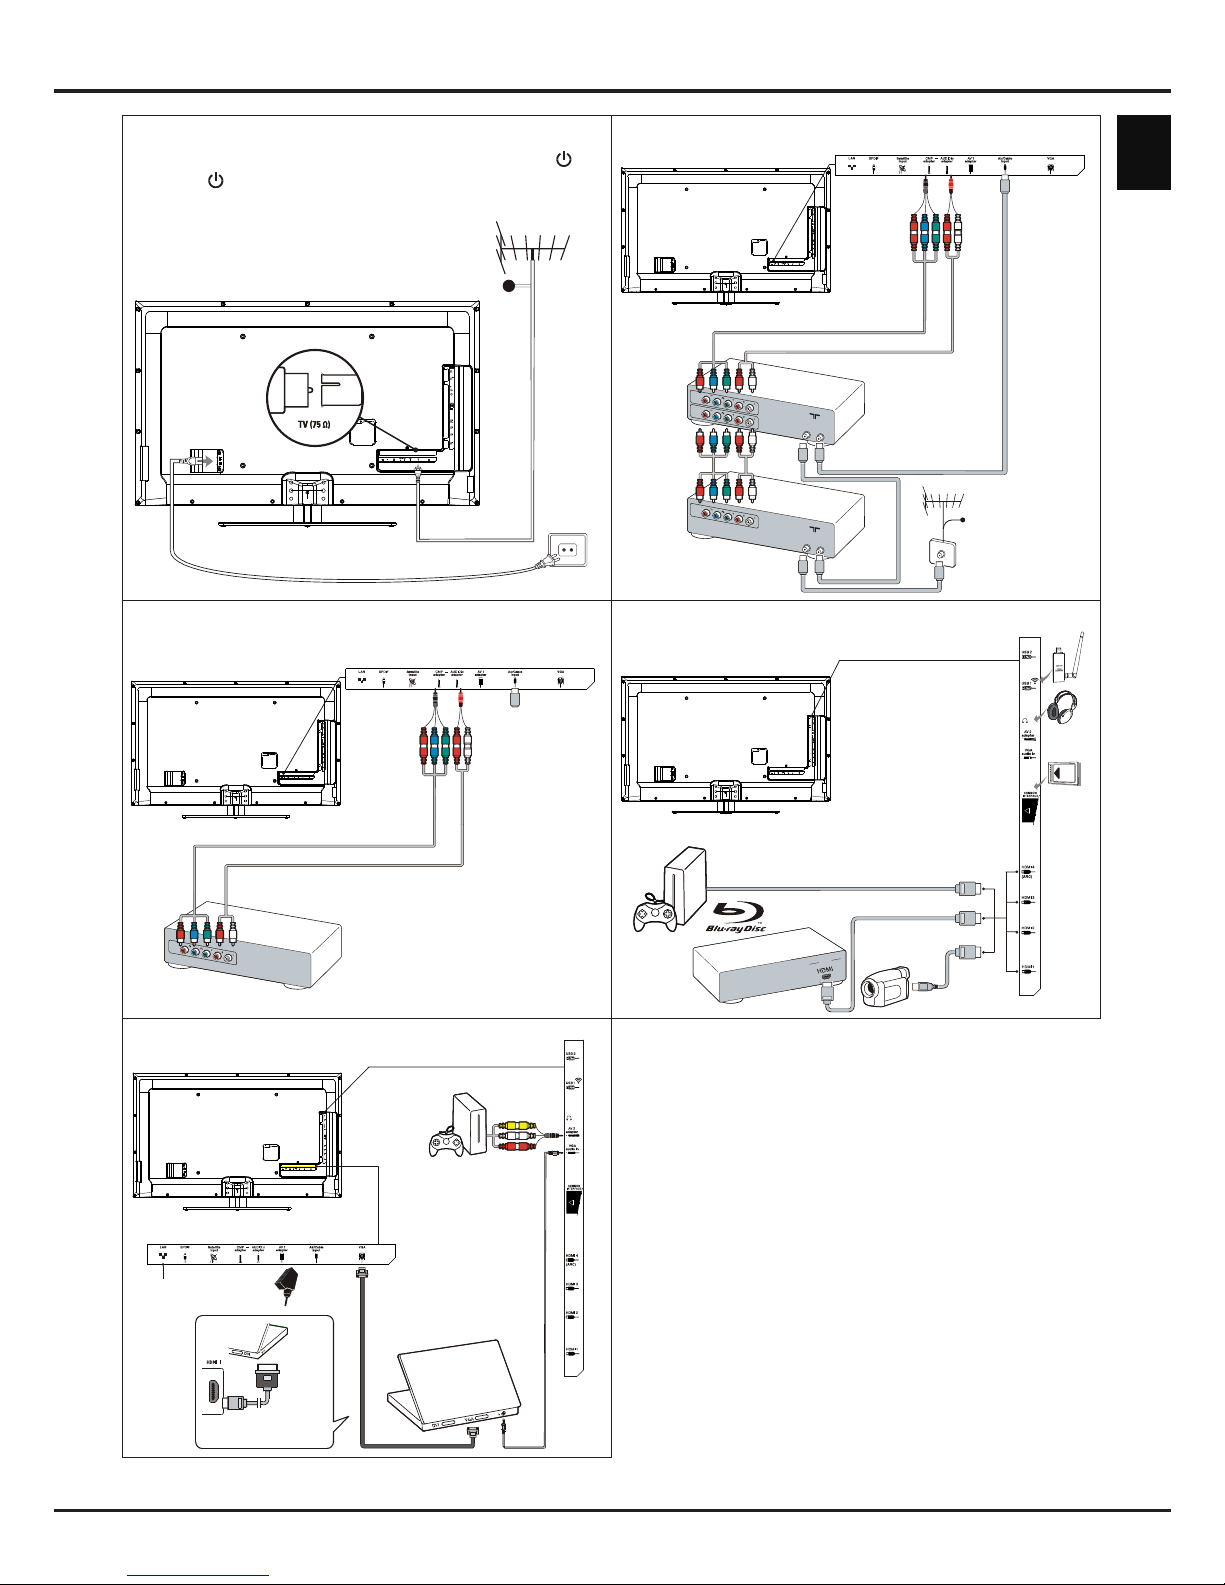
Switch the TV on and off
1. When powered on, the TV will be turned on
directly or be in standby mode. If the TV is in
standby mode, press the or POWER/ button
on the set or the button on the remote control to
turn it on.
2. To put the TV into standby mode, press the or
POWER/ button on the set or the button on
the remote control. The TV set remains powered
up, but with low energy consumption.
3. To switch the TV off, unplug the mains plug from
the mains outlet.
(*On certain models, you have to turn on the power
switch rst.)
Initial setup
Initial setup involves selecting all the settings required
to be able to search for and store all the analogue
and digital channels you can receive.
Make sure that the television is switched on and
follow all the steps in turn specied hereafter.
Note: If the channel search retrieved only the
analogue channels it could be caused by poor
broadcasting and therefore is not covered
by manufacturer warranty. Manufacturers
cannot be held responsible for lack of or poor
broadcasting in some areas.
The rst time you switch the set on, the Initial setup
wizard opens, which guides you through the initial
setup process. (Refer to Figure 1.) Press OK to start
your initial setup.
1. Press ▲/▼ to select your language, then press
OK/► to enter the next step.
2. Press ▲/▼ to select your country, then press
OK/► to enter the next step.
Note: If you select France, you will have to enter
the Password setting menu here in order
to set a password. Use the alphanumeric
buttons to enter a four-digit number for your
password. (0000 is too simple to be set as
your password.) Re-enter the same code
to conrm the password. After that, you will
enter the next step automatically. (In this
step, you can only press ◄to return to the
previous step.)
3. Press ▲/▼ to select your tuner mode Air or
Cable or Satellite. (Note: Satellite option may not
be available for certain models.)
- Select Air.
• Press OK/► to enter.
• Select Digital & Analog, Digital or Analog,
then press OK/►.
• Press ▲/▼ to select Scan, then press OK/► to
start the automatic search for all DVB-T digital
and/or analogue channels.
- Select Cable.
• Press OK/► to enter.
• Select Digital & Analog, Digital or Analog,
then press OK/►.
• Press ▲/▼ to select Scan, then press OK/►
to directly start your initial setup or enter below
step.
• Select Full if available to search for and store
all DVB-C digital and analogue channels.
• You may select another advanced scan
mode if available (for example, Advanced
or Quick), then congure proper cable
information as described below. Use the
alphanumeric buttons to adjust the values for
frequency, symbol rate and network ID; use
◄/► to select a modulation mode.
• Press OK to start initial setup relating to all
DVB-C digital and analogue channels.
- Select Satellite.
• Press OK/► to enter.
• Press ▲/▼ to select Scan, then press OK/►
to enter the next step to congure proper
information relating to satellite and antenna.
• Press OK to start initial setup relating to all
satellite channels.
Note: To prevent the channel setup process from
being interrupted, wait for the message
indicating that the setup is complete.
4. Before starting the scanning, you can also select
Skip scan to skip the initial setup process.
5. During the setup, you can follow the hints
available at the bottom of the screen to return to
the previous step by pressing ◄. Or press EXIT to
exit or interrupt the search halfway.
6. Once the automatic search ends, the set enters
the next step automatically. Press ▲/▼ to select
your location Shop or Home. Press OK/► to
conrm your selection and enter the last step.
7. - In this step, you can press OK to exit the initial
setup. The channels are arranged in a preset
order. If you wish to skip channels, modify the
preset order or rename channels, select Setup >
Organiser and press OK/► to enter.
- In this step, you can also press ◄ to return to the
previous step.
Automatically install channels
This section describes how to search and store
channels automatically. Instructions are for both
analogue and digital channels.
1. Press MENU on the remote control and select
Setup > Language > Menu language. Press
◄/► to select your desired menu language.
2. Press MENU to return to Setup, press ▲/▼ to
select Country, then press ◄/► to select your
Install channels
Chapter 2

EN 5
5. Once the automatic search ends, press MENU to
return to the previous step or press OK to restart
your channel search.
6. After the automatic search, channels are arranged
in a preset order. You can skip channels, modify
the preset order or rename channels.
Use your TV
Access channels
Using the alphanumeric buttons: press the
corresponding alphanumeric buttons to access the
channels.
Using the PR+/- or P+/- buttons: scroll through the
channels.
Watch connected devices
Repeatedly press SOURCE on the remote control
or OK on the TV set to toggle between TV and
other input sources. To resume TV viewing, press
any numeric button to enter the channel, while P+/-
will cycle through all TV channels and other input
sources.
Note: Not all models have OK button on the set.
Volume
Volume control: use the VOL+/- or VOL◄/► buttons
on the TV set or V+/- buttons on the remote control
to increase or decrease the volume.
Sound mute: press the button to temporarily mute
the sound. Press this button again or the V+ button
to restore it.
Use TV menus
1. Press MENU to display the main menu. (Refer to
Figure 3.)
2. Press ▲/▼/◄/► to select the desired item, then
press OK to open the corresponding submenu.
3. In submenus, use ▲/▼ to select menu options,
use ◄/► to set functions or change values. Use
OK to activate a setting. Use OK/► to open the
corresponding submenu.
4. Press MENU to return to the previous menu.
5. Press EXIT to close the menu.
Note: Some options may not be available for
certain signal sources.
Select menu language
You can choose your preferred menu language
following the instructions below.
1. Press MENU to display the main menu.
2. Press ▲/▼/◄/► to select Setup, then press OK
to enter.
3. Select Language and press OK/► to enter.
Use your TV
Chapter 3
country. The TV installs and arranges channels
according to your country.
3. Press ▲/▼ to select Tuner mode, then press
◄/► to select Air, Cable or Satellite. (Note:
Satellite option may not be available for certain
models.)
- Select Air.
• Press ▲/▼ to select Channel install, and
press OK/► to enter.
• Select Automatic search (Refer to Figure 2.),
then press OK/► to display Automatic search.
• Press OK to skip the country selection and
enter the next step. Or use ◄/► to reselect
your country, then press OK to enter.
• Select Digital & Analog, Digital or Analog,
then press OK/► to start the automatic search,
which relates to all DVB-T digital and/or
analogue channels.
- Select Cable.
• Press ▲/▼ to select Channel install, and
press OK/► to enter.
• Select Automatic search, then press OK/► to
display Automatic search.
• Press OK to skip the country selection and
enter the next step. Or use ◄/► to reselect
your country, then press OK to enter.
• - Select Digital & Analog, then press OK/► to
enter. Select your scan mode if available and
congure proper cable information in the same
way as in Initial setup. Select Scan and press
OK/► to start your automatic search relating
to all DVB-C digital and analogue channels.
- Select Digital, then follow the same process
as above to start your automatic search
relating to all DVB-C digital channels.
- Select Analog, then press OK/► to start
your automatic search relating to all analogue
channels.
- Select Satellite.
• Press ▲/▼ to select Satellite setup, and press
OK/► to enter.
• Press ▲/▼ to select a proper satellite or add
new satellites if needed, then press OK to enter
and congure proper information relating to
satellite and antenna.
• Select Setup > Channel install > Automatic
search, then press OK/► to enter.
- Select Country, and use ◄/►to reselect
your desired country, if necessary.
- Select Satellite tuning, press OK/► to
display Automatic search. Congure the
proper information. Select Scan, and press
OK/► to start initial setup relating to all
satellite channels.
4. The search may take a few minutes. During the
process, you can press MENU to abort halfway.

EN 6
English
Use more of your TV
4. Select Menu language and press ◄/► to select
your desired language to display the menus.
5. Press EXIT to close the menu.
Use more of your TV
Setup your favourite channels
You can create four lists of your favourite TV
channels.
1. Press LIST.
2. Press the yellow button to enter Channel list
selection. Press ▲/▼ to select the favourite list
you want to set up your favourite channels. Then
press OK to enter the selected list.
3. Press the blue button to start editing your favourite
list. Press ▲/▼ to scroll through the channel list
and press OK to select or deselect it.
4. Repeat this procedure to setup other favourite
channels.
5. Press LIST/EXIT to exit.
Shortcut operation: Press FAV on the remote
control to directly enter Channel list selection.
ECO dynamic backlight
1.
Press MENU on the remote control and select
Picture > ECO dynamic back light.
2.
Press ◄/► to select desired power saving mode
to achieve the desired power saving effect. The
Picture preset option under Picture will now be
set to Personal simultaneously.
3. Press EXIT to close the menu.
Shortcut operation: Press ECO on the remote
control to perform the same function mentioned
above.
View TV using the 3D function (* not available
for some models)
WARNING:
Some viewers may experience discomfort while•viewing 3D TV such as dizziness, nausea and
headaches. If you experience any such symptom,
stop viewing 3D TV, remove your 3D glasses and
rest.
Watching 3D videos too closely or for a long period•of time may harm your eyesight.
A responsible adult should frequently check on•children who are using the 3D function.
Do not use the 3D glasses for any other purpose•than viewing 3D videos on a 3D TV.
Do not use the 3D function or 3D glasses while•walking or moving around, otherwise it may result in
injuries due to running into objects, tripping, and/or
falling.
1.
Press MENU on the remote control and select
Picture > 3D, then press OK/► to enter. (Refer to
Figure 4.)
2. 3D Mode: Wear the 3D glasses rst, then press
◄/► to select the right 3D input format among
Top and Bottom, Side-by-Side, 2D-to-3D, Line
interleave and Frame sequential for the playing
3D video.
3. L-R Switch: Select On or Off to adjust the 3D video
for the left and right eyes with better visibility.
4. Depth of Field: Adjust the stereoscopic effect of
the 3D image converted from 2D image.
5. 3D-to-2D: Select Left or Right to display the
image for the left or right eye only. This function is
deactivated when 3D Mode is set to 2D-to-3D or
Off.
6. Press EXIT to close the menu.
Notes:
- 3D glasses from other manufacturers may not be
supported.
- All photo functions are disabled in 3D mode.
- If changing to a different signal source or
accessing the Opera browser, 3D mode will be
automatically disabled.
- Some 3D modes may not be available depending
on the input format of the 3D video source.
- Supported 3D modes:
ATV, AV, CMP: 2D-to-3D
DTV, HDMI, USB, Videos from the Internet: Top
and Bottom, Side-by-Side, 2D-to-3D, Line
interleave, Frame sequential
- 3D function in USB mode: During the playback
of a selected video from USB, press MENU
to display the video menu in the browser
mode, then select 3D Mode. For more
detail information, refer to the above related
descriptions.
PAP function
To display the pictures from different source inputs
side by side. Note that one window is for both
analogue and digital TV inputs, the other is for VGA,
HDMI and CMP inputs. (Note: Not available for AV-
Scart on both windows.)
1. Press MENU to display the main menu.
2. Select PAP and press OK to enter.
3. Select the PAP option, and press ◄/► to turn on/
off PAP function.
4. Select TV position, press ◄/► to reposition the
TV window.
5. Press ◄/► to toggle the focus window.
6. When the focus is on the TV window, the
alphanumeric buttons and P+/- work in TV. When
the focus is on the other window, P+/- switches
available external sources.
Use subtitles
You can enable subtitles for each TV channel.
Subtitles are broadcast via Teletext or DVB-T/DVB-C
digital broadcasts. With digital broadcasts, you have
Chapter 4

EN 7
Use more of your TV
the additional option of selecting a preferred subtitle
language.
Turn on/off subtitles
1. Press MENU on the remote control and select
Options > Subtitle.
2. Press OK/► to enter. (Refer to Figure 5.)
3. Select the Subtitle option, and press ◄/► to
select On/Off to turn on/off subtitles.
Enable subtitle languages on digital TV channels
1. Press MENU on the remote control and select
Options > Subtitle > Digital subtitle language.
2. Press ◄/► to select a subtitle language as your
preferred language.
3. Press ▲/▼ to select Digital subtitle language
2nd.
4. Press ◄/► to select a secondary subtitle
language.
5. Press EXIT to close the menu.
Shortcut operation: Press SUBTITLE on the remote
control to directly select a subtitle language available
for the selected digital TV programme.
Select a subtitle type on digital TV channels
1. Press MENU on the remote control and select
Options > Subtitle > Subtitle type.
2. Press ◄/► to select a subtitle type. You can
select Hearing impaired to display the hearing
impaired subtitles with your selected language.
Select decoding page language in Teletext
Press MENU on the remote control and select
Options > Teletext > Decoding page language.
Select a proper type of language in which Teletext will
display.
Digital Teletext language
For digital TV channels, your TV could zap to a
service with multiple initial Teletext pages in different
languages. This function allows you to select an
available language as primary language, which
relates to different initial Teletext pages.
Press MENU on the remote control and select
Options > Teletext > Digital teletext language.
Press ◄/► to select.
SPDIF type
Connect to an audio device through the SPDIF
output. Press MENU on the remote control and select
Options > SPDIF type. Select a proper sound type
from the list for digital programmes.
- If the current programme outputs sound in Dolby
Dformat, then either PCM or Dolby D can be
selected.
- If the current programme does not output sound
in Dolby D format, only PCM can be selected.
Otherwise no sound will be output.
- Select Off to turn off the audio output from the audio
device connected to the SPDIF output.
Note: The options you may choose depend on the
programme you are watching. If you select
PCM and the sound is ahead of the picture,
you can select SPDIF delay from the Options
menu and press ◄/► to adjust the delay time
to synchronize the sound with the picture.
T-Link
To search for CEC devices connected to the HDMI
sockets in your TV and enable one-touch play and
one-touch standby between CEC devices.
Enable or disable T-Link
1. Press MENU on the remote control, then select
Options > T-Link.
2. Press ◄/► to select On or Off.
Use one-touch play
One-touch play enables you to press the play button
on, for example, your DVD remote control. This starts
playback on your DVD device and automatically
switches your TV to the correct source, displaying
DVD content.
Use system standby
System standby enables you to press the button
on, for example, your TV remote control. This
switches your TV and all connected HDMI devices to
standby mode.
Network update
Press MENU on the remote control, then select
Options > Network update. Select On/off to enable
or disable the Network update function.
- When this function is on, the TV will automatically
update channels if your DTV service provider
updates his DTV network.
- When this function is off, you need to run the
channel search again to get new channels or
remove unavailable channels if your DTV service
provider adds or removes channels from their DTV
network.
Common interface
Encrypted digital TV channels can be decoded with a
common interface module and a card provided by a
digital TV service operator.

EN 8
English
Use more of your TV
The common interface module may enable several
digital services, depending on the operator and
services you choose (for example, pay TV). Contact
your digital TV service operator for more information
about services and terms.
Use the common interface module
WARNING: Switch off your TV before inserting a
common interface module. Be sure to follow the
instruction described below. Wrong insertion of a
common interface module may damage both the
module and your TV.
1. Following the directions printed on the common
interface module, gently insert the module into the
common interface slot on the TV.
2. Push the module in as far as it will go.
3. Turn on the TV and wait for the common interface
function to be activated. This may take several
minutes.
Note: Do not remove the common interface
module from the slot. Removing the module
will deactivate the digital services.
Access common interface services
After inserting and activating the common interface
module, press MENU on the remote control and
select Options > Common interface.
This menu option is only available if the common
interface module is correctly inserted and activated.
On-screen applications and content are provided by
your digital TV service operator.
Software update
Press MENU on the remote control and select
Options > Software update. Press OK/► to enter.
-
Current version: Checks the current version of the
software.
-
Product name: Displays the product name of your
set.
-
Serial number(if available): Displays the serial
number of your set.
-
By USB: Enables you to install the latest version
of the software from your USB ports. Select and
press OK/► to enter, then follow the on-screen
instructions to continue your installation.
-
By channel: Enables you to install the latest version
of the software if available. Select By channel and
press OK/► to enter.
• Use ◄/► to select Yes under Auto download
to automatically download the latest software
if available. After the software has been
downloaded successfully, you will be prompted
to decide if you want to install it right now. If yes,
follow the on-screen instructions to complete your
installation. You can also select to ignore the
installation here.
• Select No under Auto download to decline the
automatic download.
• Select Manual download and press OK/► to
start manual scanning the latest software. Follow
the on-screen instructions to complete. During
the scan, press OK/EXIT to cancel or exit the
process.
-
By network: Enables you to download and install
the latest software version from the Internet.
Make sure to set up a wired or wireless network
connection rst, then select By network and press
OK/► to enter. Follow the on-screen instructions to
continue.
Change to Shop or Home mode
1. Press MENU on the remote control and select
Options > Location.
2. Press ◄/► to select your location Shop or Home.
3. Press EXIT to exit.
Note: According to the regulation of European
Commission 2009/125/EC, in Home
mode, TV will be put into standby mode
automatically if there is no operation in 4
hours. This feature can be deactivated in
Options menu.
MHEG function
Some digital TV broadcasters offer dedicated digital
text or interactive services (for example, BBC1).
These services work like normal Teletext with the
addition of number, colour and navigation buttons.
1. Press MENU on the remote control and select
Options > Subtitle > Subtitle.
2. Press ◄/► to set Subtitle to Off.
Note: MHEG and subtitles are mutually exclusive
and cannot coexist on the same screen. If
Subtitle is set to On, MHEG will not appear.
3. Press the red button or TEXT on the remote
control.
4. Press ▲/▼/◄/► to select or highlight items.
5. Press OK to conrm or activate.
6. Press one of the colour buttons to select an option.
7. Press TEXT or EXIT to exit.
View photos, play music and watch videos
from a USB storage device
Your TV is tted with a USB connector that enables
you to view photos, listen to music or watch videos
stored on a USB storage device.
Supported le formats:
Photo JPEG
Music MP3

EN 9
Video AVI, MP4, MPG, MPEG, TS, DIVX, MKV…
Notes: Some USB keys and USB products like
digital cameras or mobile phones are not
fully compatible with USB 2.0 standard so
they may not work with the TV multimedia
player. Not all USB keys or devices are
compatible with the USB function. Not all
above formats are supported. The encoding
formats of your les will determine whether
or not they can be used.
When a USB device is detected, it enters the Media
center menu directly. (Alternative: Select Media in
the main menu and press OK to enter Media center.)
Photo
To display photos, if available.
1. Select Media center > Photo, then press OK to
enter the main le content browser.
2. In the main le content browser, use ▲/▼/◄/► to
select a photo or an inner le folder.
3. Select an inner le folder, press OK to enter a sub
le content browser.
4. Use ▲/▼/◄/► to select a photo in either main or
sub le content browser, press MENU to display
the photo menu in folder mode.
-
Sort: Sort folders and photos by modication
Date or Name.
-
Edit: Copy, paste or delete a selected photo.
-
Parser: You can select Recursive to display
photos from all sub le folders.
5. Select a photo, press OK to watch, and a slide
show begins from the selected photo. Press OK to
pause the photo if you want to rotate the paused
photo. Press MENU to display the photo menu
in the browser mode. You can play, pause or
rotate the photo, select different play modes and
displaying effects, etc.
6. Press the related buttons on the remote control
to perform the available functions shown on the
function bar at the bottom of the TV screen.
Music
To playback music, if available.
1. Select Media center > Music, then press OK to
enter the main le content browser.
2. Use ▲/▼/◄/► to select a song in either main or
sub le content browser in the same way as in
photo display function, press MENU to display the
music menu in folder mode.
-
Sort: Sort folders and songs by Name, Genre,
Artist or Album.
-
Edit: Copy, paste or delete a selected song.
-
Parser: You can select Recursive to display
songs from all sub le folders.
3. Select a song, press OK to play, and automatic
playback begins from the selected song. Press
MENU to display the music menu in the browser
mode. You can play or pause the song, select
different play modes, etc.
-
Show lyrics: This option is available for the
songs with lyrics. Select it and use ◄/► to turn
on/off lyrics synchronized display.
-
Audio only: Select and press OK to listen to the
music with the screen turned off. Any key press
will turn the screen on.
4. Press the related buttons on the remote control
to perform the available functions shown on the
function bar at the bottom of the TV screen.
Video
To watch videos, if available.
1. Select Media center > Video, then press OK to
enter the main le content browser.
2. Use ▲/▼/◄/► to select a video in either main
or sub le content browser in the same way as in
photo display function, press MENU to display the
video menu in folder mode.
-
Sort: Sort folders and videos by Type,
modication Date or Name.
-
Edit: Copy, paste or delete a selected video.
-
Parser: You can select Recursive to display
videos from all sub le folders.
3. Select a video, press OK to watch, and automatic
playback begins from the selected video. Press
MENU to display the video menu in the browser
mode. You can play or pause the video, select
different play modes, screen modes and preset
picture settings, etc.
4. Press the related buttons on the remote control
to perform the available functions shown on the
function bar at the bottom of the TV screen.
DivX video (* not available for some models)
ABOUT DIVX VIDEO: DivX® is a digital video format
created by DivX, Inc. This is an ofcial DivX Certied®
device that plays DivX video. Visit divx.com for more
information and software tools to convert your les
into DivX video.
ABOUT DIVX VIDEO-ON-DEMAND: This DivX
Certied® device must be registered in order to play
purchased DivX Video-on-Demand (VOD) movies.
Obtain your registration code:
• Press MENU on the remote control.
• Select Options > DivX(R) registration.
• Press OK/► and your registration code will be
displayed.
Go to vod.divx.com for more information on how to
complete your registration.
Use more of your TV

EN 10
EnglishEnglish
Use more of your TV
Deregister your TV:
If you wish to deregister your TV,
• Press MENU on the remote control.
• Select Options > DivX(R) deregistration.
• Press OK/► and a message will guide you.
DivX®, DivX Certied®, DivX Plus™ HD and
associated logos are trademarks of DivX, Inc. and are
used under license.
Time detection
You can detect the time from digital channels through
following operations.
1. Press MENU on the remote control and
select Options >Timer > Clock > Auto
synchronization.
2. Press ◄/► to select On.
Assign a channel decoder
Decoders that decode analogue channels can be
connected to the AV connector. Assign the TV
channel as a channel to be decoded. Then assign the
connection where the decoder is connected.
1. Press MENU on the remote control and select
Setup > Decode.
2. Press OK/► to enter the list.
3. Press ▲/▼ to select the channel to decode.
4. Press OK to select or unselect the channel.
5. Press MENU to return to the previous menu.
Diagnostics on digital TV channels
1. Press MENU on the remote control and select
Setup > Diagnostics.
2. Press OK/► to display some signal information on
the current digital channel, such as signal strength,
frequency, etc.
Time shift
Allows you to record the TV programme so that you
will not miss the favourite part even if you go out.
Before you use the function, connect a USB device to
the TV rst. For the rst time, you should do the disk
setup for the USB device.
1. Press MENU on the remote control and select
Setup > Time shift.
2. Press ◄/► to select On to switch on the time shift
function, then press EXIT to close the menu.
3. Press OPTION on the remote control and select
Time shift, then press OK to conrm.
4. Follow the directions on the screen to do the
setup.
5. After the disk setup is done, press OPTION and
select Time shift.
6. Press OK to display the time shift menu.
- Press the red button to pause the picture and
begin the time shift.
- Press the red button to play the recorded part.
- When the time shift menu disappears and only
the timing of the time shift remains on the screen,
you can press the red button or OK to access the
time shift menu.
- Press the green button to fast backward or the
yellow button to fast forward.
- Press the blue button to quit the time shift
function.
Notes:
- Before you connect the USB device to the TV,
make sure you have backed up the data in the
device to avoid the loss of your important data
due to unforeseen malfunction.
- We recommend you use a USB device with free
capacity above 1GB and disk speed faster than
5.0MB/sec.
- The bigger the le size for time shift, the longer
the recording time.
- If you change the channel in time shift mode, a
message prompts you to select Yes or No. You
can select Yes to exit the time shift function and
execute the channel change.
Reset shop
Allows you to reset the TV to factory default settings.
1. Press MENU on the remote control and select
Setup, then press OK to conrm.
2. Select Reset shop and press OK/► to enter.
3. Use the alphanumeric buttons to enter the
password.
4. Press ◄/► to select OK and press OK to conrm.
5. The Initial setup menu appears. Follow the
related instructions.
Customising the input settings
You can congure your TV according to the
equipment you connect to it.
1. Press MENU on the remote control and select
Setup > Input settings.
2. Press OK/► to enter Input settings.
3. Press ▲/▼ to select a connector your equipment
is connected to.
4. Press ◄/► to select the type of apparatus
attached to this connector.
5. Press MENU to return to the Setup menu.
After conguring, the selected source label will be
displayed after the name of the related connector in
the source list when pressing SOURCE on the remote
control or OK on the TV set.
Note: Not all models have OK button on the set.

EN 11
Use Electronic programme guide
EPG is an on-screen guide that displays scheduled
TV programmes. You can navigate, select, view and
record programmes.
1. Press GUIDE on the remote control, the Now
and Next EPG menu will appear, which allows
you to get information about the current or next
programme playing on each channel. Navigate
through the different programmes using the
navigation buttons on the remote control.
2. Use the colour buttons to view the 8 Days EPG.
-
Prev day (Red): List the previous day’s EPG.
-
Next day (Green): List the next day’s EPG.
-
View detail (Yellow): Display the description of
this programme if available.
-
Type lter (Blue): Programme guide lter for
digital TV programmes.
• Press the blue button to display the
programmes’ type and subtype lists.
• Navigate through the different types and
subtypes using the navigation buttons on the
remote control.
• Select one or more types, which you want to
highlight from the Type list, press OK to select
(or deselect). A checkmark will appear to
the left of the type when selected. When you
select a type, all its subtypes will be selected
accordingly.
• Also, you can select some desired subtypes
without selecting any type rst.
• Press the blue button to exit the type and
subtype list.
• After ltering, all your desired digital TV
programmes will be highlighted.
-
Add schedule (Option): Press OPTION on the
remote control to bring up the Schedule list
menu. For details on scheduled recording, refer
to the Schedule list section.
3. Press GUIDE/EXIT to exit the EPG and switch to
the selected channel.
PVR (Personal Video Recorder)
Allows you to record your favourite TV programme.
Before you use the function, connect a USB memory
device to the set rst.
Note: Due to specic country requirements, the PVR
function is not available for Finland.
1. Press OPTION on the remote control and select
Quick access > PVR.
2. Press OK/► to enter.
3. Press:
- the red button to start recording, the record le
is put into a PVR folder in Media center > Video
and named after the channel number;
- the green button to stop recording manually; if
the recording duration nishes, the recording will
stop automatically.
-
▲/▼/◄/► to adjust the recording duration.
4. In recording, PVR mini pane will also show on the
screen to indicate the recording progress.
5. To watch the recorded programme, exit PVR
mode rst and go to Media center > Video. Select
the folder PVR, then select the related record le.
Press OK to play. (It is the same if you record a
digital radio programme).
Notes:
- When CI+ card is used, PVR function will be
disabled.
- Only available for digital channels.
- Only supports USB memory device of FAT32
format.
- Before you connect the USB device to the set,
make sure you have backed up the data in the
device to avoid the loss of your important data
due to unforeseen malfunction.
- The bigger the USB device memory size for the
PVR function, the longer the recording time.
- If you want to change channel or signal source
during recording, store the recording data before
changing the channel or source.
- The set cannot play les normally if the
parameters of the le exceed the limitations of
the system, the le format is not supported, the
le is damaged, or the le cannot be decoded.
- Do not disconnect the USB memory device
when the system is reading a le or transmitting
data, otherwise the system or the device may be
damaged.
Schedule list
This function is used to perform scheduled recording.
1. Press OPTION on the remote control and select
Quick access > Schedule list.
2. Press OK to display the schedule list.
3. To add a schedule into your schedule list, press
the red button rst to display Schedule list. Then,
-
Channel number: use ◄/► to select the
channel number.
-
Start date: use the alphanumeric buttons to set
the recording date.
-
Start time: set the starting time of the recording.
-
Stop time: set the stopping time of the recording.
-
Schedule type:
• Set Reminder to be reminded that you can
switch to the scheduled programme when the
time you have set comes. When time is out and
you do not execute any operation, the dialog
box will disappear and no further operation will
be executed.
Use more of your TV

EN 12
English
• Set Record to check if you really want to start
your scheduled recording when the time you
have set comes. When time is out and you do
not execute any operation, scheduled recording
will start automatically.
-
Repeat type: set different repeat modes for the
recording.
4. Press ▲/▼/◄/► to select Add, then press OK to
add the schedule you set into your schedule list.
5. Press the red button to repeat above procedures
to add another schedule.
6. If you wish to edit or delete a schedule, select it
and press OK to enter.
7. Press EXIT to close the menu.
Network connection
You can set up your TV so that it can access the
Internet through your local area network (LAN) using
a wired or wireless connection.
Connecting to a wired network
You can attach your TV to your LAN using cable in
three ways:
•You can attach your TV to your LAN by connecting
the LAN port on your TV to an external modem
using a Cat 5 cable.
•You can attach your TV to your LAN by connecting
the LAN port on your TV to an IP Sharer, which is
connected to an external modem. Use Cat 5 cable
for the connection.
• Depending on how your network is congured,
you may be able to attach your TV to your LAN by
connecting the LAN port on your TV directly to a
network wall outlet using a Cat 5 cable. Note that
the wall outlet is attached to a modem or router
elsewhere in your house.
Select Smart TV > Settings > Interface, then select
Ethernet to connect to a wired network.
Connecting to a wireless network
To connect your TV to your network wirelessly, you
need a wireless router or modem and a Wireless
LAN Adapter. Connect your Wireless High-Gain USB
Adapter (USB dongle) delivered with your TV to your
TV’s USB 1 port.
1. Select Smart TV > Settings > Interface, then
select Wireless to connect to a wireless network.
2. Select Wireless setting and press OK/► to enter.
3. Connection Methods: You can setup the wireless
network connection three ways.
-
Scan
• Select Wireless setting > Scan, then press
OK/►, the TV will scan all access points within
range. The access points found by the TV will
be displayed.
• Select an available access point, then press
OK/► to connect the TV.
Notes:
- If you select a protected access point, you will
have to enter the corresponding password.
Press MENU on the remote control to display
the virtual keyboard to enable you to enter the
password.
- This set has a memory function of available
access point, which enables your set to be
connected to the network even if you switch
on the TV after power off.
-
Manual
Select Wireless setting > Manual, then press
OK/►, you will be prompted to enter the correct
SSID of an available wireless router to set up the
connection.
-
Auto
If your AP supports WPS (Wi-Fi Protected
Setup), you can connect to the network via PIN
(Personal Identication Number) or PBC (Push
Button Conguration). WPS will automatically
congure the SSID and WPA key in either mode.
Select Wireless setting > Auto, then press
OK/► to enter.
•
PIN: Select PIN and press OK/► to enter.
Generate a random PIN code. Make sure
this code is installed on the AP. (For the
procedures, refer to your router manual.) Press
OK/► again to set up the connection.
•
PBC: If your router has a PBC push button,
select PBC, then press OK/► to enter. Press
the PBC push button on your router within 2
minutes after you press OK/► again. Your TV
will automatically acquire all the network setting
values it needs and connect to your network.
Network setup
1. Press MENU on the remote control and select
Smart TV > Settings > Internet connection.
Press ◄/► to select On. Wait until the connection
is automatically established.
2. Select Smart TV > Settings > Connection
test, then press OK/►to check the Internet
connectivity. If it does not work, follow below steps
to make sure of the connectivity.
3. Select Smart TV > Settings > IP setting, then
press OK/►to enter the IP setting menu.
- Set Address type to Auto, it will acquire and
enter the needed IP address automatically.
- You can follow below steps to enter your IP
address manually.
• Set Address type to Manual, then press ▼ to
go to the rst entry eld.
• Enter the IP address, Subnet mask, Default
gateway, Primary DNS and Secondary DNS
values. Use the alphanumeric buttons to enter
Network connection
Chapter 5

EN 13
numbers and the arrow buttons to move from
one entry eld to another.
- After setting, select Smart TV > Settings
> Connection test to check the Internet
connectivity again.
4. Select Smart TV > Settings > Information, then
press OK/►to display the information on current
connection, such as Interface, Address type, IP
address, etc.
Share & See
Note: This manual covers products with either Share
& See or DLNA function. Share & See is DLNA-
compatible.
Connecting to your PC
Make sure to set up a wired or wireless connection
from your TV to a router rst. Then connect your
PC to your router either through a network cable or
wirelessly. Follow the steps in turn specied hereafter,
then you can enjoy recorded video, image, music
and/or text les saved on your PC.
Adding media from your PC for sharing
Install a DLNA media server on your PC. The simple
and familiar server you may install is Microsoft
Windows Media Player 11. Allow your TV to share the
designated les on your PC.
1. Open the Microsoft Windows Media Player 11.
- Select Library > Media sharing.
- Check the checkbox Share my media to.
- Select the icon of the TV set connected to your
PC.
- Select Allow to allow the TV set to access your
PC, and select OK to enable your allowing.
Note: Use the Settings button to customize your
desired settings.
2. - Select Library > Add to Library.
- Select your personal folders or folders of other
users that you can access for sharing.
- Select Add and press OK to enable your adding.
Share & See application
Select Smart TV > Share & See, then press OK to
enjoy your Share & See.
Stopping Share & See function
Select Smart TV > Settings > Internet connection,
and set it to Off.
Smart TV
WARNING:
Congure the network settings before using • Smart
TV.
Slow responses and/or interruptions may occur,•depending on your network conditions.
If you experience a problem using an application,•please contact the content provider.
According to circumstances of the contents provider,•an application's updates or the application itself may
be discontinued.
Depending on your country's regulations, some•applications may have limited service or not be
supported.
Screen display
1. Select Smart TV in the main menu and press
OK to enter. (Alternative: Press Smart TV on
the remote control to directly enter the Smart TV
menu.)
2. -
Default pre-installed apps: The left two lines on
the screen are the default pre-installed services.
-
My favorite: The left third line is your favourite
apps, whose order depends on the times you
enter.
- Promotion area: The picture on the top right is
for promotion use and pushed by the portal.
-
Information area: The information at the bottom
right is to explain the highlighted app.
3. The ◄/► on the screen indicates there are more
apps. When the highlight is on the leftmost/
rightmost, press ◄/► to move one column
leftward/rightward.
4. Press ▲/▼/◄/► to select the app such as
Orange/CANALPLAY/Deezer/YouTube/Daily
motion, then press OK to enter the page.
App store (* not available for some models)
App store is a store for downloading applications to
be used on your TV/AV equipment. You can enjoy
a variety of contents (videos, music, photos, games,
useful information, etc.) using the downloaded
applications.
Press MENU on the remote control and select Smart
TV > App store. Press OK to enter. Press ◄/► to
toggle among the options App list, My apps and
Downloading. Press ▼to move the highlight to the
app area.
App list
-
App list displays all current apps including the
installed apps and the uninstalled ones pushed by
Portal. For the installed apps, a check mark appears
on the top right of the icon.
- Press ▲/▼/◄/► to select the app. Press OK to
enter.
If the app is not installed, you could download it.•
If the app has been installed and no new version is•
found, enter the app directly.
If the app has been installed and a new version is•
found, you could update it.
Share & See
Smart TV
Chapter 6 & 7

EN 14
English
Smart TV
Press•Download or Update, then follow the on-
screen instructions to complete your download or
update.
My apps
-
My apps displays all installed apps, and the app
data will refresh at each entry.
- Press ▲/▼/◄/► to select the app, then press OK
to enter.
If there is an update version, select•Update to
begin your download and go to the Downloading
menu.
You can select•Uninstall to uninstall the app from
My apps.
- If there is a compulsory version of an app,
select•OK to download and go to the Downloading
menu.
or select•Cancel to exit. If cancelling the download
and when you enter this app next time, this app
cannot be opened until you update it.
Downloading
- In the Downloading menu, select Cancel and press
OK to enter,
select•OK to delete the current download task.
or select•Cancel to return to the Downloading
menu.
- When the download completes, you will be reminded
to start to install or update. Follow the on-screen
instructions.
- When installation or update completes, press OK to
enter the app.
Opera browser
This feature brings desired contents and services
directly from the web to your TV. (Note: Unsupported
fonts within the provider’s content will not display
normally. )
1. Select Smart TV > Opera and press OK to enter.
2. Press OK to display the homepage of your
browser.
3. Use ▲/▼/◄/► on the remote control to navigate
through the web page, and press OK on the
remote control to conrm an entry or selection.
You can also press MENU on the remote control
to access or exit the virtual keyboard. Connect
your wired or wireless mouse through your TV’s
USB port. Use your mouse to navigate within the
web page.
Home: Click it to display the homepage.
Back: Return to the web page you just left.
Go to: Select from the list to get back to a
recently visited web page.
Refresh: Click it to refresh the web page.
Bookmark manager: Click it to display the
Bookmark manager.
-
Add a folder: Add folders to your Bookmark
manager so as to organise your bookmarks
into folders to include all the websites you
visit frequently. Click Add a folder bar, type
a name for the folder, and then click Add.
Repeat this step until you have created as
many folders as you like.
-
Visit a bookmark: Go to a bookmark by
simply clicking its name, instead of having to
type its address.
-
Delete a bookmark: Click the Delete icon
behind a link to delete the link.
-
Edit a bookmark: Click the Edit icon behind
a link to edit the name and/or URL of the
bookmark.
- Click Close bookmark manager bar to close.
Add a bookmark: Go to the web page you
want to add to your Bookmark manager and click
. Type a new name for the web page, specify
the folder that the bookmark should be created in,
then click Add.
Notes for password in Parental Control Lock function:
- The default password is 1234. You can change it to
a new one.
- The super password is 0423. If you forget your code,
enter the super password to override any existing
codes.
Design and specications are subject to change without notice.
Table of contents
Other THOMSON TV manuals

THOMSON
THOMSON LCD03B User manual

THOMSON
THOMSON 25DG16ET User manual

THOMSON
THOMSON 28VT68N User manual

THOMSON
THOMSON T32E53U User manual

THOMSON
THOMSON ZPN054102 User manual

THOMSON
THOMSON DPL-1601 User manual

THOMSON
THOMSON ITC008-V2 User manual

THOMSON
THOMSON 28VT68NE User manual

THOMSON
THOMSON 30LCDB03B Administrator guide

THOMSON
THOMSON ICC20 User manual

THOMSON
THOMSON 28WS23E User manual

THOMSON
THOMSON 20DG76C User manual

THOMSON
THOMSON ETC310 User manual

THOMSON
THOMSON CR14300 Installation guide

THOMSON
THOMSON G27693 Instruction Manual

THOMSON
THOMSON CR20300 User manual

THOMSON
THOMSON 32WB842S Manual

THOMSON
THOMSON T32E32DU User manual

THOMSON
THOMSON DPL953REC - User manual

THOMSON
THOMSON IFC230 User manual