THORLABS PM101 User manual

Optical Power Meter Interfaces
2019
PM101, PM101A, PM101R,
PM101U
Operation Manual

Version:
Date: 1.0
13-Aug-2019
Copyright © 2019 Thorlabs

Foreword
Contents
1 General Information 1
21.1 PM101x Model Comparison 31.2 Ordering Codes and Accessories 41.3 Requirements
2 Getting Started 5
52.1 Parts List
3 Operating Instructions 6
63.1 How To 63.1.1 PM101x Setup 63.1.2 Connecting a Power Sensor 83.2 Power Meter Interface Features 83.2.1 PM101x Sensor Connector 93.2.2 PM101 103.2.3 PM101A 113.2.4 PM101R 113.2.5 PM101U 123.2.6 USB Operation 123.2.7 RS232 Operation 133.2.8 UART Operation 133.2.9 Reset Button 133.2.10 Baud Rate 133.2.11 Non-Volatile Memory 133.2.12 Auxiliary I/O Ports 143.2.13 Analog Output 143.2.14 Autonomous Operation to Analog Output 153.2.15 NTC Input 153.2.16 Power Supply 153.3 Software 163.3.1 Software Requirements 163.3.2 PM101x Specific Software Functions 163.3.2.1 PM101 Specific Software Functions 163.3.2.2 PM101A Specific Software Functions 163.4 Maintenance and Service
4 Appendix 17
174.1 Technical Data 204.2 Pin Assignment Output Connector

© 2019 Thorlabs
We aim to develop and produce the best solutions for your
applications in the field of optical measurement techniques. To help
us to live up to your expectations and constantly improve our
products, we need your ideas and suggestions. We and our
international partners are looking forward to hearing from you.
Thorlabs GmbH
Warning
Sections marked by this symbol explain dangers that might result in
personal injury or death. Always read the associated information
carefully before performing the indicated procedure.
Please read this advice carefully!
This manual also contains "NOTES" and "HINTS" written in this form.
Attention
Paragraphs preceded by this symbol explain hazards that could
damage the instrument and the connected equipment or may cause
loss of data.
Note

© 2019 Thorlabs1
PM101x
1 General Information
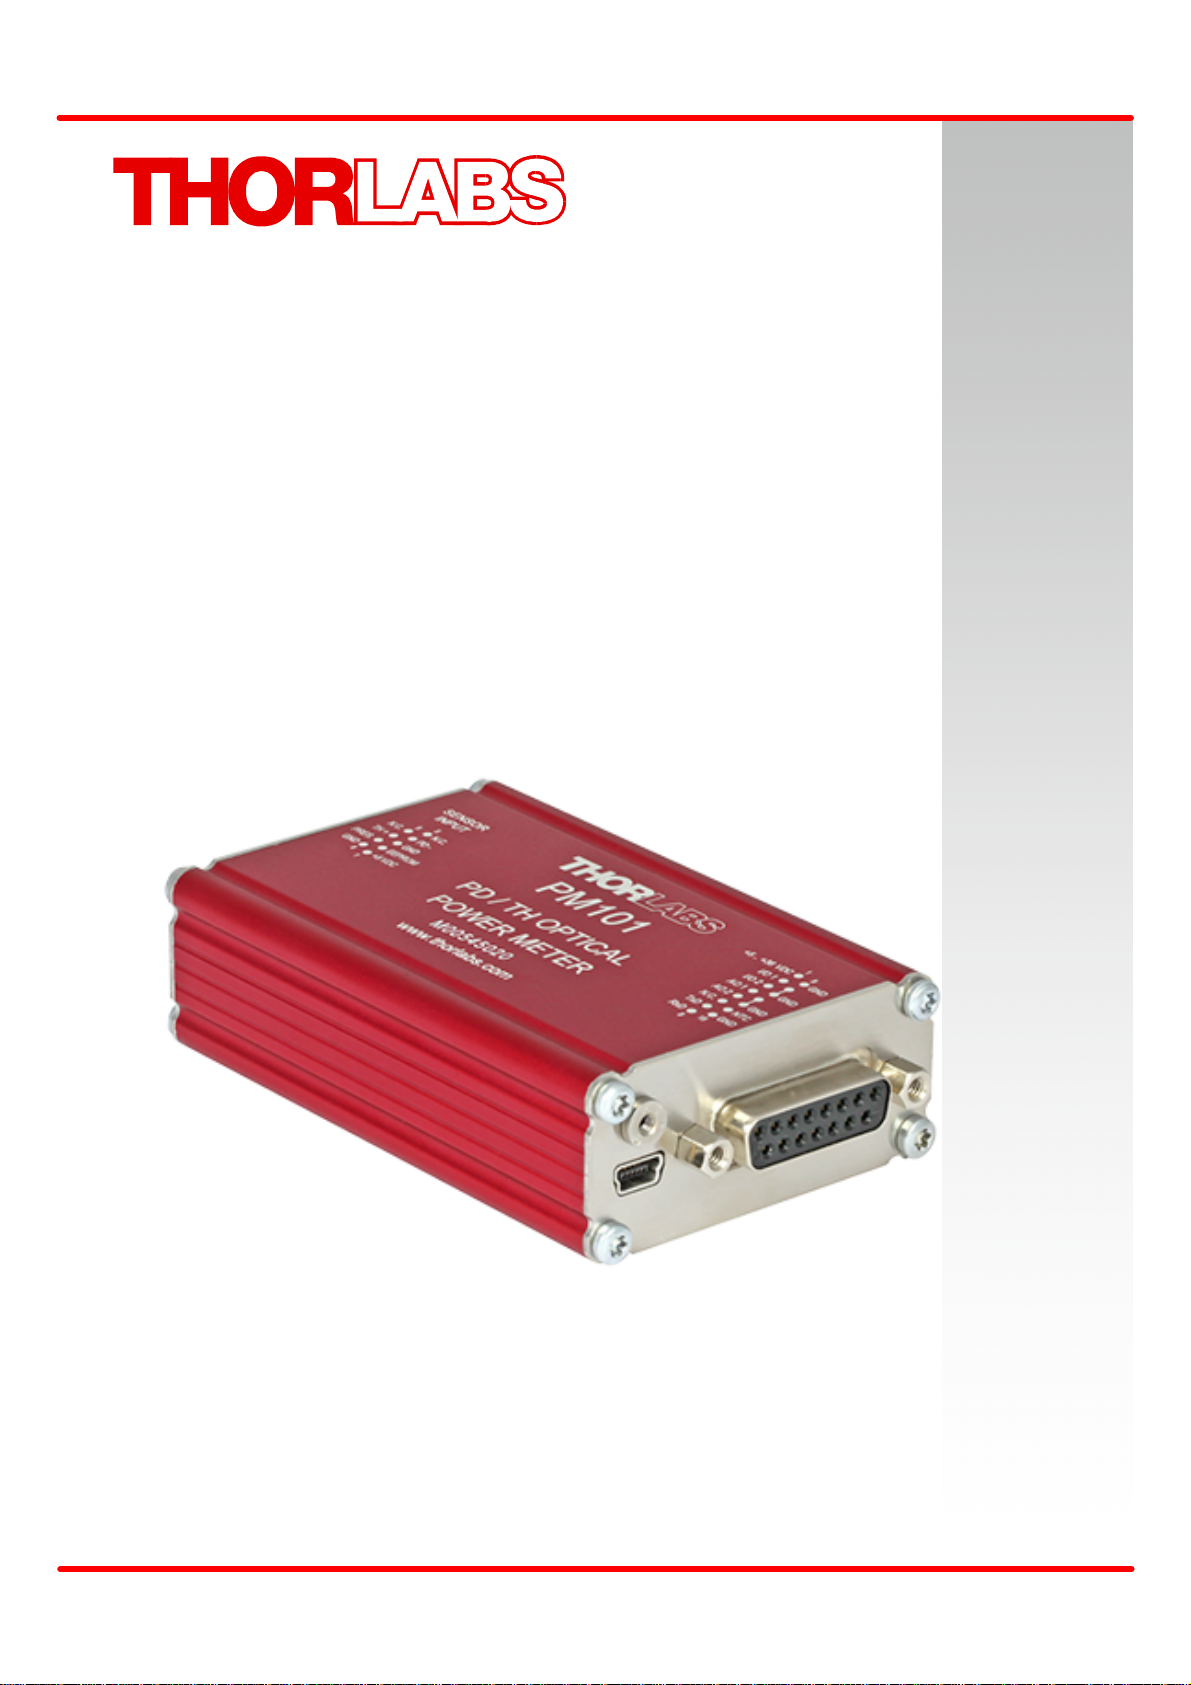
The PM101x Optical Power Meter Interfaces measure the optical power of laser light or other
monochromatic or near monochromatic light, detected by a connected sensor. The PM101x
power meter interfaces are compatible with all Thorlabs “C-Series” Photodiodes, Thermal
Sensors, and respective custom sensors.
To flexibly integrate the PM101x into a setup, the PM101x models offer different electronic in-
terfaces for instrument control and output:
·PM101: USB port and DA-15 connector
·PM101A: USB port (Input and Output) and SMA analog interface (Output only)
·PM101R: USB port and serial DE-9 connector
·PM101U: USB port only
The USB port features a fixture for secure connection of the cable to the housing.
For the PM101U and PM101A power meters, instrument control and power supply are facilita-
ted via the USB port. The PM101R can be controlled via the DE-9 port. The PM101 can alter-
natively use the DA-15 interface for instrument control and to connect a power supply. For
more information on the special features of the PM101x models, please see the table PM101x
Model Comparison below.
For instrument control and data analysis through a connected PC, tablet or laptop, Thorlabs of-
fers the Optical Power Monitor (OPM) software, available for download. Alternatively, the user
can write custom made software. For information on driver and SCPI commands, please refer
to the manual WriteYourOwnApplication (WYOA) for the PM101x.
In summary, the PM101x models give the customer the choice of different interfaces, provided
with a supplied control and analysis software and the option to use custom made software. Fur-
ther, the PM101 can even be controlled via an external micro-controller, supplied by the cus-
tomer. These features allow for maximum flexibility to integrate the instrument in test and mea-
surement systems and a wide range of industrial and scientific applications in Manufacturing,
Quality Control, Quality Assurance, and R&D for stationary and field use.
Attention
Please find all safety information and warnings concerning this product in the chapter Safety
in the Appendix.
2
2
21

© 2019 Thorlabs
1 General Information
2
1.1 PM101x Model Comparison
PM101
PM101A
PM101R
PM101U
USB Connector and Operation
Ö
Ö
Ö
Ö
Serial DE-9 Output Connector
Ö
SMA Output Connector
Ö
DA-15 Universal Connector
Ö
RS232 Operation
Ö
Ö
Analog Output Operation
Ö
Ö
Autonomous Operation to
Analog Output
Ö
Ö
Real Analog Output
Ö
Sensitivity Configurable
Analog Output
Ö
Ö
UART Operation
Ö
2 Auxiliary I/O ports
Ö
NTC Input
Ö
Power Supply +5V to +36V
Ö
Table 1
9 10 11 11
12
20
10
20
12
14
14
14
14
14
14
13
13
15
15

© 2019 Thorlabs3
PM101x
1.2 Ordering Codes and Accessories
PM101
Power Meter Interface with DA-15 Connector; USB, RS232, or UART Operation.
Digital or Analog Signal Output; Two Auxiliary I/O Ports; NTC Input; USB Interface
for Control and Power Supply.
PM101A
Power Meter Interface with SMA Connector for Analog Output; USB Interface for
Control and Power Supply.
PM101R
Power Meter Interface with DE-9 Connector; RS232 Operation for Control and
Read Out; USB Interface for Control and Power Supply.
PM101U
Power Meter Interface with USB Connector and USB Operation for Control, Read
Out, and Power Supply.
Included Accessories:
The PM101x Power Meters include certain cables. Further cables are recommended in Op-
tional Accessories .
PM101: DA-15 Connector and Connector Housing
USB Cable, Type A to Mini B, with locking screw, 1.5m
PM101A: USB Cable, Type A to Mini B, with locking screw, 1.5m
PM101R: RS232 cable, DE-9 male to DE-9 female, 1.8m
USB Cable, Type A to Mini B, with locking screw, 1.5m
PM101U: USB Cable, Type A to Mini B, with locking screw, 1.5m
Optional Accessories:
To run the PM101x power meter, additional cables or mounting devices may be required.
Cables
·PM101A: SMA cable: please provide a cable with a SMA connector with your PM101A.
Thorlabs offers a variety of SMA connector cables.
·PM101: Cable to attach to the provided DA-15 connector housing.
Mounting
·Horizontal Mounting Clamp (ECM225) to mount the PM101x onto a post.
·Vertical Mounting Clamp (ECM100) to mount the narrow side of the PM101x onto a post.
·Double Sided Horizontal Mounting Clamp (EPS225) to securely mount two devices on top of
each other.
Please visit our homepage http://www.thorlabs.com for various accessories like power and
thermal sensors, fiber adapters, posts and post-holders.
3

© 2019 Thorlabs
1 General Information
4
1.3 Requirements
Hardware Requirements
PM101: Please provide an appropriate cable to be attached to the DA-15 connector.
PM101A: Please provide an appropriate cable to connect to the SMA port.
Software Requirements
All models of the PM101x can be run with the Thorlabs' OPM software. Please see the require-
ments for the OPM on the website.
Sensor Requirements
Thorlabs C-Series Sensors
The PM101x supports all Thorlabs C-Series photodiode and thermal sensors. The C-Series
can be easily identified by the red connector-housing of the DE-9 connector, compared to older
versions of Thorlabs power sensors.
Please refer to the chapter Connecting a Power Sensor on how to use older Thorlabs
sensors or custom sensors.
6

© 2019 Thorlabs5
PM101x
2 Getting Started
Please inspect the shipping container for damage. Please do not cut through the cardboard.
You might need the box for storage or for returns.
If the shipping container seems to be damaged, inspect the contents for completeness and test
the PM101x mechanically and electrically. Keep the container for storage or in order to return
the product in case of future problems.
Verify that you have received the following items within the package:
2.1 Parts List
1. PM101x Optical Power Meter Interface
2. USB Cable, Type A to Mini B, with Locking Screw, 1.5 m
3. PM101R: RS232 cable, DE-9 Male to DE-9 Female, 1.8 m
4. PM101: DA-15 Connector and Connector Housing
5. Quick Reference
6. Certificate of Calibration

© 2019 Thorlabs
3 Operating Instructions
6
3 Operating Instructions
3.1 How To
This chapter describes how to install the PM101x for standard measurements.
3.1.1 PM101x Setup
·Download and install the Optical Power Monitor software on the device that will be used to
control the power meter interface (PC, laptop or tablet).
Note
Install the software prior to connecting the power meter interface to the PC (see Soft-
ware ).
·Connect the PM101x to a PC or other power source via the USB port.
oThe PM101 accepts external power supplies with 5 V to 36 V via the DA-15 interface.
When connecting the USB port while using an external power supply via the DA-15
port, connecting the USB port will automatically switch to the 5 V power supply via
USB.
oThe status LED for the power supply is yellow in USB mode and green when connected
to an external power supply via the DA-15 connector.
·Connect the PM101x to a readout instrument (PC) using the USB cable or a matching
cable for the respective output port (DE-9, SMA or DA-15). For PM101A and PM101,
please provide cables.
·Connect a suitable sensor to the PM101x.
The sensor status LED indicates, when a sensor has been detected (green) or when no
sensor or no recognizable sensor is connected (red).
The Power Meter is now ready for operation and is recognized by the OPM software.
Note
For detailed instructions on controlling the PM101x through the OPM software, please down-
load the OPM manual.
3.1.2 Connecting a Power Sensor
The PM101x supports all Thorlabs C-Series photodiode and thermal sensors, that can be iden-
tified by the red connector-housing of the DE-9 connector, compared to older versions of
Thorlabs power sensors. Sensor type and calibration data are saved in the non-volatile memory
of the DE-9 connector. Upon connection, this information is automatically sent to the PM101x
and to the control device and software. The software will automatically recognize the sensor.
To plug-in or remove a sensor, slightly press on the two bolts in the connector housing, that fix
it by tension.
15
6

© 2019 Thorlabs7
PM101x
DE-9 connector
Sensors can be hot-swapped to the power meter interface. After recognizing a new valid
sensor, the type and calibration data will be downloaded to the power meter interface in ap-
proximately 2 seconds and the unit is ready to operate with the new sensor.
Note
Older Thorlabs Sensors without a DE-9 connector
The PM101x will NOT automatically recognize sensors lacking a DE-9 connector, as for the
case of the 'A' and 'B' series. Please contact Thorlabs for an upgrade of old sensors with
DE-9 connectors.
Note
Custom Sensors
To use sensors without a DE-9 connector, manufactured by Thorlabs or else, the user may
provide an appropriate adapter. To build the adapter, refer to the Pin-out of the DE-9 connector
shown in the Appendix . The adapter will per default automatically be recognized by the ap-
plication Optical Power Monitor as "Photodiode adapter". This can then be adjusted in the soft-
ware.
25
21

© 2019 Thorlabs
3 Operating Instructions
8
3.2 Power Meter Interface Features
PM101x optical power meters offer full functionality to process signals from compatible photodi-
ode or thermal sensors to be displayed and analyzed on a connected PC.
PM101x general features
·All PM101x models have a non-volatile memory which prevents power meter settings from
being lost upon shutting down or rebooting.
·A fast readout rate of 1 kilo-sample per second permits online signal monitoring.
·Finely graduated thermal power ranges permit optimal resolution for thermal power measure-
ments.
·A Reset Button allows quick rebooting of the micro controller.
·The PM101x is powered either via the USB interface or via the DA-15 interface. A status LED
indicates appropriate connection to a power supply.
Beyond the above functions, the group of PM101x models offer individual electrical interfaces
for integration into different systems in industrial and scientific applications. The different elec-
trical interfaces come with further functions , described in the following chapters.
3.2.1 PM101x Sensor Connector
All models of the PM101x have the same connector shown here to the left side. The Pin as-
signment is engraved on the front of the PM101x.
6
13
13
13
2

© 2019 Thorlabs9
PM101x
3.2.2 PM101
PM101 Special Features
The PM101 features a number of additional options, due to the DA-15 output connector.
The PM101 is per default configured to RS232 configuration (+/- 5 V voltage level). This can be
changed to a UART configuration (0/5 V voltage level) so that the PM101 can be accessed by
external micro-controllers for instrument control and data export. The PM101 can also be adjus-
ted to accommodate micro-controllers using 3.3 V.
1. DA-15 Interface
2. Two Auxiliary I/O ports
3. NTC input
4. Two Analog Output Ports
5. Real Analog Output
6. Autonomous Operation to Analog Output
7. Optional Use of 5 V - 36 V Power Supply
8. RS232 Operation
9. Adjustable Baud Rate via USB or Serial Communication (SCPI commands); The default
BAUD Rate is 115200 Bit/s.
10.UART Operation (i.e. for Control via an External Micro-Controller)
11. Instrument Control using SCPI commands (Serial Communication)
12.Power Meter Control and Output via USB
20
13
15
14
14
14
15
12
13
13

© 2019 Thorlabs11
PM101x
3.2.4 PM101R
PM101R Special Features
1. RS232 Operation
2. Adjustable Baud Rate via USB or serial communication (SCPI commands); The default
BAUD Rate is 1152000 Bit/s.
3. Instrument Control using SCPI commands (RS232 Serial Communication). Please see
the document PM101x-WYOA for details.
4. Power Meter Control and Output via USB
3.2.5 PM101U
PM101U Special Features
·Power Meter Control and Output via USB
12
13
12

© 2019 Thorlabs
3 Operating Instructions
12
3.2.6 USB Operation
All PM101x models can be run via the USB port.
The USB interface on all PM101x models also serves to connect the power meter to a power
supply and to update firmware of the PM101x.
The PM101U uses the USB interface as the only port for control and output.
Note
In case a USB communication is established in addition to the DA-15/DE-9 connection, PM101
and PM101R switch to USB-Mode and the DA-15/DE-9 serial interface becomes inactive. Only
after actively closing the USB connection, the serial communication is reestablished.
When switching the PM101 or PM101R from USB to RS232 operation or, in the case of
PM101, to UART operation, PM101R and PM101 use the DA-15 or DE-9 interface for control
and output.
3.2.7 RS232 Operation
The power meters PM101 and PM101R can be operated with serial communication via
RS232.
Please use a RS232 standard protocol for RS232 communications. For questions, please con-
tact our engineers at Thorlabs .
Please set up the port as follows:
Parameter
Setting
Baud Rate
115.200 Bit/s (default)
Supported range of Baud Rate: 9.600 and 230400 Bit/s
Data Bits
8
Parity
None
Stop Bits
1
Flow Control
None
Termination Character
LF (x0A; \n). The termination character needs to be enabled.
Note
PM101:
To operate the PM101 via RS232, RxD, TxD, and GND need to be wired from the DA-15 con-
nector to a 9 Pin female connector to perform the connections.
PM101 DA-15 Pin
Male DE-9 Pin
Female DE-9 Pin (PC)
Pin7: TxD
Pin2
Pin2: RxD
Pin8: RxD
Pin3
Pin3: TxD
Pin15: GND
Pin5
Pin5: GND
25

© 2019 Thorlabs13
PM101x
3.2.8 UART Operation
The PM101 is delivered in RS232 operation but can be switched to UART operation.
UART dependent PM101 functions:
The PM101 may need to be switched from RS232 to UART operation when using an external
micro controller for PM101 control. In RS232 operation the PM101 uses voltage levels of +/-5
V, while in UART mode the voltage level is shifted to 0/5 V. The PM101 can also be adjusted to
accommodate micro-controllers using 3.3 V. When switched to 3.3 V, UART operation is toler-
ant for 5 V input signal.
For instructions on how to change the voltage level for UART operation, please refer to the doc-
ument Write-Your-Own-Applications (WYOA) for PM101x.
For UART operation, please use standard protocols for UART communication and the SCPI
commands listed in WYOA for PM101x.
3.2.9 Reset Button
This button reboots the internal micro controller of the PM101x. To press the button, please use
a small device that will not break inside the instrument. All settings are saved due to the in-
ternal non-volatile memory.
3.2.10 Baud Rate
For PM101 and PM101R, the Baud rate can be adjusted from 9600 to 230400 Bit/s. This can
be done either via the USB interface or via the serial interface using SCPI commands or driver
functions. Please see the document Write-Your-Own-Applications (WYOA) for PM101x. The
default baud Rate is 115200.
Note
After adjusting the Baud Rate via RS232 or UART, close the RS232 or UART connection and
reconnect with the desired Baud Rate in order for the Baud Rate to communicate it via
RS232/UART. This is not required for operation via USB.
3.2.11 Non-Volatile Memory
All PM101x models have an internal non-volatile memory for all settings (i.e. wavelength set-
ting, ranging, analog output configuration). The PM101x will start in the same configuration as
prior to shut-down.
3.2.12 Auxiliary I/O Ports
PM101 with its DA-15 connector gives access to two configurable general purpose input/output
(I/O) Pins (DA-15 Pins 2 and 3). Please see the Pin assignment in the appendix. These aux-
iliary I/O ports use 3 V logic for output and are tolerant for 5 V input signal.
The I/O port can be controlled or monitored via the instrument driver or through SCPI com-
mands in custom made software.
20

© 2019 Thorlabs
3 Operating Instructions
14
3.2.13 Analog Output
PM101A
The PM101A has an analog output port with a SMA output connector.
This analog output, similar to the AO2 port of the PM101, delivers a range independent voltage
which is DAC controlled. The output voltage is proportional to a configured value in V/W. This
constant can be adjusted via the OPM software or the SCPI/driver commands for custom made
software. The constant can be set in the OPM software under the Settings tab: AO Responsivi-
ty. The analog signal is generated with a 16-bit DAC with an update rate of 1 kHz. The analog
output voltage can range from -0 V to +2.5 V.
The analog signal following the DAC is of advantage when large signal dynamics are expected
because the DAC range changes and the output signal stays largely the same. Additionally, the
output signal is wavelength corrected and corrected regarding the sensor calibration data.
PM101
The PM101 has two analog outputs, AO1 and AO2.
The Analog Output ports provide the amplified photo-diode current or the amplified thermal
sensor voltage, depending on the sensor. The signals from the analog output AO1 are not
wavelength- or zero- corrected.
The signal is measurement range dependent and can be calculated to:
AO1: The AO1 (DA-15 Pin 4) delivers the amplified direct real analog signal without a Digital-
Analog-Converter (DAC). Therefore, the AO1 delivers a proportional voltage for each measure-
ment range. The analog output voltage can range from -0.25 V to +2.5 V. The bandwidth is ac-
cording the setting of the meter. The advantage of this real analog signal is its speed (up to
100kHz).The Analog Output Port is not wavelength- or zero- corrected.
AO2: The AO2 (DA-15 Pin 5) delivers a range independent voltage which is DAC controlled.
The output voltage is proportional to a configured value in V/W. This constant can be adjusted
via the OPM software or the SCPI/driver commands for custom made software. The constant
can be set in the Thorlabs software OPM under the Settings tab: AO2 Responsivity. The signal
of the AO2 is generated with a 16-bit DAC with an update rate of 1 kHz. The analog output
voltage can range from -0 V to +2.5 V.
The analog signal following the DAC is of advantage when large signal dynamics are expected
because the DAC range changes and the output signal stays largely the same.
3.2.14 Autonomous Operation to Analog Output
Power meters PM101 and PM101A can be run autonomously by only connecting a power sup-
ply and using analog output. In that case, no control device is required. For the PM101, both
analog output ports can be used for autonomous operation.

© 2019 Thorlabs15
PM101x
3.2.15 NTC Input
To monitor the temperature in a test environment, the PM101 has an NTC Input (DA-15 Pin 14)
which allows connection of an NTC thermistor. The measurement range is 0.1 – 100 kW. The
set range R0 and the bandwidth B for the NTC thermistor can be adjusted in the OPM software
or through SCPI commands. The default settings are 10 kWand 3988 K to directly access the
TSP-TH temperature probe. The measurement range with the PM101 is then -10 °C to 80 °
C with the TSP-TH.
Note
Connection of the NTC to the DE-9 Pin 7 of the Sensor Connector requires a resistance of 0.2
kWto 40 kW.
3.2.16 Power Supply
All PM101x models use the USB port for power supply. Please provide an appropriate connec-
tion to a PC or power bank.
Note
When operating the PM101 via the RS232 interface or completely autonomously via an analog
output, the unit can either be powered with 5 V via the USB connector or with any supply in the
range from +5 V to +36 V via the DA-15 connector (Pin 1 and Pin 9 (GND)). As an external
power supply, we recommend the DS5 5 VDC regulated power supply.
3.3 Software
The PM101x is operated remotely from a PC, laptop or tablet.
Thorlabs OPM Software
The Thorlabs Optical Power Monitor (OPM) software provides a Graphical User Interface to
view, log, and analyze measurement data. Download the OPM software package from the
Thorlabs website, via this link, through the software tab on the product website, or through
searching for the product name within the Thorlabs software website.
All information on software installation, device control and data management software can be
found in the software manual directly downloaded here.
Note
Do not connect the PM101x prior to software installation!
Attention
Exit all running applications on your PC as the installer may require a reboot of your PC during
installation!
Custom Made Software
The PM101x can also be run using custom made software. For this, please refer to the docu-
ment Write-Your-Own-Application (WYOA) for PM101x.
15
Other manuals for PM101
1
This manual suits for next models
3
Table of contents
Other THORLABS Recording Equipment manuals
Popular Recording Equipment manuals by other brands

Yamaha
Yamaha DSP-3000 Operation manual

Matrix Audio
Matrix Audio element-H user manual

Wildlife Acoustics
Wildlife Acoustics Song Meter SM2M+ Submersible User's manual supplement

Subzero
Subzero SZ-RS100 user manual

Jung
Jung IPS 100 REG Operationsmanual

Panasonic
Panasonic WJHD309 - DIGITAL DISK RECORDER Conversion guideline